

Run an AI agent sandbox on your own Ubuntu VM, then reach its SSH endpoint from anywhere
Containarium is an open-source agent runtime that gives each agent a persistent, isolated Linux box you can reach over SSH. It also ships an MCP server that Claude Code can drive. This guide installs it on a fresh Ubuntu VM, wires the platform MCP into Claude Code, and verifies the result locally. Only after that do we add remote access: a Localtonet TCP tunnel to the VM's SSH port, with SSH authentication and encryption left fully in place. We also state plainly where the public evidence runs out, so you know which details to confirm on your own host.
📋 What's in this guide
Why a persistent agent box needs remote access
Coding agents are most useful when they can run commands, edit files and install dependencies without risking your laptop or your production hosts. Containarium's pitch is to supply that environment: a real Linux box per agent, running on LXC or Kubernetes, with real root inside the box, a real filesystem, and an eBPF egress policy that walls it off from the host, the cluster control plane and other tenants. You bring the agent, and Containarium provides the box.
The project describes two ways to reach those boxes. One is a hosted control plane. The other is self-hosting on your own VM, which is what this guide covers. Self-hosting raises an ordinary networking question: if the VM sits at home, in an office lab, behind carrier-grade NAT or in a network you cannot change, how do you SSH into it from a laptop on another network?
That is where we come in. With Localtonet, the client on the VM opens an outbound connection to a Localtonet relay server, and a TCP tunnel gives you a public host and port that forwards to the VM's SSH service. No inbound router port forwarding, firewall change or public IP address is needed. The tunnel only carries bytes. SSH still authenticates the user and encrypts the session end to end, and Containarium's own isolation still applies inside the boxes.
The order matters. Do not start with the tunnel. First get Containarium installed and working on the VM itself, confirm that local SSH and the local API respond, and wire Claude Code on a machine you control. Exposing something that does not yet work only makes debugging harder.
What Containarium installs and where each piece runs
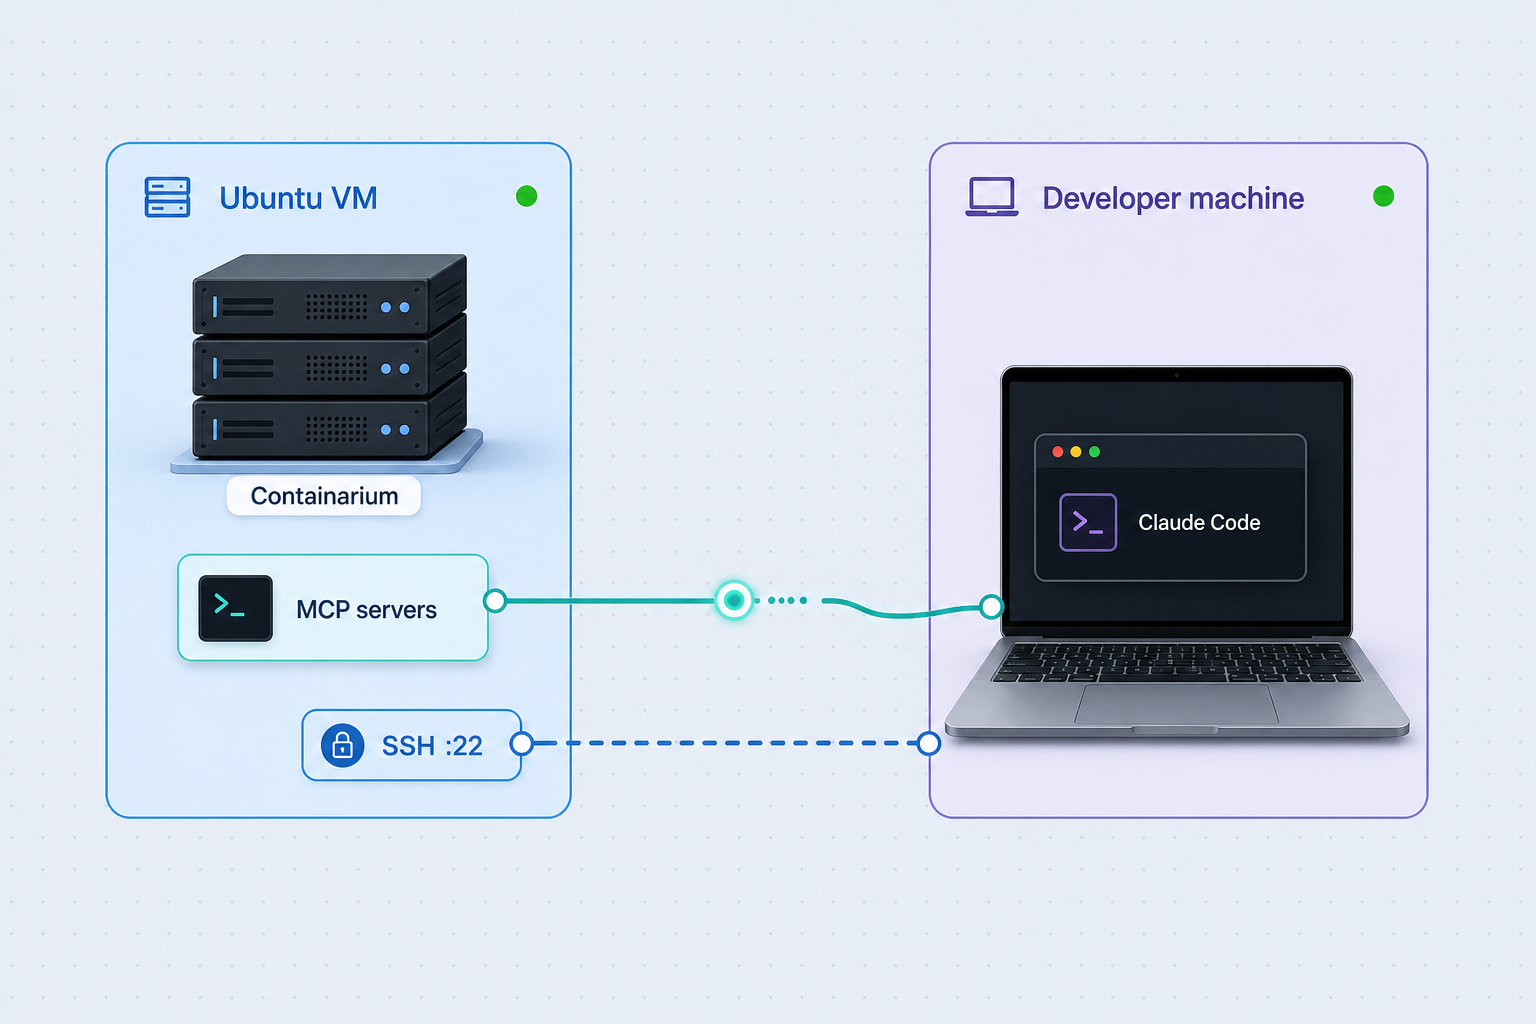
Before running anything, it helps to know that Containarium is not a single program. The v0.120.1 release page lists four binaries, and the split between the host, your laptop and the inside of each box is central to the remote-access design later in this guide.
| Binary | Where it runs | What it does |
|---|---|---|
containariumd |
The Linux host (VM) | The platform daemon plus host-side admin commands. |
containarium |
Your laptop or CI (Linux, macOS, Windows); also available on the host | The client CLI: create, list, expose-port, ssh-config and similar commands, aimed at a server via --server. |
mcp-server |
Your laptop | The platform MCP: outside-the-box admin tools such as create_container, list_containers, expose_port and list_backends. |
agent-box |
Inside each Containarium container | The in-the-box MCP: shell_exec, read_file, write_file and similar tools, reached over stdio, typically via SSH. |
Two conclusions follow. First, the platform MCP talks to the daemon over HTTP, using a server URL (the project's example is http://your-host:8080) and a JWT token. Second, the in-box MCP is reached over SSH. So SSH is the common thread: it carries box access, it carries the in-box MCP, and it can carry a port forward to the daemon API. That means one TCP tunnel to port 22 can cover all three, and the API port never has to be published.
The project's homepage also describes a built-in sentinel (sshpiper, Caddy and PROXY protocol) that gives each box a routable hostname with TLS. We have not verified how that hostname routing behaves when the VM's SSH port is reached through a raw TCP tunnel, so this guide uses plain SSH to the VM and the OpenSSH jump-host mechanism instead of depending on sentinel hostnames.
Prerequisites
The documented install target is a fresh Ubuntu VM, and the supplied README summary specifically names Ubuntu 24.04 with sudo access. Collect the following before you begin:
- A fresh Ubuntu 24.04 VM that you are allowed to modify. It can be a cloud instance, a hypervisor guest or a spare machine. The installer is meant for a clean machine, so avoid a host that already runs important workloads.
- A user with sudo on that VM, and a working SSH login to it from at least one other machine.
- Outbound internet access from the VM, because the installer is fetched with curl and the Localtonet client later connects outward to a relay.
- Claude Code on your laptop (or whichever machine you will code from), plus an SSH client with a key pair.
- A Localtonet account and an auth token for the device that will run the tunnel. Keep the token private.
The public material we reviewed does not state minimum CPU, RAM or disk figures for the host, so we will not invent them. Isolation and density depend on how many boxes you plan to run and what the agents do inside them. Start small, observe, and scale the VM as you add boxes.
The documented install command downloads a script and runs it as root. That is convenient, but it means you are trusting the script and the network path. Download the script to a file and read it first if the VM matters to you, and consider the pinned-version URL shown in the next section so you install a specific release rather than whatever is current.
Install Containarium on the Ubuntu VM
Option 1: the one-command installer
The project's homepage documents the installation on a fresh Ubuntu VM as a single command:
curl -fsSL https://containarium.dev/install.sh | sudo bashIf you prefer to inspect first, split it into download and run steps:
curl -fsSL https://containarium.dev/install.sh -o containarium-install.sh
less containarium-install.sh
sudo bash containarium-install.sh
Option 2: pin to a specific release
The v0.120.1 release page documents a version-pinned installer for a Linux host. Pinning is useful when you want a repeatable setup or need to match the client binary on your laptop to the daemon on the host:
curl -fsSL https://raw.githubusercontent.com/footprintai/containarium/v0.120.1/hacks/install.sh | sudo bashTreat v0.120.1 as the release visible in our evidence, not as a statement about the latest version. The release page we reviewed does not show a year, and we cannot establish the project's release cadence from it. Check the project's releases page for the current tag before pinning.
Option 3: manual binary install
The release page also documents manual downloads for any binary. On a Linux x86_64 host the daemon is installed like this, with the client CLI name symlinked to the same binary:
sudo curl -L -o /usr/local/bin/containariumd \
  https://github.com/footprintai/containarium/releases/download/v0.120.1/containariumd-linux-amd64
sudo chmod +x /usr/local/bin/containariumd
sudo ln -sf /usr/local/bin/containariumd /usr/local/bin/containarium
A manual install gives you the binaries but, as far as the evidence shows, not necessarily the same host setup that the installer script performs. If you take this route, read the project's documentation for what else the host needs. We do not have verified details to fill that gap here.
Verify what you downloaded
The release page publishes a SHA256SUMS.txt file and a keyless cosign signature (<file>.sigstore.json) next to every file, created by the release workflow through GitHub OIDC. The documented verification command takes this form, with your downloaded file in place of the placeholder:
cosign verify-blob --bundle <file>.sigstore.json \
  --certificate-identity https://github.com/FootprintAI/Containarium/.github/workflows/release.yml@refs/tags/v0.120.1 \
  --certificate-oidc-issuer https://token.actions.githubusercontent.com \
  <file>
Each Linux binary also has an SPDX 2.3 SBOM next to it. If your organization requires provenance checks, these are worth wiring into your process before the VM is reachable from outside.
Configure the CLI and create a first box
The supplied README summary describes CLI configuration followed by containarium quickstart alice to create a first user environment. The excerpt of the README that we could review does not include the configuration syntax, the quickstart output, or which fields it asks for, and we are not going to guess them. Use this sequence as a pointer and let the tool guide you:
containarium --help
containarium quickstart alice
Read the command output carefully, since it is the authoritative source for what was created and how to connect to it. The homepage also describes containarium create as the command that spins up an LXC container and registers a route on the sentinel. Run containarium create --help to see its arguments on your version rather than relying on our description.
The release page documents a Helm chart (oci://ghcr.io/footprintai/charts/containarium-k8s, chart version 0.120.1) that requires values such as a daemon JWT secret and an sshpiper upstream key. That is a separate deployment model and is outside the scope of this single-VM guide. The Localtonet step later in this article applies to the VM's SSH port; a cluster deployment would need its own analysis of which service to expose.
Verify everything locally before exposing anything
Remote access should be the last step. Prove each layer on the VM first, so that a later failure is clearly a tunnel problem and not an installation problem.
1. Confirm the listening ports
The supplied README summary identifies the VM's default SSH endpoint as port 22 and the local daemon API as http://localhost:8080. Check that both are listening on the host:
sudo ss -ltnp | grep -E ':(22|8080)\b'You should see an SSH daemon on 22 and the Containarium daemon on 8080. If your install uses different ports, use the ones you actually see. Also note which addresses they bind to: if the API binds only to localhost, that is the safe default and it is exactly what the SSH forwarding approach later assumes.
2. Check that the API responds
curl -i http://localhost:8080Any HTTP response, even an error status for the root path, proves that the daemon is accepting connections. The evidence we reviewed does not list specific API routes or a health endpoint, so we do not suggest one. Authenticated calls need a JWT, and we address that in the MCP section.
3. List boxes with the CLI
The client CLI includes a list command. After the quickstart, confirm that a box exists and is running:
containarium list
The release page says the client CLI works against a server selected with --server. If the command cannot find the daemon from the host itself, run containarium list --help to see how your version expects the server address and credentials to be supplied.
4. SSH to the VM and to a box
From a second machine on the same network, confirm that SSH to the VM works with your key. Then confirm that you can reach a box. The release page lists ssh-config as one of the client CLI commands, which suggests Containarium can generate the SSH configuration needed to reach boxes. Check its help output for the exact usage on your version:
ssh youruser@VM_LAN_IP
containarium ssh-config --help
Do not move on until you can log into the VM over SSH using a key and, ideally, reach the box you created. Everything remote builds on that.
Wire the Containarium MCP servers into Claude Code
The release page documents two MCP setups. They serve different purposes and sit in different places, so we describe them separately.
Platform MCP: manage boxes from Claude Code
The mcp-server binary runs on your laptop. It lets Claude Code call admin actions such as create_container, list_containers, expose_port and list_backends against the daemon. Download the binary that matches your laptop. The release page shows macOS arm64 as an example:
sudo curl -L -o /usr/local/bin/mcp-server \
  https://github.com/footprintai/containarium/releases/download/v0.120.1/mcp-server-darwin-arm64
sudo chmod +x /usr/local/bin/mcp-server
Then register it in Claude Code's configuration file, ~/.claude.json, using the documented shape:
{
  "mcpServers": {
    "containarium": {
      "command": "/usr/local/bin/mcp-server",
      "env": {
        "CONTAINARIUM_SERVER_URL": "http://your-host:8080",
        "CONTAINARIUM_JWT_TOKEN": "<your-token>"
      }
    }
  }
}
Replace the server URL with an address your laptop can actually reach, and put your own token in place of the placeholder. We have to be candid about one gap: the evidence we reviewed does not show how to mint a JWT for a self-hosted daemon, and the Helm example hints that the daemon has its own JWT secret configuration. Use the project's documentation or the CLI's help output to generate a token, never reuse one from an example, and never paste a real token into a public repository or a chat.
In-box MCP: let the agent work inside a box
The agent-box binary lives inside the container and speaks MCP over stdio. Claude Code reaches it by running SSH as the MCP command. The documented configuration looks like this:
{
  "mcpServers": {
    "containarium-box": {
      "command": "ssh",
      "args": ["user@your-box", "agent-box"]
    }
  }
}
Two practical consequences. First, agent-box has to exist in the box. The release page says to drop it into your container image, and we cannot confirm from the evidence whether a box created by the quickstart already includes it. Check from inside the box with which agent-box. Second, because Claude Code launches SSH non-interactively, the login must work without a password prompt, which means key-based authentication with the key available to the process (for example through an SSH agent).
Check that Claude Code sees the servers
Restart Claude Code after editing the file, then use Claude Code's own MCP listing to confirm both servers connect. If a server shows as failed, the most common causes are an unreachable server URL, a bad token, a missing binary path, or an SSH prompt that cannot be answered. Fix these on the local network first. The next section is where we make the same configuration work from outside it.
The platform MCP can create and manage containers and expose ports. Anyone holding the token and able to reach the daemon can use those powers. Keep the token out of version control, scope it as narrowly as your version of Containarium allows, and keep the daemon's port private as described below.
Add the Localtonet TCP tunnel to the VM's SSH port
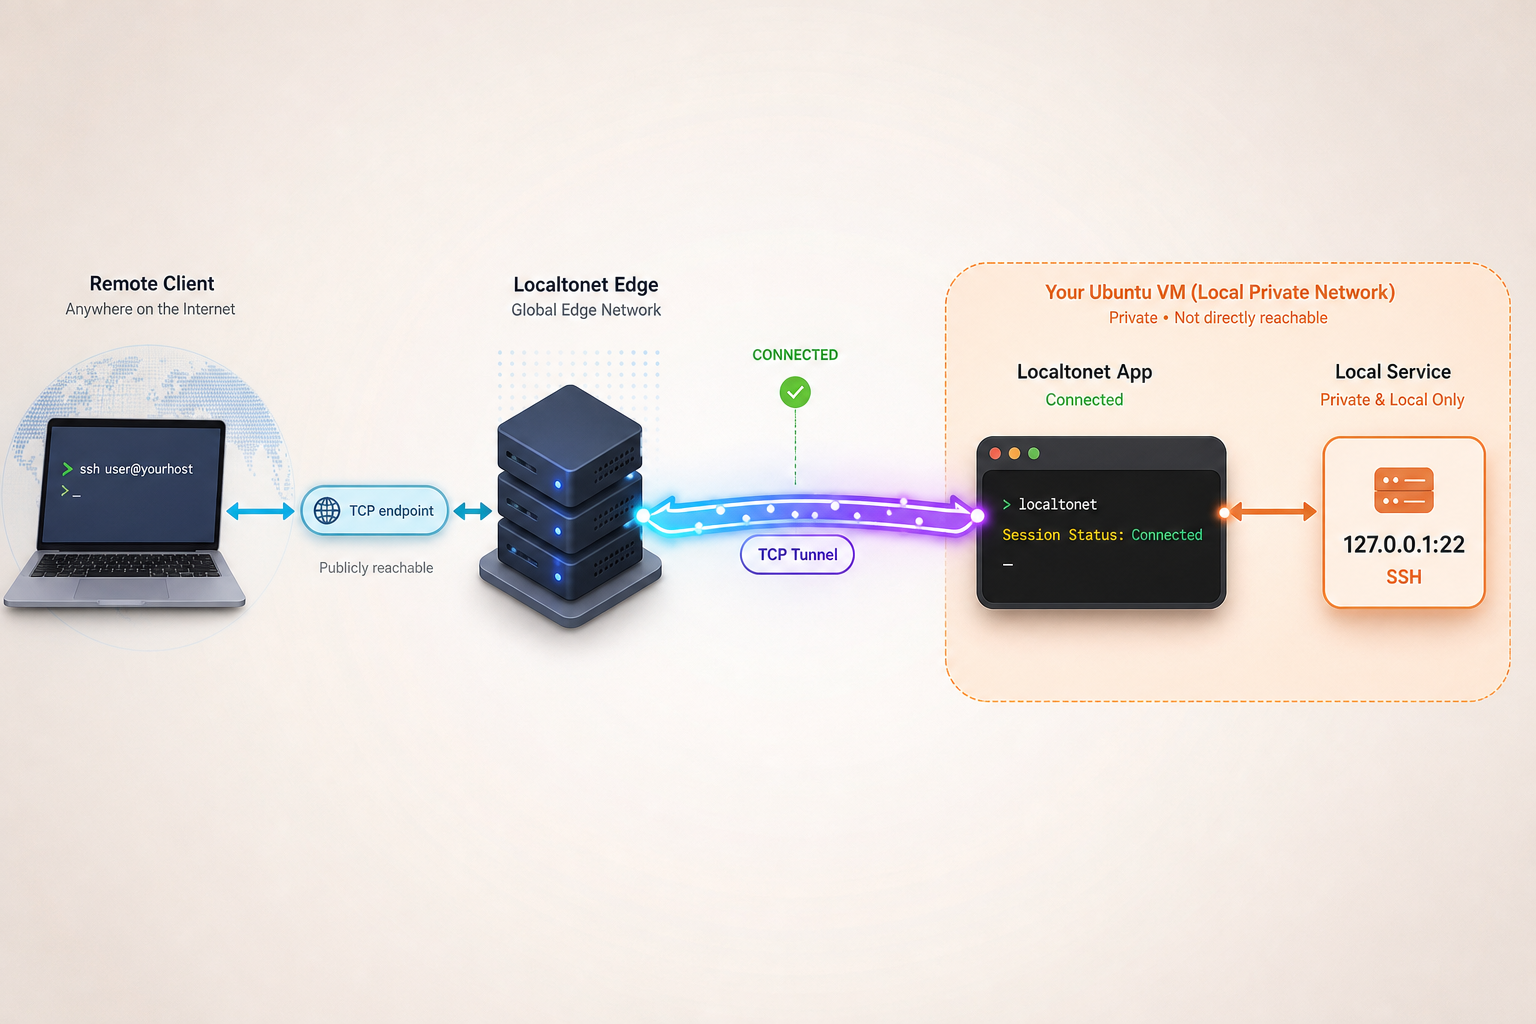
With Containarium working locally, we can make the VM's SSH service reachable from other networks. A Localtonet TCP tunnel forwards a public host and port to a local IP address and port that the client device can reach. Here the target is the SSH daemon on the VM itself. Our documentation covers the tunnel types in detail on the Localtonet documentation pages, and the following sequence mirrors our common workflow for a raw port tunnel.
Install the Localtonet client on the VM
Install the client on the machine that can reach the SSH service you want to publish. In this guide that is the Containarium VM, so the target can be its own loopback address. Use the installation instructions for Linux from our download and documentation pages, since current install commands change over time and we do not hardcode them here.
Authenticate the device with its auth token
Copy the auth token for this device from your Localtonet dashboard and supply it to the client as the installation instructions describe. The token identifies the device that will run the tunnel. Do not paste it into scripts you commit or share.
Choose the TCP tunnel type and a relay server
In the dashboard, create a new tunnel and choose the TCP type. Select the auth token for the VM and a relay server from the options the dashboard currently offers. Choose one close to where you will connect from, since server availability varies and we do not list regions in this article.
Point the tunnel at the local SSH service
Set the local target to the VM's SSH daemon: an IP address of 127.0.0.1 and port 22, matching what you saw with ss. If your SSH daemon listens on a different port, use that port instead.
Start the tunnel
Creating a tunnel does not make it run. Press the Start button. The tunnel is only available while the client on the VM is connected and the tunnel is running.
Note the assigned public host and port
The dashboard shows the public host and port for the tunnel. These are the values you will plug into your SSH commands. Treat them as sensitive-ish: they are the address anyone could try to connect to.
Notice what we did not do: we did not tunnel port 8080. The daemon's API stays local to the VM, and the next section shows how to reach it only through your authenticated SSH session.
A TCP tunnel publishes one service on one port. It does not join your laptop to the VM's network. If you need a private network between your machines instead, that is a different Localtonet feature (VPN Manager), and it is outside the scope of this tutorial.
Use Containarium remotely through the tunnel
Let's say Localtonet gave you a public host shown as PUBLIC_HOST and a port shown as PUBLIC_PORT. Substitute your real values below.
SSH to the VM
ssh -p PUBLIC_PORT youruser@PUBLIC_HOSTThis is a normal OpenSSH connection. The first time you connect you will be asked to verify a host key. Compare the fingerprint with the one on the VM itself (for example from its SSH host key files) over a channel you trust, rather than accepting blindly.
Reach a box through the VM as a jump host
Boxes live behind the VM. The standard OpenSSH way to reach them from outside is a jump host, using the tunnel address for the first hop:
ssh -J youruser@PUBLIC_HOST:PUBLIC_PORT boxuser@your-box
What your-box and boxuser should be depends on how your Containarium install addresses boxes, which the quickstart output and containarium ssh-config should tell you. We cannot verify the addressing scheme from the evidence we have, so confirm it on your host. If you maintain an SSH config file, the same idea can be written once with a ProxyJump entry so you do not retype it.
Reach the daemon API with SSH port forwarding
The platform MCP needs a server URL. Rather than publishing port 8080, forward it through the SSH tunnel so it appears on your laptop's loopback interface:
ssh -p PUBLIC_PORT -N -L 8080:localhost:8080 youruser@PUBLIC_HOST
While that command runs, http://localhost:8080 on your laptop reaches the daemon on the VM. Your Claude Code config can then use that address:
"env": {
  "CONTAINARIUM_SERVER_URL": "http://localhost:8080",
  "CONTAINARIUM_JWT_TOKEN": "<your-token>"
}
The traffic between your laptop and the VM is carried inside the encrypted SSH session, even though the daemon URL itself is plain HTTP. Keep the forwarding command running (in a terminal, or under a process supervisor of your choice) whenever you use the platform MCP. If it stops, the MCP server loses its API.
Point the in-box MCP at the remote path
For the in-box MCP, the SSH arguments gain the jump option. Because Claude Code runs this command non-interactively, make sure key authentication works without prompts:
{
  "mcpServers": {
    "containarium-box": {
      "command": "ssh",
      "args": [
        "-J", "youruser@PUBLIC_HOST:PUBLIC_PORT",
        "boxuser@your-box",
        "agent-box"
      ]
    }
  }
}
Test the equivalent command in a terminal first. If it works by hand and fails inside Claude Code, the difference is usually the environment: a missing SSH agent, a key that needs a passphrase, or a host key that has not been accepted yet.
| What you want | Path | Exposed through Localtonet? |
|---|---|---|
| Shell on the VM | SSH to the tunnel's public host and port | Yes, port 22 only |
| Shell in a box | SSH jump through the VM | Same single tunnel |
| Platform MCP (daemon API) | SSH local forward to port 8080 on the VM | No, API stays private |
| In-box MCP | SSH to the box, running agent-box over stdio | Same single tunnel |
Security: what protects you and what does not
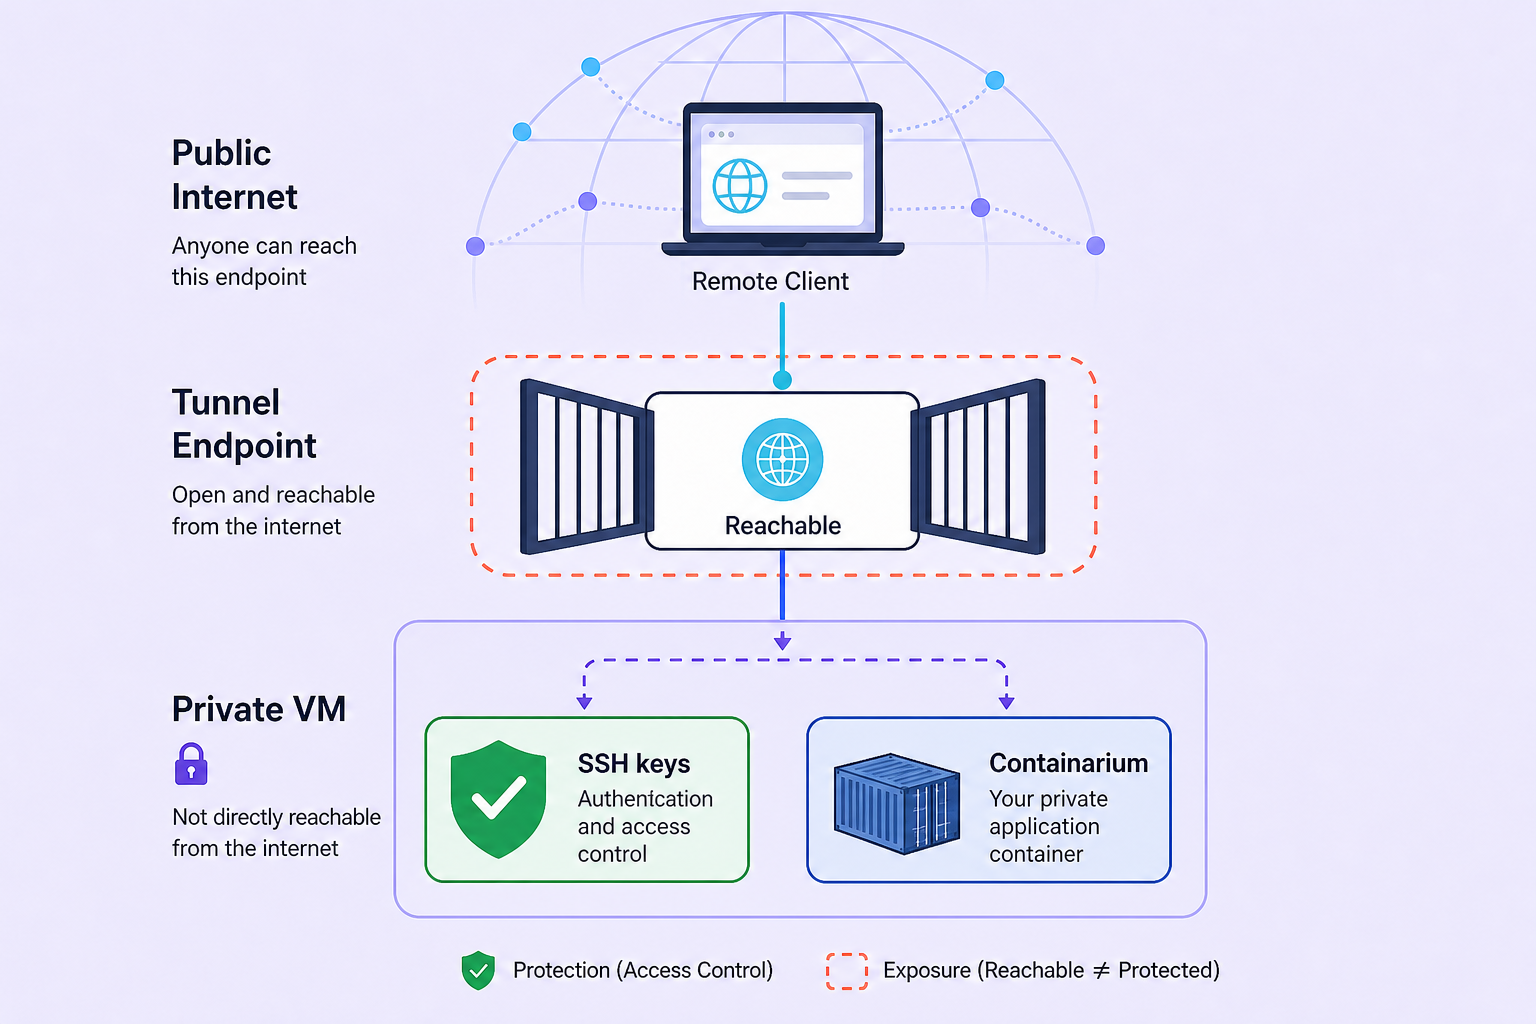
A public TCP endpoint for SSH will be probed by scanners. That is true of any internet-facing SSH port, and a tunnel does not change it. Our tunnel carries your connection to the VM's SSH daemon, but it does not add authorization on top, so the SSH configuration has to be sound by itself.
- Use key-based authentication and disable passwords. In the VM's SSH daemon configuration, set
PasswordAuthentication noand reload the service after confirming that your key login works in a second session. Do this before you start the tunnel. - Do not allow direct root login. Use a normal user with sudo.
- Limit who can log in. OpenSSH options such as
AllowUsersrestrict accounts. Add rate limiting or a brute-force blocker of your choice if you will keep the tunnel up long term. - Keep the daemon API private. Do not create a second tunnel to port 8080 just for convenience. The SSH forward in the previous section gives you the same reach with SSH authentication in front of it.
- Protect the JWT and the Localtonet auth token. Both are credentials. Rotate them if they ever land in a log, a screenshot or a repository.
- Stop the tunnel when you do not need it. An unstarted or deleted tunnel exposes nothing. For an occasional lab, stopping it after each session is a cheap control.
- Mind what agents can do. Containarium's isolation (container boundary, egress policy) is designed to limit damage from an agent in a box, but you should still understand the egress rules and the credentials you place inside boxes before giving an agent real access.
Publishing SSH through Localtonet does not override your organization's network or access policies. If your environment forbids remote administrative access to this VM, get approval first. Where allowed, combine strong SSH settings with the access controls available in your Localtonet account.
Day-to-day operations
Keeping versions aligned
The release ships the daemon, the client CLI, the platform MCP and the in-box agent as matching binaries. When you upgrade the daemon on the VM, upgrade the CLI and mcp-server on your laptop to the same tag so tool names and API shapes agree. The release notes for v0.120.1 show an active stream of fixes and a dependency security bump (go-jose 4.1.6), so reading the changelog before each upgrade is worthwhile. The evidence does not establish a long-term support policy or release schedule.
Keeping the tunnel alive
The tunnel exists only while the Localtonet client is connected and the tunnel is running. If the VM reboots, the client has to come back up too. Decide how you want to supervise it on the VM and follow our current documentation for running the client persistently, then test by rebooting once and confirming the tunnel returns before you rely on it.
Optional: get notified when the tunnel changes state
Our platform-wide webhooks can POST to a URL when a token or tunnel in a selected Token Group changes to Connected or Disconnected. The JSON body includes an Id, an ActionDate, a Type (Token or Tunnel) and a Status. For an always-on agent VM that can be a simple way to learn that the remote path went away. See the
webhook documentation for the configuration.
Cleaning up
To retire the setup, stop and delete the tunnel in the Localtonet dashboard, remove the Claude Code entries from ~/.claude.json, revoke the JWT you issued, and remove the SSH keys you added for this purpose.
Troubleshooting
| Symptom | Likely cause | What to check |
|---|---|---|
| Connection refused or times out on the public host and port | Tunnel not started, client disconnected, or wrong target | Confirm the tunnel shows as running, the client on the VM is connected, and the local target is 127.0.0.1 with the port ss showed for SSH. |
| Connected, but "Permission denied" | SSH auth failing, not the tunnel | Test the same login from the LAN. Check the key, the username, and any AllowUsers rule. |
| Host key warning after restarting or recreating the tunnel | The public host or port changed, or a different machine answered | known_hosts entries are keyed by host and port. Verify the fingerprint on the VM before replacing an entry. Never ignore the warning blindly. |
| Platform MCP fails to connect | Forward not running, wrong URL, or bad JWT | Is the -L forward still open? Does curl -i http://localhost:8080 on the laptop respond? Is the token valid for this daemon? |
| In-box MCP fails inside Claude Code but SSH works by hand | Non-interactive SSH cannot authenticate or trust the host | Load the key into an SSH agent, accept host keys once in a terminal, and confirm agent-box exists in the box. |
| Cannot reach a box through the jump host | Wrong box address or user | Re-read the quickstart output and containarium ssh-config help. Our evidence does not establish the addressing scheme. |
| Tunnel dropped after a VM reboot | Localtonet client not restarted | Start the client again and press Start on the tunnel if needed. Set up persistent supervision per our documentation. |
A general rule that saves time: split the path into segments and test each in order. Local SSH on the VM, SSH from another LAN machine, SSH through the tunnel, then API forwarding, then MCP inside Claude Code. The first failing segment is where to look.
What we could not verify
An honest guide should say where the evidence ends. The sources we relied on were the Containarium homepage, the repository overview and the v0.120.1 release page. They did not give us:
- the exact CLI configuration syntax, the output of
containarium quickstart, or the full list of flags forcreateandssh-config; - how to mint a JWT for a self-hosted daemon, or how to scope it;
- minimum host resources;
- how the sentinel's hostname routing behaves behind a raw TCP tunnel, and whether
agent-boxis preinstalled in quickstart boxes; - release dates and maintenance cadence;
- any official Containarium documentation that mentions Localtonet. The tunnel approach here is standard SSH carried over our TCP tunnel type, not a certified integration.
For each of these, rely on the tool's own help output and the project's documentation on your installed version, and treat our walkthrough as the integration layer around it.
Frequently asked questions
How do I install Containarium on Ubuntu?
The documented path is to run curl -fsSL https://containarium.dev/install.sh | sudo bash on a fresh Ubuntu VM, then configure the CLI and run containarium quickstart alice. If you want a specific version, the release page documents a pinned installer URL and manual binary downloads. Review the script first if the host matters.
Which Localtonet tunnel type should I use for Containarium?
Use a TCP tunnel pointed at the VM's SSH port (22 by default). SSH is not an HTTP service, so an HTTP tunnel is the wrong fit. The TCP tunnel gives you a public host and port, and your SSH client connects to it as usual.
Should I tunnel port 8080 as well?
We recommend not doing so. The daemon API can stay on localhost and be reached with an SSH local forward through the same single tunnel, so SSH authentication sits in front of it. Publishing the API directly would make the JWT the only barrier.
Does the Localtonet tunnel encrypt my SSH session?
The SSH protocol provides its own encryption and authentication between your client and the VM's SSH daemon, and that is unchanged by the tunnel. We make no additional claims about the tunnel's own encryption properties here. The tunnel does not replace SSH key management or server hardening.
Why does the MCP server on my laptop need a URL and a token?
The platform mcp-server talks to the Containarium daemon over HTTP. The documented environment variables are CONTAINARIUM_SERVER_URL and CONTAINARIUM_JWT_TOKEN. Over a remote link, set the URL to the local end of your SSH port forward, such as http://localhost:8080.
Is this an officially documented Containarium and Localtonet integration?
No. The Containarium material we reviewed does not mention Localtonet. This guide uses standard SSH, jump-host and port-forward behavior carried over our TCP tunnel. Expect it to work like any SSH service behind a TCP tunnel, and verify each step on your own setup.
What happens to the tunnel when the VM reboots?
The tunnel is available only while the client on the VM is connected and the tunnel is running. After a reboot, the client must reconnect. Set up supervision as described in our documentation, then test a reboot before depending on the remote path.
Start with Localtonet
Get your Containarium VM working locally first, then create a TCP tunnel to its SSH port and reach your agent boxes from any network. Create an account, install the client on the VM, and start the tunnel when you are ready.
Get Started Free →