

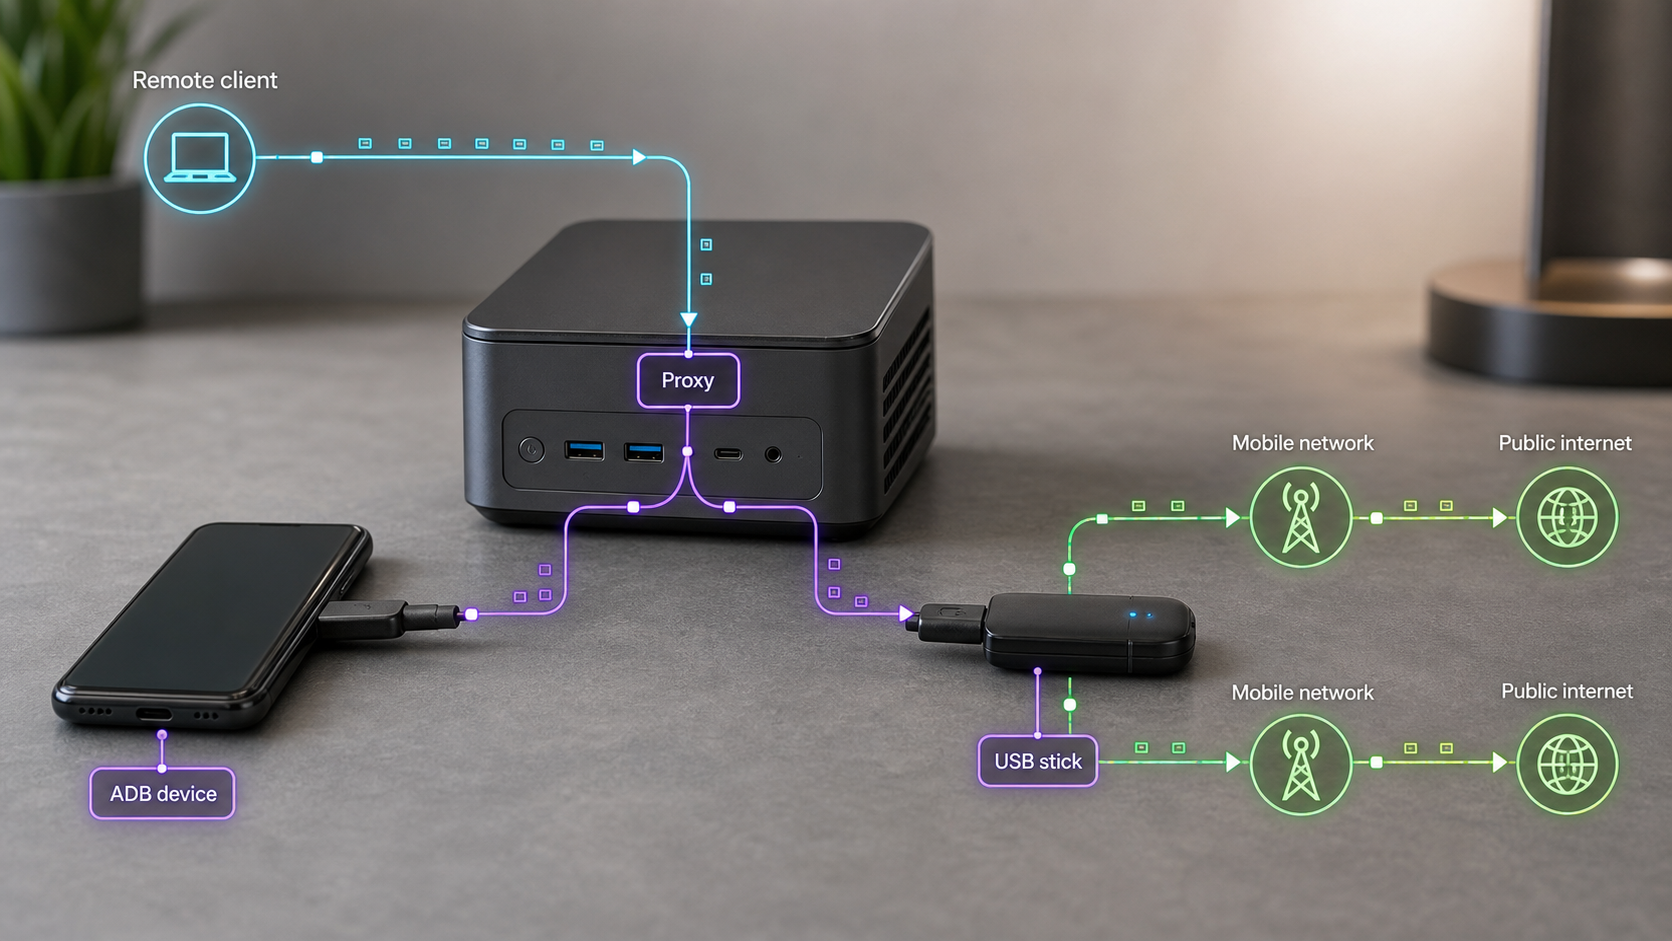
Route proxy traffic through a USB-connected device without confusing it with ordinary port forwarding
A Localtonet USB proxy configuration uses a registered USB device as the proxy exit node. The Localtonet client runs on the host computer, connects outward to our relay platform, and keeps the proxy available while the selected client and proxy configuration are running. This guide explains how to prepare the host and device, register the USB hardware, associate it with a device-specific AuthToken, create and start the proxy, verify the resulting exit IP, and troubleshoot common USB, ADB, subnet, and connectivity problems.
📋 What's in this guide
How a USB proxy exit node works
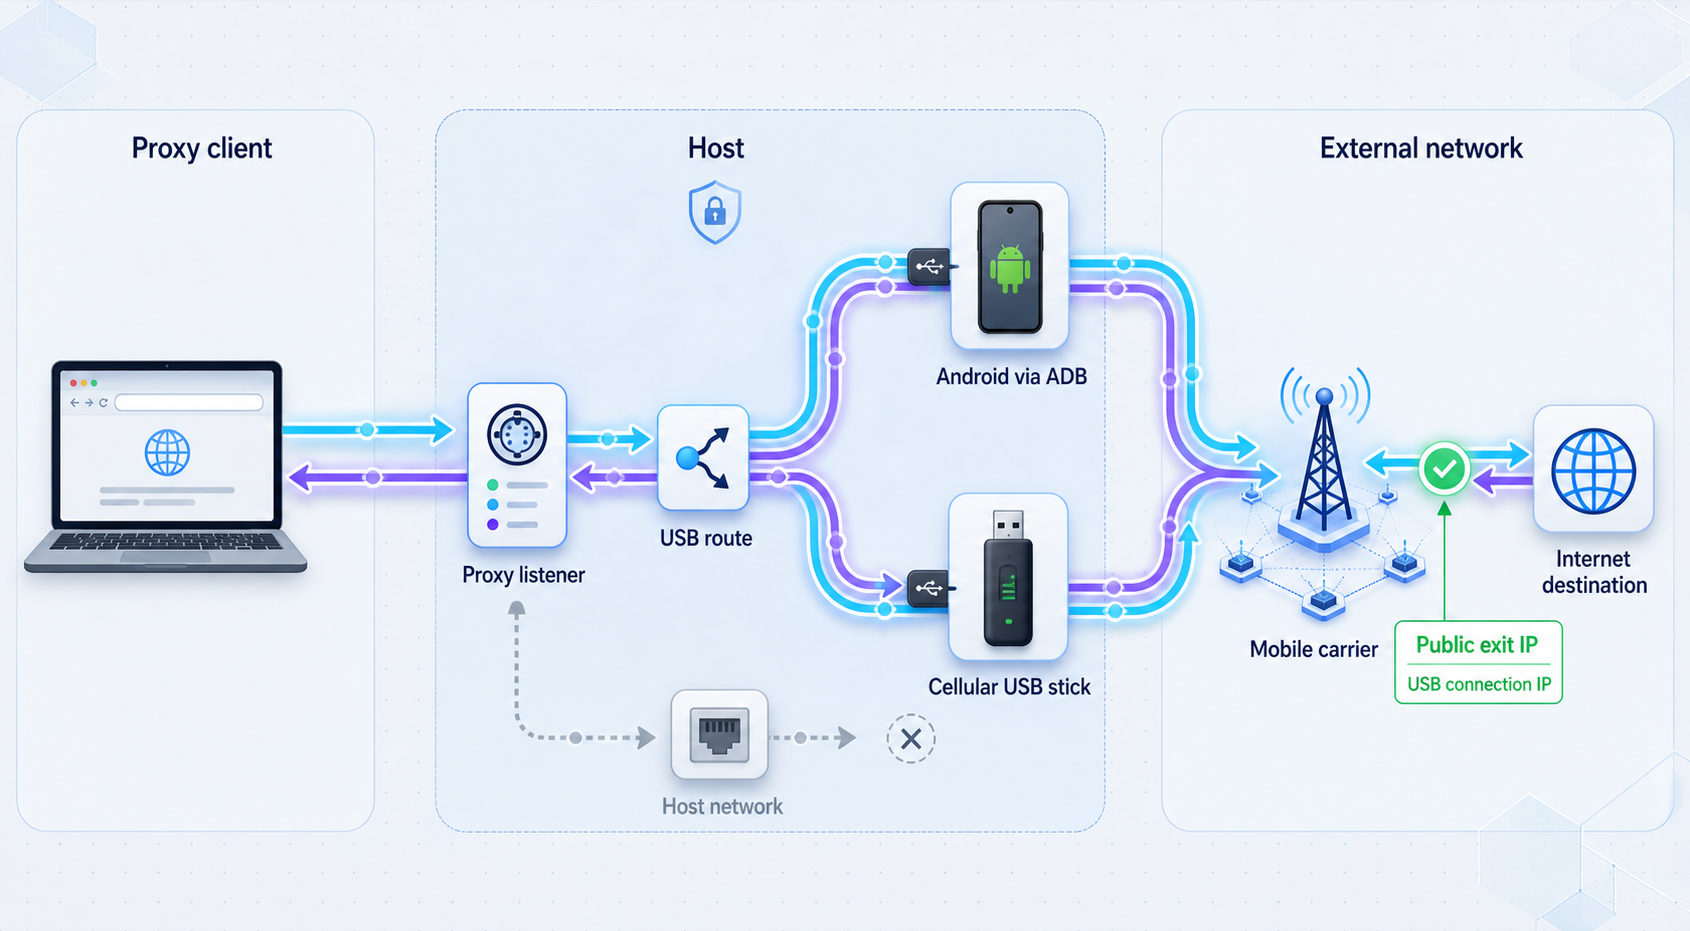
A conventional Localtonet HTTP, TCP, UDP, combined UDP/TCP, or TLS tunnel points to a local IP address and port that the connected client can reach. A proxy configuration is different. Instead of forwarding requests to a conventional local service, it makes the connected device the proxy exit node.
In this workflow, a USB device is connected to a host computer running the Localtonet client. The client establishes an outbound connection to a Localtonet relay. A proxy consumer then connects to the assigned public proxy endpoint, and eligible traffic exits through the USB device associated with that proxy configuration.
Proxy consumer
      |
      | Public proxy endpoint
      v
Localtonet relay
      |
      | Outbound client connection
      v
Host running the Localtonet client
      |
      | USB or authorized ADB connection
      v
Registered USB device acting as the exit node
      |
      v
Public internet
This architecture does not require inbound router port forwarding, a public IP address on the host, firewall changes that admit unsolicited internet traffic, or a conventional VPN setup. It does require the Localtonet client to remain connected and the proxy to remain started. Creating the proxy in the dashboard saves its configuration, but creation alone does not make it available.
ADB-connected Android devices and other USB hardware
Some Android devices are managed through Android Debug Bridge, commonly called ADB. For an ADB registration, the dashboard workflow requires the device's ADB identifier. The Android device must also be recognized and authorized by the host before Localtonet can use that connection.
Other USB hardware can expose networking or management interfaces through vendor drivers and device-specific USB modes. The exact driver, USB mode, control address, gateway procedure, and recovery process depend on the model and host operating system. ADB instructions should therefore not be applied automatically to a non-ADB modem, and modem instructions should not be applied automatically to an Android phone.
Use the model list displayed on the authenticated My USB Devices page as the current source for selectable hardware. If a model is not listed, contact our team through the Localtonet support form. Do not choose a similar-looking model unless its compatibility has been confirmed.
Prerequisites and compatibility checks
Complete the following checks before creating a proxy. Doing so separates host or USB problems from Localtonet configuration problems and makes later troubleshooting much faster.
| Requirement | What to confirm | Why it matters |
|---|---|---|
| Localtonet account | You can sign in and open the USB device, token, and Proxy Server pages. | The relevant management pages are authenticated dashboard pages. |
| Localtonet client | The client is installed and running on the computer physically connected to, or able to communicate with, the USB device. | The client maintains the outbound connection to our relay platform. |
| Device-specific AuthToken | The intended host uses its own token and appears connected. | The token identifies which client device will operate the proxy. |
| Supported USB model | The exact model is available in the current USB device registration list. | Drivers, addressing, and control behavior can vary by device model. |
| Host USB recognition | The operating system detects the hardware without an unresolved driver or authorization error. | Localtonet cannot reliably use a device that the host cannot access. |
| Working device internet access | The device has service, data connectivity, and any required local network interface. | A reachable USB device is not necessarily an internet-connected exit node. |
| Nonconflicting device network | The device's private subnet does not overlap the host LAN, a VPN, another USB device, or another active route. | Overlapping routes can send traffic to the wrong interface or make a device unreachable. |
| Authorized proxy consumer | The application that will use the proxy supports the selected HTTP or SOCKS5 configuration and can store its credentials safely. | A valid endpoint is useful only when the consuming application can connect securely and correctly. |
Localtonet client and AuthToken
Install and run the Localtonet client on the host that can reach the USB device. Authenticate that client with the device-specific AuthToken selected for this workflow. Relay server or region choices can vary over time, by deployment, and by subscription, so select from the values currently shown in your dashboard rather than copying a hardcoded server code from an old tutorial.
Confirm that the token is connected before creating or testing the proxy. If the token is disconnected, the dashboard configuration can still exist, but the host cannot carry proxy traffic through the selected device.
Do not place a real token in commands, screenshots, issue trackers, chat messages, browser recordings, or application logs. A token identifies and authenticates a client device. If a token has been disclosed, stop using the exposed value and follow the current account recovery or token replacement controls available in the dashboard.
USB drivers and networking mode
There is no universal driver or USB mode for every supported device. Some hardware uses a vendor driver. Some appears as a USB network adapter. Some Android devices use ADB after developer options and USB debugging are enabled. A phone's charge-only mode is generally insufficient when the host requires a data or debugging connection.
Use the device manufacturer's model-specific instructions to determine the required driver and USB mode. Avoid installing a driver intended for a different revision merely because the product name is similar. On managed computers, confirm that organizational policy permits USB networking and ADB before enabling either feature.
ADB prerequisites
For an Android device registered as an ADB device, the host needs a working ADB installation and an authorized debugging relationship with the phone. Enable USB debugging only on a device you control and only when it is needed. When Android displays an authorization prompt, verify that the prompt corresponds to the trusted host before accepting it.
The ADB identifier shown by the host is the value needed when registering an ADB device. Do not guess this identifier. If more than one Android device is attached, match the identifier to the correct physical device before completing the registration.
Confirm that the host can see and use the device
Do not start with the dashboard if the operating system cannot detect the device. First establish a known-good local connection.
Check the physical connection
- Use a USB cable that supports data, not a charge-only cable.
- Connect the device directly to the host while diagnosing it. An unpowered hub can cause intermittent disconnects when several devices draw power.
- Confirm that the device remains powered and does not repeatedly reconnect.
- Unlock an Android device if the operating system requires interaction for its first data or debugging authorization prompt.
- Check the operating system for a missing-driver, disabled-device, or permission warning.
Inspect the host operating system
On Windows, use Device Manager and the network adapter list to confirm that the hardware appears without a warning icon. On Linux, inspect the USB device list, network interfaces, and routing table. On macOS, use System Information and the network interface list. The exact interface name depends on the driver and device.
A device appearing in a USB inventory proves only that the USB controller can identify it. If the workflow depends on a network interface, also confirm that the expected interface exists, has an address, and can reach the device's management address or gateway.
Check an ADB device
Where ADB is already installed, run the standard device listing command:
adb devicesInterpret the result before continuing:
- device: the host recognizes the Android device and the debugging relationship is authorized.
- unauthorized: check the phone for an authorization prompt, verify the trusted host, and approve it only if appropriate.
- offline: reconnect the cable, unlock the phone, and restart the ADB relationship using the platform's normal tools.
- No entry: inspect the cable, USB mode, driver, host permissions, and USB debugging setting.
USB debugging grants elevated management capabilities to the authorized computer. Approve only a host you control. When the device is no longer used for ADB, consider revoking debugging authorizations or disabling USB debugging according to the device's security policy.
Confirm local internet access
If the device exposes a USB network interface, verify that the host can reach the device and that the device itself has internet service. Keep these tests separate. A successful connection to a local management page does not prove that mobile data or upstream internet connectivity is working.
If the host has Ethernet, Wi-Fi, VPN, and several USB network interfaces at the same time, inspect its routes carefully. A route to the device's private subnet must point to the intended USB interface. An overlapping LAN or VPN route can make the management page appear intermittently or direct traffic through the wrong gateway.
Register the USB device and configure the proxy
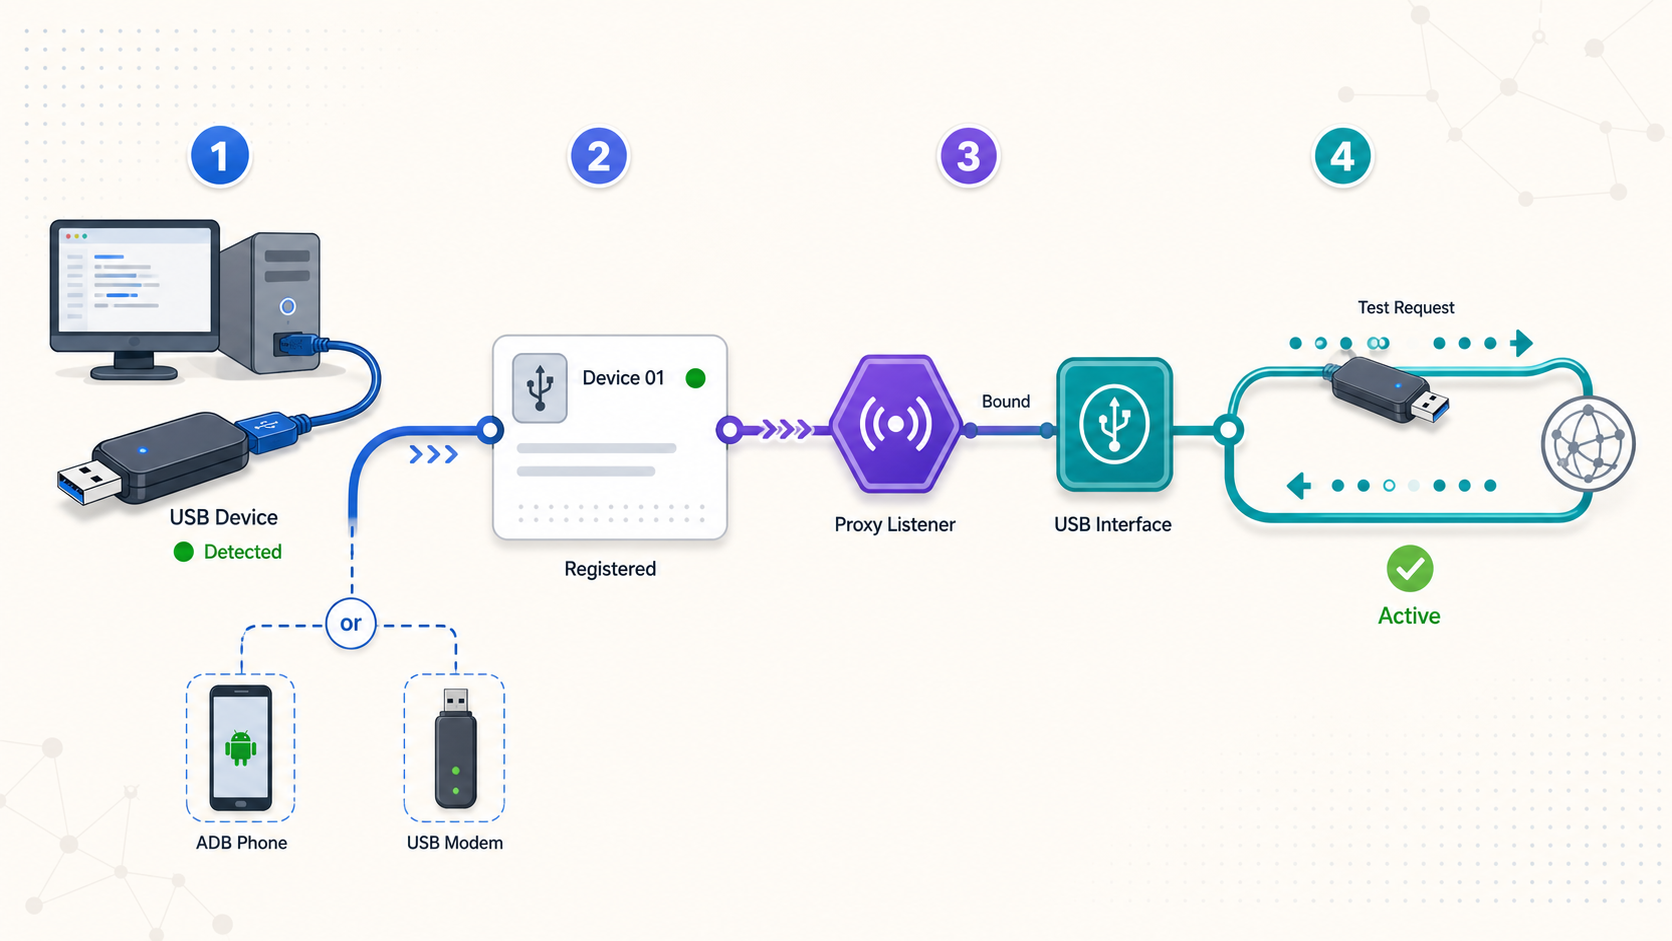
The dashboard workflow has four distinct stages: register the USB device, enable or configure the applicable AuthToken for USB use, create a proxy associated with that token and device, and start the proxy. Complete them in that order.
Register the USB device
Sign in and open My USB Devices. Give the device a recognizable name and select its exact model from the current list. If registering it as an ADB device, enter the ADB device identifier reported by the trusted host. Save the registration only after matching the identifier and physical device.
Configure the AuthToken for USB device use
Open My Tokens, locate the device-specific token used by the Localtonet client on this host, and apply the current USB-device setting presented by the dashboard. Confirm that this is the intended host token and that it is connected. Never copy the token value into notes or screenshots.
Create the proxy association
Open the Proxy Server page. Select the prepared AuthToken. Select the required proxy type from the options available for the account, choose the intended USB device when its list appears, select an available relay server or region, and create the configuration. Review the device name carefully if several units are connected.
Start the proxy
Use the Start control for the newly created proxy and wait for its current status to indicate that it is running or connected. Creation and startup are separate lifecycle actions. The assigned endpoint is not expected to work merely because the saved proxy appears in the list.
The USB device, token, and proxy pages require sign-in, and the available models, relay choices, proxy options, and field labels can vary with the current product and account. Use the live dashboard values rather than relying on old screenshots. The sequence above remains the important distinction: register, configure the token, create the association, and then start it.
Choose the appropriate proxy type
Localtonet's documented proxy family includes HTTP and SOCKS5 proxy configurations. Choose the type supported by the application that will consume the proxy. This selection describes how the consumer connects to the public proxy endpoint. It does not change the core USB exit-node model.
| Proxy type | Typical consumer support | Configuration consideration |
|---|---|---|
| HTTP proxy | Browsers, command-line HTTP clients, and applications with an HTTP proxy field | Use the exact endpoint and authentication values assigned in the dashboard. |
| SOCKS5 proxy | Applications that support SOCKS5 for general outbound connections | Confirm whether the consumer resolves destination hostnames through the proxy or locally. |
| Application-specific integration | Automation tools and software with separate proxy host, port, username, and password fields | Map each assigned value to the matching field without publishing the credentials. |
Find the assigned endpoint safely
After the proxy is started, use the public host, port, and any authentication values displayed for that proxy in the authenticated dashboard. Copy them directly into the authorized consumer. Do not infer an endpoint format, reuse credentials from another proxy, or publish a dashboard screenshot containing secrets.
When documenting an internal setup, redact the AuthToken, proxy password, endpoint secret, device identifier, account details, and any personal information. A useful screenshot can show field positions and status while replacing sensitive values with obvious placeholders.
Verify the proxy and exit IP
Verification should answer four separate questions:
- Is the Localtonet client connected with the intended AuthToken?
- Is the proxy configuration started?
- Can an authorized consumer connect to the assigned endpoint?
- Does public traffic leave through the intended USB device?
Establish a baseline
Before enabling the proxy in a test application, record the public IP observed by that application without the proxy. Then configure only that application to use the Localtonet endpoint and repeat the check using a reputable external IP-check service. The proxied result should correspond to the selected USB device's upstream connection rather than the consumer's ordinary network.
Do not treat a different IP as the only proof of success. Also test a normal destination supported by the application and confirm that the result remains stable for several requests. If several USB devices are connected, stop or isolate other test proxies while establishing which physical device produces which exit IP.
Command-line verification
If the assigned proxy is an HTTP proxy and the consumer environment includes curl, the generic form is:
curl --proxy http://PROXY_HOST:PROXY_PORT https://example.com/If proxy authentication is required, use the secure credential mechanism supported by your environment. Avoid placing a real username or password directly in shell history, shared scripts, process listings, or CI logs.
For a SOCKS5 endpoint, a generic curl test can use:
curl --proxy socks5h://PROXY_HOST:PROXY_PORT https://example.com/
The socks5h form asks curl to resolve the destination hostname through the SOCKS5 proxy. This can help prevent local DNS resolution from obscuring the test. Use only the proxy scheme and authentication method that match the created configuration.
Test stop and restart behavior
Stop the proxy from the dashboard and confirm that new proxy connections fail. Start it again and verify that connectivity returns. Next, if operationally safe, close the Localtonet client or disconnect the host and confirm that the proxy becomes unavailable. These checks demonstrate the expected lifecycle:
- A saved configuration can exist while stopped.
- A started proxy depends on its selected client remaining connected.
- The USB device must remain locally reachable and internet-connected.
- Restarting the proxy or client may require the consumer to establish a new connection.
Verification should prove that an authorized consumer can connect, not that the proxy is publicly usable without controls. Keep assigned credentials private and limit distribution to the users and systems that require access.
Plan gateways and subnets for multiple USB devices
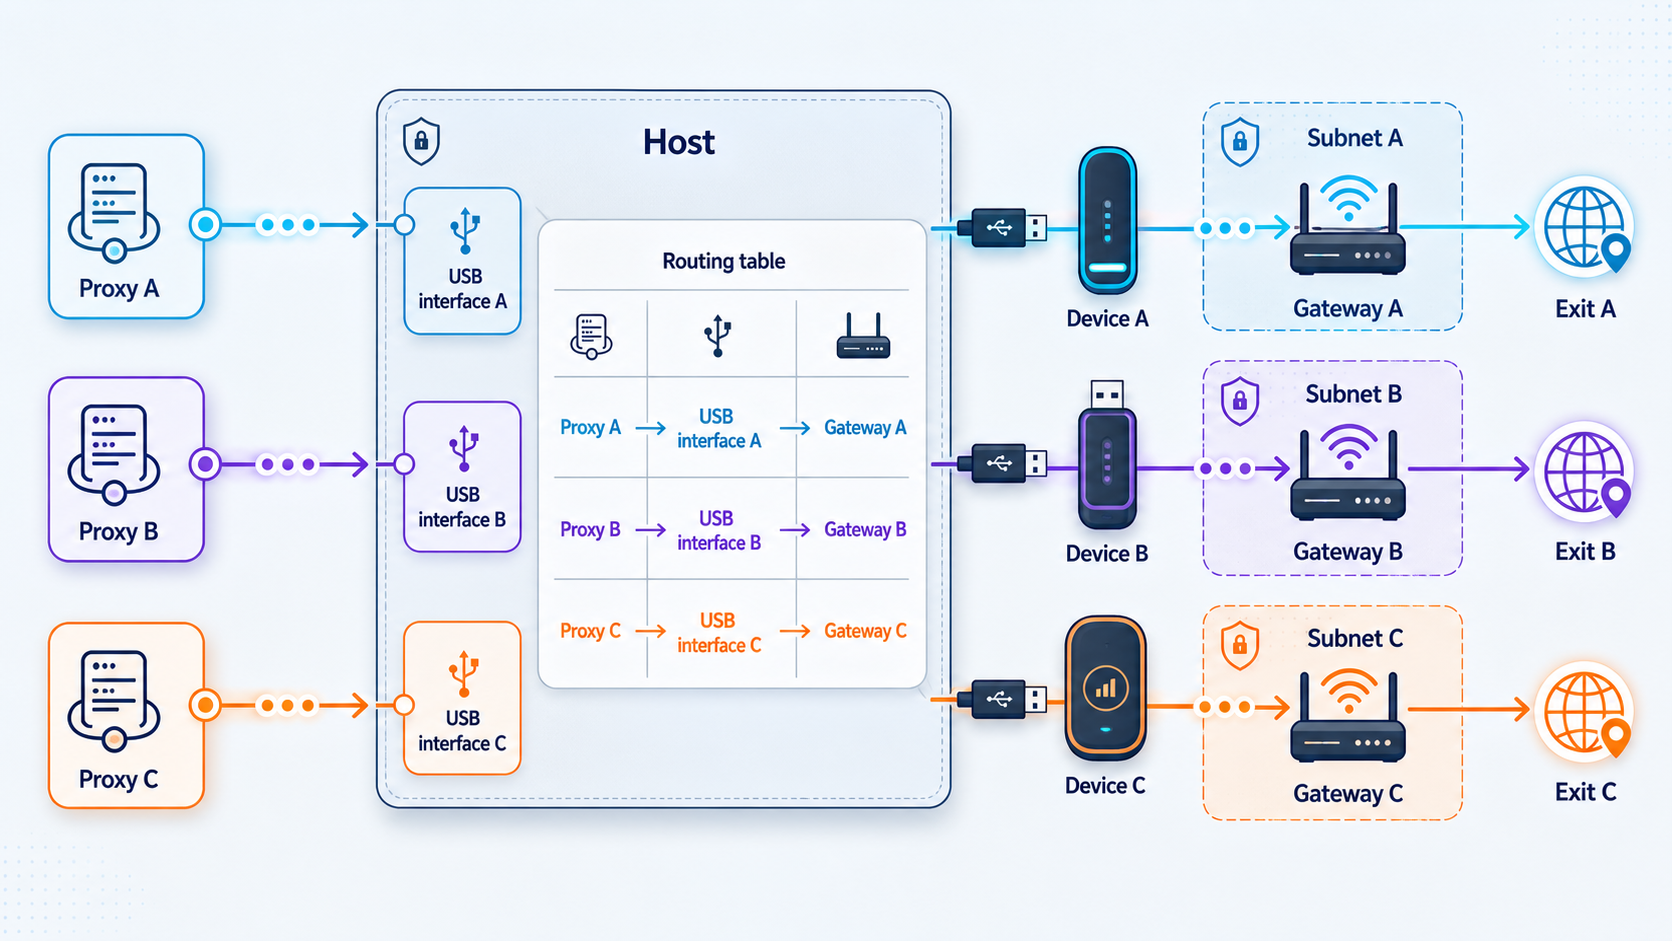
USB networking hardware commonly presents a private gateway or management network to the host. When several devices use the same private subnet, the host may install duplicate or ambiguous routes. Traffic can then reach the wrong device, alternate unpredictably, or fail altogether.
The private IPv4 range commonly intended in examples of this kind is 192.168.0.0/16, not 198.162.0.0/16. However, correcting those digits does not create a universal gateway plan. A gateway must be valid for the device's configured subnet, supported by that model, unique where required, and nonconflicting with every other active host network.
Use complete subnets, not arbitrary labels
A value such as 11 is not a device label in IP routing. In an address such as 192.168.11.1, it is part of the IPv4 address and helps define a subnet only when considered with the subnet mask. Selecting numbers from 11 through 254 does not, by itself, prove that the resulting network is available or compatible.
The following is an illustration of nonoverlapping private /24 networks, not a universal configuration:
| Illustrative device | Illustrative subnet | Illustrative gateway |
|---|---|---|
| USB device A | 192.168.11.0/24 |
192.168.11.1 |
| USB device B | 192.168.12.0/24 |
192.168.12.1 |
| USB device C | 192.168.13.0/24 |
192.168.13.1 |
These examples are usable only if the device supports changing its LAN or USB-network address, the corresponding subnet mask is configured correctly, and none of those networks overlaps the host LAN, Wi-Fi, VPN, containers, virtual machines, or other USB devices.
Safe planning procedure
- Record the current gateway, subnet mask, management URL, and USB interface for every device.
- Record the host's LAN, Wi-Fi, VPN, virtual-machine, container, and existing USB routes.
- Choose an unused private subnet that does not overlap any recorded route.
- Confirm from model-specific documentation that the device supports changing its local address or subnet.
- Change one device at a time using the manufacturer's supported procedure.
- Reconnect using the new management address and confirm internet access before changing another device.
- Update any saved Localtonet device setting only if the current dashboard requires that value.
- Test the associated proxy independently before adding the next device.
Do not assume that every Huawei, ZTE, Android, or other USB model uses the same administration page or recovery procedure. Save the original settings first. Confirm how to restore or factory-reset the specific model before changing its network address. If the management page becomes unreachable, reconnect directly, renew the host interface address if necessary, and use the manufacturer's documented recovery process.
Check for conflicts before changing anything
Inspect the host routing table and identify any route covering the proposed subnet. Common commands include route print on Windows, ip route on Linux, and netstat -rn on macOS. These are operating-system tools rather than Localtonet commands.
A route conflict may exist even when two devices have different gateway addresses. For example, 192.168.11.1 and 192.168.11.2 are still inside the same 192.168.11.0/24 network. If separate interfaces both claim that network, merely changing the final octet does not create distinct subnets.
Security and routine operation
Apply least privilege
Give proxy access only to the applications, users, and automation jobs that need it. Store endpoint credentials in an approved secret manager or protected application configuration. Avoid embedding credentials in browser bookmarks, shell history, shared spreadsheets, source code, container images, or screenshots.
The host itself should be treated as part of the security boundary. Keep its operating system, Localtonet client, USB drivers, ADB tools, and device firmware maintained according to your environment's policies. Remove unused device registrations and proxy configurations rather than leaving abandoned access paths in place.
Keep device identities clear
Assign names that map unambiguously to physical devices, such as a controlled asset label or location. Do not use the AuthToken, phone number, SIM identifier, proxy password, or another secret as the display name. When multiple identical models are connected, maintain a private asset record that maps the dashboard name to the physical port and device.
Operate the lifecycle deliberately
- Start a proxy only when it is required.
- Confirm the selected USB device before starting it.
- Stop the proxy when the workflow is finished.
- Delete obsolete configurations when they are no longer needed.
- Monitor the host for USB disconnects, power instability, and driver errors.
- Verify the exit IP again after a device reconnect, host reboot, upstream network change, or IP rotation attempt.
Auto Airplane Mode, IP Change Link, device gateway, and URL access
The USB device settings area has historically exposed controls described as Auto Airplane Mode, IP Change Link, device gateway, and URL access. Their current behavior, supported models, request methods, timing, authentication requirements, and security implications are not available from the public evidence for this revision because the page requires authentication.
Do not enable or automate these settings based solely on an older screenshot or a generic modem guide. Review the current dashboard description for the selected model and validate the action on a noncritical device first. In particular:
- Do not assume that toggling airplane mode is supported or safe on every Android device.
- Do not assume that requesting an upstream reconnection guarantees a new public IP address.
- Do not expose a device management URL or IP-change URL to unauthorized users.
- Do not include management credentials or secret query values in logs.
- Do not change the gateway until a nonoverlapping subnet and recovery plan have been confirmed.
A device reconnection can succeed without producing a different public IP. Address assignment is controlled by the device's upstream provider and network conditions. Verify the observed exit IP after the operation instead of treating the control action as proof of rotation.
Troubleshooting USB proxy problems
The USB device is missing from the host
- Replace the cable with a known data-capable cable.
- Connect directly to the host instead of through an unpowered hub.
- Confirm that the device is powered, unlocked where necessary, and in the required USB mode.
- Check for a missing or failed driver in the operating system.
- Test a different USB port and review power-management settings if disconnects continue.
- Restart the device only after saving any unsaved configuration.
The Android device is listed as unauthorized in ADB
Unlock the phone and look for the USB debugging authorization prompt. Verify that it belongs to the trusted host before approving it. If the prompt does not appear, reconnect the cable, confirm that USB debugging remains enabled, and review the device's debugging authorization settings. Do not bypass the authorization requirement or copy another device's ADB identifier.
The host sees the device, but it is missing from Localtonet
- Confirm that the exact model is supported in the current registration list.
- For ADB registration, compare the saved identifier with the output from
adb devices. - Confirm that the intended AuthToken is configured for USB use.
- Confirm that the Localtonet client using that token is connected on the same host.
- Refresh the authenticated page after the local device connection is stable.
- If the exact model is absent, use the Localtonet contact page rather than selecting an unverified substitute.
The proxy was created but is unavailable
First confirm that the proxy was explicitly started. Then check that the selected token is connected, the Localtonet client remains running, and the USB device has not disconnected. Verify the public host, port, proxy type, and authentication settings against the current dashboard. A saved proxy associated with an offline token cannot carry traffic.
The consumer reports an authentication error
Re-enter the assigned proxy credentials without exposing them in logs. Confirm that the application has separate fields mapped correctly for host, port, username, and password. Check whether special characters were altered by a configuration file, shell, URL parser, or password manager. Do not solve the problem by disabling authentication or publishing the endpoint for testing.
Two devices work separately but fail together
Inspect the host routing table for duplicate private subnets. Two USB devices can present identical gateways even when their physical identifiers differ. Changing only the final host octet may not resolve a subnet overlap. Assign distinct, supported private subnets one device at a time, then retest local management access and the associated proxy after each change.
The proxy connects, but the exit IP is not the expected device
- Confirm which USB device is selected in the proxy configuration.
- Stop other test proxies and repeat the check with one device at a time.
- Inspect the host routes for overlapping USB, LAN, Wi-Fi, or VPN networks.
- Confirm that the application is actually using the proxy and has not fallen back to a direct connection.
- For SOCKS5 clients, check whether hostname resolution is local or proxied.
- Restart the application connection after changing the proxy or USB device.
An IP-change action does not produce a new IP
Confirm that the action completed and that the device regained internet access. Then create a new proxy connection and repeat the external IP check. The upstream provider may assign the same address again, maintain a sticky address, place users behind carrier-grade NAT, or delay reassignment. Localtonet cannot guarantee that a device reconnection will result in a different public address.
The proxy stops after a host reboot
Verify that the Localtonet client is running again, that it authenticated with the intended device-specific token, that the USB driver loaded, and that the device is locally reachable. Then inspect the proxy's status. Do not assume that a previously created configuration is currently started merely because it remains visible in the dashboard.
Frequently asked questions
Does a Localtonet USB proxy forward to a local IP and port?
No. Proxy configurations make the connected device the proxy exit node. This differs from HTTP, TCP, UDP, combined UDP/TCP, and TLS tunnels that point to a conventional local IP address and port.
Does creating the proxy make it immediately available?
No. Creating the proxy saves its configuration. You must start it separately. It remains available only while the selected Localtonet client is connected, the proxy is running, and the associated USB device remains usable.
Do all USB proxy devices require ADB?
No. ADB applies to supported Android devices registered through the ADB workflow. Other USB hardware can use vendor-specific drivers, management interfaces, or USB networking modes. Follow the requirements for the exact model shown in the current Localtonet device list.
Can I use the same private gateway for several USB devices?
Devices presenting the same private network can create ambiguous or duplicate routes on the host. Plan distinct, nonoverlapping private subnets where the hardware supports them. Check the host LAN, Wi-Fi, VPN, virtual networks, and other USB routes before making a model-specific gateway change.
Is 198.162.x.1 a private gateway range?
No. The commonly intended private range is 192.168.0.0/16. Even within that range, a gateway such as 192.168.11.1 is only an example. It must belong to a valid, supported, nonconflicting subnet for the specific device.
Will toggling airplane mode always rotate the public IP?
No. A reconnection can complete while the upstream provider assigns the same public address. Support for any automated airplane-mode action is also model-specific. Confirm current dashboard behavior and verify the observed exit IP after each attempt.
Can I share the AuthToken or proxy endpoint in a screenshot?
Do not share an AuthToken, proxy password, endpoint secret, private device identifier, or personal account information. Redact all such values before saving or publishing screenshots, logs, recordings, or support material.
What should I do if my exact USB model is not listed?
Do not register it as a different model without compatibility confirmation. Send the exact manufacturer and model information through the Localtonet support form so our team can review the request.
Configure a USB proxy exit node with Localtonet
Prepare a supported device, confirm that the host can access it, connect the Localtonet client with a protected device-specific AuthToken, and then register, create, start, and verify the proxy from the authenticated dashboard.
Get Started Free →

