

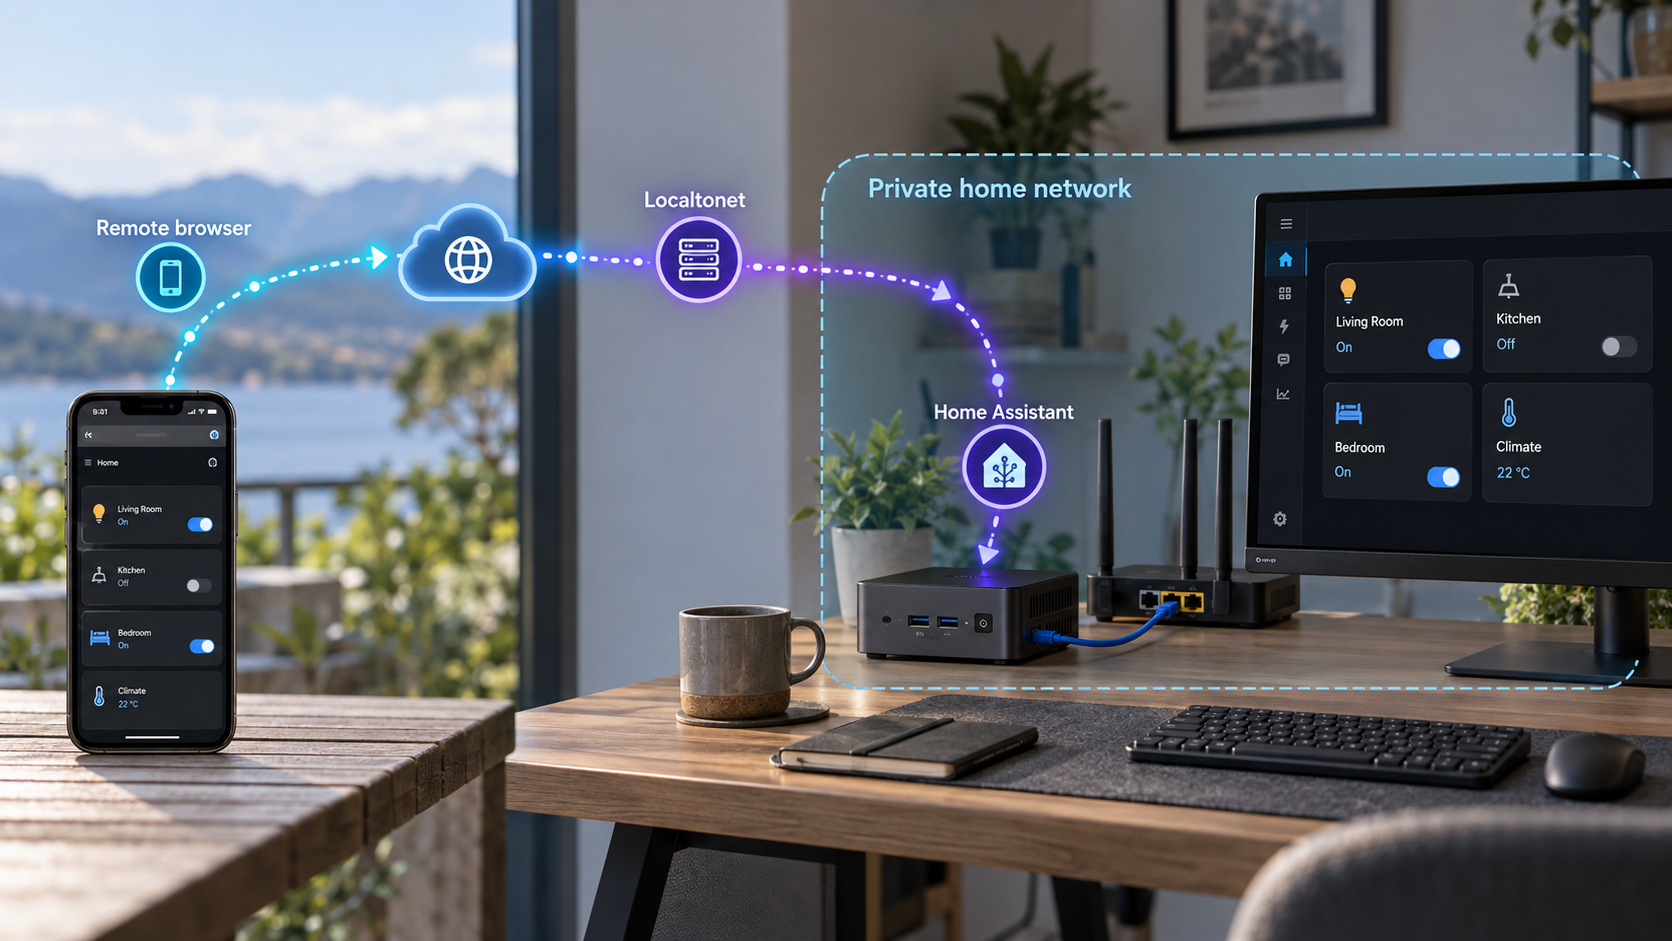
Build a supervised Home Assistant installation first, verify it on your local network, and only then add controlled remote access
Home Assistant Supervisor manages a container-based Home Assistant Core installation and related applications, but it is not documented as a standalone service that should be installed or published independently. In this guide, we explain the official installation boundary, show how to validate the resulting Home Assistant environment locally, and identify the information you need before creating a tunnel. We then configure an HTTP tunnel with Localtonet for the Home Assistant web interface, not for direct exposure of the Supervisor API. Exact installation choices, local addresses, and ports must come from the current Home Assistant installation workflow and your completed environment.
📋 What's in this guide
What Home Assistant Supervisor is, and what it is not
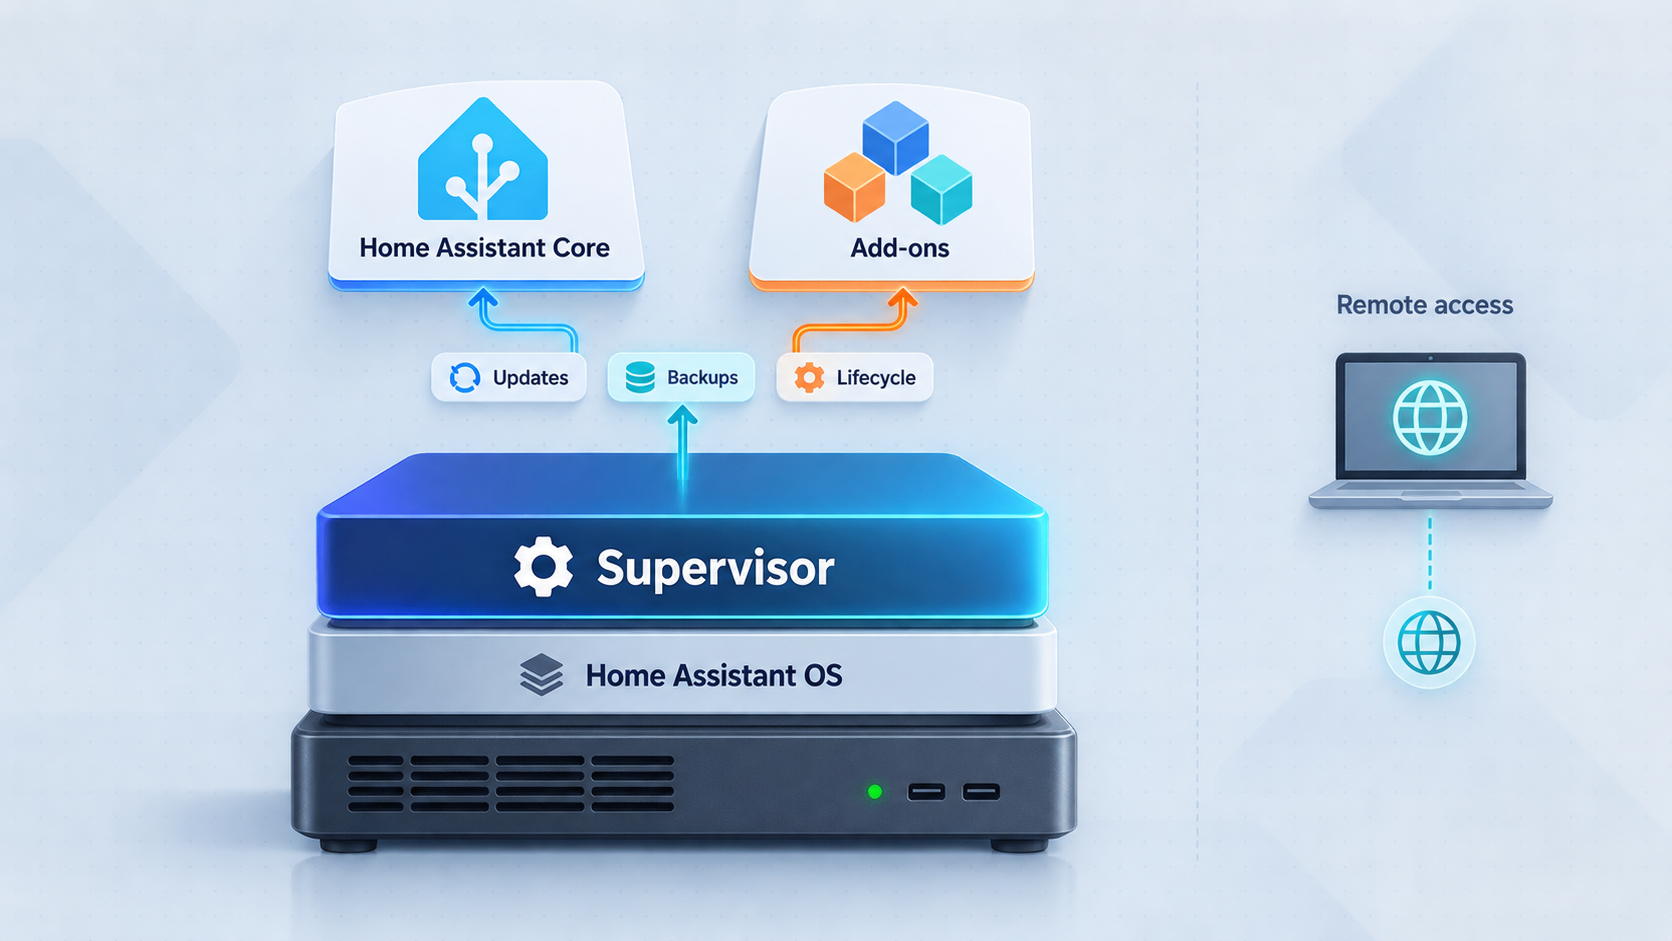
Home Assistant Supervisor is part of a managed Home Assistant environment. It supports a container-based Home Assistant Core installation and related applications. Home Assistant communicates with Supervisor, while Supervisor provides an API used to manage the installation. Its responsibilities include operations such as changing network settings and installing or updating software.
This architecture matters because a request to “install Supervisor” can imply two very different workflows. One is installing Home Assistant through an official installation path that includes Supervisor. The other is manually cloning the Supervisor repository and trying to run it as an independent application. The available project evidence directs users to the official Home Assistant getting-started documentation for installation. It does not provide a supported standalone Supervisor installation command, a standalone configuration procedure, a default external endpoint, or a documented public-access workflow.
We therefore treat Supervisor as a component obtained through an appropriate official Home Assistant installation path. This guide does not invent a package command, Docker command, Compose file, system service, network port, or environment variable for Supervisor. If an installation option in the current Home Assistant documentation does not explicitly include Supervisor, its presence should not be assumed.
Supervisor provides a management API, but the available project documentation does not identify that API as an externally appropriate endpoint. It also does not establish a public URL, port, transport protocol, or safe standalone authentication model for direct internet exposure. This guide exposes the working Home Assistant web interface conditionally through an HTTP tunnel. It does not create a tunnel to the Supervisor API.
Why this distinction prevents fragile installations
Supervisor is not merely a web application that can be placed behind any container command and expected to work. Its role is coupled to the surrounding Home Assistant system. A repository may contain source code, a Dockerfile, development resources, and release artifacts without those files constituting an end-user installation method. Development instructions are also not a substitute for a supported home automation deployment.
Following the current official installation selector helps preserve that relationship. It lets Home Assistant define the supported hardware and deployment choices, the onboarding sequence, and the management model that applies at installation time. Those choices can change independently of this article, so hardcoding an unverified operating system image, disk-writing command, package list, architecture, or container invocation would be unsafe.
Prerequisites and decisions to make before installation
The official Home Assistant getting-started journey begins with choosing hardware and proceeds through installation, onboarding, terminology, dashboard editing, integrations, automations, presence detection, and next steps. It states that Home Assistant runs on hardware in the home and that most setup work is performed through the user interface rather than by writing code or editing configuration files.
Before beginning, separate the requirements into three groups: the Home Assistant host, a local administration device, and the later Localtonet connection. This prevents remote-access concerns from obscuring installation problems.
| Requirement | Why it is needed | What must be confirmed |
|---|---|---|
| Home Assistant host | Runs the selected Home Assistant installation | It matches a current official installation path that explicitly includes Supervisor if Supervisor is required |
| Installation media and storage | Holds the Home Assistant system and its data | Use the media preparation and storage requirements shown for the selected hardware path |
| Local network connection | Supports onboarding and local administration | The host can join the intended network and can be reached from an administration device |
| Browser-equipped administration device | Completes onboarding and verifies the web interface | It can reach the address presented or assigned by the completed installation |
| Home Assistant administrator account | Protects administrative access | Create it during the official onboarding workflow and keep its credentials private |
| Localtonet-capable device | Establishes the outbound connection to our relay server | It runs the Localtonet client and can reach the local Home Assistant web service |
| Confirmed local address and port | Defines the HTTP tunnel target | Obtain both from the working Home Assistant environment or current official documentation |
The supplied official evidence does not enumerate current supported boards, virtual machine formats, host operating systems, processor architectures, storage minimums, image names, or disk-writing commands. It would be misleading to create a universal prerequisites list for them. Use the hardware selector in the current Home Assistant getting-started workflow and apply the requirements displayed for that exact path.
Decide where the Localtonet client will run
The Localtonet client must run on a device that can reach Home Assistant at its local IP address and port. It may be the same host only if that arrangement is supported by the Home Assistant deployment and a suitable Localtonet client can be installed there. Otherwise, use another continuously available machine on the same network.
Do not assume that two devices on the same physical network can communicate. Guest wireless networks, client isolation, VLAN boundaries, host firewalls, and routing policies can prevent the Localtonet device from reaching the Home Assistant host. The best preflight test is to open the exact Home Assistant address from the device that will run our client.
Record facts instead of relying on common defaults
Before creating a tunnel, record the actual local IP address or hostname, local HTTP port, and whether the interface uses HTTP or HTTPS locally. The evidence supplied for this article does not establish those values. We intentionally do not print a conventional Home Assistant port or URL because a commonly used value is not proof of the reader’s current configuration.
Also confirm that the chosen Home Assistant installation includes Supervisor. A working Home Assistant Core interface alone does not prove that Supervisor is installed. Check the management information presented by the installed environment and compare it with the current official description of the chosen installation type.
Install Home Assistant through the official Supervisor-aware path
The Supervisor repository gives one end-user installation direction: follow the Home Assistant getting-started documentation. It does not provide standalone Supervisor commands. The sequence below therefore preserves the official journey at the level supported by the available evidence while making every uncertainty explicit.
Open the current Home Assistant getting-started workflow
Begin with the official Home Assistant getting-started guide. Use its current installation selector rather than a copied command from an old article, repository issue, or unofficial image. Installation requirements can differ by hardware and deployment model.
Choose the hardware you will actually use
Follow the official hardware-selection stage and select the matching path. Do not apply instructions intended for a different board, machine type, processor architecture, virtual environment, or storage layout. If Supervisor is a requirement, verify that the description of the selected path explicitly includes it.
Complete the installation instructions for that exact path
Perform the preparation, imaging, deployment, boot, and network actions shown by the current guide for the chosen hardware. The supplied evidence does not provide universal commands or filenames, so none are reproduced here. Do not clone the Supervisor source repository as a substitute for these installation instructions.
Wait for Home Assistant to become available locally
Allow the initial startup to finish. Use the discovery method, hostname, or local address provided by the selected official path. Record the address and port that work in your environment. Do not proceed to a public tunnel while startup is incomplete or the local interface is unreachable.
Complete Home Assistant onboarding
Open the local web interface and finish the onboarding flow. Create the required administrative identity and review the settings presented by Home Assistant. Keep account credentials out of shell history, screenshots, tunnel names, support posts, and shared configuration records.
Confirm that Supervisor is present
Inspect the installed Home Assistant environment using its current user interface and documentation. Confirm that it identifies a supervised installation and offers the expected management capabilities. If Supervisor is absent, return to the official installation selector instead of attempting to graft the repository onto an incompatible deployment.
Why there is no standalone Supervisor command in this guide
A command-only tutorial would be shorter, but it would not be evidence-backed. The Supervisor project README does not define a generic end-user command, supported host package set, Compose configuration, environment-variable list, persistent data path, local port, or bootstrap procedure. Supplying any of those details would require guessing.
The repository also contains development material. Development setup is intended for work on the Supervisor project and does not establish a supported production installation for a household. Similarly, a release tag proves that the project publishes releases, but it does not create a separate installation method or justify downloading arbitrary assets without the official deployment workflow.
If Home Assistant is already running, do not replace or convert it merely to obtain Supervisor without first consulting the current migration instructions for the source and destination installation types. The available evidence does not define a universal migration procedure, compatible backup path, or rollback command. Protect current configuration and automation data before making structural changes.
Verify Home Assistant locally before remote access
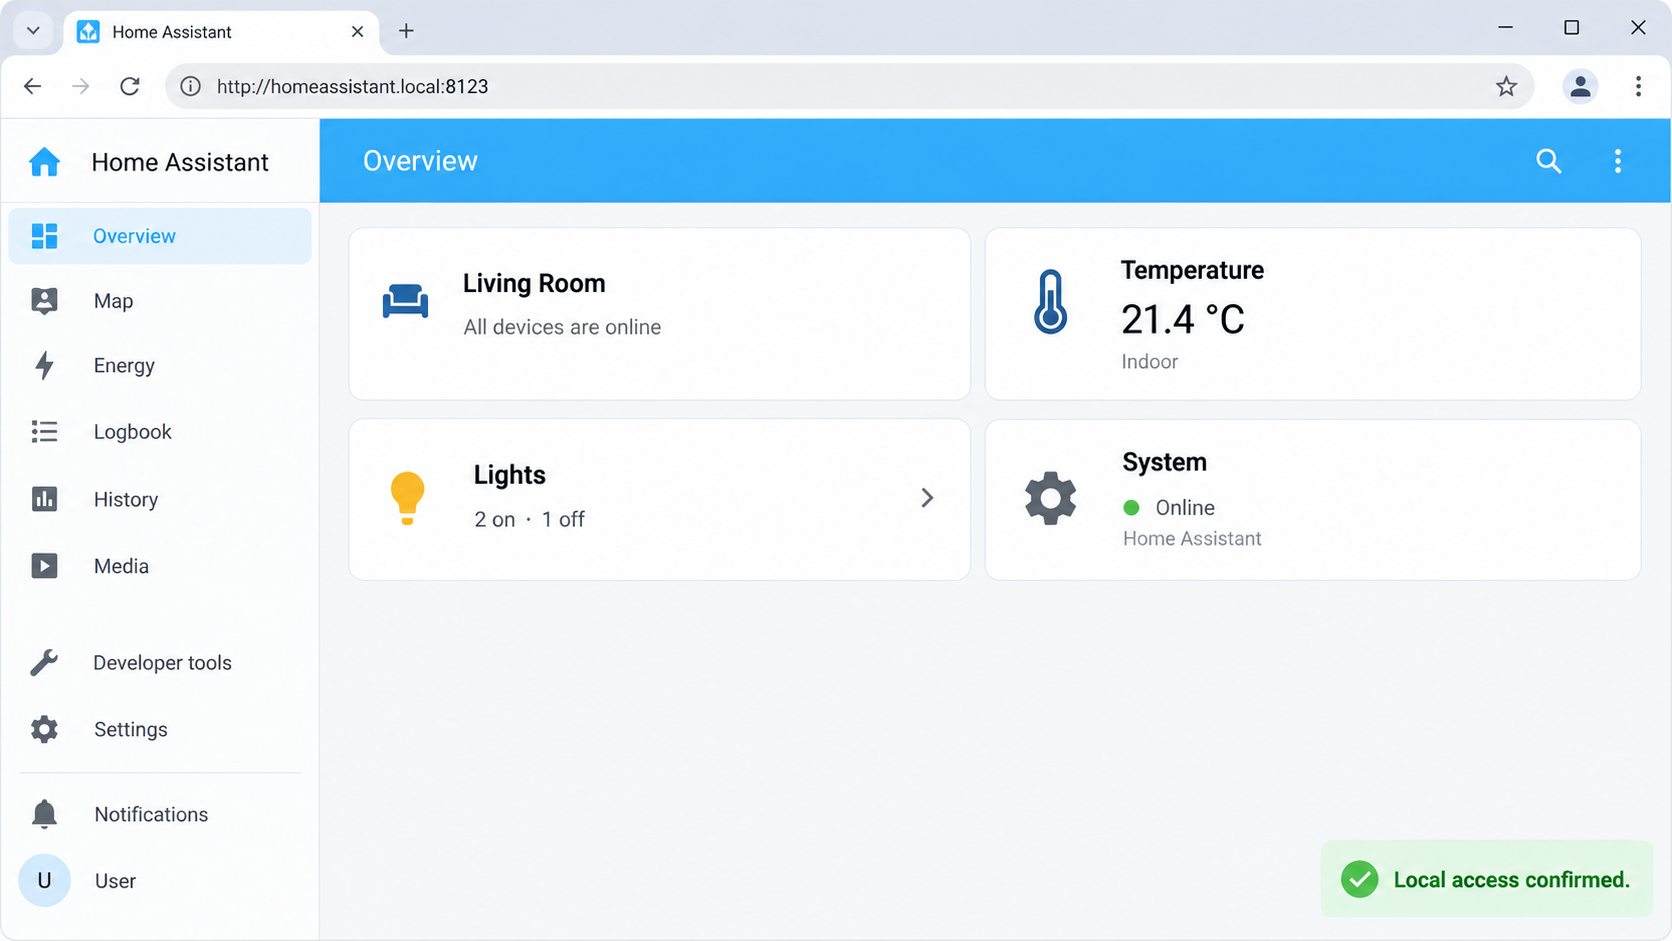
Local verification is the most important diagnostic boundary in this workflow. A tunnel forwards traffic to a local target. It does not repair an incomplete Home Assistant installation, start a stopped service, correct a wrong address, change local routing, or complete onboarding.
Use a browser on the same network to open the exact Home Assistant address established by the installation. Sign in, navigate through the interface, and confirm that pages load consistently. If the selected installation includes Supervisor, verify its presence through the management experience exposed by Home Assistant rather than probing an undocumented API endpoint.
Test from the future tunnel device
A successful browser test from a laptop does not prove that a different device can reach the service. Repeat the test from the machine that will run the Localtonet client whenever possible. If that machine has no graphical browser, use an appropriate local HTTP diagnostic tool only if you already know how to interpret the result. This article does not prescribe a command because available tools and TLS behavior vary by operating system.
If the Localtonet device cannot reach the target, fix local routing or firewall policy first. Use only the narrow rules needed for the client device to contact Home Assistant. Avoid disabling the entire host firewall as a diagnostic shortcut.
Confirm the endpoint is really Home Assistant
Shared servers and reverse proxies may host multiple applications. Confirm that the selected address and port return the Home Assistant interface rather than a router panel, container dashboard, default web server, or another application. A tunnel faithfully forwards to the configured destination, even when that destination is wrong.
Retain a tested way to administer Home Assistant from the local network. Remote access depends on additional components, including the Localtonet client, its outbound connectivity, the selected relay, and the running tunnel. Local administration remains important when any remote component is unavailable.
Expose the Home Assistant web interface with Localtonet
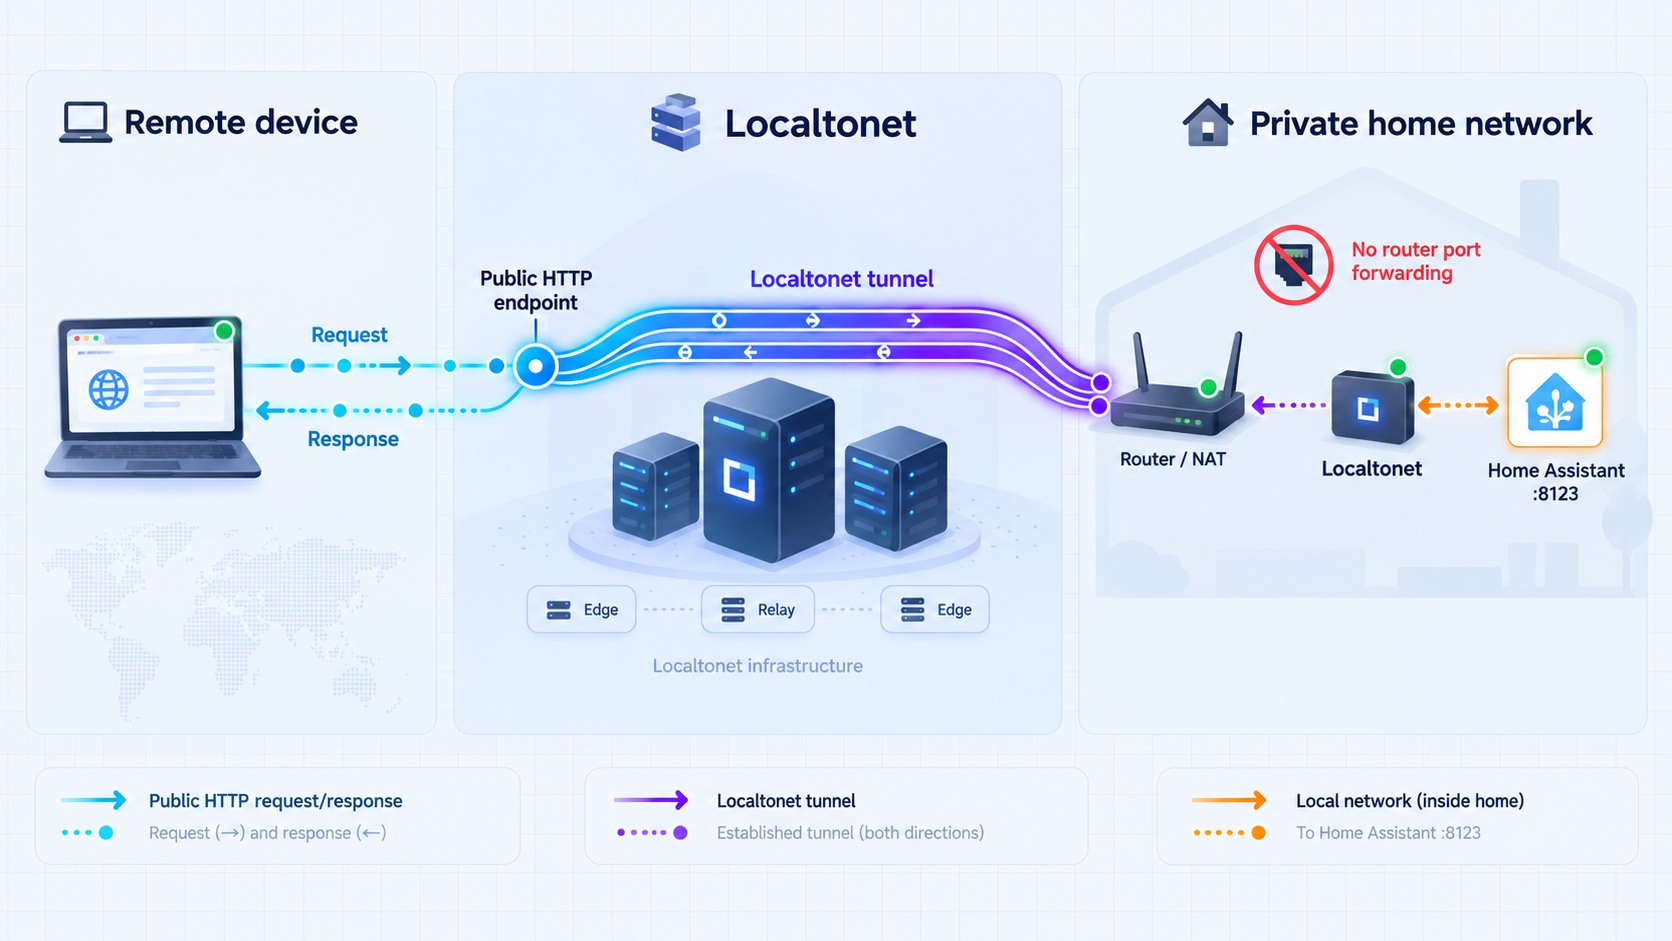
Once Home Assistant works locally, an HTTP tunnel can publish its web interface through Localtonet. Our client establishes an outbound connection to a Localtonet relay server, so this workflow does not require inbound router port forwarding, a public IP address, firewall changes for unsolicited internet traffic, or VPN setup.
The local target is the confirmed Home Assistant IP address and port. The public side is an assigned HTTPS address. HTTP tunnels can use a random subdomain, a custom subdomain where supported, or a custom domain. These process types serve the same target content, but availability can vary. Exact custom-domain DNS instructions must be taken from current Localtonet documentation rather than inferred here.
Install and run the Localtonet client
Install our client on the device that can reach the verified Home Assistant web interface. Keep the client running for as long as remote access is required. Current installation packages and platform-specific instructions should be obtained from Localtonet because no client command has been supplied for this article.
Authenticate or select the client device
Use the device-specific authentication token associated with the client. Treat it as a secret. Never paste it into a public article, screenshot, repository, support transcript, or Home Assistant configuration shared with others.
Select an available relay server
Choose a server or region currently offered in the Localtonet dashboard. Available server codes and regions can change or vary, so do not copy a hardcoded value from another user’s setup.
Create an HTTP tunnel for the verified web target
Select the HTTP tunnel family and enter the local IP address and port that successfully opened Home Assistant during local verification. Choose the required process type from the options currently available to your account. Do not point the tunnel at an assumed Supervisor API address.
Start the tunnel
Creating a tunnel does not make it run. Use the Start button after reviewing the target. The tunnel can provide remote access only while the selected client device is connected and the tunnel is running.
Open and test the assigned public address
Use the public HTTPS address assigned to the tunnel and confirm that it presents the expected Home Assistant sign-in flow. Test from a network outside the home network when practical. After validation, stop the tunnel whenever public access is no longer required, or delete it if the configuration will not be reused.
Choose the correct Localtonet tunnel family
| Localtonet option | Appropriate use in this workflow | Important distinction |
|---|---|---|
| HTTP tunnel | Publishing the verified Home Assistant web interface | Targets a local IP address and port and provides a public HTTPS address |
| TCP tunnel | Only when a separately documented raw TCP service genuinely requires it | It is not the preferred choice for the browser-based workflow described here |
| File Server | Publishing a local folder through the dedicated file-sharing workflow | It targets a folder path, not the Home Assistant web interface |
| Proxy Server | Using a connected device as a proxy exit node | It does not forward a conventional local Home Assistant IP and port |
| VPN Manager | Building a private mesh network when that is the intended architecture | It is the actual Localtonet VPN feature and is distinct from an HTTP tunnel |
For this article’s goal, use an HTTP tunnel because the target is a browser-based Home Assistant interface. Do not describe the HTTP tunnel as a VPN. If private mesh access is the actual requirement, that is a separate VPN Manager design and should be planned independently.
Security practices for remote Home Assistant access
A public tunnel changes the reachability of the application. It does not remove Home Assistant authentication, and it should not be used to bypass authorization or network policy. Before sharing or bookmarking the public address, review which accounts can sign in, which capabilities they have, and whether every exposed feature is intended for remote use.
Treat the URL as discoverable. Protect Home Assistant with its supported authentication controls, use separate accounts where appropriate, remove unused accounts, and grant only the access each person needs. Never rely on an obscure subdomain as the sole protection for a home automation system.
Protect both sets of credentials
Home Assistant credentials and the Localtonet device token serve different purposes. Home Assistant credentials authenticate users to the home automation interface. The Localtonet token identifies the client device that establishes a tunnel. Do not substitute one for the other, expose either in logs, or include either in screenshots.
If a Localtonet token is accidentally disclosed, treat it as compromised and use the current account controls to replace or revoke it. If a Home Assistant credential is exposed, follow the current Home Assistant account-recovery and credential-change process. This article does not invent rotation buttons or recovery commands that are not established by the supplied evidence.
Limit the target to the intended interface
Configure the tunnel with the exact Home Assistant web target. Do not point it at a broad reverse proxy, host-management console, container engine socket, router interface, or Supervisor API merely because those services are reachable from the same machine. A narrow target reduces accidental exposure.
The device running our client needs local connectivity to the selected target and outbound internet access to establish the relay connection. It does not need unrestricted administrative access to every system on the local network. Apply least-privilege network rules wherever the environment supports them.
Stop access when it is not needed
A Localtonet tunnel remains available only while the selected client is connected and the tunnel is running. Use that lifecycle intentionally. Stop temporary tunnels after maintenance or testing. Delete obsolete tunnel definitions when they will not be used again. If continuous remote access is required, include both the Home Assistant host and the Localtonet client in normal patching, monitoring, and restart planning.
Routine operation and maintenance
A reliable installation is more than a successful first page load. Home automation systems operate continuously, interact with local devices, and may receive updates to Home Assistant, Supervisor, and related applications. Remote access adds another running client and network path that should be included in operational checks.
Use Home Assistant for Supervisor-controlled operations
The documented architecture states that Home Assistant controls Supervisor and communicates with it. Use the supported Home Assistant management experience for software installation, updates, and network changes. Avoid calling undocumented Supervisor endpoints or constructing direct API requests based on source-code inspection.
Release notes can explain changes in a particular Supervisor release, but they do not replace the update mechanism of the installed Home Assistant environment. Do not download a release artifact and overwrite a managed component unless the official documentation for the exact installation type explicitly requires that procedure.
Preserve local verification as a health check
When remote access fails, first test the local Home Assistant interface. This immediately separates application or host failures from tunnel-specific failures. A useful maintenance record contains the local target, the device running Localtonet, the selected tunnel, and who is responsible for stopping or restarting each component. Do not put secrets in that record.
Plan for address changes
If the Home Assistant host receives a different local IP address, a tunnel configured with the previous address will stop reaching it. Use a stable addressing approach supported by the local network, or update the tunnel target when the address changes. This is a local network responsibility and should be handled without opening inbound router ports.
Understand service dependencies
| Dependency | Failure symptom | First check |
|---|---|---|
| Home Assistant host | Local and remote interfaces are unavailable | Power, startup completion, and local network connection |
| Home Assistant web service | The host responds but the interface does not load | Service state and the address reported by the installed environment |
| Local network route | Some devices can connect while the tunnel device cannot | VLAN, guest-network isolation, host firewall, and routing rules |
| Localtonet client | The tunnel reports no connected device | Client process, token selection, and outbound connectivity |
| Localtonet tunnel | The device is connected but the public endpoint is unavailable | Confirm that the tunnel was started and points to the verified target |
| User authentication | The interface loads but sign-in fails | Use the supported Home Assistant account workflow rather than changing the tunnel |
Troubleshooting installation and remote-access problems
The selected installation does not show Supervisor
Stop before configuring Localtonet. A tunnel cannot add Supervisor to Home Assistant. Return to the current Home Assistant installation selector and confirm which installation path includes Supervisor. If changing paths would replace an existing deployment, follow the current migration and backup guidance for that exact transition. No universal conversion command is established by the evidence used for this guide.
The Home Assistant page does not load locally
Check that the host has completed startup, joined the intended network, and received the address expected by the installation instructions. Verify that the browser device is on a network permitted to contact it. Confirm the exact protocol and port instead of trying random common values. Do not create a tunnel until the local interface consistently works.
Home Assistant works from one device but not from the Localtonet device
This points to local reachability rather than a Home Assistant installation failure. Look for wireless client isolation, a guest network, VLAN policy, a host firewall, or a route that differs between the two devices. Test the exact target from the Localtonet machine. Grant only the connectivity needed to reach Home Assistant.
The Localtonet device is connected, but the public URL fails
Confirm that the HTTP tunnel has been started. Creating it is not enough. Then compare its local IP and port with the target that passed local testing. If Home Assistant moved to another address after a reboot or DHCP change, correct the target. Also confirm that the selected Localtonet client is the device that can reach Home Assistant.
The public address opens the wrong application
The tunnel is likely pointing to the wrong local address or port. Stop it while correcting the destination. Recheck the target locally from the client device and verify that it displays Home Assistant before restarting the public tunnel.
The sign-in page appears, but authentication fails
The tunnel is reaching Home Assistant, so changing relay servers or tunnel families is unlikely to solve an account problem. Use the supported Home Assistant authentication or account-recovery workflow. Do not place a password in the URL, tunnel name, or public troubleshooting message.
The tunnel stops after the client device restarts
The public endpoint depends on the selected client being connected and the tunnel running. After a restart, check that the Localtonet client is active and authenticated, then inspect the tunnel state. Whether a client or tunnel starts automatically can depend on platform, client version, and configuration. No universal automatic-start behavior is asserted here.
A custom domain does not resolve
Custom-domain setup depends on current Localtonet DNS requirements. Do not guess record types, targets, validation records, or certificate timing. Check the current dashboard and documentation for the exact values associated with the tunnel. A random or selected subdomain can be used where available while domain configuration is reviewed.
Supervisor update behavior is unclear
Use the management and update controls documented for the installed Home Assistant environment. Do not infer an end-user update command from the Supervisor repository or a release page. The existence of a release does not establish that manually replacing the managed component is supported.
Check the Home Assistant host, local web interface, local route from the Localtonet device, client connection, tunnel running state, and public address in that order. This sequence identifies the failing layer without weakening unrelated security controls.
Frequently asked questions
Can I install Home Assistant Supervisor directly from its GitHub repository?
The available Supervisor project documentation does not provide a standalone end-user installation procedure. It directs users to the official Home Assistant getting-started guide. Repository source files, development resources, and a Dockerfile do not by themselves establish a supported production installation method.
Does every Home Assistant installation include Supervisor?
Do not assume so. If Supervisor is required, choose a current official installation path that explicitly states it is included. After installation, confirm its presence through the supported Home Assistant management interface.
What local Home Assistant port should I enter in Localtonet?
Enter the actual port used by the working Home Assistant web interface in your environment. The supplied official evidence does not establish a universal port for this workflow, so this guide does not guess one. Verify the complete local address from the installed environment before creating the tunnel.
Should I expose the Supervisor API through a separate tunnel?
No direct Supervisor API exposure is recommended in this guide. The available project information says that Supervisor provides a management API used by Home Assistant, but it does not identify a public endpoint or externally appropriate access method. Expose only the verified Home Assistant web interface when remote browser access is required.
Does a Localtonet HTTP tunnel require router port forwarding?
No. Our client establishes an outbound connection to a Localtonet relay server. This provides remote access without configuring inbound router port forwarding, requiring a public IP address, or setting up a VPN.
Is the HTTP tunnel itself a VPN?
No. An HTTP tunnel publishes a selected local web service. Localtonet VPN Manager is the separate feature for a private mesh VPN. Standard HTTP, TCP, UDP, TLS, and File Server tunnels should not be described as VPN functionality.
Does creating a tunnel make Home Assistant immediately public?
Not by itself. After creating the configuration, you must start the tunnel. The endpoint remains available only while the selected Localtonet client is connected and the tunnel is running.
Can the Localtonet client run on another machine?
Yes, provided that machine can reach the Home Assistant local IP address and port. Test the target from that device before creating the tunnel. Network segmentation, guest wireless isolation, or host firewall rules may prevent access even when another local device works.
Can I use a custom domain for the Home Assistant tunnel?
HTTP tunnels support random subdomains, custom subdomains where available, and custom domains. Availability can vary, and exact DNS requirements must be taken from the current Localtonet dashboard or documentation. This guide does not invent DNS records or validation steps.
What should I do first when remote access stops working?
Test Home Assistant locally. Then test the same local target from the Localtonet client device. If both work, verify that the client is connected, the correct device and relay are selected, the tunnel target is unchanged, and the tunnel is running.
Connect your verified Home Assistant interface with Localtonet
Finish the official Home Assistant installation, confirm Supervisor through the supported management interface, and verify the web service locally. Then create a Localtonet HTTP tunnel to the exact local address and port without opening an inbound router port.
Get Started Free →

