

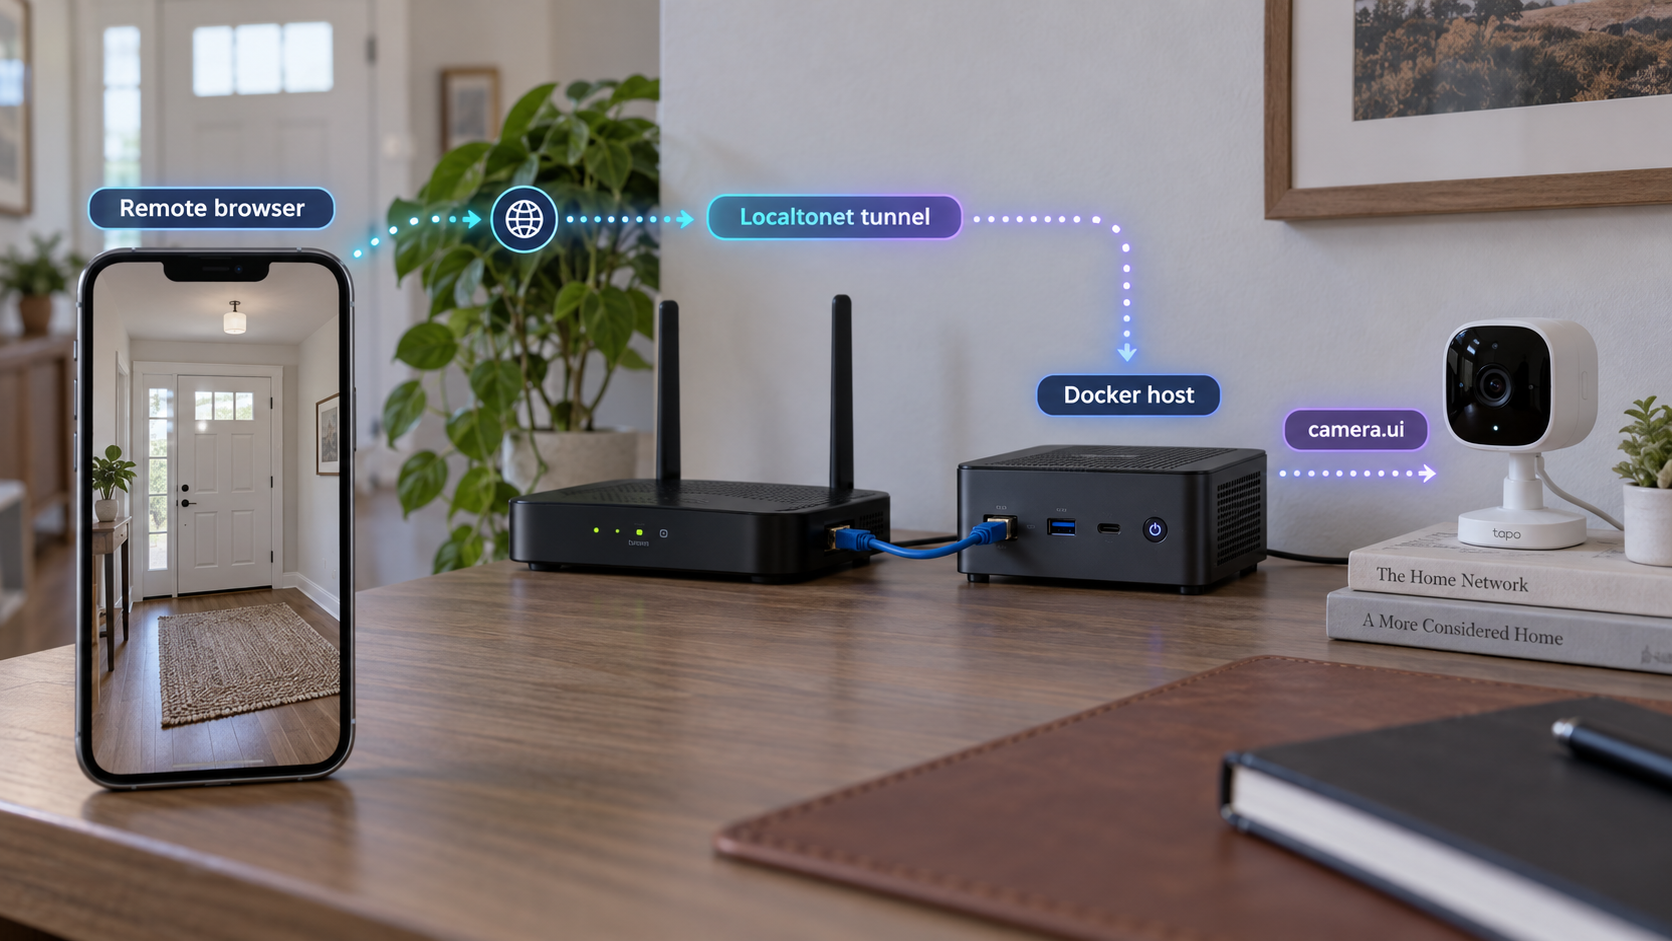
Build a local-first camera server, verify it on your LAN, and add remote access only when it is ready
camera.ui is a self-hosted platform for live camera viewing, recording, on-device AI features, search, smart-home integration, and notifications. This guide explains the Docker deployment workflow, the information you must obtain from the current camera.ui documentation, how to complete the guided first run, and how to verify the local web interface before exposing it. Once the local service works, we show how to publish its HTTP interface with Localtonet without configuring inbound router port forwarding, changing firewall rules, setting up a VPN, or requiring a public IP address. Exact camera.ui image names, Compose files, ports, volume paths, and environment variables are intentionally not guessed because those details are not established by the available project evidence and can change between releases.
📋 What's in this guide
What camera.ui provides
camera.ui describes itself as a self-hosted, local-first platform for security cameras. Its documented capabilities include live viewing, an extensible plugin ecosystem, and integration with smart-home workflows. The project also lists 24/7 recording, semantic search, and push notifications, although features marked with an asterisk in the project description require a camera.ui subscription. The core project is free and open source under the MIT license.
A local-first design is particularly relevant for video surveillance. The server runs on hardware you control, and camera.ui states that it does not require a mandatory cloud service for storing your footage. That does not automatically make every deployment secure. Camera credentials, recordings, user accounts, Docker volumes, host permissions, plugins, and any remotely reachable interface still need deliberate protection.
The camera.ui project directs users to its current documentation for supported installation paths, including Docker, Proxmox, bare-metal Linux, a desktop application, and mobile applications. This article focuses on Docker because containers provide a repeatable way to run the server while keeping its application dependencies separate from much of the host system.
Treat remote access as a separate second phase. A tunnel cannot repair an unhealthy container, an incorrect camera.ui configuration, an unavailable local port, or a service that is listening only where the Localtonet client cannot reach it. Complete installation and local verification first.
Prepare the Docker host
Before installing camera.ui, choose a host that can remain available whenever you expect cameras, recording, detection, or remote viewing to work. A surveillance server is usually a long-running workload, so evaluate storage capacity, storage reliability, network connectivity, cooling, and the processing requirements of the camera count and enabled features.
The available project evidence confirms that camera.ui has an official Docker installation path, but it does not establish a minimum Docker version, a supported Compose version, CPU or memory minimums, GPU requirements, exact host operating systems, or a storage-sizing formula. Check the current camera.ui documentation for those release-specific requirements before downloading or starting the deployment. Avoid relying on an old community Compose file when the official documentation provides a newer definition.
Host preparation checklist
- A machine that meets the current camera.ui Docker requirements.
- A functioning Docker installation using the installation method supported by the host operating system.
- Administrative access sufficient to create the documented directories, volumes, containers, and network configuration.
- Reliable network reachability from the server to the cameras and any local integrations it will use.
- Persistent storage with enough capacity for the retention policy and recording workload you intend to configure.
- A backup destination for configuration and other persistent data that cannot be recreated easily.
- A browser on the local network for completing the guided first-run process.
- A plan for authentication before making the interface remotely reachable.
Camera streams can generate substantial continuous storage and network activity. The exact requirement depends on camera count, resolution, frame rate, codec, bitrate, recording mode, and retention. Because the supplied project information does not define a sizing formula, calculate capacity from the actual streams and confirm it against the current camera.ui recommendations. Do not assume that free disk space on a general-purpose system will remain adequate.
| Preparation area | What to confirm | Why it matters |
|---|---|---|
| Docker runtime | Use a Docker and Compose setup accepted by the current camera.ui instructions. | An unsupported runtime or outdated deployment file can cause startup and upgrade failures. |
| Persistent storage | Identify every host path or named volume required by the official deployment. | Recreating a container must not silently remove configuration or recordings intended to persist. |
| Local networking | Confirm that the host can reach each camera and that the browser can reach the future web interface. | Container health alone does not prove that camera streams or the user interface are reachable. |
| Authentication | Prepare a strong, unique master password and decide how authorized users will access the system. | A surveillance interface can expose live video, recordings, metadata, and administrative controls. |
| Backups | Decide how configuration and persistent application data will be copied and restored. | Container images are replaceable, but local state may not be. |
The verified project overview does not provide the current camera.ui image reference, Compose YAML, published container port, volume paths, environment variables, or hardware-device mappings. Those values are operational configuration, not harmless examples. Copy them from the current official Docker installation page and keep their documented names and structure intact.
Install camera.ui with Docker
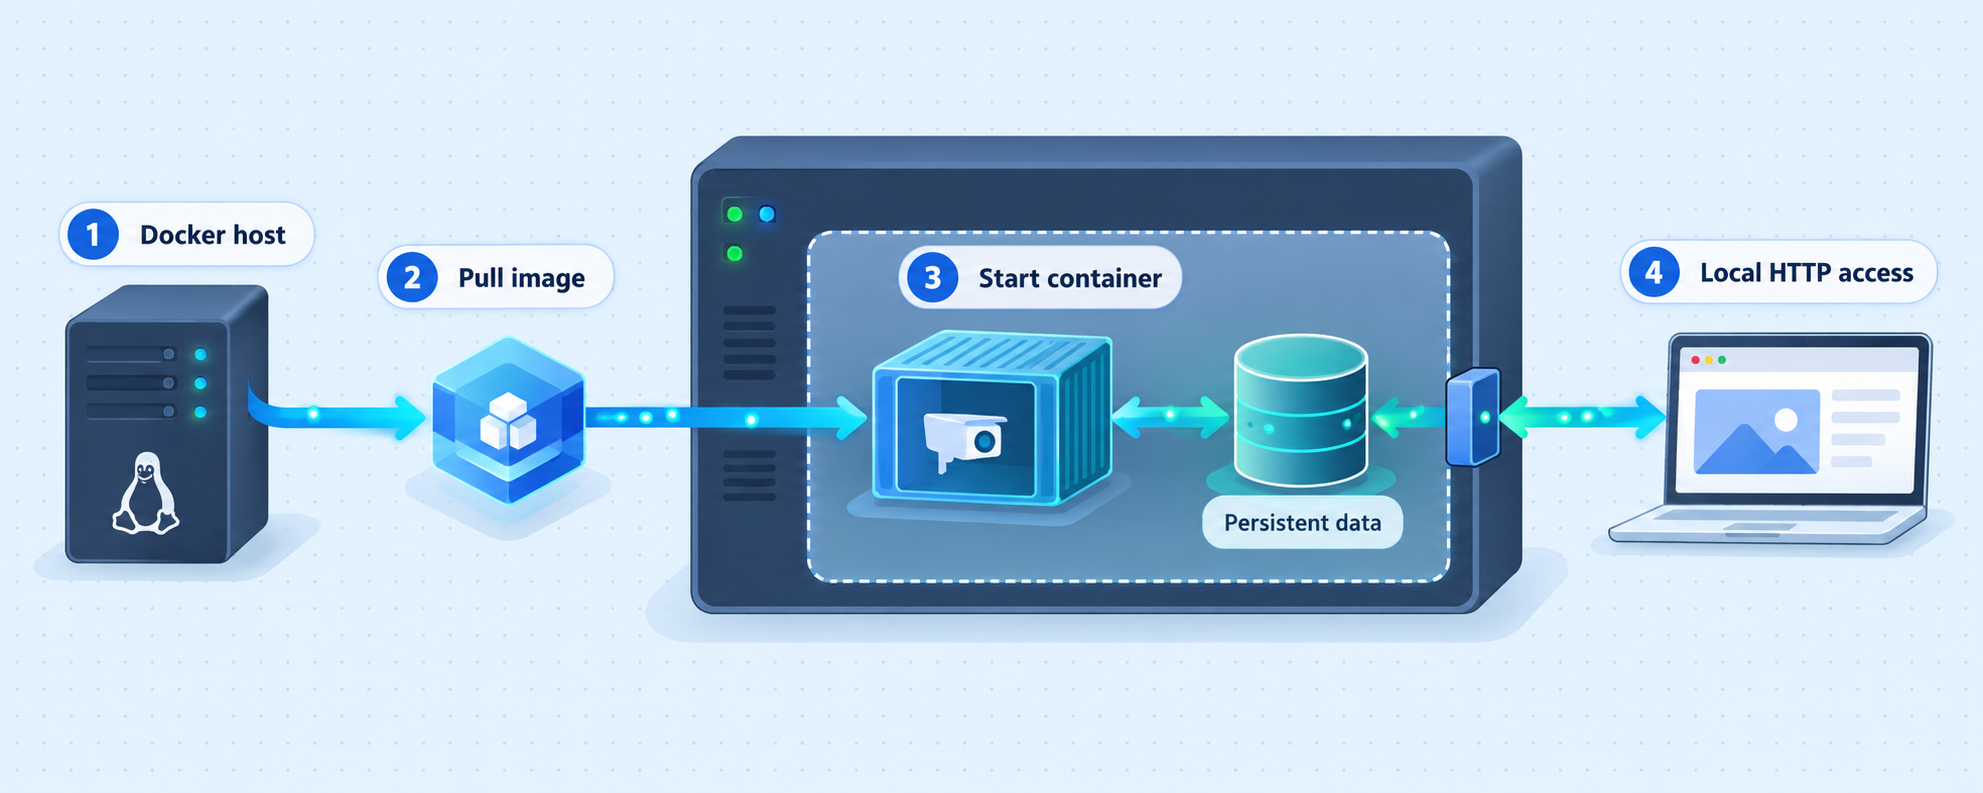
The safe installation method is to use the deployment definition currently published by camera.ui. Container image names, tags, ports, mounts, and environment variables can change as a project evolves. Substituting guessed values may produce a container that starts but loses data, cannot reach cameras, or exposes unintended interfaces.
The following workflow is therefore intentionally procedural rather than a fabricated copy-and-paste Compose file. It tells you what to validate at each stage while leaving release-specific values to the official camera.ui Docker instructions.
Open the current camera.ui Docker installation instructions
Use the Docker path in the official camera.ui documentation. Confirm that the page applies to the server release you intend to deploy. Note any host requirements, architecture restrictions, optional acceleration components, and migration notices before creating files.
Create the documented deployment and persistent storage
Reproduce the official Compose file or documented Docker configuration exactly. Create only the directories and volumes it specifies, apply the required ownership and permissions, and do not rename mounts unless the documentation explicitly allows it.
Review values before starting the container
Check the selected image tag, port publication, persistent mounts, restart behavior, network settings, environment values, and any device access needed for the enabled workload. Keep secrets out of shell history and source control. If a documented value is optional, enable it only when its purpose is understood.
Start camera.ui using the documented Docker method
Run the start command given by the official installation page from the correct deployment directory. Do not replace it with an assumed command if the project supplies a wrapper, multiple services, or a release-specific initialization process.
Inspect container state and startup logs
Confirm that the expected container or containers remain running. Read the initial logs for configuration errors, permission failures, missing mounts, unsupported hardware, database initialization problems, or port conflicts before opening the web interface.
Record the actual local endpoint
Identify the host address, published web port, and scheme shown by the official configuration and running deployment. Keep this exact endpoint for local testing and the later Localtonet HTTP tunnel. The available evidence does not establish a universal camera.ui port or whether a particular release serves local HTTP, local HTTPS, or both.
Useful Docker inspection commands
Docker can show whether containers are running and provide logs without requiring us to guess camera.ui-specific names. Run the command that matches the deployment method documented for your installation.
docker psIf the official installation uses Docker Compose, run these commands from the directory containing its Compose file:
docker compose ps
docker compose logs
For a single known container, replace the placeholder with the actual container name shown by Docker:
docker logs <container-name>These commands do not install or configure camera.ui. They only inspect the Docker state. A container shown as running is encouraging, but it does not prove that the web application, camera connectivity, recording pipeline, plugins, or persistent storage are functioning correctly.
Complete the camera.ui guided first run
camera.ui documents a guided first-run process. Open the local endpoint obtained from the deployed configuration in a browser on the same trusted network. Complete the prompts presented by the installed release rather than following field names from an older screenshot or unofficial tutorial.
Create a strong, unique master password and store it in a password manager. The camera.ui 2.3.0 release information also refers to two-factor authentication, so enable it when offered by the installed version and appropriate for your access model. Do not reuse a camera password, Wi-Fi password, Docker registry credential, or Localtonet token.
Add cameras and plugins according to the first-run interface and current documentation. Camera-specific connection methods, stream URLs, authentication formats, and discovery behavior are not established in the available evidence, so this guide does not invent them. Use credentials dedicated to the required camera access when the camera platform supports separate users and permissions.
After onboarding, confirm that any feature you intend to depend on is available in your selected camera.ui configuration. The project's overview marks 24/7 recording, semantic search, and push notifications as subscription features. Core camera.ui remains free and open source, but that does not imply every plugin-backed or starred capability is included without a subscription.
Do not place real camera passwords, master passwords, recovery information, private stream addresses, or Localtonet device tokens in Compose files committed to a public repository. Restrict access to deployment files and backups, and use the secret-handling method recommended by the current project documentation.
Verify camera.ui on the local network
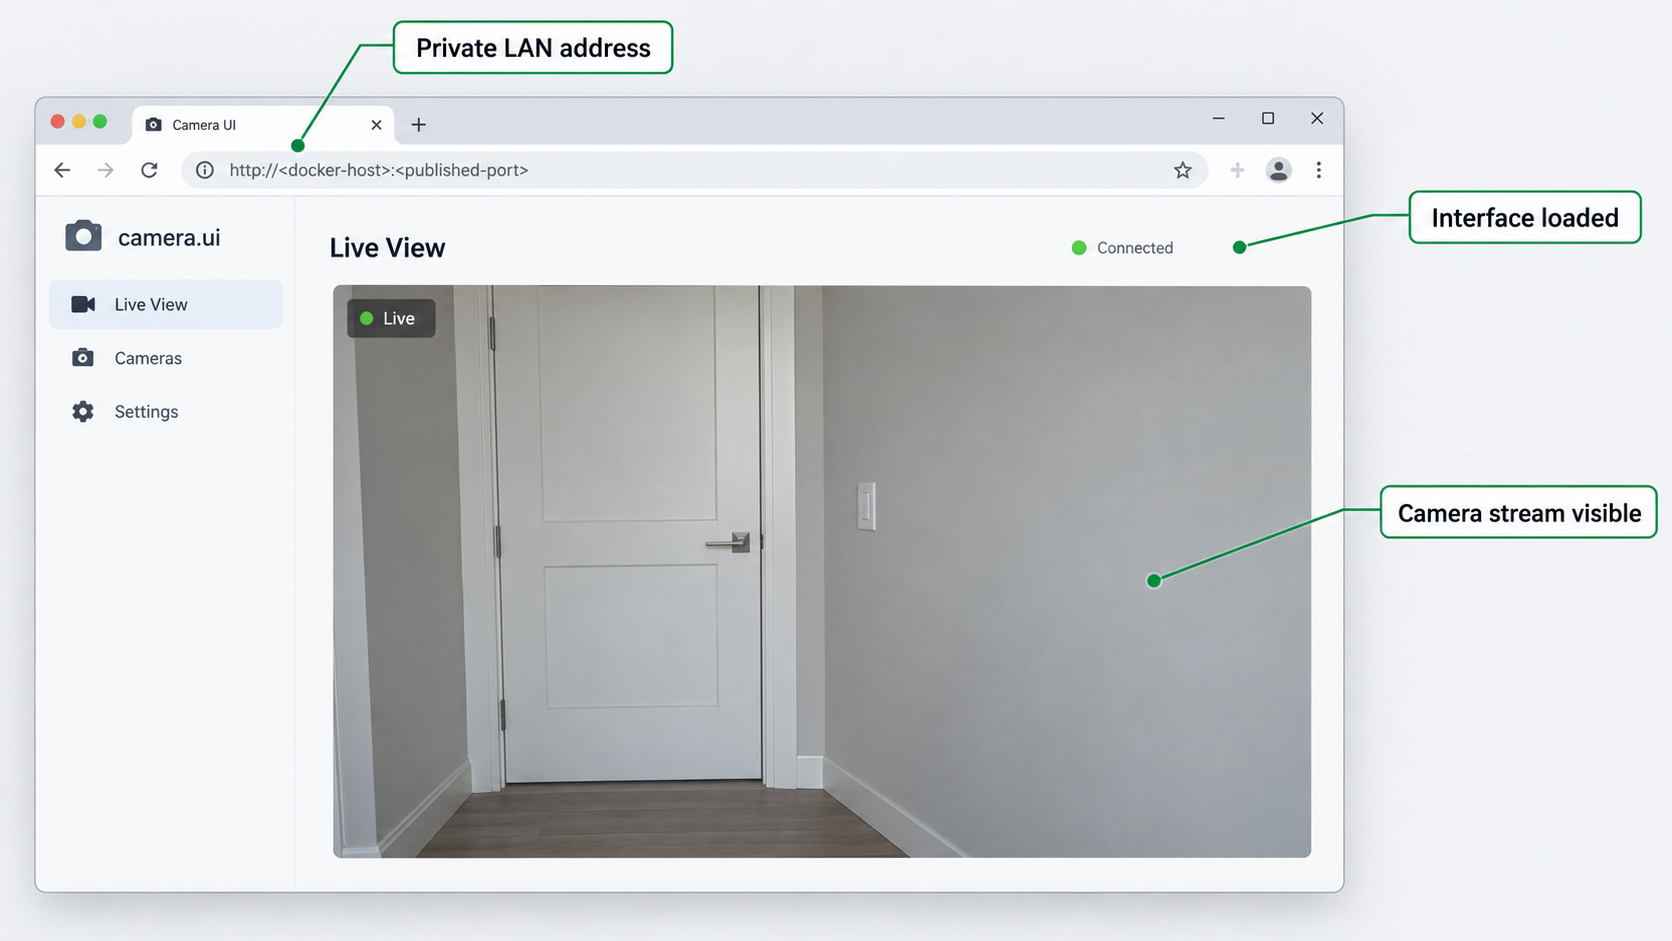
Verification should test the application from a user's perspective, not only from Docker's perspective. Start with a browser on the Docker host or the same LAN. Enter the exact scheme, host address, and published port from your deployment. If the interface loads, sign in and test the functions you intend to use remotely.
Local verification checklist
- The browser reaches the expected camera.ui page without being redirected to an unrelated service.
- The login process accepts the account created during first run.
- The main interface remains connected instead of reporting that it cannot reach the home server.
- Configured live views load and remain stable for a meaningful test period.
- Any enabled recording feature writes data to the intended persistent location.
- Recordings or events can be opened after the container is restarted.
- Enabled plugins report a healthy state and perform their intended function.
- The host retains adequate free storage during the test.
- The interface works from another authorized device on the LAN, if LAN access is part of the design.
Restart testing is especially important for containers. A successful first launch can hide an incorrect temporary path. Restart the deployment using the method documented by camera.ui, then confirm that accounts, settings, cameras, and intended persistent data remain available. If state disappears, stop and correct the volume configuration before relying on the installation.
Also confirm which local address Localtonet will target. If the Localtonet client runs directly on the Docker host, it will generally need a host-reachable published endpoint. If it runs on another machine, that machine must be able to reach the camera.ui host and port over the local network. We do not recommend creating the public tunnel until this exact path works locally.
This article does not publish a default camera.ui port because the supplied project evidence does not establish one. Read the port mapping in the official Docker configuration or inspect the running deployment. Use the host-side published port, not an assumed internal container port.
Expose the verified camera.ui interface with Localtonet
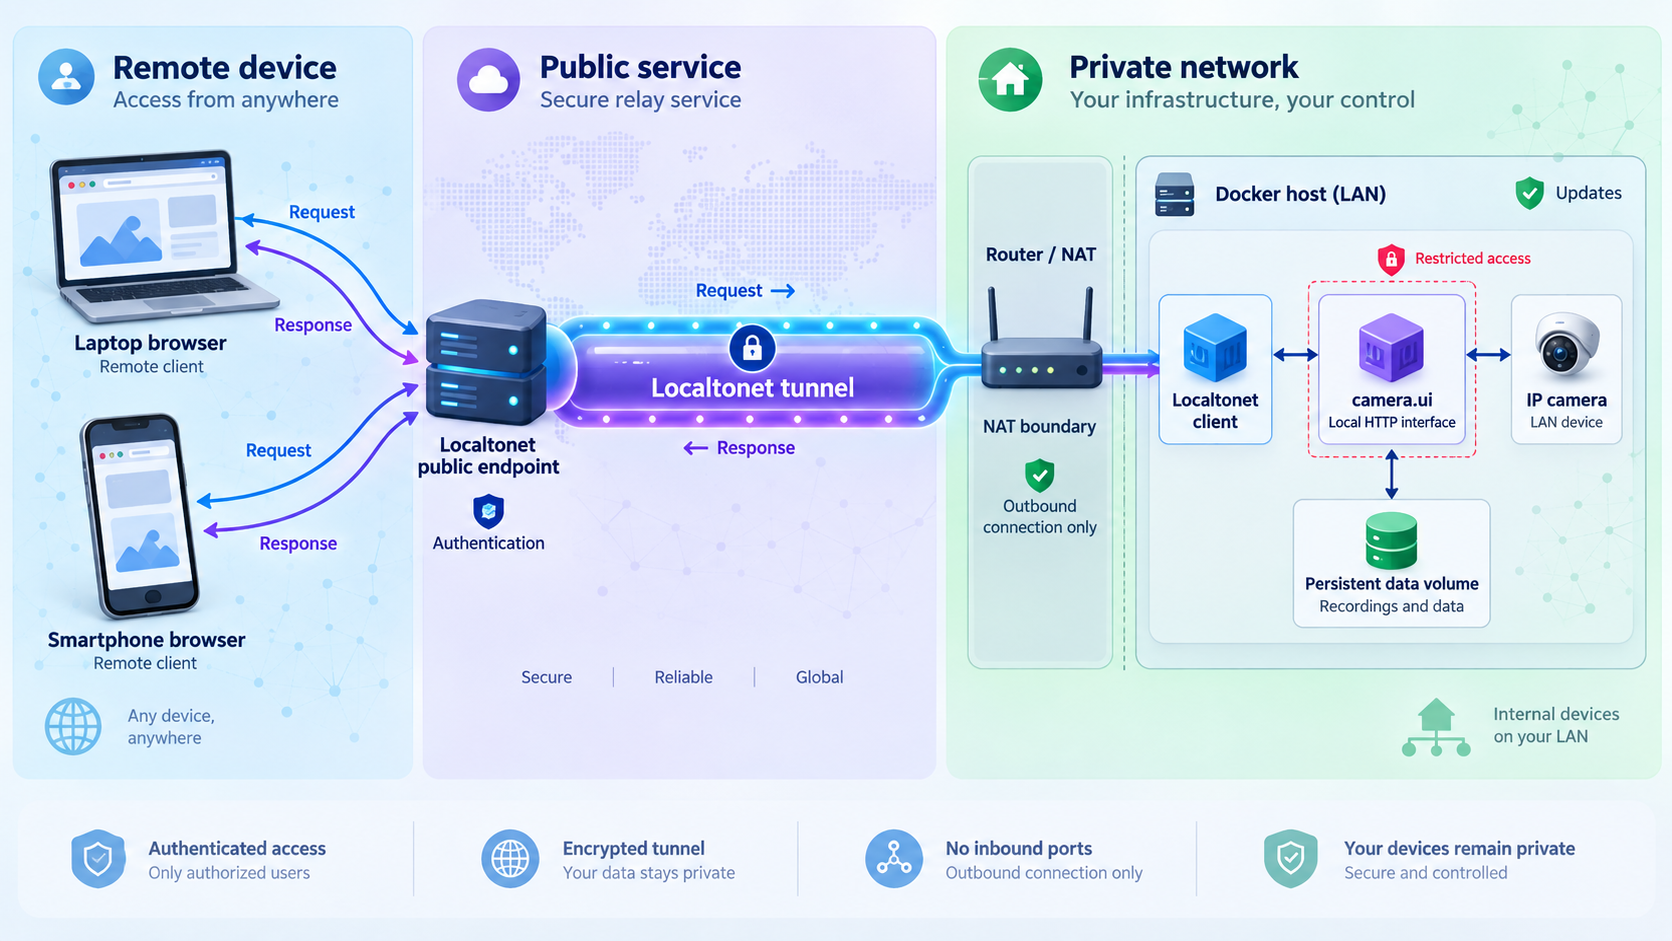
Once camera.ui works locally, an HTTP tunnel is the appropriate Localtonet tunnel family for its browser-based web interface. The Localtonet client establishes an outbound connection to one of our relay servers. This provides a public URL without inbound router port forwarding, firewall changes, VPN setup, or a public IP address.
The tunnel must point to the exact local IP address and port you verified in the previous section. Creating a tunnel does not automatically start it. The selected Localtonet device must remain connected, and the tunnel must be running for the public address to work.
Install and run the Localtonet client
Install our client on the Docker host or another trusted device that can reach the verified camera.ui endpoint. Keep the client running whenever remote access is required.
Authenticate and select the client device
Use the device-specific authentication token associated with the client that will run the tunnel. Never paste that token into an article, screenshot, public repository, or shared support message.
Select an available relay server
Choose from the server or region values currently available in the Localtonet dashboard. Availability can vary, so do not rely on a hardcoded server code copied from another deployment.
Create an HTTP tunnel to camera.ui
Select the HTTP tunnel family and enter the local IP address and host-side port that successfully opened camera.ui during local verification. For the Process Type, use a Random Sub Domain, Custom Sub Domain, or Custom Domain option available to your account and current configuration. All three process types serve the target content at a public HTTPS address.
Start the tunnel
Press Start after reviewing the target. A newly created tunnel is not running until it is started. Keep both camera.ui and the selected Localtonet client online.
Test the assigned public URL
Open the assigned URL from a different network, sign in through the camera.ui interface, and test the required views. When remote access is no longer needed, stop the tunnel. Delete it if the configuration should not be reused.
For current dashboard details, consult our Localtonet HTTP tunnel documentation. If you plan to use a custom domain, verify the current DNS requirements in our documentation before changing records. DNS values and availability should not be inferred from an unrelated tunnel or old tutorial.
Anyone who obtains the public address can attempt to reach the exposed login interface. Use strong camera.ui authentication, enable two-factor authentication when supported by the installed release, keep camera.ui current, and expose only the required web endpoint. Stop the tunnel when remote access is not needed.
Secure the camera.ui deployment
Remote access should preserve the local-first principle rather than turning the entire server into an unnecessarily broad public target. The Localtonet HTTP tunnel should point only to the camera.ui web endpoint. Do not expose Docker management sockets, host administration panels, camera configuration interfaces, databases, debugging ports, or unrelated services.
Use layered authentication
The public HTTPS address provided by an HTTP tunnel protects the browser connection at the tunnel edge, but the camera.ui application must still enforce its own account controls. Use a unique master password. Enable two-factor authentication where the installed release offers it. Remove accounts that are no longer needed, and avoid shared administrator credentials when the application provides a more appropriate account model.
Protect the Localtonet device token
A Localtonet device authentication token identifies the client device. Treat it as a credential. Do not store it in public source control, include it in screenshots, or place it in a publicly accessible environment file. If a token may have been exposed, replace it through the appropriate account workflow rather than continuing to use it.
Reduce host and container privileges
Use only the mounts, devices, network access, and host permissions required by the official camera.ui configuration. Avoid adding privileged mode, mounting the Docker socket, or exposing extra host directories unless current camera.ui documentation explicitly requires the setting and you understand the consequence.
Back up before updating
Back up the documented persistent configuration before changing image versions, plugins, AI backends, or storage layouts. A container image can normally be downloaded again, but account settings, camera configuration, event metadata, and local recordings may be unique to the installation.
Keep the exposure intentional
A Localtonet tunnel exists only while the selected client is connected and the tunnel is running. Use that lifecycle as an operational control. Stop temporary tunnels after use, periodically review active tunnels in the dashboard, and delete stale configurations that no longer have a legitimate purpose.
Routine operation, backups, and updates
A stable surveillance installation requires more than keeping a container in a running state. Monitor disk capacity, camera connectivity, plugin status, and application logs. Test sign-in and playback periodically from both the LAN and, if enabled, the Localtonet public URL.
Monitor storage consumption
Recording workloads can fill a disk while the application otherwise appears healthy. Establish a retention policy that fits available capacity and inspect free space regularly. Keep application data and recording data on storage appropriate to their workloads when the documented camera.ui configuration permits that separation.
Test backups with a restore plan
A backup is useful only if its contents and restoration procedure are understood. Identify the persistent camera.ui paths from the official deployment documentation, back them up consistently, and test restoration in an isolated environment where possible. Avoid assuming that copying the Compose file alone preserves application state.
Review release notes before updating
camera.ui releases can coordinate changes across the main server, NVR plugin, and AI backend. For example, the camera.ui 2.3.0 release instructed users to update the NVR plugin and AI backend together with camera.ui for specific search, tracking, re-identification, and segmentation behavior. This demonstrates why updating only one component without reading the matching release notes can produce incomplete or confusing results.
Before an update, record the current working version, back up persistent data, check plugin compatibility, and note any required browser action. The 2.3.0 release also documented a case where users behind a login proxy might need to clear browser site data after updating if the interface remained stuck on a message that it could not reach the home server.
Revalidate the tunnel after changes
If an update changes the local listening address, host-side port, container network, or proxy behavior, the existing Localtonet target may no longer be correct. Test camera.ui locally first, update the tunnel target only if required, start the tunnel, and then test from an external network.
Troubleshoot installation and remote-access problems
The container exits or restarts repeatedly
Inspect the Docker logs first. Common categories include malformed deployment files, inaccessible persistent paths, permission errors, missing required values, conflicting host ports, unsupported device mappings, or dependent services that did not initialize. Correct the first meaningful error rather than repeatedly restarting the stack.
The container runs but the browser cannot connect
Confirm the actual published host port and the address on which it is listening. Make sure the URL uses the correct scheme. Test from the Docker host, then from another LAN device. If access works only inside the container or only on a loopback address, review the official port-publication instructions rather than exposing arbitrary additional ports.
The interface loads but cameras do not
A working web interface does not prove that the server can reach camera streams. Confirm that the Docker host can reach the camera network, that the configured credentials are valid, and that no network segmentation rule blocks the required traffic. Use camera-specific values from the camera manufacturer and camera.ui documentation because stream paths and authentication behavior vary.
Settings disappear after recreation
This usually indicates that data expected to persist was written outside the intended persistent mount or that the wrong host path or volume was attached. Stop making changes, compare the running container mounts with the official camera.ui configuration, and restore from backup if necessary.
The Localtonet URL does not open
Verify the dependency chain in order: camera.ui is running, the exact target opens locally from the Localtonet client device, the client is connected with the correct device token, the configured relay server is available, and the tunnel has been started. Remember that creating a tunnel is not the same as starting it.
The public page opens but camera.ui reports it cannot reach the home server
First confirm that the same workflow succeeds locally. If the problem appeared after an update and the deployment uses an additional login proxy, note that the camera.ui 2.3.0 release documented stale browser site data as a cause in certain proxy configurations. Clear site data for the camera.ui address and sign in again. Do not assume this version-specific remedy applies to every connectivity failure.
The master password is forgotten
Follow the recovery instructions for the exact installed release. The camera.ui 2.3.0 release documented a recovery method involving an empty file named reset-password in the camera.ui volume folder followed by a restart. That process resets the master sign-in to the password admin and disables two-factor authentication so a new password can be set. The correct volume folder depends on the installation method, so use the current camera.ui documentation to locate it. Perform recovery only with authorized host access, change the temporary password immediately, and re-enable two-factor authentication.
If using a documented reset procedure, stop the Localtonet tunnel first so the recovery state is not exposed publicly. Complete the reset locally, set a new unique password, restore two-factor authentication, remove any reset marker required by the documented workflow, verify local sign-in, and only then restart remote access.
Frequently asked questions
What is the default camera.ui Docker port?
The supplied project evidence does not establish a universal default port, so this guide does not guess one. Read the host-side port mapping from the current official Docker configuration or inspect the running deployment. Use the exact host port that works during local browser testing.
Does camera.ui require cloud storage?
camera.ui describes itself as local-first, runs on hardware you own, and states that there is no mandatory cloud requirement for keeping footage. You remain responsible for local storage, backups, retention, access control, and the security of the host.
Is every camera.ui feature free?
The core camera.ui project is free and open source under the MIT license. The project marks some features, including 24/7 recording, semantic search, and push notifications, as requiring a camera.ui subscription. Check the current project documentation for the exact feature boundaries applicable to your release.
Which Localtonet tunnel type should I use for camera.ui?
Use an HTTP tunnel for the browser-based camera.ui web interface. Point it to the locally verified IP address and host-side port. Do not use a raw port tunnel merely because camera.ui runs in Docker, and do not describe standard tunneling as a VPN.
Do I need router port forwarding for remote camera.ui access?
No. The Localtonet client creates an outbound connection to our relay infrastructure, so the workflow does not require inbound router port forwarding, firewall changes, VPN setup, or a public IP address. The client device must remain connected and the tunnel must be running.
Can the Localtonet client run on a different machine from Docker?
Yes, provided the selected Localtonet client device can reach the camera.ui host and port over the local network. Test the exact endpoint from that device before creating the tunnel. Running the client on the Docker host is not mandatory, but it can simplify the network path.
Will the camera.ui public URL keep working if the Localtonet client stops?
No. The tunnel is available only while the selected Localtonet client or device is connected and the tunnel is running. camera.ui must also remain available at the configured local target.
Should I expose camera.ui before configuring cameras and authentication?
No. Finish the guided first run, set strong authentication, verify cameras and persistent storage, test a restart, and confirm the local endpoint first. Remote access should be the final integration step, not part of initial application debugging.
Access your verified camera.ui server with Localtonet
After camera.ui is installed, secured, and working locally, create an HTTP tunnel to its verified host address and port. Our outbound connection gives you a public HTTPS address without opening an inbound router port.
Get Started Free →

