

Install AgentDeck locally, verify its daemon, and choose a remote-access design without assuming unsupported public connectivity
AgentDeck provides local dashboards and companion surfaces for monitoring AI coding-agent sessions. This guide covers the verified Node.js CLI installation path, local dashboard testing, daemon listener inspection, and the network checks needed before attempting remote access. It also explains why a Localtonet TCP tunnel can prove public TCP reachability but cannot, by itself, prove that AgentDeck can address the assigned public port or safely accept internet traffic. For routine remote use, we recommend evaluating Localtonet VPN Manager as the private-network design and treating direct TCP exposure as a limited compatibility test until AgentDeck documents the required port, authentication, and transport-security behavior.
📋 What's in this guide
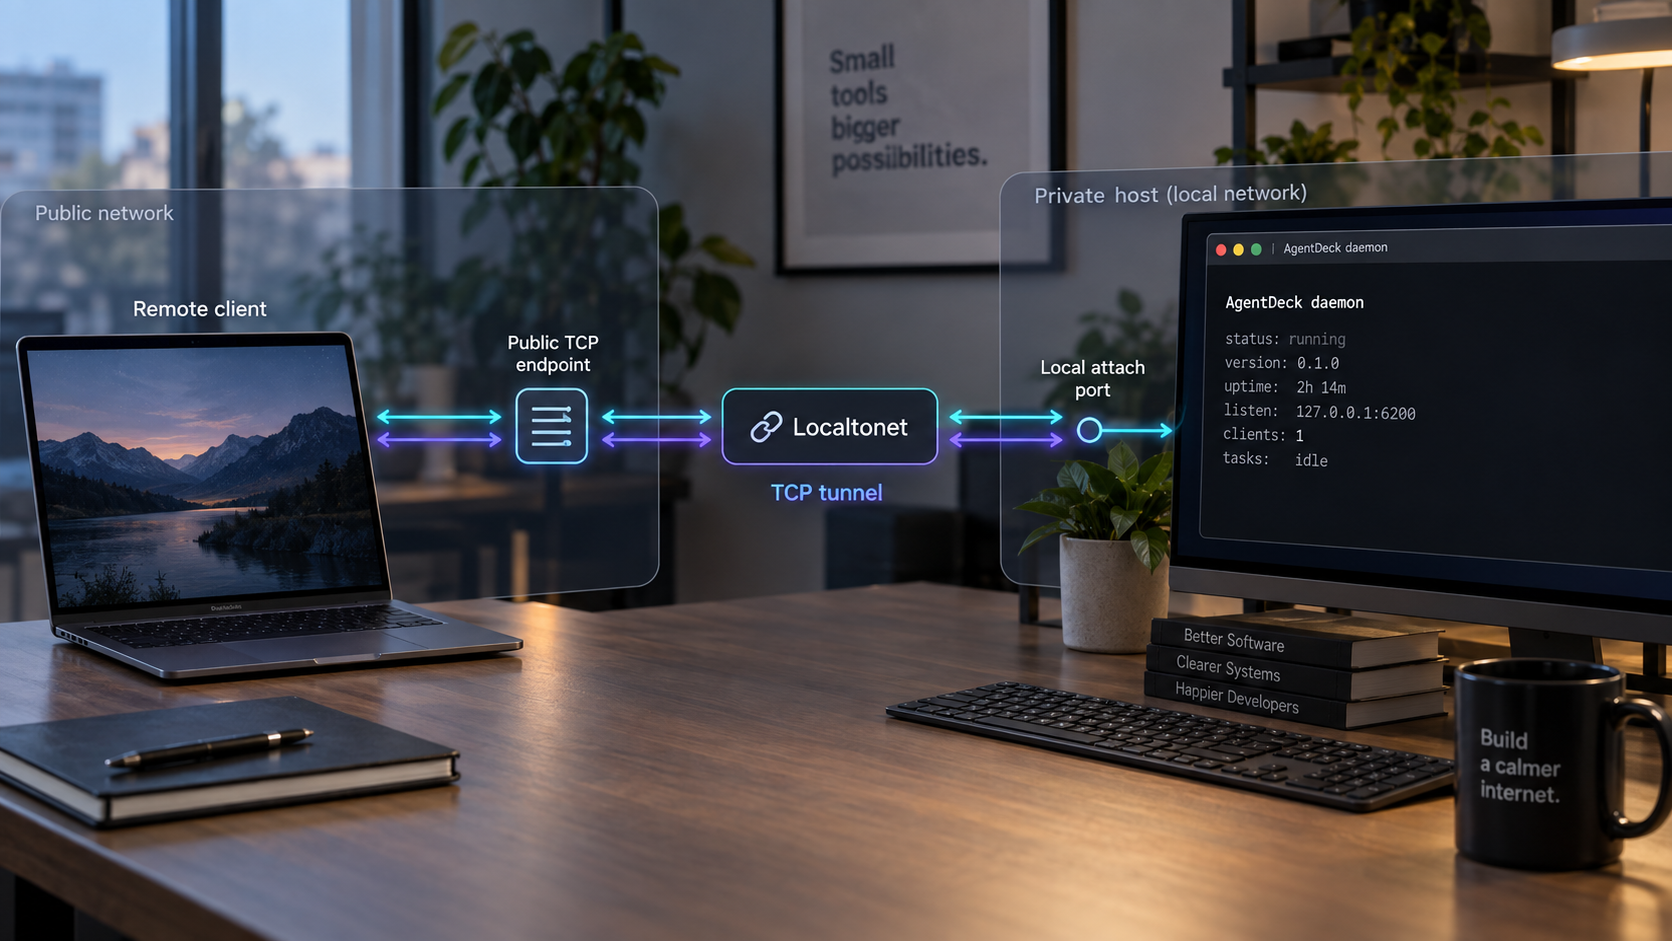
What this tutorial establishes, and what it does not
AgentDeck is an open-source local dashboard system for AI coding agents. Its current project documentation describes one local daemon connecting agent sessions to terminal, native application, mobile, Stream Deck, e-ink, ESP32, and other display surfaces. Depending on the integration and surface, AgentDeck can show sessions, current activity, timelines, usage data, permission requests, and supported controls.
You can review the current project, its installation instructions, and its implementation in the AgentDeck GitHub repository. Because AgentDeck is actively developed, verify its current README, security documentation, and release notes before relying on behavior that may have changed.
This tutorial establishes a verified local workflow:
- Install the documented AgentDeck CLI packages.
- Install and start the local daemon.
- Run a supported coding agent normally.
- Open the AgentDeck terminal dashboard.
- Confirm that the expected local daemon port is listening.
- Test whether a Localtonet client can reach that listener.
The tutorial does not claim that a direct public TCP tunnel creates a complete AgentDeck remote-attach workflow. Localtonet TCP tunnels expose an assigned public host and port. The current primary AgentDeck material supplied for this review does not establish a supported custom-port option for a remote AgentDeck client. It also does not document daemon authentication, authorization, or transport encryption suitable for unrestricted public exposure.
That distinction is essential. A successful connection made with a generic TCP testing tool proves that a socket is reachable. It does not prove that an AgentDeck client can address the same endpoint, complete its application protocol, authenticate the remote user, or protect session data in transit.
Direct public use remains unsupported by this tutorial unless current AgentDeck documentation explicitly confirms custom public-port addressing and an acceptable remote security model. If either requirement is unclear, stop the TCP tunnel and use a private-network design instead.
Prerequisites for the verified AgentDeck CLI path
AgentDeck documents two broad starting points. Apple users can use native applications, while terminal, Windows, Linux, and external-integration users can use the Node.js CLI path. This guide uses the CLI daemon because it provides a listener that can be inspected directly and because its installation commands are published in the project README.
The current AgentDeck repository states that the CLI path requires Node.js 22, 24, or 26 and supports macOS 15 or newer, Windows 11, and Linux. The Mac App Store application includes its own daemon and does not require Node.js. The repository separately states that its current iPhone and iPad companion path requires iOS or iPadOS 17 or newer and pairs with an AgentDeck daemon on the network.
| Requirement | Verified information | Check before continuing |
|---|---|---|
| Node.js | Major version 22, 24, or 26 for the CLI path | Run node --version and confirm the installed major version. |
| Operating system | macOS 15+, Windows 11, or Linux for the terminal and external-integration path | Use a currently supported operating-system release and user environment. |
| Agent integration | A supported coding agent is required to generate useful session activity | Install and configure the coding agent before diagnosing AgentDeck observation. |
| Localtonet client | Runs on the AgentDeck host or another device that can reach it | Prefer the same host unless AgentDeck is confirmed to support an appropriate LAN bind. |
| Remote-access decision | Private mesh or limited TCP evaluation | Do not select direct public exposure without verified AgentDeck port and security support. |
Confirm the Node.js version
Open a terminal or PowerShell window and run:
node --versionThe reported major version should be 22, 24, or 26. If Node.js is missing or another major version is installed, use the installation method appropriate for your operating system. This guide does not prescribe a particular Node.js package manager because package availability and supported installation methods differ by platform.
Choose one daemon authority
Do not install multiple AgentDeck daemon paths merely to follow this tutorial. If you use the native macOS application, remember that it includes its own daemon. If you use the CLI path below, the CLI manages its daemon. Switching rapidly between the native application and CLI can affect port ownership on macOS, as documented in the AgentDeck npm v1.4.2 release notes.
Prepare Localtonet without exposing the service
Install and run our client on the AgentDeck host when possible. A same-host client can target a loopback listener without changing AgentDeck to listen across the LAN. Do not create or start a public tunnel yet. First complete the installation, dashboard, process, and listener checks.
If the Localtonet client must run on another device, that device needs network access to an address on which AgentDeck actually listens. A service bound only to 127.0.0.1 is available only to software on the same computer. The supplied AgentDeck documentation does not establish a generally supported daemon bind-address configuration, so this article does not provide one.
Install AgentDeck and start local observation
AgentDeck’s current repository provides a concise CLI setup path. Run these commands as the normal operating-system user who runs your coding agents. This helps keep hooks, configuration, and session files aligned with the correct user environment.
Run the AgentDeck setup package
Use the one-command installer published by AgentDeck. Review package output before approving any prompts, especially on a shared or managed workstation.
npx @agentdeck/setupInstall the AgentDeck daemon
Install the daemon and refresh the supported observation hooks using the documented CLI command.
agentdeck daemon installStart one supported agent normally
AgentDeck’s current README shows Claude Code, Codex, OpenCode, and Kiro CLI in the terminal setup path. Start only an agent that is already installed and configured on your system.
claude
# or:
codex
# or:
opencode
# or:
kiro-cliOpen a second terminal
Leave the coding-agent session running. Open a second terminal under the same operating-system user so that the dashboard can observe the local session without interrupting it.
Launch the terminal dashboard
Start the documented terminal dashboard and confirm that it opens successfully.
agentdeck dashboardGenerate a small, non-sensitive task in the supported coding agent. Confirm that the session appears in the dashboard and updates when activity changes. The exact data available depends on the agent, provider, and integration. AgentDeck’s current project page states that controls are available only when a session exposes a supported control path. Other surfaces may display status without offering control.
This local behavior is the first meaningful success criterion. If the dashboard opens but does not show the active session, resolve the AgentDeck installation or integration problem before adding Localtonet. A network tunnel cannot create missing lifecycle events, repair an unsupported hook, or grant file access that the local integration does not have.
Verify the AgentDeck daemon locally
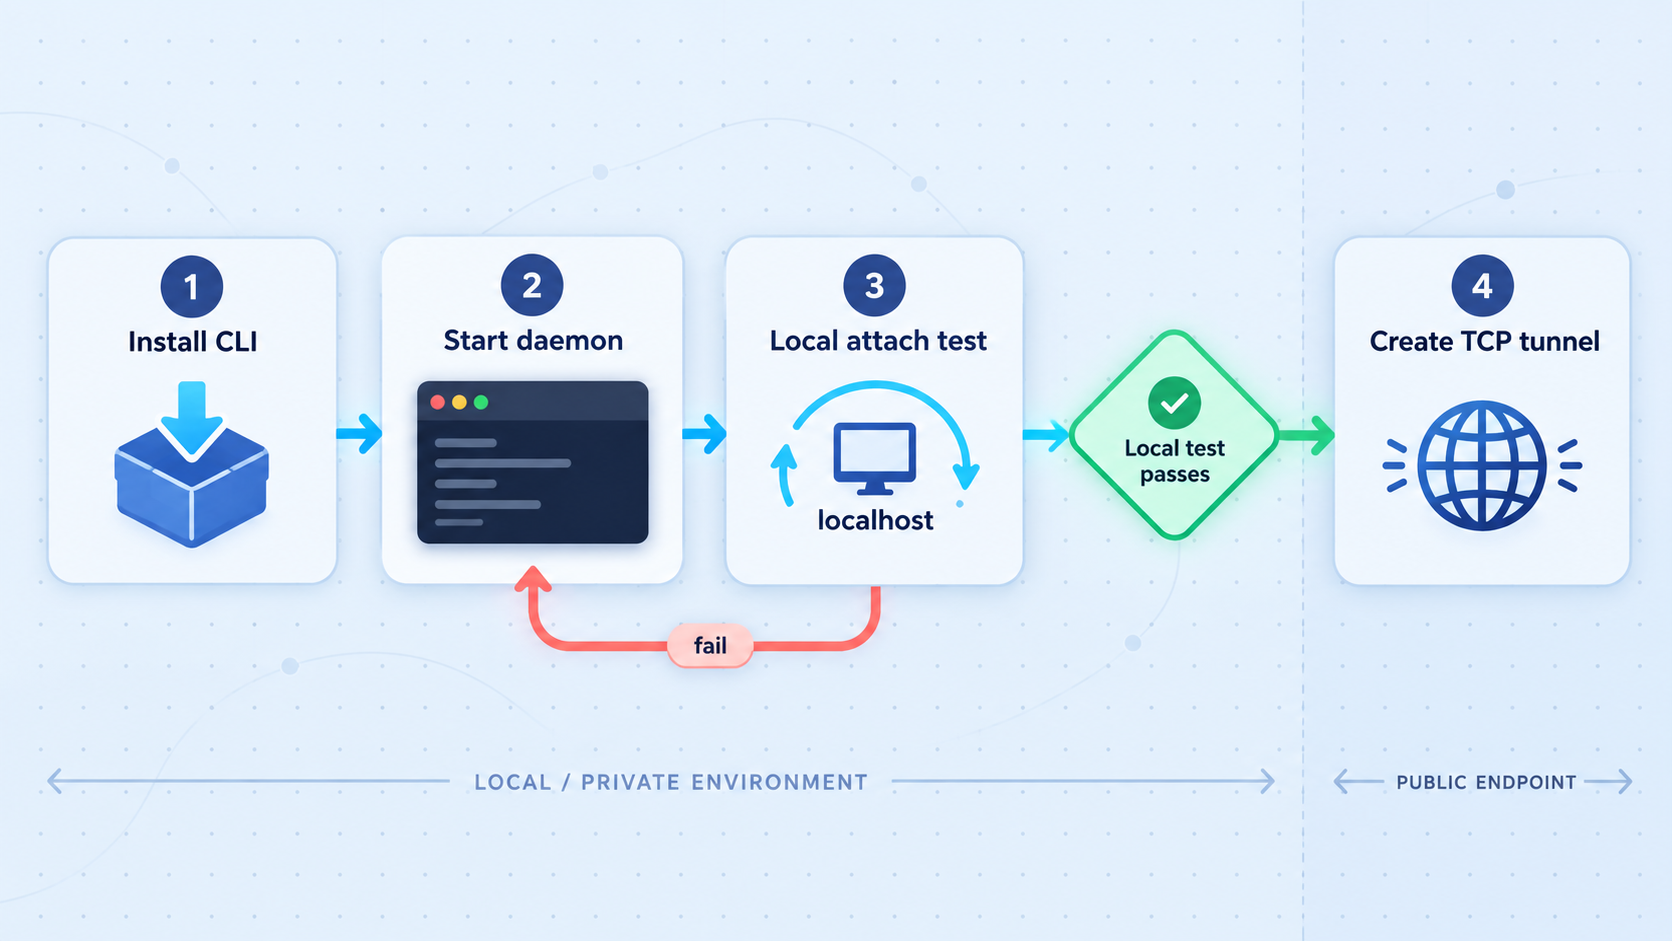
A local dashboard check and an operating-system listener check answer different questions. The dashboard confirms that AgentDeck is receiving usable session information. The listener check confirms which local address and TCP port the daemon currently owns. Complete both.
Inspect the listener on Linux
On Linux systems with the ss utility, inspect the normal AgentDeck daemon port and the documented macOS fallback port:
ss -ltnp | grep -E ':(9120|9121)\b'
The process details available from ss can depend on your permissions. Do not run unrelated commands as root merely to continue. If the process name is hidden, combine the listener result with AgentDeck’s own status and dashboard behavior.
Inspect the listener on macOS
lsof -nP -iTCP:9120 -sTCP:LISTEN
lsof -nP -iTCP:9121 -sTCP:LISTEN
The AgentDeck npm v1.4.2 release notes document a macOS handoff limitation. If the CLI starts immediately after the native application quits and port 9120 remains unavailable after an existing 20-second wait, the CLI can select port 9121. Once port 9120 is released, restarting the daemon targets 9120 again.
The relevant behavior is documented in the AgentDeck npm v1.4.2 release notes. Check newer releases as well, because a later version may change or resolve this behavior.
Inspect the listener on Windows
Get-NetTCPConnection -State Listen |
  Where-Object { $_.LocalPort -in 9120, 9121 } |
  Select-Object LocalAddress, LocalPort, OwningProcess
To identify the process associated with a returned process ID, use the standard PowerShell process query:
Get-Process -Id PROCESS_ID
Replace PROCESS_ID with the value from the listener result. Confirm that the process belongs to the AgentDeck installation you intend to use.
Interpret the local address
Record the listener’s local address as well as its port:
127.0.0.1means the service is reachable only from the same computer.::1is the IPv6 loopback equivalent.- A LAN address means the service is listening on that network interface.
- A wildcard address can make the service reachable through multiple interfaces, subject to operating-system firewall and network policy.
The listener output describes network reachability. It does not establish authentication, authorization, encryption, or the safety of accepting remote connections.
If you encounter the documented temporary port 9121 handoff, wait until port 9120 is free and restart the CLI daemon. Then repeat the listener check rather than assuming that the restart succeeded.
agentdeck daemon restartIf neither port is listening, revisit the setup output and the current AgentDeck documentation. Do not create a tunnel that points at a port merely because it is the documented default.
Choose the remote-access design
There are two materially different Localtonet designs to consider. VPN Manager provides a private mesh network. A TCP tunnel provides a public host and port that forwards to one local TCP target. They solve different networking problems and should not be described interchangeably.
| Design | Network behavior | AgentDeck status | Recommended use |
|---|---|---|---|
| Localtonet VPN Manager | Connects participating devices through a private mesh and supports granular firewall rules | Still requires AgentDeck to listen on an address reachable through the private network | Preferred design for controlled remote access when both devices can join the mesh |
| Localtonet TCP tunnel | Maps an assigned public host and port to a selected local IP address and port | Current supplied evidence does not confirm custom public-port addressing or public-exposure security | Limited reachability evaluation only |
| Same local network | Client and daemon communicate through an existing trusted LAN | Requires a supported non-loopback listener and compatible AgentDeck client behavior | Useful baseline before any cross-location design |
Why VPN Manager is the preferred starting point
A private mesh avoids presenting the AgentDeck daemon as an unrestricted public TCP service. Localtonet VPN Manager is our actual VPN feature. It can connect devices through a private mesh, bridge local LANs, and apply granular firewall rules. This is different from an HTTP or TCP tunnel.
For this use case, the security goal is to permit only the intended remote device to reach the AgentDeck host on the required port. A private-network address also avoids the assigned-public-port mismatch inherent in a TCP relay, because the remote side can target the daemon’s actual port on the private network.
This does not automatically make AgentDeck remotely compatible. If the daemon listens only on loopback, a remote mesh peer still cannot connect to it. AgentDeck must officially support an appropriate bind address, and its remote client or companion must support connecting to the private-network address. Do not change the bind address by guessing an environment variable or undocumented CLI flag.
The exact VPN Manager dashboard workflow is not included in the AgentDeck evidence supplied for this article, so we do not invent field names or commands. Use the current Localtonet VPN Manager guide to create the mesh, connect the intended devices, and apply the narrowest firewall rule supported by your current configuration. Then test AgentDeck only after confirming that its current documentation permits the required network listener.
VPN Manager reduces public exposure and can restrict network paths, but AgentDeck still controls client pairing, authorization, and application behavior. Grant mesh access only to trusted devices and permit only the destination and port actually required.
When a TCP tunnel can still be useful
A Localtonet TCP tunnel can answer a narrower question: can a remote network establish a TCP connection through our relay to the verified AgentDeck listener? This is useful for transport testing, but it is not a completed remote-access configuration.
Direct use would require all of the following to be confirmed by current AgentDeck primary documentation or source:
- The remote AgentDeck client can specify both the Localtonet public host and assigned public port.
- The daemon supports remote connections on the selected bind address.
- The daemon authenticates and authorizes the intended remote client.
- The transport protects sensitive session data appropriately.
- The configuration is supported rather than merely possible at the socket level.
Those conditions are not established by the supplied current evidence. This article therefore does not provide an AgentDeck remote command using the public endpoint.
Configure a Localtonet TCP reachability evaluation
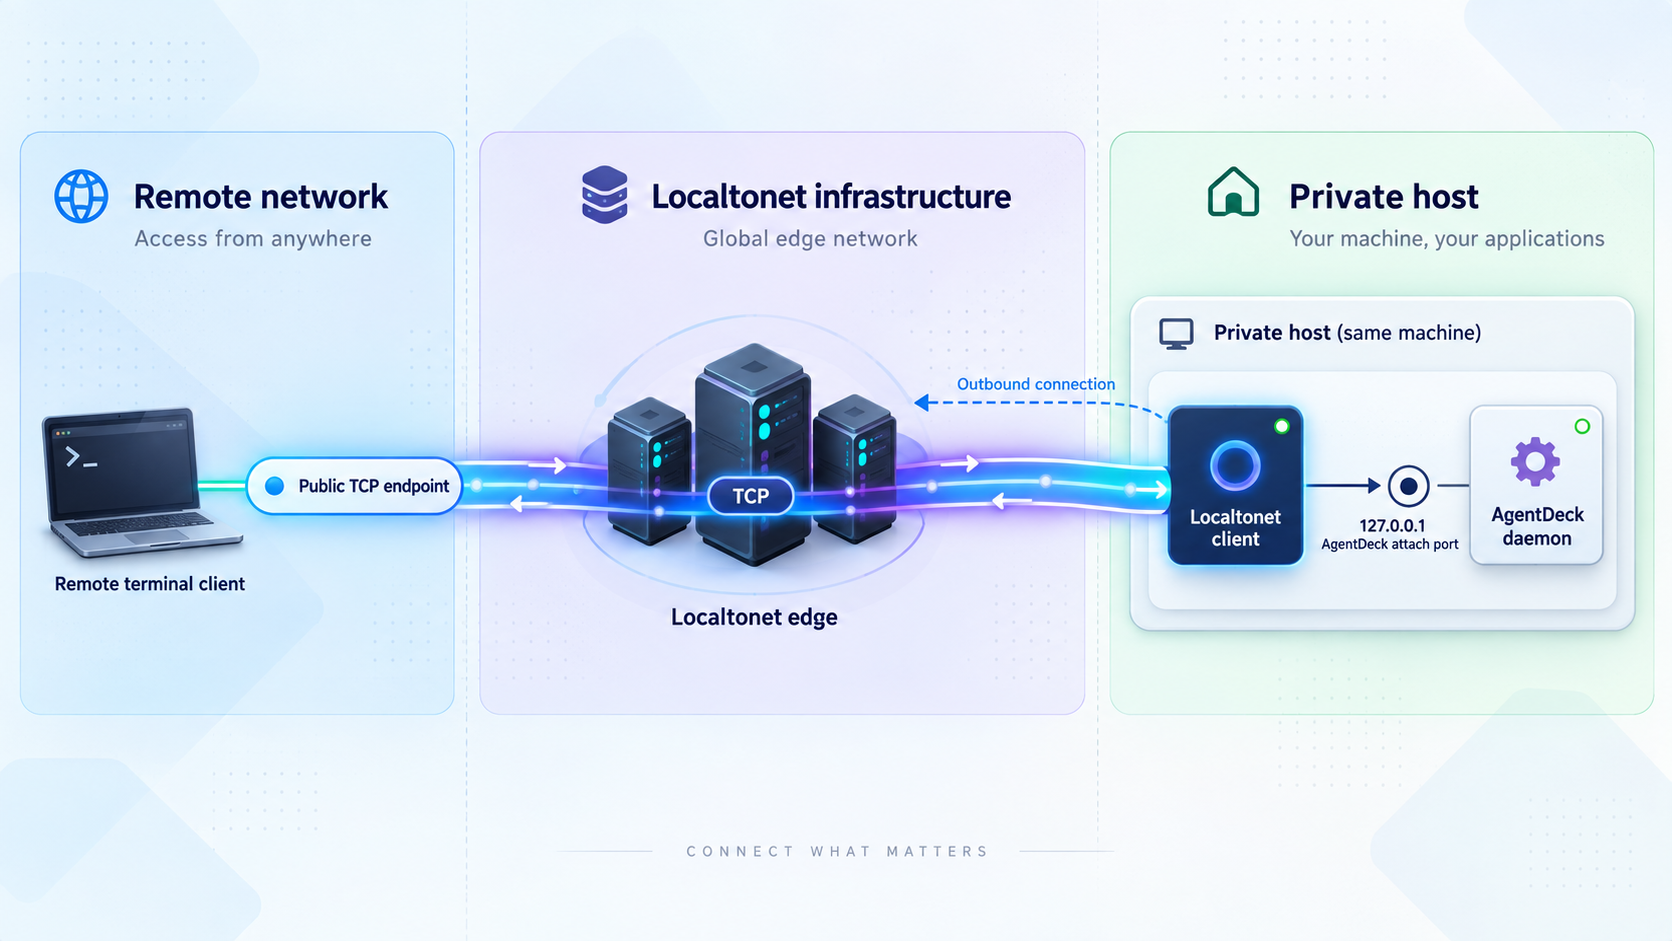
Proceed only after the local dashboard works and the operating system reports the intended AgentDeck listener. The relevant Localtonet tunnel family is TCP because this test forwards a raw TCP connection to a local IP address and port.
Do not select an HTTP tunnel merely because AgentDeck offers visual dashboards. The daemon port evaluated here is not established as a public web application. For current product navigation and available options, consult the Localtonet documentation.
Install and run the Localtonet client
Run our client on the AgentDeck host whenever possible. If the client runs on another device, first prove that the device can reach the daemon over the LAN. A loopback-only listener cannot be reached from another computer.
Select the correct device token
Select the device that will run the tunnel using its device-specific authentication token. Keep the token secret and never include it in screenshots, shell examples, repositories, or support transcripts.
Select an available relay server
Choose from the relay servers or regions currently available in your dashboard. Do not copy a server code from another tutorial because available values can vary by current product configuration and plan.
Create the TCP tunnel
Select the TCP tunnel type and enter the verified local IP address and port. For a same-host client and a listener confirmed at 127.0.0.1:9120, use that exact local target. Use port 9121 only if you have confirmed the temporary macOS fallback and intentionally want to evaluate it.
Start the tunnel
Creating the configuration does not start it. Press Start, wait for the tunnel to run, and record the assigned public host and port privately. The endpoint is available only while the selected Localtonet device is connected and the tunnel is running.
Test briefly, then stop or delete it
Perform only the TCP reachability test described below. Stop the tunnel immediately after testing. Delete the configuration if it is no longer needed.
A saved TCP tunnel is not reachable until you start it. It will also become unavailable if the selected client disconnects, the AgentDeck daemon stops, the host sleeps, or the tunnel is stopped.
Test from Windows
From a different network, use the exact public host and port displayed in the Localtonet dashboard:
Test-NetConnection -ComputerName PUBLIC_HOST -Port PUBLIC_PORT
A successful TcpTestSucceeded result indicates that a TCP connection reached the configured path. It does not identify the application protocol or validate AgentDeck behavior.
Test from macOS or Linux
If Netcat is installed, run:
nc -vz PUBLIC_HOST PUBLIC_PORTKeep the assigned endpoint private. Do not paste a real endpoint into a public issue or repository. If you need support, redact device tokens, private addresses, public endpoint details, project names, and session information.
Stop at the compatibility boundary
After the TCP test, stop the tunnel. Do not substitute the public hostname into an AgentDeck command unless current AgentDeck documentation explicitly confirms how to provide the assigned public port and describes security suitable for that connection.
A Localtonet TCP endpoint consists of both a host and a port. Documentation that accepts only a daemon hostname does not prove that the client can address an arbitrary relay port. Likewise, the fact that a daemon accepts a TCP connection does not prove that it authenticates the connecting party or encrypts application traffic.
Inventing a port flag, appending :PUBLIC_PORT to an undocumented hostname option, or assuming that AgentDeck always uses the relay’s assigned port could produce a nonfunctional or unsafe configuration. Use a private mesh or wait for explicit AgentDeck support instead.
Apply least-exposure security boundaries
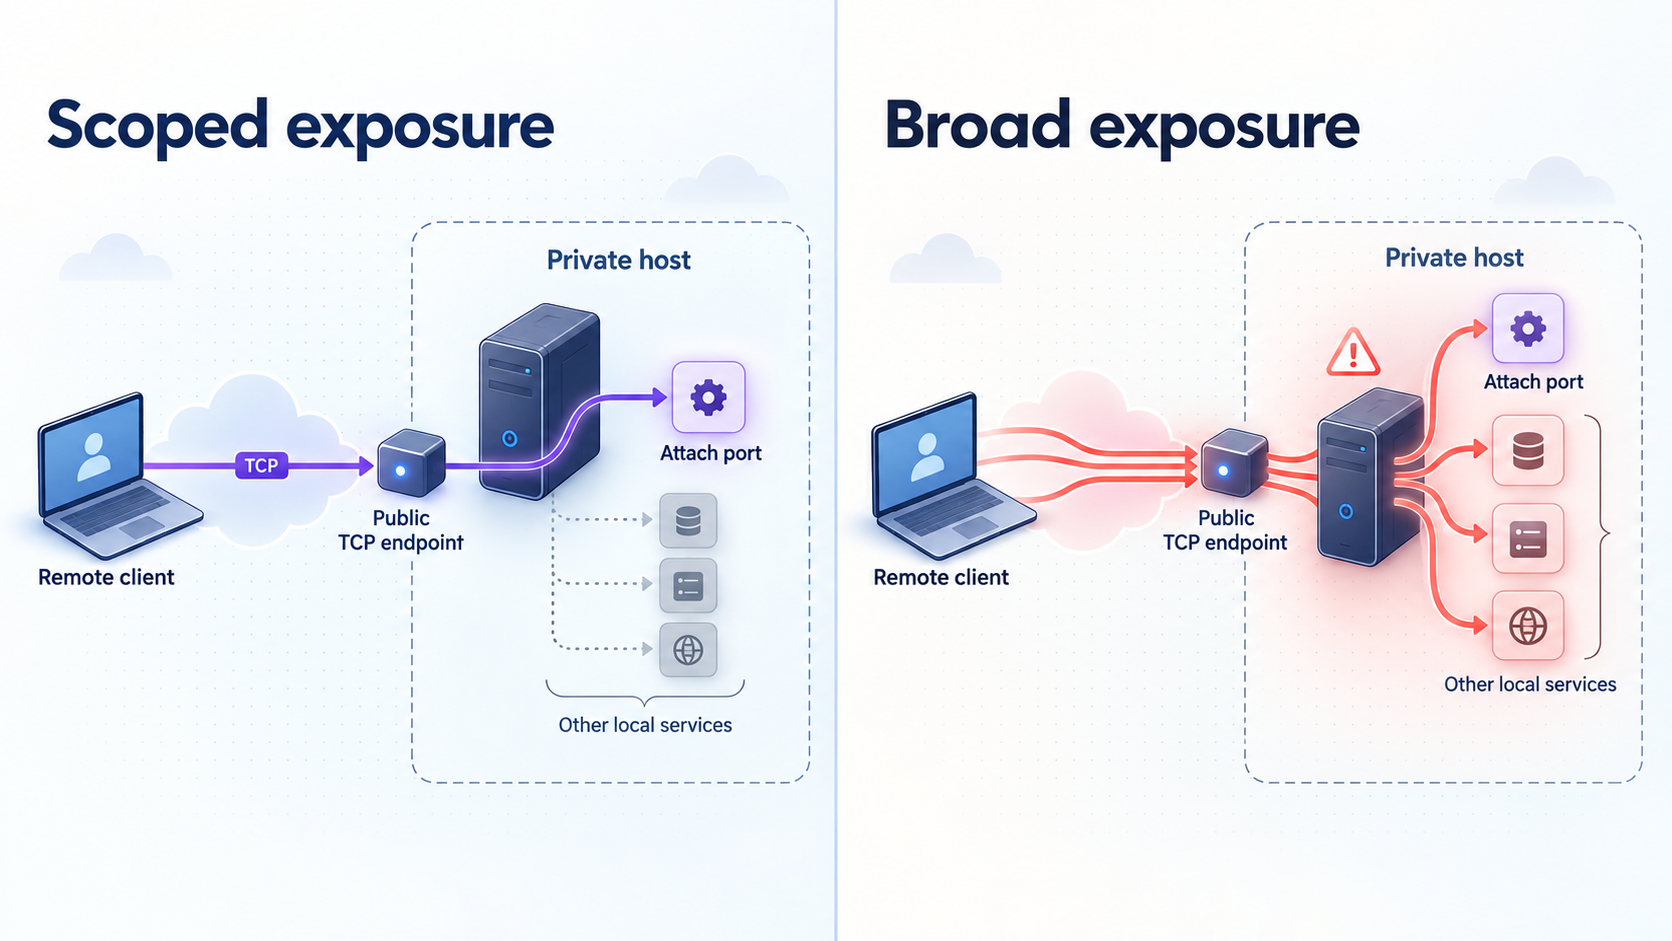
Agent dashboards can reveal operational details about projects, tools, agent state, prompts, usage, and requests that require attention. Some supported surfaces can also expose controls when a real control path exists. Treat the AgentDeck daemon and its session data as sensitive.
Localtonet removes the need for inbound router port forwarding because our client establishes an outbound connection to a relay. That networking behavior does not replace AgentDeck authentication, client authorization, protocol security, or access policy.
Recheck port ownership after daemon restarts and after switching between the macOS native application and CLI. A port number is not an application identity. If another process acquires a previously configured port, a tunnel left running could forward traffic to the wrong local service.
Keep the Localtonet client and AgentDeck installation updated through their documented channels. Review AgentDeck’s repository security information and current releases before enabling remote connectivity. If the project later documents custom-port support, pairing, certificates, shared tokens, or another remote-security mechanism, evaluate the exact version you deploy rather than applying assumptions from a newer or older release.
Troubleshoot by layer
Diagnose one layer at a time. Changing AgentDeck, the listener address, firewall policy, Localtonet target, and remote command simultaneously makes it difficult to identify the actual failure.
The AgentDeck command is not found
Confirm that Node.js reports major version 22, 24, or 26 and that the setup command completed under the current user:
node --version
npx @agentdeck/setup
Open a fresh terminal if your operating system updates executable search paths only for new sessions. Do not substitute an undocumented global installation command.
The dashboard opens but no session appears
Verify that you started one of the supported agents shown in AgentDeck’s current terminal setup path and generated actual activity. Confirm that the agent and dashboard run in the expected user environment. Review current AgentDeck diagnostics and integration instructions in the repository because integration behavior can change between releases.
Keep Localtonet stopped during this diagnosis. If AgentDeck cannot observe a local session, remote networking is not the cause.
Nothing listens on port 9120
Confirm that the daemon installation completed. On macOS, also inspect port 9121 if you recently switched from the native application to the CLI. Once port 9120 is available, run:
agentdeck daemon restartRepeat the operating-system listener check. Do not infer the port from a configuration example when the live system can report the actual listener.
The Localtonet client cannot reach the local target
If the client and AgentDeck run on the same host, confirm that the target exactly matches the listener address and port. If the client runs on another device, remember that 127.0.0.1 refers to that other device itself, not to the AgentDeck host.
A separate client device requires a supported AgentDeck LAN listener, local routing between the devices, and operating-system policy that permits the connection. This guide does not recommend changing AgentDeck’s bind behavior without official documentation.
The tunnel was created but the public TCP test fails
- Confirm that the selected Localtonet device is connected.
- Confirm that you pressed Start after creating the tunnel.
- Confirm that the tunnel type is TCP.
- Confirm that the local target matches the live AgentDeck listener.
- Confirm that the remote test uses the exact assigned public host and port.
- Confirm that the AgentDeck process still owns the target port.
- Check whether local endpoint-protection policy blocks the Localtonet client from connecting to the target.
The TCP test succeeds but AgentDeck does not connect
This is the expected boundary of the evaluation. The relay path works, but the AgentDeck client may not support the assigned public port, may expect another connection model, or may require application behavior not exercised by a generic TCP probe.
Do not guess a custom-port syntax. Stop the public tunnel and check the current AgentDeck repository, security documentation, and releases for explicit remote connectivity support. If the client can operate over a private network at the daemon’s actual port, evaluate VPN Manager instead.
A VPN peer cannot reach AgentDeck
First verify that both devices are connected to the intended private mesh and that the applicable firewall rule allows only the required peer-to-host path. Then inspect the AgentDeck listener. A loopback-only listener remains local to the AgentDeck computer and cannot be reached through a mesh interface.
Do not broaden the listener until AgentDeck documents a supported bind configuration and you understand the exposure. VPN connectivity cannot override how an application chooses its listening interfaces.
The connection worked and then disappeared
Check whether the AgentDeck daemon is still running, whether the host entered sleep, whether the Localtonet client remains connected, and whether the selected tunnel or VPN session remains active. A daemon restart can also change port ownership, particularly when dealing with the documented macOS handoff condition.
End the test safely
Stop the Localtonet TCP tunnel after the reachability test. Delete it if you do not need the saved configuration. If you use VPN Manager, disconnect devices that no longer need access and review the mesh firewall rules. Confirm that no unexpected AgentDeck sessions remain visible and remove public endpoint details from temporary notes.
Frequently asked questions
What Node.js versions does the AgentDeck CLI require?
AgentDeck’s current repository documents Node.js 22, 24, or 26 for its terminal, Windows, Linux, and external-integration path. It lists macOS 15 or newer, Windows 11, and Linux for that path.
Which commands install the AgentDeck CLI daemon?
Run npx @agentdeck/setup, followed by agentdeck daemon install. Start a supported coding agent normally and open agentdeck dashboard in another terminal to verify local observation.
What port does the AgentDeck CLI daemon use?
The documented normal CLI daemon port is TCP 9120. AgentDeck npm v1.4.2 records a macOS handoff condition that can temporarily select port 9121 if port 9120 remains occupied after the native application quits. Always inspect the live listener.
Does a Localtonet TCP tunnel complete AgentDeck remote access?
Not based on the current evidence used for this guide. The tunnel can forward an assigned public host and port to the local daemon, but AgentDeck must support addressing that public port and must provide an acceptable remote security model. Those requirements are not established here.
Why is a successful TCP probe not enough?
A TCP probe confirms only that a socket connection can be established. It does not prove application-protocol compatibility, custom-port support, client authentication, authorization, transport encryption, or correct AgentDeck session behavior.
Should I use an HTTP tunnel for the AgentDeck daemon?
No. The listener evaluation in this guide concerns a raw TCP daemon port. The existence of dashboard interfaces does not establish that the daemon should be published through an HTTP tunnel.
Is VPN Manager the same as a Localtonet TCP tunnel?
No. VPN Manager is our private mesh VPN feature and supports granular firewall rules and LAN bridging. A TCP tunnel publishes one local TCP target through an assigned public host and port. For sensitive daemon access, a private mesh is the preferred design when AgentDeck supports the required network listener.
Does VPN Manager make a loopback-only AgentDeck daemon reachable?
No. A service bound to 127.0.0.1 or ::1 accepts connections only from the same computer. AgentDeck must officially support listening on an appropriate network address before another mesh device can connect.
Does Localtonet provide AgentDeck authentication or application encryption?
This guide makes no such claim. Localtonet provides the network transport described for the selected tunnel or VPN design. AgentDeck remains responsible for its application protocol, client identity, authorization, and any application-level protection it documents.
Does creating a Localtonet tunnel make it immediately available?
No. Creating the tunnel saves its configuration. You must press Start, and the endpoint remains available only while the selected Localtonet client is connected and the tunnel is running.
Evaluate AgentDeck connectivity with the right boundary
Install AgentDeck, verify its local dashboard and live listener, then choose a private Localtonet VPN Manager design where AgentDeck officially supports network access. Use a TCP tunnel only for a short reachability evaluation until AgentDeck explicitly documents custom-port support and a security model suitable for public connections.
Get Started Free →

