

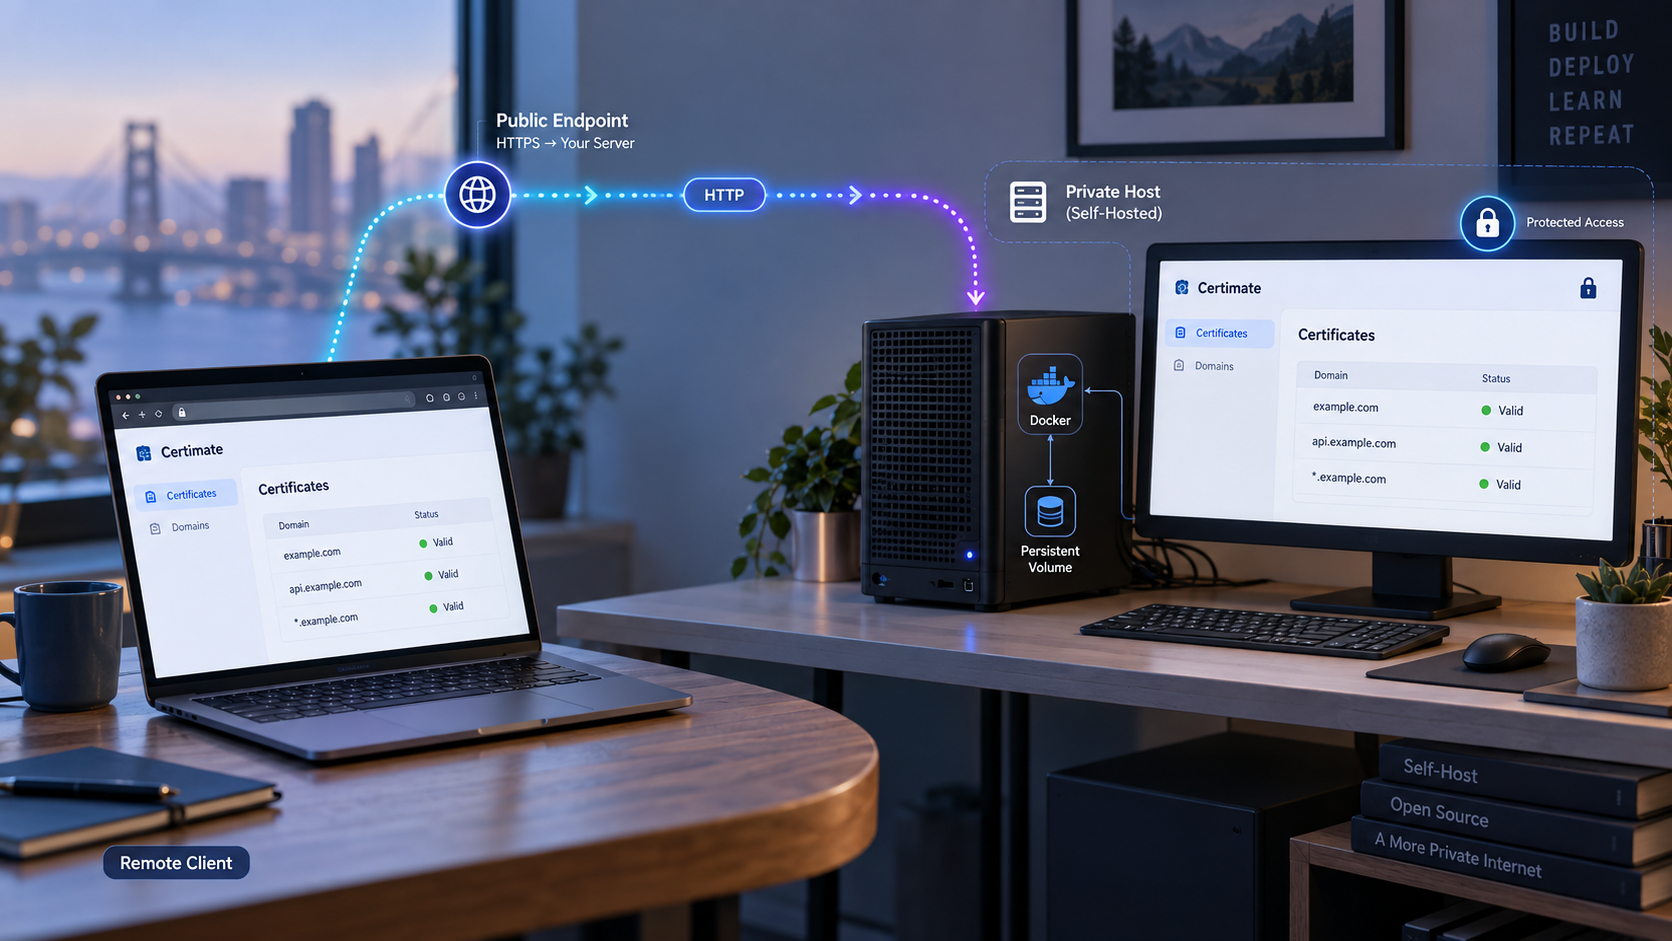
Build a persistent Certimate deployment, verify it locally, and publish its administration interface only when remote access is needed
Certimate is a self-hosted ACME certificate management application with a browser-based interface for issuing, deploying, renewing, and monitoring certificates. In this guide, we install the official Docker image, preserve its application data, confirm that the service works at its documented local endpoint, and cover routine container operations and troubleshooting. We then connect the verified service to a Localtonet HTTP tunnel as a separate step, giving authorized administrators a public HTTPS address without requiring inbound router port forwarding, firewall changes, a VPN, or a public IP address. Because Certimate can hold DNS, cloud-provider, and deployment credentials, the guide also emphasizes password changes, local data protection, limited exposure, and careful tunnel lifecycle management.
📋 What's in this guide
Why self-host Certimate?
Certimate is an open-source ACME tool designed to manage the certificate lifecycle through a visual workflow. Its documented capabilities include requesting single-domain, multi-domain, wildcard, and IP address certificates; selecting RSA or ECC keys; using DNS-01 or HTTP-01 validation; exporting formats such as PEM, PFX, and JKS; deploying certificates to supported destinations; sending notifications; and renewing certificates before expiration.
The project is intended for private deployment. Its application data is stored on the system where it runs rather than in a hosted Certimate service. That makes it useful for administrators who want direct control over certificate records, workflow configuration, provider credentials, and deployment settings. Self-hosting also makes the operator responsible for securing the host, protecting the persistent data directory, controlling remote access, installing updates, and maintaining backups.
Certimate documents multiple deployment approaches. A precompiled binary can be downloaded, extracted, and started with ./certimate serve. Docker provides a containerized deployment with a persistent data mount. The documentation also identifies source-code deployment as an available approach, although the supplied evidence does not establish the exact build commands or toolchain requirements for that path. This guide therefore focuses on the official Docker quick-start workflow and does not guess at unsupported source-build instructions.
http://127.0.0.1:8090.
/app/pb_data to a host directory so application state can survive container replacement.
| Installation path | Documented starting point | When it fits | Important consideration |
|---|---|---|---|
| Docker | Run certimate/certimate:latest and mount persistent data |
Container-based hosts and repeatable deployment | The container image and persistent data must be managed separately |
| Precompiled binary | Extract a release package and run ./certimate serve |
Direct installation without a container runtime | Service supervision, startup behavior, files, and upgrades become host responsibilities |
| Source code | Identified by the documentation as an available deployment path | Development or custom-build requirements | Exact build prerequisites and commands are not established by the evidence used for this guide |
Understand the deployment and access architecture
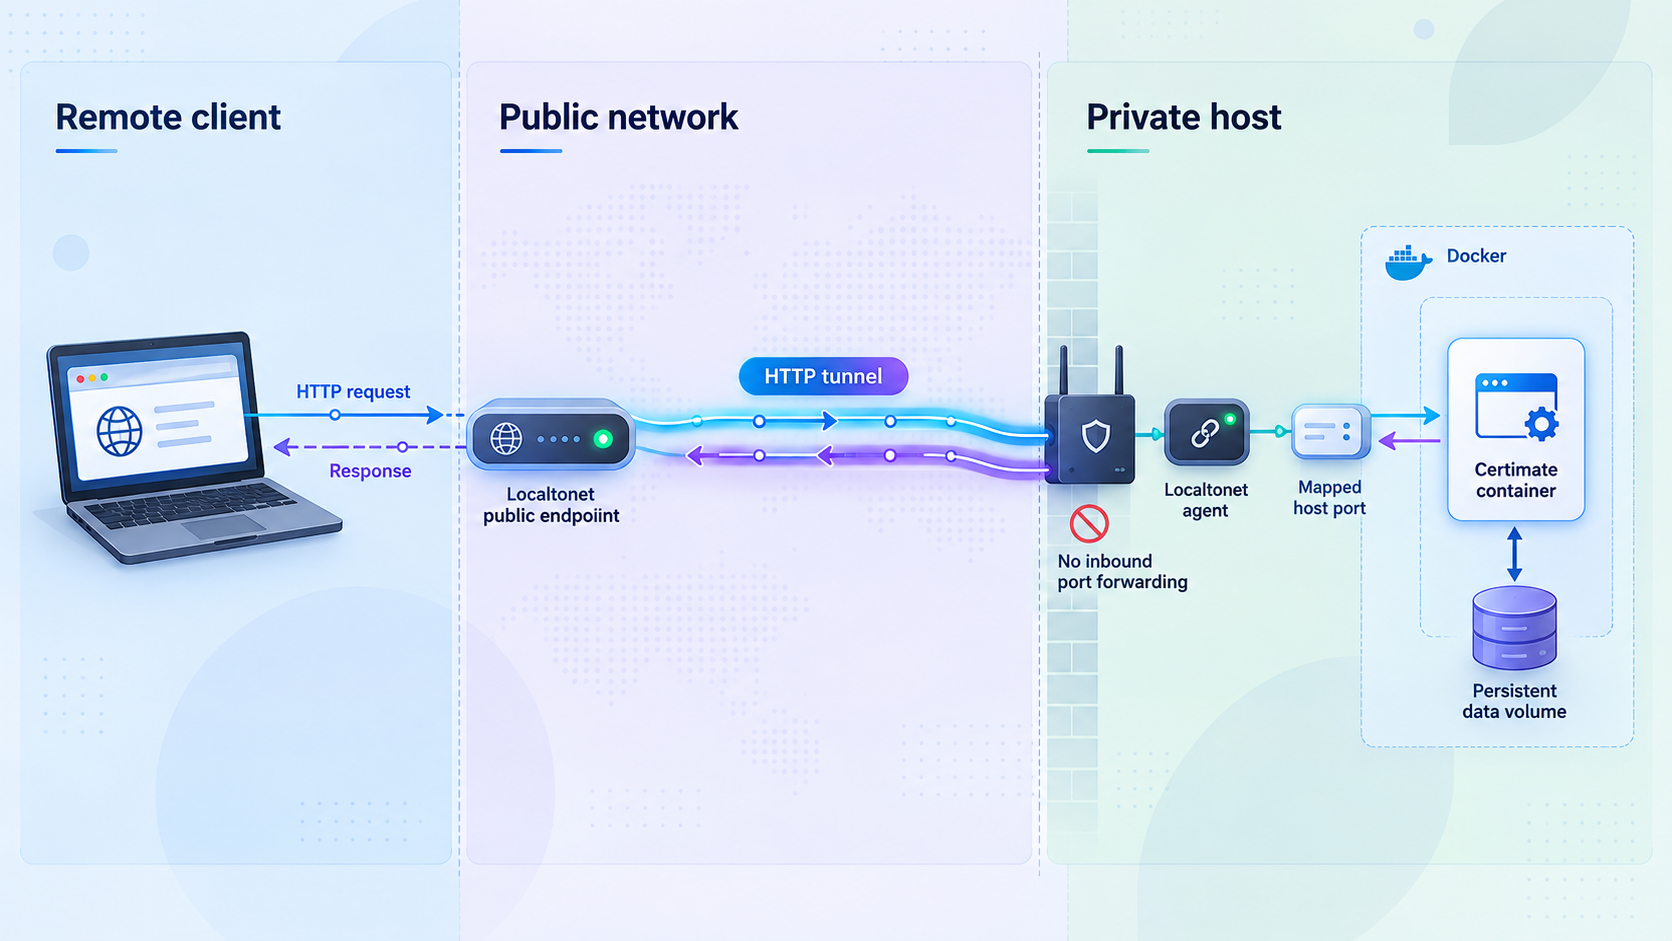
It helps to separate four concerns: the Certimate process, Docker's host-port publication, Certimate's persistent data, and the optional Localtonet tunnel. Treating these as distinct layers makes installation and troubleshooting much clearer.
Certimate application layer
Inside the official container, Certimate serves its web interface on port 8090. The official Docker command maps that container port to host port 8090. The documented browser endpoint is http://127.0.0.1:8090, which is the address we use for initial verification.
Persistent storage layer
The container path /app/pb_data holds persistent application data in the documented deployment. The quick-start command bind-mounts a data directory beneath the current host directory to that container path. This separation matters because containers can be stopped, removed, and recreated, while the mounted host directory remains available.
A container is not a backup. Accidental deletion, disk failure, filesystem corruption, or an unsafe application update can still affect the mounted directory. Include the host-side data directory in an appropriate backup process and test restoration separately from production.
Remote-access layer
Localtonet does not replace Certimate or alter its certificate workflows. Our client runs on the Certimate host, or on another device that can reach the Certimate service, and establishes an outbound connection to a Localtonet relay server. An HTTP tunnel then forwards requests from its assigned public address to the selected local IP address and port.
Creating the tunnel configuration is not the same as running it. The selected Localtonet client must be connected, and the tunnel must be started. The public address remains usable only while that client is connected and the tunnel is running. This lifecycle is useful for an administrative service because an operator can stop the tunnel when remote management is no longer required.
Publishing the Certimate dashboard through a Localtonet HTTP tunnel does not automatically configure DNS-01 or HTTP-01 challenges. Those challenges are part of Certimate's certificate workflows and must satisfy the selected ACME certificate authority's requirements. The tunnel in this guide is specifically for reaching the management interface.
Prerequisites and decisions before installation
Prepare the host before copying the Docker command. Most failed deployments come from missing runtime access, an occupied port, an unsuitable data directory, or an assumption that the public tunnel should be configured before the local service works.
A working Docker installation
The host needs a functioning Docker environment capable of pulling and running Linux container images. Confirm that your user or service account is authorized to communicate with the Docker daemon. Docker installation commands vary by operating system, distribution, package source, and managed-hosting environment, so this article does not provide a generic installation command that could be wrong for your system.
Verify Docker itself before proceeding:
docker versionThe command should return client and server information. If it reports that the daemon is unavailable or access is denied, resolve that runtime problem first. Adding broad privileges merely to suppress an error is not a substitute for following the host's Docker security model.
A durable working directory
The official command uses $(pwd)/data as the host side of the persistent mount. That means the directory from which you run the command determines where Certimate's data is stored. Choose a stable location on a suitable filesystem rather than launching the command from a temporary directory, download directory, or path likely to be deleted.
The command syntax shown in this guide follows the project's documented POSIX-style example. The $(pwd) expression is shell syntax that expands to the current directory. If the Docker host uses a shell that does not support that syntax, use the equivalent absolute host path accepted by that environment. Do not alter the container destination /app/pb_data without current project documentation confirming another supported layout.
Port 8090 availability
The documented deployment publishes host port 8090. Check whether another application or container already uses it. The exact inspection command depends on the operating system, but Docker containers can be reviewed with:
docker ps
If port 8090 is occupied, do not stop an unfamiliar production service without identifying it. Docker can map a different host port to container port 8090, but the project's supplied quick-start evidence documents 8090:8090. This guide retains that documented mapping rather than selecting an arbitrary alternative.
A plan for credentials and recovery
Certimate's published quick start includes a default administrator username and password. Anyone who knows those defaults may try them if the interface becomes reachable. Plan to sign in locally and replace the default password before publishing the interface.
Also identify where backups will be stored, who should have host access, and how certificate-provider credentials will be rotated if the host is compromised. The supplied project evidence states that data is stored locally, but it does not establish that every value in the persistent directory is encrypted at rest. Protect the host directory and its backups as sensitive data.
Localtonet prerequisites for optional remote access
The Localtonet stage requires our client application on a device that can reach Certimate. It also requires a device-specific authentication token, selection of an available relay server or region from the current dashboard, and an HTTP tunnel targeting the local Certimate address and port. Tokens must never be copied into an article, screenshot, shell history, public repository, or support message.
Install Certimate, verify it over the local address, replace the documented default administrator password, and confirm that persistent storage is working before starting a tunnel. A public address should not be used as the first test of an application with known default credentials.
Install Certimate with the official Docker image
The following sequence keeps the project installation first. Localtonet is added only after the application is running and secured.
Choose the persistent working directory
Open a terminal on the Docker host and change into a durable directory dedicated to Certimate. Because the documented mount uses $(pwd)/data, the current directory becomes the parent of the persistent data folder. Record this location for backup, migration, and recovery work.
Run the official Certimate container
Execute the project's documented Docker command from that directory. It creates a detached container named certimate, applies an unless-stopped restart policy, publishes port 8090, mounts host timezone files as read-only, persists application data, and uses the official certimate/certimate:latest image.
Confirm that the container remains running
Inspect the container list and then review the Certimate logs. A container that exits immediately is not a successful installation, even if the initial docker run command returned a container identifier.
Open the local administration interface
On the host, visit http://127.0.0.1:8090. This is the project's documented local endpoint. Confirm that the sign-in interface renders before attempting any remote-access configuration.
Sign in and replace the default password
Use the documented initial administrator credentials for the first local login, then replace the password through the account controls available in the installed version. Menu labels can change between releases, so this guide does not invent an exact settings path. Do not start a public tunnel while the default password remains active.
Run the documented container command
docker run -d \
  --name certimate \
  --restart unless-stopped \
  -p 8090:8090 \
  -v /etc/localtime:/etc/localtime:ro \
  -v /etc/timezone:/etc/timezone:ro \
  -v $(pwd)/data:/app/pb_data \
  certimate/certimate:latest
The two timezone mounts refer to Linux host paths. Before running the command, confirm that /etc/localtime and /etc/timezone exist on the selected host. If the host platform does not provide those paths, consult the current Certimate deployment guidance and the Docker documentation for that operating system rather than creating arbitrary files or guessing at replacements.
Review the purpose of each option:
-druns the container in detached mode.--name certimateassigns a stable container name for logs and lifecycle commands.--restart unless-stoppedasks Docker to restart the container after failures or daemon restarts unless an operator deliberately stopped it.-p 8090:8090maps host port8090to Certimate's container port8090.- The timezone files are mounted read-only, as indicated by
:ro. $(pwd)/data:/app/pb_datakeeps Certimate's application data in a host-side directory.certimate/certimate:latestselects the official image and its movinglatesttag.
Check the result:
docker ps
docker logs certimate
The container should appear in the running list. Logs should be inspected for startup failures, mount errors, port conflicts, or repeated restarts. Log wording can vary by release, so success should be confirmed by both container state and an actual browser request.
The unless-stopped policy improves service continuity, but it is not application monitoring, backup, or disaster recovery. It cannot correct invalid configuration, restore deleted data, resolve an occupied host port, or recover a damaged filesystem.
Secure Certimate before exposing it remotely
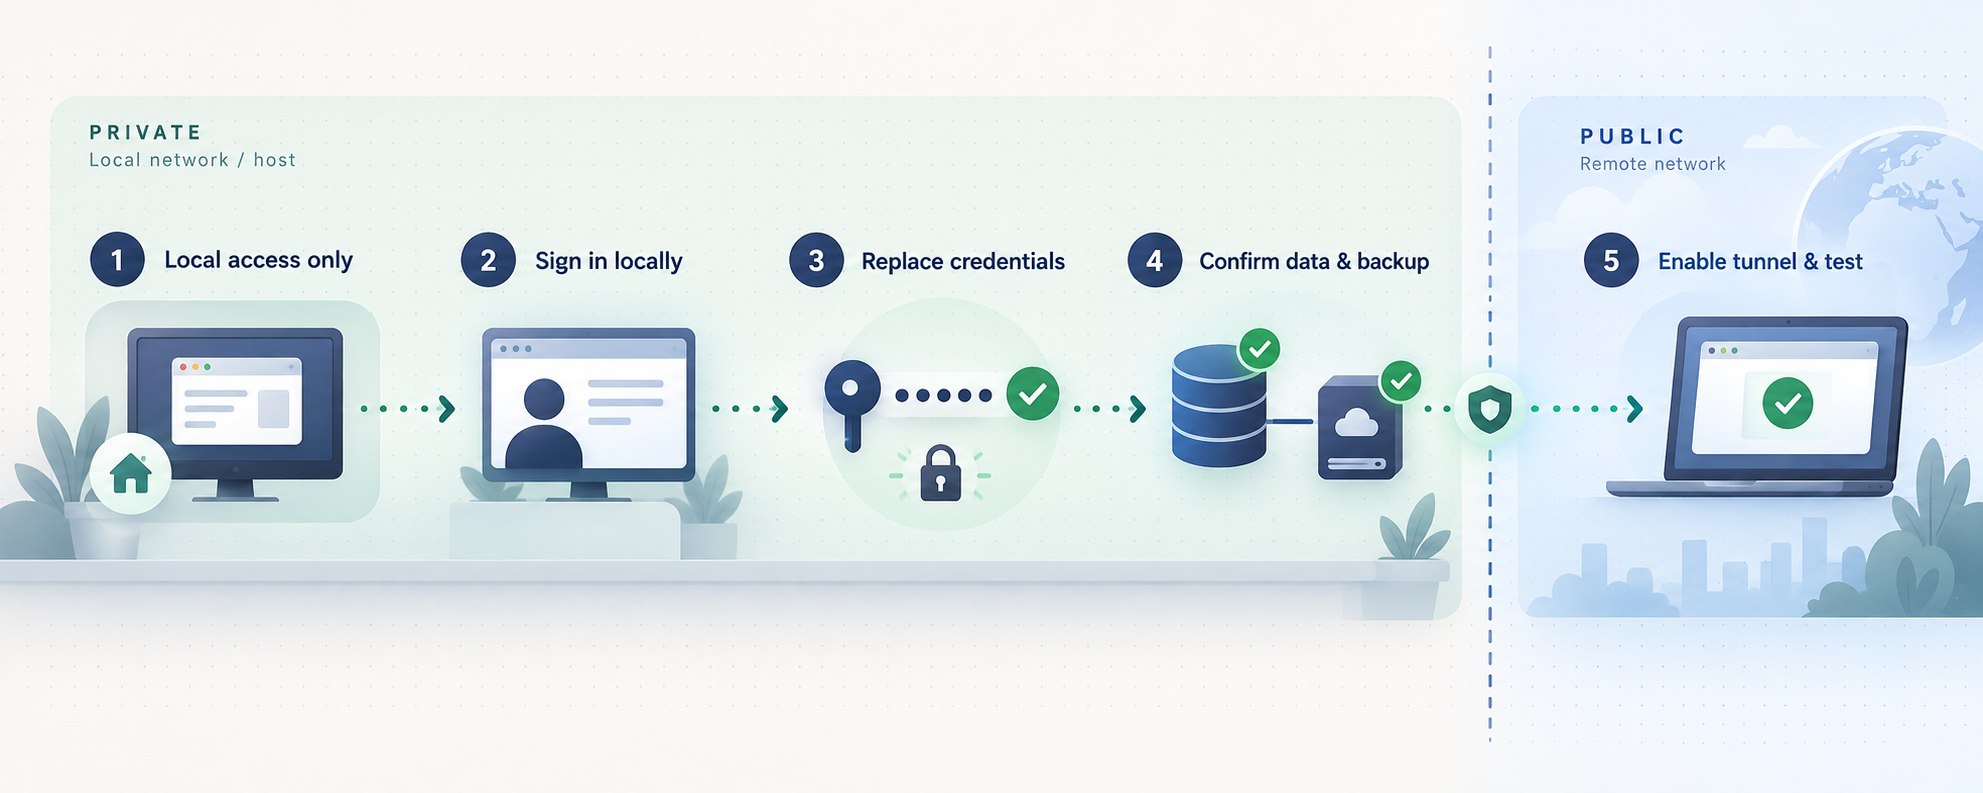
Certificate automation systems frequently need powerful credentials. A DNS-01 workflow may need permission to create validation records. Deployment workflows may connect to cloud platforms, Kubernetes environments, CDNs, load balancers, WAFs, or remote systems. A compromised administration account can therefore have consequences beyond the Certimate host.
Replace the published administrator credentials
The documented initial account is:
Username: admin@certimate.fun
Password: 1234567890
These are bootstrap credentials, not safe production credentials. Use them only for the initial local sign-in, change the password immediately, and do not reuse a password from another service. The supplied evidence does not establish the exact password menu path or additional authentication features for every release, so verify the controls exposed by the installed version rather than relying on an old screenshot or assumed menu name.
Apply least privilege to provider credentials
When configuring a DNS provider or deployment destination, create credentials limited to the operations and resources the workflow requires. For example, a certificate workflow should not receive organization-wide administrative access merely because broad credentials are easier to create. Provider-specific permission names vary, so follow the provider's current permission model.
Rotate credentials periodically and after any suspected exposure. Remove credentials for providers or deployment destinations that are no longer used. Avoid placing secrets in shell commands, screenshots, exported diagnostics, issue reports, or public repositories.
Protect the persistent directory
The host-side data directory should be readable only by the accounts and services that genuinely require it. Protect backup copies to the same standard. The fact that Certimate is self-hosted means the operator controls the storage location, but local storage by itself does not guarantee confidentiality.
Do not casually edit files inside the persistent directory while Certimate is running. The documented material supplied for this guide does not define a supported manual-editing procedure or database repair workflow. Use the application interface for normal configuration and make a verified backup before maintenance.
Consider the Docker port binding
Docker's -p 8090:8090 syntax commonly publishes the host port on available interfaces according to the Docker daemon's networking behavior. The fact that the project tells users to browse to 127.0.0.1:8090 does not by itself prove that other devices cannot reach the port.
Check the effective port binding with:
docker port certimateAlso test from the relevant network boundary or inspect the host's listening sockets using the tools appropriate for its operating system. If your deployment requires a loopback-only binding, Docker supports an explicit host address in the publication syntax:
-p 127.0.0.1:8090:8090
That is a security-oriented adaptation rather than the exact Certimate quick-start command. If Localtonet runs directly on the same host, it can target 127.0.0.1:8090. If our client runs on another device, a loopback-only Certimate binding will not be reachable from that device. Choose the network arrangement deliberately instead of exposing the port broadly and assuming it is private.
The Localtonet HTTP tunnel gives the service a public HTTPS address, but Certimate's own sign-in remains a critical security boundary. Change the default password first, limit provider permissions, stop the tunnel when it is not needed, and follow your organization's access-control policies.
Verify the local Certimate deployment
Verification should prove more than the existence of a container. A useful acceptance test checks the process, the web interface, authentication, persistence, and restart behavior before remote access is added.
Check container status
docker ps --filter name=certimateConfirm that the expected container is running and that its port publication matches the intended host configuration. If it repeatedly disappears and returns, inspect whether it is restarting because of an application, mount, or configuration failure.
Inspect recent logs
docker logs --tail 100 certimateLook for errors involving the persistent path, permissions, unavailable files, or port startup. Do not publish complete logs without reviewing them for domains, account names, provider details, credentials, or other sensitive configuration.
Open the documented endpoint
On the Docker host, browse to:
http://127.0.0.1:8090A successful test should render Certimate's web interface. A browser connection error indicates a local problem that should be resolved before Localtonet is involved. A tunnel cannot make an unhealthy target healthy.
Confirm the administrator account is secured
Sign in locally, change the default password, sign out, and verify that the default password no longer grants access. Then sign in with the replacement credentials. This confirms that the credential change was actually accepted rather than merely entered into an unsaved form.
Test persistence across a restart
After changing a harmless setting or confirming an account change, restart the container:
docker restart certimate
Wait for the application to return, reopen http://127.0.0.1:8090, and confirm that the expected state remains. This checks that the host-side data mount is functioning. It does not replace a restore test, but it can reveal an accidental ephemeral deployment before important workflows are created.
Separate application verification from certificate workflow testing
A working dashboard proves that Certimate is running. It does not prove that a particular ACME account, DNS provider, HTTP-01 route, certificate authority, deployment target, or notification channel is configured correctly. Test those integrations individually with least-privilege credentials and noncritical targets before relying on automatic renewal in production.
| Check | Expected result | If it fails |
|---|---|---|
| Container status | certimate remains running |
Review logs, mounts, image startup, and port conflicts |
| Local browser request | The interface loads at 127.0.0.1:8090 |
Check the port mapping, container state, and host network path |
| Administrator login | The replacement password works and the default no longer does | Repeat the local password-change process before exposure |
| Container restart | The service returns with its state intact | Verify that the host data directory is mounted to /app/pb_data |
| Certificate workflow | The selected challenge and deployment stages complete as designed | Inspect provider permissions, domain configuration, challenge routing, and workflow logs |
Operate, back up, and update the container
Routine operations should preserve the persistent directory and avoid accidental recreation with a different mount. Record the original working directory, image choice, port binding, timezone mounts, and any approved security adaptations.
Start, stop, and restart Certimate
docker stop certimate
docker start certimate
docker restart certimate
Stopping the container makes the local web interface unavailable. If a Localtonet tunnel remains started while Certimate is stopped, the public address will not have a healthy local target. For planned maintenance, stop the tunnel as well so users do not mistake an intentionally unavailable service for an unexplained outage.
Review logs safely
docker logs --tail 200 certimateUse logs to investigate startup and workflow failures, but handle them as potentially sensitive operational data. When sharing a small excerpt with an authorized administrator, remove secrets and unrelated identifying details without deleting the actual error context.
Back up persistent state
Back up the host directory represented by $(pwd)/data. A dependable backup process should document whether Certimate must be stopped for consistency, where copies are stored, how long they are retained, and how restoration is tested. The supplied project evidence does not define an official backup command or guarantee that copying live files produces an application-consistent snapshot, so do not invent such a guarantee.
For a conservative maintenance window, stop Certimate, create the backup using the organization's approved filesystem or storage tooling, and start the container again. Validate the service locally after startup. More advanced snapshot methods may be appropriate when the underlying storage platform provides consistency controls, but those methods are platform-specific.
Understand the moving image tag
The official quick-start command uses certimate/certimate:latest. A moving tag can refer to a newer image when it is pulled later. Restarting an existing container does not by itself replace it with a newly pulled image. Updating generally involves reviewing release information, backing up persistent data, pulling the intended image, and recreating the container with the same approved settings.
A basic pull command is:
docker pull certimate/certimate:latestPulling does not update the already-created container. Before recreating it, preserve the exact deployment parameters and verify that the current Certimate release does not require migration steps. The supplied evidence includes migration-related documentation but does not establish one universal upgrade sequence for every version transition. Review version-specific requirements before deleting the existing container.
If the release is compatible and the data backup is complete, the normal Docker lifecycle is to stop and remove the old container, then run a replacement using the same persistent host directory:
docker stop certimate
docker rm certimate
After removal, rerun the approved docker run configuration from the same working directory. Do not run it from an unrelated directory, because $(pwd)/data would then point at different storage and the new container could appear to have lost its configuration.
Do not assume that persistent storage makes every update reversible. Review the applicable release and migration notes, protect the data directory, record the currently deployed version, and validate the upgraded service locally before restarting remote access.
Access Certimate remotely through a Localtonet HTTP tunnel
Add remote access only after the local acceptance checks pass. With Localtonet, the client establishes an outbound connection to our relay infrastructure, so this workflow does not require inbound router port forwarding, firewall changes, VPN setup, or a public IP address. The HTTP tunnel points to the existing Certimate IP address and port and provides a public HTTPS address.
HTTP tunnels can use Random Sub Domain, Custom Sub Domain, or Custom Domain as their Process Type. All three serve the target content at a public HTTPS address. Availability and exact choices can vary, so use the options currently shown in the dashboard. Custom-domain DNS requirements must be checked against current documentation before changing DNS records.
Install and run the Localtonet client
Install our client on the Certimate host or on another device that can reach the Certimate service. Keep the client running for as long as remote access is required. If it runs on the same host and Certimate is reachable only through loopback, use 127.0.0.1 as the target address.
Authenticate or select the client device
Use the device-specific authentication token associated with the intended client. Treat the token as a secret. Do not paste it into public commands, documentation, screenshots, repositories, or chat messages.
Select an available relay server or region
Choose from the values currently available in the Localtonet dashboard. Server codes and regional availability can change and may vary, so this guide does not hardcode a value.
Create an HTTP tunnel for Certimate
Select the HTTP tunnel type and an appropriate Process Type. Set the local target to the address reachable from the Localtonet client and port 8090. When both applications run on the same host, the usual target for this documented deployment is 127.0.0.1:8090.
Start the tunnel
Creating the configuration does not start it. Use the Start button, then wait for the selected client and tunnel to show that they are connected. Copy the assigned public address without exposing device tokens or private configuration.
Verify remote access and manage the lifecycle
Open the assigned HTTPS address from a separate network, confirm that the Certimate sign-in page loads, and authenticate with the replacement administrator password. When remote administration is complete, stop the tunnel. Delete it if the configuration is no longer needed.
The target address depends on where our client runs. If Localtonet runs directly on the Docker host, 127.0.0.1:8090 can reach the host-published port. If the client runs on another LAN device, 127.0.0.1 refers to that other device and will not reach the Certimate host. In that arrangement, use an address that is reachable from the client and ensure the Docker port binding permits that path.
You can review the current platform workflow in the Localtonet documentation. Always use the current dashboard values for tokens, relay selection, tunnel options, and generated public addresses.
The public address works only while the selected Localtonet client is connected and the tunnel is running. A created but stopped tunnel is not active. If the public address fails later, check Certimate locally, the Localtonet client connection, and the tunnel state as separate layers.
Recommended remote verification sequence
- Confirm that
http://127.0.0.1:8090still works on the Certimate host. - Confirm that the documented default password no longer works.
- Confirm that the Localtonet client is connected.
- Confirm that the HTTP tunnel is started.
- Open the assigned HTTPS address from a device outside the local network.
- Sign in using the replacement administrator credentials.
- Perform only the intended administrative work.
- Sign out and stop the tunnel if continuous access is unnecessary.
Avoid treating a difficult-to-guess URL as an authorization mechanism. Anyone who obtains the address can reach the exposed sign-in page while the tunnel is active. The application password, credential hygiene, least-privilege provider access, and controlled tunnel lifecycle remain essential.
Troubleshoot installation and remote access
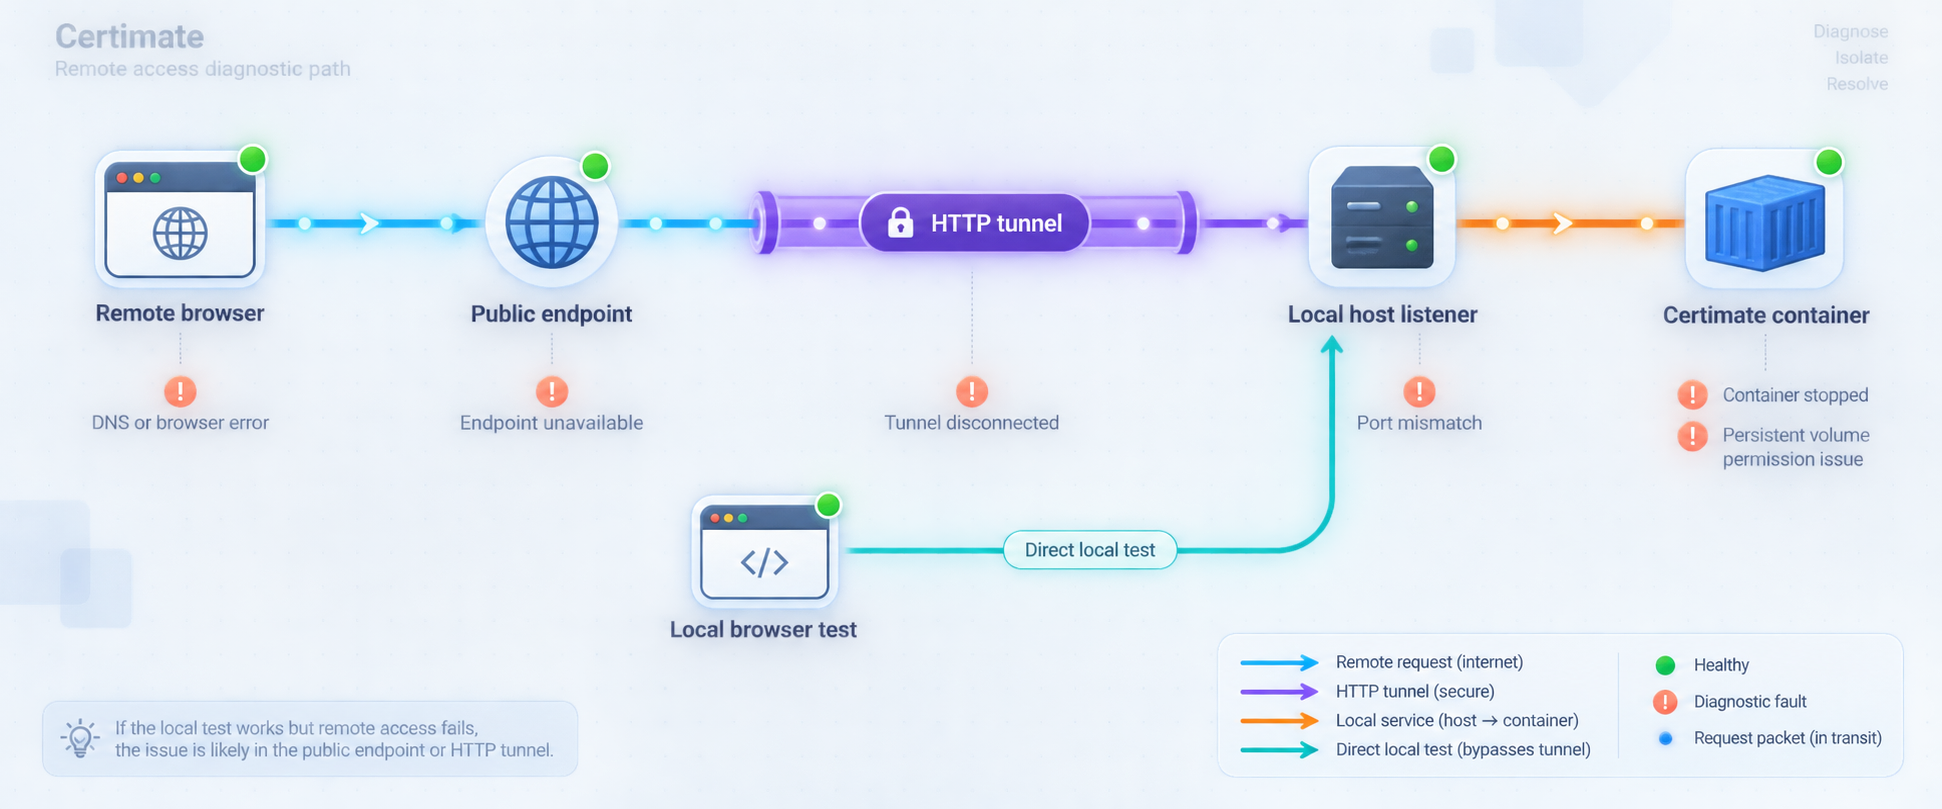
The container name is already in use
Docker will not create another container named certimate while an existing container has that name, even if it is stopped. Inspect all matching containers:
docker ps -a --filter name=certimateIf it is the intended installation, start or inspect it rather than creating a duplicate. Remove it only after confirming that its persistent storage is correctly mounted and protected.
Port 8090 is already allocated
Another process or container is using the requested host port. Inspect running containers and the host's listeners. Identify the existing service before changing anything. If a different host port is required, remember that the container still listens on 8090 and that Localtonet must target the actual host-side port. This guide does not select an arbitrary replacement because port policy is environment-specific.
The container exits or continuously restarts
docker logs --tail 200 certimate
docker inspect certimate
Look for missing timezone paths, inaccessible mounts, invalid filesystem permissions, image startup errors, or other host-level failures. The restart policy may make a broken container appear intermittently in the running list, so inspect both its current state and logs.
The browser cannot reach 127.0.0.1:8090
Confirm that the browser is running on the Docker host. The address 127.0.0.1 always refers to the device making the request. If the browser runs on another computer, it points back to that computer, not the Certimate server.
Next, verify that the container is running and that Docker published the expected port:
docker ps --filter name=certimate
docker port certimate
Resolve local reachability before investigating Localtonet. If the service does not answer locally, changing tunnel settings will not correct it.
Certimate appears empty after container recreation
The replacement container may have been launched from a different current directory. Because the documented bind mount uses $(pwd)/data, changing directories changes the host storage path. Stop before creating new configuration, inspect the mount, and locate the original data directory.
Docker's inspection output can help identify mounted host and container paths:
docker inspect certimateDo not merge directories or overwrite files blindly. Restore from a verified backup or recreate the container with the correct original host directory.
The public Localtonet address does not load
Check the layers in order:
- Verify Certimate locally at the target address and port.
- Verify that the Localtonet client is running on the selected device.
- Verify that the selected device is connected.
- Verify that the HTTP tunnel targets the correct IP address and port.
- Verify that the tunnel has been started, not merely created.
- Retest the assigned public address.
If the client is on another device, test whether that device can reach the Certimate host directly. A loopback-only Docker binding intentionally prevents another machine from reaching the service.
The public address loads the wrong application
Confirm the local target port and inspect which service is actually listening there. A wrong page usually indicates an incorrect target address, an unexpected port mapping, or another service occupying the selected host port. Do not solve this by exposing additional ports until the process ownership is understood.
Certificate issuance fails even though remote administration works
The administration tunnel and ACME challenge are different paths. A working dashboard only proves that an administrator can reach Certimate. For DNS-01, inspect DNS provider authorization, zone selection, and record propagation. For HTTP-01, verify that the challenge route satisfies the certificate authority's public validation requirements. Also inspect the selected certificate authority, requested names, workflow logs, and provider permissions.
The service works, but timezone behavior is unexpected
Confirm that the host timezone files exist and that the container received the documented read-only mounts. Timezone handling varies across host operating systems. Do not create fake timezone files solely to make the command execute. Use platform-appropriate guidance when the documented Linux paths are unavailable.
Frequently asked questions
What URL does Certimate use after the Docker installation?
The documented local address is http://127.0.0.1:8090. Open it on the Docker host for the first verification. If you use another device, 127.0.0.1 points to that device rather than the server, so the service needs an intentionally reachable host address and compatible Docker port binding.
What are Certimate's initial administrator credentials?
The published quick-start credentials are admin@certimate.fun with password 1234567890. Use them only for the first local sign-in and replace the password before exposing the interface. Verify that the default password no longer works.
Where does the Docker deployment store Certimate data?
The documented command maps $(pwd)/data on the host to /app/pb_data in the container. The host path depends on the current directory from which the command is executed. Record that path, protect it, and include it in a tested backup process.
Does restarting or replacing the container erase Certimate?
A normal restart should retain state when the persistent mount is correct. Replacing the container should also preserve state if the replacement uses the same host directory. Launching from a different directory changes $(pwd)/data and can make the application appear empty. Persistent storage is not a substitute for backups.
Does the Localtonet HTTP tunnel issue certificates for Certimate?
No. The tunnel in this guide provides remote access to Certimate's browser interface. Certificate issuance remains a Certimate workflow using the selected ACME certificate authority and DNS-01 or HTTP-01 validation. Each challenge must be configured according to its own requirements.
Does Localtonet require router port forwarding?
No. Our client establishes an outbound connection to a Localtonet relay server. This allows the HTTP tunnel to expose the local service without inbound router port forwarding, firewall changes, VPN setup, or a public IP address.
Does a created Localtonet tunnel start automatically?
Creating a tunnel does not mean it is running. The selected client must be connected and the tunnel must be started with the Start button. It can later be stopped or deleted. The public address is available only while the client is connected and the tunnel is running.
Should the Localtonet client run on the Docker host?
Running it on the same host is straightforward because the HTTP tunnel can target 127.0.0.1:8090. It can also run on another device that can reach Certimate, but that device must use the Certimate host's reachable address. A loopback-only Docker binding will not accept connections from another machine.
Can I leave the Certimate tunnel running continuously?
The tunnel can remain available while the client is connected and the tunnel is running, but whether continuous exposure is appropriate depends on your security policy. For an administrative interface containing sensitive certificate and provider configuration, stopping the tunnel when it is not needed reduces the exposure window.
Is the latest Docker image always safe to install automatically?
The official quick start uses the moving latest tag, but automated replacement without review can introduce application changes or migration requirements. Review the applicable release information, back up persistent data, record the current deployment, and verify the updated service locally before restoring remote access.
Connect your secured Certimate dashboard with Localtonet
After Certimate works locally, its default administrator password has been replaced, and its persistent data is protected, create a Localtonet HTTP tunnel to reach the dashboard through a public HTTPS address without opening an inbound router port.
Get Started Free →

