

Run persistent AI teammates on your own server and reach them through a public HTTPS address
Rakazo is an open-source platform for persistent AI teammates, with a web application plus desktop and mobile clients that connect to the same API. This guide installs Rakazo using its published Docker images, verifies the service at http://127.0.0.1:5173, and then connects that local HTTP endpoint through Localtonet. It also covers the source-based development path, optional remote computer providers, Linux service installation for our client, public-host security, routine operations, backups, upgrades, and layer-by-layer troubleshooting.
📋 What's in this guide
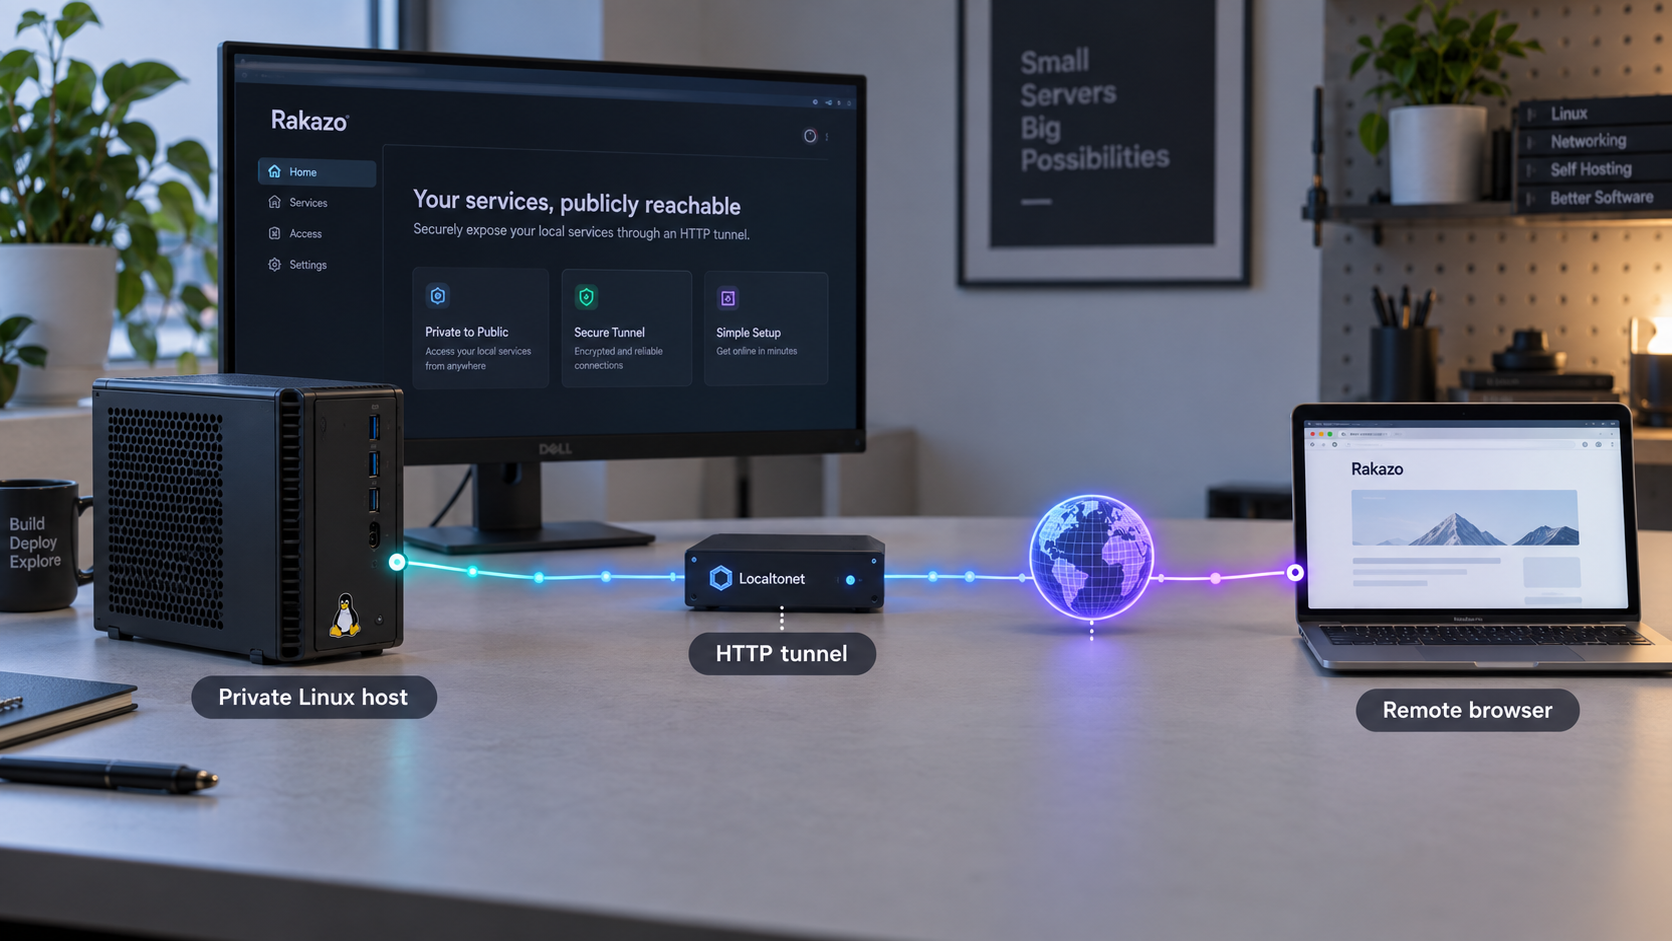
What you are deploying
Rakazo is an open-source platform for running persistent AI teammates. Bots can maintain their own conversations, memory, routines, and history while using browser, terminal, file, and graphical desktop capabilities. The project supports bring-your-own model credentials and several computer providers, including local Docker computers and the optional E2B, Daytona, CreateOS, and Box services.
The application stack includes a React and Vite web interface, a backend API, PostgreSQL storage, workers, and computer or sandbox integrations. Rakazo also provides Electron desktop and Expo mobile clients. Those clients connect to the same Rakazo API used by the browser interface, so one remotely reachable server can support browser, desktop, and mobile access.
Rakazo is currently described by its maintainers as beta software. Treat the deployment as an actively changing application. Preserve configuration, maintain tested database backups, review current self-hosting guidance before upgrades, and validate changes before depending on the server for important workloads.
http://127.0.0.1:5173, which is the endpoint used by the Localtonet HTTP tunnel.
How Localtonet fits into the stack
Rakazo must work locally before it can be exposed remotely. After the web service responds on the server, the Localtonet client establishes an outbound connection from that server to one of our relay servers. An HTTP tunnel then forwards its public HTTPS address to Rakazo’s local HTTP listener.
This arrangement does not require inbound router port forwarding, firewall changes, VPN setup, or a public IP address. Rakazo can remain bound to loopback when the Localtonet client runs on the same server. The public endpoint remains dependent on two separate services: Rakazo must be healthy, and the selected Localtonet client and tunnel must be connected and running.
Localtonet exposes a service that already works on the target machine. It does not initialize Rakazo, migrate PostgreSQL, configure a model provider, or repair an unhealthy container. Always verify http://127.0.0.1:5173 on the Rakazo host before investigating the public address.
Prerequisites and deployment choices
The shortest documented installation path uses Rakazo’s published container images. It requires Docker Engine, the Docker Compose plugin, curl, and OpenSSL. It does not require Node.js, pnpm, Git, or a source checkout.
The server also needs enough CPU, memory, disk capacity, and network access for Rakazo and whichever browser or computer workloads you enable. Rakazo’s current public quick-start material does not establish one universal resource minimum. Requirements vary with bot activity, retained data, local browser workloads, and whether computers run locally or through a remote provider.
| Installation path | Best for | Required tools | Important behavior |
|---|---|---|---|
| Published images | Normal self-hosted installation | Docker Engine, Compose plugin, curl, OpenSSL | The installer downloads Compose files, generates random secrets in .env, and starts Rakazo. |
| Prepare-only published images | Servers that need provider or public-host configuration before startup | The same published-image prerequisites | The installer prepares the deployment, lets you edit .env, and starts it when rerun normally. |
| Source checkout | Development and source-level changes | Git, Docker, pnpm 9, OpenSSL, and a supported Node.js release | You install dependencies, start PostgreSQL, apply migrations, build the sandbox, and run development processes. |
Supported Node.js versions for source development
The source workflow supports Node.js 22.22.2 or newer within the 22.x line, Node.js 24.x, or Node.js 26 and newer. Node.js 23.x and 25.x are not supported. The source workflow also requires pnpm 9 and Docker.
These version requirements do not apply to the published-image installation because that workflow does not require a host-side Node.js installation.
Plan the network boundary
Rakazo’s HTTP endpoint is the service intended for browser and client access. Do not expose PostgreSQL as a substitute. The default Compose arrangement keeps PostgreSQL network-internal. The source-development overlay can publish PostgreSQL only on loopback at 127.0.0.1:5433 for host-side pnpm commands and database tools.
For the simplest deployment, run our client on the Rakazo server and configure the tunnel target as 127.0.0.1 on port 5173. If the Localtonet client runs on another device, it must use an address through which that device can actually reach Rakazo. Another machine’s 127.0.0.1 always points back to that other machine.
The remote-facing service in this tutorial is Rakazo’s HTTP application on port 5173. Do not create a public tunnel to port 5433 or to the Compose-internal PostgreSQL service. Keep the database internal or loopback-only and limit administrative access separately.
Install Rakazo with published Docker images
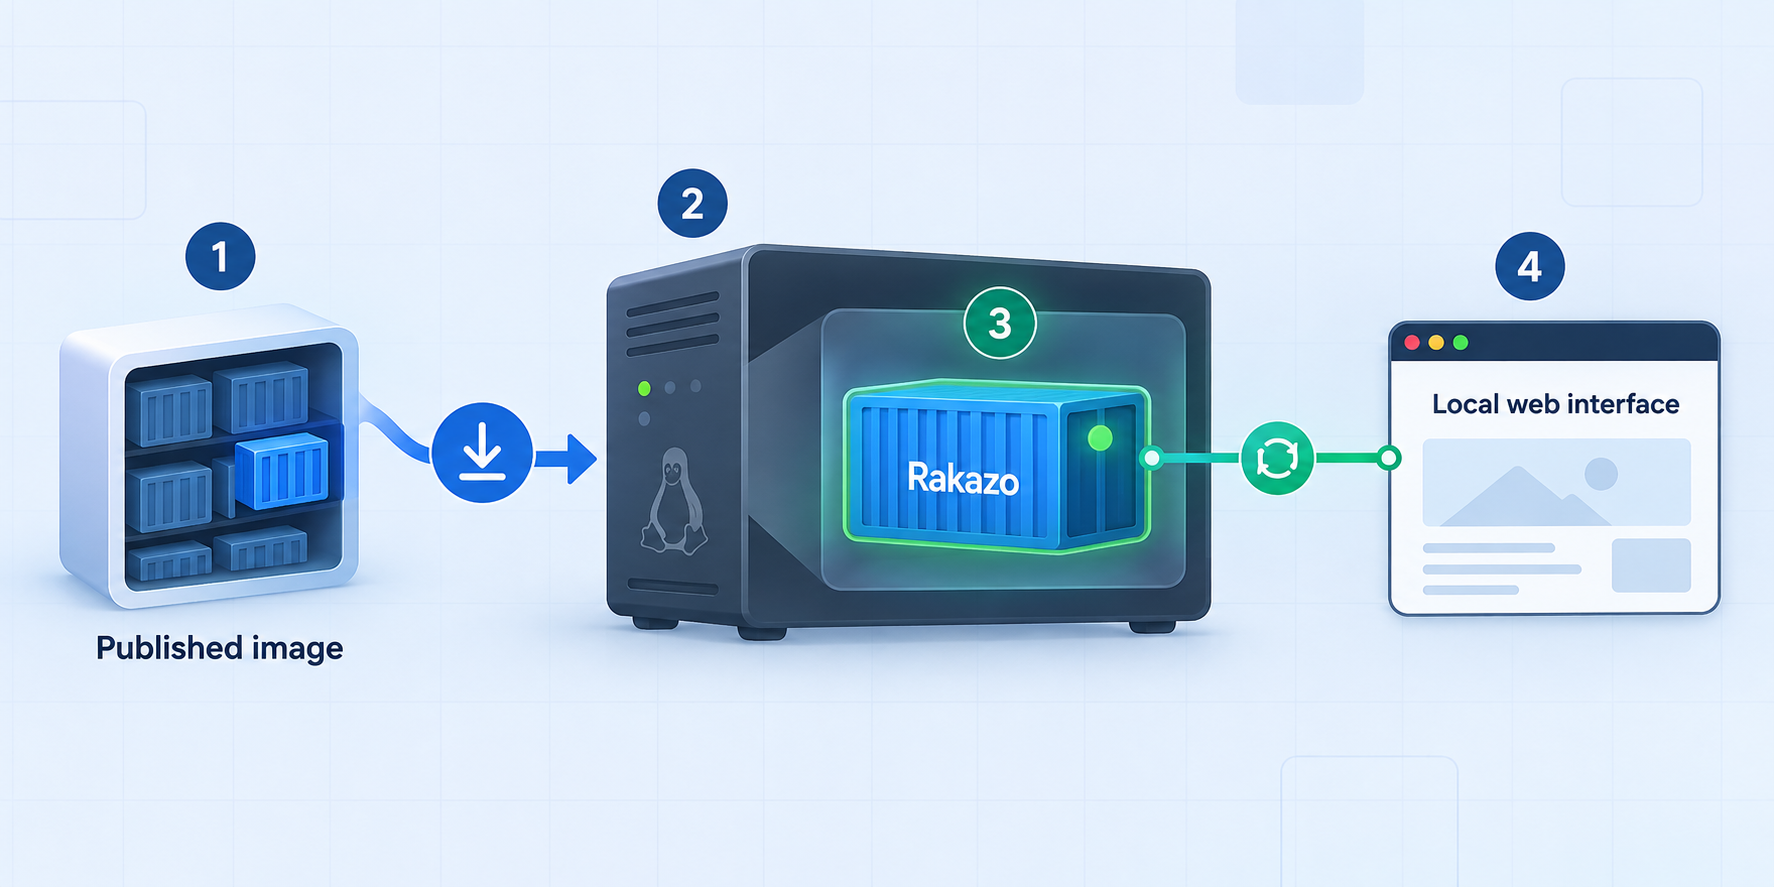
Create a dedicated directory, download the official image installer from the Rakazo repository, and run it:
mkdir -p rakazo && cd rakazo && curl -fsSLO https://raw.githubusercontent.com/elie222/rakazo/main/infra/compose/install-images.sh && bash install-images.sh
The script downloads the required Compose files, creates .env with random secrets, and starts Rakazo. Let it complete before opening the application. If the script reports an error, resolve that error before creating a tunnel.
The default published-image tag is edge. It tracks builds from the main branch and is available for linux/amd64 and linux/arm64. Because the contents of an edge tag can change, pulling the current image is an upgrade action rather than a neutral restart. Back up the database and configuration before refreshing images.
Rakazo’s installer preserves an existing .env when rerun. This prevents routine installer use from silently replacing the deployment’s secrets. It does not replace a separate backup of the environment file or PostgreSQL data.
Prepare a server before starting it
Use prepare-only mode when you need to select a remote computer provider or configure the externally used host before the first startup:
bash install-images.sh --prepare-only
Edit the generated .env, then run:
bash install-images.sh
Rakazo currently lists e2b, daytona, createos, and box as optional remote computer providers. Set SANDBOX_PROVIDER only to the provider you intend to use and add the matching provider credential. Do not set several unrelated provider keys merely because they appear in an example.
Configure CreateOS when selected
Rakazo documents the following provider value and credential for CreateOS:
SANDBOX_PROVIDER=createos
CREATEOS_SANDBOX_API_KEY=your-private-provider-key
Keep the real API key out of shell history, screenshots, support messages, and source control. CreateOS also supports these optional variables:
CREATEOS_SANDBOX_BASE_URL, defaulting tohttps://api.sb.createos.shCREATEOS_SANDBOX_SHAPE, defaulting tos-2vcpu-2gbCREATEOS_SANDBOX_ROOTFS, defaulting todesktop:1
Leave the optional values unset unless your CreateOS deployment requires different settings. Provider capabilities, billing, credentials, and service limits remain the responsibility of the selected provider.
Restricted download networks
Rakazo documents several options for environments that cannot retrieve the default installer assets directly. The download base can be overridden with RAKAZO_DOWNLOAD_BASE. Existing Compose files can be retained with --local or RAKAZO_DOWNLOAD_SKIP_EXISTING. The bootstrap script URL can also be mirrored.
A mirror becomes part of the software supply chain. Use only a mirror you control or trust, verify what it serves, and synchronize files intentionally. A successful download does not establish that a mirrored script is authentic.
Configure credentials, providers, and the public host
Protect Rakazo’s .env as a credential store. Depending on the deployment, it can contain database credentials, authentication secrets, encryption-related values, model keys, computer-provider keys, and integration tokens. Restrict its filesystem access and never place it under a publicly served directory.
Use independent secrets
For a source installation, POSTGRES_PASSWORD must match the password embedded in DATABASE_URL. Rakazo recommends a URI-safe password and gives the following generation command as an example:
openssl rand -hex 16
Rakazo also requires BETTER_AUTH_SECRET, ENCRYPTION_KEY, and SCREEN_PROXY_SECRET to contain independent long random values. Docker sandboxes require a dedicated SANDBOX_SUPERVISOR_TOKEN.
Do not reuse the database password as an authentication secret, encryption key, screen proxy secret, sandbox token, provider API key, or Localtonet device token. Credential reuse turns a disclosure in one subsystem into a broader compromise.
Configure models and integrations
You can set OPENROUTER_API_KEY before startup or connect a supported model provider during onboarding. The interface can load without every optional integration, but a usable bot still requires a supported model configuration.
Managed application catalogs are optional. Rakazo documents COMPOSIO_API_KEY for Composio. Pipedream Connect requires PIPEDREAM_CLIENT_ID, PIPEDREAM_CLIENT_SECRET, and PIPEDREAM_PROJECT_ID together.
Users can also add an HTTPS MCP server, Treg endpoint, or OpenAPI JSON document from Rakazo’s Integrations area without enabling either managed catalog. Rakazo states that connector credentials are encrypted on the server and are not returned by its API. Treg is usage-metered, and self-hosters provide their own Treg token.
Set RAKAZO_HOST deliberately
Rakazo’s server workflow documents setting RAKAZO_HOST to the host through which users access the deployment. When Localtonet provides the public address, configure this value according to Rakazo’s current self-hosting guidance and the hostname users will actually enter.
Do not assume that RAKAZO_HOST changes the listening interface or replaces the tunnel target. The tunnel still connects to 127.0.0.1:5173 in the same-host deployment. The host setting belongs to Rakazo’s public-host and application behavior, while the Localtonet target controls where requests are forwarded.
Public-host behavior can change as Rakazo evolves. Use the current docs/self-host.md file from the same Rakazo revision or image you deploy before changing authentication origins, forwarded-header handling, proxy trust, or signup behavior. The currently supplied evidence confirms that the guide covers HTTPS and host hardening, but it does not expose every current hardening variable or reverse-proxy directive. We therefore do not invent those values here.
Alternative: install Rakazo from source
Choose the source workflow when you need to inspect or modify the code, contribute to Rakazo, or run its development processes. The published-image path is simpler for an ordinary persistent server.
Install the supported development tools
Install Git, Docker, pnpm 9, and Node.js 22.22.2 or newer in the 22.x line, Node.js 24.x, or Node.js 26 and newer.
Clone Rakazo and create the environment file
Clone the repository, enter its directory, and copy .env.example to .env.
Configure database and application secrets
Set the matching PostgreSQL values and independent application, encryption, proxy, and sandbox secrets before initialization.
Start PostgreSQL with the host overlay
Use the documented base Compose file and PostgreSQL host overlay so host-side development tools can reach loopback port 5433.
Install dependencies and apply migrations
Install the workspace, generate the database client, and apply migrations in the documented order.
Build the sandbox and start development
Build the sandbox, run pnpm dev, and keep the development processes active while using the application.
git clone https://github.com/elie222/rakazo.git
cd rakazo
cp .env.example .env
After configuring .env, start PostgreSQL:
docker compose --env-file .env \
  -f infra/compose/docker-compose.yml \
  -f infra/compose/docker-compose.postgres-host.yml \
  up postgres -d
Install dependencies, initialize the database, build the sandbox, and start the development environment:
pnpm install
pnpm db:generate
pnpm db:migrate
pnpm sandbox:build
pnpm dev
Access PostgreSQL without the host overlay
Without the host overlay, PostgreSQL remains inside the Compose network. Rakazo documents opening a PostgreSQL shell through the running container:
docker compose --env-file .env -f infra/compose/docker-compose.yml exec postgres sh -c 'psql -U "$POSTGRES_USER" -d "$POSTGRES_DB"'Understand persistent volume identity
An existing pgdata volume retains the database user, password, and database created during its first initialization. Keep matching values in .env, or deliberately change the stored database values with an appropriate PostgreSQL administration procedure.
Running docker compose down -v deletes all PostgreSQL state associated with that Compose project. Use it only when the data is disposable or after creating and verifying a restorable backup.
Verify Rakazo locally before exposing it
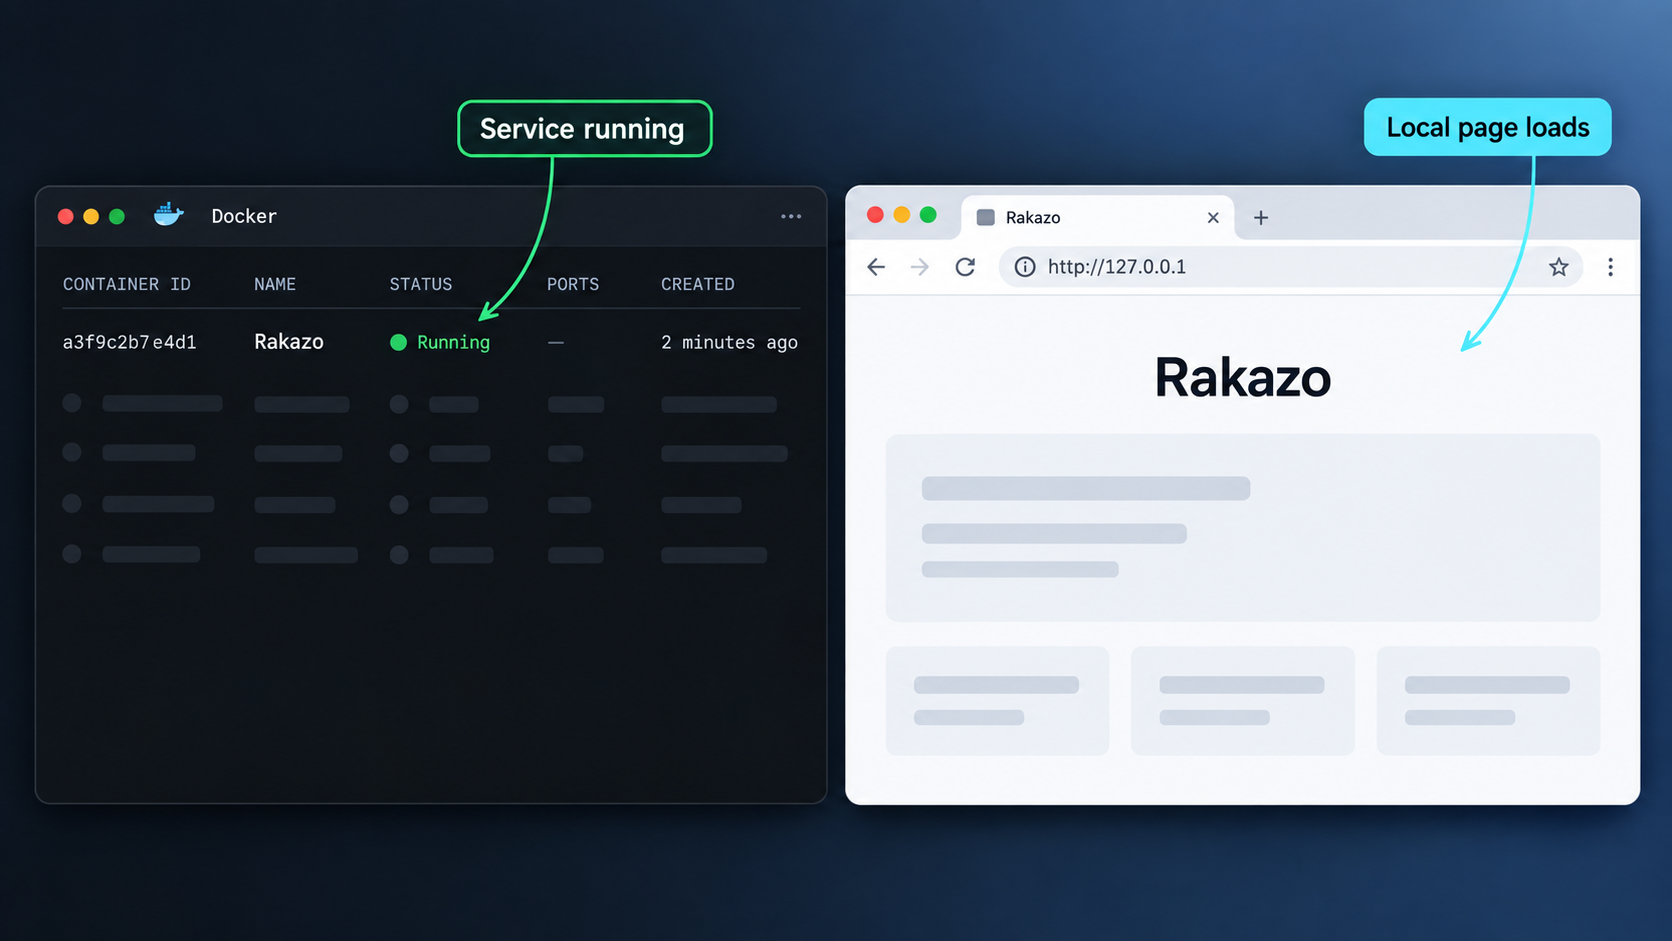
Open the following address on the Rakazo host:
http://127.0.0.1:5173A successful installation should present the Rakazo web interface. Create an account, complete onboarding, connect a model if one was not configured in advance, and create a first bot. The published-image installation enables local Docker computers by default.
Do not proceed only because containers exist. Confirm that a browser receives the interface, that the expected authentication or onboarding screen loads, and that the deployment remains healthy after an intentional restart.
Local verification checklist
- The installer completed without an unresolved error.
- The expected containers or development processes remain running.
http://127.0.0.1:5173loads from the server.- The account creation or sign-in interface appears as expected.
- Onboarding can connect a supported model using credentials you control.
- The deployment retains its data and configuration after a controlled restart.
- PostgreSQL is not included in the public-access plan.
Why loopback is useful
The address 127.0.0.1 is the server’s IPv4 loopback interface. A service bound there can be reached by processes on that server without listening on every network interface. When the Localtonet client runs on the same host, it can forward the local service while Rakazo remains unavailable through a direct inbound connection to port 5173.
A container, virtual machine, or separate computer has its own loopback interface. If the Localtonet client runs in one of those environments, determine a target address that genuinely reaches the Rakazo host and restrict that network path appropriately. There is no universal container gateway or hostname that applies to every deployment.
Install the Localtonet client as a Linux service
A persistent Rakazo server should normally use a persistent Localtonet client. Our installable DEB and RPM packages support x64 and ARM64 and require systemd 247 or newer plus OpenSSL 3. Examples of compatible distributions include Debian 12, Ubuntu 22.04 or newer, and RHEL 9.
Download the package that matches the server’s distribution and CPU architecture from the Localtonet documentation. Do not install an x64 package on ARM64 or copy a package command for a different distribution.
Debian or Ubuntu
Install the downloaded DEB package
Open a terminal in the directory containing the package and install the file matching the server architecture.
Set and protect the AuthToken
Replace the placeholder in /etc/localtonet/auth-token with the device-specific token on one line, restrict the file to its owner, and run the configuration check.
Enable and verify the systemd service
After the configuration check succeeds, enable the standard Localtonet service immediately and inspect its status or journal.
For an x64 package:
sudo apt install ./localtonet-linux-x64.debFor an ARM64 package:
sudo apt install ./localtonet-linux-arm64.deb
Edit /etc/localtonet/auth-token as root and replace DUMMY_AUTH_TOKEN with the real device token on a single line. Do not display the token in this tutorial, a screenshot, or a shared terminal transcript. Then run:
sudo chmod 600 /etc/localtonet/auth-token
sudo localtonet --headless --authtoken-file /etc/localtonet/auth-token --check-config
Start the standard tunneling service only after the configuration check succeeds:
sudo systemctl enable --now localtonet.service
sudo systemctl status localtonet.service
sudo journalctl -u localtonet.service
The journal command displays service events and remains an important diagnostic tool if the client cannot connect. Use Ctrl+C to leave a continuously displayed journal.
Fedora or RHEL
Install the matching RPM package:
sudo dnf install ./localtonet-linux-x64.rpmOn ARM64, use the downloaded ARM64 package instead:
sudo dnf install ./localtonet-linux-arm64.rpmThe AuthToken file, permission check, configuration validation, systemd enablement, and journal commands are the same:
sudo chmod 600 /etc/localtonet/auth-token
sudo localtonet --headless --authtoken-file /etc/localtonet/auth-token --check-config
sudo systemctl enable --now localtonet.service
sudo systemctl status localtonet.service
sudo journalctl -u localtonet.service
This guide creates an HTTP tunnel, not a VPN. Run localtonet.service. Do not switch to localtonet-vpn.service unless you are intentionally configuring Localtonet VPN Manager for a separate use case.
Other operating systems
Localtonet also provides Windows, macOS, Docker, Android, and other Linux downloads. Their startup and persistence mechanisms differ. Follow the current platform-specific instructions in our documentation rather than translating the systemd commands to an unsupported operating system.
Create and start the Localtonet HTTP tunnel
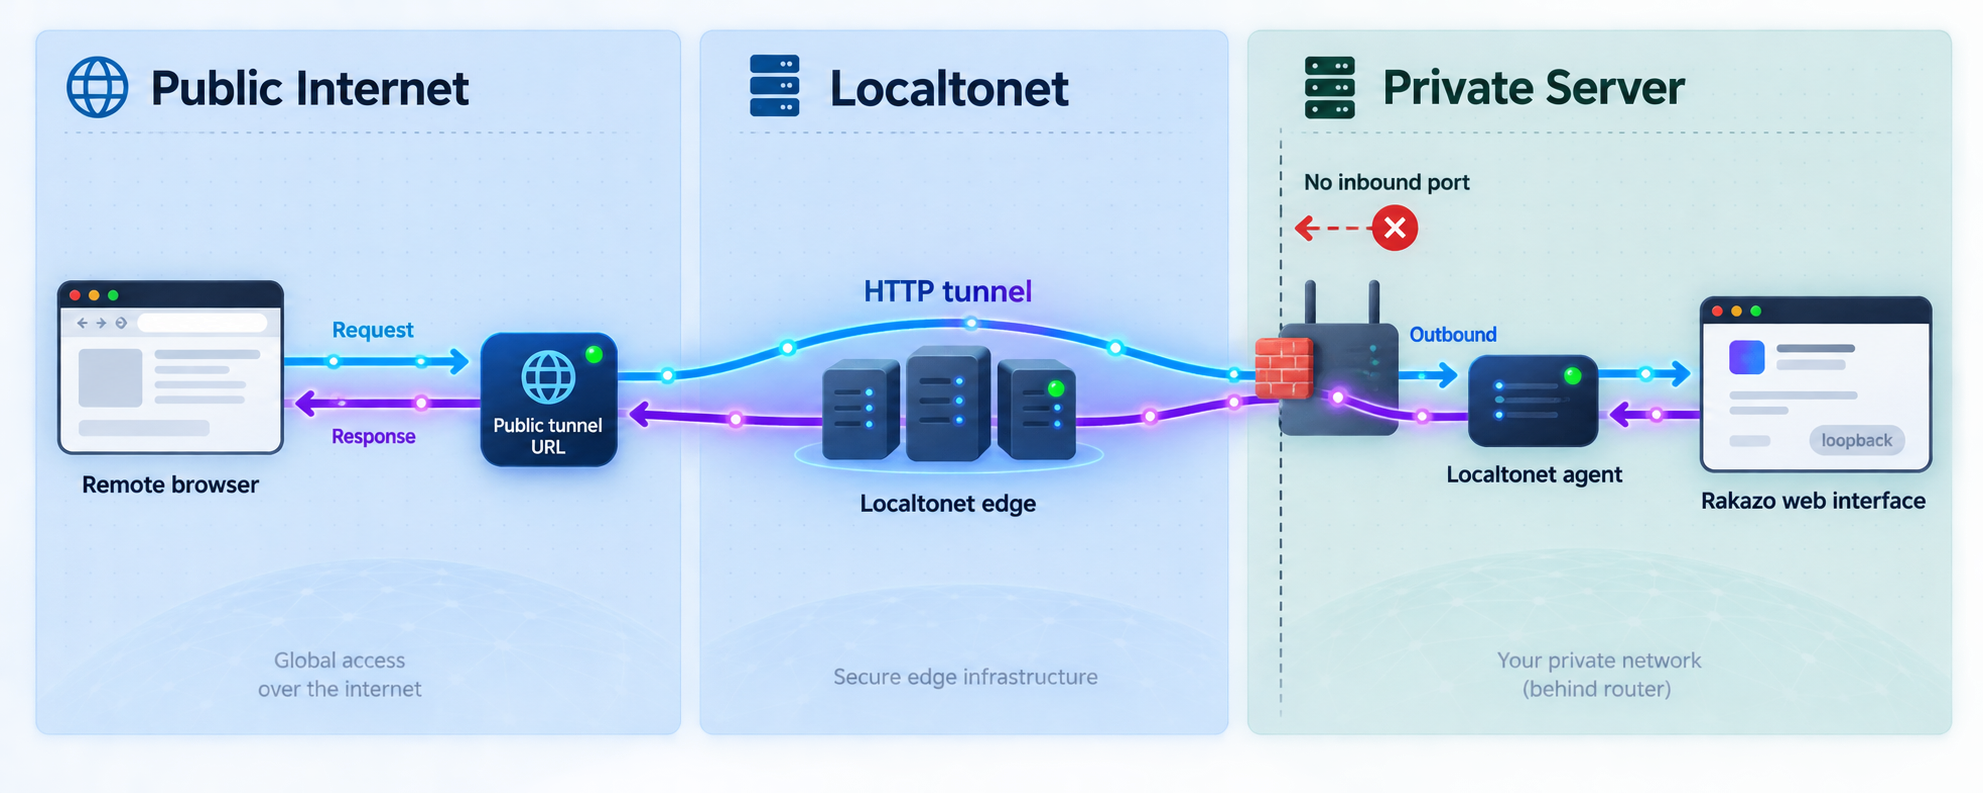
After Rakazo and the Localtonet service both pass their local checks, create an HTTP tunnel. When our client runs directly on the Rakazo server, use local IP 127.0.0.1 and local port 5173.
Confirm the Rakazo device is connected
Verify that the AuthToken identifies the intended server and that localtonet.service is running without a configuration error.
Select an available relay server
Choose a relay server or region currently available in the dashboard. Do not copy a stale server code from another tutorial.
Create an HTTP tunnel
Select the HTTP tunnel type and enter 127.0.0.1 as the local IP address and 5173 as the local port.
Choose the process type
Use Random Sub Domain, Custom Sub Domain, or Custom Domain where available. All three serve the selected local content through a public HTTPS address.
Start the tunnel
Creating the configuration does not make it run. Select Start and wait for the tunnel to become available.
Verify the public HTTPS address
Open the assigned URL from another browser session or network. Confirm that Rakazo loads, authentication works, and normal application requests complete.
| Process type | Typical use | Unchanged local target |
|---|---|---|
| Random Sub Domain | Initial testing or temporary access | 127.0.0.1:5173 |
| Custom Sub Domain | A selected subdomain where supported | 127.0.0.1:5173 |
| Custom Domain | A hostname controlled by the operator | 127.0.0.1:5173 |
Check current DNS requirements before using a custom domain. Available relay locations, process types, account capabilities, and plan limits can vary, so use current dashboard values instead of hardcoding them.
A configuration screenshot can be helpful here, but it must show the current dashboard and must redact the device token and private account details. No approved screenshot URL was supplied for this revision, so this article does not invent or embed one.
Connect desktop and mobile clients
Rakazo’s desktop and mobile applications use the same API as the web interface. For a server deployment, the desktop application supports choosing Existing instance and entering the server’s https:// address. A running Localtonet HTTP tunnel supplies that address.
Do not enter http://127.0.0.1:5173 on a remote laptop or phone. On those devices, loopback refers to the laptop or phone itself.
Harden Rakazo before leaving it public
The tunnel supplies connectivity and an HTTPS address. It does not replace Rakazo authentication, provider authorization, account controls, or operating-system security. A public URL makes Rakazo’s web and authentication surfaces reachable from the internet.
Review account registration exposure
The local quick start instructs the initial operator to create an account. Before leaving a public deployment online, test the public URL in a private browser session and determine whether the current Rakazo version still presents registration to unauthenticated visitors.
Follow the signup-hardening procedure documented by the exact Rakazo revision you deploy. The supplied repository extract does not include the current setting name or a complete disable-registration procedure, so this article does not guess one. If registration cannot be restricted as required, keep the tunnel stopped except during controlled access or place an appropriate verified access layer in front of the application.
Use the public hostname consistently
Set RAKAZO_HOST according to the externally used host and Rakazo’s current self-hosting documentation. Test sign-in, redirects, browser requests, desktop-client connection, and any screen or proxy functionality through the final HTTPS hostname rather than validating only the local URL.
Rakazo’s self-hosting guidance also covers putting HTTPS in front of port 5173 and host hardening. Localtonet terminates TLS at the tunnel edge for the public HTTPS address, but Rakazo must still interpret the externally used host and scheme correctly. Do not add arbitrary proxy-trust or forwarded-header settings unless the current Rakazo documentation requires them.
Apply least privilege
- Use strong, unique Rakazo account credentials.
- Limit which people receive the public address.
- Do not treat an unguessable subdomain as authorization.
- Grant model and computer providers only the permissions the deployment needs.
- Review bot approvals, routines, integrations, and audit information regularly.
- Keep the host operating system, Docker installation, Rakazo images, and Localtonet package maintained.
- Stop the tunnel when continuous public access is unnecessary.
A Rakazo account may reach models, browsers, computers, files, and external integrations. Protecting only the public URL is not sufficient. Secure the application account, provider accounts, server, environment file, Localtonet token, and recovery backups as separate trust boundaries.
Operate, back up, and update the deployment
Understand the two-part service lifecycle
Rakazo and Localtonet have independent lifecycles. Rakazo’s containers must remain healthy for bots and clients to use the server. The Localtonet systemd service must remain connected, and the configured tunnel must be started, for the public address to work.
Stopping the tunnel removes public access without deleting Rakazo data. Stopping Rakazo leaves the tunnel configuration in place but gives it no healthy application to forward. Use that distinction when planning maintenance.
Inspect the Localtonet service
sudo systemctl status localtonet.service
sudo journalctl -u localtonet.service
sudo journalctl -u localtonet.service -n 100 --no-pager
Restart the client after an intentional service-level change:
sudo systemctl restart localtonet.service
sudo systemctl status localtonet.service
To stop the client and prevent all tunnels on that device from operating:
sudo systemctl stop localtonet.serviceStart it again with:
sudo systemctl start localtonet.serviceFor a package upgrade, install the new matching package and restart the service. The package workflow preserves its configuration:
sudo systemctl restart localtonet.serviceInspect Rakazo without guessing its Compose invocation
The published-image installer downloads multiple Compose files. Exact file names and helper commands can change with the edge branch. Use the operation commands in the current docs/self-host.md file and the generated deployment files from the same installer revision.
Do not run a bare docker compose down, restart, or logs command until you have confirmed that it selects the same Compose files and project used by the installer. Selecting only one file from a multi-file deployment can produce incomplete status information or operate on the wrong service definition.
At minimum, inspect the files generated in the Rakazo directory and record the exact Compose command used by that deployment. The corresponding current self-hosting commands should cover:
- Listing service and container status
- Following or retrieving application and PostgreSQL logs
- Restarting the running stack without deleting volumes
- Stopping the stack while preserving persistent data
- Pulling or installing an intended image version
- Backing up PostgreSQL before an upgrade
- Restoring into a compatible deployment
- Returning to a previously tested image tag when rollback is supported
The current repository evidence supplied for this revision confirms that docs/self-host.md covers deployment, backups, and upgrades, but it does not include the guide’s exact current Compose prefixes, backup pipeline, restore command, or rollback variables. Because the default edge deployment changes with the main branch, publishing guessed commands would be unsafe. Use the commands from the self-hosting guide at the exact Rakazo revision you install.
Update cautiously
Rerunning the published-image installer is the documented way to refresh the prepared deployment, and it preserves an existing .env:
cd rakazo
bash install-images.sh
Treat this as an application update when the image tag tracks edge. Before running it:
- Record the currently deployed image identifier or tag.
- Back up PostgreSQL using the current Rakazo self-hosting procedure.
- Back up
.envseparately and protect the copy as a secret. - Review current release, migration, and self-hosting notes.
- Plan how to restore the database and return to the previous tested image if validation fails.
- Run the update during a maintenance window.
- Verify local access before testing the tunnel.
Preserving .env does not preserve every kind of data. Environment backup and database backup are separate tasks. A usable rollback also depends on database-schema compatibility, so do not assume that selecting an older image automatically reverses a migration.
Back up and restore deliberately
A complete recovery plan should include the PostgreSQL data, the protected .env, the deployed Compose files, and a record of the tested Rakazo image version. Store backup credentials and application data according to their sensitivity.
Test restoration on an isolated deployment before relying on it. A backup file that has never been restored is not yet a verified recovery path. Do not use docker compose down -v as part of routine maintenance because the -v option deletes persistent PostgreSQL state.
Troubleshoot from PostgreSQL to the public URL
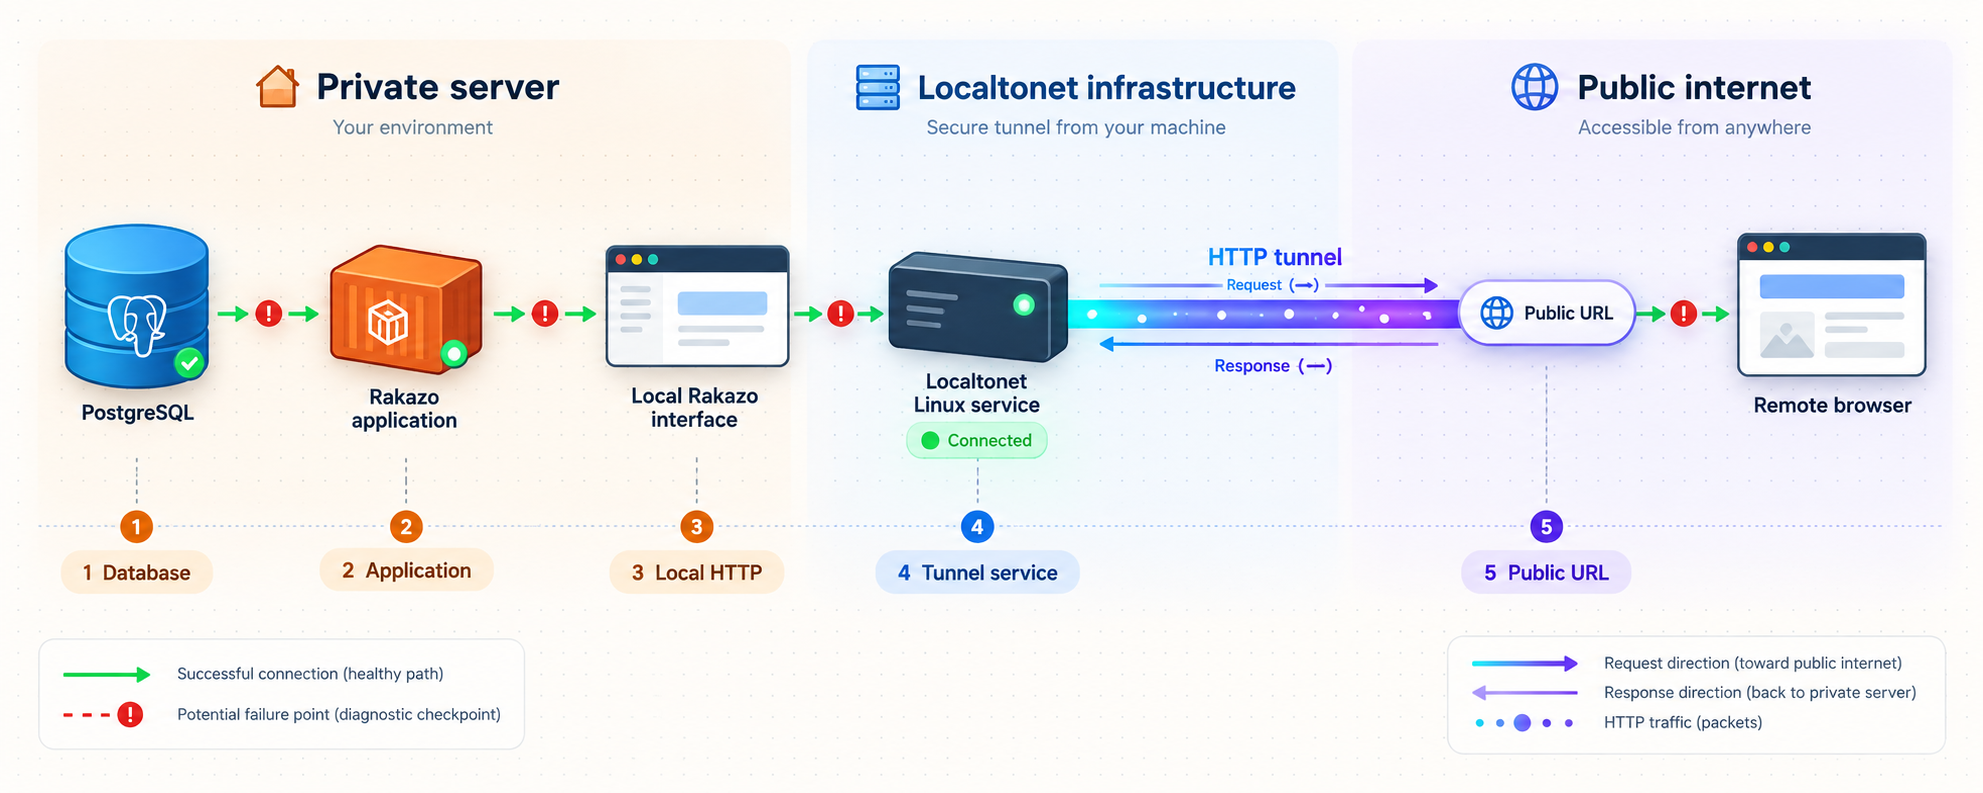
Work from the innermost dependency outward. This avoids changing tunnel settings when PostgreSQL is unhealthy or rotating application secrets when only the Localtonet service is stopped.
| Layer | Primary check | What failure means |
|---|---|---|
| PostgreSQL | Confirm the database container is running and review its logs with the exact Rakazo Compose command. | Rakazo may fail startup, migration, authentication, or data operations. |
| Rakazo | Open http://127.0.0.1:5173 on the server. |
The application or its local dependencies are unhealthy if this fails. |
| Localtonet client | Run systemctl status and inspect the systemd journal. |
The device cannot maintain its relay connection if the service is stopped or misconfigured. |
| HTTP tunnel | Confirm it is started and targets 127.0.0.1:5173. |
A connected client alone does not make an unstarted or mistargeted tunnel available. |
| Public application | Open the HTTPS URL from another browser session. | Host, authentication, redirect, or public-access behavior may differ from localhost. |
The local page does not open
Test from the Rakazo host using exactly http://127.0.0.1:5173. Confirm that the installer completed and that the relevant containers remain running. Use the exact published-image Compose command from the current self-hosting guide to inspect status and logs.
For a source checkout, confirm that pnpm dev is still running. Review its output for missing variables, unsupported Node.js versions, database errors, failed migrations, or sandbox build failures.
PostgreSQL rejects Rakazo
An existing pgdata volume retains the database user, password, and database from first initialization. Editing only .env does not retroactively change those stored values. Restore the matching values or deliberately update PostgreSQL using an appropriate administrative procedure.
Do not delete the volume merely to make new credentials take effect unless the data is disposable or a tested backup exists.
The Localtonet client is not connected
Run:
sudo localtonet --headless --authtoken-file /etc/localtonet/auth-token --check-config
sudo systemctl status localtonet.service
sudo journalctl -u localtonet.service -n 100 --no-pager
If the configuration check fails, correct the AuthToken file before restarting the service. Ensure the token occupies one line and that the file remains protected with mode 600. Never paste the token into a public issue while asking for help.
Localhost works, but the public URL does not
Confirm that localtonet.service is active and the device appears connected. Then check that the tunnel was actually started. Creating a tunnel does not start it.
Verify the target is 127.0.0.1 on port 5173. Do not use port 5433, a PostgreSQL service name, or an unrelated container port.
If our client runs on another host or inside an isolated container, 127.0.0.1 points to that client environment rather than the Rakazo server. Move the client to the Rakazo host or configure a target address that the client can legitimately reach.
The page loads, but authentication or redirects fail
Use the tunnel’s HTTPS URL rather than a local HTTP address. Review RAKAZO_HOST and compare it with the hostname users actually enter. Test in a private browser session to identify redirects, cookies, or signup behavior that an existing local session might hide.
Review the current Rakazo host-hardening and forwarded-header guidance before changing proxy settings. Do not rotate BETTER_AUTH_SECRET, ENCRYPTION_KEY, or SCREEN_PROXY_SECRET as a speculative fix. Changing persisted secrets can invalidate sessions or affect protected data.
A model, integration, or remote computer fails
Loading Rakazo proves that HTTP forwarding works. It does not prove that every external provider is configured or authorized. Check the relevant provider credential, account status, selected SANDBOX_PROVIDER, and provider-specific settings.
For CreateOS, confirm that SANDBOX_PROVIDER=createos and that CREATEOS_SANDBOX_API_KEY is valid. Review optional base URL, shape, and root filesystem values only if you intentionally changed them.
Pipedream Connect requires all three documented Pipedream values. Other providers use their corresponding credentials. Keep these errors separate from tunnel diagnosis when the Rakazo interface already loads publicly.
Source installation fails during dependency setup
Check the Node.js major version first. Node.js 23.x and 25.x are unsupported. Use Node.js 22.22.2 or newer within 22.x, Node.js 24.x, or Node.js 26 and newer with pnpm 9. Then repeat the documented sequence without skipping database generation, migrations, or the sandbox build.
Check PostgreSQL, Rakazo containers or development processes, the local URL, the Localtonet systemd service, the tunnel running state, and finally the public HTTPS URL. Stop at the first failing layer and repair it before changing anything farther out.
Frequently asked questions
What is the easiest way to self-host Rakazo?
The shortest documented route is the published-image installer. It requires Docker Engine, the Docker Compose plugin, curl, and OpenSSL. It creates the deployment files, generates random secrets in .env, and starts Rakazo without requiring Node.js or a repository clone.
Which address should the Localtonet tunnel target?
When the Localtonet client runs on the Rakazo server, configure an HTTP tunnel for local IP 127.0.0.1 and port 5173. If the client runs elsewhere, use an address through which that client can actually reach Rakazo.
Should PostgreSQL be exposed through Localtonet?
No. The intended public target is Rakazo’s HTTP application. PostgreSQL remains internal in the default deployment, while the source-development overlay publishes it only on loopback at 127.0.0.1:5433.
Does Localtonet require inbound port forwarding?
No. Our client establishes an outbound connection to a Localtonet relay server. This makes the selected service available without inbound router port forwarding, firewall changes, VPN setup, or a public IP address.
Does creating a tunnel start it automatically?
No. Creating the configuration and starting it are separate lifecycle actions. Use the Start control and keep the selected Localtonet client connected. You can later stop or delete the tunnel.
Can Rakazo use CreateOS as a computer provider?
Yes. Set SANDBOX_PROVIDER=createos and provide CREATEOS_SANDBOX_API_KEY. Rakazo also documents optional CreateOS base URL, shape, and root filesystem variables with defaults.
Can the Localtonet URL be used in the Rakazo desktop app?
Rakazo’s desktop application supports choosing Existing instance and entering an HTTPS server address. A running Localtonet HTTP tunnel provides such an address for the same Rakazo API.
Why should I be cautious when updating the edge image?
The default edge tag follows main-branch builds, so its contents can change. Back up PostgreSQL and .env, record the current image, review current upgrade guidance, and plan a schema-compatible rollback before refreshing it.
Is this HTTP tunnel a VPN?
No. This tutorial exposes one local web service through an HTTP tunnel. Localtonet VPN Manager is the separate feature for private mesh VPN networking.
Connect your verified Rakazo server with Localtonet
After Rakazo works locally at 127.0.0.1:5173, install our client as a protected systemd service and create an HTTP tunnel for a public HTTPS address without opening an inbound router port.


