

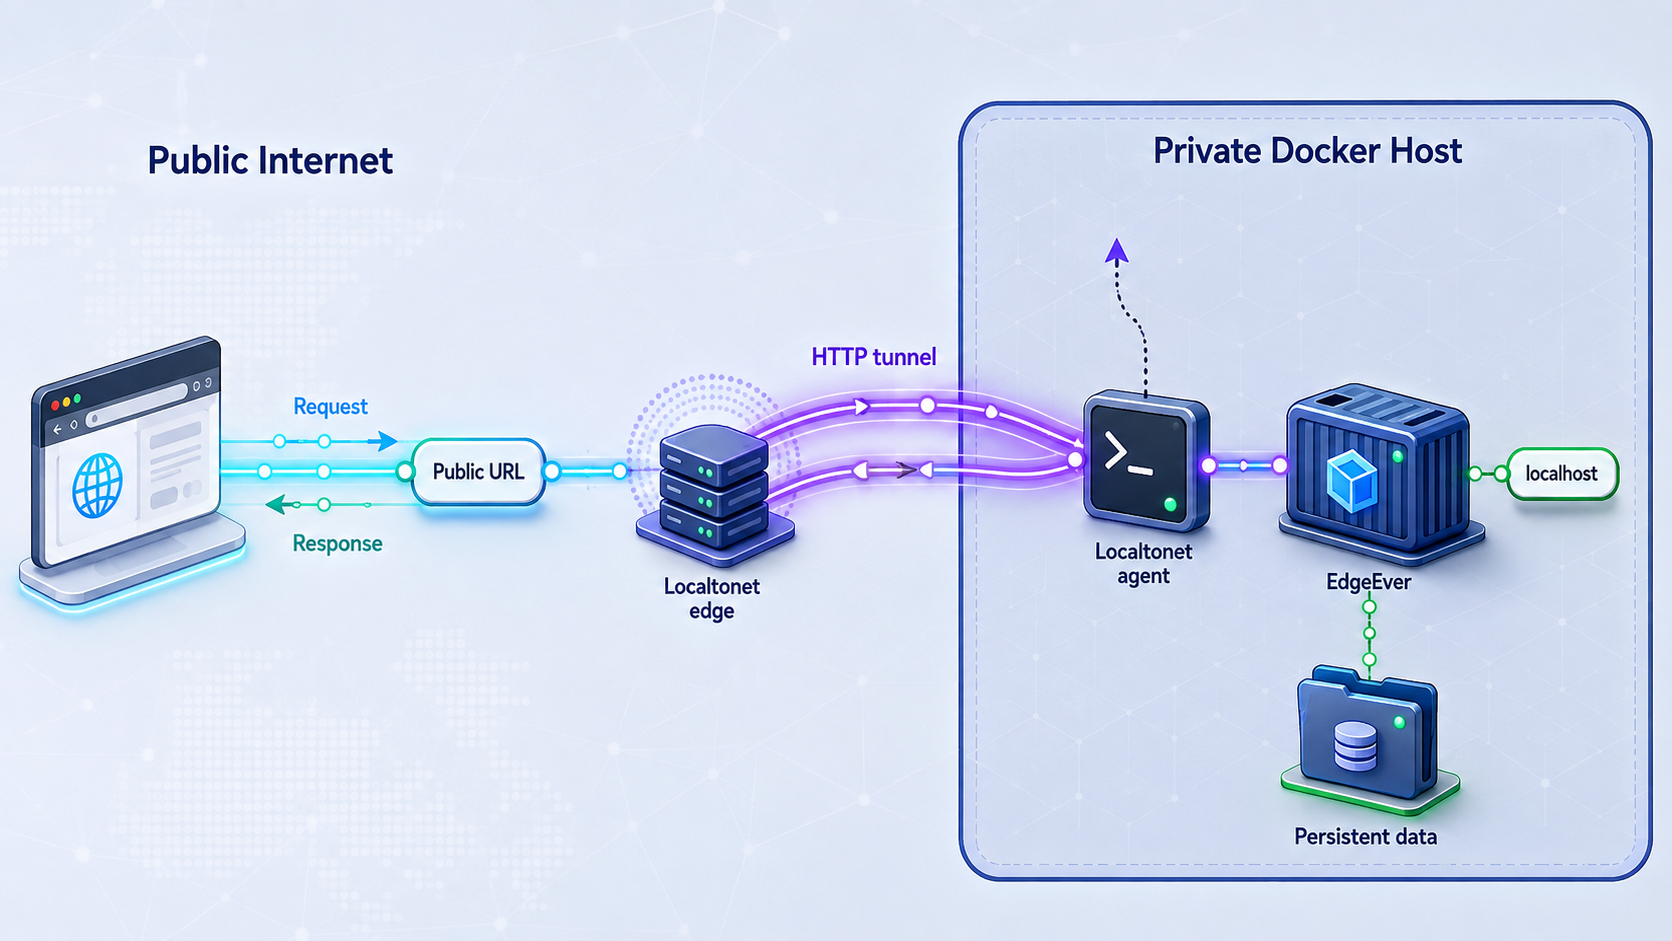
Deploy a private EdgeEver knowledge workspace, verify its data path, and expose only its authenticated web service
This tutorial follows EdgeEver's official one-line Docker installer for a VPS, NAS, or home server. You will inspect the installer before execution, identify the generated Compose project and host-side port, verify administrator access and persistence, plan backup and restoration, and check the deployment after restarts or updates. Once EdgeEver works locally, we will create a Localtonet HTTP tunnel that provides a public HTTPS address without inbound router port forwarding, firewall changes, VPN setup, or a public IP address.
📋 What's in this guide
How the EdgeEver and Localtonet architecture works
EdgeEver is an open-source notes and knowledge-base workspace with a classic notebook tree, note list, and editor layout. Its documented features include rich text and Markdown editing, nested notebooks, attachments, revision history, public note sharing, Mermaid diagrams, REST API and MCP access, single-note exports, and complete ZIP library exports. The project offers both a Cloudflare deployment model and a Docker deployment for a VPS, NAS, or home server.
This guide is specifically about the official Docker installer. EdgeEver's repository also contains a Compose definition, but administrators should not copy fragments from an article when the current repository file and installer can be inspected directly. Image tags, environment values, storage mappings, and port behavior can change between releases. The generated deployment on your host is therefore the authority for operational commands and tunnel targeting.
Docker runs EdgeEver and publishes its HTTP service on the host. Localtonet remains a separate access layer. Our client runs on the Docker host or another device that can reach it, establishes an outbound connection to a Localtonet relay, and forwards the public HTTPS address to EdgeEver's verified host-side address and port.
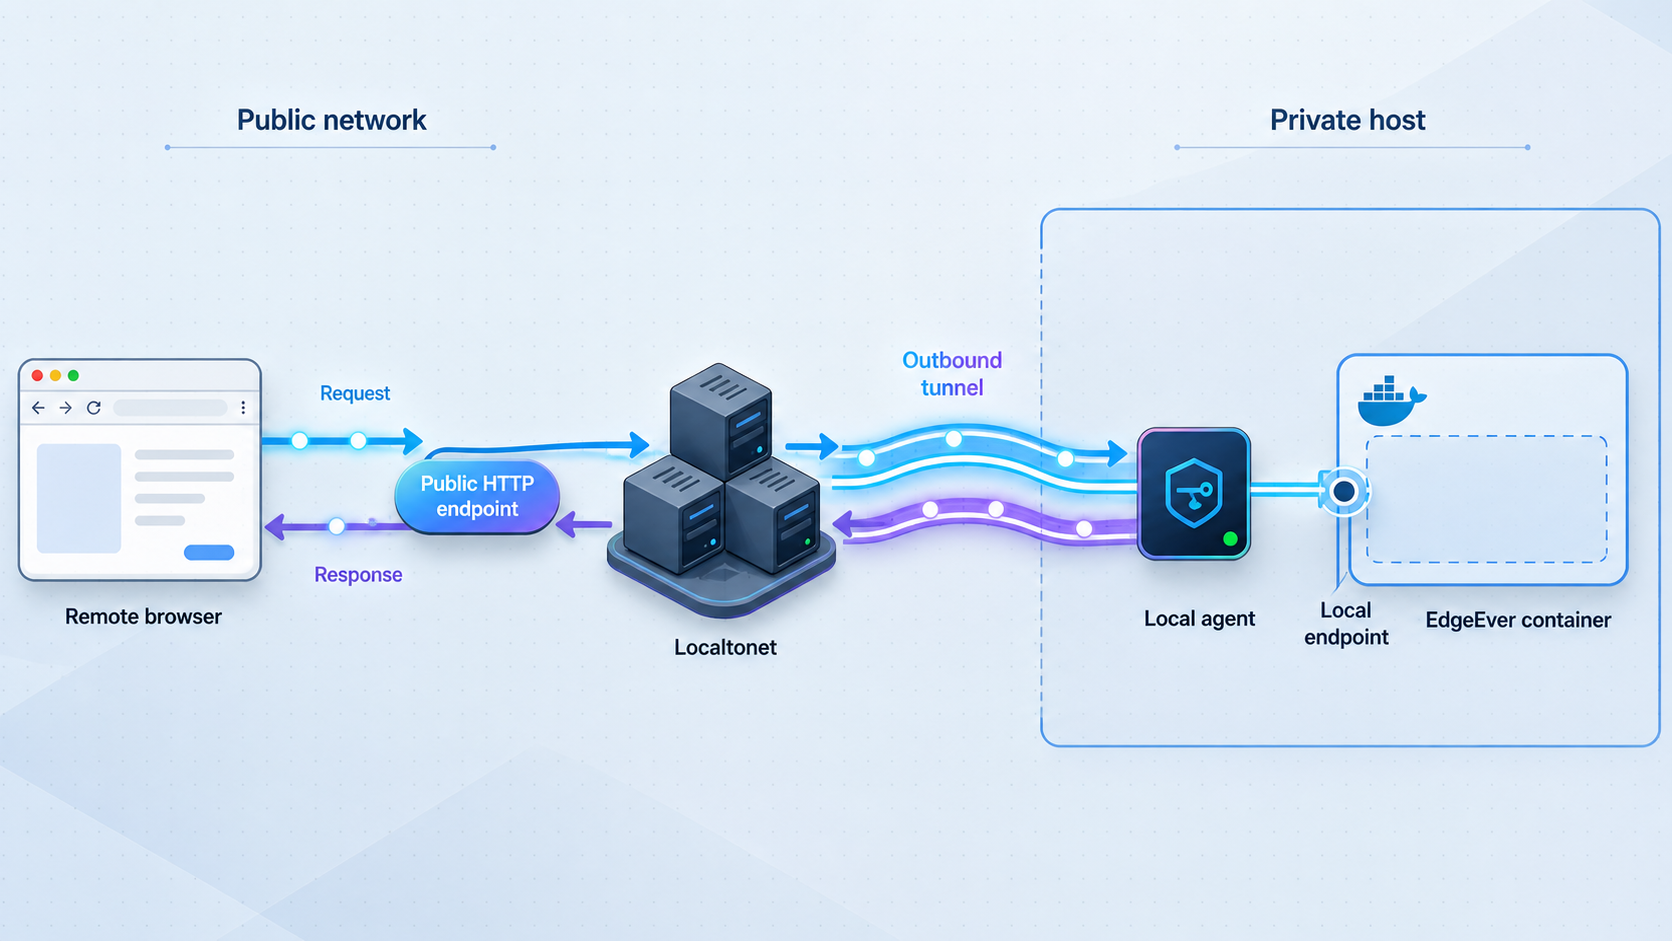
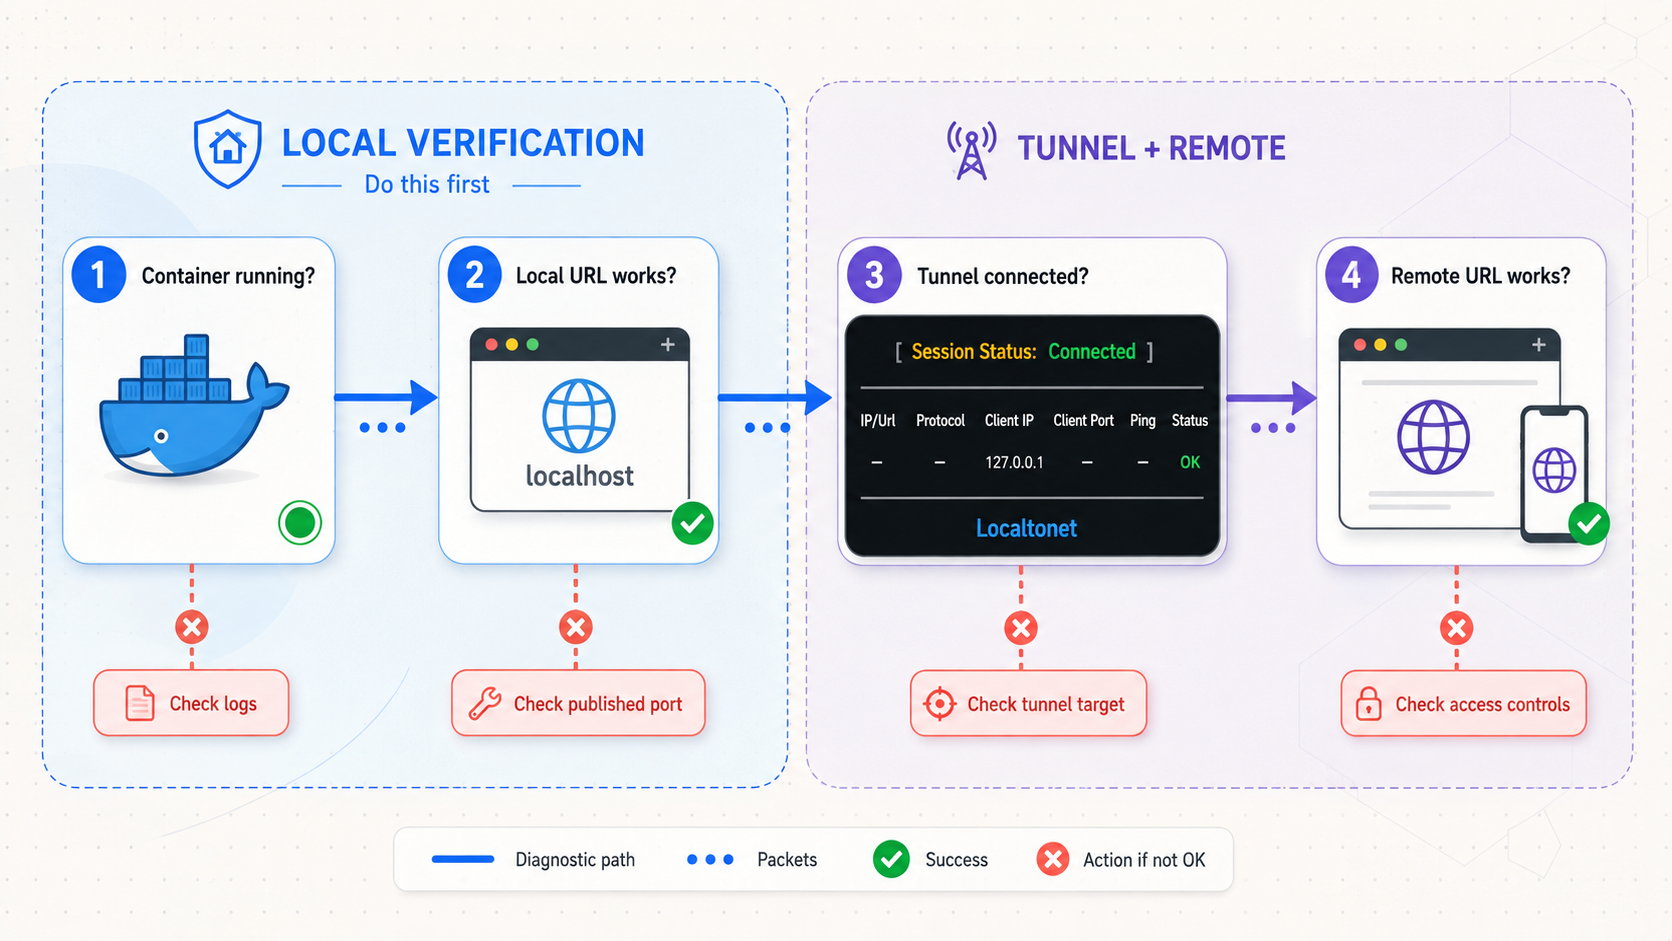
Always troubleshoot these layers in order. First prove that the container is running. Next test EdgeEver directly through the local endpoint. Then verify login and persistence. Only after those checks succeed should you add the tunnel. Localtonet cannot repair a stopped container, invalid application configuration, inaccessible storage, or failed login.
EdgeEver does not publish a stable minimum Docker version, universal host port, or one deployment path that can safely be hardcoded for every release and host. This tutorial uses the project's current official installer and shows how to obtain those values from its output, Docker metadata, and generated Compose configuration. Review the current repository, release history, and installer before applying the procedure to a production knowledge base.
Prepare the Docker host
Choose a host whose storage, uptime, and backup characteristics match the importance of your notes. A home server keeps the data on your premises but depends on local power and internet service. A NAS may already have storage monitoring and snapshot features. A VPS is remotely hosted and may have existing public network exposure that should be reviewed before installation.
The one-line installer is intended for an environment with Bash, curl, Docker Engine, and Docker Compose support. Use Docker Compose v2, invoked as docker compose. Installation and privilege requirements differ across Linux distributions and NAS platforms, so install Docker through the supported method for your operating system. Docker provides separate instructions for
Docker Engine installation and the
Compose plugin.
| Requirement | Verification | Why it matters |
|---|---|---|
| Docker Engine | docker version |
Confirms that the Docker client can communicate with the daemon |
| Docker Compose v2 | docker compose version |
Required to manage the Compose project created by the installer |
| Bash | bash --version |
Executes the official installation script |
curl |
curl --version |
Downloads the installer over HTTPS |
| Persistent disk space | df -h |
Holds the SQLite database, local attachments, Docker images, and backups |
| Outbound HTTPS | Reach the EdgeEver site and container registry | Allows installer and image downloads |
| Localtonet client device | Device is connected and can reach EdgeEver | Provides the outbound connection used for remote access |
Run the following checks from the account that will install and operate EdgeEver:
docker version
docker compose version
bash --version
curl --version
df -h
Resolve failures before continuing. If Docker reports permission denied, use the privilege model recommended for your platform rather than changing socket permissions broadly. Membership in a Docker management group can grant powerful host-level access and should be treated accordingly.
Plan storage before creating the application
EdgeEver stores structured data in SQLite and supports both local storage and S3-compatible object storage. Local storage is usually the simplest option for a single host because the application and its files remain together. S3-compatible storage can place object data in a separate service, but it introduces endpoint, bucket, credential, connectivity, and recovery dependencies.
Decide which model you will use before adding valuable data. If the current installer prompts for a storage mode, follow those prompts and preserve a redacted record of the choices. If you need to change generated configuration manually, compare it with the current repository documentation first. Do not guess environment-variable names or place object-storage credentials directly into a public Compose example.
Decide where the Localtonet client will run
Running our client on the Docker host usually creates the smallest network path. In that topology, the tunnel can target a local address and the published host port. If our client runs on another LAN device, EdgeEver must be bound to an interface reachable from that device, and local network policy must allow the connection.
Do not broaden the Docker binding merely to make testing convenient. A loopback-only publication is preferable when both EdgeEver and the Localtonet client run on the same host. LAN publication is needed only when another authorized device must reach the service directly.
Inspect and run the official EdgeEver installer
EdgeEver publishes its installer at https://edgeever.org/install.sh. The commonly documented one-line form downloads this script and sends it directly to Bash:
curl -fsSL https://edgeever.org/install.sh | bashThat form is convenient, but reviewing the downloaded script first is safer. It also lets you see the current image reference, files it creates, port-selection logic, administrator initialization, storage prompts, restart configuration, and automatic-update mechanism before any of those actions occur.
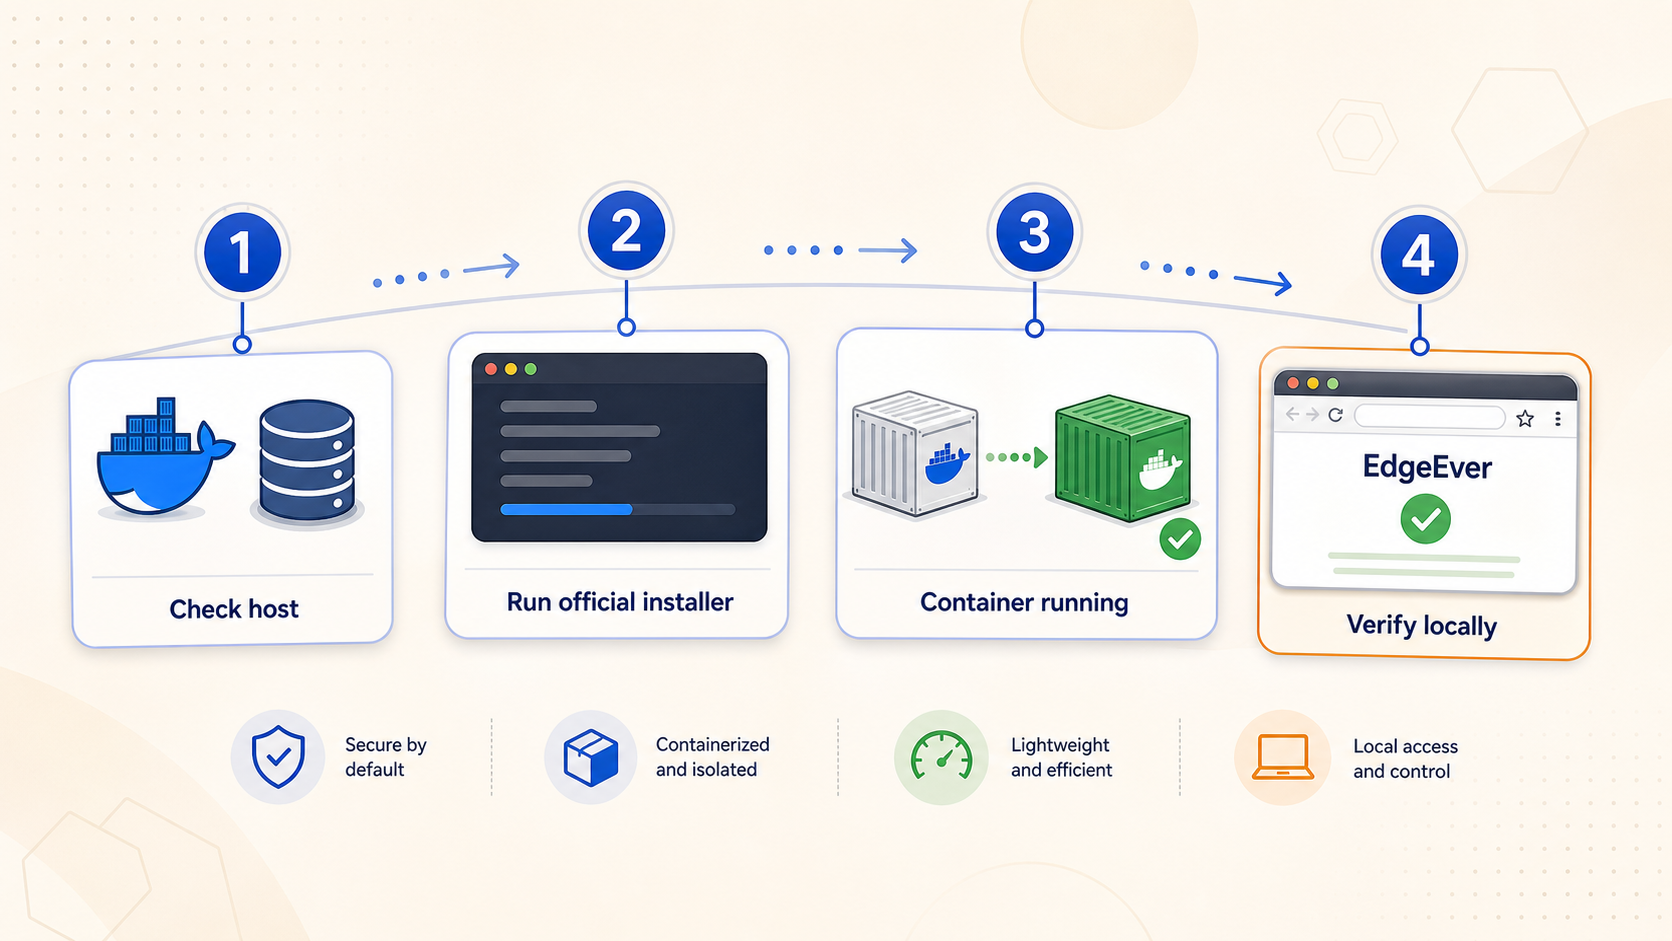
Download the installer without executing it
Save the current HTTPS response to a local file. Do not use an unofficial mirror or a script copied from a message or forum post.
Read the script and identify its effects
Review the image source, generated directories, Compose file, environment files, password handling, port selection, storage choices, update scheduling, and Docker commands. Ask a qualified administrator to review it if you are not comfortable evaluating shell code.
Execute the reviewed local copy
Run the exact file you inspected. Keep the terminal open so you can capture non-secret deployment details and read any prompts or errors.
Secure the initial administrator credential
The official installer initializes administrator access and reports the generated credential. Save it in a password manager. Never include it in screenshots, shell transcripts, tickets, tunnel settings, or repository files.
Record the generated deployment details
Record the Compose project location, selected storage mode, host-side port, update information, and final status shown by the installer. Record values, not credentials.
curl -fsSL https://edgeever.org/install.sh -o edgeever-install.sh
less edgeever-install.sh
bash edgeever-install.sh
The -f option makes curl fail on HTTP errors, -s suppresses the progress meter, -S still displays errors, and -L follows redirects. These options do not prove that a script is safe. They only control the download behavior.
During execution, follow the current prompts exactly. EdgeEver's official materials describe a one-line Docker deployment with local or S3-compatible storage. The installer creates the deployment, initializes administrator access, starts the application, and sets up its daily update behavior. The downloaded script itself is the primary record of how those actions are implemented for the version you are installing.
Installer output can reveal the administrator password, private addresses, deployment paths, object-storage details, and other host information. The recommended annotated screenshot should be created only from the current installer and must conceal every password, token, private endpoint, and credential.
Why this guide does not duplicate a manual Compose file
A manual Compose deployment is possible because the repository includes a current compose.yaml. It is appropriate for operators who want to audit and manage every image, variable, mount, network binding, and update action themselves. However, reproducing that moving definition inside an article would quickly create a second, stale configuration source. This tutorial therefore narrows installation to the official installer while teaching you how to inspect and operate the Compose project it creates.
If you choose the manual route, use the repository's current Compose definition and documentation as one versioned unit. Do not combine a Compose file from one release with environment examples or migration instructions from another. Review the selected image, required variables, local or S3-compatible storage configuration, port publication, health behavior, and mounts before running docker compose up.
Locate the generated Compose project and actual port
Keep the deployment path printed by the installer. If it was not recorded, Docker Compose adds labels to project containers that can identify the working directory and configuration files. Start by listing all containers:
docker ps -a
Identify the EdgeEver container name or ID from the image and container columns. Replace EDGEEVER_CONTAINER in the following commands with that real value:
docker inspect EDGEEVER_CONTAINER \
  --format '{{ index .Config.Labels "com.docker.compose.project.working_dir" }}'

docker inspect EDGEEVER_CONTAINER \
  --format '{{ index .Config.Labels "com.docker.compose.project.config_files" }}'
If the container belongs to a Compose project, these labels normally reveal the project working directory and configuration-file path. If a label is empty, return to the installer output and inspect the running container directly instead of assuming a directory.
Read the published host port
Docker distinguishes between the port used inside a container and the port published on the host. Local browser access and the Localtonet tunnel normally need the host-side publication. Display it with:
docker port EDGEEVER_CONTAINER
You can also inspect the PORTS column:
docker ps --filter name=EDGEEVER_CONTAINER
A result in the form HOST_ADDRESS:HOST_PORT->CONTAINER_PORT/tcp means clients connect to HOST_ADDRESS:HOST_PORT. Do not enter the container-side port into Localtonet unless our client is deliberately running inside a Docker network that can route to the container.
Inspect the effective Compose configuration
Change to the working directory reported by Docker and render the resolved configuration:
cd /ACTUAL/COMPOSE/WORKING/DIRECTORY
docker compose config
docker compose ps
Replace the example directory with the real reported path. The rendered configuration helps identify the image, port publication, restart policy, mounts, environment sources, and service names. It can also resolve variable substitutions, so treat its output as sensitive and redact credentials before sharing it.
Identify persistent mounts
Inspect Docker's mount metadata for the application container:
docker inspect EDGEEVER_CONTAINER \
  --format '{{range .Mounts}}{{println .Type .Name .Source "->" .Destination}}{{end}}'
A bind mount reports a host source path. A named volume reports a Docker volume name. Record each persistent resource and its purpose. Do not assume that copying only the Compose file protects the database or attachments. The Compose file describes storage, while the data remains in the referenced bind directories, named volumes, or S3-compatible service.
Verify EdgeEver locally before remote access
Successful installer completion is only the first checkpoint. A reliable validation sequence confirms container state, HTTP health, browser login, data persistence, logs, and restart behavior. Use the actual host address and host-side port discovered in the previous section.
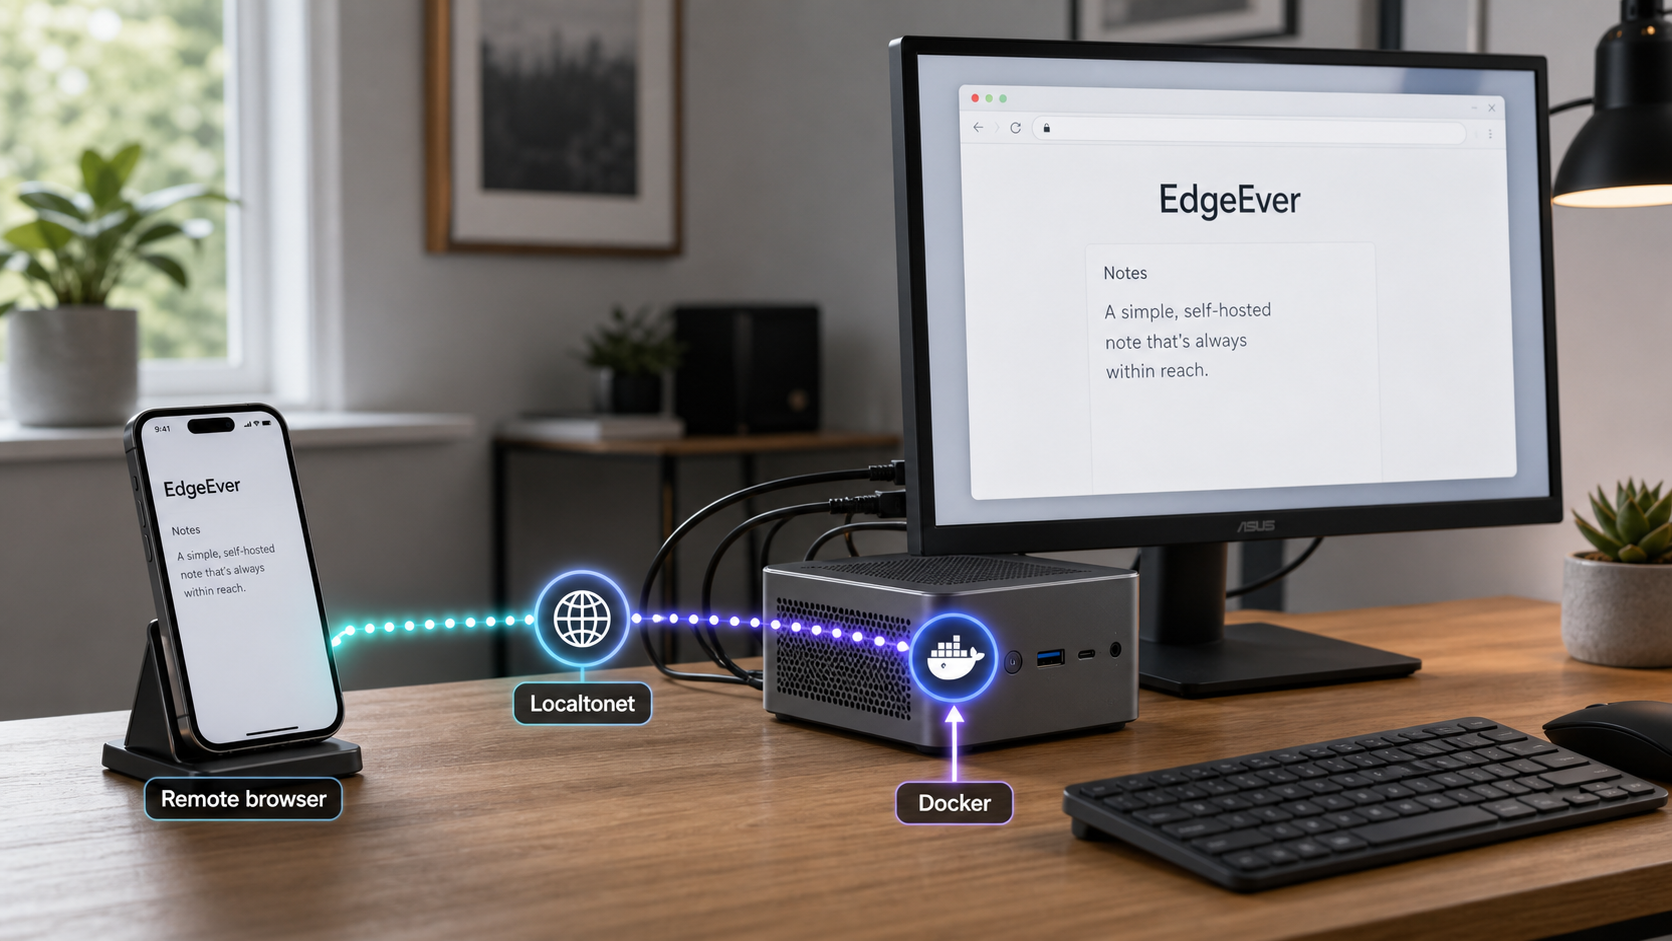
Check container and Compose status
docker ps --filter name=EDGEEVER_CONTAINER

cd /ACTUAL/COMPOSE/WORKING/DIRECTORY
docker compose ps
The relevant application service should be running. If Docker reports that it is restarting, exited, or unhealthy, inspect the logs before proceeding.
Test the HTTP health route
EdgeEver documents /api/health as a deployment verification route. Build the URL from the actual values. For example, if the endpoint is reachable on the Docker host at loopback, replace HOST_PORT below with the published host port:
curl -i "http://127.0.0.1:HOST_PORT/api/health"If Docker published the service on another host address, use that address instead. A successful HTTP response proves that the request reached the application. It does not prove that administrator login, storage, or every browser function works.
EdgeEver also identifies an OpenAPI description route. Test it with:
curl -i "http://127.0.0.1:HOST_PORT/api/openapi.json"Do not assume a particular JSON body. Check the HTTP status, response content type, and whether the response is clearly from EdgeEver rather than another service occupying the port.
Complete a browser login
Open the base origin, such as http://127.0.0.1:HOST_PORT on the host or http://PRIVATE_HOST:HOST_PORT from an authorized LAN device. Sign in using the administrator credential created during installation. Confirm that the workspace loads and that private notes are not visible before authentication.
Test persistence through a container restart
Create a temporary note with a recognizable but non-sensitive title. Save it, refresh the page, and confirm that it remains. Then restart the Compose services from the actual project directory:
docker compose restart
docker compose ps
Wait for EdgeEver to become ready, repeat the health request, sign in, and verify that the test note and any test attachment remain. This checks that the application is using persistent storage rather than disposable container state.
Review recent logs
docker compose logs --tail=200Look for repeated restarts, database errors, storage permission failures, object-storage errors, or migration failures. Logs can contain internal paths and request details. Redact them before sharing and never publish credentials, private notes, Localtonet tokens, or assigned endpoints.
Test host reboot behavior
First inspect the effective restart configuration with docker compose config. During a planned maintenance window, reboot the host using the supported operating-system procedure. After it returns, run:
docker ps -a
cd /ACTUAL/COMPOSE/WORKING/DIRECTORY
docker compose ps
curl -i "http://127.0.0.1:HOST_PORT/api/health"
Sign in and verify the temporary note again. If the services do not return automatically, use docker compose up -d from the recorded project directory and investigate the generated restart policy before depending on unattended availability.
| Check | Evidence of success | What a failure suggests |
|---|---|---|
| Compose status | EdgeEver service remains running | Startup, configuration, image, or dependency problem |
| Health request | EdgeEver returns an HTTP application response | Wrong origin, stopped service, failed startup, or port conflict |
| Administrator login | The private workspace opens with the initial credential | Credential capture or application initialization problem |
| Restart persistence | The temporary note survives a Compose restart | Missing, incorrect, or inaccessible persistent storage |
| Host reboot | Services return and data remains available | Restart-policy, Docker startup, mount, or host dependency problem |
| Logs | No recurring database, storage, or crash errors | Operational issue that should be resolved before exposure |
Configure storage, backup, and restoration
Local storage
With local storage, the database and locally stored objects depend on the bind mounts or named volumes recorded in the generated Compose project. Back up every required persistent resource, the Compose file, applicable environment files, and a record of the installed release. Protect environment files as secrets because they may contain administrator or object-storage credentials.
For a filesystem-level backup, stop application writes first unless the project's current documentation explicitly provides an online snapshot method. From the recorded project directory:
docker compose stop
Back up the bind directories or named volumes identified through docker inspect using your host's supported backup tooling. After the backup completes:
docker compose start
docker compose ps
curl -i "http://127.0.0.1:HOST_PORT/api/health"
This article does not provide a generic volume-copy container because mount destinations and ownership must come from the current generated deployment. Your backup process must preserve file contents, directory structure, permissions where required, and all related persistent resources.
S3-compatible object storage
EdgeEver's Docker deployment supports S3-compatible object storage. If selected, document the provider, endpoint, bucket, region or equivalent value where required, and credential-management method without placing secrets in the operational runbook. The application database and object storage are separate recovery concerns. Backing up only the bucket may not preserve the SQLite metadata needed to reference those objects.
Confirm connectivity and write permissions by uploading and reopening a small non-sensitive attachment. Review logs for object-storage errors. Apply least-privilege bucket permissions and use the S3-compatible provider's supported versioning, replication, or backup capabilities where appropriate.
Create portable EdgeEver exports
EdgeEver supports a lossless ZIP archive containing Markdown, Front Matter, nested folders, relative attachment links, and version histories. The project describes ZIP export and import as its portable backup and restoration workflow. Create an export through the backup or data-management interface presented by your installed EdgeEver release, then store the archive away from the live Docker host.
Portable exports and infrastructure backups serve different purposes. A ZIP export is suitable for application-level restoration and migration. A complete storage backup preserves the deployed database and storage resources. Maintain both when the knowledge base is important.
Test application-level restoration
- Create a current complete ZIP export from the source EdgeEver instance.
- Prepare a separate test EdgeEver instance rather than importing over the only production copy.
- Use the current EdgeEver import or restore interface to select the complete ZIP archive.
- Wait for the import to finish and review any reported warnings.
- Verify representative notebooks, Markdown content, Front Matter, attachments, nested paths, and version history.
- Record the EdgeEver release used for both export and restoration.
Restore a Docker storage backup
Use this procedure only with a backup that includes every persistent resource identified for the deployment:
- Stop the Compose project and confirm that its containers are no longer writing data.
- Preserve the damaged current storage separately if space permits.
- Restore each bind directory or named-volume data set to the same destination expected by the Compose configuration.
- Restore protected configuration and environment files only from a trusted backup.
- Start the Compose project and inspect its logs for database or migration errors.
- Test
/api/health, administrator login, representative notes, attachments, and a new persistence operation.
Keep at least one copy outside the live host and perform periodic restoration tests in an isolated environment. Encrypt backup media when appropriate for the sensitivity of the notes. Never overwrite the only production data set merely to test a restore.
Operate, update, and monitor the deployment
Run Compose commands from the project directory obtained from installer output or Docker labels. This prevents accidental operations against an unrelated project.
cd /ACTUAL/COMPOSE/WORKING/DIRECTORY

docker compose ps
docker compose logs --tail=200
docker compose stop
docker compose start
docker compose restart
Use stop to halt existing containers without deleting them and start to start those stopped containers. Avoid commands that remove volumes until you have mapped every persistent resource and verified a restorable backup.
Understand the installed daily updater
EdgeEver's installer establishes daily update behavior. Determine exactly what was installed by reviewing the downloaded script, its terminal output, and the generated host files. Record the scheduler type, script path, execution time, image policy, and logging location reported by the current installer. Host implementations can differ, so do not disable a guessed cron entry or system service.
Before a significant update, create a complete ZIP export and a consistent infrastructure backup. Review the current EdgeEver releases. Release notes can identify application changes and defects relevant to your deployment. For example, the published v1.45.1 release documents desktop PDF rendering and recovery behavior changes. Review the release that your Docker installation actually uses rather than assuming that a desktop-only fix affects the server container.
Run post-update checks
cd /ACTUAL/COMPOSE/WORKING/DIRECTORY
docker compose ps
docker compose logs --tail=200
curl -i "http://127.0.0.1:HOST_PORT/api/health"
Then sign in, open several representative notes, load an attachment, create and edit a temporary note, refresh it, and confirm that data persists. If S3-compatible storage is configured, include an attachment upload and download in the check.
Do not downgrade an image blindly after a database migration. Use the rollback or restoration process documented for the installed release, or restore a complete pre-update backup into a controlled environment.
Expose the verified EdgeEver service with Localtonet
Once local checks pass, create an HTTP tunnel. Our client establishes an outbound connection to a Localtonet relay, so you do not need inbound router port forwarding, firewall changes, VPN setup, or a public IP address. The EdgeEver service must still be reachable from the selected client device.
HTTP tunnels support Random Sub Domain, Custom Sub Domain, and Custom Domain Process Types. They serve the same target content through a public HTTPS address. Use the options currently available in your dashboard. Exact custom-domain DNS requirements should be confirmed against current documentation.
Install and connect the Localtonet client
Run our client on the EdgeEver host or another always-on device that can reach the verified local origin. Confirm that the device appears connected before configuring the tunnel.
Open the HTTP tunnel configuration
Create an HTTP tunnel for the EdgeEver browser service. Do not use File Server, proxy, UDP, or VPN configuration for this web endpoint.
Select the Process Type
Choose Random Sub Domain, Custom Sub Domain, or Custom Domain from the options currently displayed. A random subdomain is suitable when a specific hostname is not required.
Select the connected device token and relay
Select the device-specific AuthToken for the connected client, then select an available server or region from the current dashboard. Never copy a token or hardcode a relay value from another account.
Enter EdgeEver's local IP address and host port
Enter the address reachable from the Localtonet client and the host-side port reported by Docker. Test this exact origin from the client device before saving the tunnel.
Start the tunnel and test externally
Creating a tunnel does not start it. Press Start, wait for the running state, and test the assigned public HTTPS URL from outside the LAN. Stop or delete obsolete exposure when it is no longer needed.
See our HTTP tunnel documentation for the current interface. The essential values are the Process Type, connected device token, currently available relay selection, local IP address, host-side Docker port, and Start action.
Choose the correct target address
If our client runs on the Docker host, target the local address on which Docker published EdgeEver. If it runs on another LAN device, open the direct EdgeEver URL from that exact device first. Use the Docker host's private address only after that test succeeds.
Do not use the Localtonet public URL as the local target. Avoid using a container-only address unless the client deliberately participates in that Docker network and you understand its lifecycle. The published host endpoint is normally easier to inspect and maintain.
Validate from outside the LAN
Use a mobile data connection or another external network. Open the assigned HTTPS URL in a private browser session and confirm that EdgeEver requires authentication. Sign in with an authorized account, open a test note, save a harmless change, sign out, and confirm that protected content is unavailable afterward.
Stop the tunnel and confirm that the public route no longer serves EdgeEver. Start it again and repeat the test. The endpoint is available only while the selected client remains connected, the tunnel is running, and EdgeEver remains reachable.
Secure a remotely accessible knowledge base
Treat every public URL as discoverable. Keep EdgeEver authentication enabled, use strong unique credentials, protect Localtonet device tokens, review public note shares, and avoid storing secrets in notes when a dedicated secret manager is more appropriate.
A Localtonet device token identifies the client that runs a tunnel. Never place it in a Compose file, tutorial, repository, screenshot, or support post. A standard HTTP tunnel also is not a general VPN into the host network. Localtonet VPN Manager is our separate private mesh VPN feature.
EdgeEver supports REST API, MCP, AI integrations, and public note sharing, but this tutorial does not expose or configure those capabilities separately. Review their authentication, permissions, and data-handling effects before connecting external assistants, scripts, or services.
Troubleshooting installation and remote access
The installer fails before Docker starts
Confirm that Bash and curl are available, DNS resolves edgeever.org, outbound HTTPS is permitted, and the downloaded file is actually shell code rather than an error page. Run the reviewed local script without adding flags intended to suppress useful errors.
Docker reports permission denied
Confirm that the daemon is running and that your account has the required Docker privileges. Use the supported configuration for your operating system or NAS. Do not make the Docker socket globally writable.
The image cannot be pulled
Check DNS, outbound registry access, available disk space, and registry restrictions. Preserve the exact error text, but redact host details and credentials before sharing it.
The container repeatedly exits or restarts
docker ps -a
cd /ACTUAL/COMPOSE/WORKING/DIRECTORY
docker compose logs --tail=200
Look for configuration parsing, database, mount permission, object-storage, migration, or port-binding errors. Do not repeatedly reinstall over existing persistent data.
The Compose project directory was lost
Use the com.docker.compose.project.working_dir and com.docker.compose.project.config_files labels shown earlier. If those labels are absent, inspect the installer output, shell history without publishing credentials, and container mount metadata.
No published port appears
Run docker port EDGEEVER_CONTAINER and inspect docker compose config. Confirm that the current deployment publishes an HTTP port on the host. Do not add an assumed mapping without comparing it to the repository's current Compose definition.
The health route works only on the Docker host
Check the host address in the Docker port publication. A loopback-only binding is not reachable from another LAN device. This is acceptable when our client runs on the same host. If our client runs elsewhere, use an intentionally reachable private binding and retain appropriate host network controls.
The public URL reaches the wrong service
The configured port probably belongs to another local listener. Compare the tunnel target with docker port and test /api/health directly from the Localtonet client device.
The tunnel is configured but unavailable
Confirm that the selected device token belongs to the connected client, the current relay selection is valid, and the tunnel has been started. Creating the configuration alone does not run it. Also verify that EdgeEver still responds from the client device.
Login or saving fails only through the public URL
Reproduce the operation through the direct local origin. If it fails locally, inspect EdgeEver and storage rather than the tunnel. If local access succeeds, record the browser error and affected request while keeping credentials and note content private. Do not add undocumented proxy headers or application variables by guesswork.
Access disappears after a restart
Verify the EdgeEver container, Docker restart behavior, Localtonet client connection, and tunnel state separately. A running EdgeEver container does not guarantee that the Localtonet client is connected, and a saved tunnel does not guarantee that it has been started.
An update changes application behavior
Identify the installed image and release, review the matching EdgeEver release notes, and repeat local health, login, note, attachment, and persistence checks. Use a tested restoration plan rather than blindly replacing an image while retaining a possibly migrated database.
Frequently asked questions
What port does EdgeEver use with Docker?
Use the host-side port selected by the current deployment. Read it from installer output, docker port EDGEEVER_CONTAINER, docker ps, or the generated Compose configuration. Do not guess a common web port or use the container-side value automatically.
Where does the installer create the Compose project?
Record the path printed by the installer. If it was missed, inspect the container's com.docker.compose.project.working_dir and com.docker.compose.project.config_files labels. This provides a concrete path for later Compose commands without assuming a universal directory.
Can EdgeEver use S3-compatible storage?
Yes. EdgeEver's Docker deployment supports local storage and S3-compatible object storage. Use the choices and configuration names in the current installer or repository, protect all credentials, and back up both SQLite metadata and object data.
How is administrator access initialized?
The official installer initializes administrator access and reports the generated credential. Save it immediately in a password manager and complete a local login before starting a public tunnel.
How should I back up and restore EdgeEver?
Create complete EdgeEver ZIP exports for portable application-level restoration. Also back up the generated Compose configuration, protected environment files, SQLite storage, local attachment storage, and any S3-compatible object data. Test ZIP import and infrastructure restoration on a separate instance.
Does the installer update EdgeEver automatically?
The official installer sets up daily update behavior. Inspect the current downloaded script and generated host files to identify the scheduler, timing, script path, image policy, and logs on your system. Preserve backups and run post-update checks.
Can EdgeEver run on a NAS or home server?
Yes. EdgeEver documents Docker deployment for a VPS, NAS, or home server. Confirm that the exact platform provides a supported Docker Engine, Compose v2, Bash environment, persistent storage, and adequate permissions.
Does Localtonet require router port forwarding?
No. Our client establishes an outbound connection to a Localtonet relay. This HTTP tunnel workflow does not require inbound router port forwarding, firewall changes, VPN setup, or a public IP address.
Is the Localtonet HTTP tunnel a VPN?
No. The tunnel publishes the specific EdgeEver HTTP target configured in the dashboard. Localtonet VPN Manager is our separate private mesh VPN feature.
Will the public EdgeEver URL remain online permanently?
It remains available only while EdgeEver is reachable, the selected Localtonet client is connected, and the tunnel is running. Creating a tunnel does not start it, and a host shutdown, container failure, disconnected client, or stopped tunnel can interrupt access.
Connect your verified EdgeEver workspace with Localtonet
Install EdgeEver, record its generated Docker values, prove local health and persistence, and then publish only the authenticated HTTP endpoint through a focused Localtonet tunnel.
Get Started Free →

