

Deploy the 3D media-library frontend, validate its browser-to-server path, and expose only the endpoint that can work safely away from home
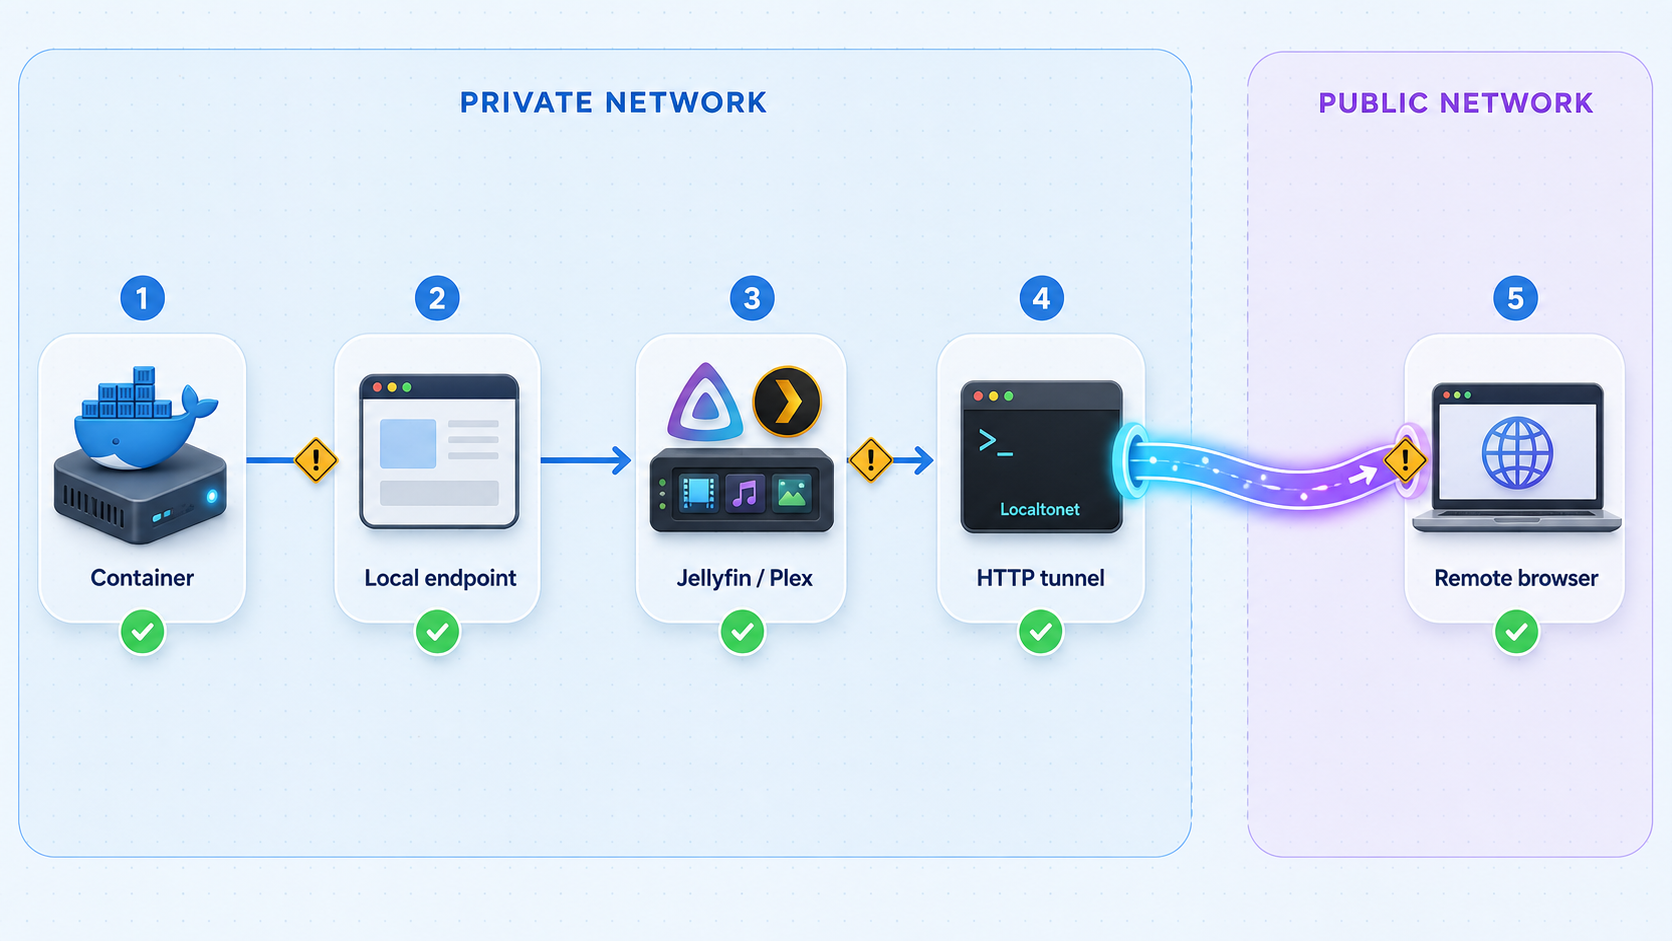
Halcyon Video turns a Jellyfin or Plex library into a walkable video rental store rendered in the browser. This tutorial installs it with Docker, distinguishes the moving master branch from the published v0.9.1 image, covers routine container operations, and verifies the local application before introducing remote access. It also addresses an important architectural limitation: the remote browser, rather than the Halcyon container, communicates with configured media services. A Localtonet tunnel can publish the Halcyon interface, but it does not automatically make a private Jellyfin, Plex, RomM, Jellyseerr, or Overseerr address reachable from an off-LAN browser.
📋 What's in this guide
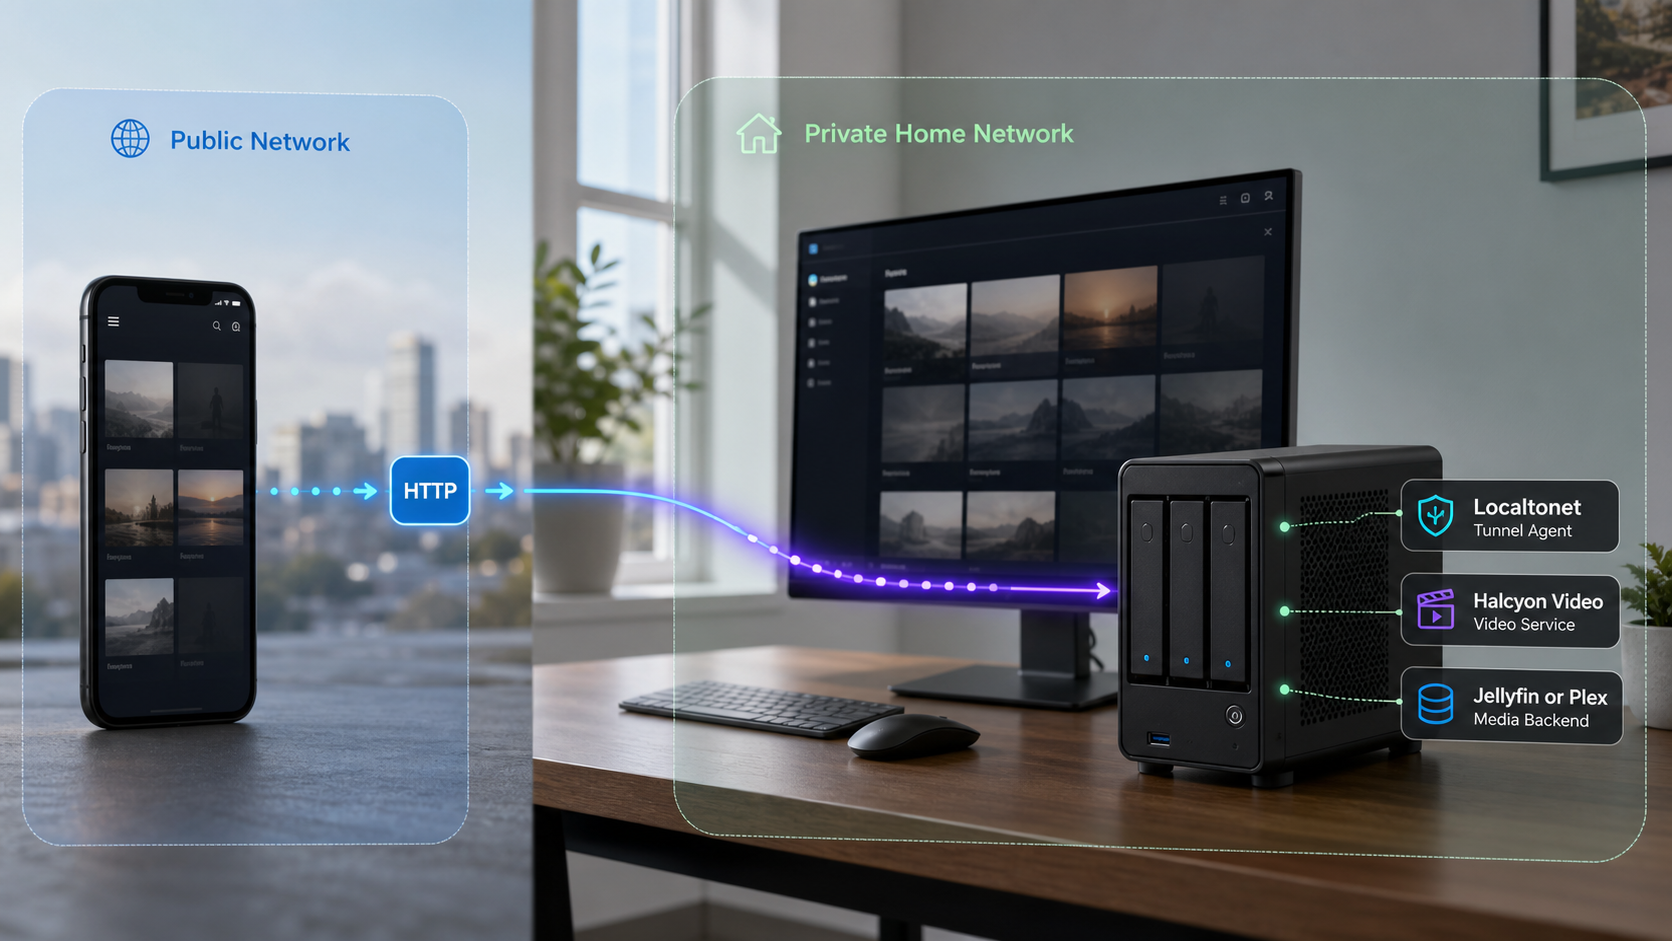
Understand the architecture before publishing anything
Halcyon Video is a self-hosted Vite, TypeScript, and three.js frontend. It presents a Jellyfin or Plex library as a three-dimensional video rental store with walkable aisles, cases, themed fixtures, a living-room viewing experience, and configurable store branding. An optional Tauri wrapper and an HTPC-oriented deployment path also exist, but this tutorial focuses on the browser application distributed through Docker.
Halcyon Video does not scan arbitrary folders or replace a media server. Jellyfin or Plex remains responsible for the actual personal library, metadata, authorization, and media delivery. The project also includes a synthetic demonstration catalog that can be used without a media server. That demo validates the interface and browser renderer, but it does not prove that a personal Jellyfin or Plex library is reachable.
The Docker container serves the Halcyon frontend. The browser that opens Halcyon then uses the server address and authorization information configured through the HTPC Connection Center to contact Jellyfin or Plex. Optional Jellyseerr, Overseerr, and RomM integrations follow the same browser-facing pattern. The container is not a general reverse proxy for those private services.
Why exposing only Halcyon may be insufficient
Suppose Halcyon is configured with a Jellyfin address such as http://192.168.1.20:8096. A browser on the same LAN may be able to reach that address. A phone using cellular data generally cannot route to that private address. Opening a public Localtonet URL for Halcyon can therefore load the store shell while library synchronization, poster requests, account calls, or playback fail.
HTTPS introduces another constraint. Localtonet serves an HTTP tunnel through a public HTTPS address. A browser can block active requests from that HTTPS page to an insecure HTTP media-server URL as mixed content. Cross-origin requests may also require the media server to accept the Halcyon origin. If a feature uses WebSockets, its WebSocket endpoint must likewise be reachable and compatible with the page's security context. An application-generated absolute URL remains pointed at the configured host; tunneling the Halcyon page does not rewrite that unrelated destination.
Treat interface loading, library access, artwork loading, and playback as separate tests. With the current browser-origin architecture, tunneling only Halcyon is suitable for the synthetic demo and can expose the application shell. A personal library works off-LAN only when the browser also has a secure, authenticated, browser-compatible route to the configured Jellyfin or Plex service. Do not publish a media server merely to make a test pass without first reviewing its own remote-access and authentication guidance.
Remote Play is a separate project feature
The Halcyon project describes Remote Play as streaming the live store to another browser and using its own TURN relay for off-LAN viewers. That is not the same operation as opening the independently hosted Halcyon web application through a Localtonet HTTP tunnel. Use the project's current Remote Play documentation when that viewing model is intended. This article does not substitute a Localtonet tunnel for Remote Play or claim that the two have identical security, media, or browser behavior.
Prerequisites and deployment decisions
Prepare the host, browser, media service, and version strategy before starting the container. Doing this first avoids mistaking a graphics, routing, or media-server failure for a Docker or Localtonet problem.
| Requirement | What to prepare | Why it matters |
|---|---|---|
| Docker | A working Docker Engine installation with permission to start and inspect containers | The published Halcyon image is distributed through GitHub Container Registry. |
| Docker Compose | The docker compose plugin if deploying from the repository Compose file |
The repository documents docker compose up -d as its clone-based workflow. |
| CPU architecture | An amd64 or arm64 Docker host for the v0.9.1 image | The v0.9.1 release identifies both amd64 and arm64 image variants. |
| Browser graphics | A current browser with working graphics acceleration for the full 3D store | The main experience uses three.js. The project also offers a lighter 2.5D mode, including for Raspberry Pi use. |
| Memory and GPU | Several gigabytes of available browser memory for the full synthetic demo and meaningful GPU capacity | The project warns that its roughly 2,000-title demo can use a few gigabytes of memory and real GPU resources. |
| Media provider | An already working Jellyfin or Plex server for a personal library | Halcyon has no built-in personal-file scanner. |
| Localtonet client | A client device that can reach the Docker host's published port | Our relay forwards to an IP address and port reachable from that client device. |
Choose a pinned release or the moving master branch
Do not treat the repository's master branch and a tagged release as interchangeable. The v0.9.1 release publishes ghcr.io/halcyon-video/halcyon-video:v0.9.1 for amd64 and arm64. Its release page also labels :latest, but a floating tag can change after an update. The audit evidence recorded 58 commits on master after v0.9.1, so master contained development beyond that release at the time of review.
Use the pinned v0.9.1 image when reproducibility and simple rollback are the priorities. Use a clone of master only when you intentionally want the current repository state and accept that later pulls can change behavior. Before changing either deployment, preserve the exact image tag or Git commit that currently works.
The primary installation below uses the published v0.9.1 container image. A separate section shows the repository Compose workflow for operators who deliberately choose master. Check the project's current release page before deployment because a newer tagged release may exist after this article's 2026 review.
Verify Docker before downloading Halcyon
docker version
docker compose version
The first command should report a reachable Docker Engine rather than only a client binary. The second is required for the repository Compose path. If access is denied, fix Docker permissions according to the host operating system instead of running unrelated application commands with elevated privileges.
Install Halcyon Video with Docker
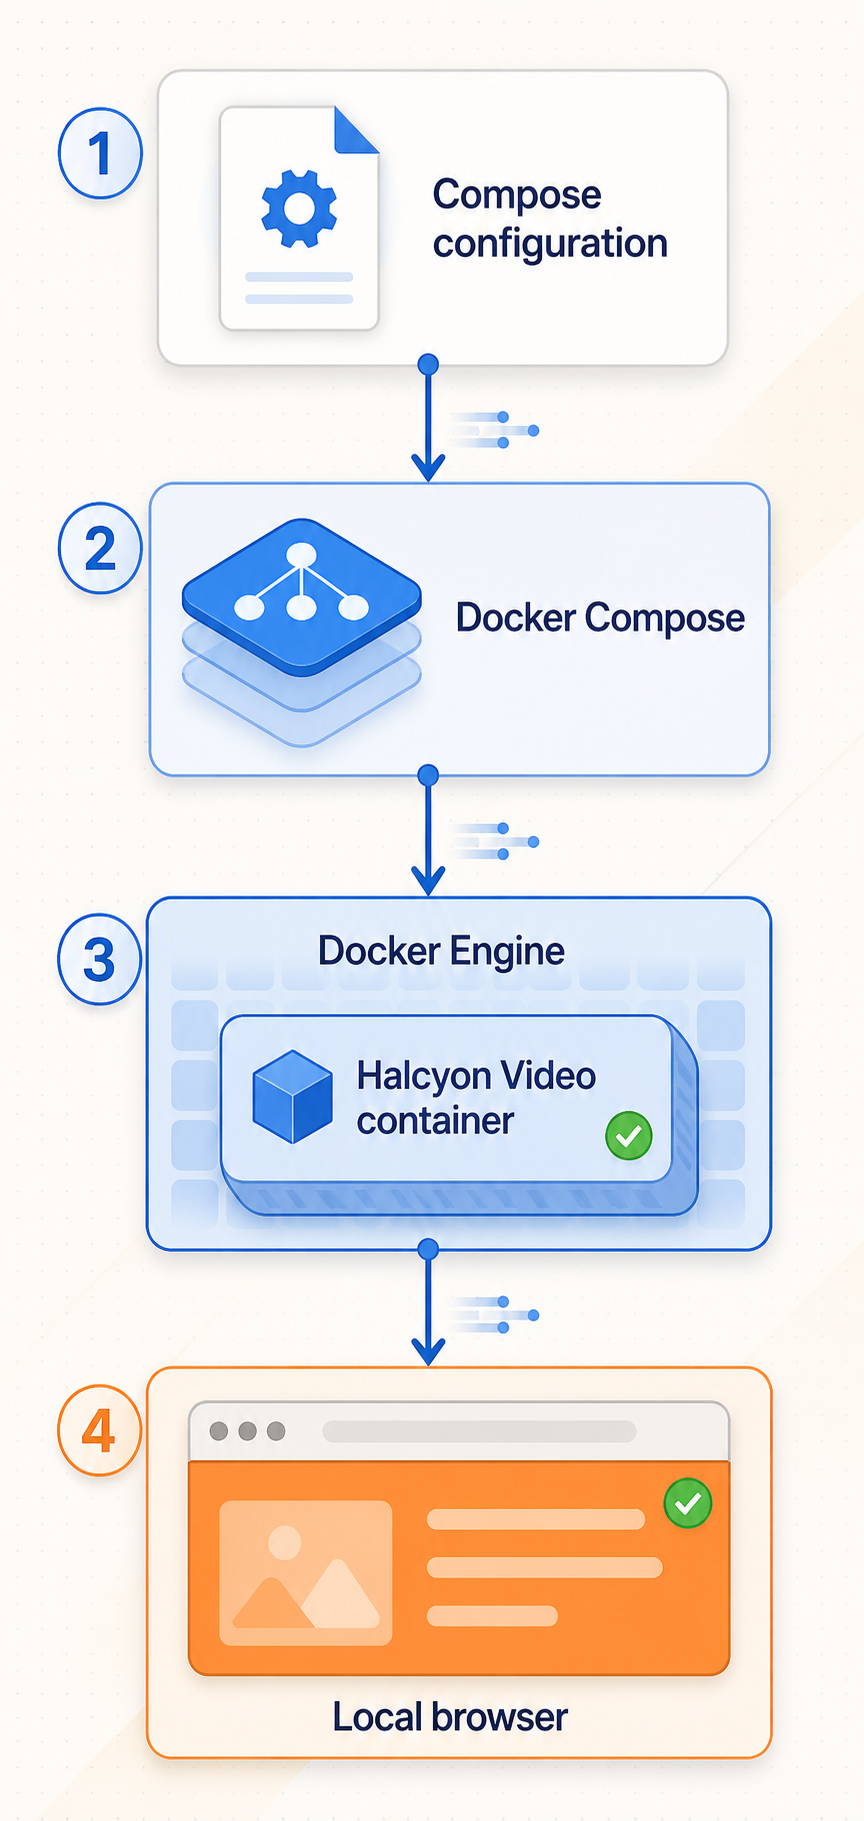
Option A: run the pinned v0.9.1 release
The release image listens on container port 80. Publish it on host port 8080, which makes the local endpoint http://localhost:8080 when testing from the Docker host. The explicit name makes later status, log, restart, and rollback commands predictable.
Pull the published release image
Download the amd64 or arm64 variant selected automatically by Docker for the host architecture.
docker pull ghcr.io/halcyon-video/halcyon-video:v0.9.1Start the container with the web port published
Bind host port 8080 to port 80 in the container. The restart policy brings the container back after a Docker restart unless it was intentionally stopped.
docker run -d \
  --name halcyon-video \
  --restart unless-stopped \
  -p 8080:80 \
ghcr.io/halcyon-video/halcyon-video:v0.9.1Confirm that the container is running
Check both container state and the published-port column. The expected mapping includes host port 8080 forwarding to container port 80.
docker ps --filter name=halcyon-video
docker port halcyon-videoReview startup logs
Inspect the current output before opening the application. A container that repeatedly exits is not ready for browser or tunnel testing.
docker logs --tail 100 halcyon-videoOpen the local endpoint
From the Docker host, visit http://localhost:8080. From another LAN device, use http://DOCKER-HOST-IP:8080, replacing the placeholder with the host's actual reachable LAN address.
If port 8080 is already occupied, choose another unused host port while retaining container port 80. For example, -p 8090:80 publishes http://localhost:8090. Record the selected host port because the Localtonet HTTP target must use that published port, not container port 80.
Option B: use the repository's Docker Compose workflow
This path follows the current repository rather than automatically providing a fixed release. Clone the repository, choose either the tagged release or master deliberately, inspect the resulting Compose model, and then start it. Checking out the tag keeps repository files aligned with v0.9.1. Remaining on master tracks the moving development branch.
git clone https://github.com/halcyon-video/halcyon-video.git
cd halcyon-video

# Reproducible tagged repository state:
git checkout v0.9.1

# Inspect the effective Compose configuration:
docker compose config

# Pull or build what the checked-out Compose file specifies:
docker compose pull

# Start the deployment:
docker compose up -d

# Show service state and published ports:
docker compose ps

# Review recent logs:
docker compose logs --tail 100
If you want master instead, omit the checkout command and record the exact commit before deployment:
git rev-parse HEAD
Inspect the ports section produced by docker compose config and the published-port information from docker compose ps. Open the corresponding host address. Do not assume that a container-only port is reachable from the host or another device.
The standalone container and Compose deployment are alternatives. If both attempt to bind the same host port, the second deployment will fail with an address-in-use or port-allocation error. Stop and remove the unused deployment, or intentionally assign different host ports.
Connect Halcyon Video to Jellyfin or Plex
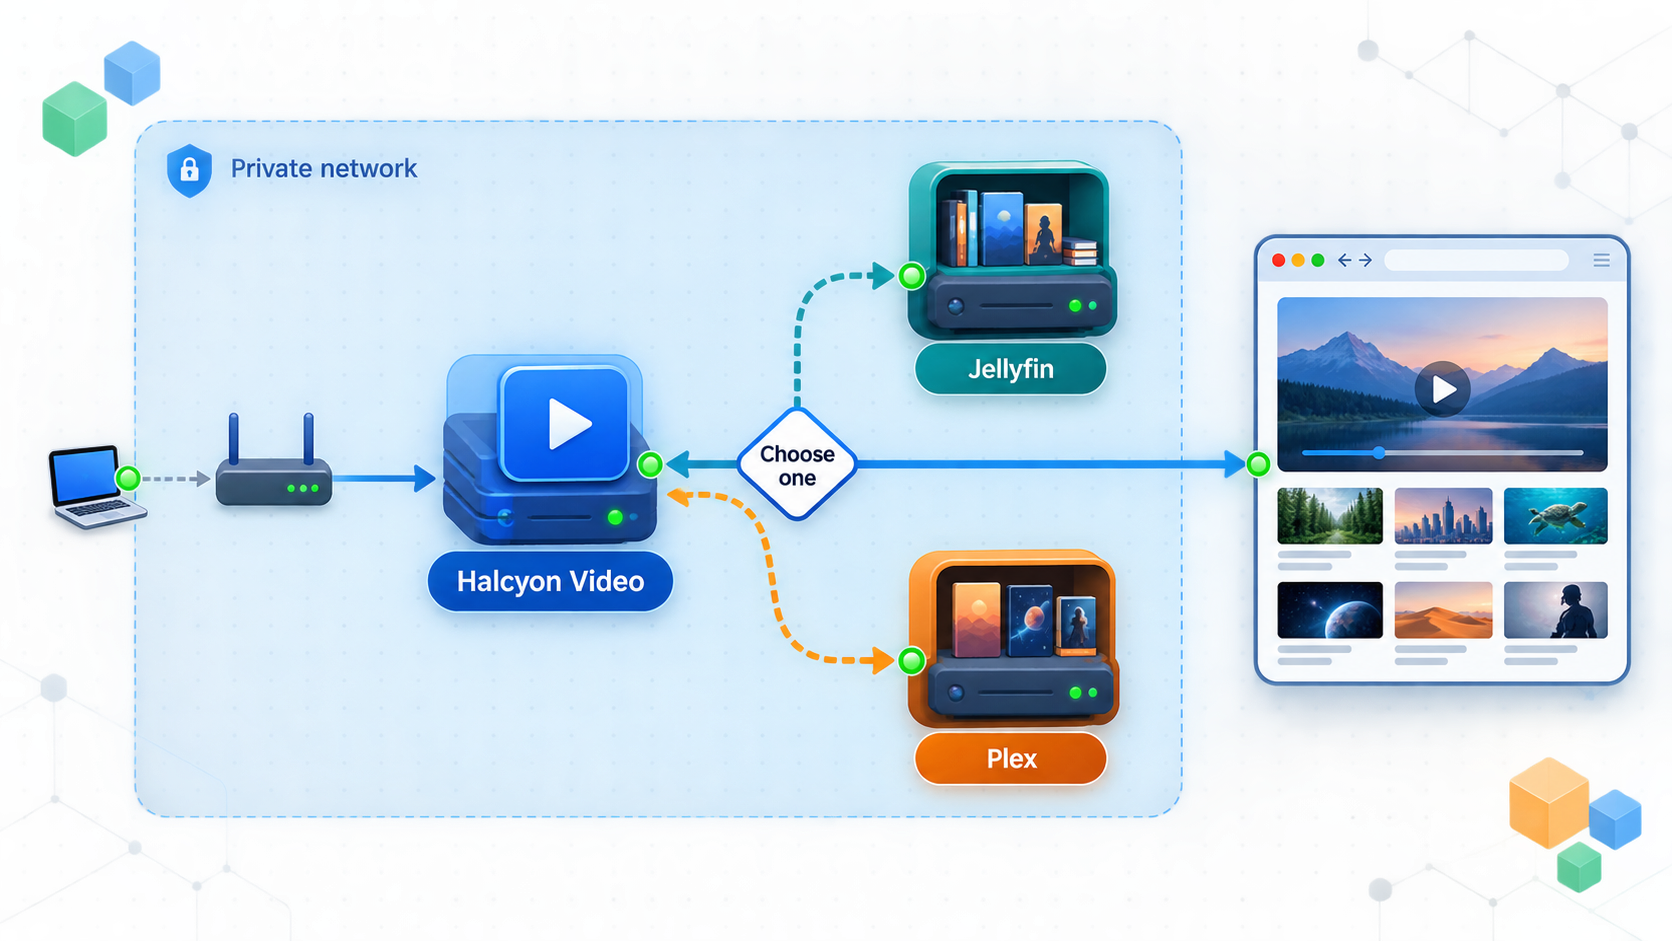
Open the HTPC Connection Center after the local interface loads. Choose one primary library provider and complete that provider's connection workflow. Test with a least-privilege media account intended for viewing rather than a server-administration account.
Jellyfin
Select Jellyfin, enter the Jellyfin server address, username, and password, and then connect and synchronize. The address should be the exact URL the browser can reach. A private LAN hostname or address may work at home but fail from an off-LAN browser. Jellyfin must also allow the required browser origin and transport behavior.
Keep the media account's permissions limited to the libraries and playback capabilities required by the intended viewer. Do not use a Jellyfin administrator account simply because it is convenient. Never place its password in a Docker command, public tunnel description, screenshot, issue report, or source repository.
Plex
Select Plex and request the plex.tv sign-in code shown by Halcyon. Enter that code at the Plex linking page on an authorized device. After authorization, Halcyon displays the available Plex servers so the intended server or servers can be selected. Plex authentication does not make an otherwise unreachable private server address routable, so off-LAN behavior must still be tested.
Optional integrations
Jellyseerr or Overseerr can provide a requests wall, and RomM can provide a video-game department. These integrations are not prerequisites for the core movie-library workflow. Each adds another server address and, where applicable, an API key or credential that must be protected and reachable from the browser.
| Option | Role | Connection behavior | Remote-access concern |
|---|---|---|---|
| Jellyfin | Primary personal-media provider | Server address plus media-account username and password | The browser needs a secure, reachable server URL and compatible cross-origin behavior. |
| Plex | Primary personal-media provider | plex.tv code authorization followed by server selection | The selected server and media path must remain reachable to the off-LAN browser. |
| Jellyseerr or Overseerr | Optional requests wall | Server address and optional integration API key | Do not expose or disclose the API key, and verify the browser's route to the service. |
| RomM | Optional game and ROM shelves | RomM server and credentials | It introduces another browser-reachable dependency and another credential boundary. |
| Synthetic demo | Interface and renderer test | No personal media server required | Useful for testing Halcyon through a tunnel, but it does not validate personal-media playback. |
Understand Halcyon's access-control boundary
The Docker deployment serves a client-side web application. Halcyon should not be treated as an independent authentication gateway protecting everything behind its URL. The connection screen can accept media-server details, and visitors who receive the public URL can reach the application interface. Media-server authorization remains necessary for protected library operations.
Do not assume that an obscure public URL is an access-control mechanism. Before sharing the endpoint, test what a fresh private browsing session can see, whether it encounters the connection screen, and whether any previous browser-specific state or media authorization is available. Never preconfigure a privileged media account for broad public use.
Publish only the Halcyon web port you intend to share. Do not accidentally target Docker's management socket, a host administration panel, Jellyfin or Plex administration pages, or another service listening on a nearby port. Use a least-privilege viewer account and stop the tunnel when it is no longer required.
Verify the complete local path
A reproducible verification starts at the container and works outward. Do not create a Localtonet tunnel until the application, browser renderer, media connection, and playback behavior work from an ordinary LAN browser.
Verify the container state
Confirm that the container remains in the running state and that the expected host port is published.
docker inspect -f '{{.State.Status}}' halcyon-video
docker port halcyon-video
The expected state is running. The port output should identify the host address and port forwarding to container port 80.
Verify HTTP from the Docker host
Open http://localhost:8080, or the alternative published port selected during installation. The boot interface should load without a browser connection error.
Test the synthetic demo
Choose the demo store without configuring a media server. Confirm that assets load, the store renders, controls respond, and the browser does not report a WebGL or graphics-process failure. Expect substantial browser memory and GPU use with the full roughly 2,000-title demo.
Test from a second LAN device
Open http://DOCKER-HOST-IP:8080 from another device on the LAN. This confirms that the service is not reachable only through the Docker host's loopback interface.
Verify the personal library
Connect Jellyfin or Plex. Confirm that synchronization completes, libraries appear, cases and posters load, detail views open, and at least one authorized item begins playback.
Inspect browser failures before tunneling
Use the browser developer tools to check failed network requests. Record whether failed URLs point to Halcyon, the media server, an artwork host, or an optional integration. Resolve local authorization, CORS, DNS, and routing failures at their actual destination.
If the full 3D experience is too demanding, try Halcyon's 2.5D mode. A successful 2.5D test can distinguish application connectivity from a WebGL, graphics-driver, GPU-memory, or power-management problem. It does not prove that the same device can run the full 3D store smoothly.
Routine operation, updates, and recovery
Standalone container commands
# Show status
docker ps -a --filter name=halcyon-video

# Follow logs
docker logs -f --tail 100 halcyon-video

# Restart
docker restart halcyon-video

# Stop
docker stop halcyon-video

# Start again
docker start halcyon-video
Stopping a container preserves its existing container definition. Removing it does not remove the downloaded image, but a replacement must be started with the same intended port, restart policy, and image tag.
Update a pinned standalone deployment
Read the target release notes before updating. Pull the exact new tag rather than changing blindly to :latest. Record the current image first:
docker inspect -f '{{.Config.Image}}' halcyon-video
After choosing a verified new tag, stop and remove the old container, then recreate it with the same published port. Replace NEW_TAG only with an actual release tag listed by the project.
docker pull ghcr.io/halcyon-video/halcyon-video:NEW_TAG
docker stop halcyon-video
docker rm halcyon-video
docker run -d \
  --name halcyon-video \
  --restart unless-stopped \
  -p 8080:80 \
  ghcr.io/halcyon-video/halcyon-video:NEW_TAG
Re-run the local demo, personal-library, and playback checks after the change. Do not leave the Localtonet tunnel running during an unverified update.
Roll back to v0.9.1
If a newer container fails and v0.9.1 was the last verified version, recreate the container with that pinned image:
docker stop halcyon-video
docker rm halcyon-video
docker run -d \
  --name halcyon-video \
  --restart unless-stopped \
  -p 8080:80 \
  ghcr.io/halcyon-video/halcyon-video:v0.9.1
Browser-side settings and authorization state may need to be rechecked independently of the container. A container rollback does not undo changes made to Jellyfin, Plex, browser storage, DNS, certificates, or optional integrations.
Operate the Compose deployment
# Status
docker compose ps

# Follow logs
docker compose logs -f --tail 100

# Restart services
docker compose restart

# Stop and remove Compose containers and networks
docker compose down

# Start again
docker compose up -d
For a master deployment, update deliberately and retain the previous commit identifier:
git rev-parse HEAD
git pull --ff-only
docker compose pull
docker compose up -d
docker compose ps
docker compose logs --tail 100
To return to a known commit, check out the recorded identifier and recreate the deployment according to that revision's Compose file. Repository configuration can change between commits, so inspect docker compose config again before starting.
Access the Halcyon endpoint with Localtonet
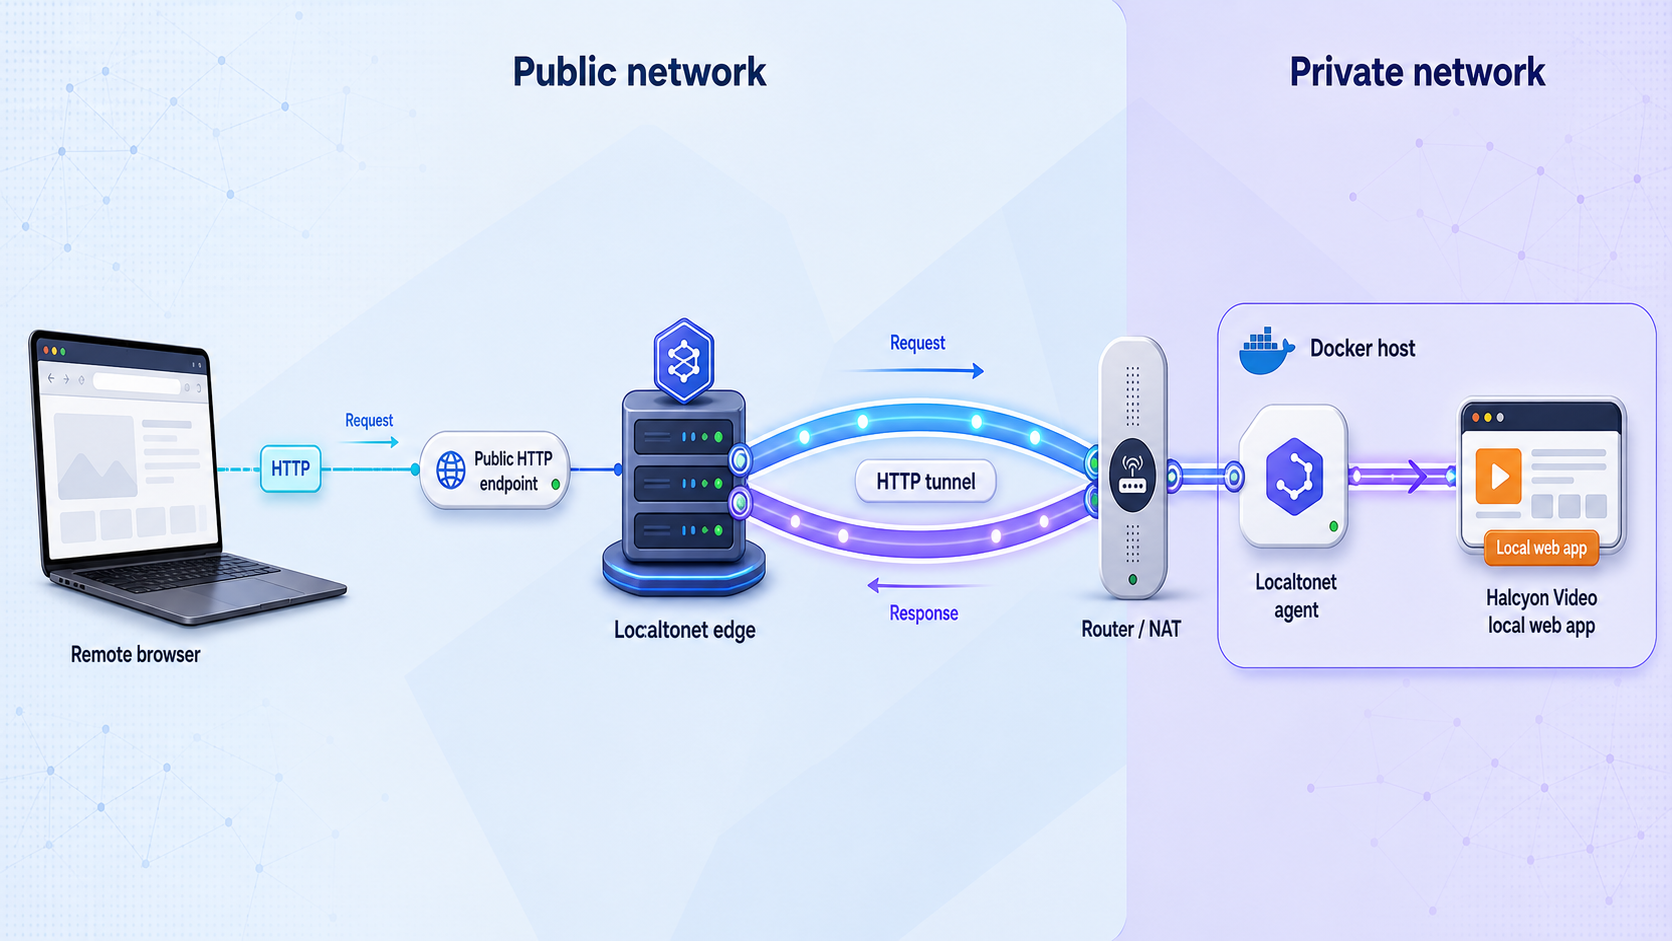
Our client establishes an outbound connection to a Localtonet relay, so publishing the verified Halcyon endpoint does not require inbound router port forwarding, firewall changes, VPN setup, or a public IP address. The tunnel remains available only while the selected client is connected and the tunnel is running.
Start with the synthetic demo when testing the tunnel itself. Because it does not require Jellyfin or Plex, it isolates Localtonet-to-Halcyon connectivity from media-server routing. Only proceed to a personal library when the remote browser also has a verified, secure route to the media service.
Install and run the Localtonet client
Run our client on the Docker host or on another device that can reach the published Halcyon port. Keep the client connected for as long as the public endpoint is needed.
Select the authenticated device
Choose the device-specific authentication token associated with that client. Tokens identify client devices and must not be exposed in screenshots, logs, repositories, or examples.
Select an available relay server
Select a currently available server or region from the dashboard. Do not copy a hardcoded server code from an old article because availability can vary.
Create an HTTP tunnel with the correct local target
If the Localtonet client runs directly on the Docker host and port 8080 was published on an address reachable to it, target that host address and port 8080. If the client runs on another LAN device, target the Docker host's reachable LAN IP and port 8080. Use the alternative host port if you changed the Docker mapping.
Choose the HTTP process type
Select Random Sub Domain, Custom Sub Domain, or Custom Domain as appropriate and available. These process types serve the configured local HTTP content at a public HTTPS address. Check current documentation before applying custom-domain DNS settings.
Start the tunnel
Use the Start button after reviewing the target. Creating the tunnel does not start it. The client must be connected and the tunnel must be running before the public URL can reach Halcyon.
Test from outside the LAN
Disable Wi-Fi on a phone or use another genuinely off-LAN network. Open the assigned public HTTPS URL in a private browsing session. First test the synthetic demo, then test any intended authenticated media workflow separately.
Stop or delete the tunnel when finished
Stop the tunnel when public access is not required. Delete it if the configuration is no longer needed. Also remove any media-server access path that was created solely for the test.
See the Localtonet HTTP tunnel documentation for the current dashboard workflow and available settings.
Expected off-LAN results
| Test | Expected result | What a failure usually isolates |
|---|---|---|
| Open public Halcyon URL | The boot interface and application assets load | Localtonet target, client connection, tunnel state, or Halcyon HTTP service |
| Open synthetic demo | The demo catalog renders without a media server | Browser graphics, memory, application assets, or frontend compatibility |
| Synchronize personal library | Authorized libraries and artwork appear | Media-server reachability, authentication, CORS, DNS, or mixed content |
| Start playback | An authorized title begins using a browser-reachable media path | Media URL routing, authorization, codec support, HTTPS policy, or WebSocket behavior |
| Open a fresh private session | Only the access and configuration state intended for a new visitor is visible | Unexpected browser persistence or an unsafe access-control assumption |
Troubleshooting
The container exits or never becomes ready
docker ps -a --filter name=halcyon-video
docker logs --tail 200 halcyon-video
docker inspect halcyon-video
Look for an image-pull failure, architecture mismatch, invalid command, or port-allocation error. The v0.9.1 release supplies amd64 and arm64 images. If the host uses another CPU architecture, do not assume compatibility. If the name already exists, inspect the existing container rather than creating another with the same name.
Docker reports that the port is already allocated
Another process or container is using host port 8080. Stop the conflicting service only if it is safe to do so, or publish Halcyon on another host port:
docker run -d \
  --name halcyon-video \
  --restart unless-stopped \
  -p 8090:80 \
  ghcr.io/halcyon-video/halcyon-video:v0.9.1
The resulting local URL is http://localhost:8090, and the Localtonet target must use port 8090. Do not change the right-hand container port unless the image documentation changes.
Localhost works, but another LAN device cannot connect
Confirm the published mapping with docker port halcyon-video. Verify that the second device is using the Docker host's LAN address rather than localhost. Host firewall or network-segmentation policy may prevent LAN access even though the container works locally. Make only the minimum policy change approved for that host and network.
The interface loads, but Jellyfin or Plex is unreachable
Open the exact configured media-server URL directly in the same browser. If it does not load there, Halcyon cannot make it routable. Check DNS, the port, the scheme, media-server availability, and account credentials. From an off-LAN browser, a private RFC 1918 address is normally not reachable without an independently configured route.
If the direct media URL works but Halcyon requests fail, inspect browser developer tools for CORS rejection, authorization errors, mixed-content blocking, failed preflight requests, or incorrect absolute URLs. Correct the media-server and browser-facing configuration. Do not disable browser security protections as a workaround.
The public HTTPS page reports mixed-content failures
An HTTPS Halcyon page can be blocked from requesting an http:// media URL. The appropriate resolution is a properly authenticated HTTPS endpoint for the media service that the browser can reach and trust. A Localtonet tunnel to Halcyon alone cannot convert unrelated absolute media URLs to HTTPS.
Posters or other assets fail while the shell still loads
Inspect the failed request hostname. Owned-media artwork is obtained through the media-server path, while optional request integrations can return other artwork addresses. A failure may therefore belong to Jellyfin, Plex, Jellyseerr, Overseerr, DNS, a content-security policy, or another artwork destination rather than to the Halcyon container.
Playback fails after library browsing succeeds
Catalog access and media delivery can use different requests or URLs. Check the final media URL, its authorization response, browser codec support, HTTPS status, and any WebSocket or session request involved. Confirm that the same item plays through the normal Jellyfin or Plex browser interface from that off-LAN device. Do not interpret successful poster loading as proof that streaming is correctly routed.
The full store is slow, blank, or unstable
Confirm that browser graphics acceleration is enabled and supported. Update the browser and graphics driver where appropriate, close memory-intensive tabs, and test on external power. The project warns that the full synthetic demo can consume a few gigabytes of browser memory and real GPU resources. Switch to Halcyon's 2.5D mode on constrained hardware, including Raspberry Pi-class systems, when the full three.js experience is unsuitable.
Localtonet cannot reach a service that works inside another container
localhost always refers to the network namespace of the process using it. If the Localtonet client runs on the host, target the host's published Docker port. If our client runs in a different container, its own 127.0.0.1:8080 does not refer to the Halcyon container or host.
Use a target address actually reachable from the Localtonet client's network namespace. The safest straightforward arrangement is to publish Halcyon on the Docker host and run our client on that host or on a LAN device that can reach the host address. Avoid exposing the Docker daemon or attaching unrelated containers to broad networks merely to solve a target-address mistake.
The public URL does not open
Recheck the system in this order: Halcyon container state, host-local URL, LAN URL from the Localtonet client device, Localtonet client connection, tunnel target, and tunnel running state. Creating the configuration is not enough. If the local target fails from the client device, resolve that routing problem before changing the public URL.
Frequently asked questions
Does Halcyon Video replace Jellyfin or Plex?
No. Halcyon is a browser frontend for a Jellyfin or Plex library. It does not include a personal-file scanner. Its synthetic demo works without a server, but that demo does not catalog or play your own media.
Which Docker port should I use?
The documented image serves HTTP on container port 80. This tutorial publishes it as host port 8080 with -p 8080:80, producing http://localhost:8080 on the Docker host. If you choose another host port, use that port in the browser and Localtonet target.
Should I use v0.9.1, latest, or master?
They are different version choices. The v0.9.1 tag identifies a reproducible published image for amd64 and arm64. The floating :latest tag can move, and master can contain commits not included in v0.9.1. Record the exact working tag or commit and review newer release notes before updating.
Does exposing Halcyon through Localtonet also expose Jellyfin or Plex?
No. The HTTP tunnel forwards to the configured Halcyon IP address and port. The remote browser still contacts the configured media-service addresses. Those services need their own secure, authenticated, browser-compatible reachability for off-LAN library access and playback.
Why does the store load remotely while the library does not?
The Localtonet tunnel may be successfully serving the Halcyon frontend while the browser cannot reach the configured Jellyfin or Plex address. Private addressing, DNS, authentication, CORS, or HTTPS mixed-content rules can independently block the library requests.
Is Localtonet the same as Halcyon Remote Play?
No. A Localtonet HTTP tunnel publishes the hosted Halcyon web endpoint. Halcyon Remote Play is a separate project feature described as streaming the live store to another browser with its own TURN relay for off-LAN viewers.
Does Halcyon provide a complete public-access authentication layer?
Do not treat it as an independent gateway protecting media services. Halcyon serves a browser application with a connection interface, while Jellyfin or Plex remains responsible for media authorization. Test a fresh private session and use least-privilege media accounts before sharing a public URL.
Can Halcyon Video run on a Raspberry Pi?
The project documents arm64 container support for v0.9.1 and describes its 2.5D mode as suitable for Raspberry Pi use. The full 3D experience depends on the specific device, browser, memory, graphics support, library size, and display workload.
Does the public endpoint remain available if the Localtonet client stops?
No. The selected client must remain connected and the tunnel must be running. Creating a tunnel configuration alone does not start it.
Publish the verified Halcyon endpoint carefully
Start with a pinned container, confirm the local demo and media workflow, and identify every address the browser must reach. When the Halcyon HTTP endpoint is ready, use Localtonet to publish only its confirmed host address and port, test from a genuinely off-LAN network, and stop the tunnel when remote access is no longer needed.
Get Started Free →

