

Create a current iii project, configure its provider safely, verify the local console, and publish only the application route you need
iii organizes backend capabilities around Workers, Functions, and Triggers. Its current installation workflow is interactive: install the CLI and engine, initialize a project, choose an LLM provider or the no-LLM template, prepare any required credentials, and start the project. The local iii console is documented on port 3113, but that console is not the same thing as a user-defined HTTP Trigger. This guide explains that distinction, covers foreground and Docker operation, and shows how to expose a verified application endpoint through Localtonet without publishing unnecessary runtime or administrative surfaces.
📋 What's in this guide
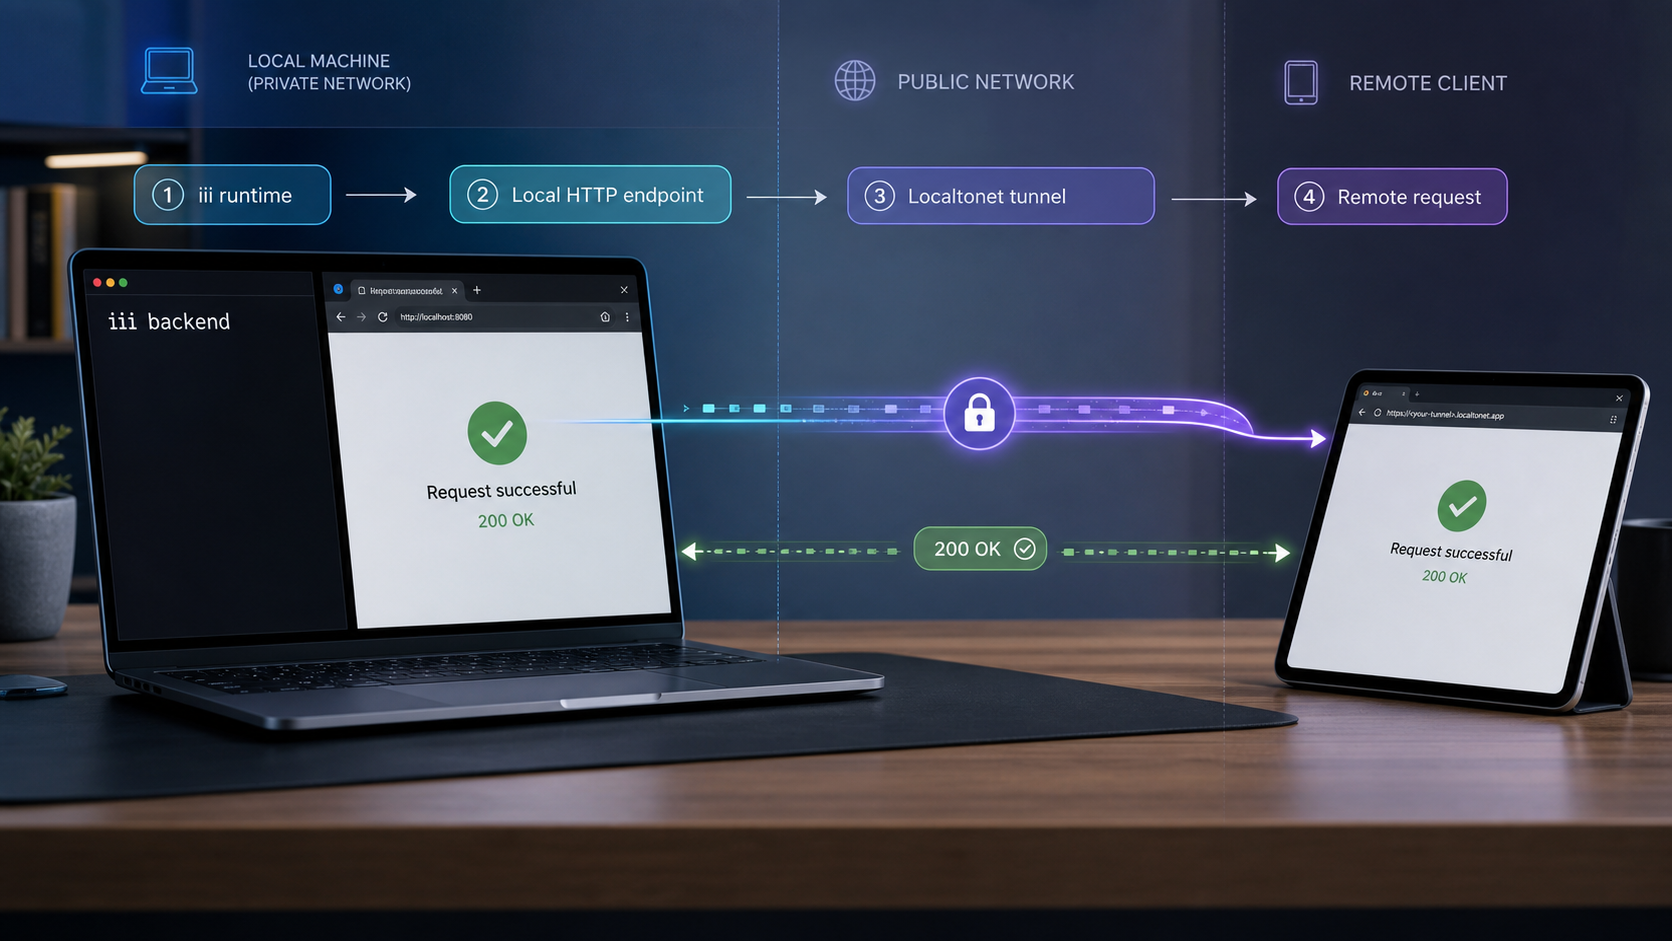
Understand what a self-hosted iii project runs
iii provides a common runtime model for capabilities that might otherwise be implemented through separate backend systems. Its three core primitives are Worker, Function, and Trigger. A Worker is a participating process. A Function is a named unit of work hosted by a Worker. A Trigger declares what causes a Function to run.
Triggers can represent direct function calls, HTTP requests, cron schedules, queue subscriptions, state changes, stream events, and other supported event sources. Workers register their Functions and Triggers with the iii engine, allowing participating processes to discover and call capabilities through a shared system surface.
The current project flow declares project workers in worker-compose.yaml and starts the engine and those workers with iii compose --up. The generated project depends on the choice made during interactive initialization. Selecting an LLM provider prepares a provider-oriented project, while selecting no LLM creates the base template.
Current iii installation documentation says that a started project can be explored through the console on 127.0.0.1:3113. This does not mean every project has an application HTTP Trigger on port 3113. The no-LLM base template starts only the console. To expose business logic over HTTP, the running system must also contain a Worker that declares the required HTTP Trigger.
The current iii repository is the best place to inspect the project structure, SDK packages, console source, engine source, and current README. See the iii repository alongside the current iii documentation.
Licensing and version compatibility require component-specific review
The current repository license table identifies engine/ as Elastic License 2.0 and identifies sdk/, console/, docs/, and website/ as Apache License 2.0. The available table does not separately list every installed CLI artifact, so this guide does not assign a license to the CLI by inference. Review the repository's current license files and the directories for the exact components you intend to use.
Likewise, do not assume a universal same-minor compatibility rule for every engine and SDK release unless the release documentation for your versions states it. Record the installed engine version, record each SDK package version, and consult the applicable release notes before upgrading. As an example of version-specific release information, see the iii 0.22.1 release notes. A specific release page is a historical snapshot, not proof that it is the latest available version.
Prepare the host and choose a provider path
The documented installer is downloaded and executed through a shell with curl. You need a compatible command-line environment, network access to the installation host, permission to install the executable, and a writable directory for the project. The supplied current documentation does not provide a complete operating-system support matrix or universal hardware minimum, so verify platform support for the machine on which you plan to run iii.
Prepare the following before installation:
- A shell capable of running the documented installer.
curland network access toinstall.iii.dev.- Permission to place and run the installed executable.
- A writable parent directory for the new project.
- A browser for opening the local console.
- A second terminal for local tests and provider commands while iii remains active.
- Docker with the Compose plugin only if you plan to use the optional generated Docker deployment.
- The required provider credential or provider login, unless you select no LLM.
Piping a downloaded script directly into a shell executes it immediately. The command in this guide is the installation method documented by iii, but your organization may require downloading, inspecting, approving, or internally mirroring the script before execution. Follow that policy rather than bypassing it.
Choose the provider before you initialize the project
The current installer walkthrough asks you to select an LLM provider or select no LLM during project setup. Most provider choices require an API key in the generated .env file. OpenAI Codex and GitHub Copilot use login-based preparation instead, and llama.cpp points to a locally operated llama server.
| Setup choice | Required preparation | Documented behavior or follow-up |
|---|---|---|
| No LLM | No provider credential | The base template starts only the iii console. It does not create an application HTTP Trigger by itself. |
| OpenAI API | Set OPENAI_API_KEY in .env |
The selected OpenAI provider is enabled by default in that provider template. |
| Anthropic | Set ANTHROPIC_API_KEY in .env |
The selected Anthropic provider is enabled by default in that provider template. |
| OpenAI Codex | Run codex login so ~/.codex/auth.json exists |
Add provider-openai-codex to the running project. |
| DeepSeek | Set DEEPSEEK_API_KEY in .env |
Add provider-deepseek to the running project. |
| Kimi (Moonshot) | Set MOONSHOT_API_KEY in .env |
Add provider-kimi to the running project. |
| OpenRouter | Set OPENROUTER_API_KEY in .env |
Add provider-openrouter to the running project. |
| xAI (Grok) | Set XAI_API_KEY in .env |
Add provider-xai to the running project. |
| Z.AI | Set ZAI_API_KEY in .env |
Add provider-zai to the running project. |
| GitHub Copilot | A GitHub Copilot subscription rather than an API key | Add the provider, then start its documented login flow. |
| llama.cpp | Run your own llama server and review .env |
The documented default target is http://127.0.0.1:8080; add provider-llamacpp to the project. |
Never paste a real provider key into a command shown in documentation, a support ticket, a screenshot, or source control. Put the required value in the generated .env file, restrict access to that file, and ensure it is excluded from commits. If a credential has been exposed, revoke or rotate it through the provider rather than merely deleting it from the latest commit.
Install iii and verify the command
Follow the current iii installation guide for the authoritative setup flow. Its installation command downloads and runs the iii installer:
curl -fsSL https://install.iii.dev/iii/main/install.sh | sh
The current install page proceeds from installation into interactive project initialization. Running iii --version is still a useful independent check, but it is not presented as the second step of the current install recipe. The version check appears in older versioned documentation and remains practical for confirming that your shell can locate the command.
iii --versionA successful result should print a version. Record that value when opening an issue or comparing behavior with release documentation.
If the shell cannot find iii
Read the installer's output for path instructions. If it changed shell configuration, open a fresh terminal and retry the version command. Confirm that installation and verification use the intended user account, and inspect that user's command search path.
The current evidence does not establish one universal installation directory. Do not guess a location, move an unfamiliar binary, or add a broad writable directory to PATH. In centrally managed environments, use the location and permissions approved by the administrator.
Initialize, configure, and start the project
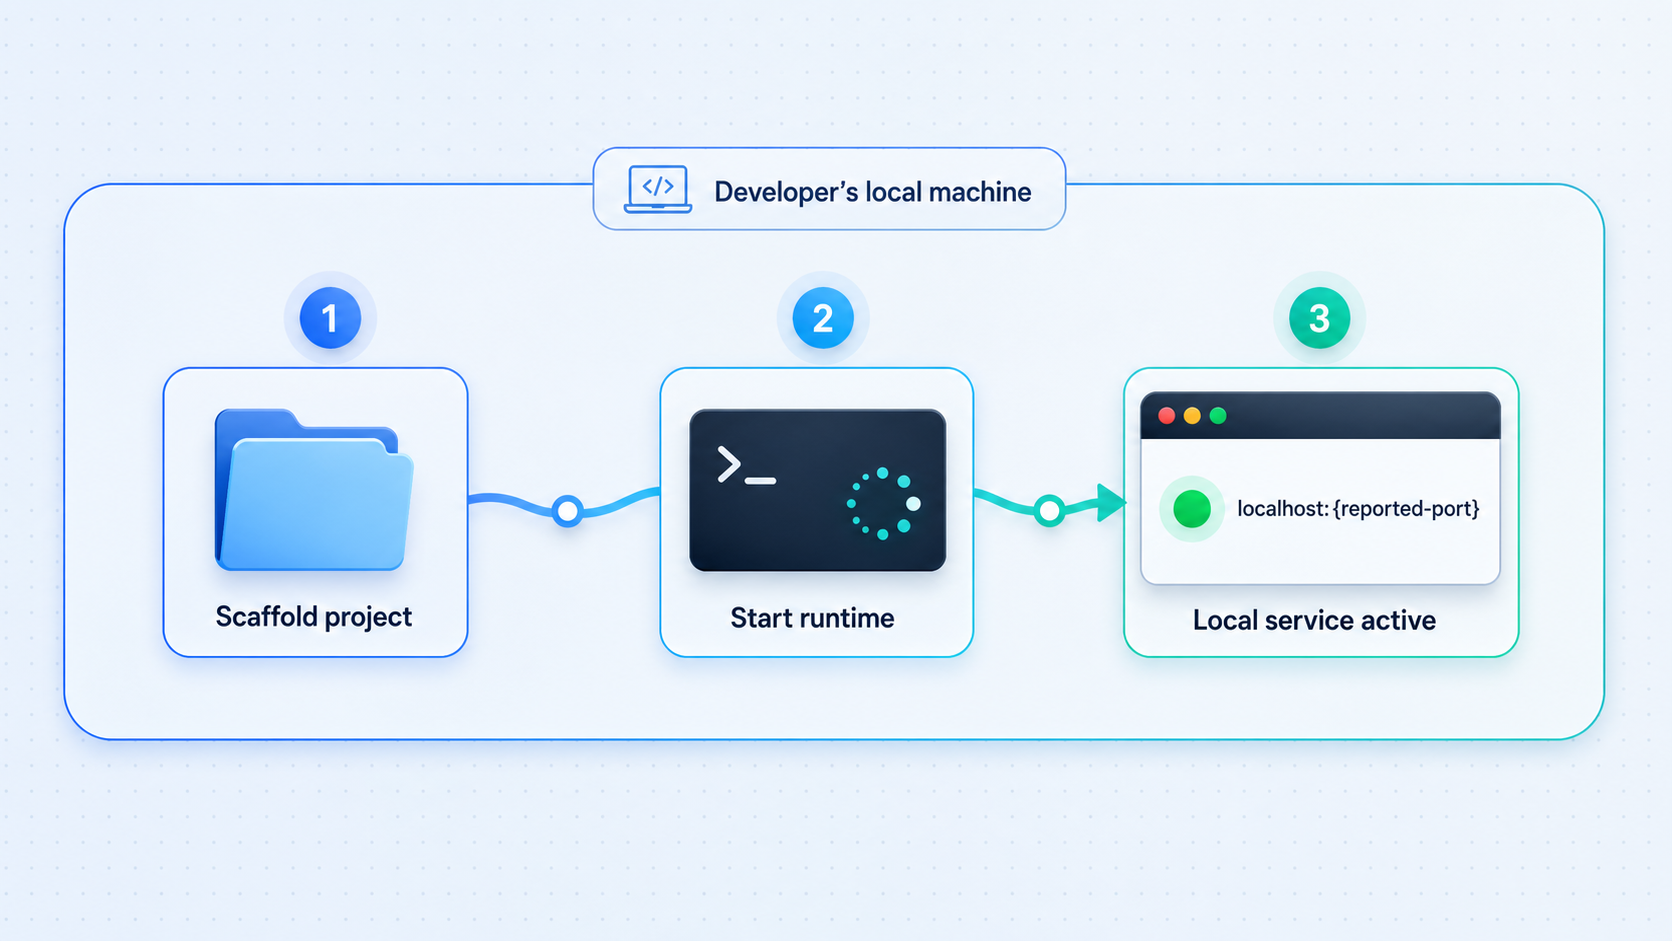
Initialize a project
Run iii project init my-app from the parent directory where the project should be created. The setup asks you to choose no LLM or one of the documented providers.
Enter the generated directory
Change into my-app. Subsequent project and Compose commands should be run from this project root.
Prepare the selected provider
For an API-key provider, edit .env and set only the variable required for that provider. For Codex, complete codex login. No provider credential is needed for the no-LLM path.
Start the engine and project
Run iii compose --up from the project root. Keep the terminal open so you can see startup and provider errors.
Add a provider when the selected path requires it
In a second terminal, run the documented compose::add command for Codex, DeepSeek, Kimi, OpenRouter, xAI, Z.AI, GitHub Copilot, or llama.cpp. GitHub Copilot also requires its provider login trigger after the worker starts.
iii project init my-app
cd my-app
iii compose --up
The initializer is interactive, so choose the provider that matches the credential or local service you prepared. Do not enable several providers merely because they appear in the documentation. Start with the one your application requires and keep unrelated credentials out of the project.
Provider commands used after startup
The current install page documents the following commands for provider choices that are added to a running project:
iii trigger compose::add worker=provider-openai-codex
iii trigger compose::add worker=provider-deepseek
iii trigger compose::add worker=provider-kimi
iii trigger compose::add worker=provider-openrouter
iii trigger compose::add worker=provider-xai
iii trigger compose::add worker=provider-zai
iii trigger compose::add worker=provider-github-copilot
iii trigger compose::add worker=provider-llamacpp
Run only the command for your selected provider. For GitHub Copilot, start the documented sign-in flow after its provider worker is running:
iii trigger provider::github-copilot::login::start
Keep .env, ~/.codex/auth.json, and any provider login state out of repositories, build output, public screenshots, and shared logs. A Localtonet tunnel should never target a file browser, shell, or other service that could reveal these files.
What the no-LLM template gives you
The no-LLM choice creates a valid base project, but the current install documentation explicitly says that it starts only the console. This is useful for confirming that the engine and console can run, but it does not create a business API, webhook receiver, or other application endpoint.
To serve an application request, add or develop a Worker that registers a Function and binds it to an HTTP Trigger. That Trigger determines the method and route used by the application. Do not point remote traffic at the console and treat it as a substitute for an application endpoint.
Avoid mixing current and old quickstarts
Older versioned documentation uses commands such as iii create --template quickstart --directory quickstart, starts the engine with iii --config iii-config.yaml, and starts the console separately with iii console. Those instructions belong to an older documentation generation.
Use the current interactive iii project init and iii compose --up flow for this tutorial. If you are maintaining an older project, match its commands to the installed version and its versioned documentation rather than combining files and commands from different generations.
Verify the console separately from application HTTP Triggers
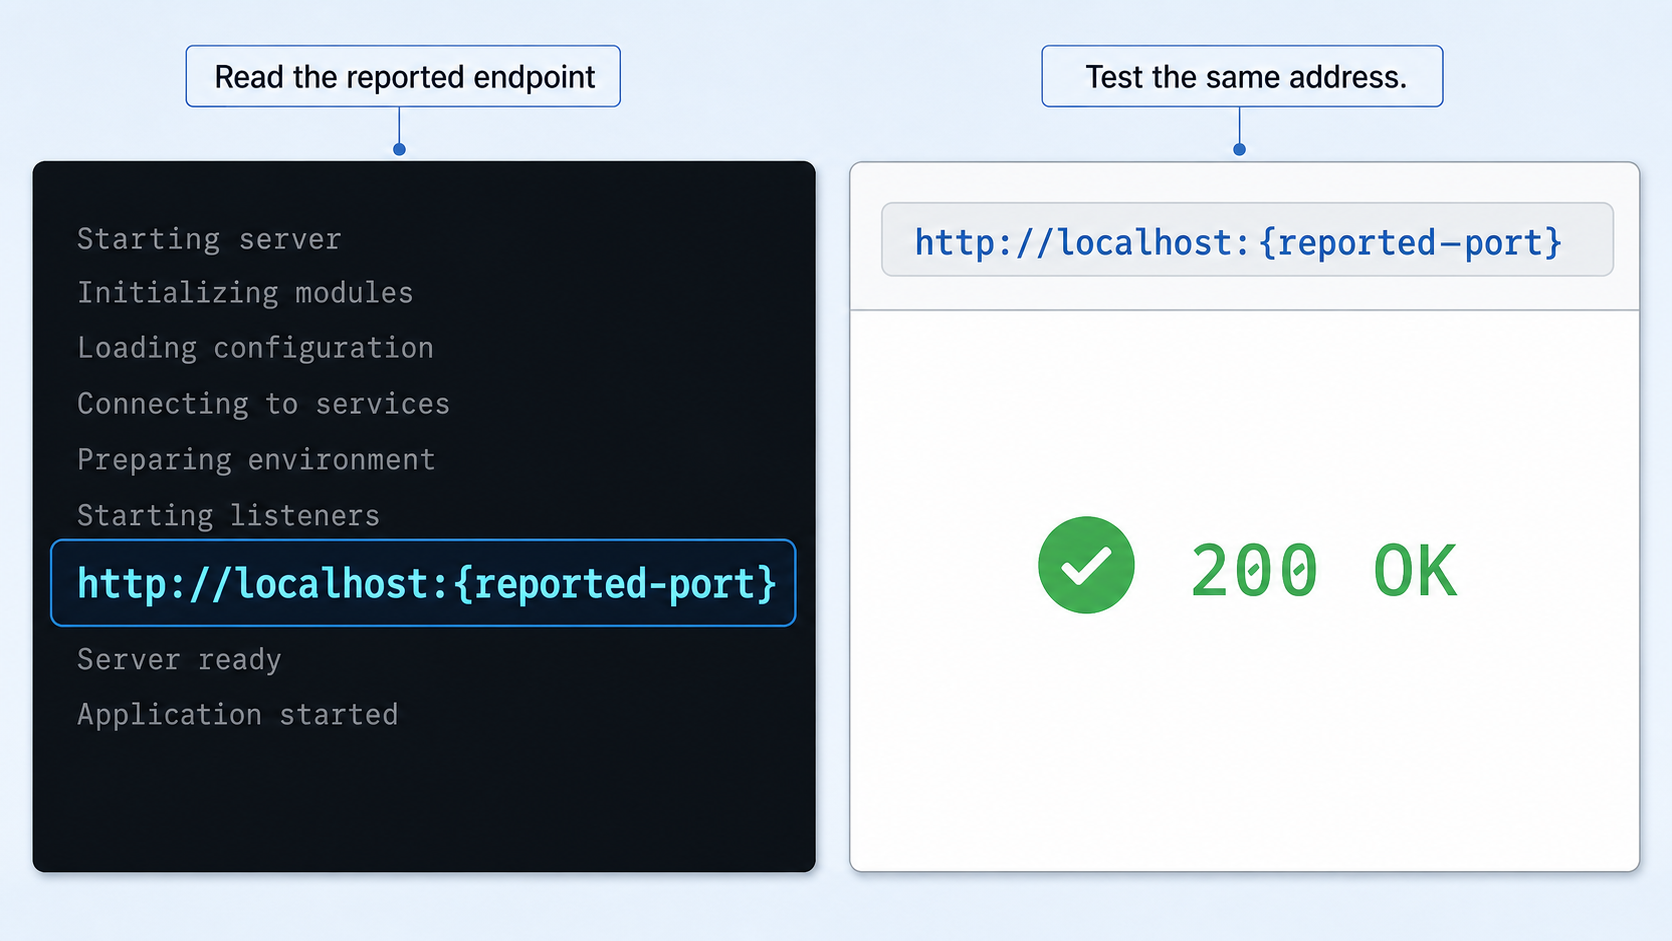
After iii compose --up remains active, first inspect its terminal output for configuration failures. A missing API key, unsuccessful provider login, unreachable llama.cpp server, or failed Worker can leave the engine partially operational while the intended project capability is unavailable.
Open the local console
The current install page names 127.0.0.1:3113 as the local console address. However, that same page is internally inconsistent about the URL scheme: its introduction shows https://127.0.0.1:3113, while its final instruction says to open http://127.0.0.1:3113.
Do not infer TLS solely from the introductory HTTPS reference. Start with the exact address printed by the installed version's startup output. The current page's final browser instruction uses http://127.0.0.1:3113, while another sentence uses HTTPS. If one scheme fails, inspect the browser error and runtime output before changing network or tunnel settings.
A practical local browser check based on the page's final instruction is:
http://127.0.0.1:3113Successful console access confirms that the console listener is reachable. It does not confirm that a provider works, that a Worker has registered an application Function, or that an HTTP Trigger exists.
Verify an application HTTP Trigger
If your project includes an application Worker, identify the route it registers. Record the local origin, path, HTTP method, required headers, authentication, and request body. Then reproduce the request from the iii host before creating any public tunnel.
curl -i http://127.0.0.1:PORT/PATH
PORT and PATH are placeholders, not iii defaults. Replace them with the values defined by your Worker and HTTP Trigger. If the Trigger expects POST, JSON, or authentication, include those requirements in the test. A browser address bar performs a simple GET and is not sufficient for every route.
| Surface | What success proves | What it does not prove |
|---|---|---|
| CLI version | The shell can find and execute iii | That a project or provider is configured |
| Engine startup | The core process remains active | That every project Worker started |
| Console on port 3113 | The local console is reachable | That an application HTTP Trigger exists |
| Provider Worker | The selected provider loaded without an immediate configuration error | That every model request or application workflow succeeds |
| Application Trigger | The requested method and route reach the intended Function | That the route is safe to publish publicly |
| Localtonet public URL | The running tunnel can reach the selected local service | That the application has adequate authorization |
Use the optional Docker deployment workflow
iii also documents a Docker-oriented deployment flow. See the current iii deployment documentation before adapting generated assets for production.
For a new Docker-oriented project, use:
iii project init --dockerTo add Docker assets to an existing project, run this from the project root:
iii project generate-docker
Both forms emit Dockerfile, docker-compose.yml, and .env. Re-running the generator does not overwrite existing files, so local edits remain in place. This also means regeneration will not automatically merge future template changes into files you have already generated.
Start, inspect, and stop the Docker stack
docker compose up -d
docker compose ps
docker compose logs
docker compose down
docker compose up -d starts the stack in detached mode. Use docker compose ps to inspect service state and docker compose logs to review startup or provider failures. Use docker compose down for a normal shutdown when the deployment should stop. Review your volume and persistence configuration before adding flags that remove stored data.
The generated deployment documents three engine transport ports:
| Port | Documented service | Exposure guidance |
|---|---|---|
49134 |
SDK WebSocket for Worker connections | Do not publish it merely because it is listening. It is not an application REST endpoint. |
3111 |
REST API | Confirm the required application route and its authorization before exposing it. |
3112 |
Stream API | Streaming and upgraded connections can require different reverse-proxy handling from ordinary HTTP requests. |
These Docker transport ports do not redefine the console. Port 3113 remains the documented local console address in the current install flow. Likewise, a listening REST port does not guarantee that a user-defined HTTP Trigger exists at a particular path.
The generated Dockerfile builds against iiidev/iii:latest and is documented as distroless and non-root. The generated Compose file includes commented Redis and RabbitMQ services for Workers that need external adapters. Enable those services only when a declared Worker requires them, and configure credentials, persistence, backups, and network access according to your deployment policy.
TLS and reverse-proxy boundaries
The iii deployment documentation says that the engine does not terminate TLS. Its reverse-proxy examples route /api/* to port 3111, /stream/* to port 3112, and /ws to port 49134. Those examples require additional production work for certificates, headers, authentication, access logging, request limits, and application-specific routing.
A Localtonet HTTP tunnel provides a public HTTPS address for the selected local HTTP target, with TLS terminated at the tunnel edge. It does not automatically combine iii's REST, stream, WebSocket, and console ports into one application. If your application needs several transport surfaces under one origin, configure and verify a suitable local reverse proxy first, then point the tunnel at that proxy.
Expose a verified iii application route with Localtonet
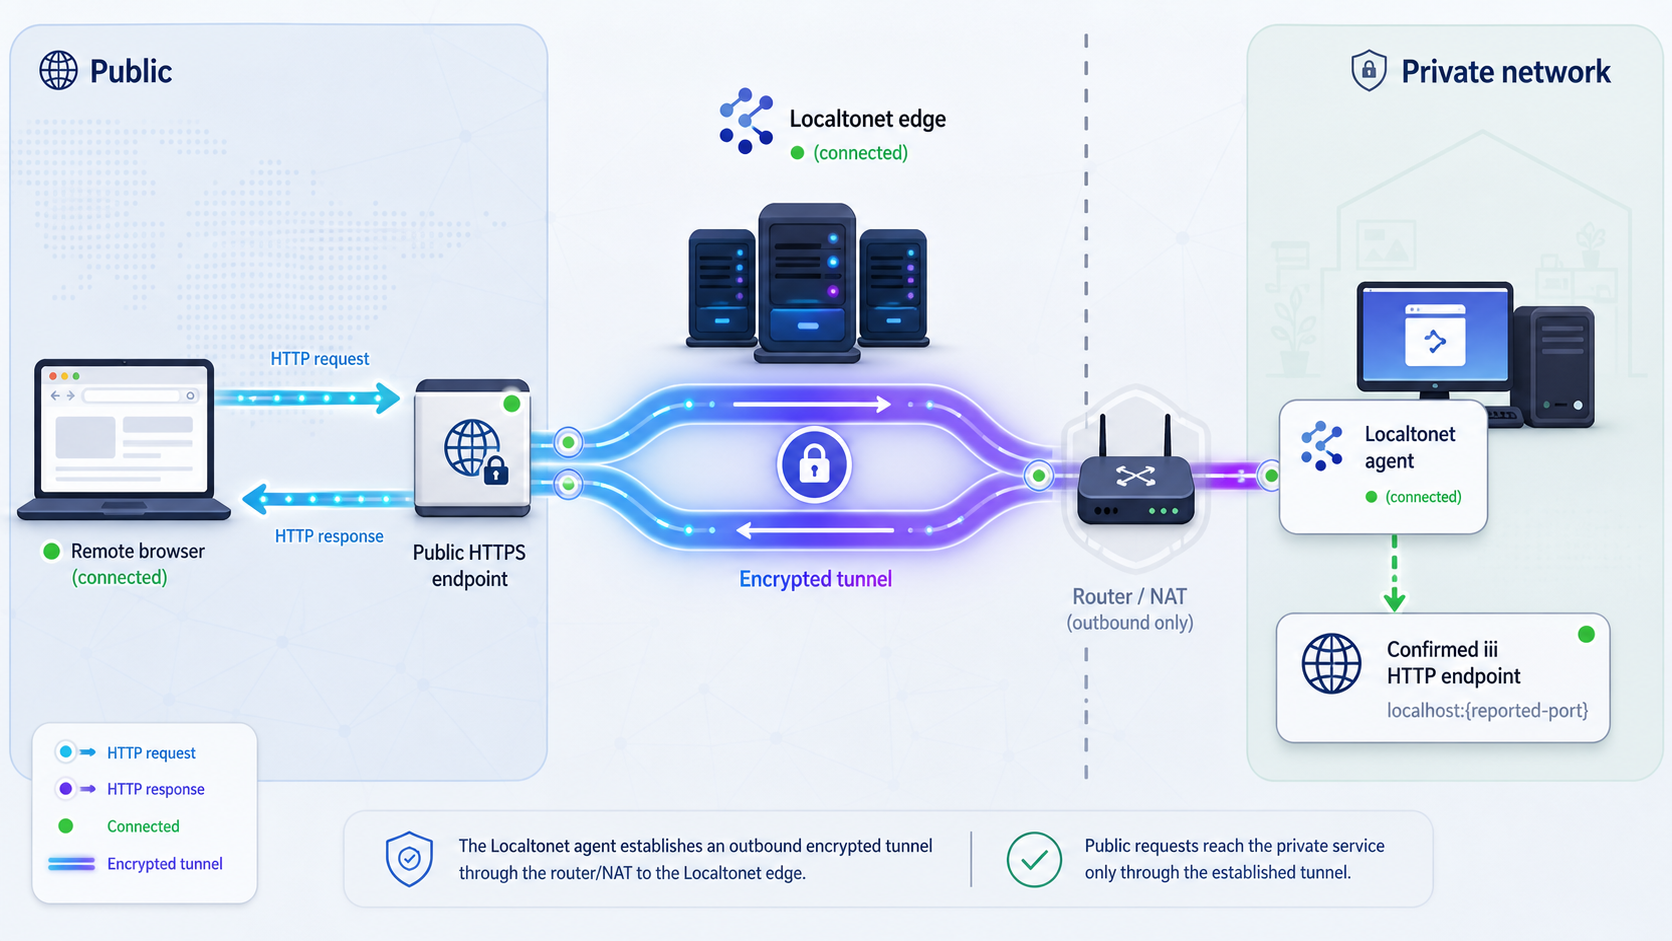
Once an application HTTP Trigger works locally, Localtonet can make that HTTP service reachable remotely. Our client establishes an outbound connection from the selected device to a Localtonet relay server, so you do not need inbound router port forwarding, firewall changes, VPN setup, or a public IP address.
Install and run the Localtonet client
Run our client on the iii host or another device that can reach the verified application service. Keep the iii project active during setup.
Select the correct device
Authenticate or select the device-specific token for the client that can reach iii. Never copy that token into source code, screenshots, logs, or documentation.
Select an available relay server
Choose a currently available relay server or region from our dashboard. Obtain current values from the product rather than copying a hardcoded server code.
Create the HTTP tunnel
Set the local target to the exact IP address and port that passed the application test. The HTTP route remains part of the request URL and is not entered as a replacement for the local port.
Start the tunnel
Creating a tunnel does not start it. Use the Start button and wait until the selected client and tunnel are connected.
Test the public application route
Append the verified Trigger path to the assigned public HTTPS address and repeat the same method, headers, authentication, and body used in the local test. Stop or delete the tunnel when remote access is no longer required.
See our Localtonet HTTP tunnel documentation for the current dashboard workflow. Available relay servers, dashboard options, and plan-specific capabilities can vary, so check the current product during setup.
The console can expose logs, traces, Workers, Functions, Triggers, queues, and runtime state. Publish only the application route needed by the remote client. A public HTTPS address provides transport reachability, not application authorization, so require appropriate authentication and apply least privilege.
The iii project and required Workers must remain active, and the Localtonet client must remain connected with the tunnel running. If either side stops, the public endpoint becomes unavailable.
Operate the project and protect its credentials
Foreground operation
When you run iii compose --up in the foreground, keep that terminal attached while developing or testing. Use the terminal output to identify the first meaningful startup failure. To stop the foreground process, use the normal terminal interrupt and allow the processes to shut down cleanly.
After restarting, verify the console, provider Worker, and application route again. Do not assume that a Worker loaded simply because the engine process remained active.
Docker operation
For a detached Docker deployment, inspect docker compose ps and docker compose logs as part of routine checks. Restart and update containers according to your deployment policy. Before changing an image tag or regenerating assets, preserve reviewed configuration and understand which files the iii generator will leave unchanged.
Protect every credential store
Treat provider API keys, Codex authentication state, GitHub Copilot login state, queue credentials, generated .env files, and the Localtonet device token as secrets. Grant access only to the account or service that needs them. Redact them from support output and rotate them after suspected disclosure.
Keep network exposure narrow
Do not publish the console, SDK WebSocket, REST API, stream API, and every Worker endpoint by default. Determine which route a remote user or system needs, verify that route locally, and expose only its local service.
If the Localtonet client runs on the same machine as iii, a loopback target can reduce unnecessary LAN exposure when the service is configured to listen there. If our client runs on another device or in another container, 127.0.0.1 refers to that device or container itself. In that case, use an address that is reachable from the client and test it from the client's actual network context.
Upgrade using release-specific evidence
Record the current engine and SDK versions before an upgrade. Read the relevant release notes, update in a controlled environment, start the project locally, check Worker and provider registration, test application Triggers, and only then test the public URL. Do not apply an assumed compatibility rule in place of version-specific release guidance.
Troubleshoot installation, providers, console access, and tunnels
iii --version does not run
Check the installer's output, current user, executable permissions, shell startup files, and command search path. Open a new terminal if the installer changed shell configuration. Do not guess the installation directory or add an insecure writable directory to PATH.
Project initialization does not show the expected setup
Confirm that you are using the current iii project init workflow rather than an older versioned quickstart. Record iii --version and compare your installed version with the current repository and applicable release notes. Avoid copying an old iii-config.yaml into a newly generated Compose project unless the matching documentation requires it.
The project starts but reports a missing provider key
Confirm that the selected provider matches the variable in .env. For example, OpenAI API uses OPENAI_API_KEY, Anthropic uses ANTHROPIC_API_KEY, and Kimi uses MOONSHOT_API_KEY. Check for an empty value or a credential stored in a different project directory. Do not print the secret while debugging.
Codex authentication is unavailable
The documented Codex path expects a prior codex login so ~/.codex/auth.json exists. Run the login as the same operating-system account that runs the iii project. If iii runs in a container or under another service account, do not assume that the host user's home-directory login state is visible there.
GitHub Copilot is not ready after adding the Worker
GitHub Copilot uses a subscription and a provider login flow rather than an API key in the documented setup. Confirm that provider-github-copilot was added successfully, then run iii trigger provider::github-copilot::login::start and complete the indicated login process.
llama.cpp cannot connect
Confirm that your own llama server is running and reachable from the iii process. The documented default is http://127.0.0.1:8080, but a container or remote service may require a different reachable address in .env. Test from the same network context as iii.
The no-LLM project has no application endpoint
This is expected for the base template. Current documentation says that the no-LLM template starts only the console. Add a Worker with a user-defined HTTP Trigger before expecting an application route. Do not use the console port as a substitute.
The console fails over HTTPS
The current install page contains both HTTPS and HTTP references for 127.0.0.1:3113. Check the exact startup output from your installed version. The page's final browser instruction uses HTTP. A protocol error can indicate that the listener is plain HTTP rather than TLS, not that the engine has failed.
The console opens but the application request fails
Console availability proves only that the console is reachable. Confirm that the intended Worker started, its Function registered, and its HTTP Trigger uses the method and path in your request. Check required headers, authentication, content type, and body separately.
A Docker port is listening but the route is missing
The generated Docker deployment exposes engine transport ports, but an open port does not create a user-defined Trigger. Inspect Worker startup and Trigger registration. Make sure you are not confusing port 3111 for REST, port 3112 for streams, port 49134 for SDK WebSocket connections, and port 3113 for the console.
Local access works but the Localtonet URL fails
Confirm that our client is connected on the selected device, the tunnel has been started, and the tunnel targets the same local IP address and port that passed the local test. If the client runs in a container or on another machine, verify that the target is reachable from there.
Then request the exact public path with the same method, body, headers, and application credentials. Requesting only the public origin does not test a Trigger registered at a deeper path.
The public URL stops when a terminal closes
The closed terminal may have been running iii compose --up or the Localtonet client. The engine, required Workers, our client, and the tunnel all need to remain active. For unattended operation, use an appropriate supervised deployment rather than leaving an interactive terminal as an accidental production process manager.
The console was exposed publicly by mistake
Stop the tunnel or correct its target immediately. Review what operational data may have been reachable, rotate exposed credentials where necessary, and follow your incident-response process. Restore remote access only after the tunnel points to the intended application service and that service has suitable authorization.
Frequently asked questions
What command installs iii?
The current documentation uses curl -fsSL https://install.iii.dev/iii/main/install.sh | sh. Review remote scripts before execution when required by your security policy.
Is iii --version part of the current two-step install recipe?
It is a sensible verification command, but the current install page proceeds from installation to interactive project initialization. The explicit install-then-version sequence appears in older versioned documentation.
What happens if I select no LLM?
The current no-LLM base template starts only the iii console. It does not create an application HTTP Trigger, so you must add an appropriate Worker and Trigger before expecting a business API route.
Is port 3113 an application HTTP endpoint?
Port 3113 is documented for the iii console. A user-defined application HTTP endpoint comes from an HTTP Trigger and can use a separately configured route or service port.
Should I use HTTP or HTTPS for the local console?
The current install page is inconsistent: it contains both HTTPS and HTTP references for 127.0.0.1:3113. Follow the endpoint printed by your running version. The page's final browser instruction uses http://127.0.0.1:3113.
Where should provider API keys be stored?
Put the required variable in the generated .env file, restrict access to it, and keep it out of version control, screenshots, logs, and documentation. Codex and GitHub Copilot use documented login flows instead of the API-key pattern.
Must iii engine and SDK versions share the same minor version?
This guide does not assert that as a universal rule without current version-specific primary evidence. Record all versions and consult the release notes that apply to the engine and SDK packages you are deploying.
Does one Localtonet HTTP tunnel expose every iii port?
No. An HTTP tunnel forwards to the local IP address and port you configure. If an application requires several iii transport surfaces on one origin, first configure and verify a local reverse proxy, then point the tunnel at that proxy.
Will Localtonet keep iii online after the project stops?
No. The iii project and required Workers must remain active, the Localtonet client must remain connected, and the tunnel must be running. The tunnel forwards traffic but does not replace the local service.
Publish only your verified iii application route
Install iii, complete the interactive provider setup, confirm the local console, and test the actual application HTTP Trigger separately. When that route works and has appropriate authorization, use Localtonet to provide remote access without configuring inbound router port forwarding.
Get Started Free →

