

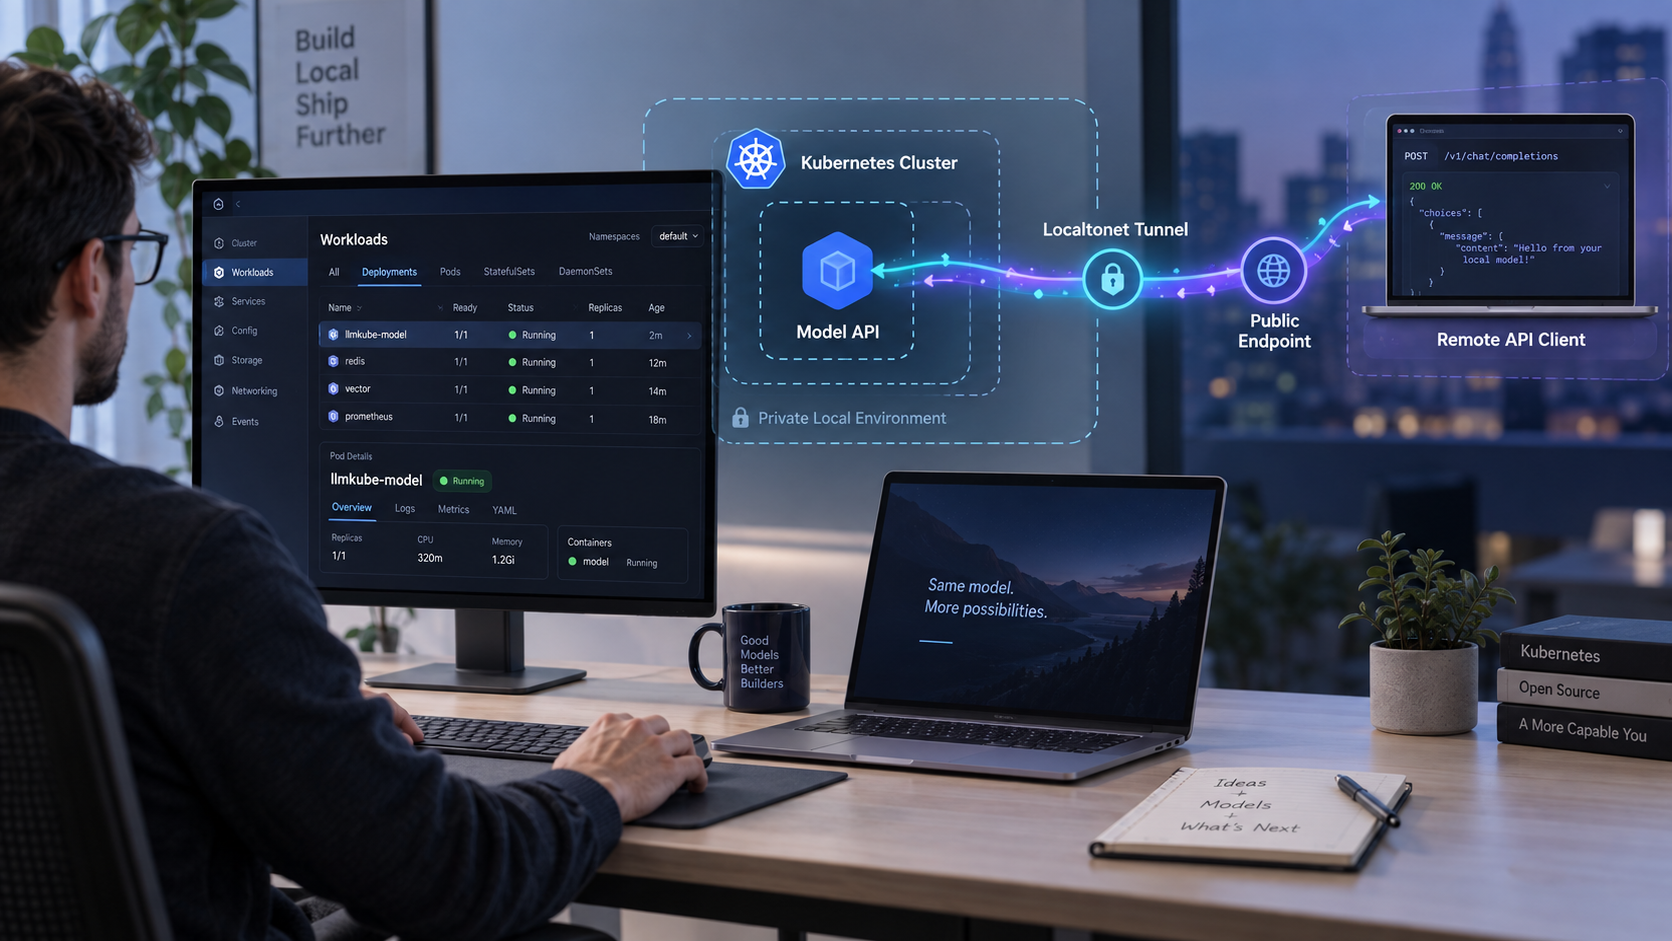
Deploy a self-hosted language model, verify its API locally, and then make that endpoint remotely reachable
LLMKube is a Kubernetes operator for running self-hosted LLM inference across supported runtimes and hardware. This guide follows its documented quick-start workflow: install the CLI, install the operator with Helm, deploy the catalog-backed Phi model, and test its OpenAI-compatible HTTP endpoint through Kubernetes port forwarding. After the local API works, we connect that same endpoint to an HTTP tunnel with Localtonet. The result is a practical installation-first workflow that keeps Kubernetes troubleshooting separate from remote-access configuration.
📋 What's in this guide
Understand the LLMKube and Localtonet architecture
LLMKube manages model inference as Kubernetes resources. Its in-cluster controller watches the relevant custom resources, schedules runtime workloads, downloads or prepares the selected model, creates a Kubernetes Service, and makes the inference API available inside the cluster. The project supports several inference runtimes, including llama.cpp, vLLM, TGI, and mlx-server, although runtime and hardware suitability depend on the model and the nodes available in your cluster.
The quick-start path used here deliberately avoids creating a Kubernetes LoadBalancer or exposing a fixed node port. Instead, kubectl port-forward maps the model's Kubernetes Service to localhost:8080 on the workstation where the command runs. That gives us a controlled local endpoint for verification before any remote access is introduced.
Localtonet becomes a separate layer after this endpoint works. Our client establishes an outbound connection from the machine running the client to a Localtonet relay server. An HTTP tunnel then maps a public address to the local HTTP target. This does not require inbound router port forwarding, a public IP address, firewall changes, or VPN setup. The tunnel remains available only while the selected Localtonet client is connected, the tunnel is running, and the local port-forward process can still reach the Kubernetes Service.
phi-4-mini using catalog-tested defaults and creates a service with an OpenAI-compatible API.
localhost:8080 to port 8080 on the phi-4-mini Service for local testing.
| Layer | Responsibility | What must remain running |
|---|---|---|
| LLMKube operator | Reconciles model and inference-service resources in Kubernetes | The operator and cluster control plane |
| Inference workload | Loads the model and handles API requests | The model workload and its Kubernetes Service |
kubectl port-forward |
Maps the in-cluster Service to localhost:8080 |
The foreground port-forward process |
| Localtonet HTTP tunnel | Connects the public HTTP address to the local target | The Localtonet client and the started tunnel |
Do not troubleshoot Kubernetes, model startup, port forwarding, and public tunneling at the same time. First establish that the local API answers at http://localhost:8080. Add Localtonet only after that test succeeds.
Prerequisites for installing LLMKube
You need a working Kubernetes cluster, local access to that cluster through kubectl, Helm, and Homebrew for the documented CLI installation command. The cluster must also contain enough compute, memory, and storage for the model and runtime selected by LLMKube. The available evidence does not establish a universal minimum CPU, RAM, disk, or GPU requirement for phi-4-mini, so this guide does not invent one.
Kubernetes can be local, on-premises, or otherwise reachable from your workstation, as long as the active kubeconfig context points to the intended cluster and your account can install the operator resources. Installing an operator commonly requires permissions beyond those of a namespace-only application user. Confirm that you are authorized to install it before proceeding.
Check the required command-line tools
Run the following commands in a terminal. Each should return version or client information rather than a command-not-found error:
brew --version
kubectl version --client
helm version
The official quick start documents Homebrew as the installation path for the LLMKube CLI. The supplied project evidence does not establish equivalent CLI installation commands for Windows, Linux package managers, or a manual binary workflow. If Homebrew is not available on your administration machine, consult the current LLMKube release instructions rather than adapting an unverified command.
Confirm access to the intended Kubernetes cluster
kubectl cluster-info
kubectl get nodes
Review the output carefully. The commands must target the cluster where you intend to run inference. A successful client-version check proves only that kubectl is installed. It does not prove that the current context points to a reachable or authorized cluster.
If kubectl get nodes fails, fix kubeconfig selection, authentication, cluster connectivity, or authorization before installing LLMKube. If the command succeeds, inspect whether the expected nodes are present and ready. A node being listed does not by itself guarantee that it has enough resources for a model.
Plan where the port forward and Localtonet client will run
The simplest arrangement is to run both kubectl port-forward and the Localtonet client on the same machine. In that layout, the HTTP tunnel can target 127.0.0.1 on port 8080. The loopback address always refers to the machine where a process is running, so a Localtonet client on another computer cannot reach a port forward bound only to the first computer's loopback interface.
The supplied LLMKube quick-start evidence demonstrates an OpenAI-compatible endpoint, but it does not establish built-in API authentication or TLS configuration for this example. Treat the API as unauthenticated unless you have independently configured and verified an access-control layer. Do not publish sensitive models, prompts, data, or unrestricted compute merely because the local test succeeds.
Install LLMKube and deploy the first model
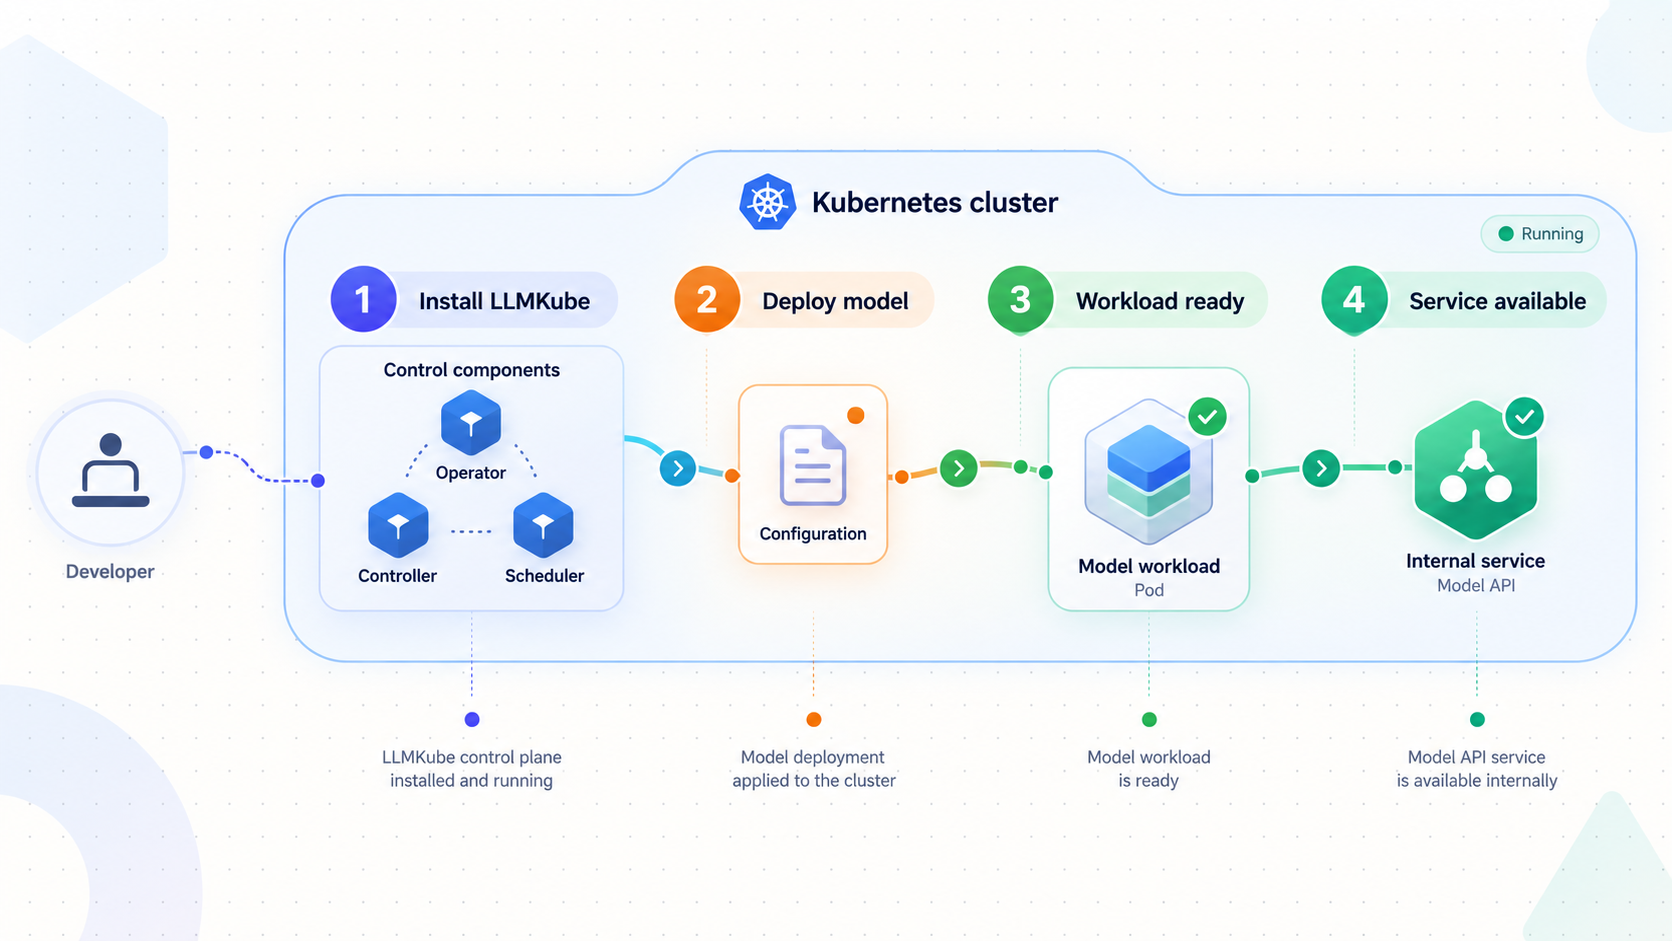
The following sequence preserves the documented quick-start order. It installs the CLI, adds the official Helm repository, installs the operator into llmkube-system, and then deploys phi-4-mini from the project catalog. Run the commands from a workstation whose active Kubernetes context points to the correct cluster.
Install the LLMKube CLI with Homebrew
Install the CLI from the project's documented Homebrew tap:
brew install defilantech/tap/llmkubeAfter Homebrew completes, confirm that the executable can be found by your shell:
llmkube --helpAdd the official LLMKube Helm repository
Register the documented chart repository with Helm:
helm repo add llmkube https://defilantech.github.io/LLMKubeA successful result means Helm has recorded the repository. It does not yet install anything into Kubernetes.
Install the LLMKube operator
Install the Helm release named llmkube into the dedicated llmkube-system namespace:
helm install llmkube llmkube/llmkube --namespace llmkube-system --create-namespaceHelm creates the namespace when necessary and installs the chart into the cluster selected by the current kubeconfig context.
Deploy the catalog model
Use the CLI to deploy the documented quick-start model:
llmkube deploy phi-4-miniThe project describes this command as using catalog-tested defaults. The operator then handles the corresponding model and inference-service deployment. Model download and startup can take time, with the duration determined by cluster resources, network access, storage behavior, and runtime initialization.
Inspect the operator installation
Helm can show whether the release exists and what state Helm recorded:
helm status llmkube --namespace llmkube-systemYou can also inspect the workloads in the operator namespace:
kubectl get pods --namespace llmkube-systemDo not confuse a successful Helm installation with a ready model. Helm reports on the chart release, while the model deployment has its own scheduling, download, startup, and health lifecycle.
Inspect the model workload and Service
The exact generated workload objects can evolve with LLMKube, so begin with broad Kubernetes inspection rather than guessing deployment names or label selectors:
kubectl get pods
kubectl get services
The quick start expects a Service named phi-4-mini. Confirm that it appears before attempting the documented port forward:
kubectl get service phi-4-miniThese commands operate in the active namespace unless you provide another namespace. If you intentionally deployed the model in a non-default namespace, include that namespace consistently in your inspection and port-forward commands. The documented quick start does not specify a separate model namespace, so this article does not invent one.
LLMKube documents GPU-oriented deployment options and supports heterogeneous hardware use cases, but this guide intentionally keeps the first deployment at llmkube deploy phi-4-mini. Do not add GPU flags unless your cluster exposes compatible resources and you have selected a supported model and runtime configuration.
Verify the OpenAI-compatible API locally
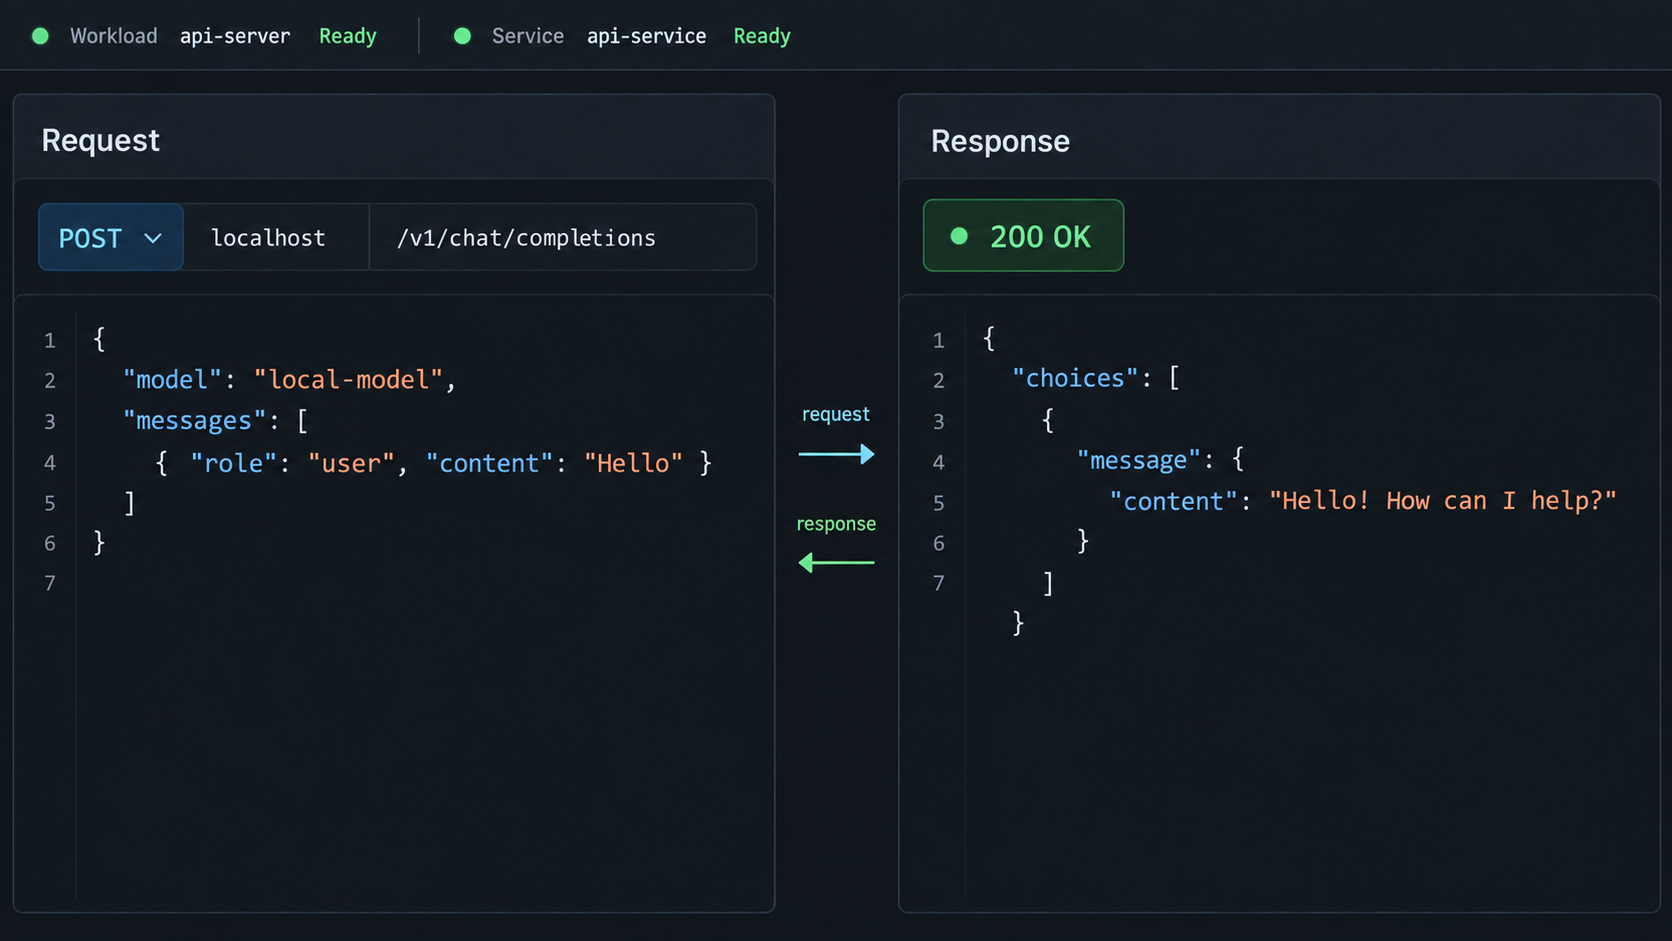
Local verification has two parts. First, create a stable path from your workstation to the Kubernetes Service. Second, send an actual chat-completions request and inspect the response. A Service object merely existing is not enough to prove that model inference works.
Start the Kubernetes port forward
Run the documented port-forward command in a terminal and leave it running:
kubectl port-forward svc/phi-4-mini 8080:8080
The first 8080 is the local workstation port. The second is the Service port used by this documented example. By default, the resulting endpoint is available from the local machine at http://localhost:8080. Closing the terminal, stopping the command, losing cluster access, or restarting the process without restoring it interrupts that path.
If local port 8080 is already occupied, the exact quick-start command cannot bind to it. You may choose another unused local port while retaining the documented Service port. For example, the following maps local port 18080 to Service port 8080:
kubectl port-forward svc/phi-4-mini 18080:8080
If you make that change, use http://localhost:18080 for testing and configure the Localtonet target port as 18080. The rest of this guide uses the original 8080 mapping.
Send a chat-completions request
Keep the port-forward terminal open. In a second terminal, send the documented request:
curl http://localhost:8080/v1/chat/completions \
  -H "Content-Type: application/json" \
  -d '{"messages":[{"role":"user","content":"Hello!"}],"max_tokens":100}'
A successful test should return an HTTP response containing JSON from the inference API rather than a connection error, Kubernetes forwarding error, or generic HTML page. The exact generated text is model-dependent, so do not use a specific sentence as the health criterion. Instead, confirm that the endpoint accepts the request and returns a structured API response.
Interpret common local outcomes
| Observed result | Likely layer | Next check |
|---|---|---|
| Connection refused on localhost | Local port-forward process | Confirm that kubectl port-forward is still running and bound to the same local port |
| Service not found | Kubernetes namespace or deployment state | Run kubectl get services in the active namespace and verify the model deployment |
| Port forward starts, then disconnects | Backend pod or cluster connectivity | Inspect pod state, recent events, and workstation access to the cluster |
| HTTP error or malformed request response | API request or inference runtime | Check the path, JSON body, content type, and workload health |
| Valid JSON inference response | Local workflow is working | Proceed to Localtonet remote-access configuration |
Seeing the phi-4-mini Service is not the same as completing an inference request. Configure remote access only after the exact local URL you intend to tunnel returns a valid response.
Expose the verified LLMKube API with Localtonet
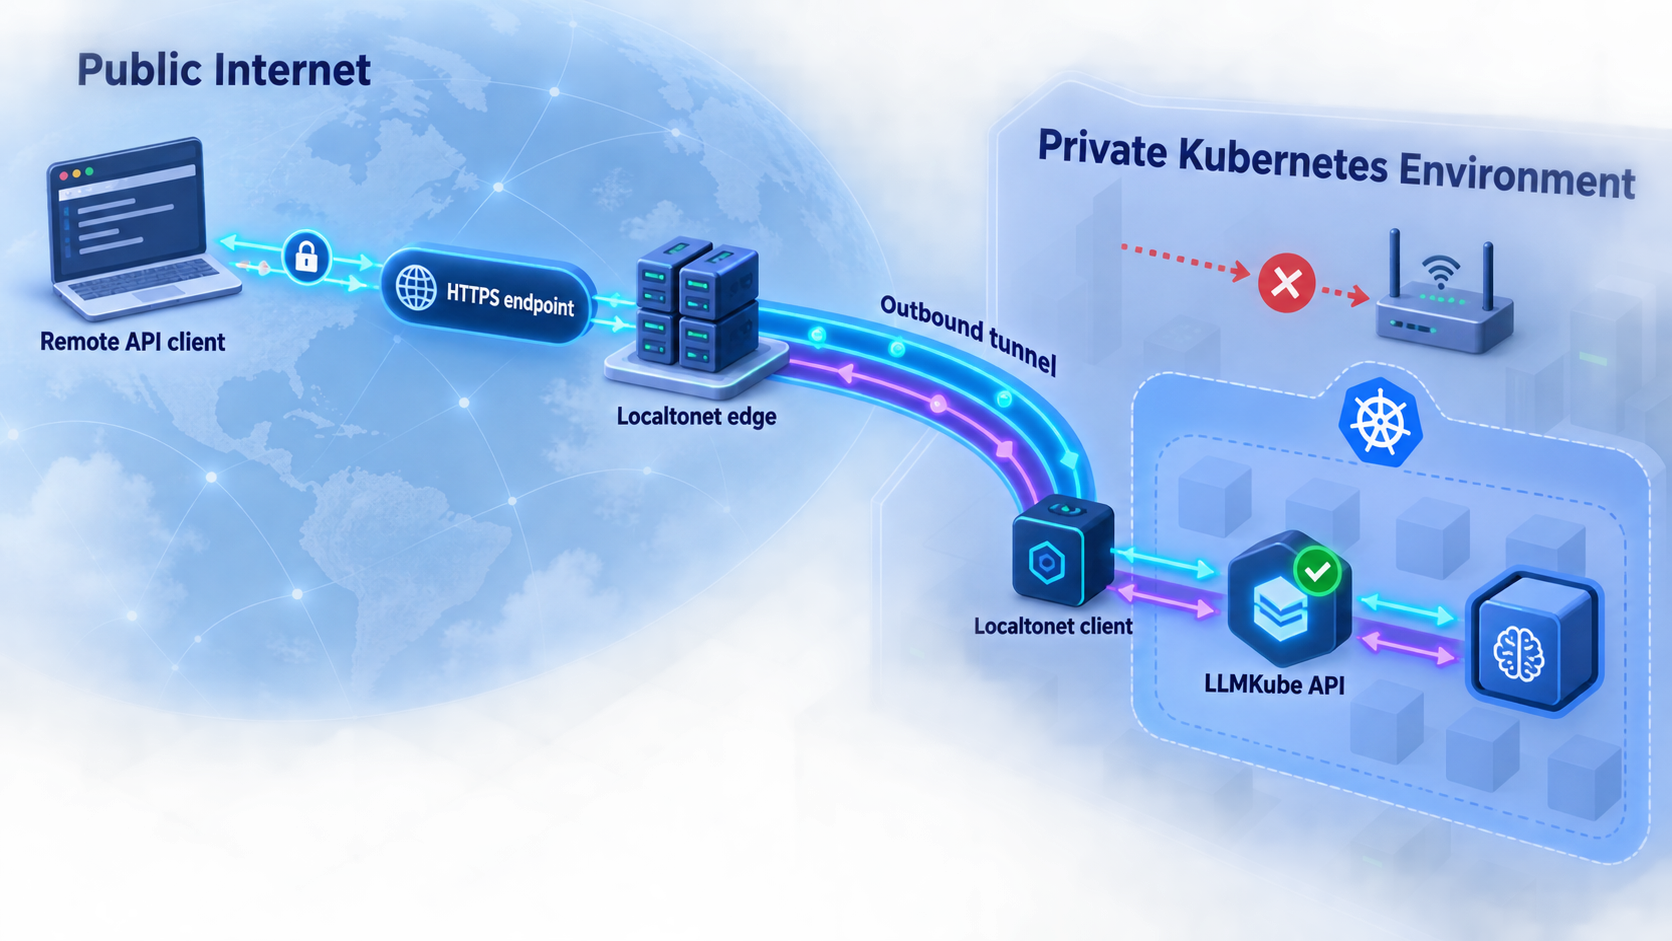
Once http://localhost:8080/v1/chat/completions works on the workstation, the local target is ready for an HTTP tunnel. Install and run our client on that same workstation unless you have deliberately created another network path to the forwarded port.
An HTTP tunnel is appropriate because the LLMKube endpoint in this workflow speaks HTTP. A raw TCP tunnel is unnecessary for the documented API test, and standard tunneling should not be described as VPN functionality. Localtonet's VPN capability is a separate feature called VPN Manager.
Install and run the Localtonet client
Install the Localtonet application for the operating system on the machine running kubectl port-forward. Start the client so it can establish its outbound connection to our platform. This arrangement allows the client to reach the loopback target directly.
Authenticate or select the client device
Use the device-specific authentication token associated with the client that will run the tunnel. Tokens identify devices and must not be copied into documentation, command history, screenshots, support messages, or application configuration. Select the intended connected device in the dashboard.
Select an available relay server
Choose an available server or region from the current dashboard. Availability can vary, so do not copy a server code from an old tutorial or guess one. Use the value presented for your account and current configuration.
Create an HTTP tunnel to the local API
Create an HTTP tunnel whose local target is 127.0.0.1 on port 8080. If you selected a different local port during verification, enter that port instead. HTTP process types can use a random subdomain, a custom subdomain, or a custom domain, with current availability and domain requirements determined by the dashboard and applicable configuration.
Start the tunnel and test the assigned address
Creating a tunnel does not start it. Use the Start button, then take the assigned public URL and append /v1/chat/completions. Repeat the same request body used for local verification, replacing only the base URL. Confirm that the public request reaches the model and returns a valid API response.
Stop or delete access when it is no longer required
Stop the tunnel to remove active public access while retaining the configuration, or delete it when the mapping is no longer needed. The public endpoint also depends on the selected client remaining connected and the port-forward process remaining active.
For the current dashboard sequence and available HTTP options, use our HTTP tunnel documentation. Exact region values, domain requirements, and available options should always be taken from the current product rather than hardcoded into automation from this article.
Test the public endpoint without exposing private details
Replace the placeholder below with the public base URL assigned to your tunnel. Do not publish a private endpoint copied from your own dashboard:
curl https://YOUR-ASSIGNED-PUBLIC-HOST/v1/chat/completions \
  -H "Content-Type: application/json" \
  -d '{"messages":[{"role":"user","content":"Hello!"}],"max_tokens":100}'
If this request succeeds while the local request also succeeds, the complete path is working. A remote API client that supports an OpenAI-compatible endpoint can then be configured to use the assigned public base address. Exact client settings differ between SDKs and applications, so verify how your chosen client accepts a custom base URL rather than assuming a particular environment variable.
The LLMKube inference workload must be healthy, kubectl port-forward must remain connected, and the Localtonet client and tunnel must remain running. A failure in any one of these layers interrupts remote requests.
Secure the inference endpoint before wider use
A working tunnel establishes reachability, not application authorization. The evidence for this LLMKube quick start does not document built-in API authentication, an API key requirement, user isolation, request quotas, or per-client permissions. Localtonet must not be treated as a substitute for application-level access control when multiple users, sensitive prompts, valuable compute, or confidential model output are involved.
Add an authorization boundary when needed
For anything beyond controlled testing, place a reviewed authentication or API-gateway layer in front of the inference endpoint, or use another access-control architecture appropriate to your environment. That layer should reject unauthenticated requests before they consume inference resources. Because no particular gateway is part of the supplied workflow, this article does not invent configuration for one.
Apply least exposure
Start the tunnel only for the period during which remote access is needed. Limit who receives the endpoint, avoid embedding it in public repositories, and stop the tunnel after testing. If your surrounding access layer supports least-privilege policies, request limits, or source restrictions, configure them according to the intended users rather than opening unrestricted inference to the internet.
Protect prompts, output, and operational data
Prompts can contain source code, customer information, internal instructions, or other sensitive data. Test with harmless content first. Do not send production data until you have reviewed every layer in the path, including the remote client, public endpoint, authentication layer, local forwarding process, Kubernetes workload, model runtime, and any logging configuration.
Protect credentials and device tokens
The Localtonet authentication token identifies a device and must remain secret. It does not belong in a curl command, model manifest, container image, repository, tutorial screenshot, or frontend application. Likewise, if you add API credentials through another component, keep them out of browser-delivered code and source control.
Do not rely on obscurity as the only control for an inference endpoint. Anyone who obtains a functioning public address may be able to submit requests unless an independently verified authorization layer prevents it.
Operate and maintain the deployment
A development port forward is convenient, but it is also an additional process that must be supervised. For occasional testing, keeping it in a dedicated terminal is often sufficient. For longer-lived access, decide how your team will detect and restore failures without silently exposing an unhealthy or unintended backend.
Use a layer-by-layer health check
When checking the deployment, work from the inside out:
- Confirm that the Kubernetes cluster is reachable.
- Confirm that the LLMKube operator is running.
- Confirm that the model workload and
phi-4-miniService exist. - Confirm that the local port-forward process is active.
- Send a local inference request.
- Confirm that the Localtonet client is connected and the tunnel is started.
- Send the equivalent request through the public address.
This order identifies the earliest failed dependency. Starting with the public endpoint can otherwise make a Kubernetes scheduling failure look like a tunneling problem.
kubectl cluster-info
kubectl get pods --namespace llmkube-system
kubectl get pods
kubectl get service phi-4-mini
helm status llmkube --namespace llmkube-system
Understand tunnel lifecycle behavior
Saving a Localtonet tunnel configuration does not make it active. It must be started. It can later be stopped without deleting the configuration, or deleted when it is no longer needed. It is also dependent on the selected client device being connected.
This means a Kubernetes Service can remain healthy while its public address is unavailable because the tunnel is stopped. The reverse is also possible: the Localtonet client and tunnel can be active while the local target is unavailable because the port forward ended or the inference workload is not ready.
Review versions before production changes
The basic Homebrew and Helm commands shown here follow the project's quick start and may install versions current at the time they run. Before using the workflow in a controlled environment, review the LLMKube CLI, Helm chart, Kubernetes compatibility, runtime, and model versions you intend to operate. Test upgrades in a non-production cluster and avoid assuming that every future release preserves generated resources or runtime behavior exactly.
Choose a durable exposure architecture deliberately
This tutorial uses kubectl port-forward because it provides a clear, reversible local verification path and avoids inventing an unsupported external Kubernetes service configuration. For permanent production access, evaluate whether a port-forward process meets your reliability and operational requirements. If not, design a reviewed in-cluster ingress, gateway, or service architecture based on current LLMKube and Kubernetes documentation, then point Localtonet at a target reachable from the client device.
Do not assume that the quick-start Service has a fixed externally exposed Kubernetes port. The evidence supports forwarding the named Service to a local port, not claiming a NodePort, LoadBalancer address, or built-in ingress.
Troubleshoot installation, inference, and remote access
The llmkube command is not found
Confirm that the Homebrew installation completed and that your shell can find Homebrew-installed executables. Open a fresh terminal if your shell environment changed, then run:
brew --version
llmkube --help
Do not download an arbitrary similarly named binary or invent a package-manager command. The verified path for this tutorial is brew install defilantech/tap/llmkube.
Helm cannot install the operator
First confirm that the repository-add command succeeded and that the active Kubernetes context is correct. Then check cluster access and authorization:
kubectl cluster-info
kubectl get nodes
helm status llmkube --namespace llmkube-system
If Helm reports that a release named llmkube already exists, inspect that release rather than repeatedly running the installation command. If Kubernetes rejects resource creation, use an account with the required authorization or ask the cluster administrator to review the operator installation.
The model remains unavailable
Inspect pods and Kubernetes events without assuming a generated workload name:
kubectl get pods
kubectl get events --sort-by=.metadata.creationTimestamp
Common Kubernetes-level causes include insufficient schedulable resources, image retrieval failures, storage problems, model download failures, node constraints, and runtime startup errors. The exact resolution depends on the status and event messages. Do not add a GPU flag as a generic fix. GPU deployment requires compatible cluster resources and an appropriate LLMKube configuration.
The phi-4-mini Service is not found
Check the active namespace and list Services:
kubectl get services
kubectl config current-context
Also confirm that llmkube deploy phi-4-mini completed against the same cluster and namespace context used by the port-forward command. If your team intentionally uses another namespace, include it explicitly in every relevant kubectl command.
Local port 8080 is already in use
Use another unused local port while preserving Service port 8080:
kubectl port-forward svc/phi-4-mini 18080:8080
Test http://localhost:18080/v1/chat/completions and update the Localtonet target to port 18080. A frequent mistake is changing the port-forward command but leaving the tunnel configured for the old local port.
The local API works but the public endpoint does not
This narrows the problem to the path after local verification. Confirm all of the following:
- The Localtonet client is running on the same machine as the loopback port forward.
- The selected device is connected.
- The HTTP tunnel is configured for
127.0.0.1and the correct local port. - The tunnel has been started, not merely created.
- The public request includes the
/v1/chat/completionspath. - The request sends valid JSON with the
Content-Type: application/jsonheader.
If the Localtonet client runs in a container, VM, pod, or different host, its 127.0.0.1 does not refer to the workstation's loopback interface. Move the client to the port-forward host or deliberately create a reachable target that matches your network design.
The public endpoint worked and then stopped
Check the short-lived components first. The port-forward terminal may have closed, the workstation may have slept, cluster credentials may have expired, the Localtonet client may have disconnected, or the tunnel may have been stopped. Retest the local curl request before changing tunnel configuration. If local inference no longer works, repair that layer first.
Requests connect but inference is slow
The supplied evidence does not define a performance target for this model, cluster, runtime, or tunnel configuration. Measure local inference first. If the local request is already slow, investigate model/runtime and cluster resources before attributing latency to remote access. If local behavior is acceptable but remote behavior is not, compare repeated controlled requests and review the selected relay options currently available to your account. Do not infer guaranteed latency or throughput from a single test.
Frequently asked questions
Does LLMKube require a GPU for this quick-start workflow?
The documented basic command is llmkube deploy phi-4-mini and does not include a GPU flag. LLMKube also documents GPU deployment options, but hardware suitability depends on the selected model, runtime, and cluster. This guide does not claim a universal CPU, memory, or GPU requirement because the supplied evidence does not establish one.
Why use kubectl port-forward instead of exposing the Kubernetes Service directly?
Port forwarding is the exposure method documented by the LLMKube quick start. It creates a local endpoint without assuming that the Service is a LoadBalancer, NodePort, or ingress-backed service. It also gives us a clear local verification checkpoint before adding public access.
Must the Localtonet client run on the Kubernetes cluster?
No. In this workflow, it should run on the workstation that runs kubectl port-forward. That lets the client reach 127.0.0.1:8080. The client can run elsewhere only if that device has a valid network route to the chosen local target.
Does starting a Localtonet tunnel automatically start LLMKube or kubectl port-forward?
No. The Kubernetes model workload, the kubectl port-forward process, and the Localtonet tunnel are separate components. Each must be available for a remote request to succeed. Localtonet does not start or supervise the LLMKube deployment or the Kubernetes port-forward command.
Is the quick-start API protected by an API key?
The supplied quick-start evidence does not establish built-in API authentication or an API-key requirement for this endpoint. Treat it as unauthenticated unless you have configured and tested a separate authorization layer. A public tunnel provides reachability and should not be mistaken for application authentication.
Can OpenAI-compatible clients use the Localtonet URL?
LLMKube documents an OpenAI-compatible endpoint and compatibility with common OpenAI SDK use cases. A client that supports a custom API base URL can point to the assigned public address, provided the expected API operation is supported. Exact settings vary by SDK and application, so use that client's documented custom-base-URL mechanism.
Does creating the tunnel make it immediately available?
No. Creating a Localtonet tunnel stores its configuration, but the tunnel must also be started. It remains available only while the selected client is connected and the tunnel is running. In this workflow, the port forward and LLMKube service must also remain available.
Can I use a custom domain for the model API?
HTTP tunnels can use a random subdomain, a custom subdomain, or a custom domain as the process type. Current availability and exact custom-domain DNS requirements must be checked in the dashboard and current documentation. This guide does not provide guessed DNS records.
Connect your verified LLMKube API with Localtonet
Deploy the model, prove that the chat-completions endpoint works locally, and then create an HTTP tunnel from the same machine to provide controlled remote access without inbound router port forwarding or a public IP address.
Get Started Free →

