

Build a virtual OpenCCU hub, verify it on your local network, and then add controlled remote browser access
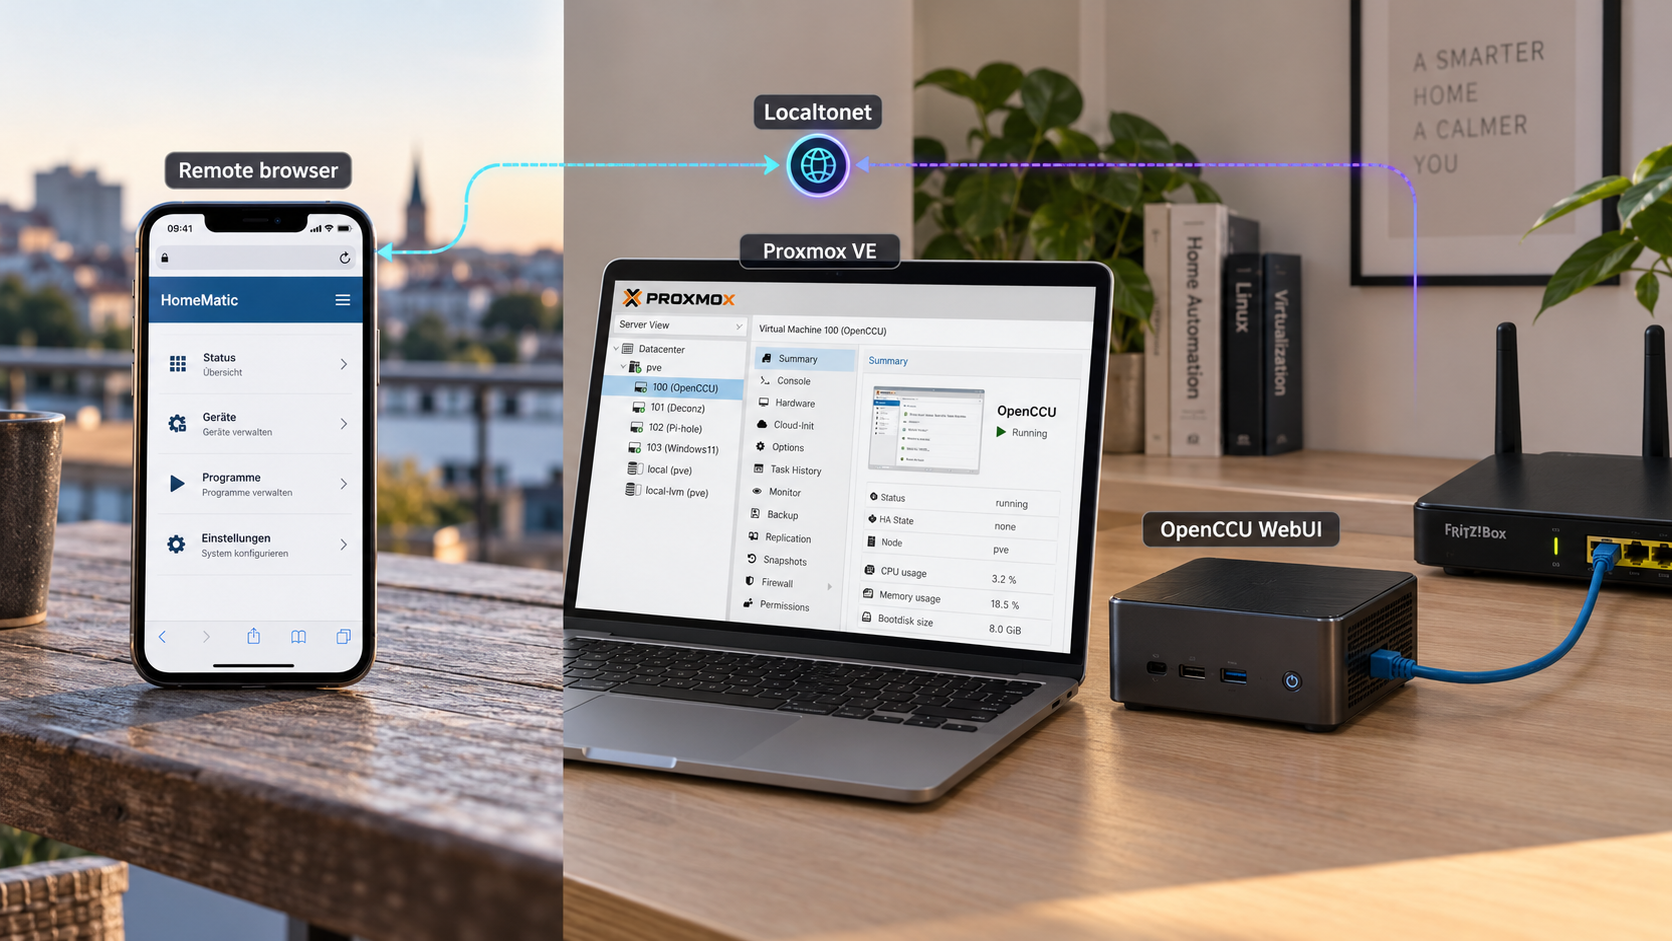
OpenCCU is a free, open-source, cloud-free operating system for running a Homematic IP and HomeMatic-compatible CCU smart-home hub. It is available as a virtual appliance for Proxmox VE, which lets you keep the automation controller separate from other workloads while managing it through your existing hypervisor. This guide explains the evidenced installation workflow, first boot, local WebUI verification, migration considerations, maintenance, and troubleshooting. After OpenCCU works locally, we show how to expose its HTTP WebUI through Localtonet from a separate reachable device, without inbound router port forwarding, firewall changes, a public IP address, or VPN setup.
📋 What's in this guide
What you are building
OpenCCU, formerly known as RaspberryMatic, is an open-source operating system for a cloud-free smart-home hub compatible with eQ-3 Homematic IP and HomeMatic devices. The project targets compatibility with the vendor's CCU3 platform while adding WebUI, operating-system, connectivity, stability, and performance improvements. It can run directly on supported hardware or as a virtual appliance on platforms that include Proxmox VE.
In this deployment, Proxmox VE hosts the OpenCCU virtual appliance. OpenCCU receives an address from the local network and presents its browser-based CCU WebUI. On first boot, OpenCCU detects available Homematic or Homematic IP radio modules, including supported modules connected through USB or GPIO where applicable. Because this is a virtualized deployment, any required physical USB radio device must be made visible to the guest through an appropriate Proxmox hardware assignment.
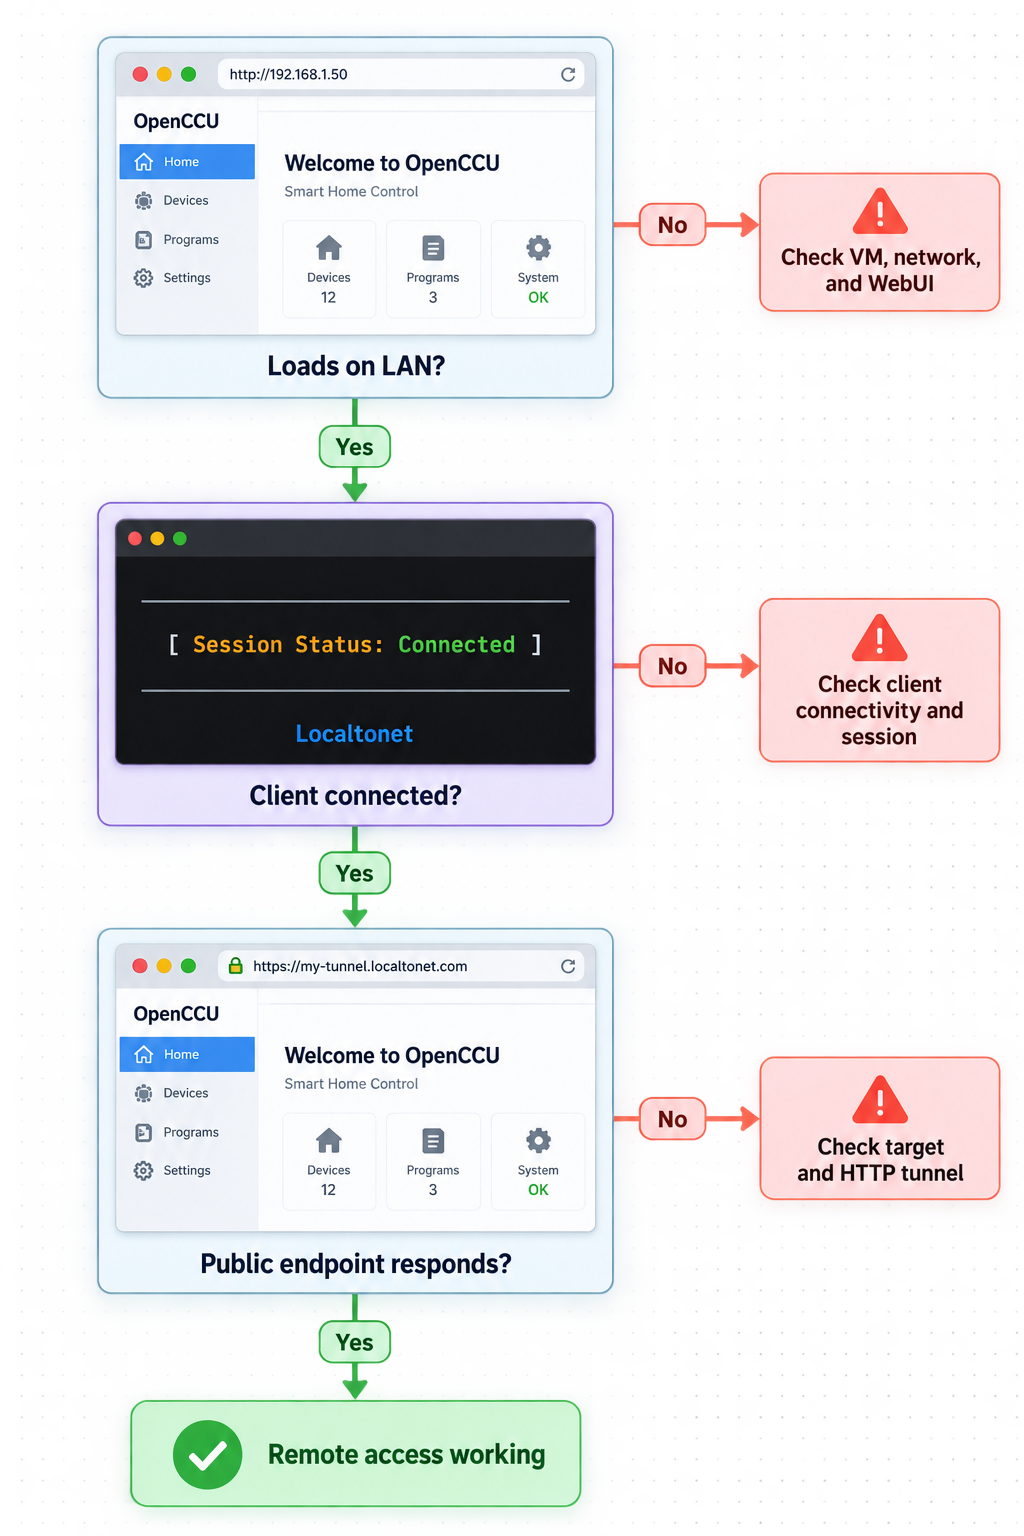
Remote access is a separate layer. You should first install OpenCCU, confirm that its WebUI opens from another machine on the LAN, finish the relevant first-run configuration, and test your smart-home hardware. Only then should you create a Localtonet HTTP tunnel.
The Localtonet client does not need to run inside the OpenCCU appliance. In fact, the available project evidence does not establish a supported method for installing our client directly in the OpenCCU operating system. The safer documented architecture for this guide is to run our client on another computer, virtual machine, or device that can reach the OpenCCU WebUI over the local network. That client creates an outbound connection to a Localtonet relay server and forwards the resulting public HTTPS address to OpenCCU's local HTTP endpoint.
http://openccu/ or the DHCP-assigned IP address when local name resolution is unavailable.
OpenCCU is designed as a cloud-free hub. The Localtonet portion of this guide is optional and should be completed only after the appliance operates correctly on the LAN. Keeping installation and remote exposure as separate phases makes failures easier to isolate.
Prerequisites and deployment decisions
Prepare the hypervisor, network, release files, and radio interface before creating the appliance. OpenCCU supports generic x86_64 and aarch64 environments, but the correct artifact depends on the Proxmox host architecture and the project's current installation guidance. Do not select an image solely because its filename looks familiar.
Proxmox VE host
You need a working Proxmox VE environment with permission to create and manage a virtual machine, attach storage, configure networking, start and stop the guest, and assign hardware where necessary. The supplied evidence confirms that OpenCCU supports Proxmox VE, but it does not establish a particular Proxmox release, storage backend, virtual network name, firmware mode, machine type, CPU count, memory allocation, or disk size.
Those values may depend on your Proxmox version, host architecture, storage configuration, and the current OpenCCU appliance. Review the current OpenCCU Proxmox installation page before choosing platform-specific import settings. This guide deliberately does not invent commands or resource values that are absent from the verified project material.
Correct OpenCCU release artifact
OpenCCU releases use filenames based on the pattern OpenCCU-X.XX.XX.YYYYMMDD-<TARGET>.zip. For a virtualized installation, the project instructs users to follow the installation procedure for the applicable hypervisor or container platform.
The release evidence available for this article identifies OpenCCU 3.89.11.20260919 as a security bugfix release. That release provides an OVA archive and a standalone OVA for initial installation. The OVA is listed for Proxmox VE and several other hypervisors. It also provides a generic aarch64 appliance identified for Proxmox VE.
Release versions change, so treat that version as a verified example rather than a permanent recommendation. At installation time, use the current release that matches your architecture and deployment method. Do not rename or substitute a Raspberry Pi, Docker, LXC, or generic image for an OVA unless the current OpenCCU instructions explicitly tell you to do so.
Integrity verification
OpenCCU publishes SHA-256 checksums with release assets. Verify the downloaded file before importing it. This helps detect an incomplete, corrupted, or unexpected download. Match the checksum against the value published beside the exact asset and release you downloaded.
On a Linux workstation, a standard checksum command is:
sha256sum OpenCCU-<version>.ovaOn Windows PowerShell, the equivalent standard operation is:
Get-FileHash .\OpenCCU-<version>.ova -Algorithm SHA256Compare the complete result character by character. If it does not match, stop and download the asset again from the official OpenCCU release page. Do not import an image with a failed integrity check.
Network access
The appliance must be attached to a network where it can obtain an address and communicate with the devices and services your automation setup requires. The evidenced first-boot workflow expects a DHCP-assigned IP address. Local name resolution may also make the appliance available as http://openccu/, but that hostname is not guaranteed to resolve on every network.
Record the assigned IP address once the appliance starts. A known address is especially useful for browser access, troubleshooting, and the later Localtonet configuration. Any DHCP reservation or static-address strategy must be configured according to your own router and current OpenCCU networking documentation. The supplied evidence does not establish a universal OpenCCU static-address procedure.
Homematic radio hardware
A CCU installation normally needs a compatible radio path to communicate with Homematic or Homematic IP devices. OpenCCU can detect modules such as RPI-RF-MOD and HmIP-RFUSB through GPIO or USB. In a Proxmox virtual machine, a USB-connected module is generally the more directly virtualizable form, but compatibility and assignment details depend on the actual module, host hardware, and hypervisor configuration.
If you use a physical USB radio, identify it carefully and arrange for the OpenCCU guest to receive access to the correct device. Avoid assigning unrelated USB devices. The exact Proxmox UI fields and passthrough procedure are not included in the supplied project evidence, so follow the current OpenCCU Proxmox instructions and your installed Proxmox version rather than copying unverified commands.
Localtonet client host
For the remote-access phase, prepare a supported machine on the same reachable network as OpenCCU. It can be the Proxmox host only if installing additional software there fits your administration policy, but a separate managed VM or device is often easier to isolate. The essential requirement is network reachability from the Localtonet client to the OpenCCU WebUI.
You also need a Localtonet account, an installed Localtonet client, and a device-specific authentication token selected through our platform. Never publish the token in documentation, screenshots, shell history, or support posts.
| Component | Purpose | What to confirm |
|---|---|---|
| Proxmox VE host | Runs the OpenCCU appliance | The host can import and operate the architecture-appropriate virtual appliance. |
| OpenCCU release asset | Provides the appliance image | The artifact is intended for Proxmox and its SHA-256 value matches the published checksum. |
| Virtual network | Connects OpenCCU to the LAN | DHCP is available and another LAN device can reach the assigned address. |
| RF interface | Communicates with Homematic devices | The required module is supported and visible to the OpenCCU guest. |
| Browser workstation | Performs local setup and verification | It can open the OpenCCU hostname or DHCP-assigned IP address. |
| Localtonet client device | Creates the optional outbound tunnel | It remains online and can reach the verified OpenCCU HTTP endpoint. |
Install OpenCCU on Proxmox VE
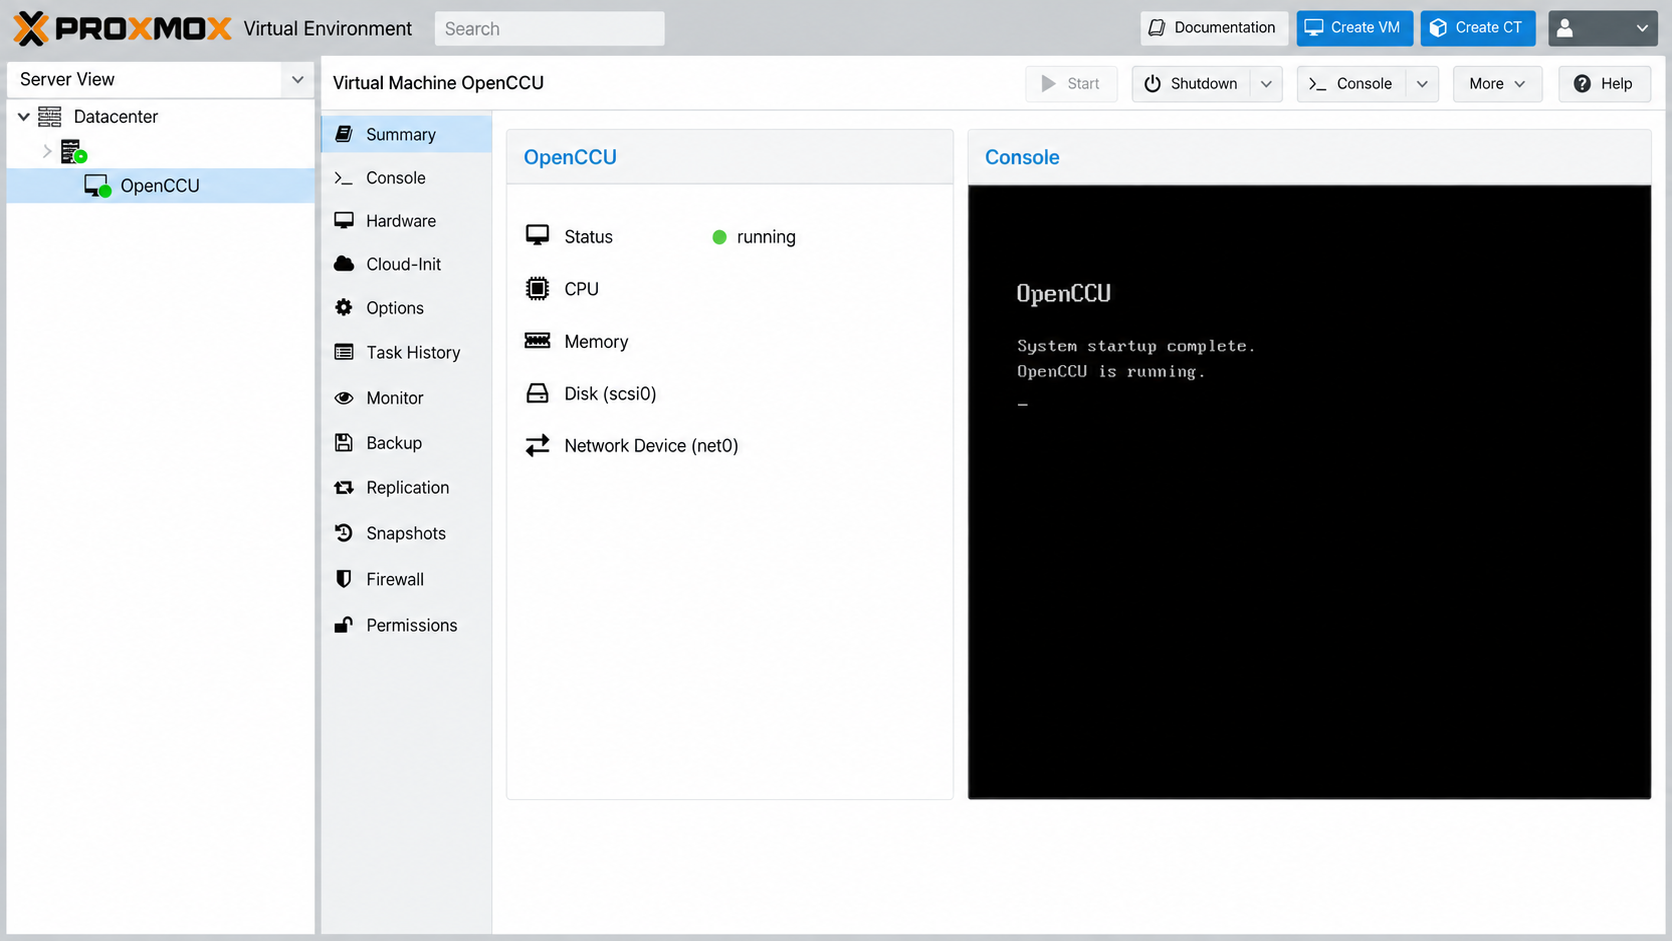
The official high-level installation path is to download the target-specific release, use the virtualized-environment procedure for Proxmox VE, start the virtual appliance, and access its WebUI. The project evidence confirms the availability of the OVA but does not provide the exact Proxmox import commands or resource settings in the supplied excerpt.
The steps below therefore preserve the documented workflow without inventing a command, storage identifier, virtual bridge, firmware type, or allocation. Where Proxmox asks for a deployment-specific value, use the setting required by your environment and the current OpenCCU Proxmox installation page.
Download the Proxmox-compatible OpenCCU appliance
Open the current OpenCCU release and select the appliance artifact documented for your Proxmox host architecture. For the verified example release, the OVA is listed for Proxmox VE, while a separate generic aarch64 appliance is also identified for Proxmox VE. Use the current release instructions to choose between them.
Verify the downloaded asset
Calculate its SHA-256 digest and compare it with the checksum published for that exact release asset. Do not continue if the filename, release version, target, or checksum differs.
Import the virtual appliance into Proxmox VE
Follow the current OpenCCU procedure for importing the appliance into Proxmox. Select storage and network resources that exist in your environment. Preserve appliance-specific settings required by the current documentation rather than applying generic virtual-machine assumptions.
Connect the appliance to the local network
Attach the guest to the intended LAN-facing virtual network so it can obtain an address through DHCP. Confirm that this network is appropriate for the smart-home devices and management clients that need to reach OpenCCU.
Make the required RF module available
If your installation uses a compatible USB radio module, assign the correct physical device to the OpenCCU guest using the supported Proxmox mechanism. The precise method is hardware-specific and is not established in the supplied evidence, so verify it against the current OpenCCU Proxmox documentation before starting production use.
Start the OpenCCU virtual machine
Power on the imported appliance and watch the Proxmox console and network environment for startup progress. On first boot, OpenCCU detects available Homematic and Homematic IP RF modules presented through supported interfaces.
Open the local WebUI
From a browser on the local network, try http://openccu/. If that name does not resolve, use the appliance's DHCP-assigned IP address. Reaching the CCU WebUI confirms that the virtual appliance has booted and its local browser interface is available.
The available evidence does not define universal CPU, memory, disk, firmware, bridge, or import-command values for OpenCCU on Proxmox VE. These details may change between appliance releases and host architectures. Use the current OpenCCU Proxmox procedure for those fields, and document the final choices in your own operations notes.
Verify OpenCCU locally before proceeding
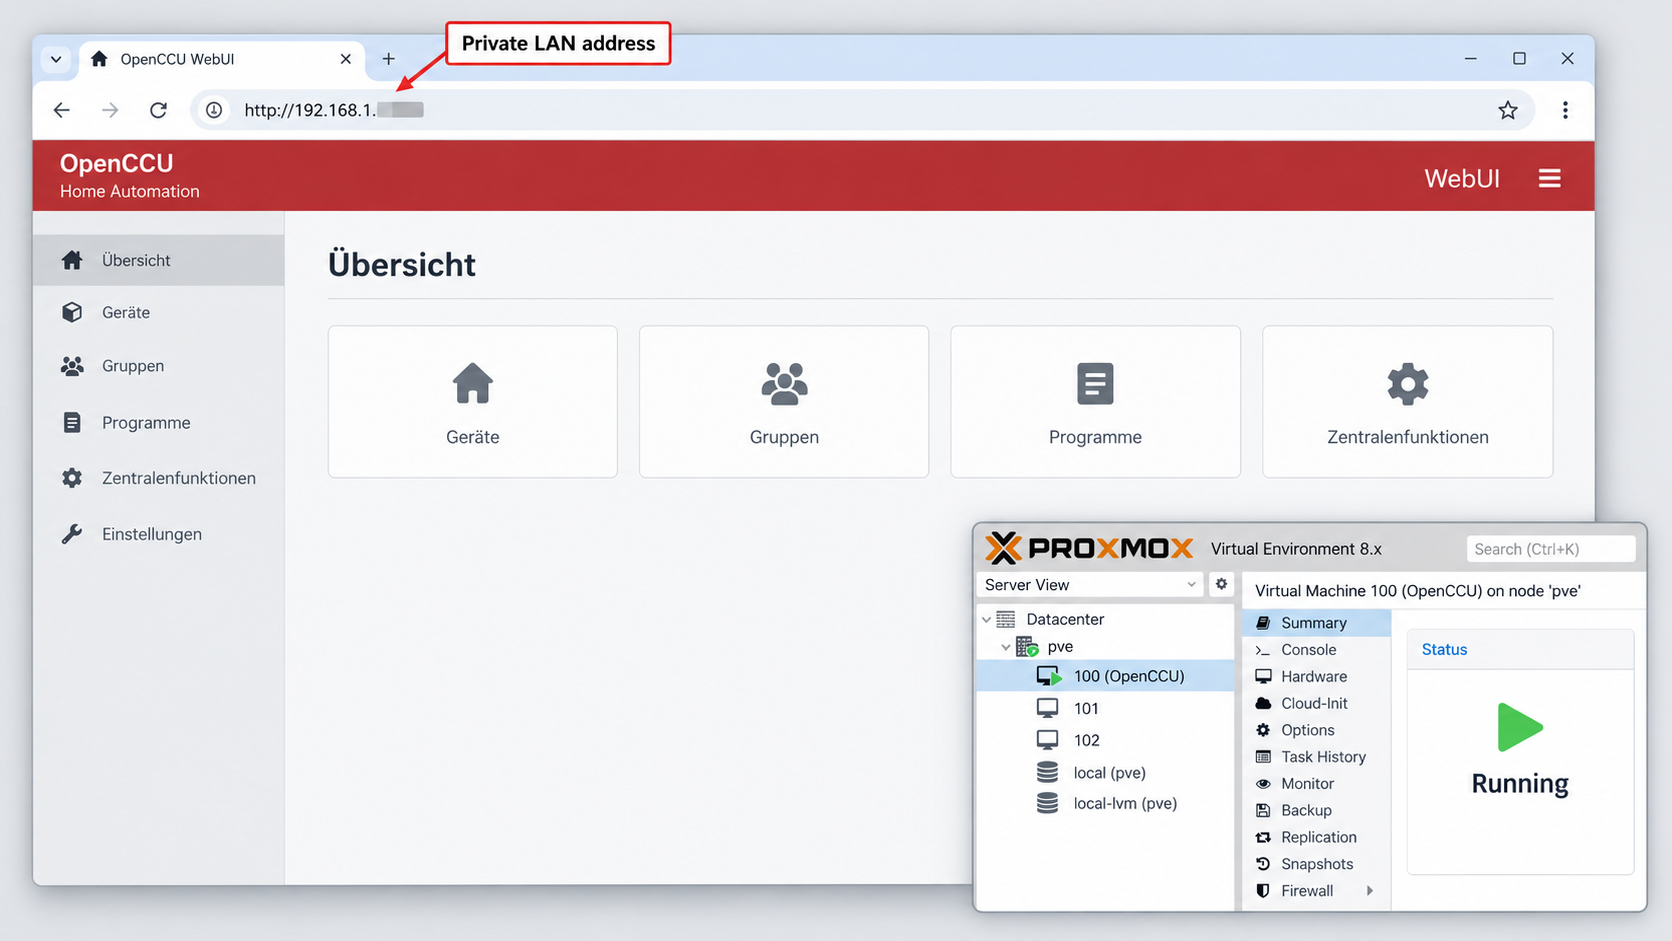
A successful virtual-machine start does not prove that OpenCCU is ready for use. Verify the complete local path before adding remote access. This separates appliance, radio, name-resolution, routing, and browser problems from tunnel configuration.
Confirm the appliance address
Identify the IP address assigned to OpenCCU by DHCP. Depending on your environment, it may be visible through your DHCP server, router, Proxmox guest information, or the appliance console. The exact discovery method varies, so use the source authoritative for your network.
Record the address and verify that it belongs to the intended network. If the address changes after a restart, consider creating a DHCP reservation according to your router's documentation. A stable target prevents future tunnel failures caused by an address reassignment.
Test hostname and IP access separately
First try the documented hostname:
http://openccu/If that does not work, open the DHCP-assigned address:
http://<openccu-dhcp-address>/Replace the placeholder with the actual private address. If the IP works but the hostname does not, OpenCCU itself may be healthy and the problem is likely local name resolution. You can continue using the verified address while investigating hostname discovery.
Confirm the response is really OpenCCU
The browser should show the familiar CCU WebUI rather than a Proxmox page, router login, generic error, or another service. Check that pages load consistently and that the session does not immediately fail. A partially loaded interface can indicate browser caching, a network interruption, or incomplete startup.
Check radio detection
Verify that OpenCCU detects the radio hardware your installation requires. A working WebUI and a working radio path are separate outcomes. If the interface opens but no expected RF module appears, review the physical connection, Proxmox device assignment, supported-device information, and OpenCCU logs before pairing or controlling devices.
Restart once and repeat the test
A controlled restart helps reveal configuration that was not persistent. After restarting the appliance, verify that it boots, obtains the expected address, detects its hardware, and presents the WebUI again. This is also a useful time to confirm that the virtual machine follows your intended Proxmox startup policy.
The Localtonet client must reach the same OpenCCU endpoint you have already verified. Test that endpoint from the actual machine that will run our client. Success from your laptop does not prove success from a different VM, VLAN, or isolated network segment.
Configure, migrate, and operate OpenCCU
Once the WebUI is available, complete OpenCCU's first-use tasks before publishing any access path. The exact screens depend on the installed version and whether this is a new deployment or a migration. Do not pair production devices or restore irreplaceable configuration until you have a recoverable backup plan.
New installation
For a new system, use the WebUI to establish the administrative configuration appropriate for your environment and begin configuring supported Homematic or Homematic IP devices. Apply current OpenCCU security advice, install only required add-ons, and make one controlled change at a time. This makes it easier to identify which configuration caused a problem.
The supplied evidence confirms the WebUI and add-on ecosystem but does not establish exact first-run screen labels, default credentials, password rules, or device-pairing steps. Those details should be taken from the WebUI presented by your installed release and the current OpenCCU documentation. Never rely on guessed default credentials.
Restore an existing CCU backup
OpenCCU documents backup interchangeability with vendor CCU firmware, which supports migration between a vendor CCU environment and OpenCCU. The quick-start guidance also identifies restoring an existing CCU backup as an optional migration step.
Before restoring, retain the original backup outside the OpenCCU appliance and preserve an untouched copy. Confirm that the destination release and required add-ons are appropriate for the source configuration. After restoration, verify the WebUI, devices, programs, system variables, integrations, and radio connectivity locally before changing or retiring the original controller.
Updates
OpenCCU publishes release archives for supported targets and supports WebUI-based update mechanisms for applicable files. Each release can include WebUI, operating-system, kernel, device, stability, feature, and security changes. Read the release notes and use the asset intended for your deployment type.
Before an update, create a current OpenCCU backup and an appropriate Proxmox recovery point according to your operational policy. A hypervisor snapshot can help with appliance-level rollback, while an OpenCCU backup protects the application configuration. They solve different recovery problems and should not be treated as interchangeable.
After an update, repeat the same checks used after installation: appliance boot, network address, WebUI access, RF module detection, core automation behavior, and Localtonet reachability if remote access is enabled.
Routine operations
Keep a short record containing the installed OpenCCU version, selected appliance target, Proxmox host architecture, network assignment, DHCP reservation, attached RF hardware, installed add-ons, backup location, and the device running the Localtonet client. This information is valuable when diagnosing a later failure.
For a reproducible OpenCCU problem, the project requests useful details such as the OpenCCU version, target hardware or hypervisor, steps to reproduce, expected and actual behavior, and relevant logs. Search existing discussions and issues before reporting a new bug.
| Operation | Before the change | After the change |
|---|---|---|
| Restore a CCU backup | Preserve the original backup and confirm compatibility. | Verify devices, programs, variables, add-ons, and radio communication. |
| Update OpenCCU | Read release notes and create recoverable backups. | Test boot, WebUI, radio detection, automations, and integrations. |
| Change networking | Record the current working address and configuration. | Test from the browser workstation and Localtonet client device. |
| Change RF hardware | Identify the exact physical device and current assignment. | Confirm that OpenCCU detects the intended module. |
| Enable remote access | Confirm local WebUI operation and review access risk. | Test the public URL, then stop it when it is no longer required. |
Expose the verified OpenCCU WebUI with Localtonet
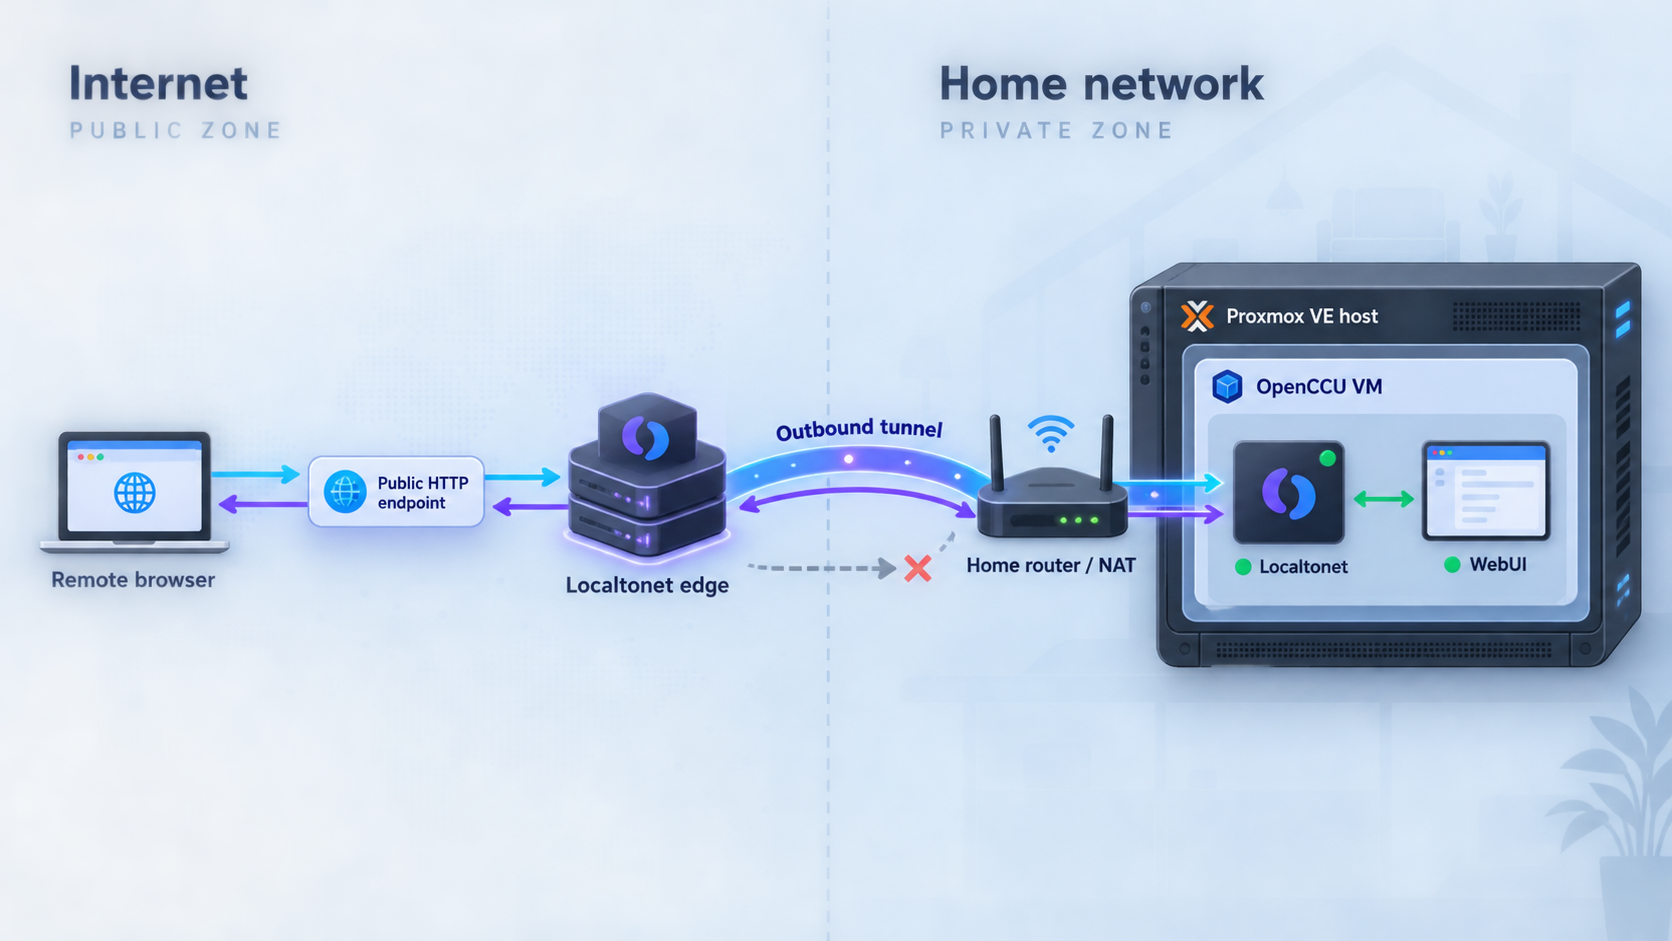
Localtonet can publish a service running on a machine, device, or reachable LAN host without inbound router port forwarding, firewall changes, VPN setup, or a public IP address. Our client establishes an outbound connection to a Localtonet relay server. An HTTP tunnel then provides a public HTTPS address for the selected local HTTP target.
For this architecture, run the Localtonet client on a separate device that can reach OpenCCU. The target IP is the verified local address of the OpenCCU appliance. The target port must be the actual port used by the working WebUI endpoint.
The documented endpoint is http://openccu/ or the DHCP-assigned IP address, but the available OpenCCU excerpt does not state a numeric port. The Localtonet HTTP tunnel configuration requires the actual local IP address and port. Determine that port from your working deployment, browser endpoint, current OpenCCU documentation, or authoritative network configuration. Do not guess it.
HTTP tunnels support Random Sub Domain, Custom Sub Domain, and Custom Domain process types. All three serve the configured content at a public HTTPS address. Availability and any plan-specific limitations can vary, so use the options currently shown in your dashboard. Exact custom-domain DNS instructions must come from current Localtonet documentation rather than assumptions.
Install and run the Localtonet client
Install our client on a supported device that can reach the OpenCCU WebUI over the LAN. Keep this machine online whenever remote OpenCCU access is needed. Do not assume that the Localtonet client can be installed inside the OpenCCU appliance.
Authenticate the client device
Use the device-specific authentication token provided through your Localtonet account. Treat it as a secret. Do not place it in this article, a public command, a screenshot, or a shared configuration file.
Select an available relay server
Choose a server or region currently available in the Localtonet dashboard. Server codes and regional availability can change and may vary, so this guide does not hardcode a value.
Create an HTTP tunnel for OpenCCU
Choose the HTTP tunnel family and an appropriate Process Type. Enter the OpenCCU appliance's verified local IP address and the actual WebUI port established from your deployment. The target must be reachable from the machine running our client.
Start the tunnel
Creating a tunnel does not make it active. Use the Start button and wait until the selected client device and tunnel are running. The tunnel remains available only while that client is connected and the tunnel is active.
Test the assigned public address
Open the assigned public HTTPS address from a network outside your LAN and confirm that it reaches the expected OpenCCU WebUI. Test authentication and normal navigation without making unnecessary automation changes. Stop or delete the tunnel when remote access is no longer required.
For current dashboard details, use the Localtonet HTTP tunnel documentation. The dashboard remains authoritative for available relay servers, process types, account-specific options, and current field names.
How to validate the target from the Localtonet client device
Before creating the tunnel, open the OpenCCU local URL in a browser on the Localtonet client machine, if that machine has a graphical browser. Otherwise, use an appropriate HTTP client already available in your managed environment. The important result is a valid OpenCCU HTTP response from the exact IP address and port that will be entered into the tunnel.
If OpenCCU is reachable from your laptop but not from the Localtonet device, fix local routing, VLAN, guest isolation, or host firewall policy first. A tunnel cannot compensate for a local target that its client cannot reach.
Tunnel lifecycle
A saved tunnel and a running tunnel are different states. After creating the configuration, start it explicitly. If the Localtonet client disconnects, the host loses network access, or the tunnel is stopped, the public endpoint will not remain available.
This behavior is useful for controlled access. You can keep the tunnel stopped during normal local-only operation and start it only when remote administration is required. If you no longer need the configuration, delete it rather than leaving an unused exposure path in the dashboard.
Security guidance for a smart-home administration interface
The OpenCCU WebUI controls a sensitive home-automation environment. Publishing it changes the exposure model from local-network access to an internet-reachable address. Treat that decision as a security change, not simply a convenience setting.
Update before exposure
Install a current, appropriate OpenCCU release and review its release notes before creating the tunnel. The verified example release was specifically described as a security bugfix release and included WebUI input-validation, sanitization, escaping, and command-handling changes. This illustrates why old appliance versions should not be exposed merely because they still start.
Use OpenCCU access controls
Configure the strongest appropriate WebUI authentication and authorization options offered by your installed OpenCCU release. Do not rely on a hard-to-guess public URL as the only defense. Remove or disable unused accounts, avoid shared administrative credentials, and grant only the permissions required for the intended task.
The supplied evidence does not define current OpenCCU credential defaults or exact account-management screens, so this article does not reproduce or guess them. Follow the security guidance for your installed release and verify the resulting behavior before enabling the tunnel.
Limit duration and scope
Start the HTTP tunnel only when remote browser access is genuinely needed. Stop it when maintenance is complete. Expose only the verified OpenCCU WebUI target, not the Proxmox management interface, router administration page, an entire network segment, or unrelated services.
Protect the Localtonet token
The authentication token identifies the Localtonet client device. Store it only where that client needs it. Do not paste it into public issue reports, OpenCCU configuration fields, browser URLs, source repositories, or screenshots. If you believe a token has been exposed, replace it through the appropriate account workflow rather than continuing to use it.
Separate management layers
Proxmox administration, OpenCCU administration, and Localtonet tunnel administration are distinct privileges. Avoid using one broadly shared account for all three. A compromise in one layer should not automatically provide credentials to the others.
Back up before remote changes
Remote access makes it easy to change automation settings from elsewhere, but distance does not reduce the impact of a mistake. Create a current backup before major upgrades, restores, add-on changes, or radio configuration work. Avoid performing changes that could cut off connectivity unless someone can recover the installation locally.
The target in this guide is the OpenCCU WebUI only. The Proxmox management interface has different security and operational requirements. Never substitute the Proxmox host address simply because it is easier to identify.
Troubleshooting OpenCCU and Localtonet
The OpenCCU virtual machine does not start
Confirm that the downloaded artifact matches the host architecture and intended Proxmox installation path. Recheck its checksum, import status, storage availability, and the current OpenCCU Proxmox instructions. Review the Proxmox task output and guest console for the first concrete error rather than repeatedly changing unrelated virtual hardware.
If you report the problem to the OpenCCU community, include the OpenCCU version, selected target, Proxmox environment, reproduction steps, expected result, actual result, and relevant logs. Remove tokens, credentials, public endpoint details, and personal network information first.
The VM starts, but http://openccu/ does not open
Try the DHCP-assigned IP address. If that works, the appliance is reachable and hostname resolution is the likely issue. Continue with the IP while checking local DNS, multicast name discovery, client network policy, or the naming behavior expected by your environment.
If neither form works, verify that the VM obtained an address, that its virtual network is connected to the intended LAN, and that the browser device has a route to that network. Do not begin Localtonet troubleshooting until local browser access succeeds.
The WebUI works, but the RF module is missing
Treat this as a hardware-presentation issue rather than an HTTP issue. Confirm the module is supported, physically connected, powered, and assigned to the correct guest. Check whether Proxmox still owns or reassigns the device after a restart. Then review OpenCCU's relevant logs and supported-device guidance.
Do not pair devices or modify unrelated automation settings in an attempt to fix missing hardware. The guest must detect the radio interface first.
The OpenCCU address changes
DHCP can issue a different address after lease or network changes. Create a reservation using the authoritative procedure for your DHCP server or router. Then update the Localtonet target if necessary and repeat local verification from the client device.
The Localtonet tunnel is configured but unavailable
Confirm that the selected Localtonet client is connected and that the tunnel has been started. Creating the configuration alone is not enough. Verify that the client device remains powered on, has outbound network access, and can still reach OpenCCU locally.
Also check that the selected relay server is currently valid and that the dashboard shows the expected state. Do not reuse a server code copied from an old tutorial because available values must come from the current dashboard.
The public URL opens the wrong page
Recheck the tunnel's local IP address and port. The IP must belong to the OpenCCU appliance, not the Proxmox host, router, Localtonet client, or another web application. Test the same target locally from the Localtonet client device and confirm that it displays the OpenCCU WebUI.
The local endpoint works, but the public page does not
Check the problem in layers. First confirm the client is connected. Next confirm the tunnel is running. Then verify the exact local target from the client device. Finally, test the assigned public address from a genuinely external network to avoid confusing local DNS or caching behavior with tunnel availability.
If the WebUI redirects to an unexpected hostname or address, record the behavior and compare it with the current OpenCCU remote-access and custom-certificate guidance. Do not change headers, DNS records, or proxy behavior without verified instructions for the installed release.
The tunnel stops after a reboot
The public endpoint depends on both the Localtonet client connection and the running tunnel. Confirm that the client device has restarted successfully and authenticated as the expected device. Then check whether the tunnel is running in the dashboard. Do not assume that creating a tunnel guarantees availability after every host lifecycle event.
An update breaks access
Determine whether the failure affects OpenCCU locally or only through Localtonet. If the local WebUI is unavailable, troubleshoot the appliance, network, and update first. If local access works, verify whether the IP address or HTTP endpoint changed and update the tunnel target only after confirming the new local endpoint.
| Symptom | Most useful first check | Likely layer |
|---|---|---|
| VM will not boot | Artifact target, checksum, import result, and console output | Appliance or Proxmox |
| Hostname fails, but IP works | Open the DHCP address directly | Local name resolution |
| WebUI works, but devices cannot communicate | Check RF module detection | Radio hardware or passthrough |
| Local WebUI fails from the tunnel client | Test routing between that client and OpenCCU | LAN, VLAN, or firewall policy |
| Public URL is unavailable | Check client connection and tunnel running state | Localtonet lifecycle |
| Public URL shows another service | Verify the target IP and actual WebUI port | Tunnel target configuration |
Frequently asked questions
Is OpenCCU officially available for Proxmox VE?
Yes. OpenCCU identifies Proxmox VE as a supported virtualized environment, and its releases include virtual-appliance assets intended for Proxmox deployments. Select the artifact appropriate for the host architecture and follow the current OpenCCU Proxmox installation procedure.
Which OpenCCU file should I download for Proxmox?
Use the current appliance asset documented for your Proxmox host architecture. The verified example release provides an OVA for initial installation and separately identifies a generic aarch64 appliance for Proxmox VE. Do not assume that an artifact for Raspberry Pi, Docker, LXC, or another target is interchangeable.
How do I open OpenCCU after the first boot?
Open http://openccu/ from a browser on the same reachable network. If that hostname does not resolve, use the DHCP-assigned IP address of the appliance. Verify that the resulting page is the OpenCCU CCU WebUI.
Does OpenCCU need a physical radio module when it runs in Proxmox?
A compatible radio path is required to communicate directly with relevant Homematic or Homematic IP devices. OpenCCU can detect supported RF modules connected through interfaces such as USB or GPIO. In a virtual machine, the required physical hardware must be made visible to the guest through an appropriate supported method.
Can I restore a backup from an existing CCU?
OpenCCU documents backup interchangeability with vendor CCU firmware and identifies restoring an existing CCU backup as an optional migration path. Preserve the original backup, confirm release and add-on compatibility, and verify the restored system locally before retiring the original controller.
Must the Localtonet client run inside OpenCCU?
No. Run our client on another device that can reach the OpenCCU WebUI over the local network. The available evidence does not establish a supported installation method for putting the Localtonet client directly inside the OpenCCU appliance.
Which port should I enter in the Localtonet HTTP tunnel?
Enter the actual port used by the working OpenCCU WebUI in your deployment. The evidence supplied for this guide documents the HTTP hostname and DHCP-address access methods but does not state a numeric WebUI port. Confirm the value from your running endpoint or current OpenCCU documentation instead of guessing.
Does creating a Localtonet tunnel immediately make it available?
No. After creating the tunnel, you must start it. The public endpoint is available only while the selected Localtonet client is connected and the tunnel is running. You can later stop or delete it.
Do I need router port forwarding or a public IP address?
No. The Localtonet client establishes an outbound connection to our relay server, so this workflow does not require inbound router port forwarding, firewall changes, VPN setup, or a public IP address. The client still needs outbound connectivity and local network access to OpenCCU.
Should I leave the OpenCCU tunnel running permanently?
That depends on your access requirements and security policy. For occasional administration, starting the tunnel only when needed reduces the period during which the WebUI is internet-reachable. In every case, keep OpenCCU current, use appropriate WebUI authentication, protect the Localtonet device token, and stop or delete tunnels that are no longer needed.
Connect your verified OpenCCU WebUI with Localtonet
Finish the OpenCCU installation and local tests first. Then run our client on a device that can reach the appliance, create an HTTP tunnel for the verified endpoint, and start it only when remote browser access is required.
Get Started Free →

