

Run a local-first AI agent gateway on your own machine and reach it securely from a browser
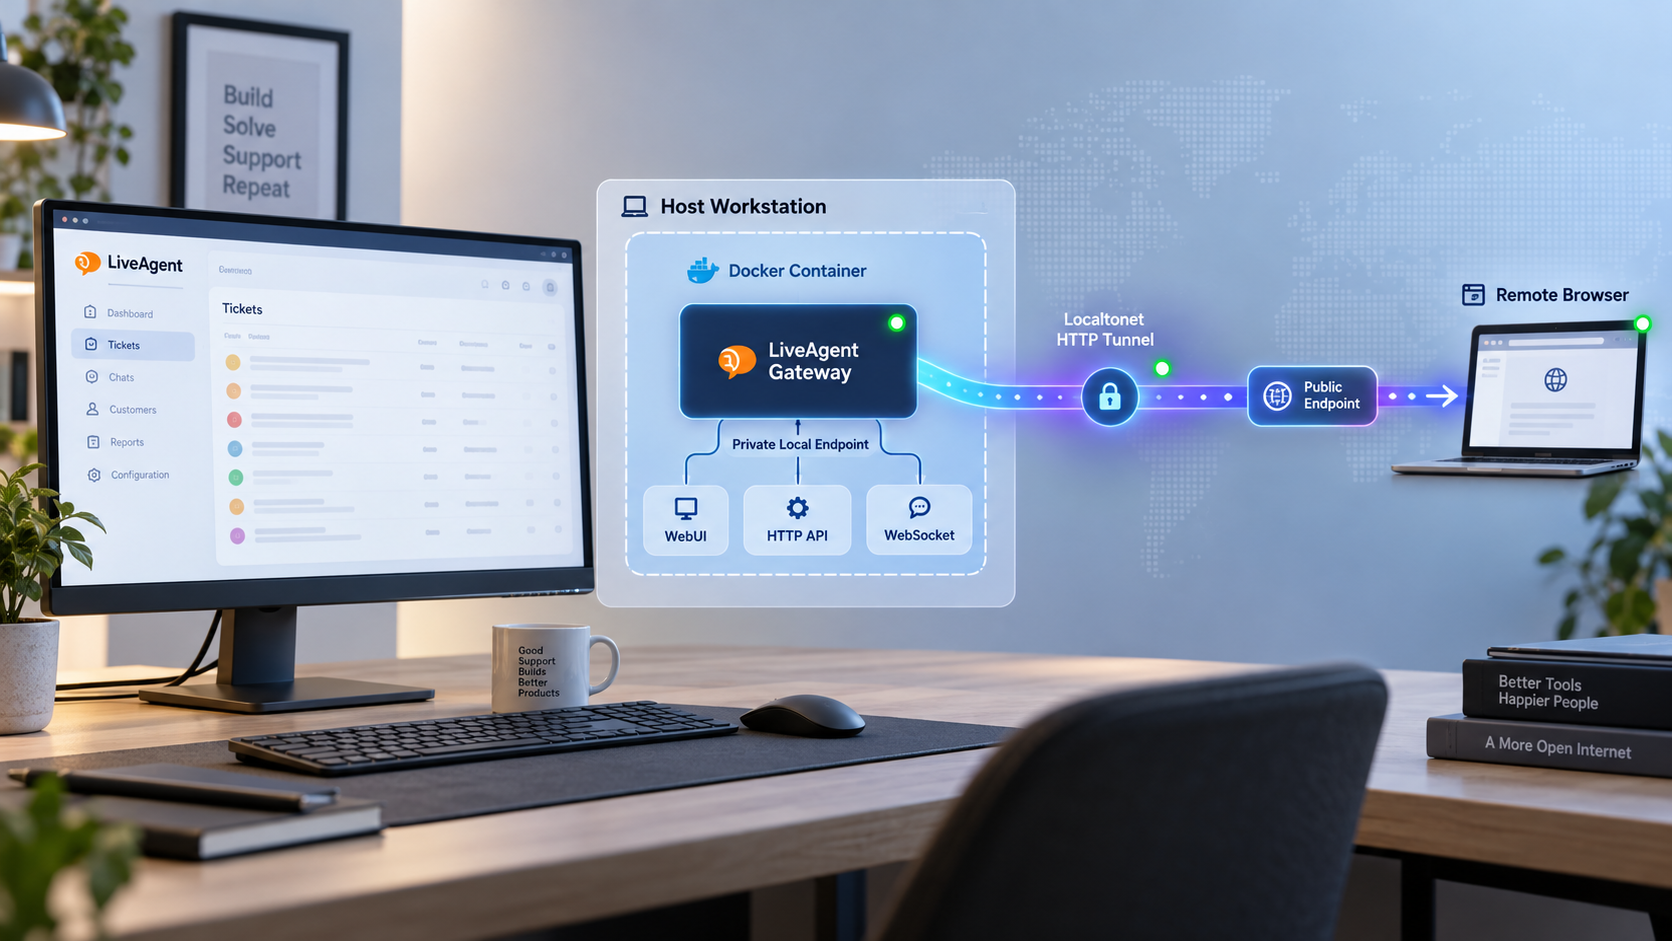
LiveAgent combines a desktop AI agent with an optional browser-accessible Gateway. In this guide, we install the desktop client, deploy the official Gateway container, verify its WebUI, HTTP API, and WebSocket endpoint locally, and cover routine Docker operations and troubleshooting. After the local deployment works, we connect its single HTTP endpoint to a Localtonet HTTP tunnel so authorized users can reach the Gateway without inbound router port forwarding, firewall changes, a VPN, or a public IP address.
📋 What's in this guide
How the LiveAgent desktop app, Gateway, Docker, and Localtonet fit together
LiveAgent is a local-first AI agent desktop client. Its documented capabilities include multi-model access, local file operations, command execution, managed long-running processes, scheduled tasks, MCP integration, Skills packages, and persistent memory. Because it can work with files, commands, and other resources on the computer where it runs, the desktop application is the component that performs local agent work.
The desktop application does not require a server for ordinary local use. The LiveAgent Gateway is an optional service for remote browser access and collaboration. It provides a WebUI and uses HTTP and WebSocket communication to reach the local agent. This distinction matters: installing only the Gateway does not replace the desktop agent, and readers who only need local desktop access do not need to deploy the Gateway.
The official Gateway image listens on container port 8080. The documented Docker mapping publishes that port as 3000 on the Docker host, producing a local endpoint such as http://127.0.0.1:3000. The WebUI, HTTP API, and WebSocket connections share this endpoint. There is no evidenced requirement for a separate TCP tunnel, UDP tunnel, or independently exposed WebSocket port in this workflow.
ghcr.io/stack-cairn/liveagent-gateway:latest image and publishes its container port 8080 on host port 3000.
The recommended order is therefore straightforward: install and test the LiveAgent desktop client, run and verify the Gateway on the local Docker host, connect the desktop application to that Gateway as documented by the project, and only then add remote access. Keeping local installation and public exposure separate makes troubleshooting much easier.
A tunnel forwards traffic to an existing service. It does not install LiveAgent, start the Gateway, fix a failed container, or configure the desktop application. Do not create the tunnel until http://127.0.0.1:3000 responds successfully on the Docker host.
Prerequisites and deployment decisions
For this workflow, you need a computer that can run the LiveAgent desktop client, a Docker host for the Gateway, and permission to install and run software on both. They may be the same computer. If they are different machines, account for host firewalls and routing between them, and do not assume that 127.0.0.1 on one machine refers to the other.
You also need Docker with permission to pull images from GitHub Container Registry and create containers. The official Gateway image is documented as multi-architecture for amd64 and arm64. The supplied project documentation does not establish support for other CPU architectures, so confirm compatibility before using another platform.
| Component | Verified requirement | Purpose |
|---|---|---|
| LiveAgent on macOS | Intel x64 or Apple Silicon aarch64 | Runs the local desktop agent using the matching signed DMG package. |
| LiveAgent on Windows | Windows x64 and the WebView2 runtime | Runs the desktop agent. WebView2 is bundled with Windows 11. |
| LiveAgent on Linux | Linux x86_64 with WebKitGTK 4.1 | Runs the desktop client. Ubuntu 22.04 and Debian 12 or newer are given as examples. |
| Gateway container | Docker on amd64 or arm64 | Hosts the remote WebUI, HTTP API, and WebSocket endpoint. |
| Localtonet client | A device that can reach the Gateway endpoint | Establishes the outbound connection to our relay and runs the HTTP tunnel. |
Choose the correct network placement
Running Docker and the Localtonet client on the same machine is the simplest arrangement. The tunnel target can then be 127.0.0.1 with port 3000. Binding the Gateway to loopback also reduces unnecessary LAN exposure, although the precise Docker publishing command used later determines which host interfaces accept connections.
If the Localtonet client runs on another device, the target cannot be 127.0.0.1, because loopback always refers to the device running the client. You would need a LAN-reachable address for the Docker host and a Docker port binding that permits access from that LAN. The exact address depends on your network and must not be guessed. Test it from the Localtonet client device before configuring the tunnel.
Know which credentials are outside this guide
LiveAgent can connect to AI model providers and compatible services, but provider selection, API keys, custom base URLs, and model-specific settings depend on the services you choose. Never place model credentials in Docker commands, tunnel URLs, screenshots, browser bookmarks, or public documentation. This guide does not invent credential names or environment variables that are not established by the supplied project documentation.
LiveAgent can work with local files, execute commands, and supervise processes. Treat its remote Gateway as an administrative interface. Before exposing it, review the Gateway's current authentication and authorization options, use least-privilege operating system permissions, limit which files and tools the agent can access, and stop the tunnel when remote access is no longer required.
Install the LiveAgent desktop client
LiveAgent installers are published through the project's GitHub Releases page. Choose the installer for your operating system and processor architecture. Package filenames include a version placeholder, so substitute the release version you actually download rather than copying the placeholder literally.
Open the LiveAgent releases page
Visit the project's LiveAgent GitHub Releases page and select the current release. Review its release notes and assets before downloading an installer.
Choose the package for your operating system
On macOS, choose the aarch64 DMG for Apple Silicon or the x64 DMG for an Intel Mac. On Windows x64, choose the setup executable, MSI package, or portable ZIP. On Linux x86_64, choose AppImage, DEB, or RPM according to your distribution and installation preference.
Install or launch the package
On macOS, open the signed and notarized DMG and drag LiveAgent into Applications. On Windows, run the setup executable or MSI, or extract and run the portable ZIP. On Linux, install the distribution package or make the AppImage executable and run it.
Confirm the desktop application opens locally
Launch LiveAgent and make sure its interface loads without an operating system or runtime error. Resolve desktop installation problems before deploying the optional remote Gateway.
Linux package commands
Replace the placeholder filename with the exact asset you downloaded. Run commands from the directory containing that file.
For an AppImage:
chmod +x LiveAgent-<version>-Linux-x86_64.AppImage
./LiveAgent-<version>-Linux-x86_64.AppImage
For Debian or Ubuntu family systems:
sudo dpkg -i LiveAgent-<version>-Linux-x86_64.debFor Fedora or openSUSE family systems:
sudo rpm -i LiveAgent-<version>-Linux-x86_64.rpmA package manager may report missing operating system dependencies. Install the required dependencies using the supported process for your distribution, then retry the package installation. The verified Linux requirement is WebKitGTK 4.1; do not substitute another major API version unless the current LiveAgent release documentation explicitly supports it.
If you only want to use LiveAgent directly on the desktop, stop here. Deploy the Gateway only when you need browser-based remote access or the Gateway's collaboration workflow.
Deploy the LiveAgent Gateway with Docker
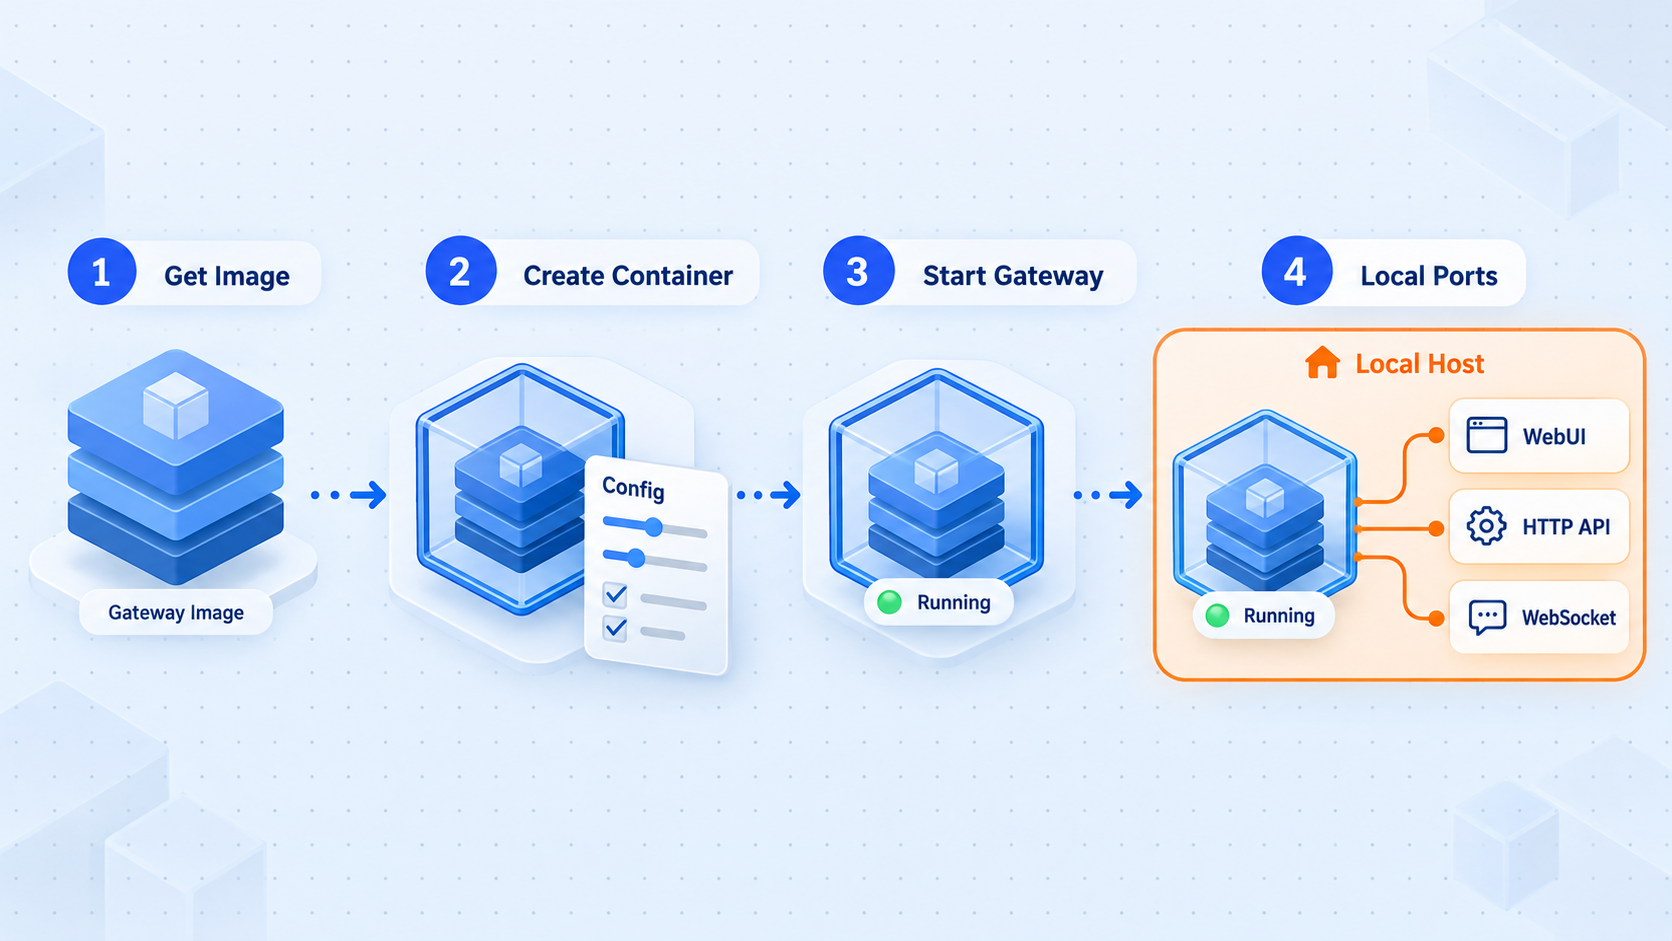
The official container image is ghcr.io/stack-cairn/liveagent-gateway:latest. The documented image is built for both amd64 and arm64. The deployment maps container port 8080 to host port 3000, names the container liveagent-gateway, runs it in the background, and configures Docker to restart it unless it has been explicitly stopped.
The project documentation also shows a named volume for Gateway data. However, the supplied verified excerpt does not preserve the complete destination path inside the container. We will not guess that path. The command below is therefore a verified functional baseline for evaluating the Gateway, but it does not claim persistent Gateway storage across container replacement. Before a production deployment, use the complete current volume mapping from the project's release documentation or README.
Confirm Docker is available
Check that the Docker CLI can communicate with the Docker daemon. If this fails, resolve the Docker installation, service, or user-permission problem before continuing.
Pull the official Gateway image
Download the current image from GitHub Container Registry so Docker has the Gateway image locally.
Start the Gateway container
Run the image in detached mode, publish host port 3000 to container port 8080, assign the documented container name, and enable the documented restart policy.
Inspect its startup state
Confirm that the container remains running and inspect its logs for startup errors. A container that exits immediately is not ready for local verification or tunneling.
Check the Docker client and daemon:
docker versionPull the official image:
docker pull ghcr.io/stack-cairn/liveagent-gateway:latestStart the verified baseline deployment:
docker run -d \
  --name liveagent-gateway \
  --restart unless-stopped \
  -p 3000:8080 \
  ghcr.io/stack-cairn/liveagent-gateway:latest
Check whether the container is running:
docker ps --filter name=liveagent-gatewayRead its recent output:
docker logs liveagent-gatewayThe command above deliberately omits an incomplete, unverified volume destination. Removing and recreating this container may remove data held only in its writable container layer. Confirm the complete current persistent-storage mapping, backup expectations, authentication behavior, and upgrade procedure for the LiveAgent version you deploy before relying on it in production.
Optional loopback-only publishing
Docker's -p 3000:8080 syntax commonly publishes the port on host interfaces according to the Docker host's configuration. When the Localtonet client runs on the same machine, a loopback-only binding can reduce direct LAN exposure:
docker run -d \
  --name liveagent-gateway \
  --restart unless-stopped \
  -p 127.0.0.1:3000:8080 \
  ghcr.io/stack-cairn/liveagent-gateway:latest
Use either the standard documented host mapping or the loopback-only variant, not both. Loopback binding is unsuitable when the Localtonet client or another required component must connect from a different machine.
Verify the Gateway locally before exposing it
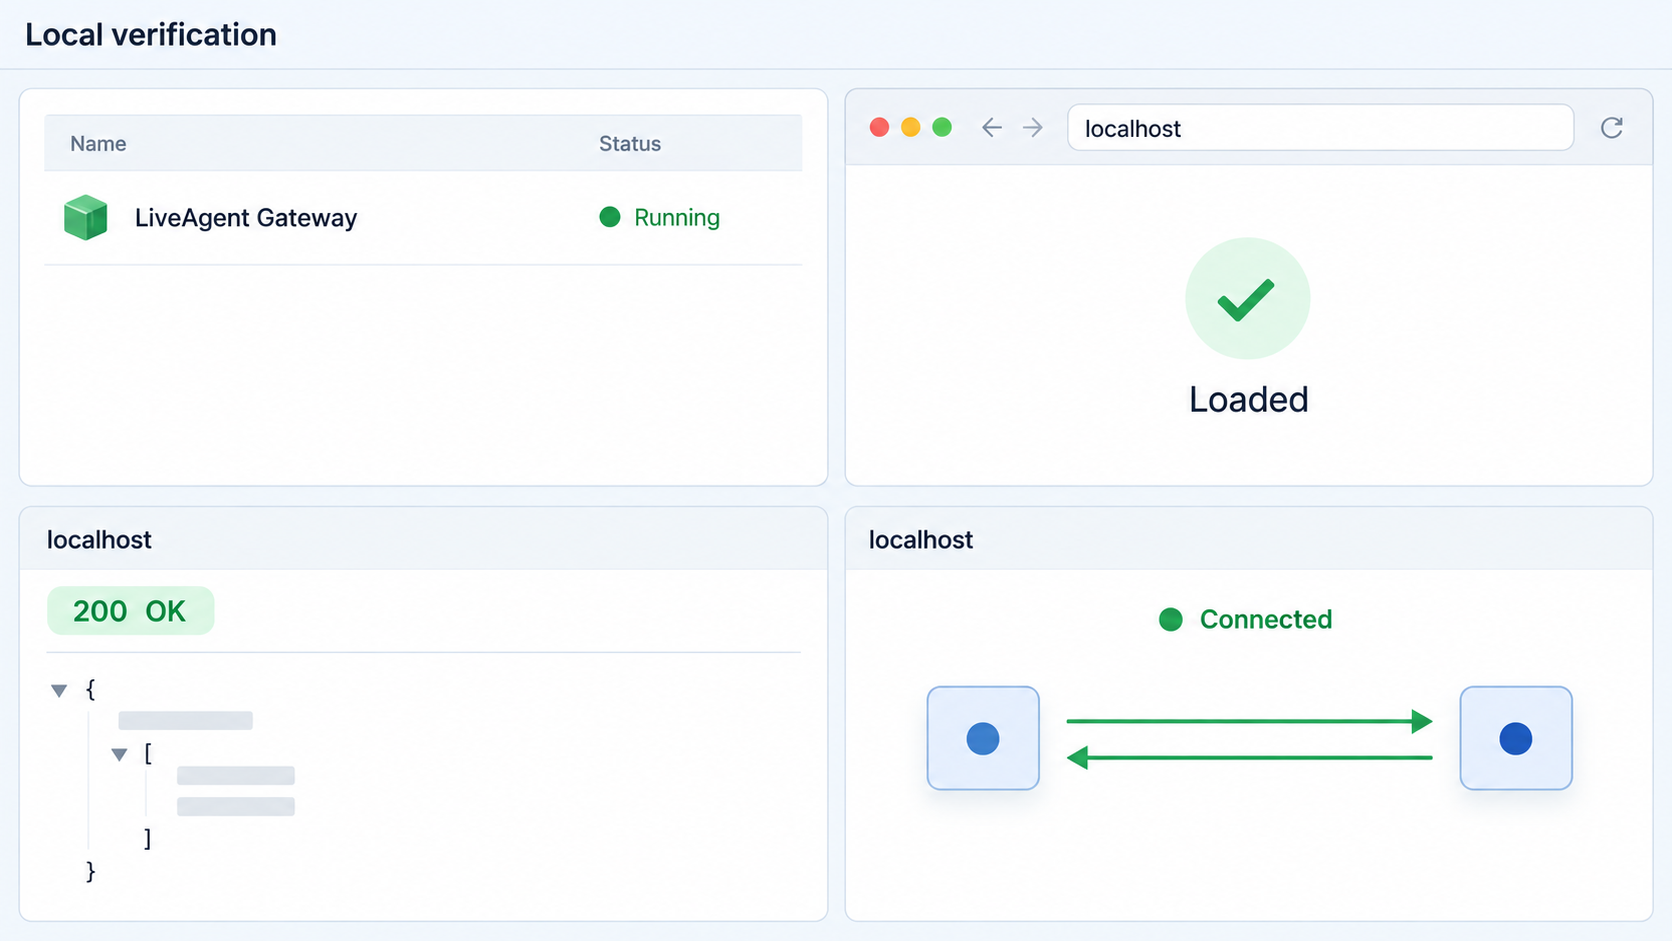
Local verification should test the same endpoint that Localtonet will later use. On the Docker host, that endpoint is http://127.0.0.1:3000. A successful test confirms that Docker port publishing reaches the Gateway and that its HTTP listener is available.
Confirm the container remains active
Run docker ps and verify that liveagent-gateway appears as a running container. If it is absent, inspect both active and stopped containers and read its logs.
Open the local Gateway URL
From the Docker host, open http://127.0.0.1:3000 in a browser. Confirm that the Gateway WebUI loads rather than a Docker, proxy, or browser connection error.
Check the HTTP response independently
Use an HTTP client such as curl to confirm that the port responds. The exact status code and response body can vary with the Gateway route and version, so focus on receiving a response rather than assuming an undocumented health-check format.
Connect the desktop client to the Gateway
In LiveAgent, open Settings → Remote and enter the Gateway address required by your deployment. Start with the locally reachable URL while validating the same-machine workflow. Do not use the public Localtonet URL until the tunnel exists.
Test an actual browser session
Load the WebUI, connect it to the expected desktop agent, and verify ordinary interaction. This exercises more of the workflow than merely confirming that port 3000 accepts a TCP connection.
Check the local HTTP endpoint:
curl -i http://127.0.0.1:3000/A browser-rendered interface is the clearest WebUI check. The curl result is useful for distinguishing a network refusal from an application-level response, but it does not fully test browser JavaScript or WebSocket behavior.
Understanding WebSocket verification
The Gateway uses WebSocket communication alongside its HTTP interface. A page can load successfully while a WebSocket connection fails, so complete verification should include an interaction that depends on the live connection to the desktop agent. Browser developer tools can help: open the Network panel, filter for WebSocket traffic, and look for a connection that remains open rather than repeatedly disconnecting.
Do not invent a WebSocket path and test it manually. The supplied documentation establishes that the Gateway uses WebSocket and Protobuf, but it does not establish a public path or a standalone protocol test command. Let the official WebUI initiate the connection.
The WebUI, HTTP API, and WebSocket connection share the Gateway's HTTP origin, but they behave differently. A complete local test should cover initial page loading, an ordinary HTTP response, and a sustained browser session with the desktop agent.
Operate and maintain the Docker container
Once the Gateway works, routine administration should be predictable. Docker can stop, start, restart, inspect, and remove the named container. These operations affect the Gateway service but do not uninstall the LiveAgent desktop client.
| Task | Command | Expected effect |
|---|---|---|
| View status | docker ps --filter name=liveagent-gateway |
Shows the container when it is currently running. |
| Read logs | docker logs liveagent-gateway |
Displays application output useful for startup and runtime diagnosis. |
| Follow logs | docker logs -f liveagent-gateway |
Streams new log output until the command is interrupted. |
| Stop Gateway | docker stop liveagent-gateway |
Stops the service and makes the local endpoint unavailable. |
| Start Gateway | docker start liveagent-gateway |
Starts the existing stopped container with its existing configuration. |
| Restart Gateway | docker restart liveagent-gateway |
Stops and starts the existing container. |
| Inspect configuration | docker inspect liveagent-gateway |
Shows Docker's recorded networking, restart, mount, and runtime configuration. |
Updating the Gateway image
The latest tag can change when a new image is published. Pulling it does not automatically replace an already running container. Updating requires pulling the image, stopping and removing the old container, and recreating it with the intended configuration.
docker pull ghcr.io/stack-cairn/liveagent-gateway:latest
docker stop liveagent-gateway
docker rm liveagent-gateway
After removal, run the selected deployment command again. Before doing so, verify persistent storage and backup requirements. The baseline command in this guide does not guarantee persistence across container replacement. In a production environment, also review release notes before updating and keep a rollback plan appropriate to your storage configuration.
Restart-policy behavior
The documented unless-stopped policy asks Docker to restart the container after a failure or Docker daemon restart unless an administrator intentionally stopped it. This does not make the service highly available, guarantee successful application startup, or recover from invalid configuration. Continue to monitor container state and logs.
A running container is also not proof that the browser workflow is healthy. Repeat the local URL and WebUI checks after upgrades, Docker configuration changes, operating system updates, or changes to the desktop application's remote settings.
Expose the verified Gateway with a Localtonet HTTP tunnel
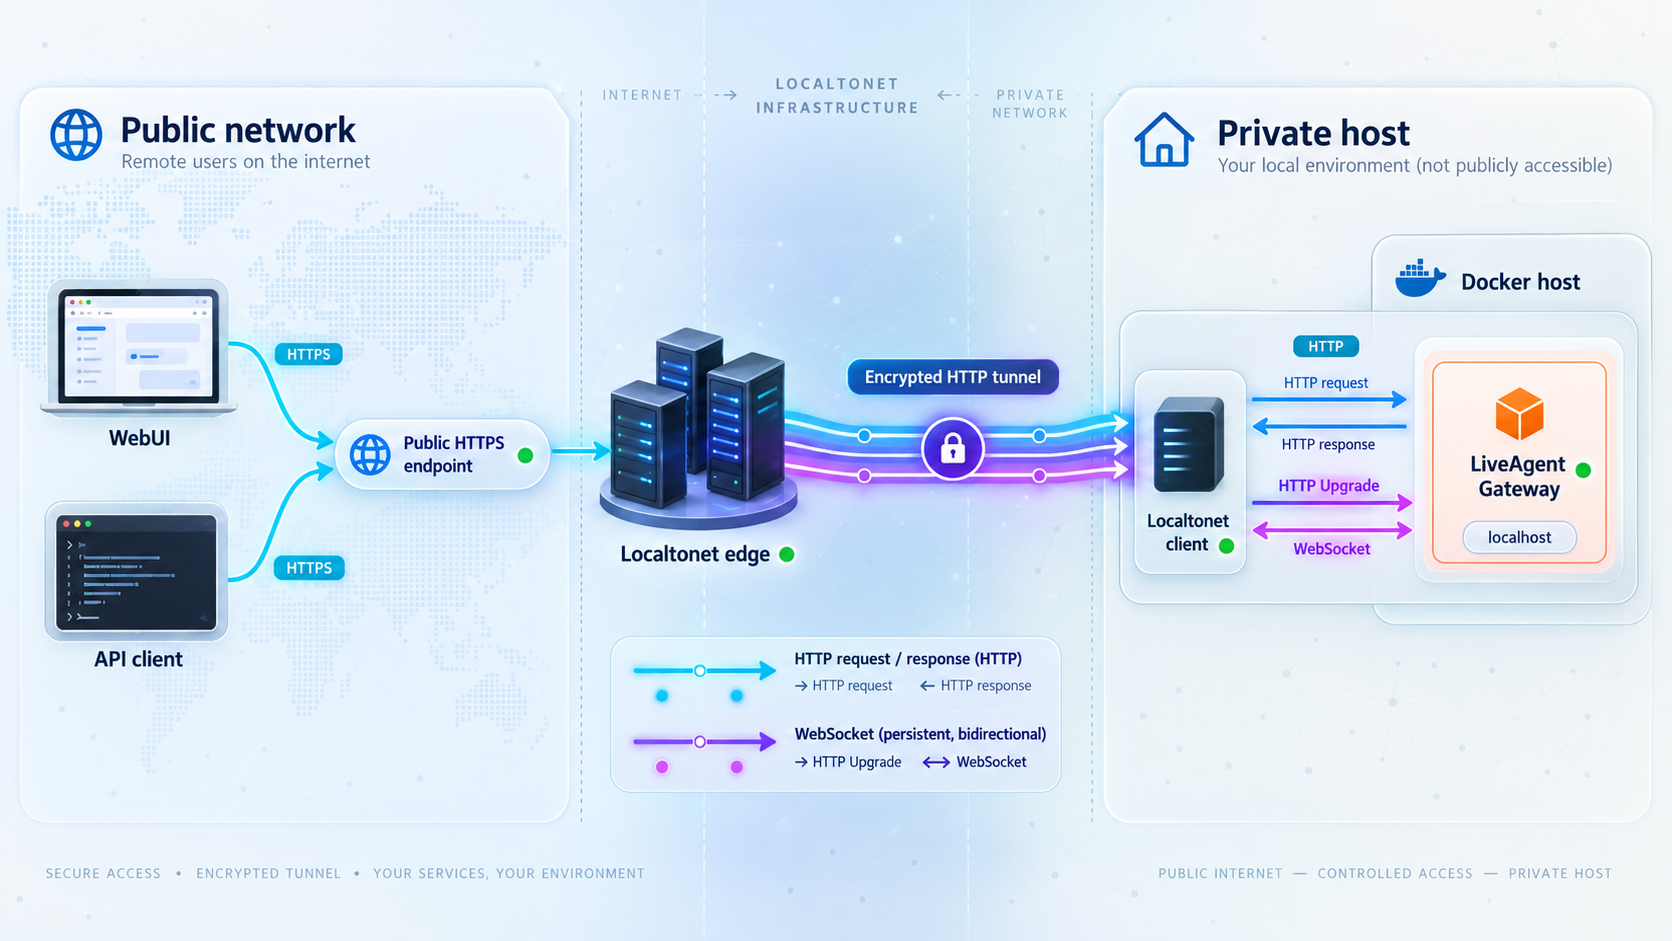
After the Gateway works at its local address, Localtonet can provide remote access without opening an inbound router port. Our client runs on a device that can reach the Gateway, establishes an outbound connection to a Localtonet relay server, and connects a public address to the local HTTP target.
Use an HTTP tunnel for this workflow because the verified Gateway endpoint serves the WebUI, HTTP API, and WebSocket communication through the same HTTP origin. There is no evidenced need to create additional TCP or UDP tunnels.
Install and run the Localtonet client
Run our client on the Docker host or another trusted device that can reach the Gateway. Same-host deployment allows the local target to remain on loopback.
Authenticate or select the client device
Use the device-specific authentication token through the supported client and dashboard workflow. Keep the token private and never place it in commands, screenshots, browser URLs, or article text.
Select an available relay server
Choose a currently available server or region from the Localtonet dashboard. Available server codes and regions can vary, so obtain the value from the current product rather than copying a hardcoded example.
Create an HTTP tunnel to the Gateway
Select an HTTP tunnel and set its local target to the Gateway address. When the Localtonet client and Docker run on the same machine, use local IP 127.0.0.1 and port 3000. If they run on different devices, use the tested LAN address instead.
Start the tunnel
Creating the configuration does not start it. Press Start and wait for the selected device and tunnel to be connected. The tunnel is available only while the client is connected and the tunnel is running.
Test the assigned public HTTPS address
Open the public address in a browser from a separate network, verify that the WebUI loads, and test an interaction that uses the Gateway's live connection. Stop or delete the tunnel when remote access is no longer needed.
HTTP tunnels can use a random subdomain, a custom subdomain where supported, or a custom domain. These Process Type choices serve the same local content at a public HTTPS address. Custom-domain DNS requirements must be checked against the current Localtonet documentation before making DNS changes.
For the current dashboard sequence and available options, consult our HTTP tunnel documentation. Do not copy another user's server code, authentication token, or public hostname.
Anyone who learns a public address can attempt to connect to it. A hard-to-guess URL is not a substitute for authentication. Confirm LiveAgent's current access controls, restrict the desktop agent's privileges, avoid exposing secrets through the WebUI, and share the address only with authorized users.
Configure LiveAgent with the public address
The project documentation identifies Settings → Remote as the desktop location for the Gateway address. When a reverse proxy provides HTTPS, it instructs users to enter the HTTPS Gateway URL and use port 443. With a Localtonet HTTP tunnel, use the assigned public HTTPS address as displayed by our platform rather than appending the local port 3000.
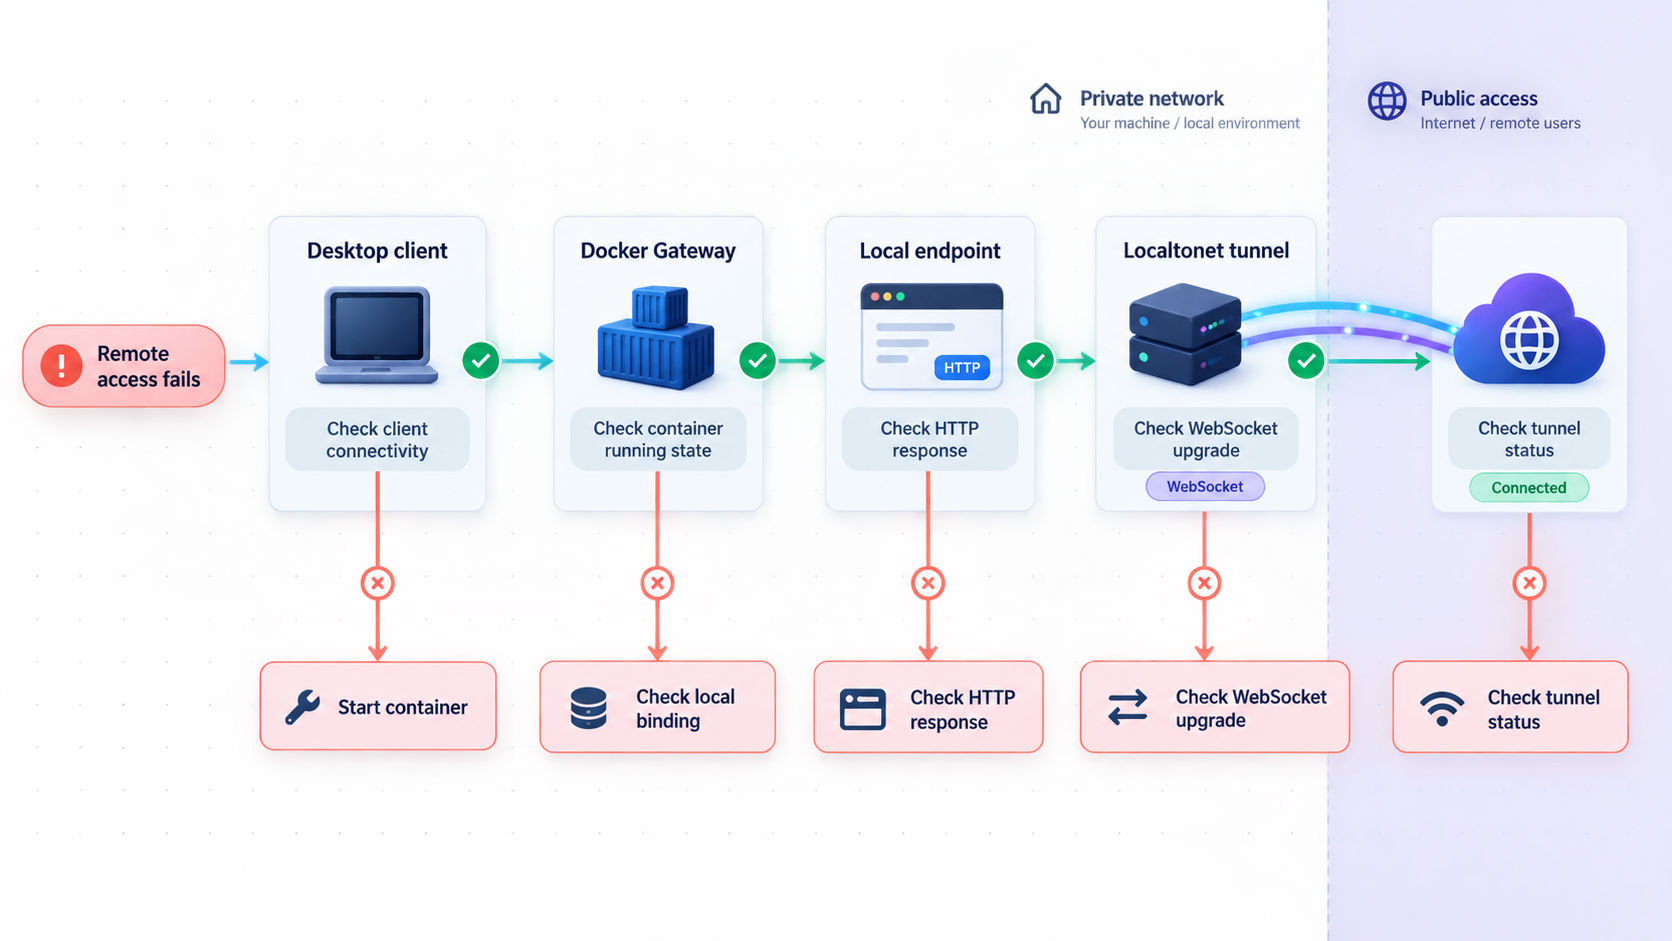
Keep the local endpoint for diagnostics. If the public session stops working, first check http://127.0.0.1:3000. If local access also fails, troubleshoot LiveAgent or Docker. If local access works but public access fails, investigate the Localtonet client, device connectivity, tunnel state, target address, and browser behavior.
Security and production-readiness checklist
Exposing an ordinary status page and exposing an AI agent capable of local tool execution are not equivalent. LiveAgent's useful capabilities also increase the consequences of an unauthorized session. Security should be designed around the desktop agent, Gateway, Docker host, Localtonet configuration, model credentials, and any connected MCP servers.
Separate secrets from deployment instructions
Do not paste real API keys or device tokens into support requests. When recording a reproducible configuration, replace credentials with obvious placeholders and remove public URLs if the tunnel is still active. Review container logs before sharing them because application output can contain operational context.
Restrict the agent's working environment
LiveAgent's local tools can read and modify files and execute commands when enabled and requested. Run it in an environment appropriate to that level of access. Avoid granting broad administrative privileges by default. Review which directories, repositories, shells, MCP servers, scheduled tasks, and external services are available to the agent.
Understand tunnel lifecycle
A Localtonet tunnel is not permanently available merely because it exists in the dashboard. The selected device must remain connected and the tunnel must be running. Stopping the tunnel removes public reachability through that address, but it does not stop the Docker container or desktop application. Conversely, stopping the container leaves the tunnel unable to reach its target.
Troubleshooting LiveAgent, Docker, WebSocket, and tunnel problems
The container name is already in use
Docker requires unique container names. Check both running and stopped containers:
docker ps -a --filter name=liveagent-gatewayIf the existing container is the deployment you want, start or inspect it instead of creating a duplicate. If it is obsolete, confirm that removing it will not discard required data, then stop and remove it before recreating the deployment.
Host port 3000 is already allocated
Another process or container may already use port 3000. Inspect active containers:
docker ps
Stop the conflicting service only if it is safe to do so. You may publish the Gateway on a different host port while keeping container port 8080, but that would be a deployment choice rather than the documented example. If you change the host port, use the same chosen port in local tests and as the Localtonet target.
The container starts and immediately exits
Show stopped containers and inspect the logs:
docker ps -a --filter name=liveagent-gateway
docker logs liveagent-gateway
Look for architecture errors, image-pull problems, missing resources, or application startup failures. Do not create a tunnel until the container remains running.
The browser reports connection refused locally
Confirm that the container is active and that Docker reports the expected port mapping:
docker port liveagent-gateway
docker inspect liveagent-gateway
Verify that you are testing from the correct machine. 127.0.0.1:3000 works only from the Docker host. If you are testing from another device and used a loopback-only binding, remote LAN connections are intentionally unavailable.
The WebUI loads but the desktop agent does not connect
This usually narrows the problem to the relationship between the browser, Gateway, and desktop application rather than the initial Docker port mapping. Check the Gateway address entered under Settings → Remote, inspect container logs, and use browser developer tools to see whether the WebSocket connection opens or repeatedly fails.
If using the public address, enter the HTTPS URL issued for the tunnel. Do not append :3000 to that public URL. Port 3000 is the local Docker-host port, not necessarily the public-facing port.
Local access works but the public URL does not
Check the problem in layers:
- Confirm the Localtonet client is running and connected.
- Confirm the selected device is the device that can reach the Gateway.
- Confirm the HTTP tunnel has been started, not merely created.
- Confirm its local target is the correct IP address and port.
- Retest that target from the Localtonet client device.
- Inspect browser developer tools for HTTP or WebSocket failures.
If the client runs in a separate container or virtual machine, its 127.0.0.1 is not the Docker host's loopback interface. Use a reachable target appropriate to that network design and verify it directly from the client environment.
The public page loads but live updates fail
A successful initial HTML request does not prove that the WebSocket session works. Use the browser's Network panel to inspect the connection initiated by the official WebUI. Also inspect Gateway logs while reproducing the problem:
docker logs -f liveagent-gatewayAvoid guessing a manual WebSocket path. The verified documentation does not provide one in the supplied evidence. Test through the WebUI so it can use the route and protocol expected by the installed version.
The Gateway stops after a machine reboot
Confirm that Docker itself starts during boot and inspect the container's restart policy:
docker inspect liveagent-gateway
The deployment command uses --restart unless-stopped. If an administrator explicitly stopped the container, Docker preserves that intention. Start it again with docker start liveagent-gateway.
An update appears to have no effect
Pulling a newer image does not modify an existing container. Inspect the currently running container and recreate it with the updated image when appropriate. Resolve persistent storage before removal, because the baseline deployment in this guide does not promise that data stored inside the old container will survive replacement.
Frequently asked questions
Do I need the LiveAgent Gateway to use the desktop app?
No. The desktop application works standalone and does not require a server for ordinary local use. Deploy the Gateway when you need browser-based remote access or its collaboration workflow.
Which Docker image should I use?
The documented official image is ghcr.io/stack-cairn/liveagent-gateway:latest. It is documented as a multi-architecture image for amd64 and arm64.
What local URL should the Docker deployment use?
With the documented 3000:8080 mapping, test http://127.0.0.1:3000 from the Docker host. If another device must connect, use a tested LAN-reachable host address and an appropriate Docker binding.
Do the WebUI, HTTP API, and WebSocket need separate tunnels?
No separate tunnel is evidenced for this deployment. The Gateway serves the WebUI, HTTP API, and WebSocket communication through the same HTTP endpoint, so the verified workflow uses one Localtonet HTTP tunnel to the Gateway's local port.
Do I need router port forwarding or a public IP address?
Not when using Localtonet for this workflow. Our client establishes an outbound connection to a relay server, so the tunnel does not require inbound router port forwarding, firewall changes, VPN setup, or a public IP address.
Why does the public URL stop working when the local computer sleeps?
The selected Localtonet device must remain connected, the tunnel must be running, Docker must be available, and the Gateway container must be active. Sleep, shutdown, network loss, a stopped client, or a stopped container can make the public endpoint unavailable.
Is the Docker command in this guide suitable for permanent production storage?
It is a functional baseline for installation and verification, but it does not claim persistent storage across container replacement. The verified excerpt shows that the project documents a named volume, but it does not preserve the complete container destination path. Confirm the current official volume mapping and backup process before production use.
Should I put port 3000 in the public Gateway address?
No, not when using the public HTTPS address assigned to the HTTP tunnel. Port 3000 is the local Docker-host port. Enter the assigned public HTTPS address in LiveAgent's remote settings as presented by the tunnel.
Is a Localtonet HTTP tunnel the same as a VPN?
No. This workflow publishes a specific local HTTP service. Localtonet VPN Manager is our separate private mesh VPN feature. Standard HTTP tunneling should not be described as a VPN.
Connect your verified LiveAgent Gateway with Localtonet
Once the Gateway responds locally and the LiveAgent desktop connection works, create an HTTP tunnel to port 3000 and use the assigned public HTTPS address for authorized remote access.
Get Started Free →

