

Build and verify a local AI research service before enabling controlled remote access
Local Deep Research is a self-hosted research application with a browser interface, multiple search-engine integrations, and support for local or compatible cloud model endpoints. This guide installs the Python package in an isolated environment on Windows, macOS, or Linux, runs SearXNG with Docker, connects Ollama, verifies the complete research workflow at http://localhost:5000, and explains routine operation and troubleshooting. Only after the local deployment and its access controls are verified do we connect it to a Localtonet HTTP tunnel.
📋 What's in this guide
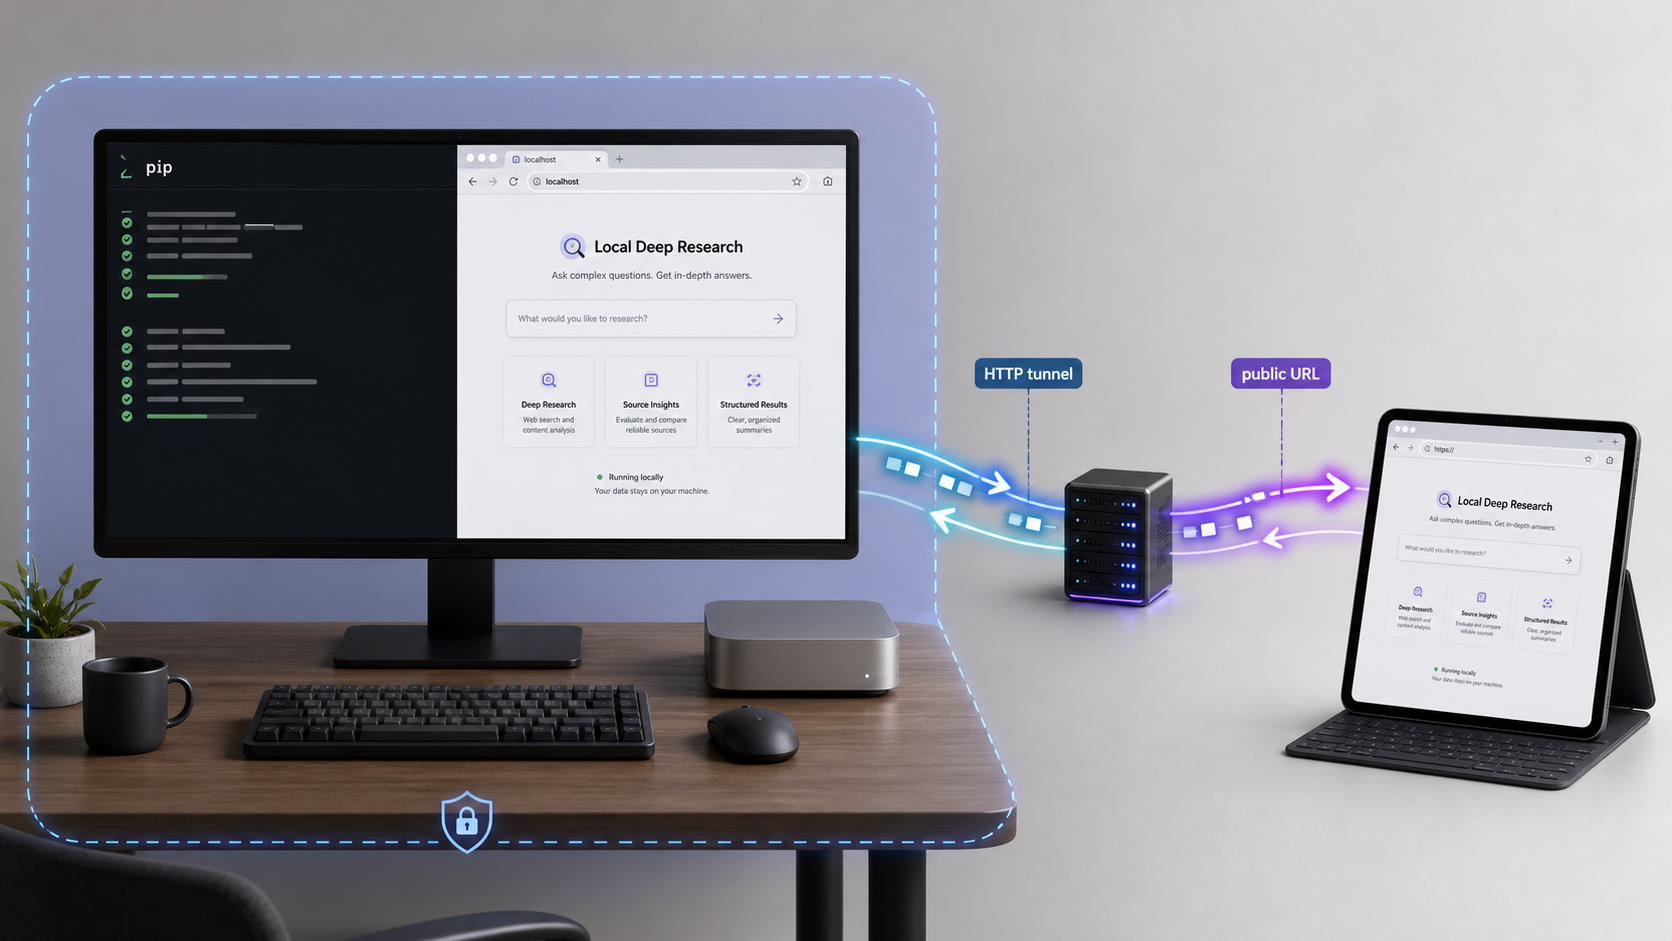
What you are installing
Local Deep Research, often abbreviated as LDR, is an AI-powered research assistant that searches web sources, academic services, and local documents before synthesizing the collected information into reports with citations. It can use local language models and compatible cloud endpoints, and it provides a browser interface for configuring and running research.
This tutorial follows the project's Python package installation guide. The project recommends Docker for many general deployments because containers handle more dependencies automatically. A pip installation is useful for developers, Python users, and operators who want LDR inside a conventional Python environment, but it leaves the supporting services and process environment under your control.
The working installation contains several separate components. LDR provides the web application and research workflow. SearXNG supplies search results. Ollama supplies the language-model endpoint used in this example. SQLCipher protects the application's database when the encrypted backend loads successfully. Localtonet is added afterward to provide remote connectivity to the verified HTTP service.
local-deep-research package installs into a Python 3.10 or newer environment and starts a browser interface on port 5000.
gemma3:12b before the first research request.
sqlcipher3 wheels documented for Windows, macOS, and Linux.
A successful pip installation does not prove that Docker, SearXNG, Ollama, the selected model, or the LDR web process is working. Verify each layer independently before adding remote access. This makes failures much easier to isolate.
Prerequisites for Windows, macOS, and Linux
The current LDR guidance requires Python 3.10 or newer and pip. This tutorial also requires Docker for the documented SearXNG container and Ollama for the example local model. Install these from their primary project pages rather than from an unofficial package mirror:
- Python downloads and the official Python virtual-environment documentation
- Docker installation documentation
- Ollama downloads
- SearXNG documentation
- SQLCipher project information
Verify Python and pip
Open PowerShell or Command Prompt on Windows, or a terminal on macOS or Linux. Check the interpreter before creating an environment:
python --version
python -m pip --version
Some Windows installations use the Python launcher:
py --version
py -m pip --version
Some macOS and Linux systems expose Python 3 as python3:
python3 --version
python3 -m pip --version
Continue only if the selected interpreter reports Python 3.10 or newer and its matching pip command works. Using python -m pip, py -m pip, or python3 -m pip ties pip to the interpreter you selected and avoids a common problem where the standalone pip executable belongs to another installation.
Verify Docker and its daemon
Docker must be installed and its engine must be running before the SearXNG container can start. Docker Desktop users should launch Docker Desktop first.
docker --version
docker info
The first command verifies that the Docker command is available. The second contacts the Docker daemon. If docker --version succeeds but docker info reports that it cannot connect, start Docker Desktop or the Docker service appropriate for your operating system.
Install and verify Ollama
Install Ollama using the official operating-system installer. On Windows and macOS, launch the Ollama application after installation. On a system where Ollama is installed but not already running as a background service, the documented server command is:
ollama serveLeave that process running if it occupies the terminal. Open a second terminal for the remaining commands. Verify the local API:
curl http://localhost:11434/api/tags
A JSON response shows that the Ollama endpoint is reachable. If curl is unavailable, open http://localhost:11434/api/tags in a browser or use another HTTP client. Do not proceed to LDR model configuration until this endpoint responds.
Hardware and disk considerations
Current LDR guidance says x86-64 systems require an AVX-capable processor. Intel Sandy Bridge and AMD Bulldozer, introduced around 2011, are given as the compatibility floor. Scientific Python dependencies such as pandas and scikit-learn can terminate with an Illegal instruction error on older processors. ARM64, also called aarch64, is documented as supported.
The project installation guidance estimates approximately 100 MB for LDR, 1 to 2 GB for SearXNG, and 5 to 15 GB for Ollama models. Actual model storage depends on the model selected. Leave additional space for Python packages, Docker image layers, downloaded documents, indexes, reports, application data, and updates.
| Platform | Required foundation | Important platform note |
|---|---|---|
| Windows | Python 3.10+, pip, Docker Desktop, and Ollama | PowerShell and Command Prompt use different environment-variable syntax. PDF export also requires Pango and Cairo system libraries. |
| macOS | Python 3.10+, pip, Docker Desktop, and Ollama | The POSIX shell examples work in common shells. macOS includes fonts used for common CJK and emoji PDF output. |
| Linux | Python 3.10+, pip, Docker Engine, and Ollama | Confirm your account can access Docker. Additional host fonts may be needed for CJK or emoji characters in PDF exports. |
Create and activate a Python virtual environment
A virtual environment keeps LDR and its Python dependencies separate from system packages and unrelated projects. Create the environment in a dedicated directory and reactivate it whenever you return to the installation.
Windows PowerShell
mkdir local-deep-research
cd local-deep-research
py -m venv .venv
.\.venv\Scripts\Activate.ps1
python -m pip --version
If your Windows installation uses python rather than py, use python -m venv .venv. The final command should display a pip path inside the .venv directory.
If PowerShell blocks the activation script, consult Microsoft's current execution-policy guidance or use Command Prompt activation instead. Do not disable system security controls globally merely to activate one Python environment.
Windows Command Prompt
mkdir local-deep-research
cd local-deep-research
py -m venv .venv
.venv\Scripts\activate.bat
python -m pip --version
macOS or Linux with a POSIX-compatible shell
mkdir local-deep-research
cd local-deep-research
python3 -m venv .venv
source .venv/bin/activate
python -m pip --version
Once activated, the environment usually adds a (.venv) prefix to the prompt. That visual indicator is helpful but not conclusive. The pip path reported by python -m pip --version is the stronger verification.
To leave the environment later, run:
deactivateInstall and configure Local Deep Research with pip
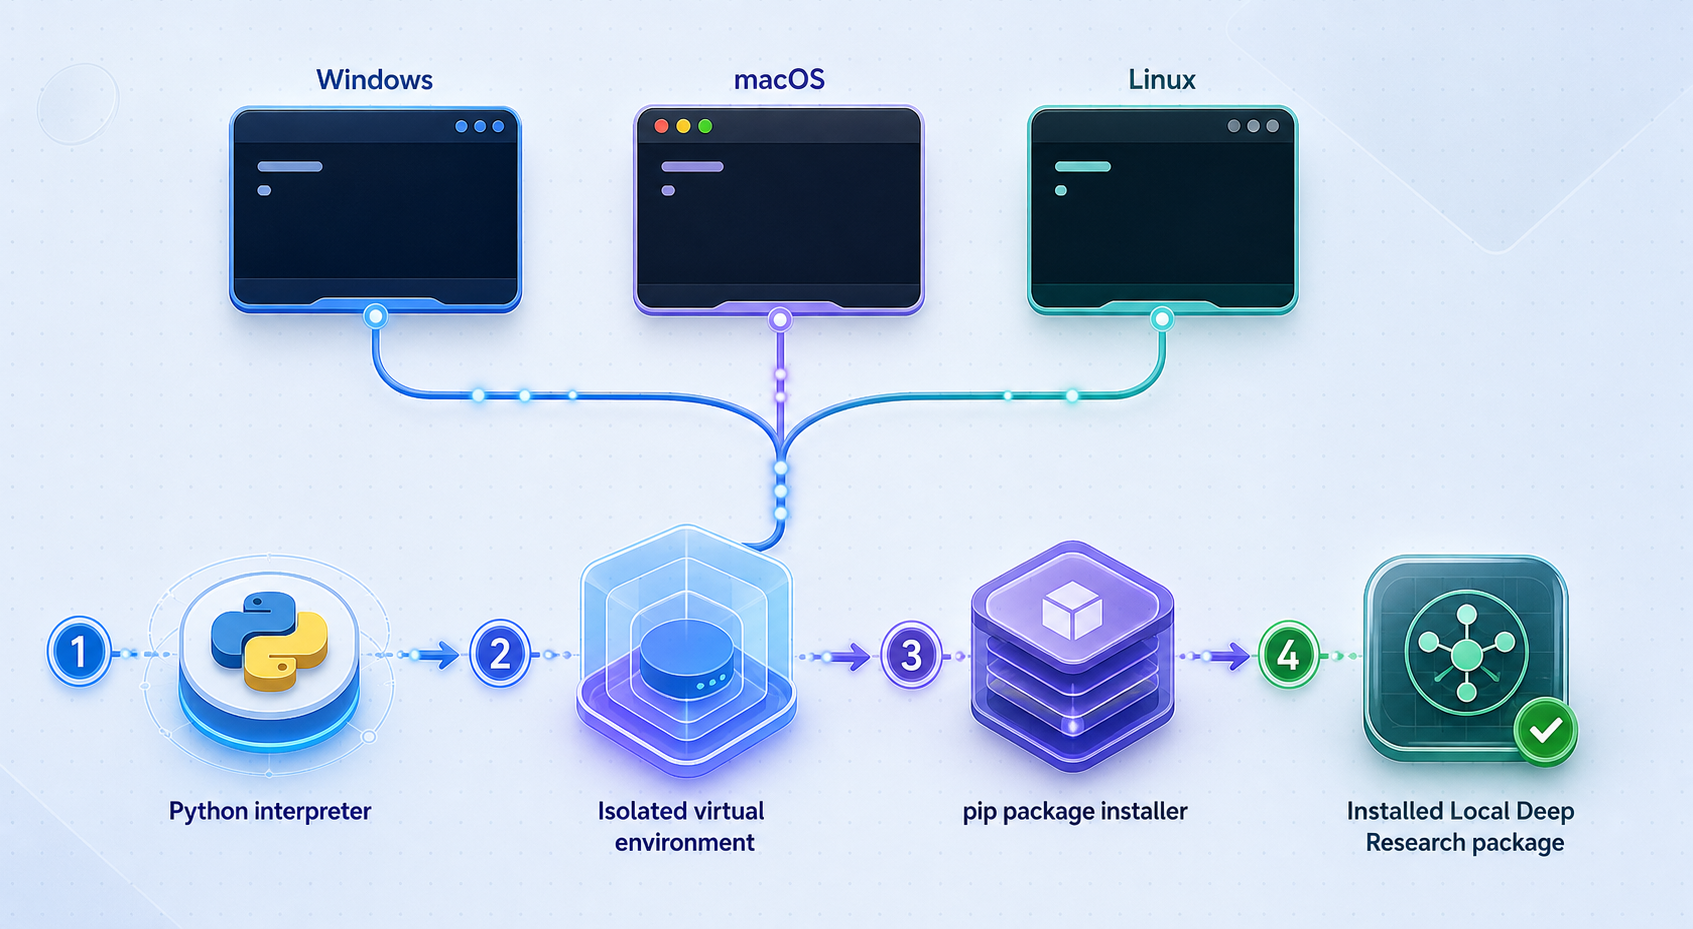
Complete the following five documented installation stages in order. Keep the virtual environment active for the package installation, LDR verification, and LDR startup commands.
Install the Local Deep Research package
Install the published package through the interpreter associated with the active virtual environment.
python -m pip install local-deep-researchWait for dependency installation to finish. Confirm that the package can be imported before adding the supporting services.
python -c "import local_deep_research; print('Local Deep Research import succeeded')"Pull and run SearXNG
The official pip guide runs SearXNG in a Docker container named searxng and publishes it on local port 8080.
docker pull searxng/searxng
docker run -d -p 8080:8080 --name searxng searxng/searxng
Confirm that the container is running and review its initial logs.
docker ps
docker logs searxngStart and verify Ollama
Launch the installed Ollama application or run ollama serve where a background service is not already active. Verify http://localhost:11434/api/tags before continuing.
curl http://localhost:11434/api/tagsDownload and verify the example model
Pull the model used by the current pip-install example. The download can take time and consume several gigabytes.
ollama pull gemma3:12b
ollama list
Confirm that gemma3:12b appears in the model list. The Python package does not include a language model.
Approve the SearXNG origin and start LDR
LDR blocks private, loopback, and link-local search-engine URLs unless the server operator explicitly approves them. Pinning the exact SearXNG URL both configures it and marks it as operator-approved. Use the command for your active shell, then start the web application.
macOS and Linux
export LDR_SEARCH_ENGINE_WEB_SEARXNG_DEFAULT_PARAMS_INSTANCE_URL=http://localhost:8080
python -m local_deep_research.web.app
Windows PowerShell
$env:LDR_SEARCH_ENGINE_WEB_SEARXNG_DEFAULT_PARAMS_INSTANCE_URL = "http://localhost:8080"
python -m local_deep_research.web.app
Windows Command Prompt
set LDR_SEARCH_ENGINE_WEB_SEARXNG_DEFAULT_PARAMS_INSTANCE_URL=http://localhost:8080
python -m local_deep_research.web.app
The current project README starts pip installations with python -m local_deep_research.web.app, so this tutorial uses that form as the canonical entry point. The dedicated pip guide also documents:
ldr-web
Both are evidenced project entry points. The module form makes the selected Python interpreter explicit and is often easier to diagnose inside a virtual environment. If ldr-web is not on PATH, activate the correct environment and use the module command instead.
If the interface says SearXNG is disabled because its instance URL is private, loopback, or link-local, stop LDR and define the variable in the same shell or process environment that will restart it. LDR 1.10.5 also supports the finer-grained LDR_SEARCH_PRIVATE_ENGINE_URL_ALLOWLIST=http://localhost:8080 operator setting. Avoid the broader LDR_SEARCH_ALLOW_PRIVATE_ENGINE_URLS=true option unless you have reviewed and accepted the wider access scope.
Environment variables assigned with export, $env:, or set apply to the relevant shell session and child processes. If you close that terminal, define the variable again before restarting LDR. Do not assume that a variable entered in one terminal is available to a process launched from another terminal, desktop shortcut, task scheduler, or service manager.
Database encryption and fallback behavior
The pip guide states that LDR uses SQLCipher for AES-256 encrypted databases. Pre-built sqlcipher3 wheels are provided for Windows, macOS, and Linux, so most users do not need to compile SQLCipher. Watch the LDR startup output for database or encryption errors before adding API keys, private documents, or sensitive research data.
The project provides LDR_BOOTSTRAP_ALLOW_UNENCRYPTED=true as a fallback to standard SQLite. This is not an equivalent security mode. LDR explicitly warns that API keys and data are stored unencrypted when this fallback is enabled. Do not use it merely to silence an installation failure without evaluating storage permissions, backups, other users on the machine, and the sensitivity of the research data.
Verify the complete local installation
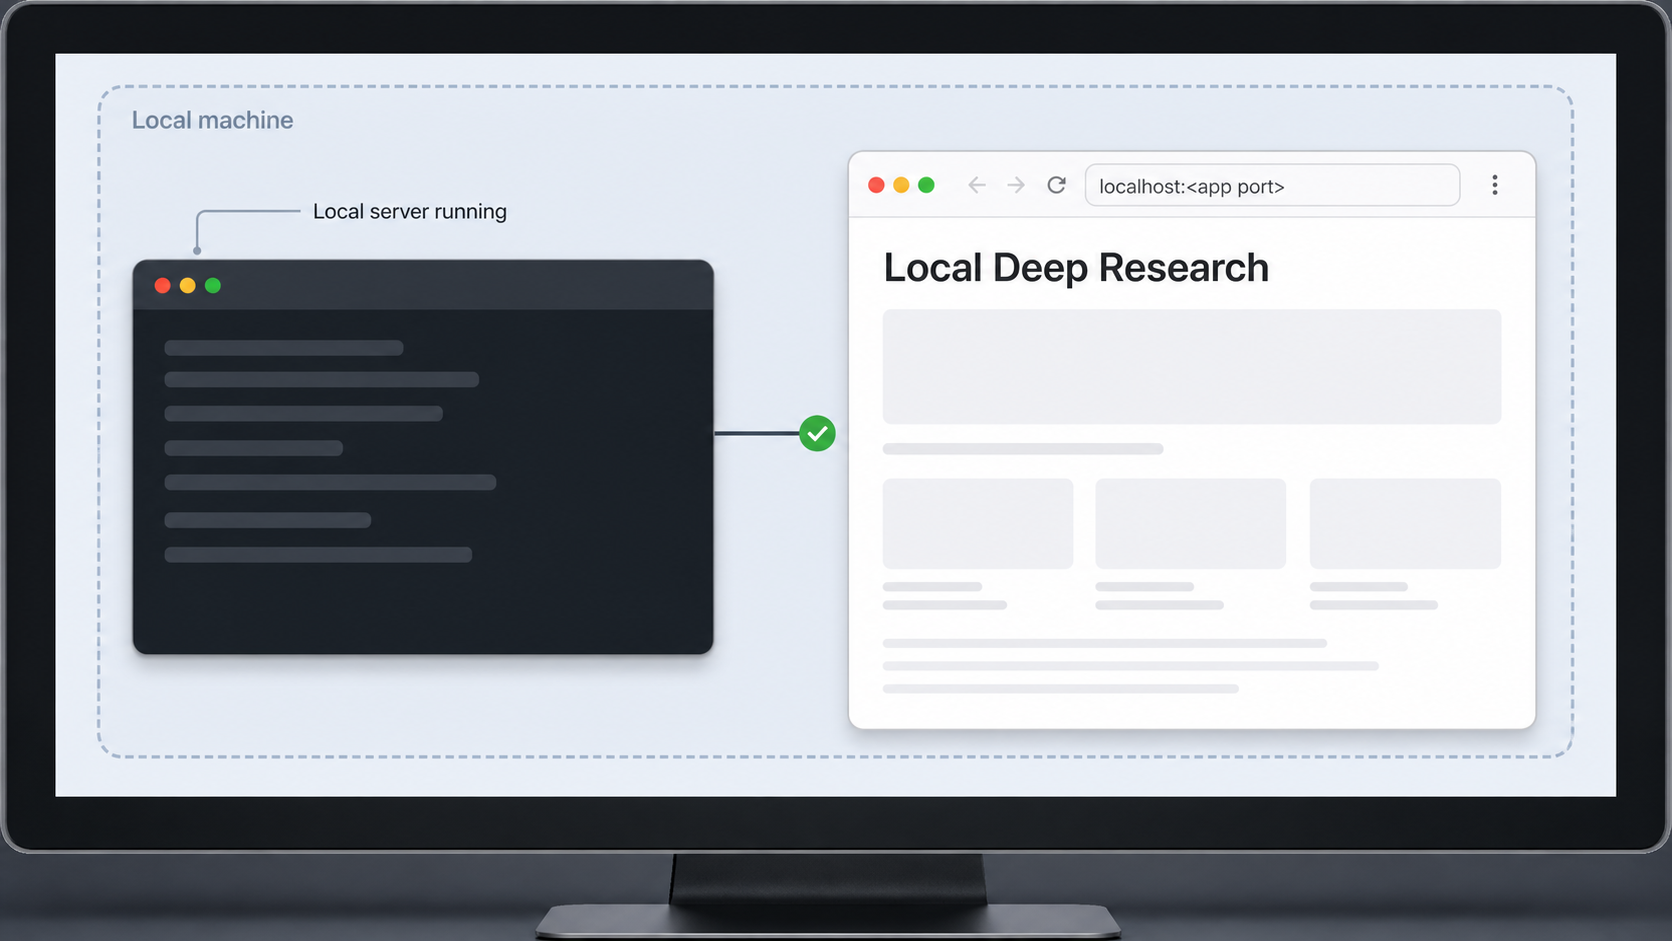
Do not treat the appearance of a startup message as full verification. Check the search service, model endpoint, model inventory, LDR process, local port, browser interface, and one small research request.
1. Verify SearXNG
docker ps
curl http://localhost:8080
The searxng container should appear as running, and the HTTP request should return the SearXNG page. If it does not, inspect:
docker logs searxng2. Verify Ollama and the model
curl http://localhost:11434/api/tags
ollama list
The API must respond and gemma3:12b must appear in the installed model list. A running Ollama service with no downloaded model is not sufficient.
3. Verify LDR startup and port 5000
Keep the LDR terminal open and read its startup output. Then open:
http://localhost:5000If the browser cannot connect, confirm whether another process is already using the port.
On macOS or Linux:
lsof -i :5000On Windows:
netstat -ano | findstr :5000If LDR owns the port, leave its process running and retry the browser. If another application owns it, stop or reconfigure that application according to its own documentation. The supplied LDR evidence establishes port 5000 but does not provide a supported alternate-port command for this pip workflow, so this guide does not invent one.
4. Run a small end-to-end research request
In the local LDR interface, confirm that the intended Ollama endpoint and downloaded model are selected. Submit a small, non-sensitive test question that requires search, such as a request to summarize a public technical topic and cite a few sources. Use test content rather than private documents or credentials.
A successful end-to-end test should complete model generation, return search-backed content, and show citations or source material appropriate to the selected workflow. Watch the LDR terminal while the request runs. If the interface loads but the test lacks search results, look for the private SearXNG URL error. If it lacks a model, verify Ollama and the model inventory again.
Localtonet forwards traffic to an existing service. It cannot repair an LDR startup failure, a stopped SearXNG container, an unreachable Ollama endpoint, a missing model, or an occupied local port.
Stop, restart, inspect, and update the installation
A pip deployment consists of an LDR foreground process plus separately managed SearXNG and Ollama services. This tutorial does not define a production service manager because the current evidence does not establish one cross-platform configuration. Use the following commands for deliberate manual operation.
Manage the SearXNG container
docker stop searxng
docker start searxng
docker restart searxng
docker logs searxng
docker logs -f searxng
docker stop preserves the container so it can be started again. docker logs -f follows new log output until you interrupt the command. If you remove the container, its name becomes available for a new docker run command:
docker stop searxng
docker rm searxng
To update the image deliberately, pull the current image, stop and remove the existing container, and recreate it with the same documented port and name:
docker pull searxng/searxng
docker stop searxng
docker rm searxng
docker run -d -p 8080:8080 --name searxng searxng/searxng
Review current SearXNG release and configuration guidance before updating an important deployment. Recreating a container can discard changes stored only inside that container.
Stop and restart LDR
Press Ctrl+C in the terminal running LDR to stop the foreground process. To restart it, reactivate the same virtual environment, restore the required environment variable, and run the module entry point again.
On macOS or Linux:
cd local-deep-research
source .venv/bin/activate
export LDR_SEARCH_ENGINE_WEB_SEARXNG_DEFAULT_PARAMS_INSTANCE_URL=http://localhost:8080
python -m local_deep_research.web.app
On Windows PowerShell:
cd local-deep-research
.\.venv\Scripts\Activate.ps1
$env:LDR_SEARCH_ENGINE_WEB_SEARXNG_DEFAULT_PARAMS_INSTANCE_URL = "http://localhost:8080"
python -m local_deep_research.web.app
On Windows Command Prompt:
cd local-deep-research
.venv\Scripts\activate.bat
set LDR_SEARCH_ENGINE_WEB_SEARXNG_DEFAULT_PARAMS_INSTANCE_URL=http://localhost:8080
python -m local_deep_research.web.app
Restart LDR whenever you change an operator environment variable. A browser refresh does not replace a process restart because the environment is read by the server process.
Update the Python package
Stop LDR, activate the virtual environment, and update the package through the same interpreter:
python -m pip install --upgrade local-deep-researchRead the project's release notes before updating. Afterward, repeat the import, startup, SearXNG, Ollama, model, browser, encryption, and end-to-end checks. Updates can change dependencies, settings, security behavior, and compatibility.
Establish access control before remote exposure
A Local Deep Research deployment can contain API keys, research reports, local document indexes, search history, model access, and other sensitive information. A service restricted to localhost has a much smaller exposure surface than the same application at a public URL.
The supplied current LDR evidence does not establish that every pip-installed version provides suitable application-level authentication for public internet exposure. It also does not document a universal authentication setup that we can safely reproduce here. Therefore, do not start a public tunnel based only on the fact that the local page loads.
Before creating or starting the tunnel, inspect the exact installed LDR version and its current security documentation. Verify whether authentication is enabled, whether an unauthenticated browser is denied, which routes are protected, how sessions and credentials are handled, and whether sensitive settings, documents, reports, and model functions require authorization. Record the tested version and result in your deployment notes. If you cannot demonstrate suitable access control, do not publish LDR directly.
A safe compensating pattern when LDR authentication is not verified
Place an authenticated access gateway or reverse proxy in front of LDR on the local machine. Keep LDR reachable only through localhost, configure the gateway to require authentication before forwarding any request, and point Localtonet to the gateway's local HTTP port rather than directly to LDR port 5000.
The gateway must protect every LDR route, including static pages, APIs, document operations, reports, settings, and any streaming or upgrade connections used by the application. Use strong credentials or an appropriate identity provider, apply least privilege, and avoid shared accounts. Test from a clean browser session before starting Localtonet:
- An unauthenticated request must be denied or redirected to authentication.
- Direct access to the gateway's protected application routes must not bypass the login check.
- Successful authentication must expose only the intended LDR deployment.
- LDR port 5000 should remain unavailable to untrusted network interfaces.
- Authentication secrets must not appear in the Localtonet target, URL, screenshots, or article content.
The exact reverse-proxy configuration depends on the gateway selected and its current documentation. We do not provide an invented production configuration. If you cannot configure and test such a control, use LDR locally and leave the tunnel stopped.
Localtonet supplies connectivity to the chosen local target. It does not create application accounts or determine which LDR actions a visitor may perform. Authentication, authorization, data handling, and application updates remain part of the deployment's security design.
Configure the Localtonet HTTP tunnel
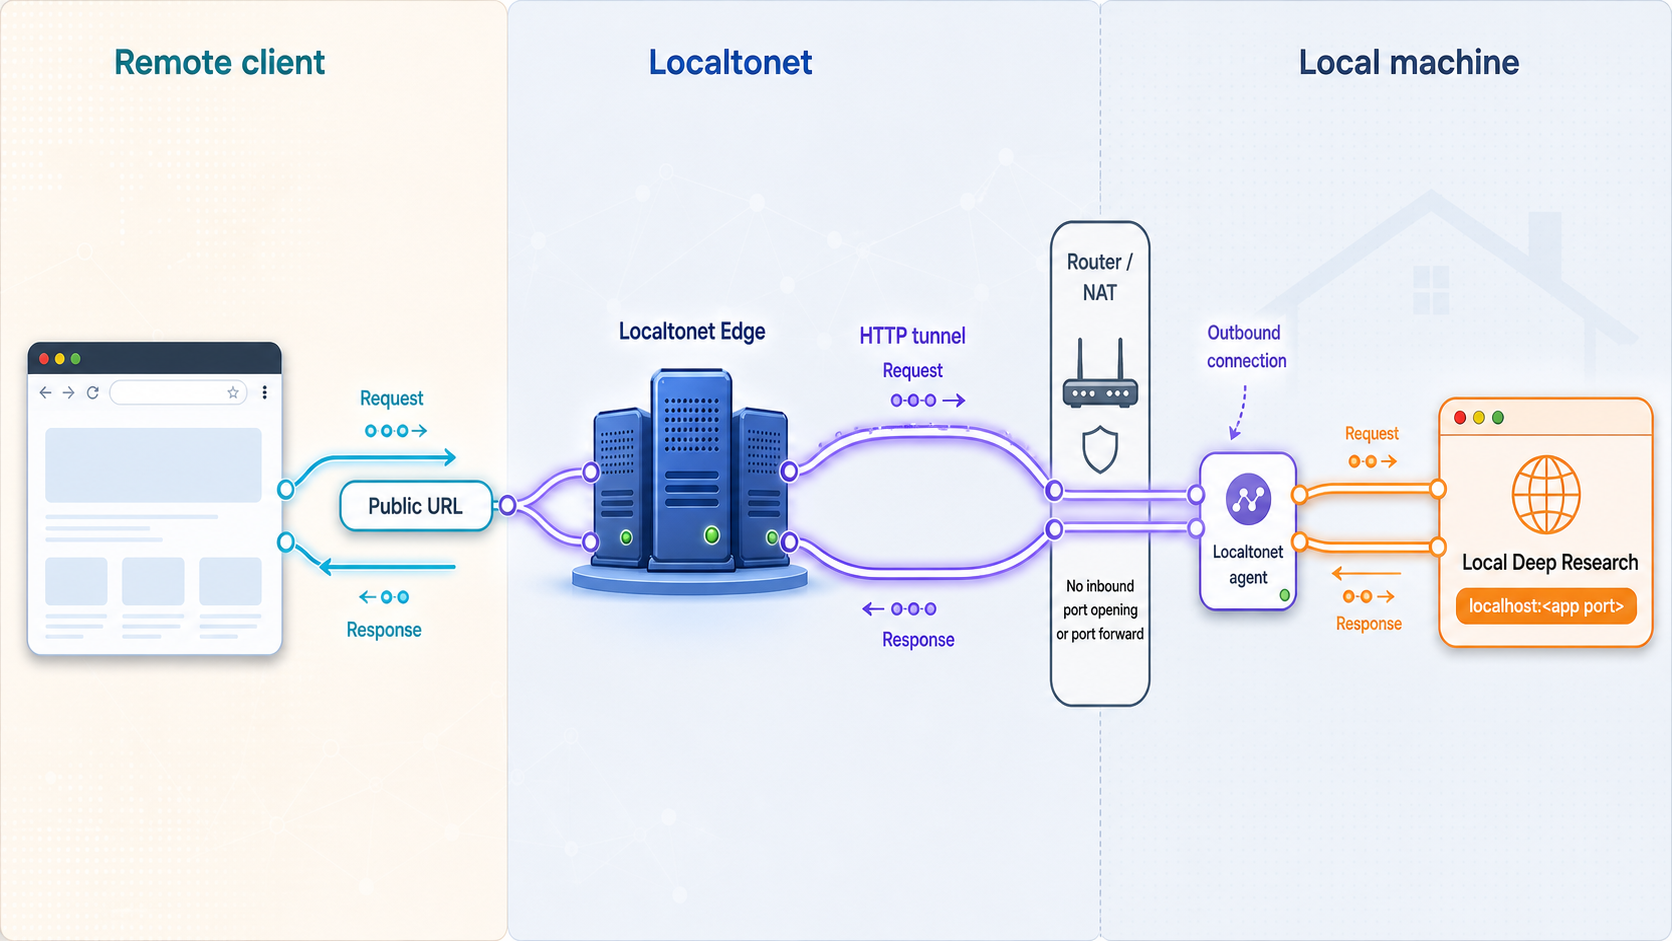
Once the local service and its authentication layer pass verification, use an HTTP tunnel for the browser interface. Our client establishes an outbound connection to a Localtonet relay server. This workflow does not require inbound router port forwarding, firewall changes, VPN setup, or a public IP address.
If the installed LDR version has been verified to provide suitable application authentication, the local target can be the LDR host and port 5000. If you are using an authenticated gateway, target the gateway's local port instead. Do not point the tunnel around that gateway directly to LDR.
Install and connect the Localtonet client
Install our client on the Windows, macOS, or Linux device running the protected service, or on a device that can reach it locally. Run the client and confirm that it connects to our platform.
Select the device token
Select the device-specific authentication token for the client that will run the tunnel. Treat the token as a secret. Never place it in screenshots, source files, shell history examples, or shared documentation.
Select an available relay server
Choose a currently available server or region from our dashboard. Available values can vary, so use the current product selection instead of copying a hardcoded server code.
Configure the HTTP local target
Create an HTTP tunnel and enter the local host and port of the protected service. Use localhost and port 5000 only when the client runs on the same machine, direct LDR exposure has passed the authentication gate, and LDR is listening there. If an authenticated gateway is required, use its verified local port instead.
Start the tunnel
Review the device, relay, protocol, host, port, and access-control path. Then use the Start button. Creating or saving a tunnel does not mean it is running.
Verify externally and stop when finished
Open the assigned public URL from a separate browser profile or network. Verify that an unauthenticated visitor is denied before signing in, then verify the intended authenticated workflow. Stop or delete the tunnel when remote access is no longer required.
See our HTTP tunnel documentation for the current dashboard workflow. HTTP process types can provide a generated subdomain, a selected subdomain where supported, or a custom domain. Check current documentation before changing custom-domain DNS because exact requirements can change.
The public endpoint works only while the selected Localtonet client is connected, the tunnel is started, and the protected local service is reachable. Creating the tunnel alone does not start it. Stopping LDR, its gateway, our client, or the tunnel interrupts remote access.
Troubleshoot the complete installation
Work from the inside out. Verify Python and the virtual environment first, then the package, Docker, SearXNG, Ollama, the model, LDR, the local access-control layer, and finally Localtonet.
| Symptom | Likely cause | What to check |
|---|---|---|
python, pip, or ldr-web is not found |
PATH or inactive virtual environment | Verify the interpreter, reactivate .venv, use python -m pip, and start LDR with python -m local_deep_research.web.app. |
| pip installs into the wrong directory | Interpreter mismatch | Run python -m pip --version and confirm its path is inside the intended virtual environment. |
| pip reports dependency or wheel failures | Unsupported Python, platform mismatch, stale installer, or unavailable dependency | Confirm Python 3.10 or newer, review the complete error, and avoid mixing packages from several Python installations. Do not enable unencrypted storage merely to hide an unrelated dependency error. |
| Docker cannot connect to the daemon | Docker Desktop or Docker Engine is stopped | Run docker info. Start Docker using the supported procedure for the host operating system. |
Docker says the name searxng is already in use |
An existing container has that name | Run docker ps -a. Start the existing container or stop and remove it deliberately before recreating it. |
| Port 8080 is already allocated | Another service uses the SearXNG host port | Identify the existing listener. The documented LDR environment value and Docker mapping must refer to the same approved origin. |
| SearXNG returns no results | Private-origin guard or stopped container | Check docker ps, docker logs searxng, and the LDR logs. Define the exact approved origin in the environment that launches LDR, then restart LDR. |
| Ollama connection fails | Ollama is stopped or the endpoint is incorrect | Request http://localhost:11434/api/tags. Start Ollama and verify the LDR endpoint configuration. |
| No language models are available | The model was not downloaded or LDR is using another Ollama endpoint | Run ollama list, confirm gemma3:12b appears, and confirm LDR connects to the same Ollama instance. |
Illegal instruction |
CPU lacks required AVX support | Check processor capabilities. Current LDR x86-64 packages require AVX, while ARM64 is documented as supported. |
| SQLCipher initialization fails | Encryption dependency or platform problem | Review the complete startup error and the project's SQLCipher instructions. Treat LDR_BOOTSTRAP_ALLOW_UNENCRYPTED=true as a security downgrade because API keys and data become unencrypted. |
localhost:5000 does not load |
LDR stopped, failed to start, or port 5000 is occupied | Read the LDR terminal, verify the virtual environment, and inspect port 5000 with lsof or netstat. |
| Environment changes have no effect | LDR was not restarted or inherited another process environment | Stop LDR, define the variable in the launching shell, and start the process again from that shell. |
| Local service works but the public URL does not | Localtonet client, target, relay, or lifecycle problem | Confirm our client is connected, the correct device token and available relay are selected, the protected local target is reachable, and the tunnel has been started. |
| The public URL opens the wrong service | Incorrect local target | Recheck the host and port. When using an authenticated gateway, ensure the tunnel targets the gateway rather than bypassing it to port 5000. |
| The public URL opens LDR without authentication | Missing or bypassed access control | Stop the tunnel immediately. Verify LDR authentication or place a tested authenticated gateway in front before starting the tunnel again. |
PDF export dependencies
On Windows, LDR's pip guide states that PDF export requires Pango and Cairo system libraries and links to the WeasyPrint installation guidance. A working web interface does not prove that PDF export dependencies are installed.
For CJK characters on Linux, the project documents host font packages such as fonts-noto-cjk on Debian or Ubuntu and google-noto-sans-cjk-fonts on Fedora or RHEL. Emoji output may require the corresponding Noto emoji font package. macOS and Windows include commonly used CJK and emoji fonts.
Frequently asked questions
Does Local Deep Research support pip installation on Windows, macOS, and Linux?
Yes. The current project documentation supports pip installation on all three operating-system families and documents pre-built SQLCipher wheels for them. Virtual-environment activation, environment-variable syntax, Docker installation, and optional PDF libraries differ by platform.
Should I start LDR with ldr-web or the Python module command?
Both are documented. The pip-specific guide uses ldr-web, while the current main README uses python -m local_deep_research.web.app. This tutorial uses the module form because it explicitly runs through the selected virtual-environment interpreter and remains useful when the console script is not on PATH.
What port does the LDR web interface use?
The documented pip startup serves the interface at http://localhost:5000. Verify that address locally and complete a small research request before configuring remote access.
Why does LDR block my localhost SearXNG address?
LDR blocks private, loopback, and link-local search-engine URLs by default. The server operator must approve the exact SearXNG origin. Pinning http://localhost:8080 through the documented SearXNG environment variable both configures the URL and marks it as approved.
Can I use another model provider instead of Ollama?
LDR documents support for Ollama and OpenAI-compatible model endpoints. This tutorial uses Ollama because it is part of the official pip quick-install path. Use the project's current provider documentation for another endpoint rather than guessing its URL, credentials, or model settings.
Is the unencrypted SQLite fallback equivalent to SQLCipher?
No. Setting LDR_BOOTSTRAP_ALLOW_UNENCRYPTED=true switches to standard SQLite, and the project warns that API keys and data will be stored unencrypted. Treat it as a deliberate security downgrade, not a routine installation shortcut.
Can I expose LDR directly if the local page loads?
No. A loading page proves connectivity, not authorization. Verify the exact installed version's application authentication and test that an unauthenticated browser is denied. If suitable authentication cannot be demonstrated, keep LDR local or place a tested authenticated gateway in front and tunnel to that gateway.
Does creating a Localtonet tunnel immediately make it available?
No. Creating a tunnel does not start it. The selected Localtonet client must be connected and the tunnel must be started. The protected local target must also remain running and reachable.
Do I need router port forwarding or a public IP address?
No. Our client establishes an outbound connection to a Localtonet relay server, so this workflow does not require inbound router port forwarding, firewall changes, VPN setup, or a public IP address.
Connect your verified research service with Localtonet
Install LDR in an isolated Python environment, verify SearXNG, Ollama, the model, SQLCipher, port 5000, and a complete local research request. After you have tested authentication or placed a protected gateway in front, create an HTTP tunnel from the device that can reach that controlled local target.
Get Started Free →

