

Install the NocoBase platform, restore its official CRM solution, and publish the verified application safely
NocoBase is an open-source AI and no-code platform for building business systems through a visual interface, data models, workflows, permissions, and plugins. The initial CLI procedure in this guide installs the NocoBase platform, not the prebuilt CRM. The official CRM solution requires a separate backup restoration into a compatible PostgreSQL 16 environment. We will verify the application locally, restore and test the CRM where required, and then connect the working HTTP service to Localtonet without inbound router port forwarding.
📋 What's in this guide
Understand what you are installing
NocoBase provides the application platform on which business systems are built. Its architecture separates business data from the user interface and lets administrators work with collections, pages, workflows, roles, permissions, and plugins. It can be used for CRM, ERP, project management, approval systems, and other data-driven applications, but installing the base platform does not automatically add every solution.
This distinction is especially important for the official NocoBase CRM. Running the CLI installer gives you a NocoBase application and its administration interface. You can use that platform to build a CRM manually. If you want the supplied NocoBase CRM solution with its prepared modules, the current documented installation method is to restore the solution backup through the Backup Manager plugin.
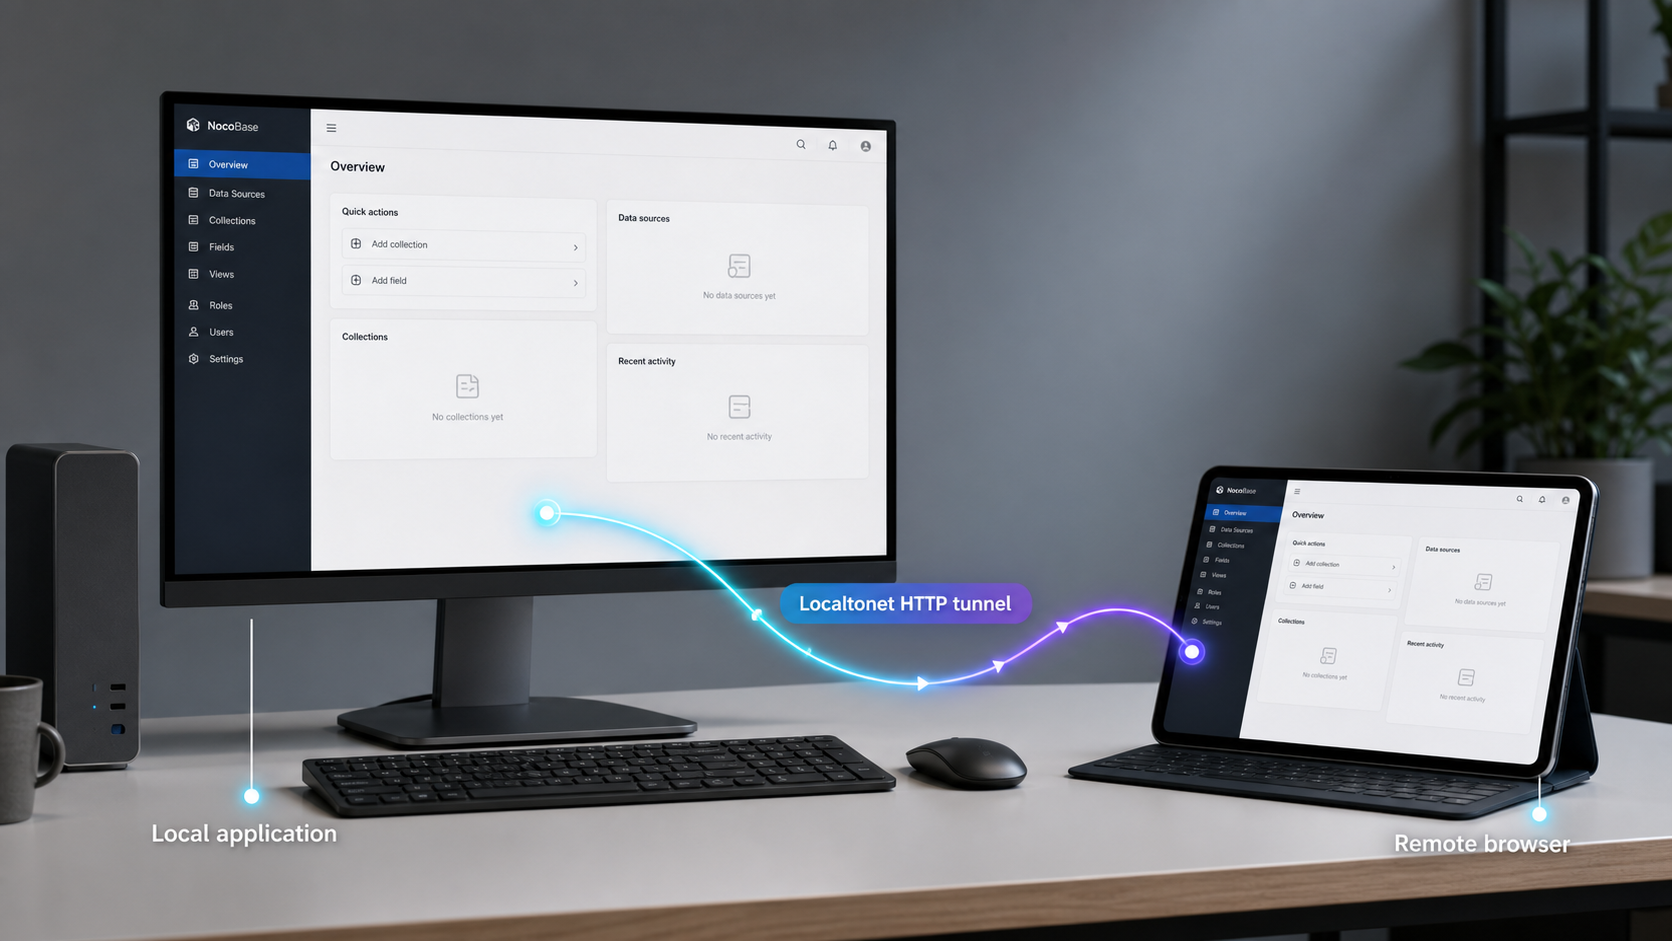
Keeping these layers separate makes failures easier to diagnose. First establish that the NocoBase process, database, and local browser interface work. Next restore and validate the CRM if you need it. Only then add Localtonet. If the public URL later fails, this sequence gives you known-good checkpoints at the application, network, and tunnel layers.
Prerequisites, installation paths, and release selection
The current NocoBase CLI installation documentation lists Node.js 22 or newer and Yarn 1.x as prerequisites. Docker must already be installed and running if you choose a Docker-based application source or use the full Docker image required for the recommended CRM restoration path. You also need an account with permission to install global npm packages and to create the application storage directory.
Run the prerequisite checks in the same shell and user context that will run the NocoBase CLI:
node --version
yarn --version
npm --version
docker --version
docker info
The Node.js result must be version 22 or newer, and Yarn must be from the 1.x line for this documented workflow. The Docker checks are required only when Docker will be involved. A Docker version response confirms that the client exists, while docker info also tests whether the current user can communicate with a running Docker service. Resolve permission or daemon errors before starting an installation that depends on containers.
Choose the installation path deliberately
This tutorial follows the current NocoBase CLI and its UI initializer. The wizard lets you choose the application source and version, storage location, runtime port, database, administrator account, access URL, and authentication method. NocoBase also provides terminal and non-interactive CLI initialization paths. Production deployment documentation and Docker-based approaches are available for environments that need more explicit service supervision and data-volume management.
The correct path depends on the intended result. A disposable local evaluation can use simpler local settings. A system holding real CRM data needs durable application storage, a backed-up database, controlled secrets, reliable process startup, logs, and a tested upgrade procedure. Do not treat a successful quick start as proof that the environment is production-ready.
Select a current patched release
The detailed installer documentation currently shows an alpha-tagged CLI package, while the NocoBase repository quick start shows the CLI package without an explicit tag. The CLI channel and the application version selected in the wizard are decisions that should be reviewed separately. Alpha builds are development builds and should not be treated as the default production choice merely because an installation page uses an alpha CLI command.
Before exposing the application, select a currently supported NocoBase release that contains the latest applicable security fixes. NocoBase v2.2.2 fixed an access-control bypass involving firstOrCreate and updateOrCreate, which could otherwise allow existing records to be read or modified without the required view or update permission. That makes release review materially important for a CRM reachable from the internet. At minimum, use a supported release containing that fix, and check the current release notes for later security updates before installation or upgrade.
The CRM documentation lists v2.1.0-beta.2 or newer as a compatibility floor. That minimum is not a current security recommendation. Install a currently supported, patched release that remains compatible with the CRM backup, then validate the restoration before enabling public access.
Installation commands and release channels can change. The current workflow is documented in the NocoBase application installation guide, while the repository quick start is available from the NocoBase project repository. Review the selected application release itself rather than assuming that a package tag implies production suitability.
Install and initialize the NocoBase platform
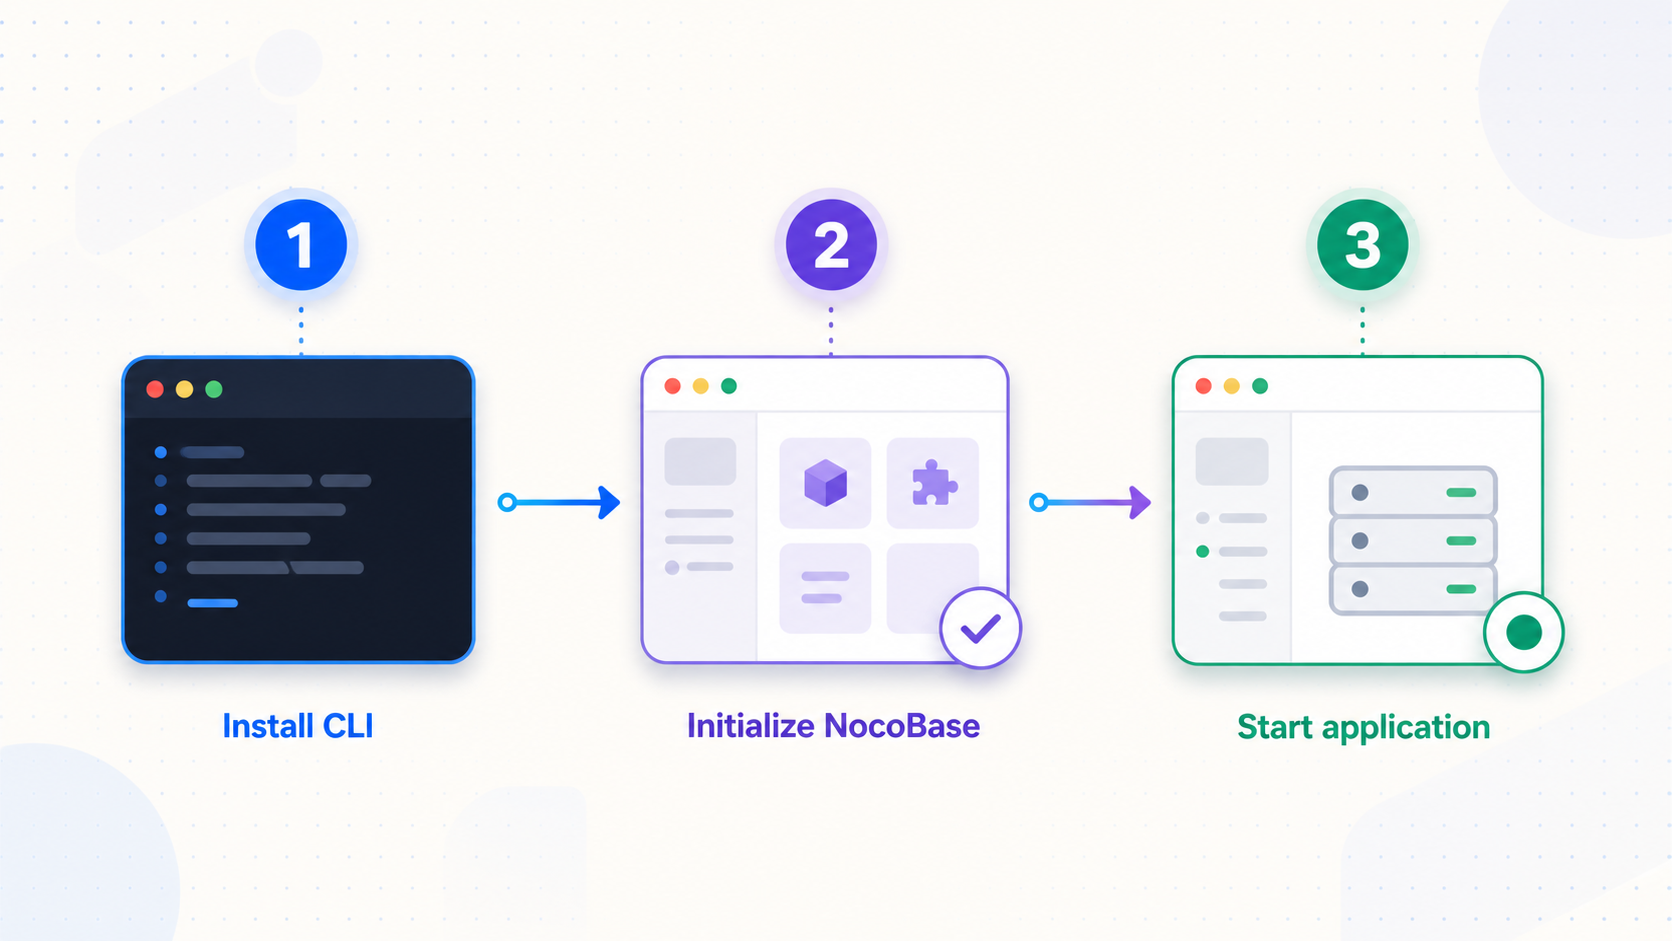
Install and verify the NocoBase CLI
Install the CLI globally using the command from the current detailed documentation, then print its version. If your deployment policy does not permit an alpha CLI, stop and confirm the current supported package channel before continuing. A version response confirms that the nb executable is available in this terminal.
Initialize the application with the UI wizard
Run the UI initializer. Set an environment identifier and choose Install a new app. Configure the application basics, storage location, runtime port, source and version, database, first administrator account, application access URL, and authentication method. Record the selected port and database arrangement because they are needed during local verification and tunnel configuration.
Confirm that the environment and application are ready
Verify that the environment was saved, the application started normally, and the administrator can sign in. Inspect the environment information and logs if any check fails. A default local installation can usually be opened at http://localhost:13000, but the wizard values take precedence.
npm install -g @nocobase/cli@alpha
nb --version
nb init --ui
The UI wizard is useful here because it exposes decisions that are easy to overlook in an automated installation. Use an application storage location that will not be deleted with a temporary working directory. Select the intended application version rather than accepting a channel without review. Confirm whether the database is local, containerized, or hosted elsewhere, and create the administrator account with a strong, unique password.
NocoBase also documents an interactive terminal initializer:
nb initFor scripts or controlled CI environments, the documented non-interactive form is:
nb init --yes --env app1Non-interactive installation should be used only when the remaining settings are supplied and managed through an established deployment process. It is not a reason to skip database durability, authentication, version selection, or local verification.
If multiple terminals or AI agents will manage environments concurrently, NocoBase recommends setting up session isolation once so that each session can retain its own current environment:
nb session setupDo not publish the application until the administrator can sign in locally and roles have been reviewed. Do not share the administrator account for routine work. A public HTTPS URL changes how the application is reached, but it does not replace NocoBase authentication, authorization, or least-privilege role design.
Verify NocoBase locally before restoring or tunneling
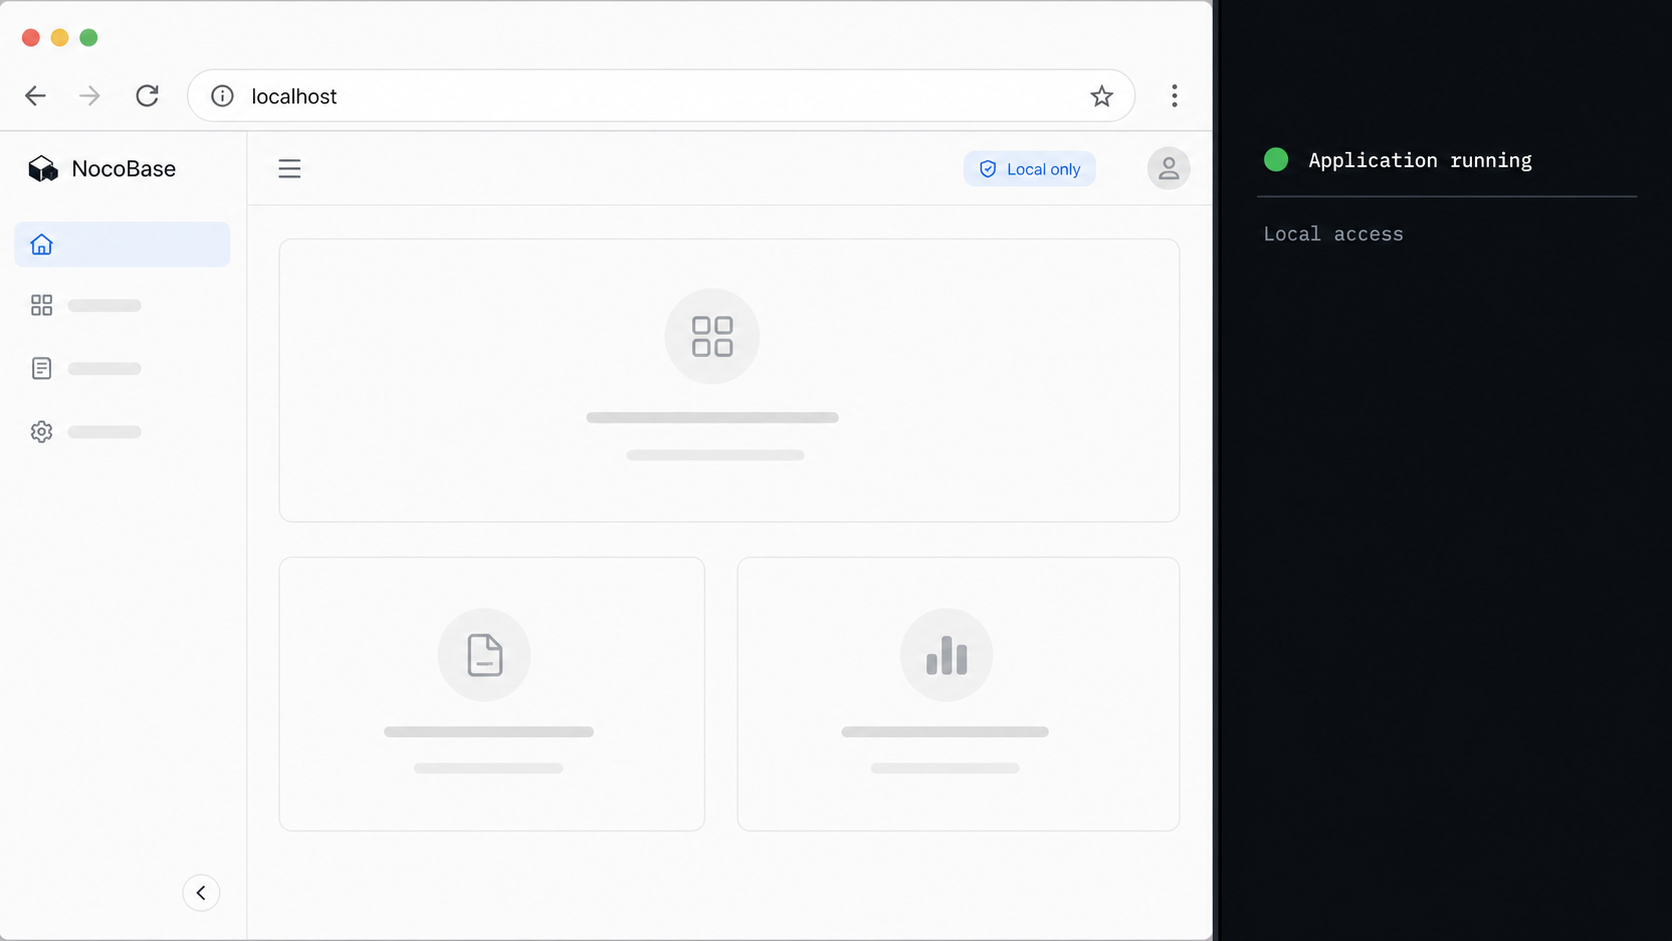
Start by opening the access URL configured in the wizard. For a default local installation, this will usually be http://localhost:13000. Confirm that the sign-in page appears, authenticate with the administrator account, sign out, and sign in again. Navigate through System Management and Plugin Manager to verify that authenticated application requests work, not only the first HTML page.
Inspect the saved environment and application logs:
nb env list
nb env info
nb app logs
nb env list confirms that the environment exists. nb env info provides the current environment's connection and runtime details. nb app logs is the first place to look for startup, configuration, plugin, or database errors. Keep sensitive connection details out of tickets, screenshots, and public posts.
Test from the Localtonet client device
A browser test on the NocoBase host is not sufficient if the Localtonet client will run on another machine. From the actual client device, open or request the NocoBase URL using an address that routes to the host. The correct target might be loopback, a LAN address, a virtual machine address, or a published container port.
Where curl is available, use it to confirm that the HTTP listener responds:
curl -I http://localhost:13000
Replace localhost and 13000 with the verified target. An HTTP response, including a redirect to a sign-in route, demonstrates that a service answered. A connection refusal usually means no process is listening at that address and port. A timeout more often points to routing, binding, firewall, virtual machine, or container-network boundaries.
Account for containers and network namespaces
Inside a container, localhost refers to that container. On the Docker host, it refers to the host. On another LAN device, it refers to that other device. If NocoBase runs in a container but the Localtonet client runs on the host, the NocoBase HTTP port must be published or otherwise made reachable from the host. If the client runs in a different container, both containers need an appropriate network path and a resolvable target.
Do not create a tunnel to an unpublished container-only listener. First prove that the Localtonet client environment can reach NocoBase directly. Record the exact IP address and runtime port that passed this test. Those values become the Local IP and port in the HTTP tunnel.
Restore the official NocoBase CRM solution
Skip this section if you plan to build your own application on the NocoBase platform. To install the documented CRM solution, obtain the required backup named nocobase_crm_v2_backup_260523.nbdata from the current NocoBase CRM installation page. Use the file linked by the official documentation rather than a copy from an unverified mirror.
The current restoration requirements are strict:
- A basic NocoBase environment must already be running.
- The NocoBase version must be v2.1.0-beta.2 or newer, although a current patched compatible release should be used for internet exposure.
- The database must be PostgreSQL 16 because the solution backup was built on PostgreSQL 16.
- The database version, character set, case-sensitivity behavior, and schema name must be compatible with the backup source.
DB_UNDERSCOREDmust not be set totrue.- The required backup file must be available to the administrator performing the restoration.
- The recommended application image is the full NocoBase image because it includes the database client tools used by Backup Manager.
Check the environment and any docker-compose.yml used by the deployment. The CRM documentation explicitly states that DB_UNDERSCORED must not be true because it conflicts with the solution backup. Do not change this setting casually on an established database. Prepare a separate compatible environment or follow an approved migration process instead of risking existing data.
Prepare PostgreSQL and the full image
Confirm the PostgreSQL server version from your database administration tooling or deployment configuration before restoration. A PostgreSQL 16 client alone does not make an older database server compatible. The target server itself must be PostgreSQL 16, and the NocoBase connection must point to the intended database and schema.
NocoBase strongly recommends the full application image because it includes supporting database programs. The documented pull command is:
docker pull nocobase/nocobase:beta-fullPulling the image does not start or replace the existing application. Update the image reference in the deployment definition that already supplies your database connection, persistent storage, port publication, and other NocoBase settings, then recreate or restart the service using that deployment's normal Docker or Compose procedure. Verify that the selected image contains a current patched NocoBase version before exposing it.
A universal replacement docker run or Compose file is intentionally not provided here. The evidence for this tutorial does not define one safe set of database names, credentials, volume paths, ports, or network names for every environment, and inventing those values could create an ephemeral or misconnected installation. The required outcome is a running full-image NocoBase service connected to PostgreSQL 16, with durable storage and DB_UNDERSCORED not set to true.
Back up before changing an existing application
Treat restoration as a replacement operation, not as an additive import into an application you can casually discard. Before uploading the CRM backup, create a recoverable backup of the current NocoBase application, database, uploaded files, and deployment configuration. Record the running application image or version and the database connection arrangement. Store the backup separately from the environment being replaced.
If the target already contains custom collections, interfaces, workflows, roles, plugins, or data, rehearse the restoration on a separate non-production environment first. Confirm that you know how to return to the previous application image and restore the previous database and files. A backup is not proven until its restoration procedure has been tested.
Run NocoBase with the full image
Use the full NocoBase image in the deployment and connect it to the compatible PostgreSQL 16 environment. Ensure persistent application storage and the HTTP port are configured through your existing deployment definition. Start the service, inspect its logs, and confirm that the administrator can sign in before attempting restoration.
Enable Backup Manager
Sign in to NocoBase, open Plugin Manager, find Backup Manager, and enable it. Backup Manager is open source and is documented as available to all editions, including Community Edition.
Restore the local CRM backup
Refresh the page after enabling the plugin. Open System Management, select Backup Manager, choose Restore from local backup, place nocobase_crm_v2_backup_260523.nbdata in the upload area, and select Submit. Wait for completion without restarting the application or submitting the job again.
NocoBase states that restoration can take from a few dozen seconds to several minutes. The operation restores configurations and system files, including print-template files and files uploaded through collection file fields. That completeness is useful, but it also explains why database and storage compatibility matter.
Understand the plugin and edition nuance
A backup can fail when it requires a plugin that is missing from the destination. Confirm required plugin availability and enablement before restoration. However, the CRM FAQ provides an important qualification for Pro installations: the demo uses some Enterprise features, including email management and audit logs, but unavailable Enterprise menu entries can simply disappear while core CRM modules such as leads, opportunities, and orders continue to work.
These statements are not contradictory. Optional edition-specific features documented by the CRM solution may disappear without breaking the core Pro installation. A genuinely required, incompatible, or unavailable plugin dependency can still interrupt another backup restoration. Validate the actual CRM result in the edition you intend to operate instead of assuming that every absent plugin is harmless or that every absent plugin is fatal.
Verify the restored CRM
After restoration, sign in again and verify that expected CRM navigation and modules are present. Test leads, opportunities, customers, contacts, products, quotations, and orders as applicable to your edition. Confirm that roles can see only their intended records and actions. Create disposable test data, update it, search for it, and remove it to check both read and write behavior.
Review workflows and plugin status, inspect the application logs, and check uploaded or restored files. If the demo logo is missing, the CRM documentation explains that its logo has a domain restriction. Upload your own logo through System Settings rather than treating that visual issue as a failed database restoration.
The current CRM documentation says that solution upgrades overwrite custom modifications. Back up the environment before every CRM replacement upgrade, test the replacement on a separate copy, document local changes, and verify a rollback path before applying it to operational data.
Choose the correct Localtonet access method
NocoBase is a browser-based HTTP application, so a Localtonet HTTP tunnel is the appropriate standard tunnel for its web interface. Our client establishes an outbound connection to a Localtonet relay server and forwards the assigned public address to the verified local IP address and port. This does not require inbound router port forwarding, firewall changes, VPN setup, or a public IP address.
| Localtonet option | Appropriate use | Target behavior |
|---|---|---|
| HTTP tunnel | NocoBase browser interface | Points to the IP address and HTTP port where NocoBase is reachable from our client. |
| TCP tunnel | A raw TCP service with a specific TCP client | Forwards a TCP port and is not the standard public HTTPS workflow for the NocoBase web interface. |
| File Server | Publishing a local folder | Targets a folder path rather than the running NocoBase HTTP application. |
| VPN Manager | Private mesh networking and LAN bridging | Provides actual VPN functionality and is separate from a standard HTTP tunnel. |
Do not expose the PostgreSQL port through a public tunnel for this workflow. Remote users need the NocoBase web interface, not direct database access. Keep the database limited to the application and its authorized administration path.
Access NocoBase with a Localtonet HTTP tunnel
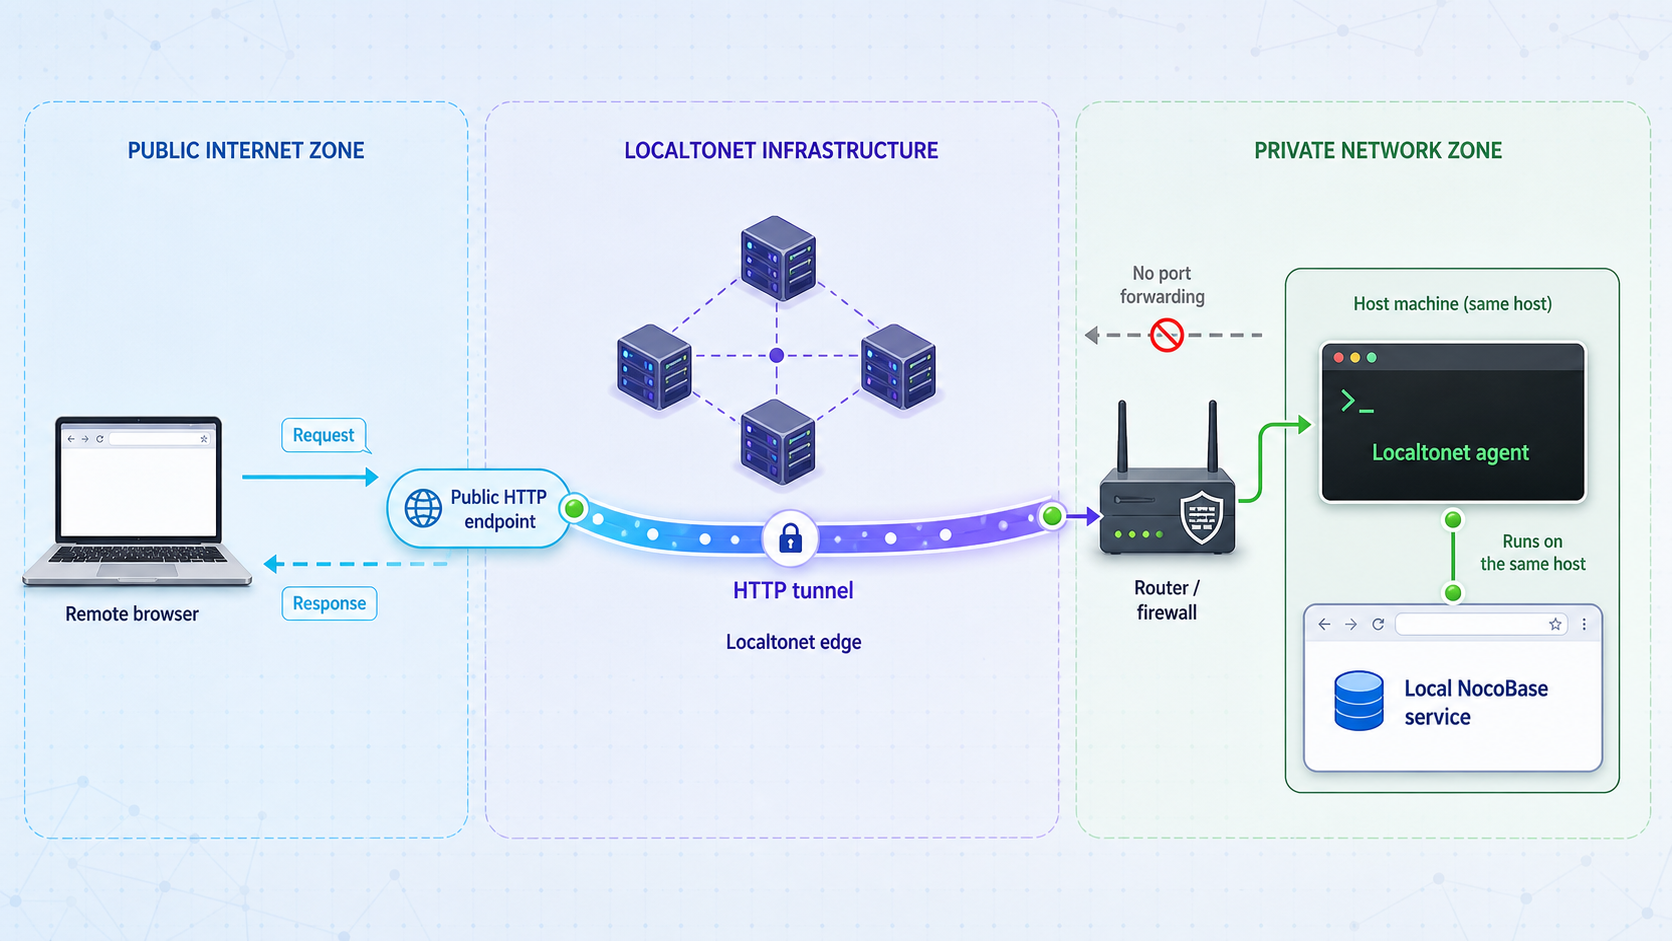
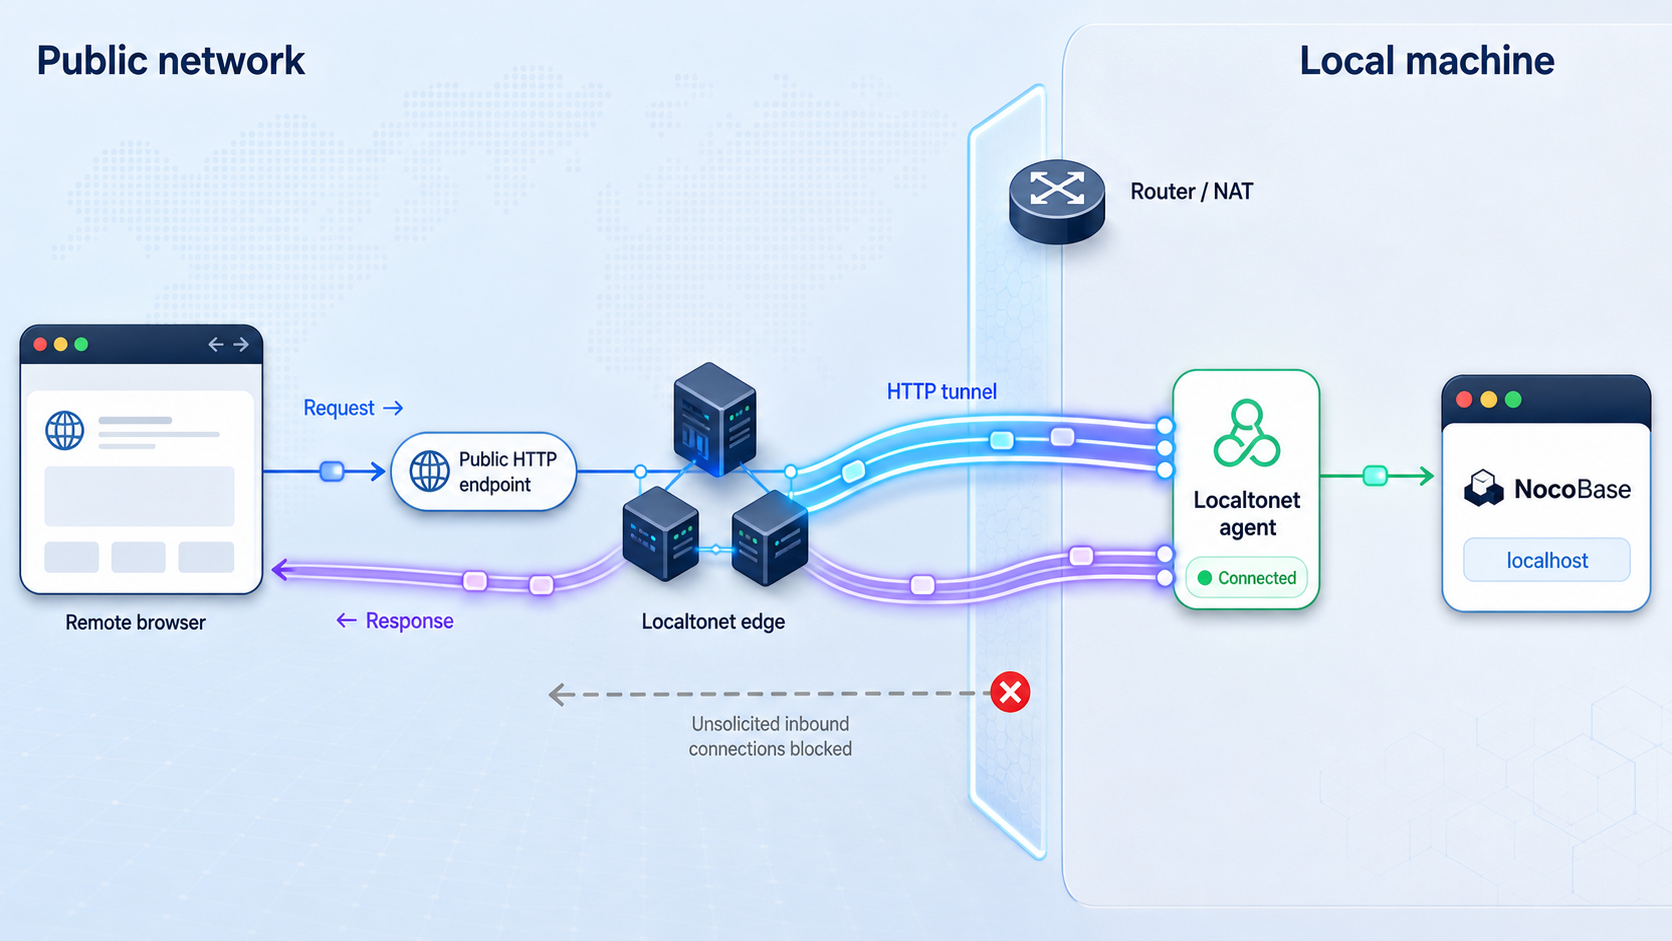
Install and run the Localtonet client
Install our client on the NocoBase host or another device that can reach the NocoBase HTTP listener. Keep the NocoBase service running and repeat the direct reachability test from this device before configuring the tunnel.
Choose the HTTP Process Type
Open the HTTP tunnel configuration and select Random Sub Domain, Custom Sub Domain, or Custom Domain as the Process Type. All three serve the same target content through a public HTTPS address. Availability can vary, and custom-domain DNS should be configured only with the current dashboard and documentation.
Select the client device token
Select the device-specific AuthToken belonging to the client that will run this tunnel. Treat the token as a secret. Do not place it in application code, screenshots, terminal recordings, public support messages, or source control.
Select an available relay server
Choose a server or region offered by the current Localtonet dashboard. Available server values can vary by deployment, region, or plan, so do not copy a hardcoded server code from an old tutorial.
Enter the verified local target
Enter the local IP address and runtime port that successfully reached NocoBase from the selected client device. Use 127.0.0.1 or localhost only when NocoBase and our client share the same reachable network namespace. Use the configured port rather than assuming port 13000.
Start the tunnel and verify the public URL
Creating the tunnel does not make it run. Select Start, wait for the tunnel and client to show as connected, and open the assigned public URL from an external browser session. Test the sign-in page and an authorized workflow without relying on an existing local session.
For the current dashboard sequence and custom-domain requirements, consult the Localtonet HTTP tunnel documentation. Exact DNS instructions should always come from the current product documentation rather than a copied record from an older deployment.
The endpoint is available only while the selected Localtonet client device is connected and the tunnel is running. Starting NocoBase alone does not start the tunnel, and creating a tunnel does not press Start for you. Stop the tunnel when remote access is temporarily unnecessary, or delete it when the endpoint should no longer be retained.
Verify from outside the local network
Use a private browser window or a browser on another network so that the test does not reuse an authenticated administrator session. Confirm that the public URL loads the expected NocoBase sign-in page. Sign in with a non-administrator test account and verify only the functions that role should have.
Also test negative cases. An unauthenticated visitor should not see protected CRM records. A limited user should not gain administrator menus or unauthorized record access. Sign out and confirm that the protected interface cannot be reopened from browser history without authentication.
Routine operation, backups, and upgrades
A useful deployment procedure covers more than first startup. Document who starts and stops NocoBase, how the database starts, where logs are retained, which local URL is expected, and whether the Localtonet tunnel should start automatically or only during approved access windows.
Start, inspect, restart, and stop the application
Use the control method associated with the installation path selected in the NocoBase wizard. For a container deployment, use the existing Docker or Compose service definition so that the same ports, volumes, network, image, and database settings are preserved. For a CLI-managed environment, select the intended environment before using its documented application management controls.
The supplied installation evidence confirms the following inspection commands:
nb env list
nb env info
nb app logs
Exact CLI start, stop, and restart syntax is not included in the supplied evidence, so this article does not invent it. Use the current NocoBase Manage apps documentation or the deployment supervisor already configured for the service. After every restart, inspect logs, open the local URL, sign in, and only then confirm or restart the Localtonet tunnel.
Back up all state that matters
A recoverable NocoBase backup must account for the database, application files, uploaded content, plugin state, and deployment configuration. Keep a protected copy outside the application host. Record the NocoBase version, image tag, PostgreSQL version, schema arrangement, enabled plugins, and relevant environment settings with each operational backup.
Back up before changing the NocoBase version, replacing the CRM solution, modifying database naming behavior, changing storage paths, or enabling plugins with migration requirements. Test restoration on a separate environment periodically. Retaining untested files is not equivalent to having a verified recovery plan.
Upgrade safely
Review NocoBase release notes before each upgrade, with special attention to security fixes, database changes, plugin compatibility, and version-specific migration instructions. Upgrade a non-production copy first. Verify sign-in, permissions, CRM records, workflows, file access, and application logs before scheduling the operational upgrade.
Keep the previous application version and pre-upgrade backup available until validation is complete. The CRM solution currently uses full replacement upgrades that overwrite custom changes, so document customizations and assume they must be reapplied or otherwise managed. Do not perform a replacement while the public tunnel continues to direct users to an application in transition.
Disable access safely
For a short maintenance period, stop the Localtonet tunnel first so new public requests no longer reach the application. Then stop or restart NocoBase using its normal service manager. When maintenance is complete, verify NocoBase locally, test it from the Localtonet client device, start the tunnel, and finally test the public URL externally.
If access must be revoked permanently, stop and delete the tunnel. Disable affected NocoBase accounts or sessions where appropriate, rotate any credentials that may have been exposed, and preserve logs and backups needed for investigation. Deleting a tunnel does not repair compromised application credentials or undo unauthorized application changes.
Troubleshoot installation, restoration, and tunnel failures
Troubleshoot one layer at a time. The preferred order is prerequisites, CLI environment, application process, database, local HTTP listener, reachability from the Localtonet client, tunnel state, and external browser behavior. Changing several layers simultaneously removes useful evidence.
| Symptom | Likely area | What to verify |
|---|---|---|
nb is not found |
CLI installation or shell path | Confirm npm completed successfully, reopen the shell if required, and run nb --version. |
| The application does not start | Runtime, environment, database, or plugin startup | Run nb env info and inspect nb app logs. Confirm Node.js, storage permissions, and database reachability. |
| Localhost refuses the connection | Stopped process, wrong port, or listener binding | Confirm the selected runtime port, application state, and URL shown by the environment information. |
| The CRM restore is interrupted | Database compatibility, missing tools, or plugin dependency | Confirm PostgreSQL 16, schema compatibility, the full image, required plugins, and that DB_UNDERSCORED is not true. |
| NocoBase works on the host but not from our client | Network namespace, unpublished port, binding, or routing | Test the exact target from the client device. Publish the container port or use an address reachable across the relevant network. |
| The public URL is unavailable | Client, tunnel lifecycle, or wrong target | Confirm that the selected client is connected, the tunnel was started, and the saved local IP and port match the tested target. |
| The public page loads but CRM actions fail | NocoBase, database, permissions, or restored plugins | Reproduce the operation locally, inspect application logs, and review the user's role and plugin status. |
CLI installation failures
Recheck node --version, yarn --version, and npm --version. Confirm that the global package installation did not end with a permission or network error. If nb --version works in one terminal but not another, compare user accounts and shell paths. Do not compensate for an unsupported Node.js version by repeatedly reinstalling the CLI.
Database and CRM restoration failures
Confirm that the database server is PostgreSQL 16, not merely that a PostgreSQL 16 client exists in the application image. Review character set, case-sensitivity behavior, database and schema selection, credentials, and network reachability from the NocoBase container or process. Verify that DB_UNDERSCORED is absent or not true.
Make sure the application is running from the full image and that Backup Manager is enabled. Confirm that the uploaded file name is nocobase_crm_v2_backup_260523.nbdata and that it came from the official CRM installation page. Inspect logs around the restoration time rather than repeatedly submitting the same backup.
If the message identifies an unavailable plugin, distinguish between optional edition features and a required dependency. The CRM FAQ says some Enterprise-only features disappear in Pro without affecting core modules, but an incompatible required plugin can still interrupt restoration. Resolve the specific dependency reported by the destination environment.
Container reachability failures
Verify where each process runs. A NocoBase listener available at localhost:13000 inside its container may not exist at that address on the host. Ensure the deployment publishes the selected runtime port when the Localtonet client runs on the host. If the client runs in another container, use the intended container network and reachable service address.
Test from the same environment as the Localtonet client. Do not assume that a successful browser test on your laptop proves reachability from a remote server, container, or virtual machine. Fix direct connectivity before editing tunnel settings.
Public URL failures
Confirm that the NocoBase application remains running, the Localtonet client is connected with the selected device token, and the tunnel is running. Check that the Process Type, relay selection, local IP, and local port were saved correctly. If the local target responds but the public URL does not, stop and start the tunnel after rechecking the configuration.
Test from an external private browser session. Existing cookies can hide sign-in problems, and local DNS or browser cache can produce misleading results. If the public page opens but an operation fails, reproduce it through the local URL. A failure on both URLs belongs to the application or database layer rather than the tunnel.
Rollback after a failed change
Stop the Localtonet tunnel to prevent new public traffic. Preserve the failed application logs and record the versions and settings involved. Restore the previous database and application files using the tested recovery procedure, return to the previously recorded NocoBase image or application version, and start the application without public access.
Verify the restored application locally and from the Localtonet client device. Check accounts, permissions, CRM records, workflows, files, and logs. Start the tunnel only after the rollback has passed those checks. If credentials or tokens may have been disclosed, rotate them before restoring remote access.
Security checklist before public exposure
A Localtonet HTTP tunnel provides a public HTTPS address and routes requests to the local NocoBase service. It does not replace NocoBase authentication, role enforcement, patching, database security, backups, monitoring, or production hardening.
Review records, attachments, workflows, APIs, and integrations before inviting users. Disable unused accounts and plugins. Avoid displaying stack traces or sensitive connection details to unauthenticated visitors. Retain enough application and service logging to diagnose failures while protecting personal and business data.
For an operational CRM, establish ownership for updates, backup verification, account reviews, incident response, and tunnel lifecycle management. Public reachability should be the final step in a controlled deployment, not the first test of whether the application works.
Frequently asked questions
Does the NocoBase CLI automatically install the official CRM?
No. The CLI initializes the NocoBase platform. The documented CRM solution is installed separately by restoring nocobase_crm_v2_backup_260523.nbdata through Backup Manager in a compatible PostgreSQL 16 environment.
What are the CLI installation prerequisites?
The current NocoBase installation guide lists Node.js 22 or newer and Yarn 1.x. Docker must also be installed, running, and accessible if the selected installation or CRM restoration path uses Docker.
Is v2.1.0-beta.2 the recommended version for public access?
No. It is the CRM documentation's minimum compatibility version. Use a current supported and patched release that remains compatible with the CRM. NocoBase v2.2.2 included a fix for an access-control bypass, so older compatibility alone is not a sufficient security standard.
Why does the CRM restoration require PostgreSQL 16?
The supplied CRM backup was built on PostgreSQL 16. NocoBase requires the destination database version, schema naming, character set, and case-sensitivity behavior to be compatible with the source environment.
Can DB_UNDERSCORED be true for the CRM restoration?
No. The current CRM installation documentation explicitly says that DB_UNDERSCORED must not be set to true because it conflicts with the solution backup and can cause restoration failure.
Will missing Enterprise CRM features break a Pro installation?
The NocoBase CRM FAQ says that unavailable Enterprise features such as email management and audit logs can simply disappear in Pro while core modules continue to work. A separate backup with an incompatible required plugin can still fail, so verify the dependencies and resulting modules in your edition.
Which local URL should I enter in Localtonet?
Enter the IP address and port that successfully reach NocoBase from the selected Localtonet client device. A default local installation often uses http://localhost:13000, but the wizard can select another port and containers may require a published host port or another reachable address.
Does creating a Localtonet tunnel make it available immediately?
No. After creating the tunnel, select Start. The public endpoint is available only while the chosen client device is connected and the tunnel is running.
Does the public HTTPS URL secure the whole CRM deployment?
No. It provides HTTPS reachability at the tunnel edge. NocoBase authentication, authorization, security updates, database protection, plugin review, backups, logging, and production hardening remain necessary.
Connect your verified NocoBase application with Localtonet
After NocoBase is patched, locally reachable, backed up, and protected by reviewed authentication and permissions, create an HTTP tunnel to provide authorized users with a public address without configuring inbound router port forwarding.
Get Started Free →

