

Run a pinned OpenOps stack locally, verify every layer, then publish only its web interface
This tutorial uses OpenOps tag 0.7.1, commit 6f85a06, as a reproducible deployment baseline. You will clone that exact revision, prepare its environment file, validate and start the supplied Docker Compose stack, inspect its services and persistent storage, test the documented local web endpoint, and operate the deployment safely. After OpenOps works locally, you will configure a Localtonet HTTP tunnel so authorized users can reach the browser interface without inbound router port forwarding, a public IP address, or a VPN.
📋 What's in this guide
OpenOps release baseline and deployment scope

OpenOps is an open-source, no-code FinOps automation platform. It provides customizable workflows for processes such as allocation, anomaly management, budgeting, reporting, governance, workload optimization, and controlled de-provisioning. It also includes OpenOps Tables, OpenOps Analytics, integrations, workflow logs, versioning, and human-in-the-loop controls.
The project offers a managed service and a free Docker Compose based self-hosting option. This guide covers the self-hosted option. Self-hosting gives you control over where the stack runs, but it also makes you responsible for the host, application identities, integration credentials, persistent data, backups, upgrades, and the network path to the interface.
The reproducible baseline in this tutorial is the official
OpenOps 0.7.1 release,
identified by commit 6f85a06. The release page reports that tag as the latest release in the supplied project evidence and dates it 24 September. This tutorial was reviewed against the supplied repository and release evidence on 20 August 2026. Pinning the tag prevents a later change to the repository's moving default branch from silently changing the Compose definition used during installation.
The complete source tree for the selected revision is available in the
OpenOps 0.7.1 repository tree.
Its deployment assets include
compose.yaml
and
.env.template.
Keep those files on the same revision. Do not combine the Compose file from one release with an environment template or upgrade instructions from another.
Localtonet provides reachability to a working HTTP service. It does not initialize OpenOps, repair failed containers, migrate application data, or replace OpenOps authentication. Complete the installation and local verification first.
Prerequisites for OpenOps 0.7.1
Use a Linux, macOS, or Windows host on which the Docker Engine and the Docker Compose plugin are supported. Docker Desktop provides both components on supported desktop systems. On a server, install Docker Engine and the Compose plugin using the installation method appropriate to that operating system.
OpenOps identifies Docker Compose as its supported self-hosting path, but the supplied 0.7.1 evidence does not publish a minimum CPU allocation, memory allocation, disk capacity, Docker version, Compose version, or complete architecture matrix. Capacity therefore needs to be chosen for the workflows, integrations, analytics data, and concurrency you expect. Confirm any production sizing requirements in the current OpenOps repository and project documentation before treating a host as production-ready.
Required tools
- Git, so the exact tag can be cloned and recorded.
- Docker Engine or Docker Desktop with permission to create containers, networks, and volumes.
- The Docker Compose v2 plugin, invoked as
docker compose. - An HTTP client such as
curl, plus a browser for first-run setup. - Sufficient local storage for container images, persistent application data, logs, and backups.
- A Localtonet client device that can reach the final OpenOps host address and published port.
Check the local tooling before downloading OpenOps:
git --version
docker version
docker compose version
Successful output should show a Git version, a reachable Docker client and server, and a Docker Compose v2 version. If docker version reports that it cannot connect to the daemon, start Docker and verify that your account is authorized to use it. Do not work around a permission problem by making application files or Docker's storage directories globally writable.
Network and namespace decisions
Decide whether the Localtonet client will run directly on the OpenOps host or on another device. When it runs on the same host, a loopback endpoint such as 127.0.0.1 can be a suitable target if the published port is bound there. When it runs on another device, the OpenOps service must be reachable through an appropriate LAN address and the host must permit that local connection.
Loopback is scoped to a network namespace. If the Localtonet client is placed in a separate container, 127.0.0.1 refers to that client container, not to the Docker host and not to an OpenOps container. Test from the actual client environment instead of assuming that an address working in the host browser will work everywhere.
Configuration and credential preparation
The selected repository includes .env.template. The working .env file created from it may contain secrets and deployment-specific values, so it must not be committed, pasted into tickets, included in screenshots, or sent in unredacted diagnostics. Keep a secure record of values needed for recovery.
The supplied official evidence does not enumerate a universal set of mandatory production overrides or publish default administrative credentials for 0.7.1. For that reason, this tutorial does not invent variable names or replacement values. The safe rule is to preserve the template's names and comments, replace values explicitly marked as required or placeholders by that revision, and generate unique secrets where the template instructs you to do so.
Review the generated configuration and complete the local owner or account setup before creating the public tunnel. If any credential is disclosed in a terminal recording, repository, screenshot, or support message, rotate it rather than merely deleting the visible copy.
Install OpenOps 0.7.1 with Docker Compose
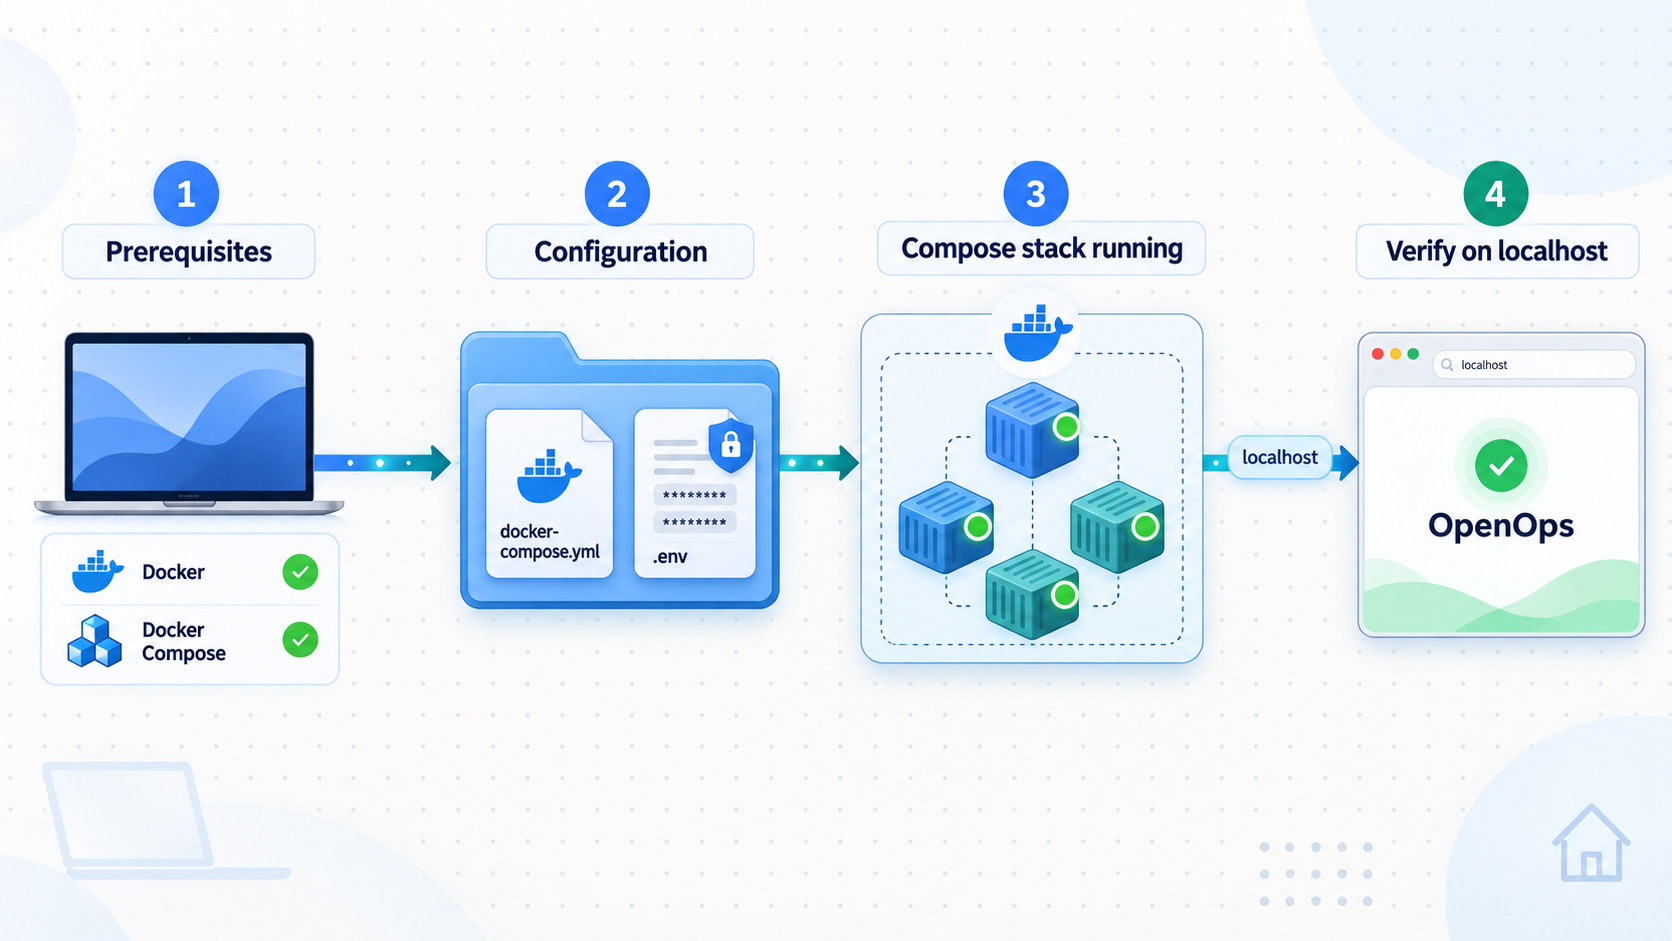
Run the following procedure from a terminal on the Docker host. The commands pin the source to tag 0.7.1, preserve the matching deployment files, and use the Compose v2 interface.
Clone the selected OpenOps release
Clone tag 0.7.1 directly so the working tree does not follow the moving default branch.
git clone --branch 0.7.1 --depth 1 https://github.com/openops-cloud/openops.git
cd openops
git rev-parse --short HEAD
git describe --tags --exact-match
The commit check should return 6f85a06, and the tag check should return 0.7.1. Stop if they identify a different revision.
Create the working environment file
Copy the environment template belonging to the pinned tag. Restrict access to the resulting file on systems that support Unix permissions.
cp .env.template .env
chmod 600 .env
Open .env in a local editor. Follow the comments in that exact template, replace entries explicitly marked as placeholders or required, and use unique values for secrets. Do not alter variable names, remove entries you do not recognize, or copy credentials from a public example.
Render and inspect the Compose configuration
Ask Docker Compose to resolve variable substitutions before it creates anything. Then print the services, images, persistent volumes, and published port mappings defined by the selected revision.
docker compose config --quiet
docker compose config --services
docker compose config --images
docker compose config --volumes
docker compose config | grep -A 8 -E 'ports:|volumes:'
The quiet validation command should exit without an interpolation or syntax error. The remaining commands provide the authoritative service and storage inventory for this checkout. The stack contains the browser-facing OpenOps application and the supporting services declared in compose.yaml. Supporting containers should remain on the Compose network unless that file explicitly publishes them.
Pull the images referenced by the release
Download the container images resolved from the 0.7.1 deployment files and environment configuration.
docker compose pullInvestigate authentication, disk-space, image-platform, or network errors before starting the stack. Do not switch arbitrary image tags merely to make a failed pull disappear.
Start the OpenOps stack
Start all services in detached mode using the validated Compose definition.
docker compose up -dCompose creates the declared network and volumes, starts dependencies, and launches the OpenOps services. Initial image extraction and application initialization can take longer than later starts.
Inspect status and startup logs
Confirm that services remain running and review their startup output before opening the application.
docker compose ps
docker compose logs --tail=200
No required container should be trapped in a restart loop or exit immediately. If the Compose definition includes health checks, allow initialization to complete and confirm that those services become healthy.
Open the documented local interface
Open http://localhost:3000 in a browser on the Docker host. For a command-line check, request the same endpoint without sending credentials.
curl -I http://127.0.0.1:3000A successful check returns an HTTP response rather than a connection refusal or timeout. Redirects can be normal for an application that sends the browser to an authentication or onboarding route. If your rendered Compose configuration publishes a different host port, use that rendered value instead of assuming port 3000.
Complete first-run setup locally
Follow the account creation, sign-in, or initialization screen presented by the installed release. OpenOps 0.7.1 evidence supplied for this tutorial does not document a universal default username or password, so no default credential is assumed. Complete setup locally, sign in, and confirm that the workflow interface loads before making the endpoint remotely reachable.
docker compose config resolves the selected revision together with your environment file. It is the safest way to confirm actual service names, images, host ports, mounts, and named volumes without relying on examples from another release.
Verify the application and its local endpoint
A browser page is only one layer of verification. Confirm the container state, HTTP response, application session, and reachability from the device that will run Localtonet. This creates a baseline that separates OpenOps problems from tunnel problems.
Check every Compose service
docker compose ps --all
docker compose logs --since=10m --tail=200
Look for services that are exited, restarting, or unhealthy. A supporting service might not publish a host port, which is normal for a multi-container deployment. The browser-facing service can communicate with internal dependencies over the Compose network without exposing those dependencies to the host or internet.
To inspect one failing service, obtain its exact name from docker compose config --services and run:
docker compose logs --tail=300 SERVICE_NAME
docker compose ps SERVICE_NAME
Replace SERVICE_NAME with a name printed by the selected Compose configuration. Service logs can contain URLs, account identifiers, or integration details, so redact sensitive information before sharing them.
Confirm the published port
docker compose ps
docker compose port openops 3000
The first command displays published ports for running services. The second form is useful only if openops is the browser-facing service name and 3000 is its declared container port in the rendered 0.7.1 configuration. If either differs, use the service and port shown by docker compose config rather than forcing this example.
Test the HTTP response
curl -sS -o /dev/null -D - http://127.0.0.1:3000
curl -sS -L -o /dev/null -w 'HTTP %{http_code}\nFinal URL: %{url_effective}\n' http://127.0.0.1:3000
The first request displays response headers. The second follows redirects and prints the final status and URL. An HTTP response proves that something is listening, but the browser must still show the expected OpenOps page. A response from an unrelated application means the host port is mapped incorrectly or already occupied.
Verify application behavior
Sign in through the configured OpenOps access flow. Confirm that the workflow editor or workflow list loads, then visit the OpenOps Tables and OpenOps Analytics areas available in the deployment. Page navigation should complete without persistent API errors. If you connect an external platform, begin with a non-production account and the least privilege needed for a read-only test.
Do not use a destructive cloud workflow as the installation test. A safe first verification checks authentication, navigation, stored configuration, and a low-risk workflow path without modifying important infrastructure.
Test from the Localtonet client device
If our client runs on another device, replace the loopback address with the Docker host's reachable LAN address:
curl -I http://OPENOPS_HOST_IP:3000
Replace OPENOPS_HOST_IP with the actual private address. The request must reach OpenOps from the Localtonet client device before you create the tunnel. A timeout at this stage points to local routing, firewall policy, host binding, or Docker port publication. Localtonet cannot correct an unreachable local target.
Finish the intended owner-account and authentication setup locally. An enrollment or administrator-creation screen exposed publicly may allow an unintended user to claim or alter the deployment.
Create a Localtonet HTTP tunnel for OpenOps
OpenOps presents a browser-based HTTP interface, so use a Localtonet HTTP tunnel. Our client establishes an outbound connection to a Localtonet relay server and forwards the assigned public HTTPS address to the local IP address and port you configure.
Follow the current Localtonet HTTP tunnel documentation if dashboard labels vary. Available relay servers, regions, process types, and plan-specific options must be taken from the current product rather than hardcoded into this tutorial.
Install and run the Localtonet client
Install our client on the OpenOps host or another device that passed the local reachability test. The client must remain connected whenever the tunnel is expected to be available.
Open the HTTP Tunnel page
In the Localtonet dashboard, go to the HTTP Tunnel configuration page. This tunnel family is intended for the OpenOps web interface.
Select the process type
Choose Random Sub Domain, Custom Sub Domain, or Custom Domain as available for your account and current product configuration. Each option serves the same OpenOps content at a public HTTPS address. Check current documentation before making custom-domain DNS changes.
Select the device token and relay server
Select the device-specific authentication token for the client that can reach OpenOps, then select an available relay server from the dashboard. Never publish, guess, or paste the token into documentation.
Enter the target and start the tunnel
Enter the exact local IP address and port that passed verification, then create the configuration and press Start. Creating a tunnel does not mean it is running. Open the assigned public HTTPS address and confirm that it presents the expected authenticated OpenOps interface.
For a client running directly on the Docker host, the verified target may be 127.0.0.1 and port 3000. For a client on another device, use the reachable private host address and verified published port. Do not use a container-only hostname or container-internal address unless the client deliberately shares the required Docker network.
Test the public URL from a separate browser session or device. Confirm that the OpenOps authentication flow works, that authenticated navigation succeeds, and that the public endpoint does not expose an unrelated host service.
Stop remote access when it is not needed
Tunnel cleanup is an operational action, not an initial configuration step. Stop the tunnel when temporary access ends, and delete obsolete tunnel configurations when they will not be reused. The public endpoint is available only while the selected client is connected and the tunnel is running.
This configuration publishes one selected HTTP service. It does not place remote users on the host network. Localtonet VPN Manager is our separate private mesh VPN feature.
Protect the OpenOps security boundary
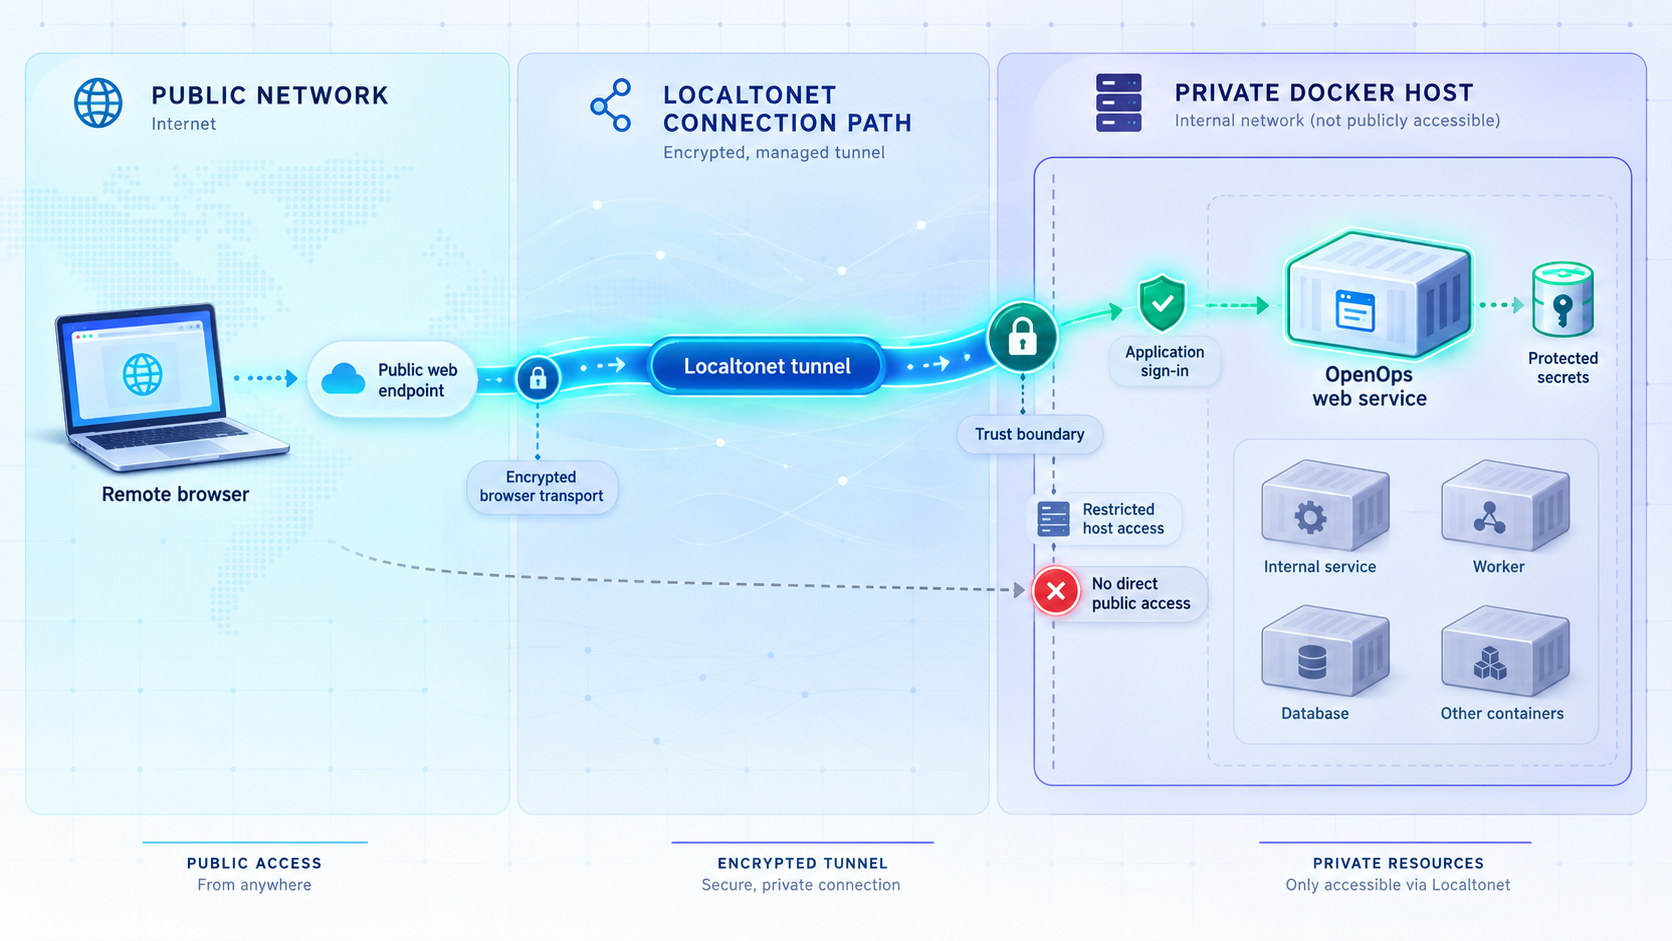
A FinOps platform may contain cloud cost data, account metadata, resource identifiers, workflow history, approval decisions, and integration status. Depending on the credentials assigned to it, a workflow may also modify cloud resources. Public reachability is therefore a meaningful security boundary change.
Keep application authentication enabled
The public URL must lead to an authenticated OpenOps experience. A Localtonet address is not an application identity system, and an unguessable URL is not a substitute for authentication. Review application accounts regularly and remove access that is no longer required.
Apply least privilege to integrations
Scope each cloud or tool integration to the accounts, projects, subscriptions, resources, and actions its workflow actually needs. Separate discovery and reporting credentials from remediation credentials where practical. A workflow that reports anomalies should not automatically receive broad permission to delete or resize resources.
Keep supporting services private
Only the browser-facing OpenOps port belongs in the HTTP tunnel. Do not create public tunnels for database, cache, analytics-support, or internal worker ports merely because they appear in the Compose network. Internal dependencies should remain reachable only where the deployment requires them.
Protect environment files and logs
Keep .env, cloud credentials, application secrets, session data, Localtonet device tokens, and backup archives out of repositories and shared messages. Logs should be treated as potentially sensitive. If a secret is exposed, rotate it at its source and update the deployment securely.
Test automation in a low-risk scope
Before enabling a workflow that changes infrastructure, test its inputs, conditions, approval points, retry behavior, and outputs against non-production or narrowly scoped resources. Review workflow logs and ensure that a partial failure cannot cause an unsafe repeated action.
Localtonet provides a public HTTPS address and forwards traffic to the configured local target. The OpenOps operator remains responsible for authentication, user management, workflow design, integration permissions, host maintenance, secrets, backups, and updates.
Stop, restart, back up, restore, and upgrade OpenOps
Run routine Compose commands from the directory containing the pinned compose.yaml and working .env. A different directory or project name can cause Docker Compose to address a different set of containers and volumes.
Status and logs
docker compose ps --all
docker compose logs --since=30m --tail=300
docker compose top
Use the service-specific log form when one component fails:
docker compose logs --follow --tail=200 SERVICE_NAME
Press Ctrl+C to stop following logs. This does not stop the containers.
Stop and start without removing containers
docker compose stop
docker compose start
These commands stop and restart the existing containers. Persistent named volumes remain attached.
Restart services
docker compose restart
Restarting is useful after a transient service failure, but it does not apply a changed Compose definition by recreating containers. If configuration or images changed, use docker compose up -d after validating the configuration.
Remove containers while retaining persistent volumes
docker compose down
A normal down removes the Compose containers and network but does not request deletion of named volumes. Start the stack again with:
docker compose up -d--volumes casually
docker compose down --volumes requests deletion of the project's named volumes. That can permanently remove databases and other persistent application state. It is not a normal stop or upgrade command.
Identify the backup boundary
The backup boundary is defined by the selected Compose file, not by the containers themselves. Record the configuration, named volumes, and bind mounts before designing a backup:
docker compose config > openops-compose.rendered.yaml
docker compose config --volumes
docker compose config | grep -A 12 'volumes:'
docker compose ps
Protect the following material:
- The pinned release tag or commit and the matching deployment files.
- The working environment configuration, stored through an appropriately protected secret or configuration backup process.
- Every persistent named volume declared by the rendered Compose configuration.
- Every host path used as a persistent bind mount.
- Any external data store configured outside this Compose project.
Container images and recreated containers are not substitutes for persistent-data backups. The supplied OpenOps 0.7.1 evidence does not document an application-aware online backup or database restore command. For a consistent filesystem-level backup, stop application writes before copying volume data, or use the documented native backup mechanism of the specific data service after confirming its service name and version from the rendered configuration.
A valid restore test uses the same pinned deployment files and compatible images, restores all persistent components as one consistent set, supplies the protected environment configuration, starts the stack, and repeats the local verification procedure. Test restoration in an isolated environment before relying on the backup.
Upgrade to a later release
Do not upgrade a production deployment by changing to the default branch. Select a specific target release, read its release notes, compare its environment template and Compose definition, and create a verified backup first.
git fetch --tags
git status
git diff 0.7.1..TARGET_TAG -- compose.yaml .env.template
docker compose config --volumes
Replace TARGET_TAG with an actual OpenOps release you have reviewed. Preserve your existing .env, then reconcile it manually with newly documented variables rather than overwriting it with the new template.
docker compose stop
git checkout TARGET_TAG
docker compose config --quiet
docker compose pull
docker compose up -d
docker compose ps
docker compose logs --tail=200
Follow any migration sequence in the target release documentation before using these general lifecycle commands. The supplied 0.7.1 evidence does not establish that every future release can be upgraded only by pulling images and recreating containers.
After an upgrade, verify local HTTP access, authentication, workflows, tables, analytics, integrations, and a low-risk workflow run before relying on the public URL. OpenOps and the Localtonet tunnel have separate lifecycles, so test each layer independently.
Troubleshooting the deployment and tunnel
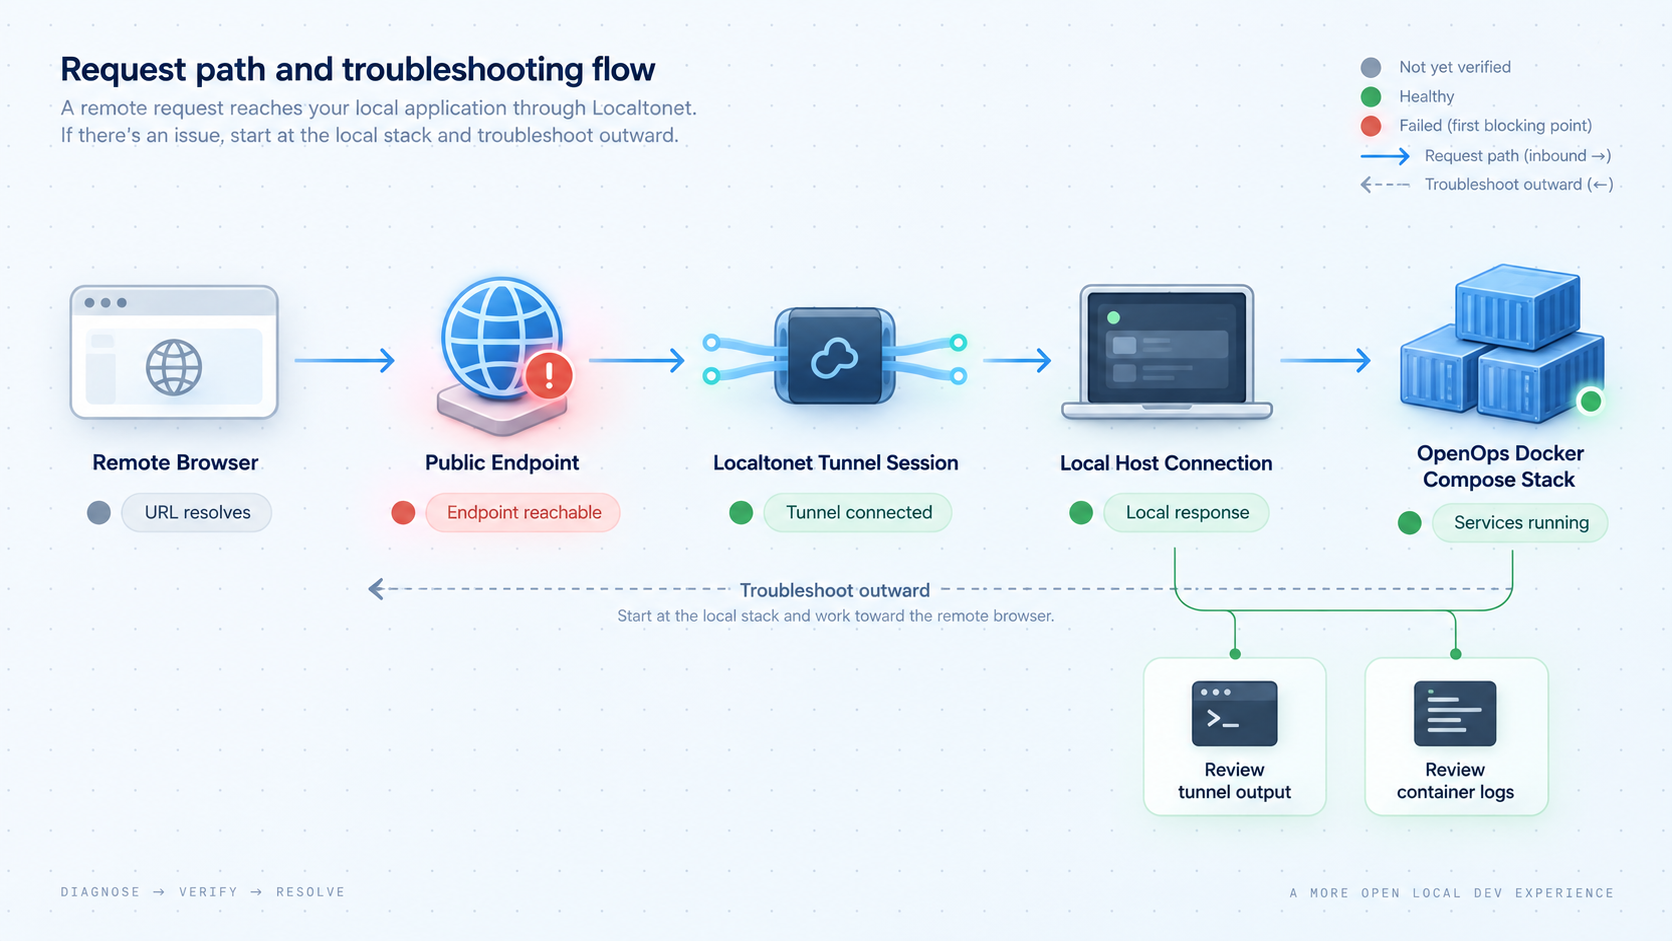
Compose reports a missing variable or invalid configuration
docker compose config --quiet
git diff -- .env.template compose.yaml
git status --short
Confirm that .env was created from the 0.7.1 template and that required placeholders were handled according to its comments. Do not copy a variable list from another release. If deployment files were edited accidentally, compare them with the pinned tag before continuing.
An image cannot be pulled
docker compose config --images
docker compose pull
Check the exact image references resolved from the environment and Compose file. Then check Docker registry connectivity, available disk space, and platform compatibility. Do not replace a failing image with an arbitrary latest tag.
A container exits or repeatedly restarts
docker compose ps --all
docker compose logs --tail=300 SERVICE_NAME
docker inspect "$(docker compose ps -q SERVICE_NAME)"
Look for missing configuration, dependency failures, storage permissions, failed initialization, health-check errors, or unavailable ports. Use the service name printed by docker compose config --services.
Port 3000 is already in use
Check which process owns the host port, then decide whether to stop that conflicting service or use a port override explicitly supported by the OpenOps environment and Compose files. Do not edit an internal container port blindly.
docker compose config | grep -A 8 'ports:'
docker compose ps
After any supported change, rerun docker compose config --quiet, recreate the affected service with docker compose up -d, and verify the new host endpoint.
The host browser cannot open OpenOps
docker compose ps --all
curl -v http://127.0.0.1:3000
docker compose logs --since=10m --tail=300
A connection refusal usually means nothing is listening on the selected host port. A timeout points to a different network or firewall problem. An HTTP error proves that the request reached a service, so inspect OpenOps logs and the browser response instead of changing Localtonet.
The host works, but the Localtonet client device cannot connect
Retest from the client device with the Docker host's private address. Check the application's host binding, Docker's published port, LAN routing, and host firewall. If the client runs in a container, remember that its loopback address belongs to that container.
The tunnel exists, but the public URL is unavailable
Confirm that the intended Localtonet client is connected and that the tunnel was explicitly started. Then verify that the token belongs to the device that passed the local target test. Creating the configuration alone does not start it.
The public URL shows the wrong page
Compare the tunnel target with the verified local IP address and port. Request that target directly from the Localtonet client device. If another local application responds, correct the target instead of changing OpenOps authentication.
The login page works, but later requests fail
Review browser developer tools and OpenOps logs for failed API, session, callback, or origin requests. The supplied 0.7.1 evidence does not document a universal external URL, trusted-origin, reverse-proxy-header, or callback setting. Change only settings supported by the selected OpenOps documentation rather than adding speculative environment variables.
An upgrade caused the failure
Compare the old and new release notes, templates, images, Compose files, and required migrations. Do not delete volumes while diagnosing an application or migration error. If the documented recovery path requires rollback, restore a complete, tested backup that is compatible with the pinned earlier release.
Frequently asked questions
Which OpenOps revision does this tutorial install?
This tutorial pins OpenOps tag 0.7.1, commit 6f85a06. The clone procedure verifies both identifiers before the deployment starts.
What is the local OpenOps address?
The documented local browser endpoint used in this tutorial is http://localhost:3000. Confirm the effective mapping with docker compose config and docker compose ps, especially if you changed supported environment values or port mappings.
Does OpenOps provide default administrator credentials?
The supplied official evidence for OpenOps 0.7.1 does not document a universal default username and password. Complete the account creation or sign-in flow presented by the local installation, and do not rely on credentials found in an unrelated example.
Which Localtonet tunnel type should I use?
Use an HTTP tunnel for the browser-based OpenOps interface. Configure it with the exact local IP address and host port that succeeded from the Localtonet client device.
Do I need router port forwarding or a public IP address?
No. Our client establishes an outbound connection to a Localtonet relay server. This workflow does not require inbound router port forwarding, an inbound firewall change, a public IP address, or VPN setup.
Can the Localtonet client run on another device?
Yes. That device must be able to reach the OpenOps host address and published port. A service bound only to the Docker host's loopback interface will not be reachable from a different device.
Does docker compose down delete OpenOps data?
A normal docker compose down does not request deletion of named volumes. Adding --volumes can remove persistent project volumes and should not be used as routine cleanup. Always inspect the selected Compose storage definition and maintain tested backups.
What must be backed up?
Back up the protected environment configuration, every persistent named volume, every persistent bind mount, and any external data store used by the deployment. Also record the exact OpenOps tag or commit and retain its matching deployment files.
Is the public Localtonet address a replacement for OpenOps authentication?
No. The tunnel provides network reachability to one configured endpoint. OpenOps must still enforce authentication, user access, secure sessions, least-privilege integration permissions, and safe workflow controls.
Can I use a custom domain for OpenOps?
Localtonet HTTP tunnels support Random Sub Domain, Custom Sub Domain, and Custom Domain process types. Availability can vary by current configuration or plan. Check the current dashboard and documentation before making DNS changes.
Publish your verified OpenOps interface with Localtonet
Pin and start OpenOps 0.7.1, complete its local first-run setup, and verify the endpoint from the device running our client. Then create an HTTP tunnel for that exact address and port, start it, and share the public URL only with intended users.
Get Started Free →

