

Install and validate App Platform on a conformant Kubernetes cluster outside the automatic LKE workflow
Akamai App Platform combines a developer portal, GitOps delivery, identity, ingress, observability, CI/CD, policy, and other cloud-native capabilities on Kubernetes. This guide focuses specifically on the documented provider: custom installation path for a conformant Kubernetes cluster, not the one-click LKE deployment. You will prepare storage, load balancing, networking, DNS, and Helm values, then verify the release through the platform endpoint and first login. We also cover application inventory, release-sensitive operations, and the conditions that must be satisfied before a private App Platform endpoint can be reached through Localtonet.
📋 What's in this guide
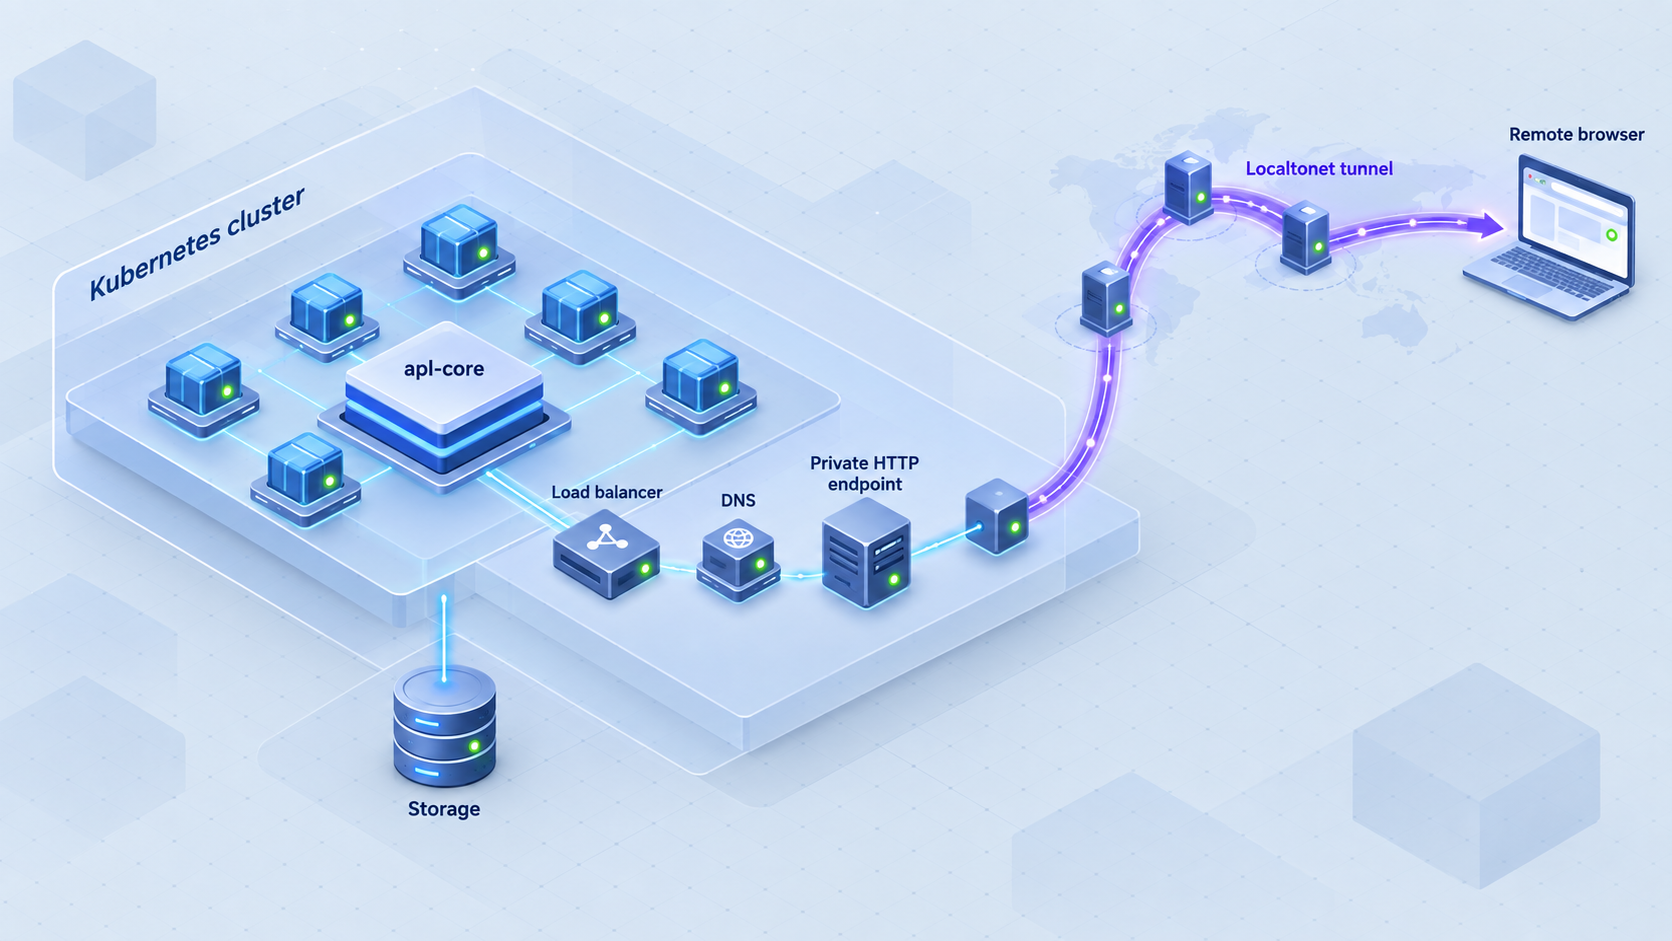
What Akamai App Platform provides
Akamai App Platform is a pre-built Kubernetes developer platform intended to help teams deploy, manage, observe, expose, and secure containerized workloads. The open-source implementation is maintained in the linode/apl-core repository under the Apache 2.0 license. It is optimized for Linode Kubernetes Engine, but Akamai also documents a custom installation path for other conformant Kubernetes services.
App Platform is not one independent web application or a single pod. It coordinates multiple Kubernetes controllers, operators, databases, ingress resources, identity services, and developer tools. Configuration-as-code and GitOps workflows manage desired state, while the browser-based portal gives developers a central interface for workloads, application templates, images, secrets, repositories, networking, logs, metrics, and related platform capabilities.
Platform administrators receive a multi-tenant foundation for onboarding teams, managing users, applying policies, and operating shared capabilities. Developers can build OCI-compliant images from source, deploy workloads through GitOps, expose applications, manage secrets, access telemetry, and work with private repositories and CI/CD pipelines when the corresponding applications are enabled.
Use the Apps documentation as the current inventory
The repository README and the current App Platform Apps documentation do not categorize every component in the same way. The README describes a broader group of core integrations, while the Apps page distinguishes applications that are always installed from applications that can be activated optionally. For deployment planning, use the release-matched Apps documentation and chart values rather than treating the README categories as an immutable installation manifest.
| Current category | Applications listed by the Apps documentation | Operational meaning |
|---|---|---|
| Always installed | Argo CD, External Secrets Operator, Istio, Keycloak, OpenTelemetry, Prometheus, Sealed Secrets Operator | These applications form part of the installed platform according to the current Apps page. |
| Optional | Alertmanager, CloudNativePG, Gitea, Grafana, Harbor, Knative, Kserve, Kubeflow Pipelines, Kyverno, Loki, RabbitMQ, Tekton, Trivy, Valkey | Availability and activation still depend on the installed App Platform release and its configuration. |
| README integrations | Includes several components that the Apps page currently classifies as optional | The README explains the project ecosystem, but it should not override the release-specific application lifecycle documentation. |
Release status also matters. The v6.3.0 release notes mark Kubeflow Pipelines as deprecated and introduce an add-ons capability for platform administrators to deploy custom Argo CD applications. Review the v6.3.0 release notes or the notes for the version you actually install before depending on an optional component.
The instructions below target another conformant Kubernetes cluster and follow the custom Helm installation path. Automatic and manual LKE installations have separate infrastructure assumptions. Do not combine their sizing statements or provisioning steps with the custom-provider minimums.
Choose the correct installation path
App Platform has three documented installation paths. Select the path before sizing the cluster or writing values because the requirements are not identical.
| Installation path | Use it for | Important distinction |
|---|---|---|
| Automatic installation on LKE | A new LKE cluster created through Akamai Cloud Manager | App Platform is enabled during cluster creation, and the required HA control plane is enabled as part of that workflow. |
| Manual installation on LKE | An existing LKE cluster | Follow the dedicated LKE manual process rather than assuming custom-provider values apply unchanged. |
| Custom installation | Another conformant managed service or a prepared on-premises cluster | Set provider: custom and supply storage, a working LoadBalancer implementation, DNS, and compatible networking. |
Resolve the conflicting LKE sizing statements conservatively
Two current Akamai pages describe LKE resources differently. The Cloud Manager getting-started page says App Platform requires at least three workers with a combined minimum of 16 GB memory and 12 CPUs. The Akamai App Platform product page says at least three workers, each with at least 16 GB memory and 4 vCPUs. Those statements should not be merged into an unofficial fourth requirement.
For a new LKE deployment, the conservative interpretation is three workers with at least 16 GB memory and 4 vCPUs each, while also confirming what the current Cloud Manager interface enforces. If capacity or cost planning depends on the smaller total-memory statement, resolve the discrepancy with the current LKE documentation or Akamai support before provisioning.
Neither LKE statement changes the separate custom-provider prerequisite. The custom installation page currently specifies Kubernetes 1.33 or newer and a node pool with at least 6 vCPU and 12 GB RAM. These are minimums, not production sizing recommendations. Optional applications, builds, user workloads, telemetry retention, databases, and availability goals can require substantially more allocatable capacity.
Prerequisites for the custom installation
A successful helm install submission does not prove that App Platform will become usable. Controllers may remain blocked by missing storage, insufficient scheduling capacity, an unavailable external IP, unsupported networking, DNS failures, or duplicate cluster services. Validate the underlying cluster first.
| Requirement | Documented expectation | What to verify |
|---|---|---|
| Kubernetes | Version 1.33 or newer | The control plane and workers run a supported version and all intended nodes are healthy. |
| Compute | A node pool with at least 6 vCPU and 12 GB RAM | Enough allocatable capacity remains after system workloads and existing applications are counted. |
| Persistent storage | A default StorageClass, or app-specific storage selected through _rawValues |
Dynamic provisioning works and the selected class has suitable topology and lifecycle behavior. |
| External address | The installation creates a Service of type LoadBalancer |
An implementation assigns an address that is reachable from inside the cluster. |
| Ingress | App Platform installs an NGINX Ingress Controller | Any annotations required by the infrastructure provider are known before installation. |
| CNI | A CNI that enforces Kubernetes NetworkPolicy is needed for network-policy features | The cluster's existing CNI supports the Kubernetes version and actually enforces policies. |
| Metrics Server | Installed by App Platform unless disabled | The platform copy is disabled if the managed service already supplies Metrics Server. |
| DNS | Access to a DNS zone | You control the intended zone and can provide supported, narrowly scoped provider credentials. |
| Autoscaling | Cluster Autoscaler is not installed by App Platform | Install a provider-supported autoscaler separately if automatic worker scaling is required. |
| Administrative access | Working Kubernetes and Helm access | The active context targets the intended cluster and your identity can create the required resources. |
Begin with read-only checks:
kubectl config current-context
kubectl cluster-info
kubectl get nodes -o wide
kubectl get storageclass
helm version
kubectl version
Confirm that every intended worker reports Ready. Compare the server version, not only the local kubectl client version, with the platform requirement. In the StorageClass output, identify whether one suitable class is marked as the default.
DNS API tokens and other provider credentials are secrets. Do not commit a populated values.yaml file, paste it into tickets, retain it in shell history unnecessarily, or expose it in recordings. Use narrowly scoped credentials where supported and rotate any credential that may have been disclosed.
Prepare storage, load balancing, networking, and DNS
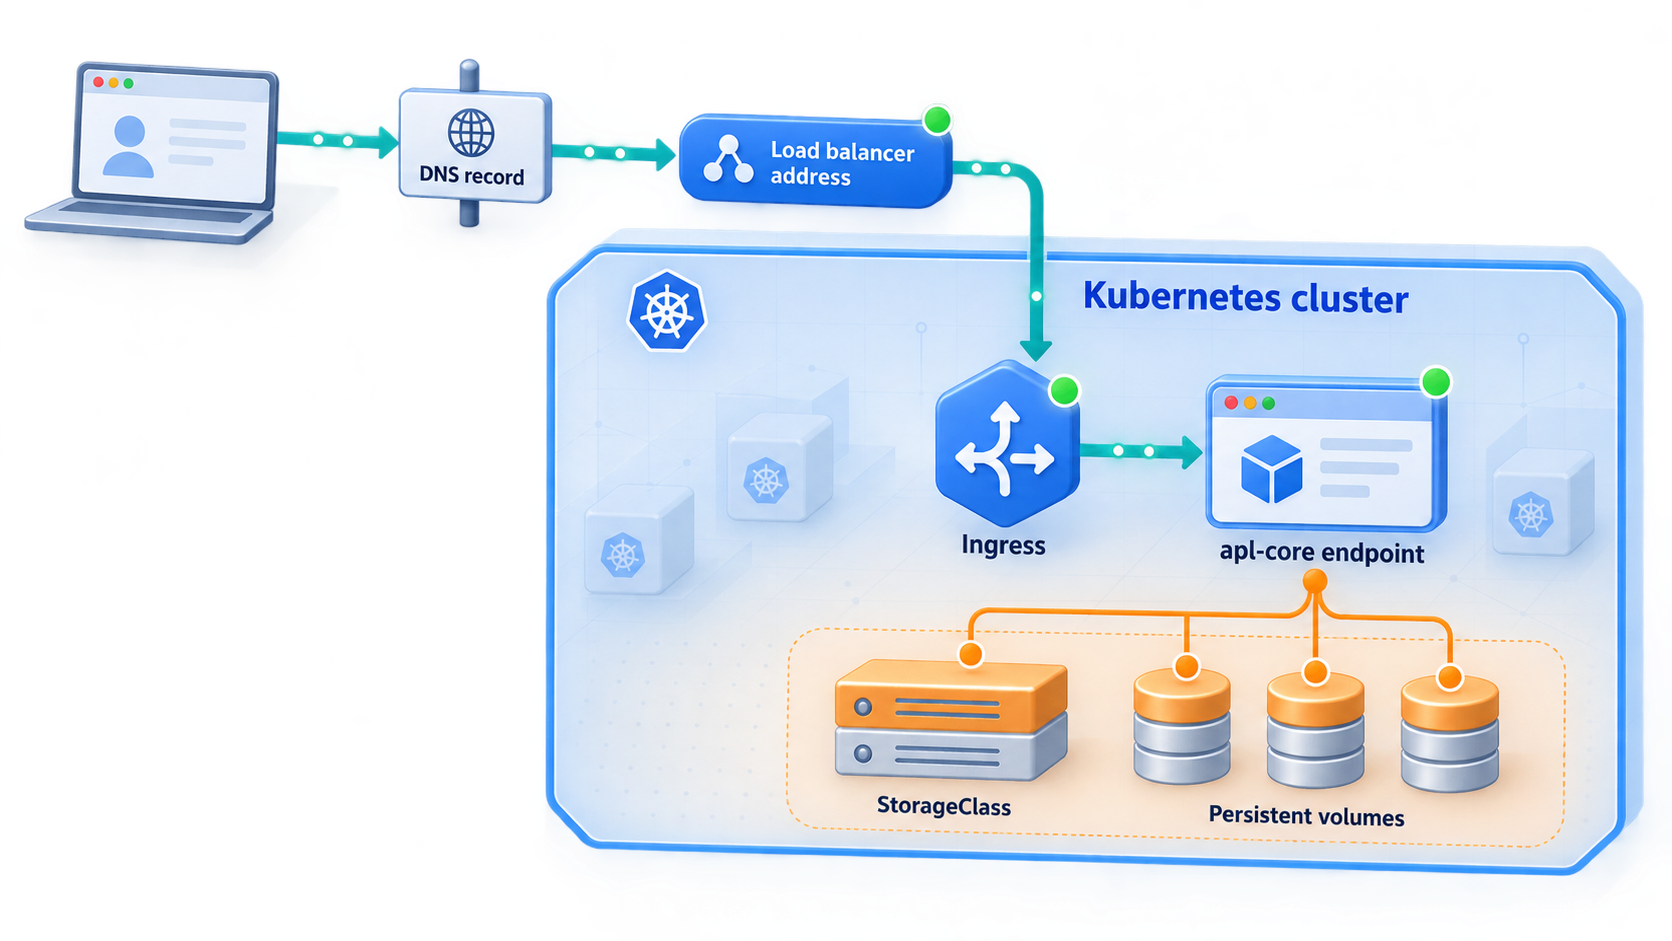
Configure the default StorageClass
The custom installation uses the cluster's default StorageClass unless an application receives another class through its raw values. If a suitable class exists but is not currently the default, the documented command is:
kubectl patch storageclass <your-storage-class> -p '{"metadata": {"annotations":{"storageclass.kubernetes.io/is-default-class":"true"}}}'
Replace the placeholder with the exact name returned by kubectl get storageclass. Before changing the default, review the class's performance, expansion, reclaim, failure-domain, and topology behavior. The change can affect every workload that creates a PersistentVolumeClaim without explicitly naming a class.
App Platform also supports selecting a StorageClass per application through _rawValues. The documented Harbor example is:
app:
  harbor:
    _rawValues:
      persistence:
        persistentVolumeClaim:
          registry:
            storageClass: <your-storage-class>
            size: 5Gi
This structure applies to the shown Harbor configuration. Do not assume that another integrated application uses the same value hierarchy. Check the schema for the App Platform release and application being customized.
Provide an address for the LoadBalancer Service
App Platform creates a Kubernetes Service of type LoadBalancer. Managed Kubernetes providers commonly supply an implementation for this service type. Bare-metal and on-premises clusters often do not, which leaves the external address in Pending.
The custom installation documentation suggests MetalLB for on-premises environments:
kubectl create namespace mlb
helm repo add metallb https://metallb.github.io/metallb
helm repo update
helm install metallb metallb/metallb -n mlb
sleep 60

cat <<EOF | kubectl apply -f -
apiVersion: metallb.io/v1beta1
kind: IPAddressPool
metadata:
  name: default-pool
  namespace: mlb
spec:
  addresses:
  - <start-ip>-<end-ip>
---
apiVersion: metallb.io/v1beta1
kind: L2Advertisement
metadata:
  name: default-pool
  namespace: mlb
EOF
Use an address range reserved for load-balancer allocation. Do not select arbitrary DHCP addresses or addresses already assigned to other systems. L2 adjacency, routing, address ownership, and firewall behavior depend on the network design.
If the provider requires annotations on the NGINX ingress LoadBalancer Service, the documentation shows this provider-specific example:
ingress:
  platformClass:
    entrypoint: ''
    annotations:
      - key: service.beta.kubernetes.io/do-loadbalancer-enable-proxy-protocol
        value: true
This is not a universal setting. Apply only annotations documented by the infrastructure provider. An incorrect proxy-protocol setting can prevent ordinary HTTP traffic from being parsed correctly.
Use a Kubernetes 1.33-compatible CNI
NetworkPolicy resources are effective only when the active CNI enforces them. First identify the CNI installed by the cluster provider. Do not install a second CNI or replace the current implementation simply because the App Platform custom-installation page mentions Calico.
The current custom-installation page still shows Calico 3.26.3 commands. That Calico release predates the stated Kubernetes 1.33 minimum, and the supplied current documentation does not establish that 3.26.3 is compatible with Kubernetes 1.33 or newer. For that reason, this guide does not present those pinned commands as safe, runnable instructions.
CNI failures can disrupt networking across the entire cluster. Use the CNI already supported by your provider when it enforces NetworkPolicy. If you need Calico, select a release whose official compatibility matrix explicitly supports your Kubernetes version, and follow that release's installation instructions. Reconcile this dependency before installing App Platform rather than attempting a CNI replacement afterward.
Handle Metrics Server correctly
App Platform installs Metrics Server by default. If the cluster provider already operates it, disable the platform-managed copy:
apps:
  metrics-server:
    enabled: false
For clusters whose kubelet endpoints use certificates that Metrics Server does not trust, the documented setting is:
apps:
  metrics-server:
    extraArgs:
      - --kubelet-insecure-tls=true
This relaxes certificate validation between Metrics Server and kubelets. Use it only when required by the cluster's certificate configuration. A properly trusted certificate chain is preferable.
Prepare DNS and autoscaling
The custom provider requires access to a DNS zone. Its installation example uses a Linode DNS API token, but the provider can be used with other DNS services. Do not transplant the Linode provider block into another DNS environment. Obtain the exact provider schema supported by the App Platform release you are installing.
App Platform does not install Cluster Autoscaler. If worker autoscaling is required, install the implementation supported by your Kubernetes provider. Identity permissions, node-group discovery, and scaling constraints are provider-specific, so there is no safe universal command.
Install apl-core with Helm
The official custom installation page defines three Helm steps: create the values file, add and update the chart repository, and install the chart. Review the values before resources are created.
Create the custom-provider values file
Set the cluster name, select provider: custom, configure Metrics Server only as required, and provide the supported DNS configuration for your provider.
Add and update the App Platform Helm repository
Add the official apl repository and refresh local repository metadata.
Install the chart
Install apl/apl as the Helm release named apl with the reviewed values file.
Step 1: Create values.yaml
The documented Linode DNS example is:
tee values.yaml<<EOF
cluster:
  name: $CLUSTER_NAME
provider: custom

# optionally configure metrics-server for kubelet-insecure-tls
apps:
  metrics-server:
    extraArgs: ["--kubelet-insecure-tls=true"]

# dns is required!
dns:
  domainFilters:
    - <your-domain>
  provider:
    linode:
      apiToken: $LINODE_TOKEN
EOF
Set CLUSTER_NAME and, for this specific example, LINODE_TOKEN before running the command. Replace <your-domain> with the zone intended for App Platform. The unquoted heredoc expands shell variables into the file, so confirm they are populated without printing the resulting token into shared logs.
Remove the insecure kubelet TLS override when it is not required. If the provider already runs Metrics Server, replace that section with enabled: false. For another DNS provider, use its current App Platform schema rather than guessing field names.
Step 2: Add the chart repository
helm repo add apl https://linode.github.io/apl-core
helm repo update
If the repository name already exists, verify its configured URL:
helm repo listStep 3: Install the release
helm install -f values.yaml apl apl/apl
This creates a release named apl. A successful command means Kubernetes accepted the release resources. It does not prove that the operator completed its first apply, that dependent applications are ready, or that the portal can complete an authentication flow.
The unpinned command resolves the chart available through the repository at installation time. Record the chart version shown by helm list and retain the exact sanitized values used. Post-installation, upgrade, and recovery instructions must match that release rather than whichever release becomes current later.
Complete the release-matched post-installation workflow
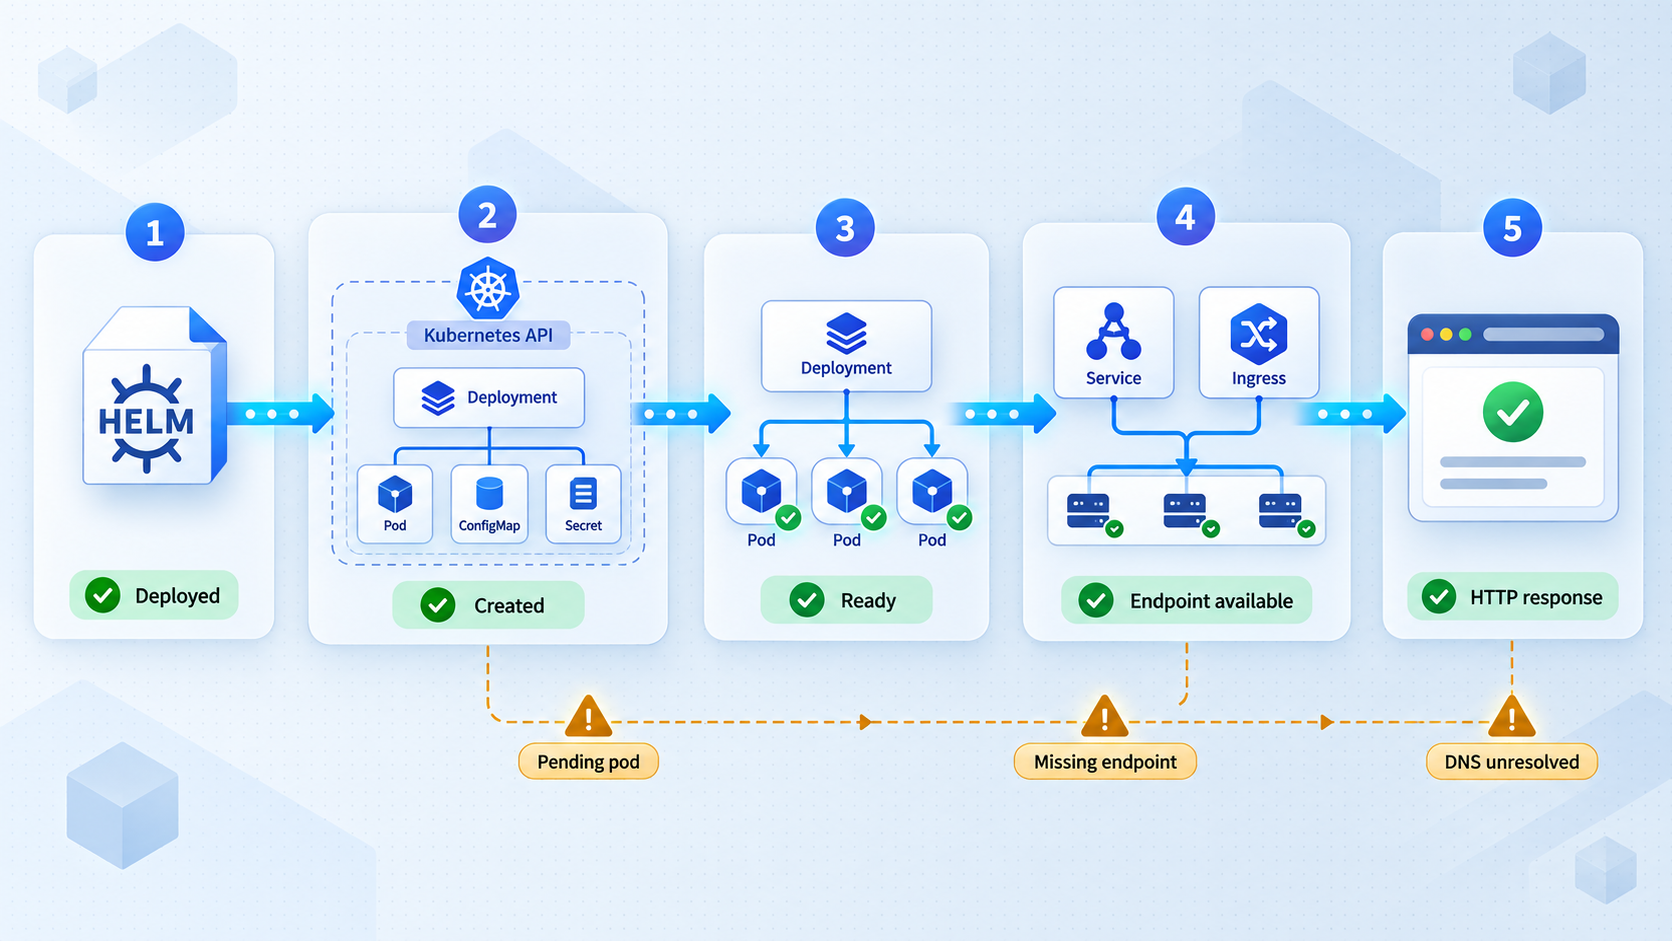
Akamai's getting-started sequence explicitly places post-installation after chart installation. Do not expose the platform or begin onboarding developers until this phase is complete.
1. Record the installed release and rendered configuration
helm list -A
helm status apl
helm get values apl -a
helm get manifest apl > apl-rendered-manifest.yaml
Run the release commands in the release namespace if Helm reports one other than the current namespace. Store exported material in a protected administrative location. Review it before retention because rendered manifests and computed values can contain sensitive configuration.
2. Check workloads, events, and operator progress
kubectl get pods -A
kubectl get deployments,statefulsets,daemonsets -A
kubectl get jobs -A
kubectl get events -A --sort-by=.lastTimestamp
Investigate pods that remain Pending, restart repeatedly, fail readiness checks, or report image, mount, permission, or scheduling errors. In v6.3.0, operator readiness is designed to signal completion of the first successful apply. For another release, use its release notes to interpret readiness behavior.
3. Verify persistent storage
kubectl get pvc -A
kubectl get pv
Expected claims should become Bound. A pending claim commonly indicates a missing default StorageClass, failed dynamic provisioning, unsupported access behavior, topology constraints, or an app-specific class that does not exist.
4. Discover the installed ingress endpoints
Do not guess the console service, namespace, hostname, or port. List the actual ingress rules generated by the installed release:
kubectl get svc -A
kubectl get ingress -A
kubectl get ingress -A -o custom-columns='NAMESPACE:.metadata.namespace,NAME:.metadata.name,CLASS:.spec.ingressClassName,HOSTS:.spec.rules[*].host,ADDRESS:.status.loadBalancer.ingress[*].ip'
If the provider returns a hostname rather than an IP address, the abbreviated custom-column output may not show it. Use the full ingress description:
kubectl describe ingress -n <namespace> <ingress-name>Identify the portal or console ingress by its resource name, routes, and backend, then record its exact configured host. That hostname is the canonical browser entry point for the deployment. Verify that its DNS record resolves to the ingress address and that the certificate presented for HTTPS covers the same hostname.
5. Retrieve the initial credentials using the installed release's instructions
Initial credential storage is release-sensitive. Secret names, namespaces, and keys must not be guessed. First inspect the notes packaged with the installed chart:
helm get notes aplFollow the credential retrieval instruction in those notes and the post-installation page corresponding to the chart version recorded earlier. If the instruction retrieves a Kubernetes Secret, run it only from an authorized administrative terminal. Do not copy the decoded value into shell history, chat, issue trackers, or shared logs.
If the installed chart does not provide credential retrieval instructions in its notes, stop rather than searching and decoding arbitrary cluster Secrets. Use the post-installation instructions linked by the official App Platform getting-started guide for that release. This safeguard prevents an administrator from confusing a database, service-account, OAuth client, or Keycloak internal credential with the platform login.
Initial administrator credentials provide privileged platform access. Retrieve them only through the release-matched procedure, complete the first login from a trusted workstation, and rotate or replace bootstrap credentials when the installed release's workflow permits or requires it.
6. Complete the first login through the canonical hostname
Open the exact HTTPS hostname found in the ingress resource. Confirm that the certificate and browser address refer to that hostname. Sign in with the documented initial account, complete any password-change or account-initialization prompt presented by the installed release, and sign out and back in to verify that the resulting credentials work.
Do not substitute a load-balancer IP, an arbitrary localhost URL, or an alternate public tunnel hostname for this test. Keycloak and OIDC flows depend on issuer URLs, browser redirects, callback URLs, secure cookies, and hostname-aware ingress routing. Testing first through the configured canonical host separates platform readiness from proxy compatibility.
7. Complete required administrative configuration
Before onboarding developers, review platform users, administrative membership, team or tenant configuration, DNS behavior, enabled applications, and identity-provider settings exposed by the installed release. Remove unnecessary privileged access and avoid enabling optional applications until their release stage, resources, storage, and recovery requirements have been reviewed.
If external identity is configured, verify that the issuer, authorization endpoint, token endpoint, redirect URIs, and logout redirect behavior all use the intended canonical public origin. An OIDC login that starts successfully but returns to another hostname is not ready.
8. Perform readiness checks from a user perspective
- The Helm release exists and its recorded chart version matches the post-installation instructions being followed.
- Required deployments, stateful workloads, daemon sets, jobs, and operators are healthy.
- Required PersistentVolumeClaims are bound.
- The LoadBalancer has a usable address and ingress rules contain the intended hostnames.
- DNS resolves those hostnames to the intended ingress path.
- HTTPS presents a certificate valid for the canonical hostname.
- The first login completes without a redirect loop or callback error.
- A platform administrator can reach the expected portal and application-management views.
- Enabled applications report the expected lifecycle state for the installed release.
- Bootstrap credentials and DNS provider credentials are handled according to the organization's credential policy.
The platform is demonstrably usable only after these infrastructure and user-facing checks succeed. Pod readiness alone is insufficient.
Operate, upgrade, recover, and remove the platform safely
App Platform coordinates many independently stateful and versioned applications. Treat upgrades, rollback, backup, identity changes, and removal as planned platform changes rather than generic one-command Helm tasks.
Respect application release stages
| Stage | Intended use | Integration expectation |
|---|---|---|
| Alpha | Preview and testing | Experimental and minimally compliant with the platform's integration criteria. |
| Beta | Pre-production evaluation | More stable than alpha and partially compliant with the criteria documented for platform applications. |
| GA | Stable platform use | Fully compliant with the stated integration criteria and intended to remain unchanged within a major version. |
The criteria documented by Akamai cover backup and restore, database upgrades, lifecycle management, authentication and authorization, graceful termination, continuity, Kubernetes-version support, monitoring, and resource management. A release-stage label therefore has direct operational significance.
Prepare an upgrade
- Record the current chart version, effective Helm values, application inventory, Kubernetes version, ingress hosts, and storage configuration.
- Read every intermediate release note between the installed and target versions. Check application updates, deprecations, required value changes, and Kubernetes compatibility.
- Back up platform data, configuration, identity information, databases, and external dependencies according to the recovery objectives for your environment.
- Verify that backups can be restored in a non-production recovery test.
- Confirm that the target App Platform release supports the cluster's Kubernetes version and that enabled applications support the target release.
- Schedule the change and define user-visible health checks for login, GitOps synchronization, builds, registry access, telemetry, and exposed applications.
Do not assume that helm upgrade alone is the complete procedure. The target release may include operator, schema, database, identity, and application changes. Use the upgrade instructions and release notes for the exact source and target versions.
Plan rollback before upgrading
A Helm revision rollback restores Kubernetes manifests, but it does not automatically reverse every database migration, persistent-volume change, external DNS update, credential rotation, or application-level schema change. A safe rollback plan must define which components can be rolled back through Helm, which require data restoration, and which are forward-only.
Preserve the previous chart version and sanitized values, but do not run helm rollback merely because a pod is unhealthy. First determine whether the release notes support rollback across the attempted version boundary. If they do not, restore through the release-specific recovery procedure.
Back up and restore the whole service, not only manifests
A complete recovery plan can include cluster configuration, App Platform values, application configuration, Keycloak identity data, databases, Git repositories, registry content, object storage, persistent volumes, DNS state, certificates, and external secrets. The exact set depends on the applications enabled in your release.
Kubernetes manifests are not a substitute for stateful backups. Likewise, the presence of a backup job does not prove recoverability. Test restoration, record recovery time, and verify that authentication, GitOps reconciliation, workloads, and ingress still work after recovery.
Rotate credentials deliberately
Track bootstrap administrator credentials, DNS API tokens, external identity-provider secrets, registry credentials, database credentials, webhook secrets, and Localtonet device tokens as separate assets. Rotate them through the owning application's supported procedure. Updating a Kubernetes Secret directly may not cause a controller or application to reload it, and can break generated configuration.
After any identity or OIDC change, test login and logout through the canonical hostname. Verify redirect URIs, issuer discovery, token validation, and administrative access before ending the maintenance window.
Remove the platform only after preserving required data
A Helm uninstall can remove release-managed Kubernetes resources, but it may not remove persistent volumes, provider load balancers, DNS records, object-storage data, externally managed secrets, or applications created through separate GitOps flows. It can also trigger destructive deletion depending on resource ownership and reclaim policies.
Before removal, stop new platform changes, inventory retained data, export configuration, perform and test final backups, record DNS and identity settings, and identify resources managed outside the release. Use the uninstall procedure for the installed App Platform release. Afterward, audit namespaces, cluster-scoped resources, PersistentVolumes, load balancers, DNS records, cloud storage, and credentials rather than assuming Helm removed everything.
Use Localtonet only with a hostname-compatible endpoint
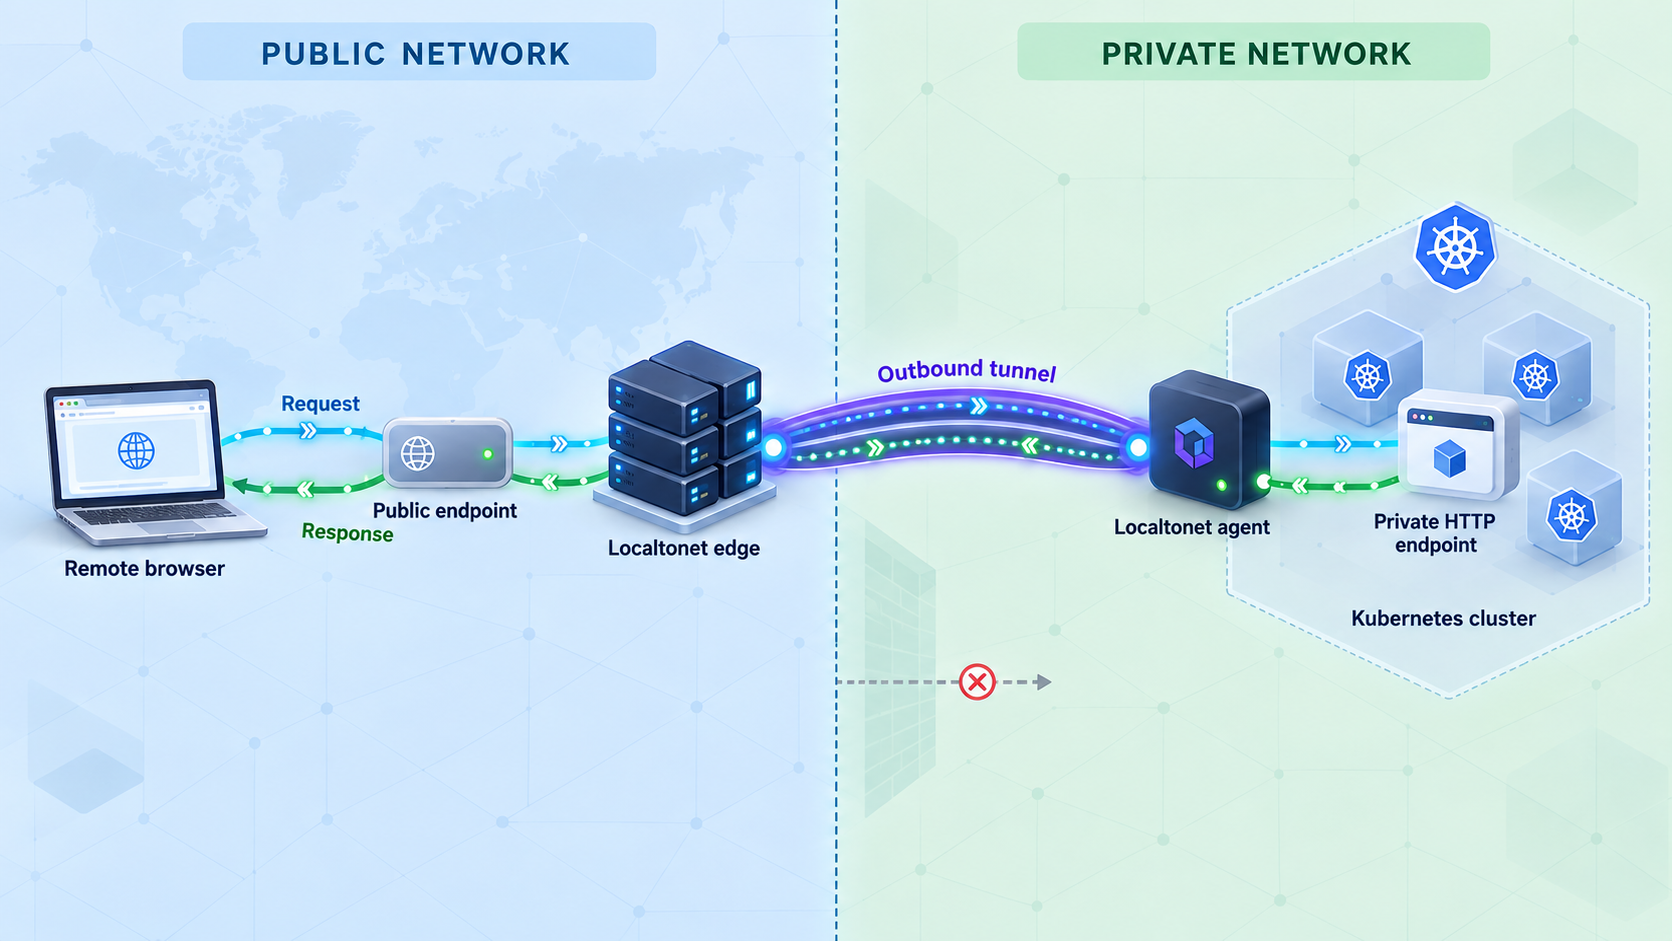
Localtonet can expose an HTTP service reachable from the device running our client. The client establishes an outbound connection to a Localtonet relay, so this access path does not require inbound router port forwarding, firewall changes, a VPN, or a public IP address.
App Platform introduces an important compatibility condition: its ingress and authentication stack are hostname-aware. A random Localtonet public hostname is not automatically equivalent to the hostname configured in App Platform. The ingress may reject or misroute an unexpected Host header, TLS may target another server name, and Keycloak or another OIDC provider may redirect the browser back to the canonical platform origin.
Use Localtonet for the console only when the public origin is supported by the App Platform ingress and identity configuration. The safest pattern is usually a custom domain whose hostname is intentionally configured across DNS, ingress, TLS, redirects, cookies, Keycloak, and OIDC clients. Do not promise console access through an alternate hostname until the complete login flow has been tested.
Validate the upstream from the client device
Run our client on a device that can already reach the intended ingress. Test the canonical host from that device before creating a tunnel. When the ingress address is private but DNS resolves elsewhere, a hostname-preserving test can distinguish basic reachability from virtual-host routing:
curl -I https://<canonical-platform-hostname>/If you must test a specific ingress address while preserving the hostname, use an HTTP client feature that maps the hostname to that address for the test. Do not disable certificate validation as the normal solution. Confirm that the response is the intended portal or authentication redirect, not an ingress default page.
Choose the Localtonet process type carefully
Localtonet HTTP tunnels can use Random Sub Domain, Custom Sub Domain where supported, or Custom Domain. All provide a public HTTPS address, but App Platform compatibility depends on the hostname seen by the browser and upstream.
| Process type | App Platform consideration | Recommendation |
|---|---|---|
| Random Sub Domain | The public hostname differs from the canonical App Platform hostname. | Use only if ingress routing, redirects, cookies, and OIDC have been explicitly configured and tested for that alternate origin. |
| Custom Sub Domain | Still requires the selected hostname to be accepted throughout the platform and identity flow. | Validate it as a separate origin before relying on it. |
| Custom Domain | Can align the browser hostname with an intentionally configured platform hostname. | Prefer this approach when current Localtonet DNS requirements and App Platform configuration both support the same hostname. |
Create the tunnel after compatibility is established
Install and run the Localtonet client
Run our client on a device that can reach the verified App Platform ingress endpoint.
Authenticate and select the device
Use the device-specific authentication token for that client. Keep it private and select the corresponding connected device.
Select an available relay server
Choose a currently available server or region from the dashboard. Do not hardcode server codes from an article.
Create an HTTP tunnel to the verified target
Enter the local IP address and port reachable by the client. Select a process type only after confirming that its public hostname is compatible with ingress, TLS, redirects, cookies, and identity configuration.
Start the tunnel
Press Start after reviewing the configuration. Creating a tunnel does not start it.
Test the complete authentication flow
Open the public URL, sign in, follow every redirect, reach the portal, sign out, and sign in again. Stop or delete the tunnel if the hostname changes unexpectedly or the identity flow does not remain on an approved origin.
See our HTTP tunnel documentation for the current dashboard workflow. Check the current custom-domain requirements before making DNS changes.
Verify App Platform authentication before starting the tunnel. Apply least privilege, restrict administrator accounts, and never expose the Kubernetes API, databases, metrics ports, identity backchannels, or arbitrary internal services. Stop the tunnel when temporary access is complete.
Troubleshoot in dependency order
| Symptom | Likely area | What to check |
|---|---|---|
| Pods remain Pending | Compute or storage | Inspect events for insufficient resources, scheduling constraints, unbound claims, topology restrictions, or missing volumes. |
| PersistentVolumeClaims remain Pending | StorageClass | Confirm a suitable default class exists, dynamic provisioning works, and app-specific values name a real class. |
| LoadBalancer address remains Pending | Provider integration or MetalLB | Check the controller, address pool, L2 advertisement, available addresses, and provider-required annotations. |
| Ingress hostname does not resolve | DNS | Check the zone, domain filter, provider schema, token permissions, generated record, and authoritative name servers. |
| Ingress returns a default page | Host routing | Use the exact hostname from the ingress rule and confirm the request carries that host rather than an IP or unrelated public domain. |
| Metrics components fail | Duplicate Metrics Server or certificate trust | Determine whether the provider already supplies Metrics Server and use the insecure kubelet TLS option only when required. |
| NetworkPolicy has no effect | CNI | Verify that the active CNI supports Kubernetes 1.33 or newer and enforces NetworkPolicy. Do not install the old pinned Calico release without validation. |
| Portal opens but login loops | OIDC origin mismatch | Compare the browser origin, issuer URL, callback URI, forwarded scheme and host, cookie settings, and canonical ingress hostname. |
| Certificate error at the upstream | TLS hostname mismatch | Confirm that the client connects using a hostname covered by the certificate and that the intended TLS virtual host is selected. |
| Local endpoint works but the Localtonet URL does not | Tunnel or hostname configuration | Confirm that the client is connected, the tunnel is running, the local target is correct, and the public hostname is accepted by ingress and identity services. |
| The public URL stops working | Tunnel lifecycle | Check whether the selected Localtonet client remains connected and whether the tunnel is still running. |
Troubleshoot from the lowest dependable layer upward: node health, CNI, storage, workloads, LoadBalancer, ingress, DNS, TLS, canonical-host login, local client reachability, and finally the Localtonet URL. This sequence prevents a public access symptom from hiding an underlying Kubernetes or identity failure.
Frequently asked questions
Can App Platform run outside LKE?
Yes. App Platform is optimized for LKE, but Akamai documents a custom provider for another conformant Kubernetes cluster. The environment must satisfy the custom requirements for Kubernetes, compute, storage, load balancing, networking, DNS, and administrative access.
What resources does the custom provider require?
The current custom-installation page specifies Kubernetes 1.33 or newer and a node pool with at least 6 vCPU and 12 GB RAM. These are minimums. Production capacity depends on enabled applications, builds, user workloads, storage, availability, and telemetry volume.
Which LKE sizing requirement should I use?
Current Akamai pages conflict. One states three workers with 16 GB total memory and 12 total CPUs, while another requires three workers with at least 16 GB and 4 vCPUs each. Use the more conservative per-worker requirement unless current LKE guidance or Akamai support resolves the discrepancy. These LKE statements do not replace the separate custom-provider minimum.
Should I install the Calico 3.26.3 commands from the custom page?
Not without compatibility validation. The pinned Calico version predates the documented Kubernetes 1.33 minimum, and the supplied current evidence does not confirm support for that combination. Prefer the provider-supported CNI when it enforces NetworkPolicy, or choose a Calico version whose official compatibility matrix supports your Kubernetes release.
How do I find the App Platform console URL?
Inspect the ingress resources created by your installed release and identify the portal ingress by its host, route, and backend. Verify that hostname through DNS and HTTPS. Do not guess a service port or substitute the load-balancer IP for the configured hostname.
Where should I obtain the first administrator password?
Use the credential procedure packaged with the installed chart and the post-installation instructions matching its exact version. Begin with helm get notes apl. Do not decode arbitrary Kubernetes Secrets because database, service-account, OAuth, and platform administrator credentials are not interchangeable.
Can a random Localtonet URL expose the App Platform console?
It cannot be assumed to work. The alternate hostname must be compatible with ingress Host routing, upstream TLS, redirects, cookie scope, Keycloak issuer URLs, and registered OIDC callbacks. Use a deliberately configured and fully tested hostname, preferably through a compatible custom-domain design.
Does Localtonet replace App Platform authentication?
No. Localtonet provides connectivity to the selected local target. App Platform identity, authentication, authorization, network policies, users, and workload security remain separate responsibilities.
Is Helm rollback a complete disaster-recovery method?
No. Helm can restore release manifests, but it does not necessarily reverse database migrations, persistent data changes, DNS updates, credential rotation, or changes in external services. Use a release-supported rollback path together with tested data backups and restoration procedures.
Connect a verified, hostname-compatible endpoint with Localtonet
After App Platform is healthy, the canonical portal login works, and ingress and identity configuration support the intended public hostname, create a Localtonet HTTP tunnel for controlled remote reachability without inbound router port forwarding.
Get Started Free →

