

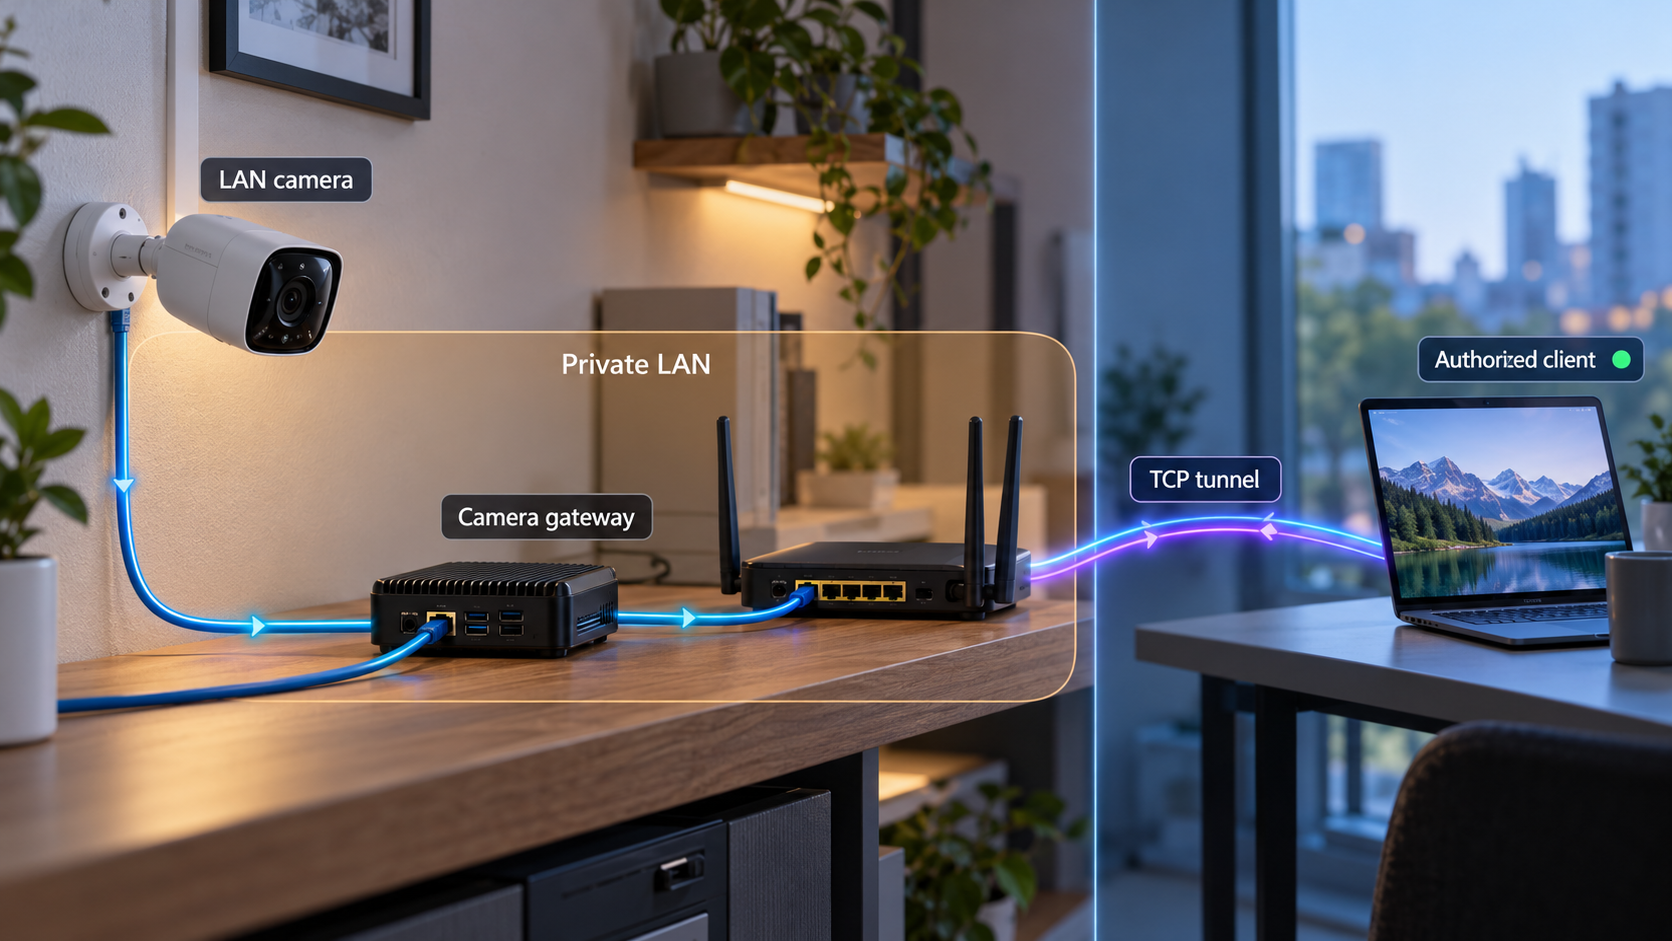
Build a LAN-first camera control gateway, verify it locally, then add carefully controlled remote connectivity
Reolink CLI provides command-line access to compatible Reolink cameras, video doorbells, NVRs, and Home Hub devices on the local network. This guide covers the supported installer paths, release verification, initial device setup, capability checks, and the local gateway endpoint. Once the gateway works on 127.0.0.1:9000, we explain how to connect that TCP endpoint through Localtonet without opening an inbound router port. Because the available project documentation does not establish gateway authentication or recommend direct internet exposure, the remote-access section also explains the security decisions you must make before starting a public tunnel.
📋 What's in this guide
What Reolink CLI and the local gateway do
Reolink CLI is an official command-line tool for operating supported Reolink IP cameras, video doorbells, NVRs, and Home Hub devices. It communicates directly with devices on the local network rather than depending on a cloud account. Its documented capabilities include device discovery, camera information, snapshots, live-media operations, PTZ control, lighting, encoder settings, event monitoring, storage inspection, VOD search and download, two-way audio, and generation of RTSP, RTMP, or FLV stream URLs.
Feature availability is device-specific. A camera model may support only part of the command set, and paired devices can behave differently from independently addressable LAN cameras. The project therefore provides a capability query rather than expecting users to infer support from a model name. Unsupported operations are documented to return a clear device-support error instead of silently appearing to succeed.
The distribution includes two related executables: reolink-cli and the gateway. The CLI handles interactive and scripted camera operations. The gateway provides a local network endpoint that another compatible application can use as a control plane. For this workflow, that endpoint is kept on the loopback address at 127.0.0.1:9000. A different free port can be selected, but every component must then use the same replacement port.
jq when desired.
127.0.0.1:9000. The protocol is not identified as HTTP in the supplied project evidence, so it should be treated as a raw TCP service.
The published repository contains installers, agent integrations, manifests, documentation, and related assets. The prebuilt Reolink CLI binaries are proprietary and distributed under a royalty-free EULA. The CLI source code is not published there. Review the included EULA and third-party notices before deployment, especially in managed or commercial environments.
Gateway traffic and camera media are different
Exposing the gateway does not automatically expose every camera protocol or stream port. The gateway is a control endpoint. RTSP, RTMP, FLV, snapshots, and other media operations may involve separate URLs or device connections. A remote application must still be compatible with the gateway, and any media path it receives must be reachable from the application that consumes it.
This distinction matters when planning remote access. A successful TCP connection to the gateway proves only that the gateway endpoint can be reached. It does not prove that a separately returned private RTSP address is usable from the remote client. Do not create additional tunnels for camera ports until you understand the specific application flow, authentication model, and exposure risk.
The MCP server is not the TCP gateway
Reolink CLI also includes an MCP server intended for compatible AI-agent integrations. That server uses JSON-RPC over stdio, meaning an agent launches it as a local process and communicates through the process input and output streams. It does not, by itself, provide a TCP listening port that can be forwarded through a network tunnel.
For that reason, this guide tunnels only the documented gateway endpoint. Do not point a Localtonet TCP tunnel at an MCP stdio process. If an agent integration needs remote access, its architecture must include an explicitly documented network gateway or another safe, authenticated intermediary.
Prerequisites and deployment decisions
Choose a machine that can remain connected to the same LAN as the Reolink devices. It can be a workstation for temporary testing or a dedicated host for longer-running automation. The camera gateway depends on local network reachability, so installing it on a remote server that cannot route to the camera LAN will not make discovery or camera commands work.
| Requirement | Why it is needed | Important detail |
|---|---|---|
| Supported host environment | Runs Reolink CLI and the gateway | The documented automatic installers cover macOS, Linux, and Windows. Windows x64 requires the Microsoft Visual C++ runtime. |
| LAN access to Reolink devices | Allows discovery and direct device operations | Routing, host firewall rules, Wi-Fi isolation, and VLAN policy must permit the required local communication. |
| Device credentials | Authenticates commands to the camera, NVR, or hub | Use an appropriate device account and avoid placing credentials in shell history, scripts, screenshots, or tunnel configuration. |
| Available local port | Provides the gateway listener | This guide uses 127.0.0.1:9000. If port 9000 is occupied, choose another free port and update all dependent configuration consistently. |
| Localtonet client on the gateway host | Connects the loopback-only service to our relay | Running the client on the same machine allows it to reach 127.0.0.1 without changing the gateway bind address. |
| An authorization plan | Protects camera-control functions | The supplied gateway documentation does not establish built-in gateway authentication. Do not assume the endpoint is safe merely because cameras themselves have credentials. |
Camera and recorder topology
Cameras with their own LAN address can be registered directly. Wired or Wi-Fi NVRs and Home Hub devices can also be used. The documented device expand operation registers one entry per NVR channel. Expansion is also the documented way to reach a battery camera paired with a hub rather than independently addressable on the LAN.
A sleeping battery camera may take several seconds to answer its first command. Treat that delay differently from a permanent connection failure. Test again after the device has had time to wake, and use capability inspection to determine what that particular camera exposes.
Network placement
Broadcast discovery usually works best when the host and cameras occupy the same local broadcast domain. Segmented networks can intentionally block broadcast discovery even when direct routed connections are permitted. If discovery returns nothing, that does not necessarily mean the installation failed. You may need the device-registration or bulk-import workflow documented by the CLI rather than broadcast discovery.
The documented feature set can include live media, PTZ movement, sirens, lights, recordings, device users, two-way audio, and system actions. Use a dedicated least-privilege device account when the camera firmware permits it. Never expose credentials in command examples, logs, shell history, screenshots, support requests, or Localtonet configuration.
Install Reolink CLI and verify the distribution
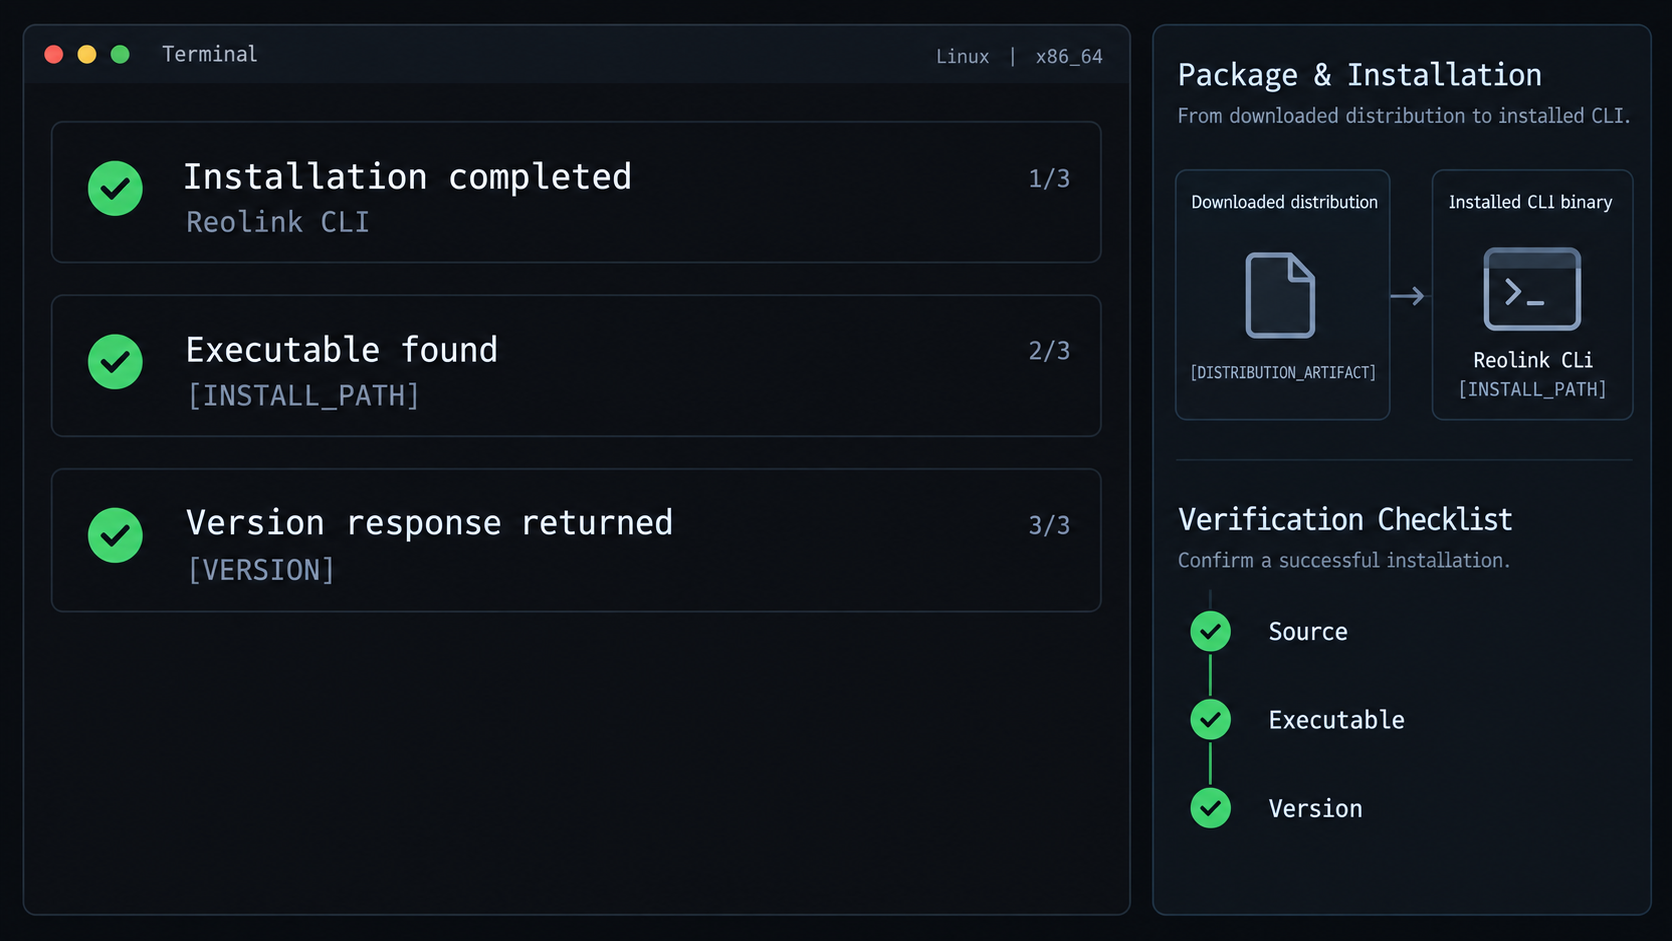
The supported command-line installers install reolink-cli and reolink-gateway. On macOS and Linux, the documented destination is ~/.local/bin, and the installer does not require sudo. It also initializes configuration. The exact Windows destination is not established by the supplied evidence, so this guide does not invent one.
Select the installer for your operating system
Use the shell installer on macOS or Linux. Use the PowerShell installer on Windows. Before piping a remote installer into a shell, review the script if required by your security policy and confirm that the URL points to the official Reolink CLI repository.
Run the documented installer
Execute the matching command below. Both installers are documented to verify the downloaded release before installing it.
Confirm the executable is available
Open a fresh terminal if necessary, run the CLI help command, and confirm that the command list is displayed. If a Unix shell cannot find the binary, check whether ~/.local/bin is in that user's PATH.
Inspect the installed command manifest
Use the help system and machine-readable feature manifest from the installed binary. These are authoritative for the installed version and prevent instructions for another release from being applied blindly.
macOS and Linux installer
curl -fsSL https://raw.githubusercontent.com/reolink/reolink-cli/main/install.sh | sh
This installs the CLI and gateway to ~/.local/bin without sudo and initializes the configuration. If the command finishes but the shell reports that reolink-cli is not found, start a new shell and inspect your PATH:
printf '%s\n' "$PATH"
ls -l "$HOME/.local/bin"
reolink-cli --help
reolink-cli features
Do not compensate for a user-level path problem by rerunning an unfamiliar installer as root. Correct the user environment instead.
Windows installer
The documented Windows command can be launched from PowerShell or Command Prompt:
powershell -NoProfile -Command "iwr https://raw.githubusercontent.com/reolink/reolink-cli/main/install.ps1 -UseBasicParsing | iex"Windows x64 requires the Microsoft Visual C++ runtime. If the binary is installed but fails immediately because a runtime component is unavailable, install the required Microsoft runtime and retry. Open a new terminal after installation if the current session does not recognize the command.
reolink-cli --help
reolink-cli features
Manual release archive verification
Manual installation is useful when a policy prohibits piping downloaded scripts into a shell, when you need to inspect the archive before deployment, or when packaging the binary through an internal software-distribution process. Download the archive for the required platform together with its matching .sha256 sidecar from the official release.
Archive filenames vary by platform and release, so this guide does not guess them. Place the downloaded archive in the same working directory where you run the check. For release v0.20.0, the documented committed checksum file can be downloaded and used as follows on systems with shasum:
curl -fsSL -o CHECKSUMS https://raw.githubusercontent.com/reolink/reolink-cli/main/checksums/v0.20.0.sha256
shasum -a 256 -c CHECKSUMS --ignore-missing
Confirm that the output reports a successful match for the archive you actually downloaded. The --ignore-missing option allows the checksum file to contain entries for other platforms, but it also means you must actively verify that your intended archive appears in the successful results. Do not extract or execute an archive that is absent from the output or reports a mismatch.
The one-line installer tracks the current distribution from the repository. For repeatable production deployments, review the current release, its EULA, notices, archive, and checksum before rollout. The example checksum path above is specifically for v0.20.0; do not reuse it to validate another version.
Initialize configuration and register cameras
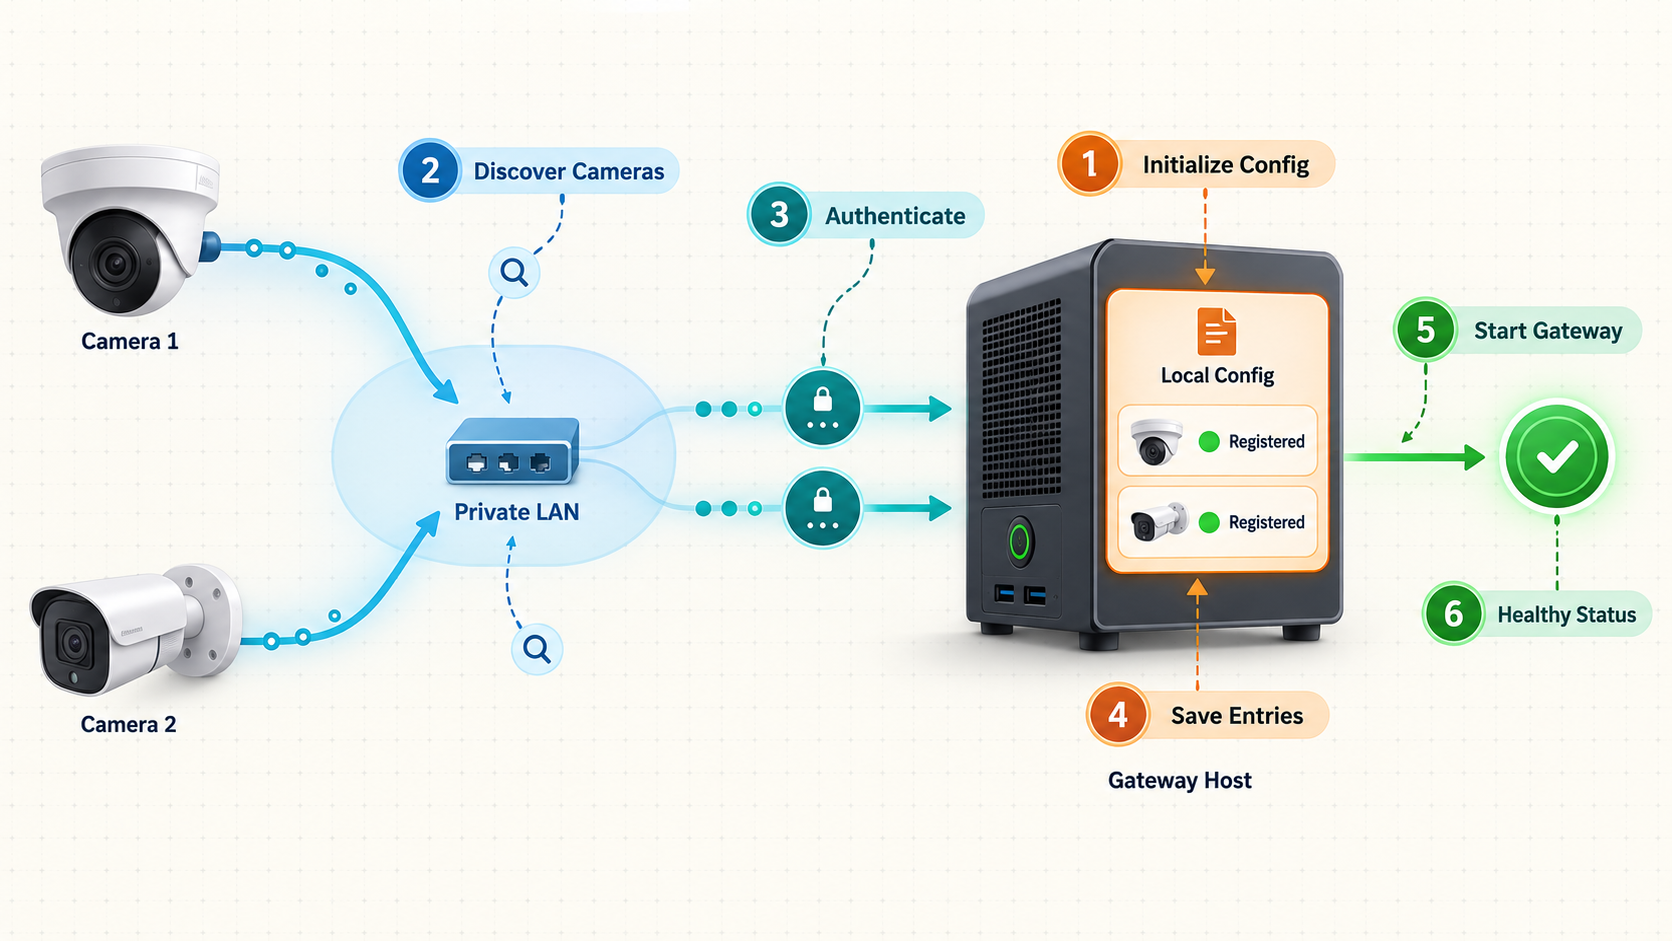
Reolink CLI exposes setup and registry commands including init, setup, config, device, discover, and doctor. Exact flags can evolve, so the installed binary's help output is the authoritative command reference. The supplied evidence does not establish every credential flag or interactive prompt, and this guide will not invent them.
Inspect the setup commands for the installed release
Read the help for setup, initialization, discovery, and device registration. This identifies the exact prompts and flags supported by your binary.
Discover or register the local device
Use LAN discovery where broadcast traffic is available. On segmented networks, use the documented device-registration or bulk-import path shown by the installed help instead of assuming broadcast discovery will cross the router.
Provide credentials through the supported workflow
Authenticate with the camera, NVR, or hub using the mechanism documented by the installed CLI. Avoid putting real passwords directly into reusable command examples or scripts unless the official option is designed for protected secret input.
Expand NVR or Home Hub channels when required
If devices are attached through an NVR or hub, inspect the device expand help and register the required channels. This is also the documented route to a battery camera paired with a hub.
Test connectivity and capabilities
Use the registered camera name with ping, information, and capability operations. Capability results should guide every later automation decision.
reolink-cli setup --help
reolink-cli init --help
reolink-cli discover --help
reolink-cli device --help
reolink-cli doctor --help
After registering a camera under a local name such as porch, inspect what it supports:
reolink-cli --camera porch capabilitiesYou can also inspect the syntax for basic connectivity and information commands before running them:
reolink-cli ping --help
reolink-cli info --help
reolink-cli status --help
If you use jq, the default JSON output can be filtered for local scripts. The following official-style pattern retrieves selected information fields from a registered camera:
reolink-cli --camera front-door info | jq '.data | {model, firmware, name}'
The name front-door is only an example registry identifier. Substitute the actual name you assigned locally. Do not publish command output containing serial numbers, private addresses, account names, stream credentials, or other deployment details.
Start the local camera gateway
Complete the camera registration and direct CLI tests before starting the gateway. This isolates failures: if the CLI cannot reach a camera, adding the gateway or a tunnel will not repair the underlying LAN, credential, or compatibility problem.
The intended local endpoint for this workflow is 127.0.0.1:9000. Binding to 127.0.0.1 keeps the listener accessible only to processes on the same host. This is safer than binding it to every interface while you are still evaluating authentication and client behavior.
The available project evidence confirms the gateway command family and the local endpoint, but it does not include the exact current bind or port flags. Those flags must not be guessed. Run the installed gateway help and use the syntax reported by your installed release to bind the gateway to 127.0.0.1:9000.
Confirm direct camera commands work
Run a non-destructive information or capability query against the registered camera. Resolve authentication, reachability, and model-support errors first.
Inspect the installed gateway help
Use the built-in help to identify the exact listener-address and port syntax supported by the installed release.
Configure the loopback endpoint
Set the listener to 127.0.0.1 and port 9000, or choose another unused local port. Do not bind to 0.0.0.0 merely to make Localtonet work. Our client can target loopback when it runs on the same host.
Start the gateway and keep the process running
Launch it using the syntax shown by the installed help. Keep the terminal open during initial testing so startup errors and connection messages remain visible.
reolink-cli gateway --help
The installer also provides reolink-gateway. If your installed release documents that executable as the preferred entry point, inspect its help as well:
reolink-gateway --helpUse only the entry point and options documented by the installed package. Do not run multiple gateway processes on the same address and port.
Choosing another port
Port 9000 is the documented endpoint for this workflow, but another free port can be used when configured consistently. If you select 9100, for example, the gateway must listen on that port, local verification must test that port, and the Localtonet tunnel target must also use that port. A mismatch produces a public endpoint that may accept a connection at the relay while failing to reach the intended local process.
Verify the gateway before remote access
Local verification should prove three separate facts: the process is still running, the expected TCP port is listening, and a compatible local client can complete a real gateway operation. A listening socket alone does not establish that the camera configuration, credentials, or application protocol are correct.
Check the listening address
Use an operating-system networking tool available on your host to confirm that the selected port is bound to 127.0.0.1. Tool availability and output vary by operating system, so the examples below are diagnostic options rather than Reolink CLI requirements.
ss -ltn
lsof -nP -iTCP:9000 -sTCP:LISTEN
On Windows, an available built-in check is:
Get-NetTCPConnection -LocalPort 9000 -State Listen
Look for a listener associated with the expected process and local address. If the output shows 0.0.0.0 or a LAN interface address instead of 127.0.0.1, the service is available beyond the local host. Stop it and correct the bind configuration unless broader LAN exposure is intentional and protected.
Test basic TCP reachability
A TCP connection test can establish that the port accepts connections, but it cannot validate the application protocol:
nc -vz 127.0.0.1 9000
If nc is unavailable, use an equivalent operating-system tool. On Windows:
Test-NetConnection 127.0.0.1 -Port 9000Do not test the endpoint with a web browser and conclude that it is broken when no page appears. The available documentation does not classify the gateway as HTTP. A browser sends HTTP requests, while this endpoint should be treated as a raw TCP service unless the installed gateway documentation explicitly says otherwise.
Complete an application-level test
Use the intended compatible local gateway client and perform a non-destructive operation, such as retrieving device information or capabilities. This proves that the client speaks the expected protocol and that the gateway can reach the registered camera. Only proceed to remote tunneling after this local application-level test succeeds.
A tunnel adds another connection layer. If the gateway fails locally, keep the tunnel stopped and troubleshoot the process, address, port, camera route, credentials, and client compatibility first.
Connect the gateway through a Localtonet TCP tunnel
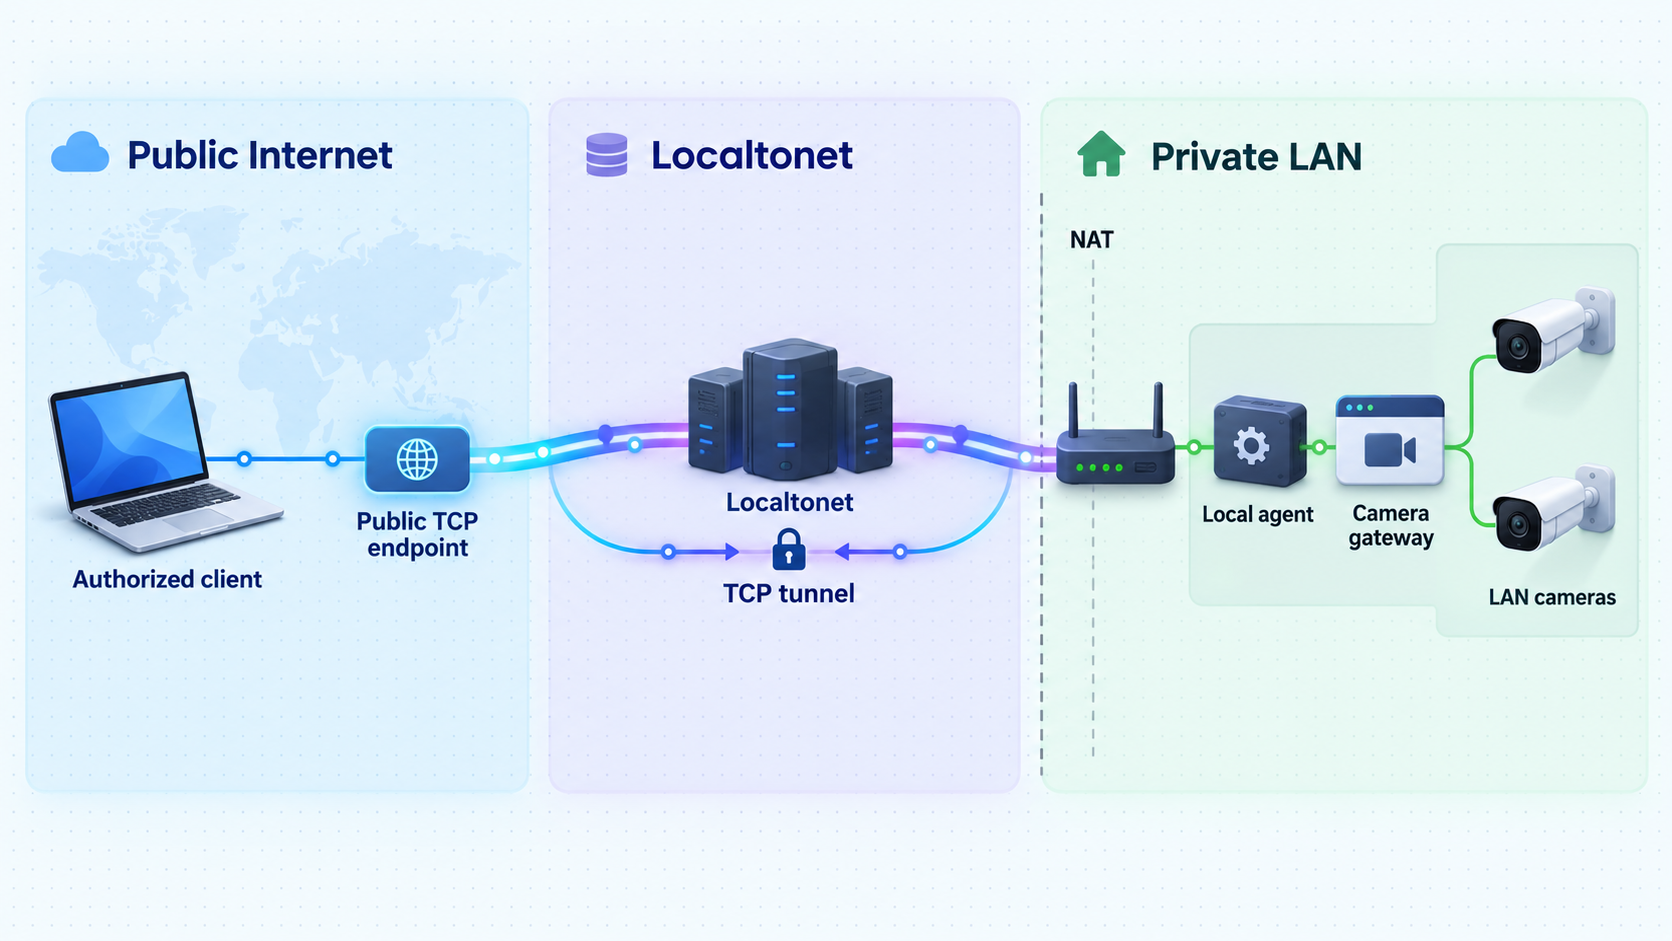
Once the gateway is working locally, Localtonet can expose its TCP listener through a public host and port. Our client establishes an outbound connection to a Localtonet relay, so this workflow does not require an inbound router port-forwarding rule, a public IP address, firewall changes for inbound internet traffic, or VPN setup.
Use a TCP tunnel because the documented endpoint is a network socket but the supplied project evidence does not identify it as HTTP. An HTTP tunnel could alter expectations around request framing, hostnames, or web behavior. A raw TCP mapping preserves the application connection between the remote client and gateway.
The available Reolink gateway evidence does not document gateway authentication and does not endorse direct remote exposure. A Localtonet TCP tunnel provides connectivity, not proof that the application protocol has an adequate authorization layer. Do not start the tunnel unless you have confirmed how remote clients are authenticated and restricted. If that cannot be established, keep the gateway local or place it behind a separately verified access-control layer.
Install and run our client on the gateway host
Run the Localtonet client on the same computer as Reolink Gateway. This allows the tunnel target to remain 127.0.0.1:9000 instead of broadening the gateway listener to the LAN.
Authenticate or select the device
Use the device-specific authentication token through the supported client or dashboard workflow. Treat the token as a secret. Never paste it into an article, public script, screenshot, issue, or shared terminal transcript.
Select an available relay server
Choose a currently available server or region from the dashboard. Availability can vary, so do not copy a hardcoded server code from an unrelated guide.
Create a TCP tunnel to the local gateway
Select the TCP tunnel type and set the local target IP address to 127.0.0.1. Set the local target port to 9000, or the alternative port you verified locally.
Start the tunnel
Creating the tunnel does not make it active. Use the Start button and wait until the selected client device and tunnel are connected.
Configure the authorized remote client
Replace the client's local gateway address with the public host and port assigned to the TCP tunnel. Do not prepend http:// or https:// unless the gateway client's own documentation explicitly requires a URL scheme.
Test and stop exposure when finished
Perform a non-destructive remote operation, check the gateway process for errors, and stop the tunnel when remote access is no longer required. Delete unused tunnels rather than leaving forgotten configurations available for later accidental startup.
You can review our current tunnel documentation at Localtonet documentation. Current dashboard values should be used for device selection and relay availability rather than values copied from old examples.
What happens along the connection path
| Connection stage | Address used | Responsibility |
|---|---|---|
| Remote gateway client | Assigned public host and port | Uses the protocol expected by Reolink Gateway and supplies any application-level authorization that the gateway requires. |
| Localtonet relay path | Public TCP endpoint to connected device | Forwards the TCP connection through the outbound client connection. |
| Localtonet client | 127.0.0.1:9000 |
Connects to the configured local target on the gateway host. |
| Reolink Gateway | Local camera registry and LAN routes | Processes compatible requests and communicates with registered Reolink devices. |
| Camera, NVR, or hub | Private LAN address | Authenticates device operations and performs supported actions. |
The tunnel remains available only while the selected Localtonet client is connected and the tunnel is running. The Reolink Gateway process must also remain active. If any one of those components stops, remote gateway access stops.
Routine operation and security practices
Use capabilities instead of hardcoded assumptions
Query each camera's capabilities before building automation around PTZ, audio, lighting, detection, or recording commands. Fleet deployments can contain different models and firmware versions under a single NVR or hub. A command that works on one channel may correctly return a device-support error on another.
Keep destructive actions out of connectivity tests
Initial tunnel tests should retrieve information, capabilities, or status. Do not use siren, PTZ, user-management, reboot, Wi-Fi configuration, privacy masks, recording changes, or two-way audio merely to prove connectivity. Test those functions only when there is an operational reason and the affected people have authorized the action.
Separate service availability from tunnel availability
Monitor the gateway and Localtonet tunnel as separate processes. A running tunnel cannot forward to a gateway that has stopped. Conversely, a healthy local gateway remains local-only when our client is disconnected or the tunnel is stopped. This separation is useful when diagnosing incidents and when intentionally limiting remote-access windows.
Review updates before applying them
The CLI includes a self-update command family, but production systems should not update blindly. Inspect the currently installed version's help, review the target release, verify its archive, and test camera and gateway behavior before broad deployment. Release changes can affect device targeting, firmware-specific behavior, gateway clients, and automation output.
reolink-cli self-update --help
reolink-cli features
reolink-cli doctor --help
Protect logs and JSON output
Device information and troubleshooting output can include model identifiers, firmware versions, camera names, serial information, private IP addresses, storage details, or other environment-specific data. Treat diagnostic output as operational data. Redact it before opening a support request or sharing it outside the authorized team.
Stop temporary access explicitly
When remote work is complete, stop the Localtonet tunnel first. If the local gateway is no longer needed, stop that process as well. Stopping and deleting are different lifecycle actions: stopping retains the configuration for later use, while deleting removes the tunnel configuration. Choose intentionally and remove obsolete entries.
Troubleshooting installation, gateway, and tunnel failures
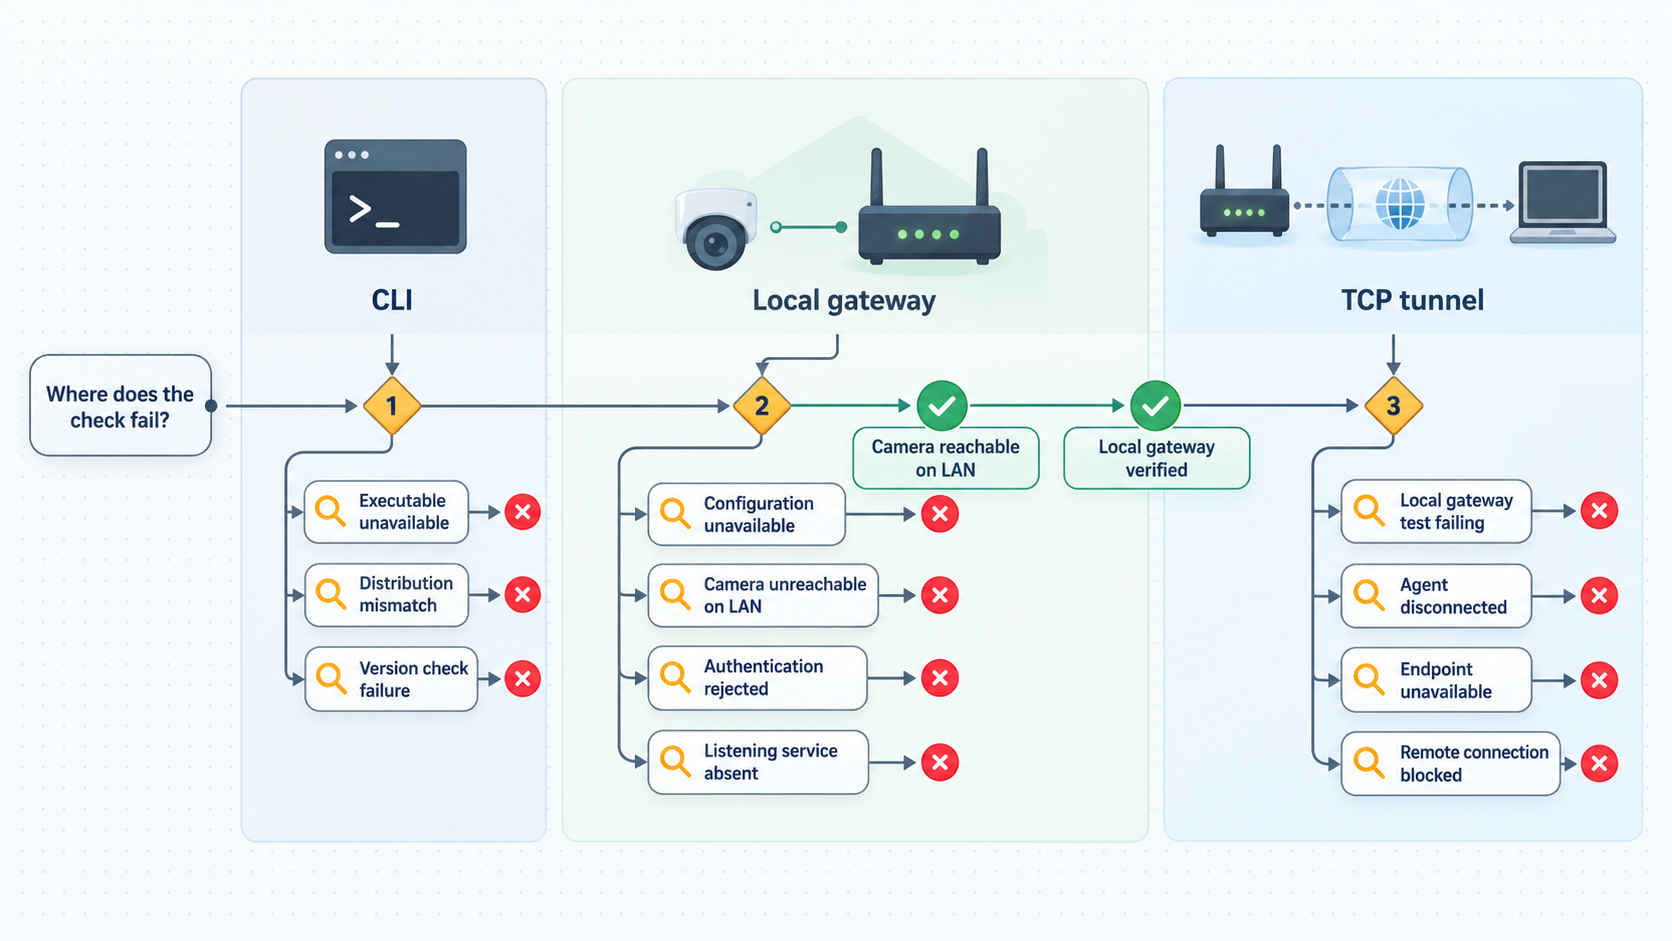
The command is not found after installation
On macOS or Linux, confirm that ~/.local/bin exists, contains the installed executables, and appears in the current user's PATH. Start a new terminal after installation because shell startup files may not have been reloaded. Make sure you are checking the same user account that ran the installer.
On Windows, open a new PowerShell or Command Prompt session. If the binary starts with a runtime-related error, verify that the required Microsoft Visual C++ runtime is installed for Windows x64.
Checksum validation does not mention the archive
Confirm that the release archive is in the current working directory and that its filename has not been changed. Make sure the checksum file belongs to the exact release you downloaded. Because the documented command uses --ignore-missing, the absence of a failure is not enough. You must see a successful result for your intended archive.
Discovery finds no cameras
Verify that the host is connected to the intended LAN and that client isolation, VLAN boundaries, host firewall policy, or wireless access-point settings are not blocking broadcast traffic. Discovery can fail while direct routed access remains possible. In that case, inspect the installed device and setup help for the supported registration or bulk-import workflow.
A camera rejects credentials
Confirm the account directly against that device, NVR, or hub and check whether the account has permission for the requested operation. Avoid repeatedly attempting unknown credentials, which can trigger lockouts or obscure the original configuration issue. Do not paste the password into diagnostic output.
The first battery-camera request is slow
A battery camera paired through a Home Hub may be asleep, and the first request can take several seconds while it wakes. Allow time for the response before treating it as unreachable. Also confirm that the hub channels were expanded into registry entries using the documented device workflow.
The gateway does not listen on port 9000
Read the startup output and gateway help. Check whether another process already occupies the port and whether the listener was configured for a different address or port. If you intentionally selected another port, update the local connectivity test and Localtonet target to match.
The gateway listens on the LAN instead of loopback
Stop it and correct the bind address to 127.0.0.1 unless LAN-wide access was an explicit, reviewed requirement. You do not need to bind the gateway to 0.0.0.0 when our client runs on the same machine.
Local access works but the Localtonet endpoint does not
Confirm that the Localtonet client is running on the intended device, the correct device token was selected, an available relay was chosen, the tunnel type is TCP, and the target is the same address and port verified locally. Then confirm that the tunnel was started. Creating a tunnel alone does not activate it.
If the public TCP port is reachable but the application fails, verify that the remote program is actually compatible with Reolink Gateway. A generic browser, HTTP monitor, or unrelated camera application is not an application-level gateway test.
The tunnel connects but camera operations fail
Return to a local gateway client and repeat the same operation. If it also fails locally, troubleshoot the camera registry, credentials, LAN route, sleeping state, firmware behavior, and capability support. If it succeeds locally but not remotely, compare client configuration and protocol expectations. Also determine whether the operation returns a private media URL that the remote system cannot reach.
An operation reports that the device does not support it
Treat that as a capability result, not a tunnel failure. Run the capability query for the exact camera or NVR channel and adjust the automation. Do not repeatedly retry an unsupported operation or assume another model's features apply.
Frequently asked questions
Is Reolink CLI open source?
The repository publishes installers, manifests, agent assets, documentation, and other supporting files, but the CLI source code is not published there. The prebuilt CLI binaries are proprietary and distributed under a royalty-free EULA. Review the license and notices included with the release before deployment.
Does Reolink CLI require a Reolink cloud account?
The documented CLI workflow is LAN-first and communicates directly with supported Reolink devices on the local network. You still need appropriate device credentials and local network reachability.
Why use a TCP tunnel instead of an HTTP tunnel?
The supplied project evidence confirms a local gateway endpoint but does not identify its protocol as HTTP. A Localtonet TCP tunnel is therefore the evidence-safe mapping because it forwards the raw TCP connection without assuming browser or HTTP behavior.
Can I tunnel the built-in MCP server directly?
Not as a conventional TCP service. The built-in MCP server uses JSON-RPC over stdio, so an agent communicates with a locally launched process through standard input and output. Use the separately documented network gateway for this TCP workflow.
Must Reolink Gateway listen on 0.0.0.0 for Localtonet?
No. Run our client on the same host and target 127.0.0.1:9000. This allows the gateway to remain loopback-only while the Localtonet client establishes the outbound relay connection.
Does a Localtonet tunnel add authentication to the Reolink gateway?
A TCP tunnel provides a connectivity path to the configured local service. It should not be treated as proof that the gateway protocol authenticates every remote client. The available Reolink gateway evidence does not establish built-in gateway authentication, so confirm and enforce an appropriate authorization design before public exposure.
Will remote gateway access also make private RTSP URLs reachable?
Not necessarily. The gateway tunnel forwards only the configured gateway port. If an operation returns a stream URL containing a private camera address, the remote media consumer still needs a safe route to that separate endpoint. Do not expose additional camera ports without reviewing authentication and application requirements.
Can I use another local gateway port?
Yes. Choose an unused port and configure it consistently in the gateway, local tests, and Localtonet TCP target. The exact gateway flag must come from the help output of your installed Reolink CLI release.
Why is the Localtonet public endpoint unavailable after I created the tunnel?
Tunnel creation and tunnel startup are separate actions. The selected Localtonet client must be connected, the Reolink gateway must be running, and the tunnel must be started. Also verify that the configured local target matches the gateway's actual listening address and port.
Connect your verified camera gateway with Localtonet
After Reolink CLI is installed, the cameras work locally, and the gateway is verified on its loopback TCP endpoint, create a Localtonet TCP tunnel for carefully authorized remote access without inbound router port forwarding.
Get Started Free →

