

Deploy a pinned Calagopus release, verify the panel locally, and publish only the web interface
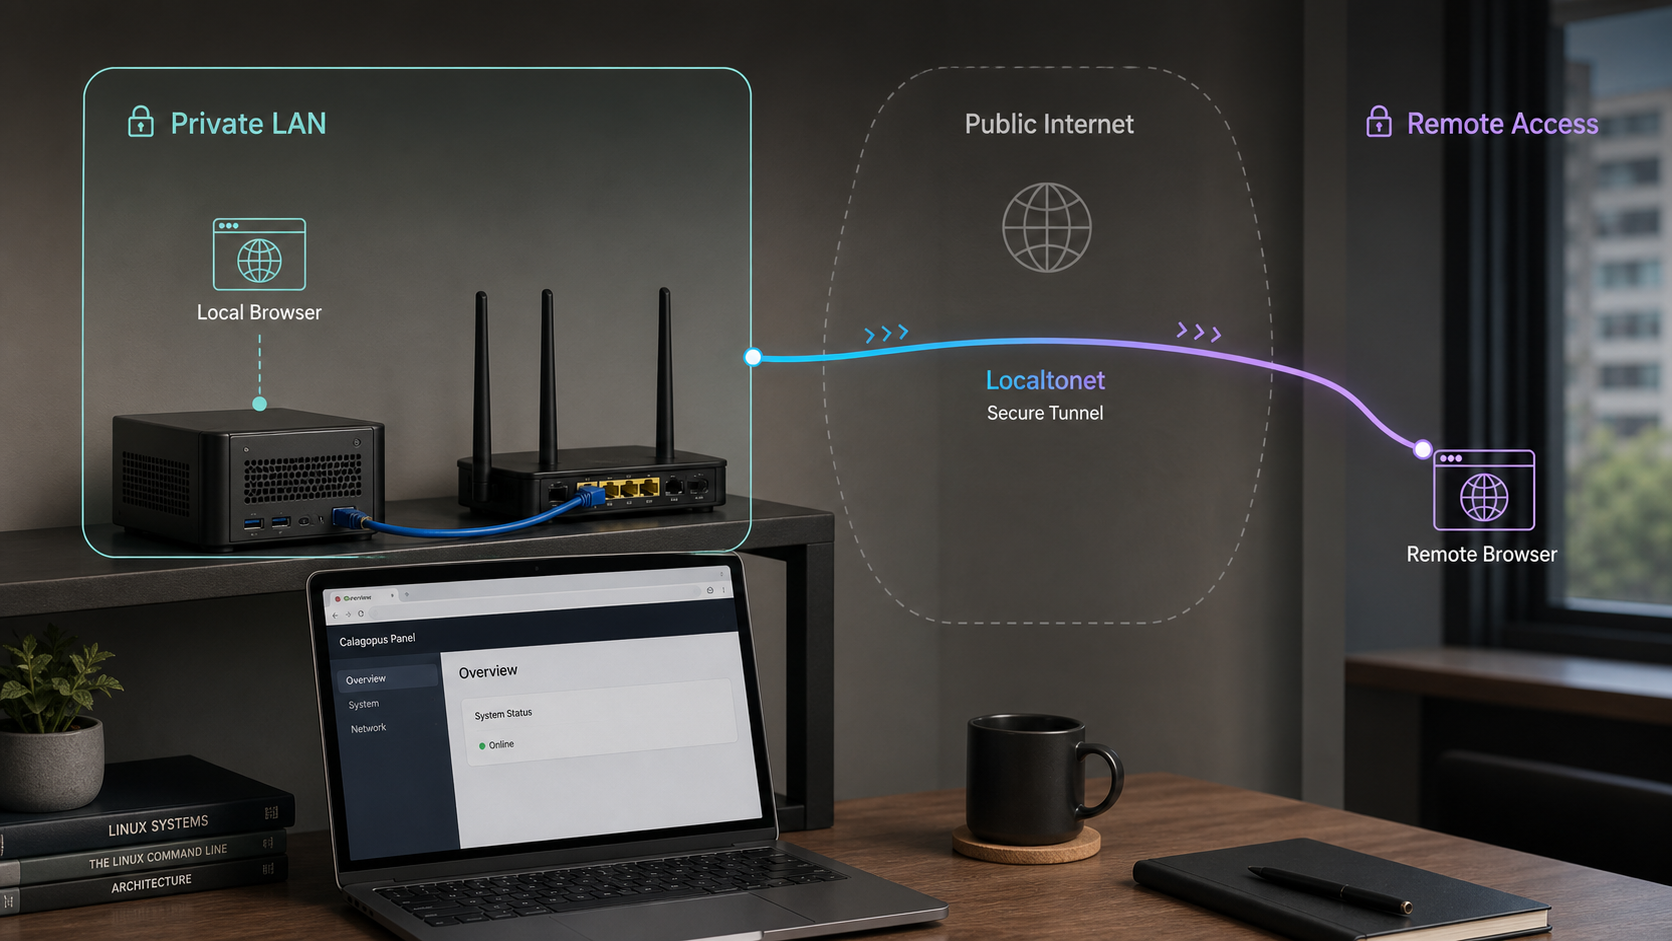
This tutorial uses the repository-provided all-in-one Docker Compose deployment for Calagopus Panel release 1.1.4, verified against the project repository and release information on August 20, 2026. It covers host preparation, release pinning, environment review, container startup, first-run administration, local verification, persistent storage, offline backups, updates, and troubleshooting. After the panel works locally, we show the documented Localtonet HTTP tunnel sequence for providing a public HTTPS address without inbound router port forwarding, firewall changes, VPN setup, or a public IP address.
📋 What's in this guide
Understand the Calagopus deployment model
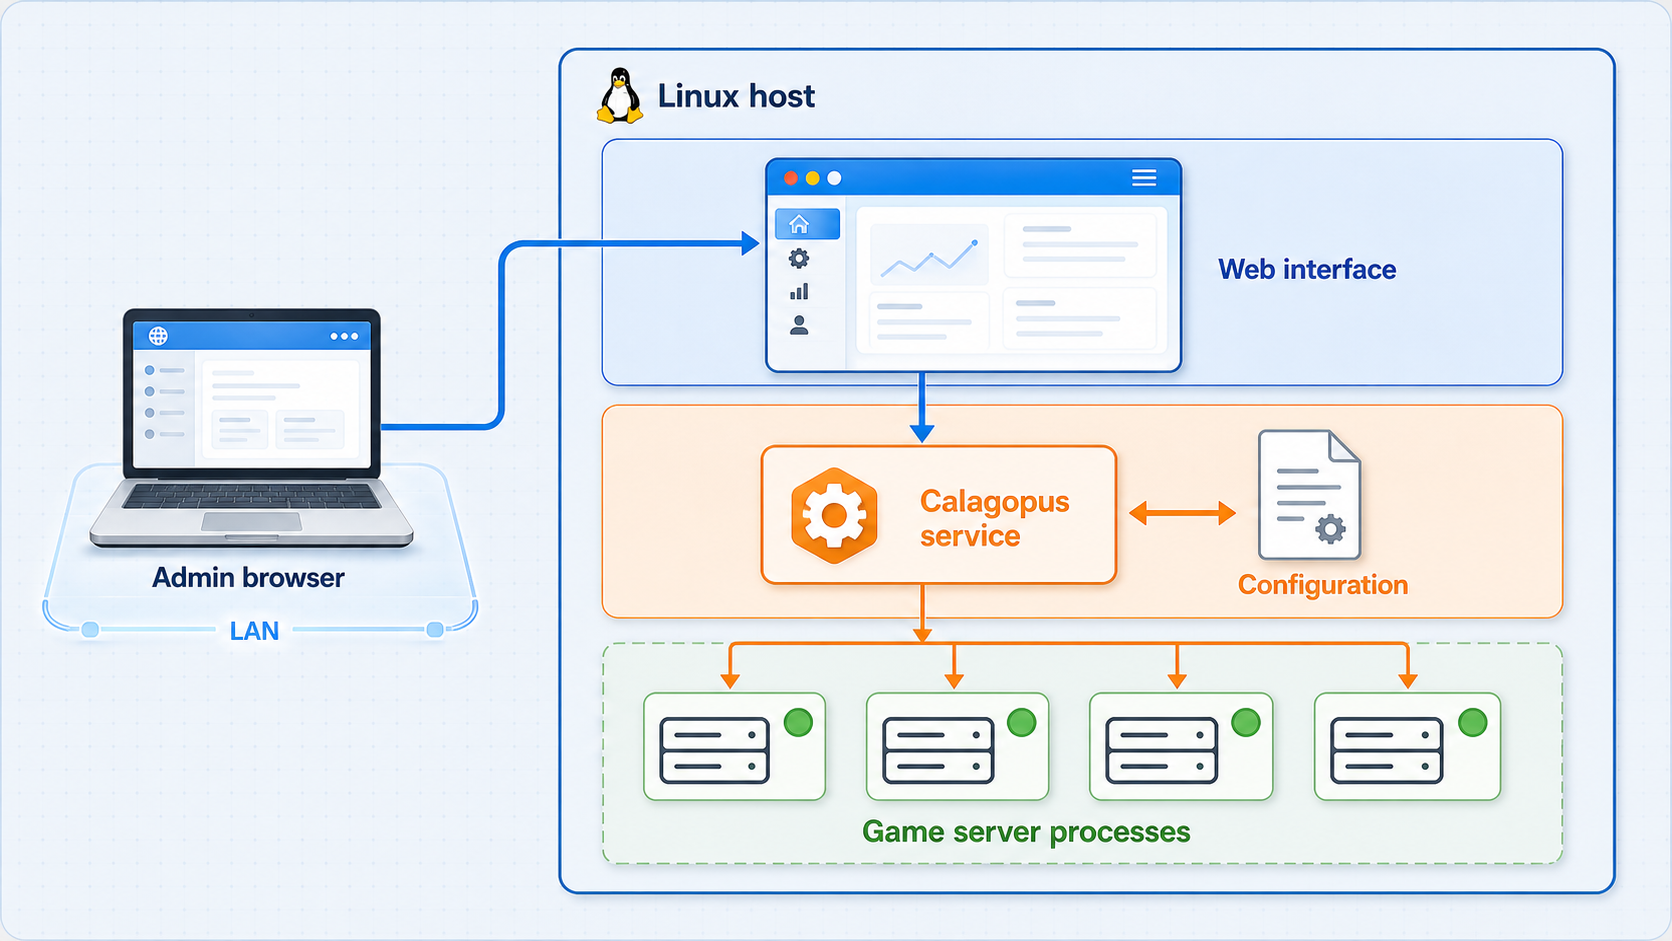
Calagopus is an open-source game-server management panel implemented as a ground-up reimplementation of Pterodactyl Panel. Its backend uses Rust, Tokio, and Axum, while its browser interface uses React, Mantine, and Tailwind. Calagopus manages game servers in Linux Docker containers and is compatible with Pterodactyl-style eggs. The project also provides migration tooling for existing Pterodactyl and Pelican installations.
This guide selects the Docker all-in-one path represented by compose.aio.yml in the official Calagopus repository. The repository also contains minimal, heavy, and database-backup Compose variants. Those variants represent different deployment choices and should not be combined casually. The all-in-one path is used here because it provides a defined repository artifact for a fresh installation and avoids mixing traditional package installation with container deployment.
The commands below pin the checkout to the named release-1.1.4 tag rather than cloning an unspecified moving branch. Calagopus is actively changing, and its main branch had moved beyond that release when this tutorial was verified on August 20, 2026. Pinning makes the repository files used by the deployment internally consistent. Before installing a newer tag, review that release and repeat the configuration checks shown in this guide.
The repository includes .env.example and the Compose definitions that belong to the selected tag. Treat those files as the authority for environment-variable names, image definitions, services, mounts, and published ports. Do not paste environment names or port assumptions from a different Calagopus release, Pterodactyl tutorial, or community Compose file.
compose.aio.yml file from the pinned Calagopus release.
Fresh installation versus panel migration
The procedure in this article creates a fresh Calagopus deployment. It does not import nodes, users, allocations, databases, files, eggs, or credentials from another panel. If you already operate Pterodactyl or Pelican, preserve that installation, create a complete source backup, and follow the dedicated Calagopus migration workflow for the source product. Release 1.1.4 includes a fix related to password encoding in the Pterodactyl and Pelican import flow, which is another reason to keep migration instructions tied to a named release.
A clean Compose deployment and an in-place migration have different data and rollback requirements. Do not point a new Calagopus stack at an existing Pterodactyl or Pelican database unless the current migration documentation explicitly instructs you to do so. Keep the source panel and its backups intact until the imported deployment has been tested.
Prepare the Docker host
Use a Linux host that can run Docker Engine and the Docker Compose plugin. Calagopus manages workloads that run in Linux Docker containers, so the Docker host also needs enough CPU, memory, disk capacity, and network connectivity for the game servers you plan to create. Panel startup alone does not prove that the machine is appropriately sized for a specific game workload.
Calagopus documents ARM64 support, and its Docker Compose setup is described as working on a Raspberry Pi. That confirms architecture support, not a universal performance level. Evaluate storage durability and game-specific resource requirements before using constrained hardware for active servers.
The following host assumptions apply to this tutorial:
- A supported Linux installation with administrative access.
- Git for checking out the pinned Calagopus release.
- Docker Engine and the
docker composeplugin. - Outbound access to retrieve the Git repository and required container images.
- A persistent local filesystem with space for panel data, databases, logs, backups, and managed game files.
- A local browser path to the panel, either from the host or from another trusted machine on the LAN.
- A separate backup destination that is not stored only inside the running containers.
Verify the required host tools
Run these checks before downloading Calagopus. They verify the tools used by the installation without changing the host:
git --version
docker --version
docker compose version
docker info
The final command must successfully communicate with the Docker daemon. If it returns a permission error, use the Docker installation and user-access procedure supported by your operating system. Do not make the Docker socket broadly writable as a shortcut. Access to Docker is effectively administrative access to the host.
Choose an installation directory
Store the repository, environment file, and operational notes in a dedicated location. The example below uses /opt/calagopus. If your organization uses another application directory, substitute it consistently throughout the tutorial.
sudo mkdir -p /opt/calagopus
sudo chown "$(id -u):$(id -g)" /opt/calagopus
cd /opt/calagopus
Keep sufficient free space on the filesystem that backs Docker volumes and Calagopus data. Container images, database growth, server files, archives, and backups can consume substantially more storage than the initial panel checkout.
Decide how the panel should be reached locally
The Compose file for the selected release determines which container port is published and on which host interface. Do not assume a fixed Calagopus port before inspecting the resolved Compose configuration. A service published only on 127.0.0.1 can be reached from the same host, but not directly from another LAN device. A service published on all interfaces has a wider local exposure boundary and should be protected accordingly.
The Calagopus environment file may contain database credentials, application secrets, or other sensitive values defined by the selected release. Do not commit .env to source control, post it in support channels, include it in screenshots, or copy it into a publicly readable backup. Restrict access to both the file and the Docker host.
Install Calagopus 1.1.4 with Docker Compose
The following procedure uses the repository files at the release-1.1.4 tag. It deliberately validates the environment and Compose model before starting containers. If a command fails, stop at that point and resolve the reported error rather than continuing with a partially initialized deployment.
Clone the pinned Calagopus release
Clone the official repository directly into the prepared directory and select release 1.1.4. Pinning prevents later changes on the main branch from silently altering this installation procedure.
Create and review the environment file
Copy the release-provided example to .env, restrict its permissions, and inspect every active setting and placeholder. Replace required placeholders with deployment-specific values while preserving the variable names expected by this release.
Validate the all-in-one Compose model
Ask Docker Compose to resolve variables and render the final configuration. Review the resulting services, images, mounts, volumes, networks, and published ports before anything starts.
Pull images and start the stack
Retrieve the images referenced by the pinned Compose file, then start the services in detached mode. Docker creates the declared networks and volumes as part of this operation.
Verify initialization and container health
Inspect service state and logs. Allow required initialization or database migrations to finish, then confirm that required services remain running without restart loops.
1. Clone and confirm the release
cd /opt/calagopus
git clone --branch release-1.1.4 --depth 1 https://github.com/calagopus/panel.git .
git status
git describe --tags --always
The final command should identify the release checkout rather than an unrelated branch or commit. Do not run production deployments directly from a moving main checkout unless you intentionally accept unreleased changes and have a separate validation process.
2. Create and review the release environment
cp .env.example .env
chmod 600 .env
grep -nEv '^[[:space:]]*(#|$)' .env
Open .env with your preferred local editor. Review every uncommented value. Replace explicit placeholders and example credentials, but do not rename variables. When a value is unclear, inspect how the pinned Compose file references it:
grep -n '\${' compose.aio.yml
docker compose --env-file .env -f compose.aio.yml config --environment
Use the exact variable names and accepted formats present in the checked-out release. Generate independent random values for fields that explicitly require secrets. Do not reuse the Calagopus administrator password, Localtonet device token, host login password, or database credential across systems.
The repository makes the environment example and Compose file release-specific. Reading those pinned files is part of the installation, not a referral to an unspecified document. The validation commands below show the actual configuration Docker will apply on your host, including its published ports and mounted storage.
3. Resolve and inspect the Compose configuration
docker compose --env-file .env -f compose.aio.yml config --quiet
docker compose --env-file .env -f compose.aio.yml config > resolved-compose.yml
chmod 600 resolved-compose.yml
docker compose --env-file .env -f compose.aio.yml config --services
docker compose --env-file .env -f compose.aio.yml config --volumes
The quiet validation command must exit successfully. If Compose reports a missing variable, invalid interpolation, duplicate mount, malformed YAML, or unsupported option, correct that problem before startup. The generated resolved-compose.yml is useful for local review, but it can contain resolved secrets. Keep it private and do not upload it to a public issue.
Review the ports, volumes, and environment sections in the resolved file. Confirm that the host port is not already occupied and that every bind-mounted host directory exists with suitable ownership. Named volumes are created by Docker, while bind mounts depend on host paths.
4. Pull and start Calagopus
docker compose --env-file .env -f compose.aio.yml pull
docker compose --env-file .env -f compose.aio.yml up -d
docker compose --env-file .env -f compose.aio.yml ps
The ps output shows each service, its current state, and any published host ports. A container that was created successfully can still be unhealthy, restarting, or unable to reach its database. Do not proceed solely because up -d returned without an error.
5. Watch initialization
docker compose --env-file .env -f compose.aio.yml logs --tail=200
docker compose --env-file .env -f compose.aio.yml logs -f
Watch for the application becoming ready and for database initialization or migration activity to finish. Exit the live log view with Ctrl+C; this does not stop the containers. Investigate repeated connection failures, permission errors, migration failures, or process exits before opening the panel.
Find the local endpoint and complete first-run setup
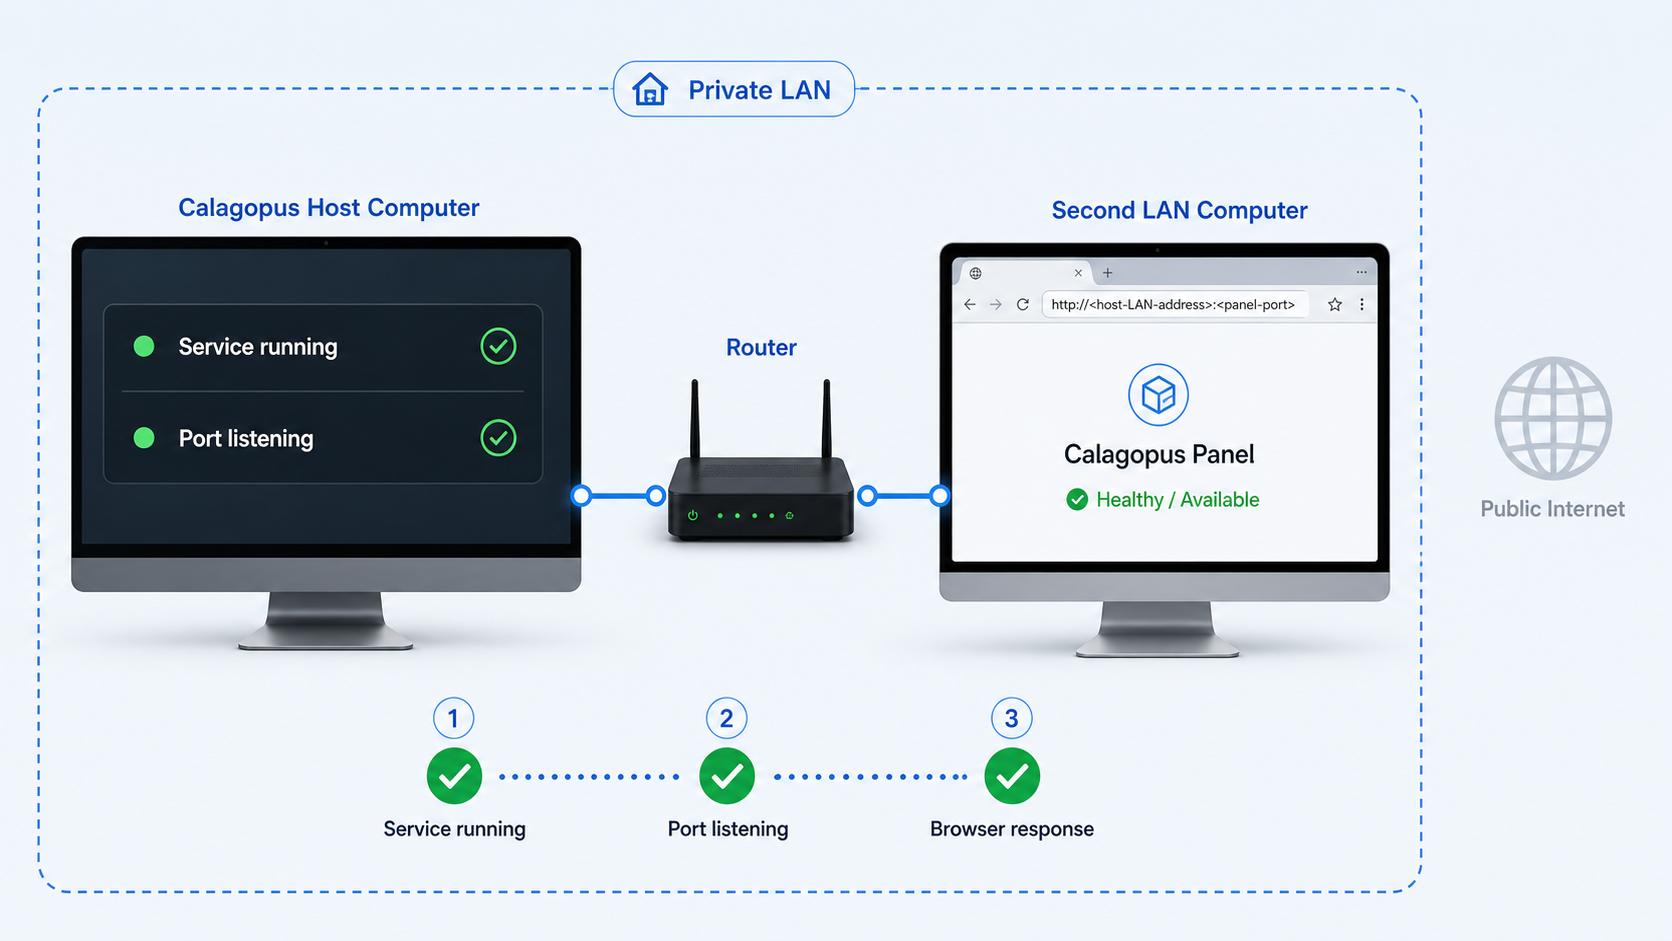
Obtain the host address and published port from the active deployment rather than assuming a universal Calagopus URL:
docker compose --env-file .env -f compose.aio.yml ps
docker compose --env-file .env -f compose.aio.yml config | grep -A 8 'ports:'
In the ps output, a mapping such as 127.0.0.1:HOST_PORT->CONTAINER_PORT means the panel is limited to the Docker host. A mapping such as 0.0.0.0:HOST_PORT->CONTAINER_PORT means it is published on the host's IPv4 interfaces. Replace HOST_PORT in the following checks with the actual value shown by your deployment:
curl -I http://127.0.0.1:HOST_PORT/
curl -v http://127.0.0.1:HOST_PORT/
Use HTTPS in the local test only if the resolved Calagopus deployment or a local reverse proxy actually serves HTTPS. The future Localtonet public address being HTTPS does not change the protocol spoken by the local target.
Complete the guided first-run wizard
Open the verified endpoint in a browser. Calagopus provides a guided first-run wizard that takes the deployment from installation into an administrable panel. Complete every required page using deployment-specific administrative details. Create a unique administrator credential, record it in an approved password manager, and avoid exposing the setup wizard publicly.
The exact fields can change with Calagopus releases. Use the wizard displayed by the pinned 1.1.4 deployment as the authority for required fields. Do not enter placeholder domains, sample passwords, or credentials copied from another panel. After completing the wizard:
- Sign out and sign back in with the new administrator account.
- Load multiple sections of the interface, not only the initial HTML page.
- Confirm that navigation, API-backed data, and static frontend assets load without browser errors.
- Review container logs again for authentication, database, or permission failures.
- Restart the stack once and verify that configuration and first-run state persist.
docker compose --env-file .env -f compose.aio.yml restart
docker compose --env-file .env -f compose.aio.yml ps
docker compose --env-file .env -f compose.aio.yml logs --tail=200
A successful restart is an important persistence test. If the first-run wizard returns, users disappear, or configuration resets, stop and inspect the declared volumes and bind mounts. Do not expose the panel until state survives a controlled restart.
| Verification point | How to check it | Expected result |
|---|---|---|
| Container state | Run docker compose ps |
Required services remain running and avoid restart loops |
| Web listener | Use the published port shown by Compose | The host accepts a connection on the configured local endpoint |
| Complete frontend | Open several panel pages in a browser | Scripts, styles, and API requests load successfully |
| Authentication | Sign out and sign in again | The administrator account works after first-run setup |
| Persistence | Restart the Compose stack | Configuration and administration state remain available |
| Application logs | Review recent Compose logs | No repeated database, migration, filesystem, or startup failures |
Operate, back up, and update the deployment
Routine service commands
cd /opt/calagopus

docker compose --env-file .env -f compose.aio.yml ps
docker compose --env-file .env -f compose.aio.yml logs --tail=200
docker compose --env-file .env -f compose.aio.yml restart
docker compose --env-file .env -f compose.aio.yml stop
docker compose --env-file .env -f compose.aio.yml start
Use stop when you want to retain containers and volumes while taking services offline. A normal docker compose down also retains named volumes unless --volumes is supplied. Avoid down --volumes during ordinary maintenance because it requests deletion of Compose-managed persistent volumes.
Identify persistent storage
docker compose --env-file .env -f compose.aio.yml config --volumes
docker compose --env-file .env -f compose.aio.yml config | grep -A 12 'volumes:'
docker volume ls --filter label=com.docker.compose.project=panel
The first two commands show storage declared by the release. The final command lists volumes associated with the default Compose project name when the project directory is named panel. If you set a different Compose project name, use that name in the filter. Bind-mounted host directories will not appear as Docker named volumes and must be backed up separately.
Create a consistent offline backup
A filesystem copy taken while a database is actively writing might not be transactionally consistent. For a portable baseline backup, schedule downtime, stop the stack, archive every named volume and bind-mounted data directory, and then start the stack again. The following example archives Compose-labeled named volumes after shutdown:
cd /opt/calagopus
BACKUP_DIR="/var/backups/calagopus/$(date +%Y%m%d-%H%M%S)"
sudo mkdir -p "$BACKUP_DIR"
sudo chmod 700 "$BACKUP_DIR"

docker compose --env-file .env -f compose.aio.yml stop

docker volume ls \
  --filter label=com.docker.compose.project=panel \
  --format '{{.Name}}' |
while read -r volume; do
  sudo docker run --rm \
    -v "${volume}:/source:ro" \
    -v "${BACKUP_DIR}:/backup" \
    alpine \
    tar -C /source -czf "/backup/${volume}.tar.gz" .
done

sudo cp .env compose.aio.yml "$BACKUP_DIR/"
sudo chmod 600 "$BACKUP_DIR/.env" "$BACKUP_DIR/compose.aio.yml"

docker compose --env-file .env -f compose.aio.yml start
docker compose --env-file .env -f compose.aio.yml ps
Adjust the Compose project label if your deployment uses another project name. Also archive every host directory shown as a bind mount in the resolved Compose configuration. Store backups on another device or backup system, encrypt sensitive copies, apply retention rules, and test restoration on an isolated host. A backup that has never been restored is not a verified recovery plan.
The repository also contains compose.with-db-backups.yml. That is a separate deployment variant, not an automatic feature of the compose.aio.yml stack used here. Do not assume it is active unless you intentionally deploy and validate that variant according to the same release.
Update to another Calagopus release
Never convert a pinned production installation into a blind pull from main. Select a release, read its release notes, verify its Compose and environment changes, and take a restorable backup first.
cd /opt/calagopus

git fetch --tags
git tag --list 'release-*'

docker compose --env-file .env -f compose.aio.yml stop

git checkout NEW_RELEASE_TAG
git status

diff -u .env.example .env || true
docker compose --env-file .env -f compose.aio.yml config --quiet
docker compose --env-file .env -f compose.aio.yml pull
docker compose --env-file .env -f compose.aio.yml up -d
docker compose --env-file .env -f compose.aio.yml ps
docker compose --env-file .env -f compose.aio.yml logs --tail=200
Replace NEW_RELEASE_TAG only after selecting and reviewing a real published tag. The environment comparison is a review aid, not an instruction to overwrite .env. Merge new required variables deliberately while retaining deployment-specific secrets. After startup, repeat local login, page-loading, persistence, and managed-service tests.
Expose the verified panel with a Localtonet HTTP tunnel
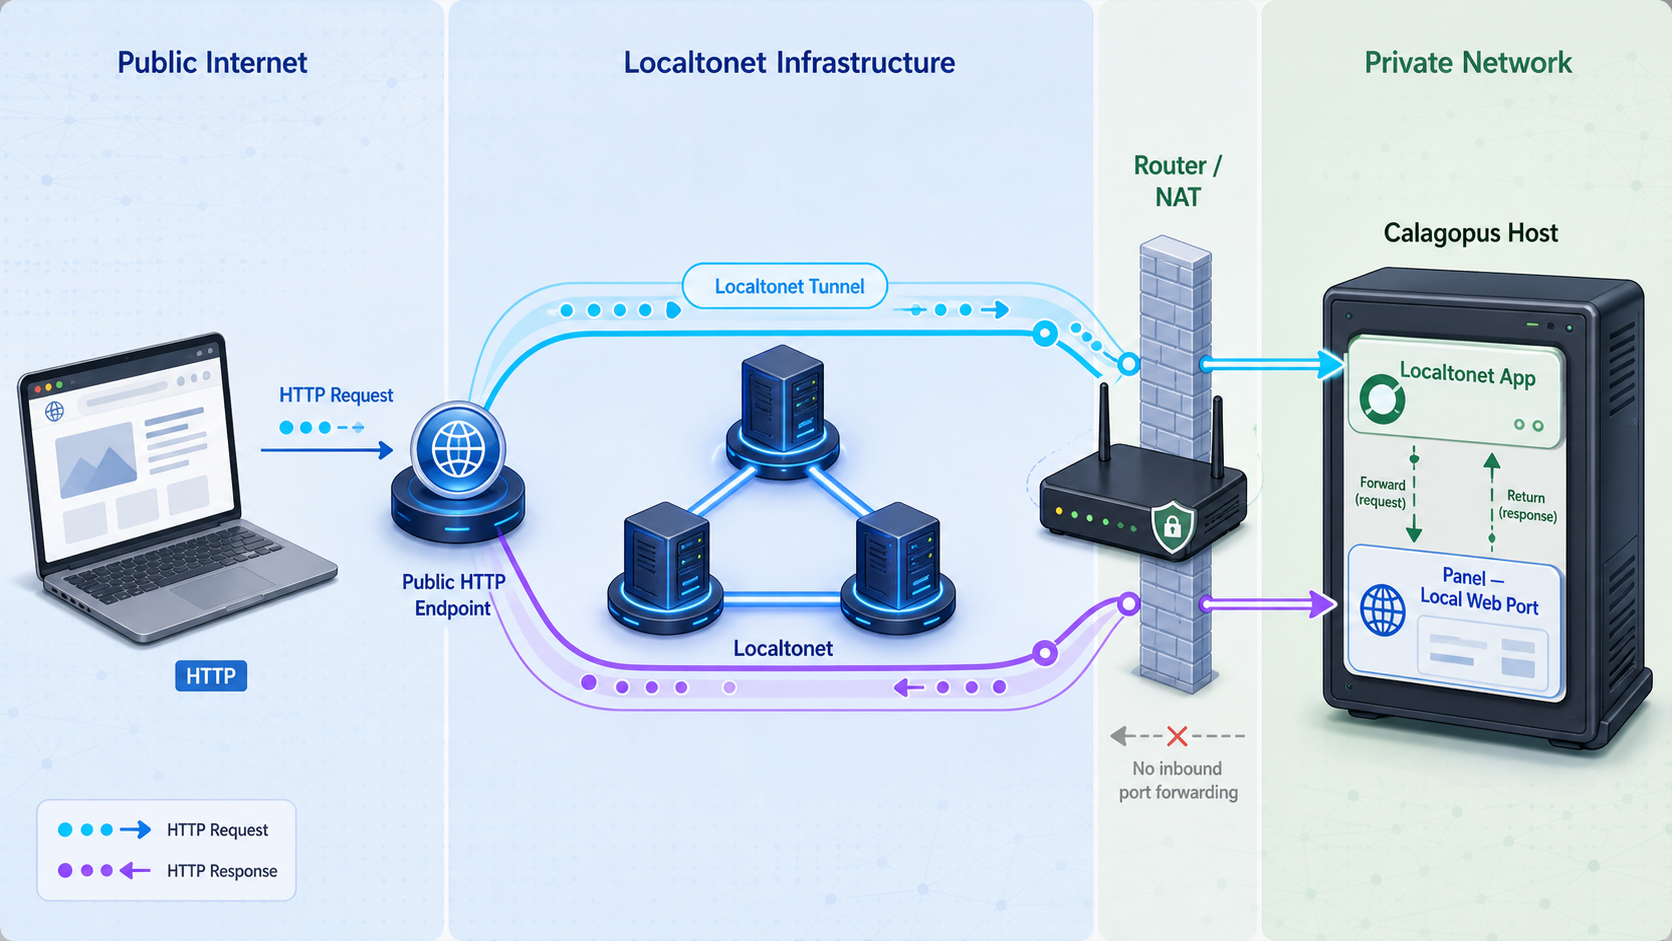
Create the tunnel only after Calagopus works from the device that will run our client. Localtonet establishes an outbound connection to a relay server, providing a public URL without inbound router port forwarding, firewall changes, VPN setup, or a public IP address. The public endpoint is available only while the selected client is connected and the tunnel is running.
The current documented HTTP tunnel sequence is installation, opening the HTTP Tunnel page, selecting a Process Type, selecting the AuthToken and server, entering the local IP address and port, and pressing Start. Do not replace that sequence with a generalized tunnel lifecycle.
Install and run the Localtonet app
Install our client for the operating system on the Calagopus host or another device that can reach the verified local endpoint. Keep the client running so it can maintain the outbound relay connection.
Open the HTTP Tunnel page
In the Localtonet dashboard, go to the HTTP Tunnel page to create the web tunnel configuration.
Select the Process Type
Choose Random Sub Domain, Custom Sub Domain, or Custom Domain as available for your account and current dashboard. All three process types serve the configured content at a public HTTPS address. Check current documentation before making custom-domain DNS changes.
Select the AuthToken and relay server
Select the device-specific AuthToken for the client that can reach Calagopus, then select an available server from the current dashboard. Never publish, guess, or hardcode an AuthToken or server code in an article, repository, screenshot, or support message.
Enter the verified local IP address and port
Use the Calagopus endpoint confirmed during local testing. If Localtonet runs in a separate container or on another LAN device, 127.0.0.1 refers to that client environment, not automatically to the Calagopus container or host.
Press Start and test the public URL
Creating the configuration does not start it. Press Start, open the assigned public URL, and test sign-in and authenticated navigation from outside the local network when possible.
For the current interface and option descriptions, consult our Localtonet HTTP tunnel documentation. Available relay choices and account capabilities can vary, so select current dashboard values rather than copying an old example.
A tunnel provides connectivity to the configured target. It does not replace Calagopus authentication, least-privilege administration, host updates, backups, or credential protection. Finish the first-run wizard locally, verify sign-in, and remove placeholder credentials before starting public access.
Keep panel traffic separate from game ports
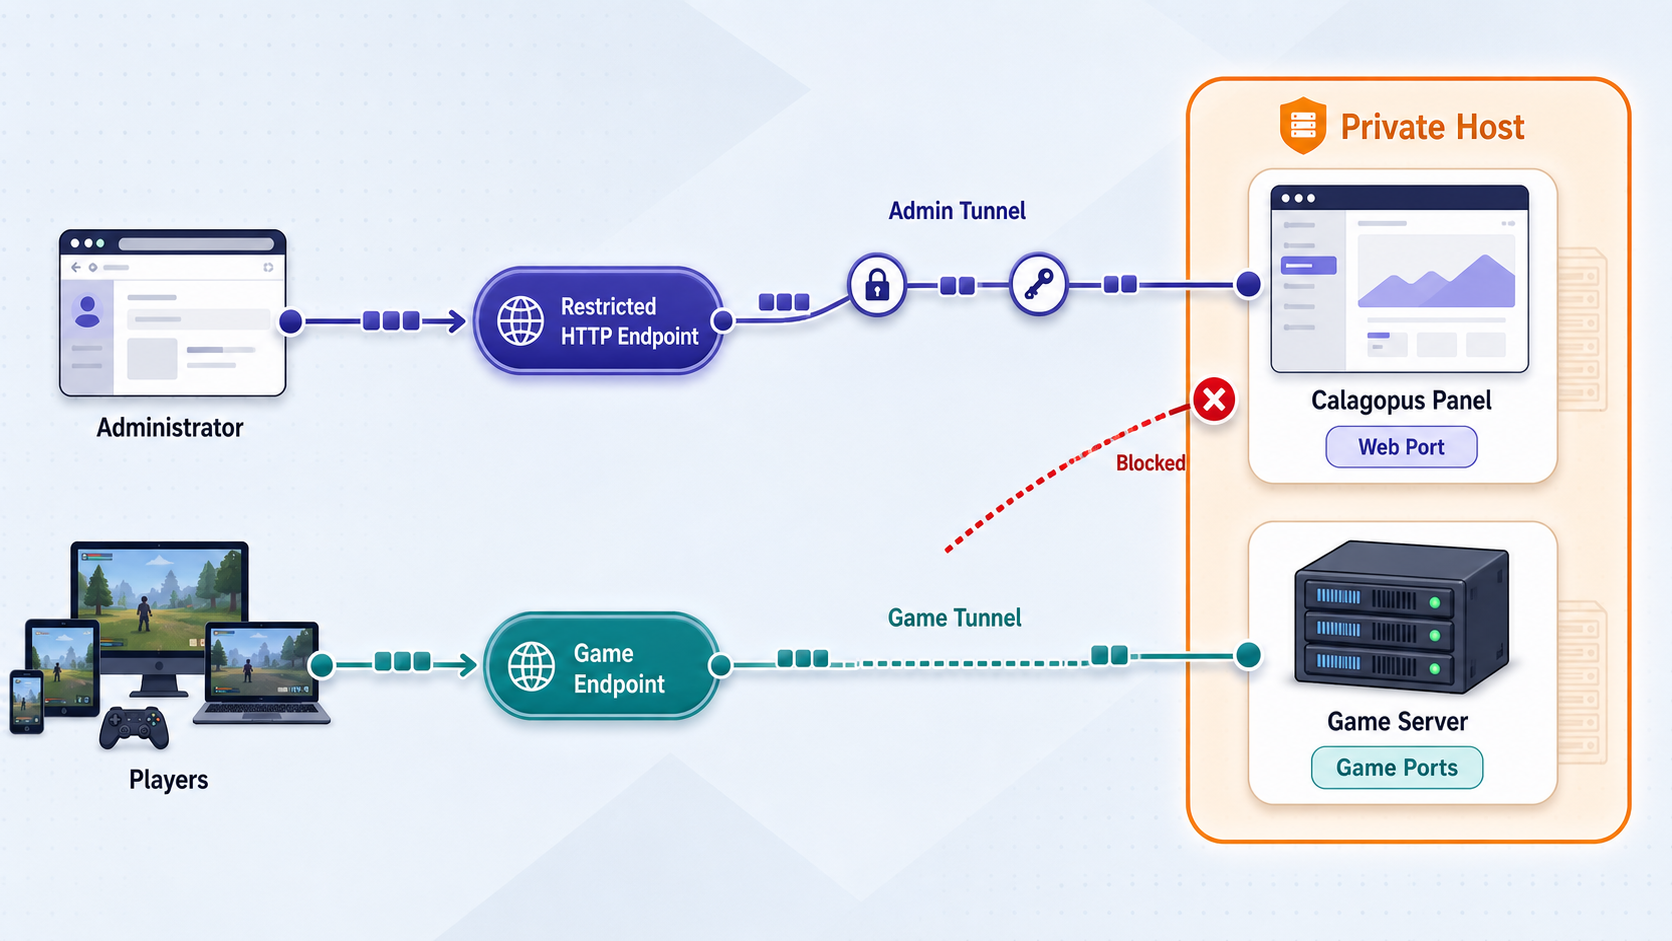
The Calagopus panel is a browser application, so an HTTP tunnel is appropriate for its verified web endpoint. Managed game servers may use raw TCP, UDP, or both. Publishing the panel does not publish those game services, and exposing a game port does not expose the panel.
| Service | Localtonet family | Information required first |
|---|---|---|
| Calagopus web interface | HTTP tunnel | Verified local IP address, web port, working interface, and authentication |
| TCP game service | TCP tunnel | The specific game's documented TCP port and reachable local address |
| UDP game service | UDP tunnel | The specific game's documented UDP port and reachable local address |
| Service requiring both transports | Combined UDP/TCP or separate configurations as appropriate | Authoritative confirmation of both transports and their exact ports |
Pterodactyl-style egg compatibility does not imply that every egg uses the same port or transport. Read the selected game's configuration and egg variables, verify the active listener, and expose only the required service. Do not point player traffic at the Calagopus administration URL.
Troubleshoot installation and remote access
A container exits or repeatedly restarts
docker compose --env-file .env -f compose.aio.yml ps -a
docker compose --env-file .env -f compose.aio.yml logs --tail=300
docker inspect CONTAINER_NAME
Look for an invalid environment value, unavailable dependency, failed migration, occupied port, missing file, or permission error. Correct the underlying condition and recreate the affected services with docker compose up -d. Do not repeatedly delete volumes to make the error disappear because that can destroy the state needed for diagnosis or recovery.
The panel cannot connect to its database
Confirm that the required database service is running, that the application and database share the expected Compose network, and that the credentials in .env match the active database initialization. Inside a Compose network, applications usually address another service by its Compose service name rather than 127.0.0.1. Use the values and service names resolved from the pinned files.
docker compose --env-file .env -f compose.aio.yml ps
docker compose --env-file .env -f compose.aio.yml config --services
docker compose --env-file .env -f compose.aio.yml logs --tail=200
If credentials were changed after the database volume was initialized, changing only .env may not rewrite the existing database account. Restore the matching configuration or follow a documented credential-rotation procedure. Do not delete the database volume unless this is an intentionally disposable fresh installation.
Logs show permission denied
Determine whether the failing path is a named volume or a bind-mounted host directory. For bind mounts, compare host ownership and permissions with the user expected by the container image. Avoid granting world-writable permissions. Correct only the specific path and identity involved.
docker compose --env-file .env -f compose.aio.yml config | grep -A 12 'volumes:'
ls -ld /PATH/SHOWN/BY/THE/COMPOSE/CONFIG
docker compose --env-file .env -f compose.aio.yml logs --tail=200
The first page appears, but the interface never finishes loading
Open the browser developer tools and inspect failed network requests. A returned HTML document does not prove that frontend assets and backend API calls work. Check for incorrect origins, proxy headers, unreachable API requests, authentication failures, and static files returning error pages. Compare the failure with the container logs while reloading the page.
First test the exact local URL. If local access works but the tunnel URL fails, focus on the tunnel target and application behavior through a public origin. If local access also fails, repair Calagopus before changing Localtonet.
The local endpoint is unreachable
docker compose --env-file .env -f compose.aio.yml ps
docker compose --env-file .env -f compose.aio.yml config | grep -A 8 'ports:'
curl -v http://127.0.0.1:HOST_PORT/
Verify the actual host port and bind address. A listener bound to 127.0.0.1 is not reachable through the host's LAN address. A port can also be published only on IPv6 or be occupied by another service. Use the active Compose output rather than guessing a common port.
The Localtonet public URL returns a connection error
Test the Calagopus target from the same operating-system environment in which the Localtonet client runs. If the client runs on another machine, test the host's reachable LAN address rather than 127.0.0.1. If it runs in a container, container loopback refers to that container. Enter the exact reachable IP address and port in the HTTP tunnel configuration.
The client or tunnel is disconnected
Confirm that the selected Localtonet client device is online and authenticated with the intended device-specific token. Then confirm that the tunnel itself has been started. Creating or saving a tunnel does not make it active. The endpoint stops being available if the client disconnects or the tunnel is stopped.
Also verify that the tunnel uses the correct token and current relay selection. Do not attempt to fix a disconnection by publishing the device token or substituting a token from another device.
The panel works locally but authentication fails publicly
Confirm that the browser is reaching the intended Calagopus deployment and not another service on the same host. Review application logs while attempting sign-in. If cookies, redirects, or origin-sensitive behavior is involved, use the current Calagopus configuration supported by the installed release. Do not disable authentication or browser security controls as a workaround.
First prove that Calagopus is healthy at the exact target address from the Localtonet client device. Then test the public URL. This separates application, database, permission, and bind-address failures from token, target, client, relay, and tunnel-state problems.
Frequently asked questions
Which Calagopus version does this tutorial install?
It checks out the official release-1.1.4 tag and uses that release's .env.example and compose.aio.yml files. The project evidence and procedure were reviewed on August 20, 2026. Review later release notes and configuration changes before substituting another tag.
What is the default Calagopus port?
This tutorial does not assume a universal port. Run docker compose ps and inspect the resolved ports configuration for the pinned release. The host port shown by the active deployment is the value to test and, later, use as the Localtonet target.
Can Calagopus run on ARM64 or a Raspberry Pi?
Calagopus states that ARM64 is supported and that its Docker Compose setup works on a Raspberry Pi. The host still needs enough memory, CPU, storage, and network capacity for the panel and the specific game servers you intend to manage.
Can I import Pterodactyl or Pelican with these fresh-install commands?
No. Calagopus provides migration tooling for both panels, but migration is a separate operation with source backups, compatibility checks, import steps, and rollback planning. Do not point a fresh stack at an existing panel database unless the current migration procedure explicitly requires it.
Do Pterodactyl eggs work with Calagopus?
Calagopus is designed to reuse Pterodactyl-style eggs, and the project includes a Rust implementation of relevant validation behavior. Individual eggs still have their own images, variables, ports, protocols, and resource requirements, which must be reviewed before deployment.
Must Localtonet run on the Calagopus host?
Not necessarily. Our client can run on the Calagopus host or another device that can reach the panel's local IP address and port. The selected device must remain connected and the tunnel must remain running for the public URL to stay available.
Does the HTTP tunnel expose Calagopus-managed game servers?
No. The HTTP tunnel targets the panel's web interface. A managed game server may require TCP, UDP, or both on separate ports. Configure player-facing connectivity separately only after verifying the exact protocol and port for that game service.
Will deleting containers erase the panel?
Properly mounted persistent data can survive container recreation, but data stored only in a container's writable layer does not. Inspect the resolved volumes and bind mounts, test a controlled restart, maintain independent backups, and avoid docker compose down --volumes during routine maintenance.
Connect to your verified Calagopus panel with Localtonet
Finish the pinned Docker deployment, complete first-run administration, confirm persistence, and test the exact local endpoint first. Then use our documented HTTP tunnel sequence to provide remote panel access without configuring inbound router port forwarding.
Get Started Free →

