

Plan an xsrv deployment, identify the real application endpoint, and publish that verified HTTP service with Localtonet
xsrv is an Ansible collection and set of utilities for installing and managing self-hosted services on Debian-based servers. It is not one web application with a universal installation command, port, or public interface. The versioned material verified for this revision confirms the xsrv 2.2.0 project structure, role catalog, installation phases, command-line utility, single-server starter concept, and release-specific upgrade commands, but it does not include the executable first-install commands, complete inventory format, or role-variable definitions required for a safe command-by-command installation tutorial. This article is therefore scoped as a planning, architecture, verification, and remote-access guide rather than inventing an unsupported xsrv installation procedure.
📋 What's in this guide
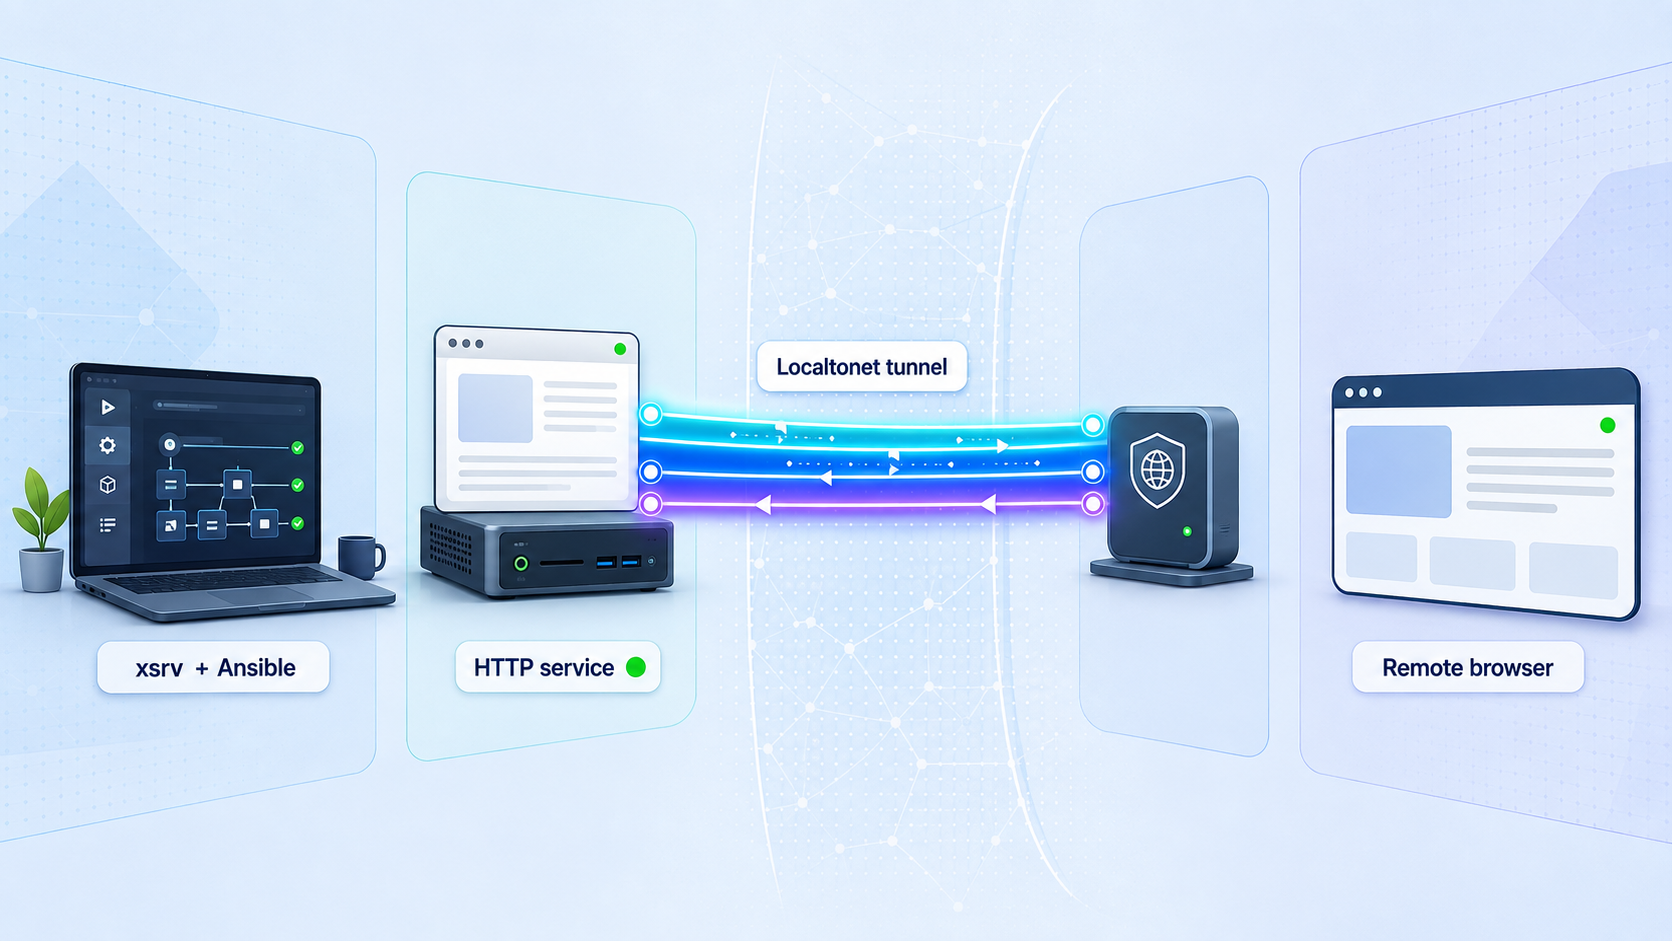
What this guide can verify about xsrv 2.2.0
The current xsrv documentation identifies itself as version 2.2.0 and describes xsrv as a collection of Ansible roles, an optional command-line tool, and a starter template for a single-server environment. That version identification was verified against the published documentation and the 2.2.0 release entry dated August 26, 2026.
The verified documentation index divides a first installation into three areas: server preparation, controller preparation, and first-project creation. It also provides separate navigation for configuration variables, tags, maintenance, and the changelog. Those headings establish the supported workflow, but the extracted version-matched material available for this article does not contain the actual preparation commands, dependency versions, inventory syntax, generated project files, prompts, or complete role configuration needed to reproduce a first installation.
A reliable installation tutorial must reproduce exact, version-matched commands and configuration. It would be unsafe to fill those gaps with generic Ansible commands, guessed package names, an assumed inventory layout, or variables copied from another xsrv release. Use this guide to design and validate the deployment and to add Localtonet after the application works. Do not represent the planning sequence below as an executable xsrv installer.
The distinction is especially important because the command examples confirmed in the 2.2.0 release entry appear inside an upgrade procedure for existing installations. Commands such as xsrv upgrade, xsrv check, and xsrv deploy are real, but their presence in that migration procedure does not prove that they are the complete sequence for creating a new controller, preparing a new server, or generating a first project.
Readers completing a fresh deployment should use the versioned xsrv documentation and open its Server preparation, Controller preparation, and First project pages. Confirm that the displayed documentation version still matches the release being installed. The documentation link is a necessary supplement here because the verified material does not contain enough command-level detail to reproduce those pages accurately.
First installation and release migration are different procedures
| Procedure | Purpose | What is verified here |
|---|---|---|
| Server preparation | Prepare the Debian-based managed server | Confirmed as a first-install documentation phase, but its executable commands and supported release matrix are not present in the verified extract |
| Controller preparation | Prepare the environment that controls the Ansible deployment | Confirmed as a separate first-install phase, but dependency and installation commands are not present in the verified extract |
| First project | Create a deployment project and select the intended managed server | Confirmed as a documented phase and supported by a single-server starter concept, but the exact project and inventory format is not present |
| 2.2.0 upgrade | Migrate an existing xsrv installation to release 2.2.0 | Release-specific prerequisites and the commands xsrv upgrade, optional xsrv check, and xsrv deploy are documented |
Never apply migration instructions to a first installation merely because they are the only commands visible in a release note. An upgrade starts from an existing project and may depend on earlier state, old variables, installed roles, facts on managed hosts, and intermediate release migrations.
Understand the xsrv and Localtonet architecture
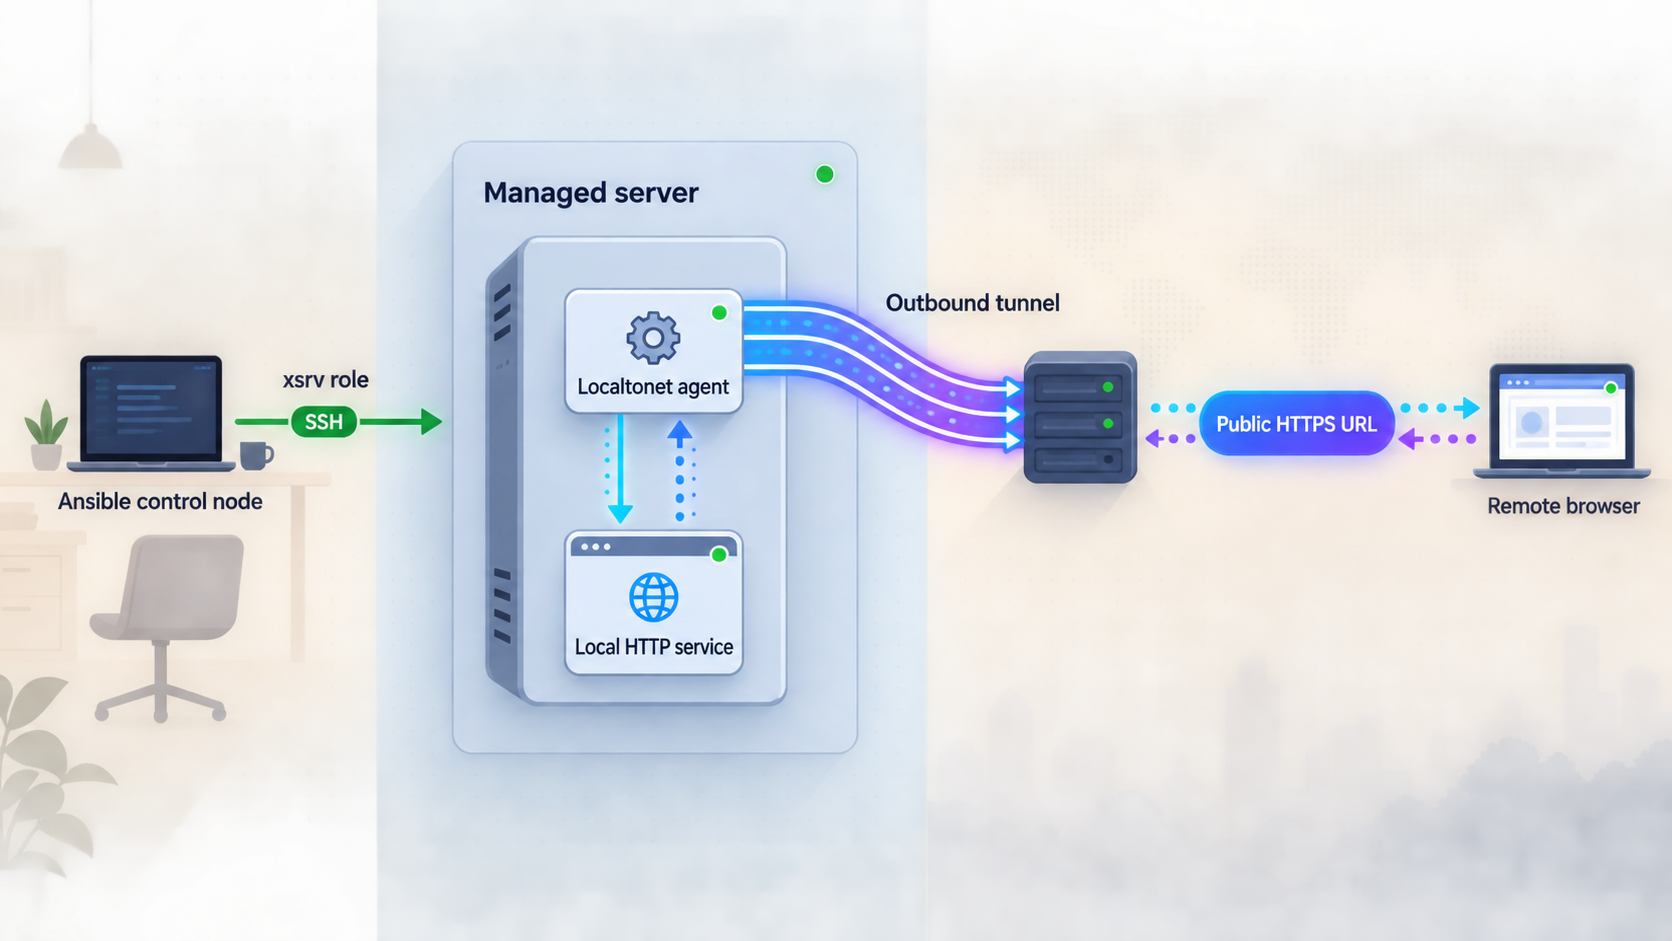
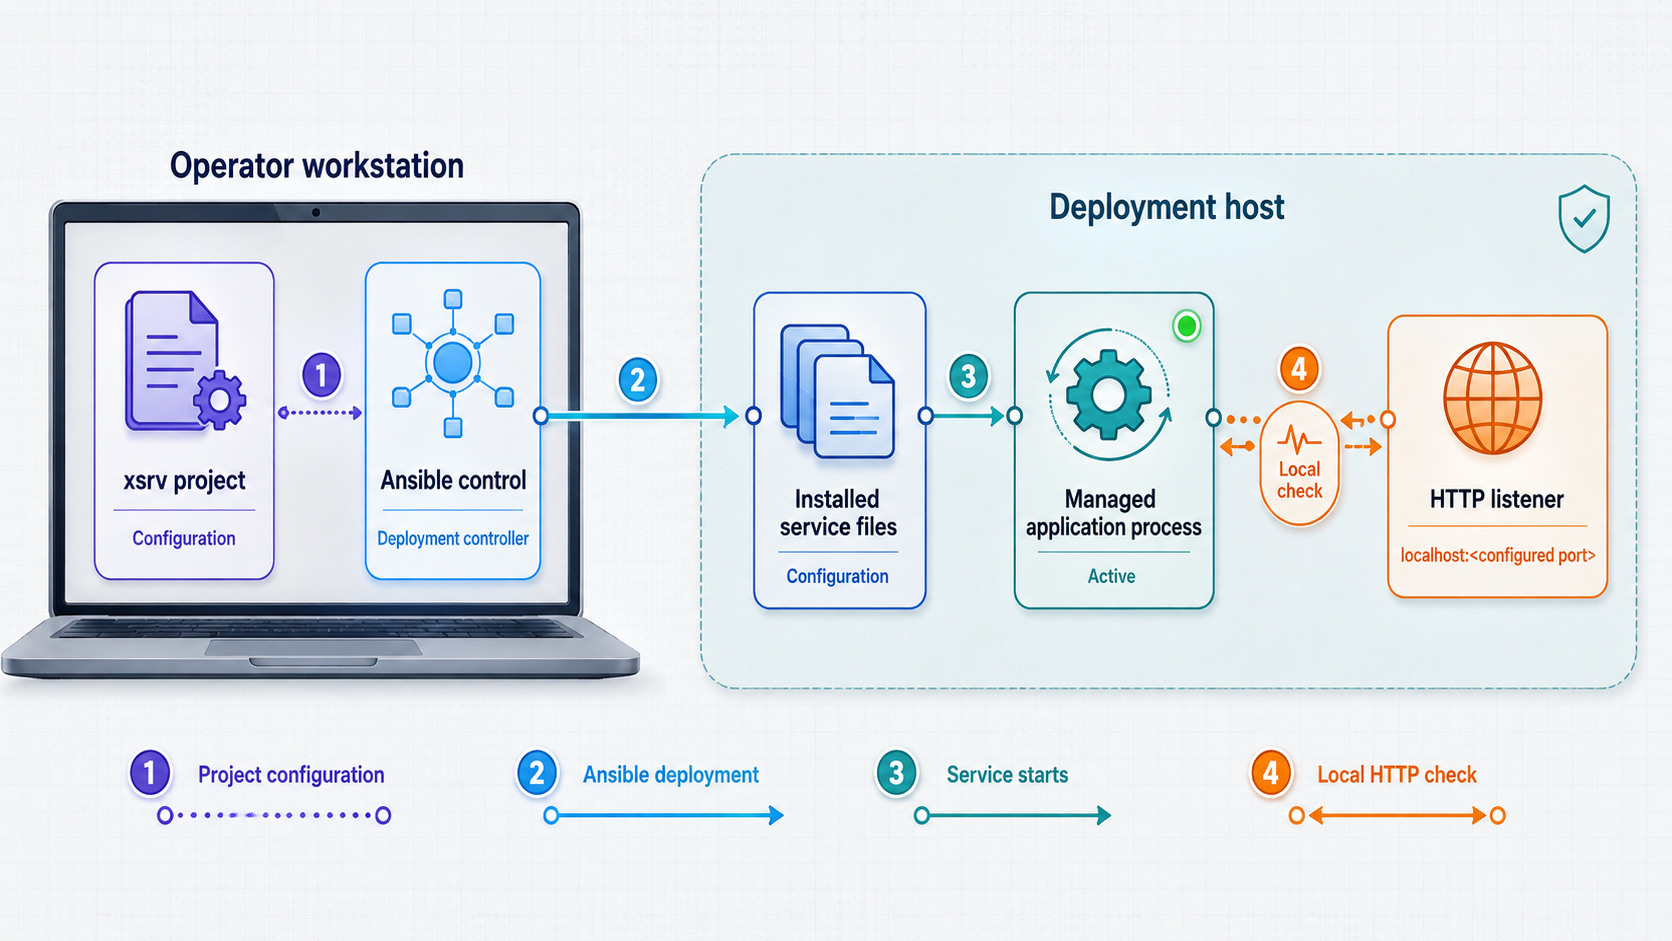
xsrv does not provide one generic web endpoint. It automates the installation and configuration of selected services. The role chosen for a project determines what software is deployed, which variables are required, how persistent data is handled, and whether an HTTP interface exists.
The verified role catalog includes HTTP-facing applications such as Gitea, homepage, Jellyfin, Jitsi, Kiwix, Grafana, Nextcloud, Owncast, SearXNG, Shaarli, Transmission, and Tiny Tiny RSS. It also includes infrastructure and non-HTTP roles such as PostgreSQL, Samba, Dovecot, Mumble, WireGuard, dnsmasq, backup, OpenLDAP, and monitoring components. Inclusion in the xsrv catalog does not mean every role should be published through an HTTP tunnel.
For a concrete planning example, consider the xsrv homepage role, which the project catalog describes as a simple webserver homepage or dashboard. This is useful for understanding the workflow because it is HTTP-facing. However, the verified evidence does not include that role’s required variables, installation tags, listener port, file locations, or authentication capabilities. This article therefore does not provide a guessed host_vars file or claim a default port.
The same boundary applies to every other role. An upstream application may document a common port, but an xsrv role can place that application behind Apache, change its binding, or introduce role-specific configuration. The tunnel target must come from the deployed result, not from an unrelated upstream tutorial.
Plan the first installation before changing a server
A first deployment should begin with a written plan. This makes the missing or role-specific values visible before automation changes the target. It also gives you a baseline for deciding whether a deployment succeeded and whether remote access is appropriate.
Choose a version and keep every instruction version-matched
This guide discusses xsrv 2.2.0 as documented and released on August 26, 2026. Before installing, verify the version shown by the live documentation and release page. If a newer release is available, use its installation pages and review every relevant change between versions rather than combining 2.2.0 commands with newer role variables.
Save the release identifier in your deployment notes. Also record the date on which you checked the documentation. This provides context when troubleshooting a project after the documentation or role catalog changes.
Select one HTTP-facing role for the first deployment
Begin with one intended application and only the supporting roles required by its documentation. A first run that simultaneously introduces a database, reverse proxy, monitoring stack, file service, VPN, identity service, media server, and backup system creates too many possible failure points.
For the homepage planning example, collect the complete role documentation before proceeding. Identify every required variable, the documented host group or role-selection mechanism, persistent content locations, listener behavior, and any security controls. If the role does not provide authentication, do not assume that putting it behind a public HTTPS address makes the page private.
Identify the controller and managed server
Decide which machine will be the xsrv controller and which Debian-based machine will be managed. Record their hostnames and addresses, but do not publish that inventory. Confirm that the target is a system you are authorized to manage.
The controller must be able to reach the managed server using the connection and privilege method required by the version-matched xsrv documentation. Because those exact requirements are absent from the verified extract, this guide does not prescribe an SSH user, Python package, Ansible version, privilege command, or controller operating system.
Inventory existing services and ports
Before applying a role, list the services already running on the target and note their listening addresses. A web application or reverse proxy can conflict with an existing listener even if its deployment configuration is otherwise valid. Also record existing databases, storage mounts, virtual hosts, firewall rules, scheduled tasks, and backup jobs that could be affected.
Plan persistent data and recovery
Determine which application data must survive redeployment or server replacement. Depending on the selected role, this may include configuration, uploaded content, repositories, databases, media, generated keys, or account data. Obtain exact paths from the role documentation instead of assuming standard upstream locations.
xsrv includes a backup role based on rsnapshot, but the existence of that role does not prove that an application is automatically backed up. Verify what is included, where backup data is written, what retention applies, and how restoration is performed. Test restoration before relying on the backup for an upgrade or rollback.
Keep passwords, private keys, application tokens, database credentials, and Localtonet device tokens out of public repositories, screenshots, issue reports, and copied terminal transcripts. Use only the secret-management method documented for the selected xsrv workflow.
Prepare the project, host selection, and role values
The official xsrv documentation separates first-project creation from server and controller preparation. Preserve that order when using the full version-matched pages: prepare the managed server, prepare the controller, and then create the first project. Do not treat an optional command-line utility responding successfully as proof that the server or project is ready.
A project should make the intended target unambiguous. Before deployment, you should be able to answer all of the following questions:
- Which exact managed host will receive the role?
- Which xsrv release and role documentation were used?
- Which role or roles are selected?
- Which variables are mandatory for that role?
- Which values are secrets, and how are they protected?
- Where will persistent application data be stored?
- Will the application listen directly or sit behind a reverse proxy?
- What local IP address and port should become available?
- What observable result proves that the deployment worked?
How to obtain values that vary by deployment
| Value | Where to obtain it | Validation |
|---|---|---|
| Managed hostname | Your authorized server inventory and the xsrv first-project procedure | Confirm it resolves or connects to the intended server before deployment |
| Role variables | The configuration-variable documentation for the exact xsrv role and release | Check required values, types, defaults, and examples against the selected version |
| Credentials | Generate or supply them using the role’s documented secret workflow | Confirm they are not committed, logged, or exposed in generated documentation |
| Application port | The deployed configuration, reverse-proxy configuration, or operating-system listener inspection | Make a successful request from the Localtonet client device |
| Application hostname | The role’s hostname, external-URL, or reverse-proxy documentation where applicable | Check redirects, generated links, sign-in, assets, and logout behavior |
| Persistent paths | The selected role’s storage and backup documentation | Create and restore test data before production use |
xsrv publishes lists of configuration variables and tags. Use those lists only for the matching release. A tag selects documented work within the project, but it is not a replacement for complete role configuration. A partial or utility-tag run may not install all components required by a new service.
Do not manufacture a sample project file
Configuration examples are useful only when their schema, filenames, inventory groups, variable names, and paths have been verified. None of those details is complete in the evidence available for this revision. A plausible YAML example could send automation to the wrong host or configure unsupported variables, so this guide intentionally omits one.
Once the version-matched installation pages have been followed, review generated files before deployment. Confirm the target host and role selection, inspect every placeholder, and search the project for unresolved example values. Keep an untouched backup or version-control checkpoint of the non-secret configuration so you can identify later changes.
Deploy and verify the selected HTTP application locally
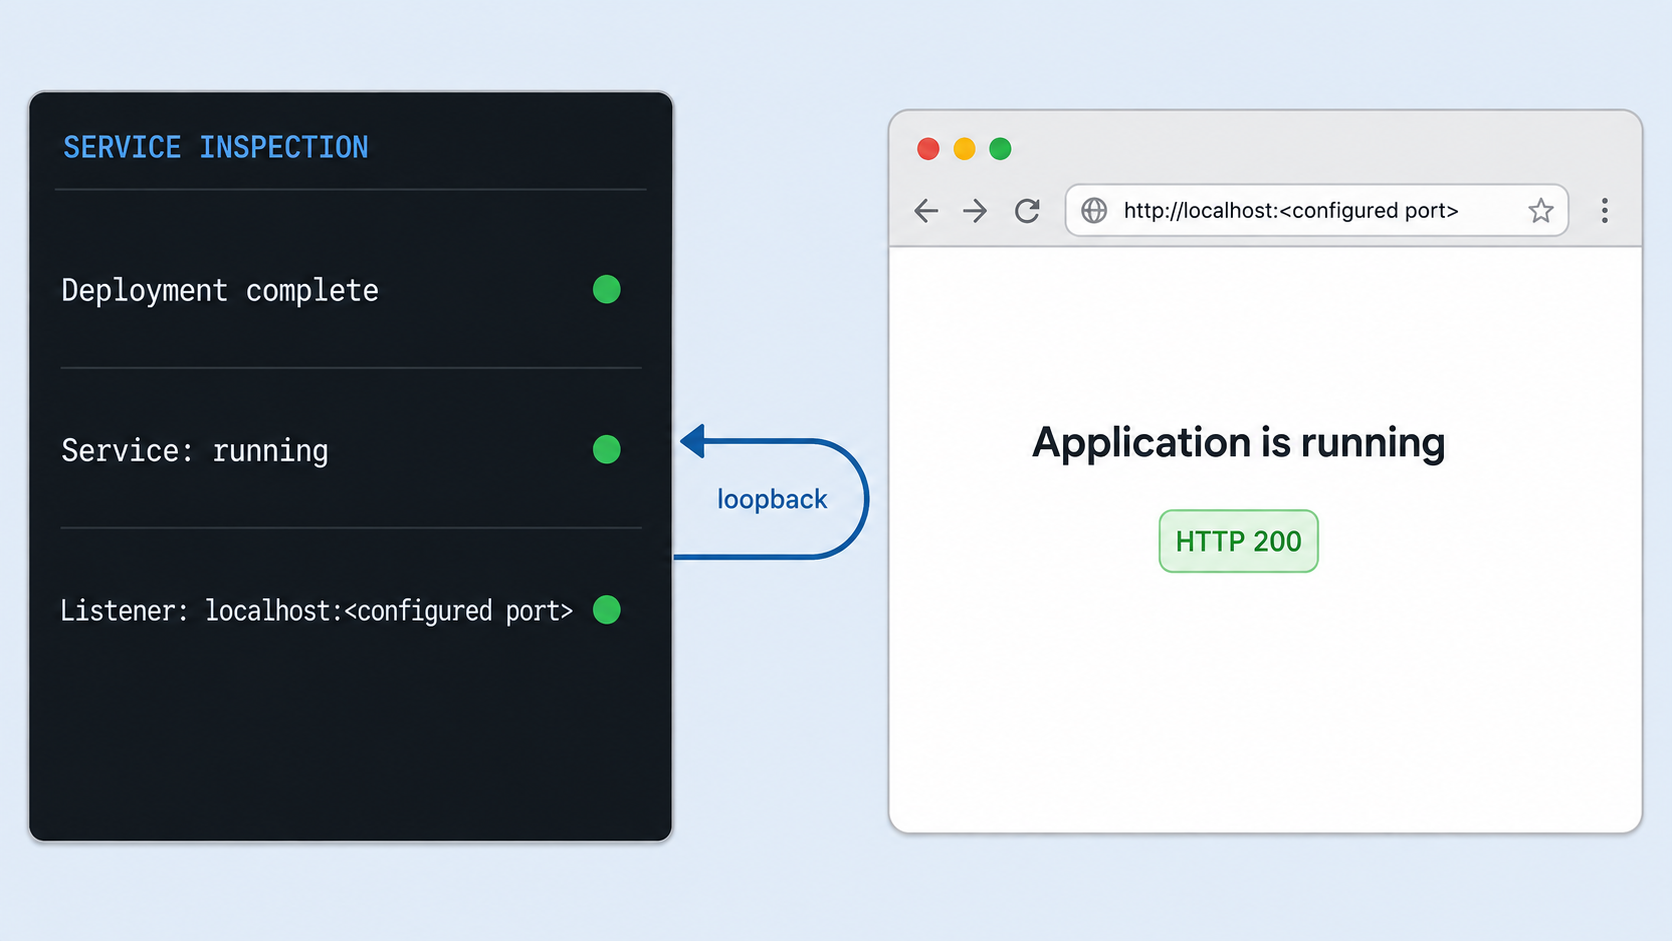
Use the deployment and checking procedure from the first-project documentation for the installed release. Do not infer the fresh-install command sequence from the 2.2.0 migration notes. The release notes confirm xsrv check as an optional simulation and xsrv deploy as the operation that applies changes within that documented upgrade path, but they do not establish every prerequisite for a new project.
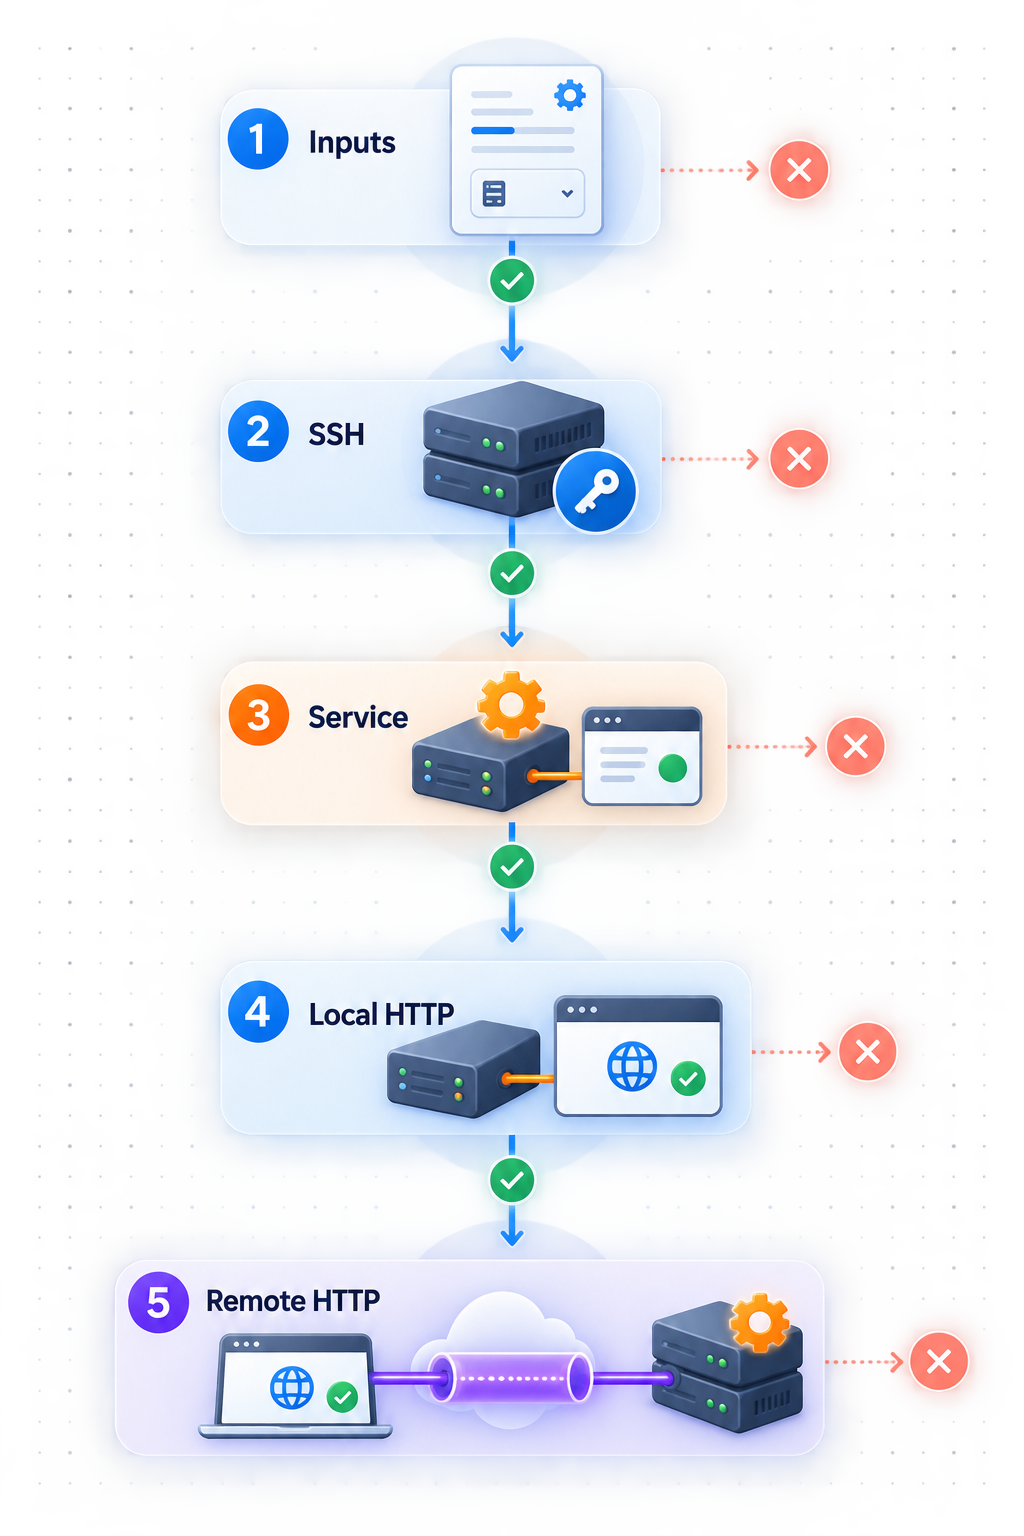
A complete local verification should progress through several layers. This isolates configuration-management problems from application problems and later separates both from tunnel problems.
- Deployment result: confirm that the documented deployment operation completed for the intended host. Investigate relevant failed, unreachable, or unexpectedly skipped tasks.
- Service state: use the role’s documented validation method to confirm that the application and required supporting components are running.
- Listener discovery: identify the actual local IP address and HTTP port from the deployed configuration, reverse-proxy configuration, or operating-system inspection.
- Server-local request: request the endpoint from the managed server and confirm that it returns the intended application rather than a default web page or setup error.
- Application setup: complete any administrator, storage, database, hostname, or first-run configuration through a trusted local path.
- Functional test: sign in with a test account and complete a harmless normal action. A process being active does not prove the application works.
- Client-path test: make the same request from the device that will run Localtonet. This proves that the tunnel client can reach the chosen target.
Record the verified local endpoint privately using placeholders in shared documentation, such as http://<application-host>:<verified-port>. Replace those placeholders only in your private deployment record. The host may be loopback, a LAN address, or a reverse-proxy hostname depending on where the Localtonet client runs and how the role was configured.
If the application listens on 127.0.0.1, a Localtonet client on the same server may be able to target that listener. A client on another machine cannot use its own 127.0.0.1 to reach the xsrv server. Either run our client on the application host or use a documented, appropriately restricted listener that is reachable from the client device.
Observable local success criteria
Do not continue to public access until every criterion relevant to the application is satisfied:
- The intended xsrv host was changed, and no unintended host was targeted.
- The deployment completed without an unresolved relevant failure.
- The expected service and its required dependencies are running.
- The discovered listener matches the intended application or reverse proxy.
- The Localtonet client device can reach that listener.
- The expected page loads with its styles, scripts, and images.
- Authentication works with a non-administrator test account.
- Redirects remain on the intended application and do not reveal an internal hostname.
- No unfinished setup wizard, directory listing, default site, or administrative bootstrap page is exposed.
- Persistent test data remains available after the application’s documented restart procedure.
Add remote HTTP access with Localtonet
Once the application works through the exact local address available to the client device, Localtonet can expose it without inbound router port forwarding, firewall changes, VPN setup, or a public IP address. Our client establishes an outbound connection to a Localtonet relay. The resulting HTTP tunnel provides a public HTTPS address for the local IP address and port you selected.
These instructions follow the verified Localtonet HTTP tunnel workflow. Dashboard labels and available relay locations can change by product version, region, or account, so use the current values displayed in your dashboard rather than copying a hardcoded relay code.
Install and run the Localtonet client
Install our client on the xsrv-managed server or another device that can reach the verified application endpoint. Keep the client running whenever remote access is needed.
Authenticate and select the client device
Use the device-specific authentication token for the client and select that device for the tunnel. Treat the token as a secret. Do not place it in the xsrv project, screenshots, shared logs, or version control.
Select an available relay server
Choose an available relay server or region from the current dashboard. Do not hardcode or guess a server code because available values can vary.
Create the HTTP tunnel configuration
Select the HTTP tunnel type and enter the exact local IP address and port verified from the Localtonet client device. For the process type, choose Random Sub Domain, Custom Sub Domain, or Custom Domain as appropriate and available. These process types serve the same target content at a public HTTPS address. Check the current documentation before configuring custom-domain DNS.
Start the tunnel and test the public address
Creating the tunnel does not start it. Select Start, open the assigned public HTTPS address from outside the server’s local network, and verify the complete authorized workflow. Stop or delete the tunnel when it is no longer needed.
The Localtonet HTTP tunnel documentation provides the current product workflow. Use the endpoint you actually verified. Do not choose a raw TCP tunnel merely because the application listens on a TCP port. The HTTP tunnel family is intended for HTTP applications and provides the public URL workflow described here.
Public verification criteria
Test the assigned address from a device or connection outside the application’s local network. A public test confirms behavior that a server-local request cannot, including public hostname handling and the complete tunnel path.
- The assigned HTTPS address opens the intended application.
- The response is not a default server page, unrelated virtual host, or first-run installer.
- Sign-in succeeds with a limited test account.
- Unauthorized requests are denied according to the application’s policy.
- Redirects return to the public address rather than an internal IP address or hostname.
- Styles, scripts, images, downloads, and other required assets load correctly.
- Logout terminates the test session as expected.
- Role-specific features such as uploads, callbacks, streaming, or WebSocket operations are tested if they are part of the intended workflow.
The tunnel must be started. It remains available only while the selected client is connected, the tunnel is running, and the application target remains reachable. Application downtime can make the public endpoint fail even when the Localtonet connection itself is active.
Secure the application before sharing the address
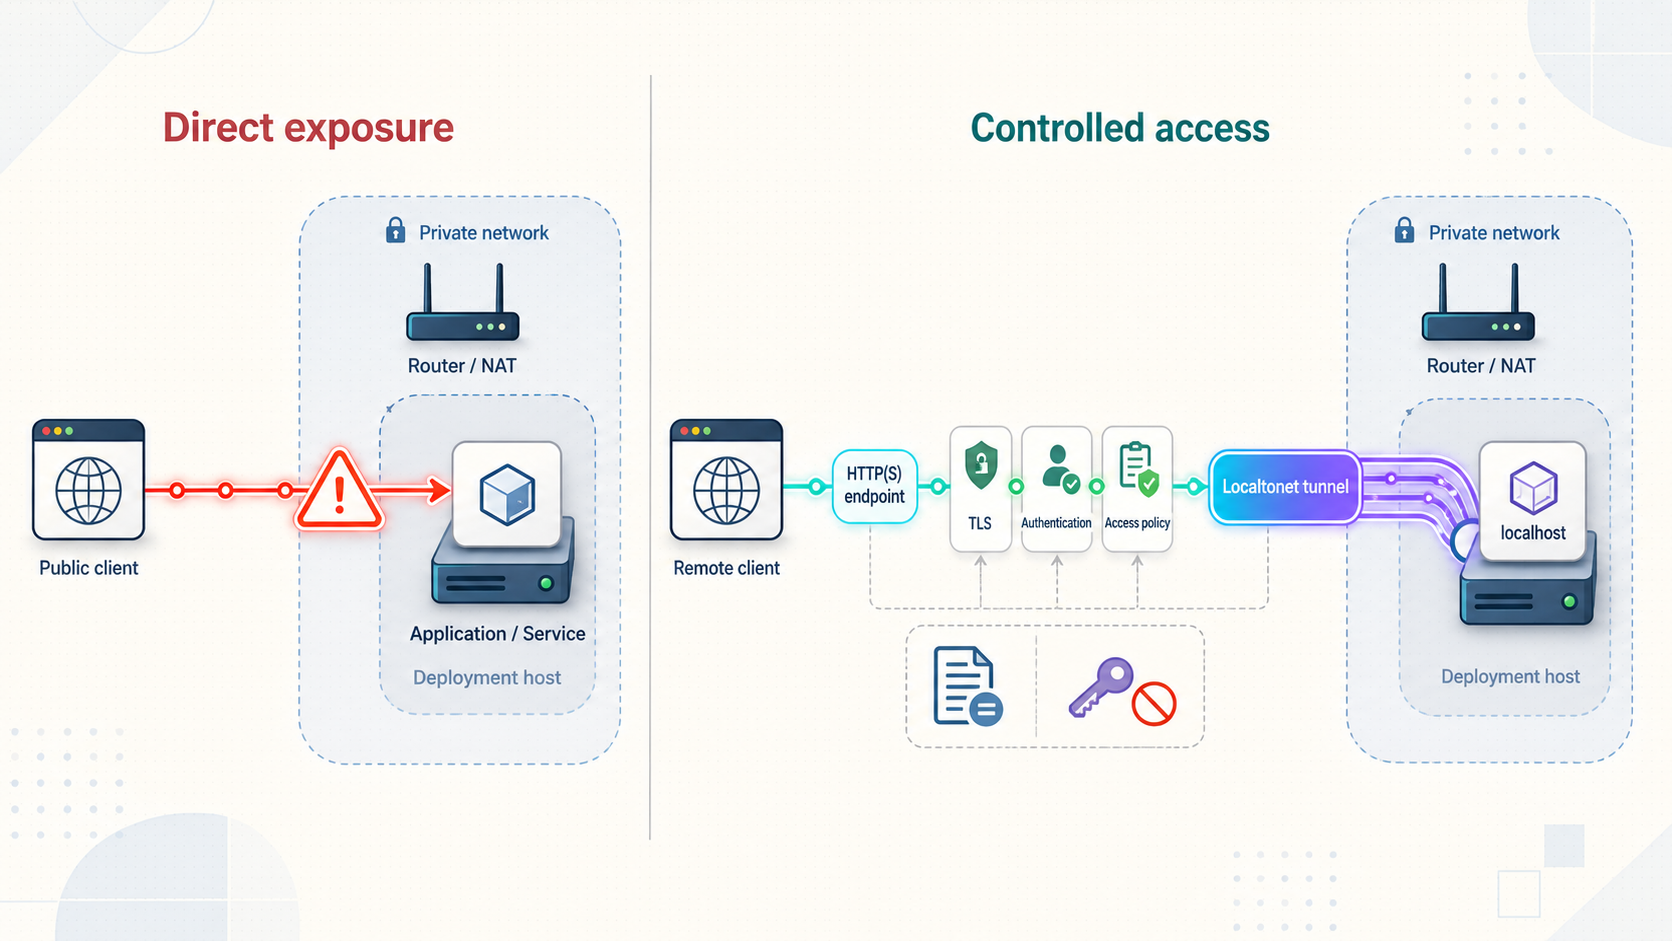
Remote connectivity changes the application’s audience. A page previously reachable only from one server can receive internet traffic after its public address is shared or discovered. A public HTTPS address protects transport to the tunnel edge, but it does not add application accounts, correct unsafe authorization, remove default credentials, or repair an unpatched service.
Inspect the public interface for information leakage. Dashboards can reveal internal hostnames, private addresses, software versions, monitoring labels, repository names, storage paths, user email addresses, and links to services that were never intended for remote access. A homepage or dashboard role deserves particular care because it may aggregate sensitive internal destinations.
PostgreSQL, Samba, Dovecot, Mumble, WireGuard, and similar roles do not become HTTP services merely because xsrv manages them. Use only the tunnel family that matches the actual protocol, and expose a service only when there is an authorized and protected need. Standard HTTP, TCP, or UDP tunneling is not the same as Localtonet VPN Manager.
Define rollback and shutdown criteria
Rollback should be planned before deployment and before public exposure. There are two separate actions: stopping remote access and reversing an application change. They should not be confused.
Stop the Localtonet tunnel immediately when
- The public URL shows an installer, default site, directory listing, or unintended application.
- Authentication can be bypassed or an unauthorized account receives excessive permissions.
- Redirects expose private hostnames, ports, or addresses.
- A Localtonet device token or application credential may have been disclosed.
- The endpoint reveals sensitive data or internal infrastructure details.
- The application begins returning unexplained errors after exposure.
Stopping a tunnel removes public availability but does not uninstall the xsrv role, remove local data, or reverse a deployment. After stopping it, preserve relevant logs without publishing secrets, correct the underlying problem, repeat local verification, and start the tunnel again only after every public success criterion passes.
Rollback the application change when
- The role changed an unintended host or service.
- Required persistent data is missing or corrupted.
- The application cannot complete its documented startup or health check.
- A dependency migration failed and the documented recovery path requires restoration.
- The new configuration cannot provide the required local workflow without weakening security.
Follow the selected role’s documented rollback or restoration procedure. Do not assume that rerunning automation with an old variable automatically restores databases or user content. Restore only from a verified backup and confirm the application locally before restoring remote access.
Keep xsrv 2.2.0 upgrade commands separate
For existing installations, the xsrv 2.2.0 release notes require users to upgrade to 2.1.0 first if that has not already been done. They also identify migration work for VictoriaMetrics, Stirling PDF, WireGuard, and OpenLDAP before the general upgrade command.
The release-specific command sequence then includes:
xsrv upgrade
xsrv check
xsrv deploy
In that release note, xsrv check is optional and simulates changes, while xsrv deploy applies them. The same release also documents an optional TAGS=utils-debian12to13 xsrv deploy operation for upgrading Debian 12 hosts to Debian 13, followed by another deployment. That operating-system upgrade is a major maintenance action, not a normal first-install step, and it should not be copied into a new deployment procedure without its full prerequisites and recovery plan.
The 2.2.0 migration also warns WireGuard users with projects under version control to ignore data/wireguard/* so downloaded configurations and private keys are not committed. Preserve that release-specific warning if your existing project uses the relevant utility.
Troubleshoot one layer at a time
The controller cannot manage the server
Return to the version-matched Server preparation and Controller preparation pages. Confirm the intended target identity, connection method, privilege setup, dependencies, and supported operating system. Avoid repairing the problem with generic Ansible advice until you know it matches the xsrv release.
The deployment targets the wrong host
Stop before applying more changes. Review the project’s host selection and inventory using the first-project documentation. Determine what was changed on the unintended host and follow the relevant role’s recovery procedure. Do not attempt to compensate by deploying the same configuration to additional hosts.
The automation finishes, but there is no HTTP page
A completed automation run does not prove that you are using the correct endpoint. Check the role’s service validation instructions, identify the actual listener, and determine whether Apache or another reverse proxy is the intended entry point. Do not rely on an upstream application’s usual port.
The page works on the server but not from the Localtonet device
Compare the tested address with the tunnel target. If the application listens only on loopback and the client is on another device, that client cannot reach the server through its own loopback address. Run the client on the application host or use a documented, restricted listener reachable from the client.
The tunnel is configured but the public address is unavailable
Verify the layers in order: application service, local request from the Localtonet device, client connection, selected device token, available relay selection, target IP and port, and tunnel running state. Creating a tunnel does not start it.
The public address opens the wrong website
The target may point to a default virtual host or a different service. Recheck the IP address and port. If hostname-based routing is involved, consult the selected role and reverse-proxy documentation for the correct hostname configuration. Do not guess application hostname variables or custom-domain DNS records.
Login works, but assets or redirects fail
The application may be generating URLs with an internal hostname, a different scheme, another port, or an unsupported base path. Review the role’s external-URL and reverse-proxy variables for the exact installed version. Correct the application configuration, verify it locally, and then repeat the external test.
The application was exposed before setup was complete
Stop the tunnel immediately. Complete the application’s administrator and security setup over a trusted local connection. Review whether credentials or setup tokens were visible, rotate anything that may have been disclosed, and test with a limited account before restarting remote access.
An xsrv upgrade fails
Confirm the starting version and review every intermediate migration instruction. For the 2.2.0 path, check whether the installation first needed to reach 2.1.0 and whether the documented VictoriaMetrics, Stirling PDF, WireGuard, or OpenLDAP actions apply. Do not continue deploying repeatedly when a required migration remains unresolved.
Frequently asked questions
Is xsrv a web application with one default port?
No. xsrv is an Ansible collection and set of utilities for managing many services. The selected role produces the application or infrastructure service. Its deployed listener, not xsrv as a whole, determines the Localtonet target.
Why does this guide not provide a generic xsrv installation command?
The verified xsrv 2.2.0 material confirms the installation phases but does not include the complete first-install commands, dependencies, inventory format, or project-generation procedure. Providing a plausible generic command would risk installing the wrong requirements or creating an incompatible project. Use the version-matched Server preparation, Controller preparation, and First project pages for the executable procedure.
Can I use the xsrv 2.2.0 upgrade commands for a fresh installation?
Do not assume so. The confirmed commands appear in the 2.2.0 upgrade procedure for an existing installation and depend on release-specific migration requirements. They do not replace the documented first-install preparation and project-creation workflow.
Which xsrv role should I expose in this workflow?
Select an HTTP-facing application that you have intentionally deployed and secured. The homepage role is used here only as a planning example because the catalog describes it as a simple webserver homepage or dashboard. Its exact configuration and port must come from the role documentation and deployed result.
What port should I enter in the Localtonet HTTP tunnel?
Enter the actual port on which the intended application or reverse proxy responds from the Localtonet client device. xsrv has no universal HTTP port. Discover the listener from the deployed configuration and verify it locally before creating the tunnel.
Can the Localtonet client run on another machine?
Yes. The client device must be able to reach the configured local IP address and port. If the application listens only on the xsrv server’s loopback interface, run our client on that server or use a documented, appropriately restricted listener reachable from the other device.
Does Localtonet require router port forwarding or a public IP address?
No. Our client establishes an outbound connection to a Localtonet relay, so the standard tunnel workflow does not require inbound router port forwarding, firewall changes, VPN setup, or a public IP address.
Does the public HTTPS address replace application authentication?
No. HTTPS protects transport to the tunnel edge. The application must still enforce authentication, authorization, secure account setup, and least privilege. Do not expose an unfinished setup screen or an unauthenticated administrative interface.
Does creating a tunnel start it automatically?
No. Creation and operation are separate lifecycle actions. Select Start after reviewing the target. The public endpoint remains available only while the selected client is connected, the tunnel is running, and the application is reachable.
Publish a verified xsrv-managed application with Localtonet
Complete the version-matched xsrv installation, verify the application’s real local HTTP endpoint, secure its accounts, and then use our outbound tunnel workflow to provide remote access without inbound router port forwarding.
Get Started Free →

