

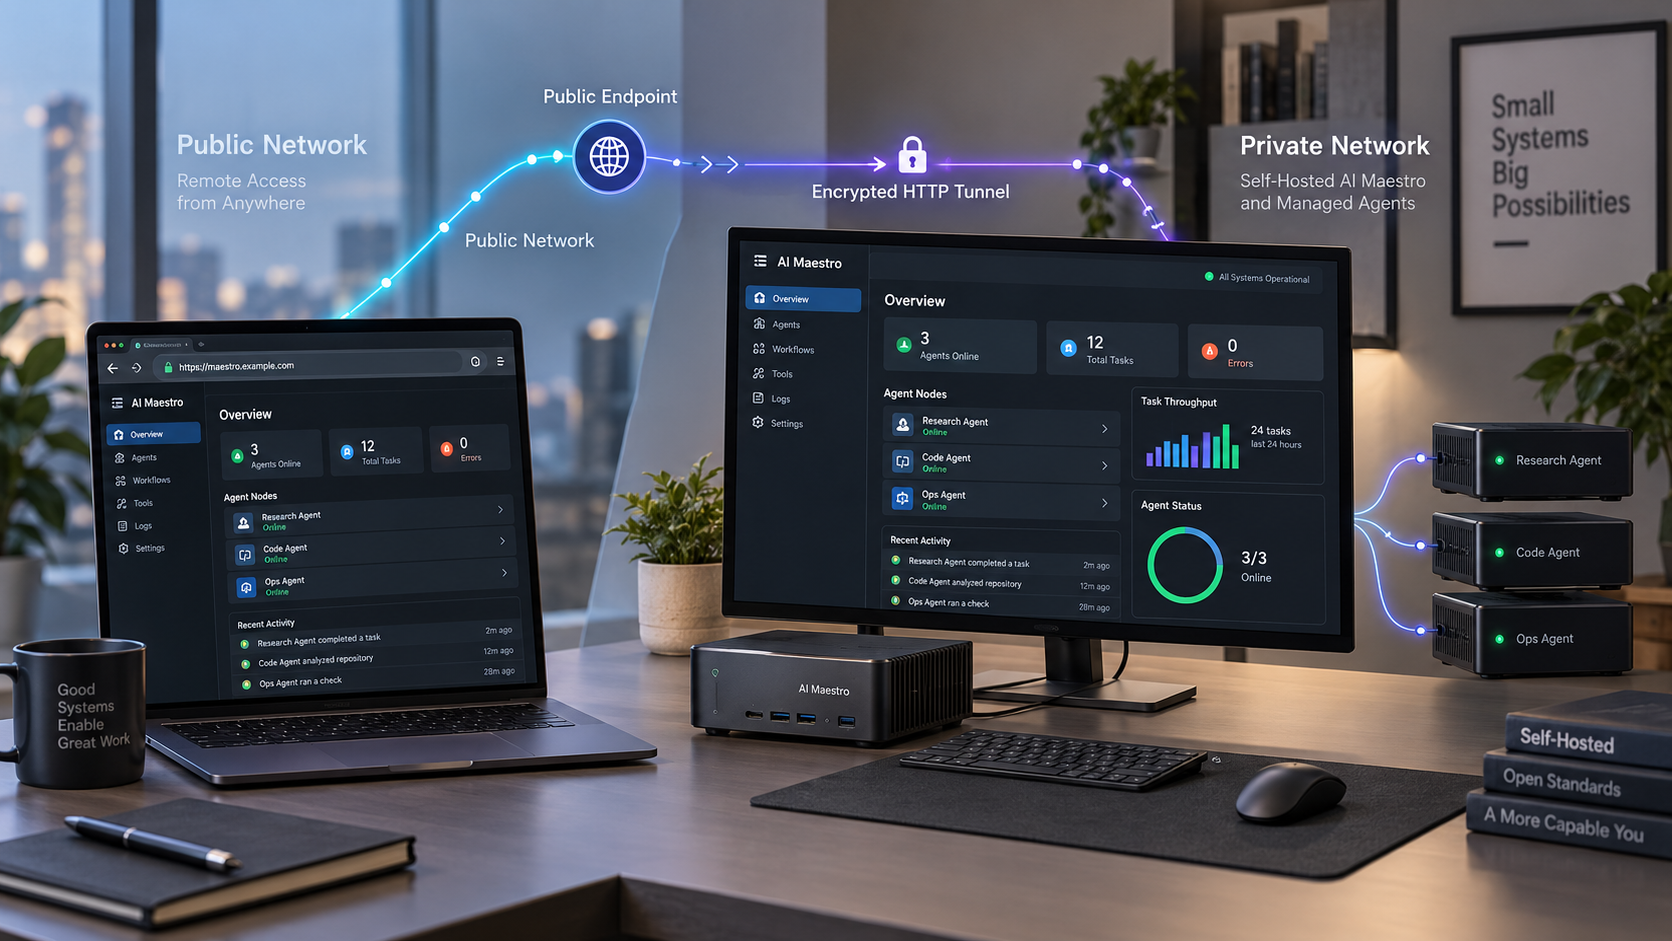
Run your AI agent command center locally, then reach it from another network
AI Maestro provides a self-hosted browser dashboard for organizing and managing terminal-based AI agents across one or more machines. In this guide, we install the complete AI Maestro service, start it, verify the documented local dashboard at http://localhost:23000, and cover the first operational steps. Once the local deployment works, we configure a Localtonet HTTP tunnel as a separate remote-access layer. Because the available project documentation does not establish built-in dashboard authentication, we also explain why public exposure requires a careful security decision.
📋 What's in this guide
What AI Maestro is and how this deployment works
AI Maestro is an open-source orchestration platform for AI coding agents. It is designed around a browser dashboard that can discover and organize agents, present terminal activity, preserve operational context, and support communication between agents. The project describes support for terminal-based agents such as Claude Code, Codex, Grok Build, Cursor, OpenClaw, Hermes, and Droid, as well as other terminal-based tools that fit its operating model.
The central idea is that an agent is treated as a persistent member of a working environment rather than as a disposable one-off task. An agent can have a name, working directory, ongoing context, and ownership of one or more repositories or responsibilities. AI Maestro then gives the operator one dashboard from which to see and switch between those agents.
Multi-machine operation does not mean that every agent shares one filesystem. The project instead emphasizes independent working copies and Git-based collaboration. If two agents need the same repository, each can work from its own clone and branch, then integrate changes through the normal push, review, and merge process. This model remains practical when the agents run on separate laptops, servers, or operating systems.
http://localhost:23000 after the full service is running.
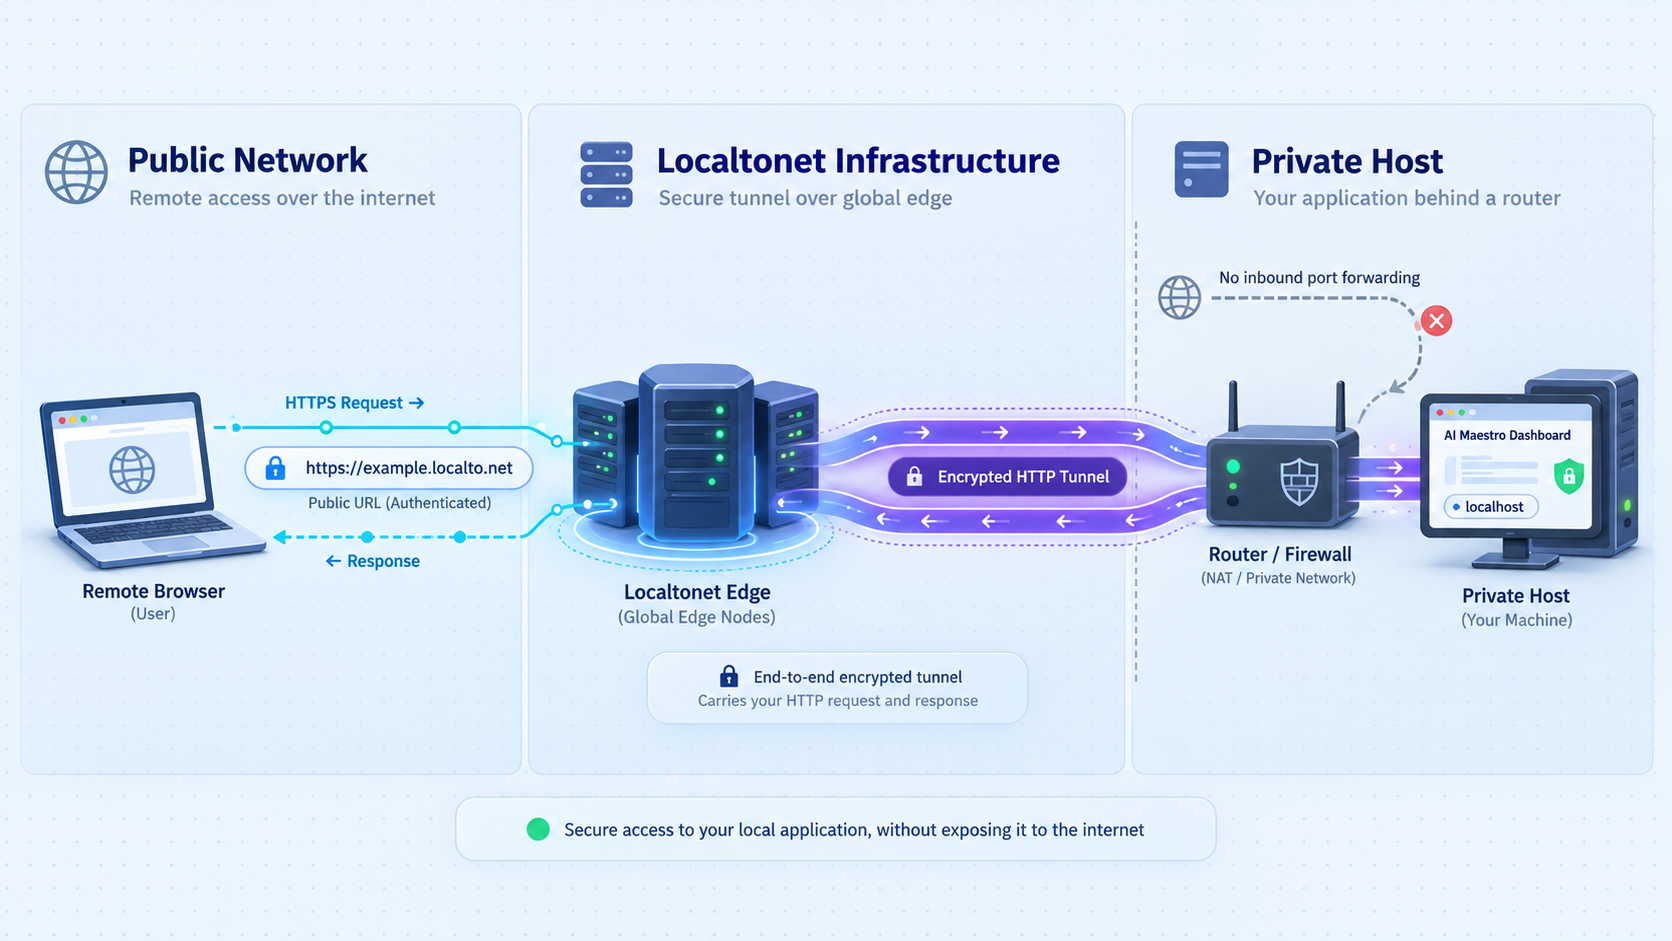
In the workflow covered here, AI Maestro remains the application and Localtonet supplies the optional connectivity layer. The AI Maestro service listens locally, while our client on the host establishes an outbound connection to a Localtonet relay server. Requests sent to the assigned public address are forwarded to the configured local IP address and port.
This separation is important for troubleshooting. First make AI Maestro work locally. Only then add the tunnel. If the dashboard does not load on the host, a tunnel will not repair the application, its dependencies, or its startup process.
Do not begin with the public tunnel. Install AI Maestro, start the service, and confirm that http://localhost:23000 opens from the host. This creates a known-good baseline before remote networking is introduced.
Prepare the AI Maestro host
The documented baseline requirements are Node.js 18 or newer and tmux. The recommended remote installer is described as installing the AI Maestro dashboard and service, the Agent Messaging Protocol components, and a Claude Code plugin with its associated skills and scripts. Claude Code itself is optional for the general dashboard installation, although the project's inbox modification requires a compatible Claude Code release.
Choose a host that will remain available whenever you need the dashboard or its agents. Localtonet does not change the host's uptime. If the computer sleeps, shuts down, loses connectivity, stops AI Maestro, or disconnects our client, remote access will stop.
| Requirement | Why it matters | What to verify |
|---|---|---|
| Node.js 18 or newer | AI Maestro is a Node.js application. | Confirm the installed version before using the manual Yarn workflow. |
| tmux | AI Maestro uses tmux for local terminal session discovery and management. | Make sure the command is installed and available inside the environment where AI Maestro runs. |
| Git | The manual installation clones the project repository. | Confirm Git is installed if you are not using the recommended remote installer. |
| Yarn | The documented manual installation uses yarn install and yarn dev. |
Use a Yarn installation compatible with the project rather than substituting an undocumented package-manager workflow. |
| Build tools on Linux | Native dependencies may require a compiler and related build tooling. | On supported Debian or Ubuntu-style systems, the project documents installing build-essential. |
| WSL2 on Windows | The documented Windows installation runs AI Maestro inside a Linux environment. | Install WSL2, restart if required, and perform the AI Maestro setup from the Ubuntu shell. |
| A free local port 23000 | The documented dashboard endpoint uses port 23000. | Make sure another service is not already occupying the port. |
Linux preparation
On a Debian or Ubuntu-style Linux system, the AI Maestro documentation calls out tmux and the standard build tools explicitly:
sudo apt install tmux build-essentialThis command does not install Node.js, Git, or Yarn. Confirm those separately according to the package-management policy for your distribution. We do not recommend inventing a universal Node.js installation command because repositories, package versions, and organization policies differ across Linux distributions.
Before continuing with the manual installation, inspect the versions and command availability:
node --version
tmux -V
git --version
yarn --version
The Node.js output must indicate version 18 or newer. The other commands should return version information rather than a command-not-found error.
Windows preparation with WSL2
AI Maestro's documented Windows path uses WSL2. Install WSL2 from an elevated PowerShell session using the current Microsoft-supported procedure, restart Windows when prompted, and then open the installed Ubuntu environment from the Start menu. The extracted project evidence available for this draft does not preserve a trustworthy WSL installation command, so we do not reproduce one that might be malformed or outdated.
Run the AI Maestro installation inside the WSL2 Ubuntu shell, not directly in PowerShell or Command Prompt. The project also recommends keeping agent directories in the Linux filesystem, such as ~/agents/<name>, rather than under a mounted C:\ path. Accessing Windows-mounted project directories from WSL can be substantially slower.
Windows can browse those Linux files through the WSL network path:
\\wsl.localhost\Ubuntu\home\<your-user>\agentsIf your distribution is not named Ubuntu, the share name will differ. Do not assume the example path matches every WSL installation.
The recommended installer downloads a shell script and sends it directly to sh. That is the project's documented quick-start method, but piping remote code into a shell gives the downloaded script permission to act as your user. In a controlled or production environment, inspect the current script before executing it, or use the manual Git and Yarn installation path.
Install and start AI Maestro
AI Maestro documents two complete installation paths: the recommended remote installer and a manual source installation. Choose one path. Do not run both in the same directory simply to see which succeeds, because that can make ownership, dependency, and startup problems harder to diagnose.
Option 1: use the recommended remote installer
Open the correct shell on the target host
Use a normal shell on Linux or an Ubuntu shell inside WSL2 on Windows. Confirm Node.js 18 or newer and tmux are available before proceeding.
Run the documented installer
Execute the project's remote installation command. Review the script first if your security policy does not permit direct remote-script execution.
Allow the installation to complete
The project estimates approximately five to ten minutes. Watch the terminal for dependency, permission, network, or build errors rather than assuming that a returned prompt means every component succeeded.
curl -fsSL https://raw.githubusercontent.com/23blocks-OS/ai-maestro/main/scripts/remote-install.sh | shThe documented installer provides the dashboard and service, the agent messaging system, and the Claude Code plugin components. Installation behavior can change as the project evolves, so retain the terminal output for troubleshooting and review what the current script reports about service startup.
Option 2: perform a manual source installation
The manual path is easier to audit because the repository is cloned before dependencies are installed. It also leaves you with a visible source checkout from which to run the documented development command.
Clone the AI Maestro repository
Use Git to create a local checkout of the official project repository.
Enter the project directory
Change into the newly created ai-maestro directory so that subsequent Yarn commands use the project's package files.
Install project dependencies
Run the documented Yarn installation command and resolve any dependency or build errors before attempting to start the application.
Start the development service
Run yarn dev from the repository directory. Keep this terminal open while verifying and using the service unless you have separately configured a supervised process.
git clone https://github.com/23blocks-OS/ai-maestro.git
cd ai-maestro
yarn install
yarn dev
The supplied project evidence documents yarn dev for manual startup. It does not establish a universal production service manager, systemd unit, launch agent, Windows service, or restart policy. We therefore do not invent one here. If you later convert the application into a persistent service, base that work on the project's current deployment guidance and your operating system's service-management standards.
AI Maestro also describes a Claude Code plugin-only path, but most of its skills require the full AI Maestro service. It does not provide the browser dashboard workflow covered by this guide. Use the recommended installer or the manual Git and Yarn path when your goal is to self-host the complete service.
Verify the local dashboard before adding remote access
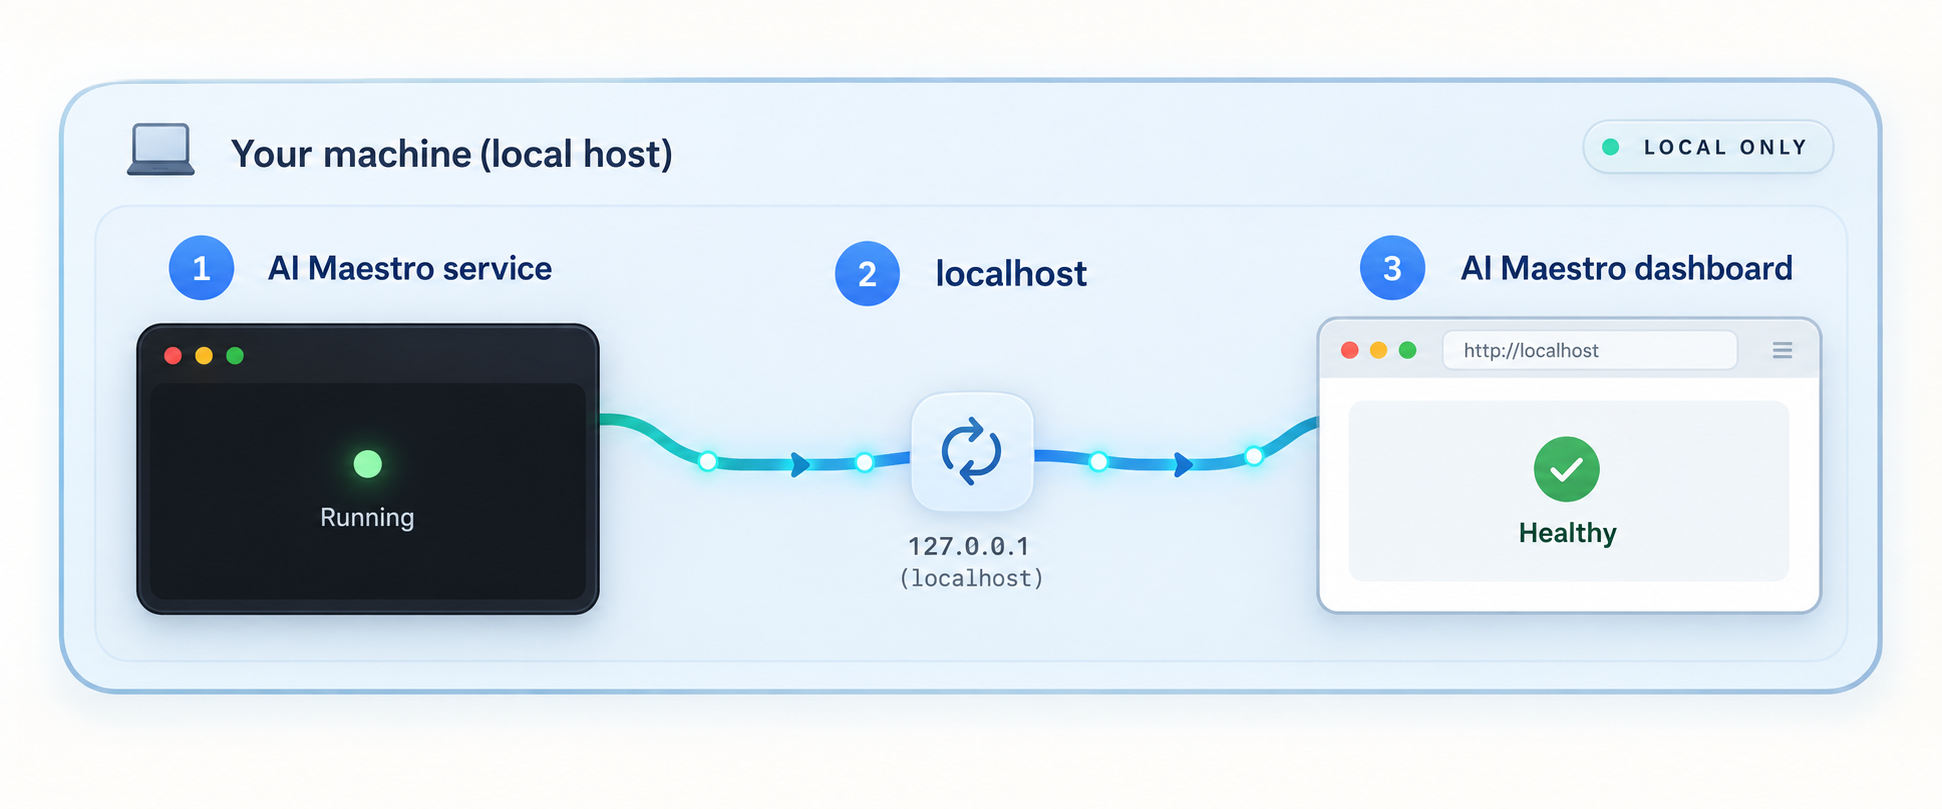
Open a browser on the AI Maestro host and visit:
http://localhost:23000A successful result is the AI Maestro dashboard rather than a connection error, an unrelated application, or a generic proxy page. This check verifies that the application started and that something is accepting HTTP connections on the documented port.
If you installed manually, keep the terminal running yarn dev visible during this test. Startup errors and stack traces in that terminal are usually more useful than the browser's generic failure message. If the command exited, resolve its final error and run it again from the project directory.
Check the HTTP response from the command line
Where curl is available, request the local endpoint:
curl -I http://localhost:23000The exact status code and headers may vary with the project's current routing behavior, so this article does not prescribe one specific response. The important distinction is whether an HTTP response arrives at all. A connection-refused error usually means no process is listening on that address and port. A returned HTTP response shows that the local TCP connection reached a web service, although you should still open the dashboard and confirm it is AI Maestro.
Verify from the same environment that runs the application
On Windows with WSL2, start with the browser and command-line checks appropriate to the current WSL networking configuration. The project documents localhost:23000, but host integration can vary with WSL and Windows versions. Confirm the service from inside WSL first if the Windows browser cannot reach it. This helps distinguish an AI Maestro startup failure from a Windows-to-WSL networking issue.
Check for a port collision
If the startup output says that the address is already in use, another process may be bound to port 23000. Do not terminate an unknown process without identifying it. The supplied project evidence establishes port 23000 as the dashboard endpoint but does not document a supported alternative-port configuration, so we do not guess an environment variable or command-line flag. Identify the conflicting process and decide whether it can be safely stopped.
A Localtonet tunnel forwards traffic to the target you configure. If no working AI Maestro service is available at that target, remote visitors will receive an error. Establish a reliable local response first.
Create your first agent and understand routine use
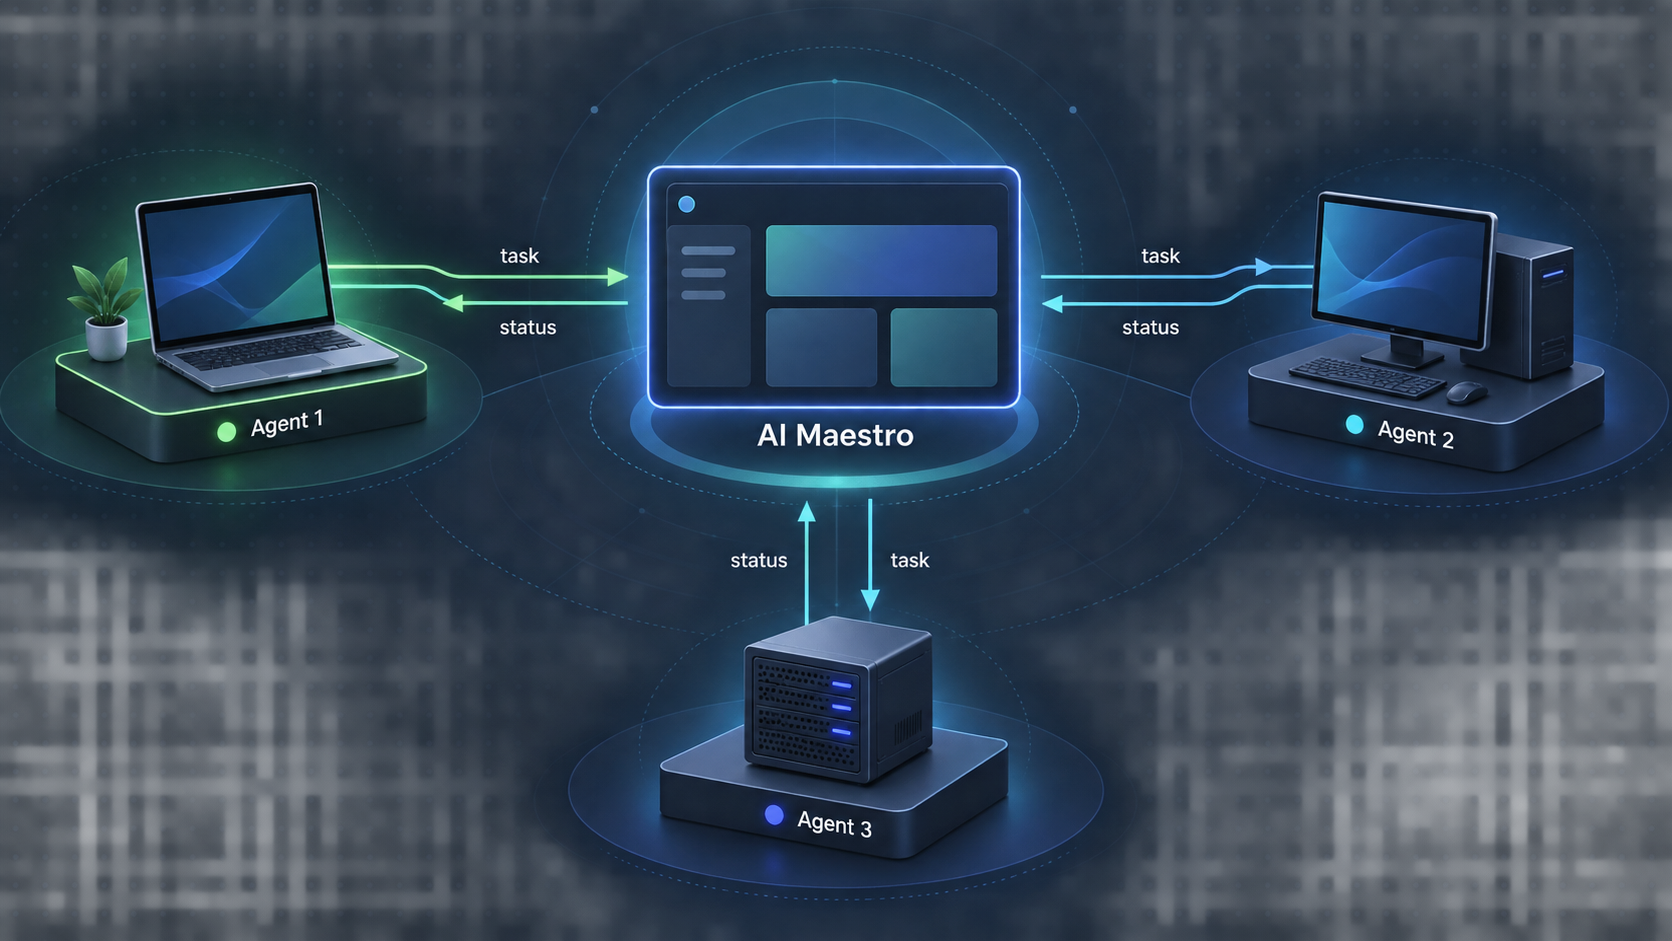
After the dashboard opens, create an agent to validate more than the landing page. The documented dashboard workflow uses the plus button in the sidebar, asks for an agent name and working directory, and then creates the agent.
Open the creation workflow
Select the plus button in the AI Maestro sidebar.
Enter an agent name
Use a descriptive name such as myproject-backend-api. AI Maestro uses structured names to help organize agents visually.
Choose the working directory
Select the directory the agent should own or operate in. Use an independent repository clone when another agent on another machine also needs the same project.
Create the agent
Select Create Agent, then confirm that the new agent appears in the dashboard and can be selected.
AI Maestro can auto-discover tmux sessions, which makes tmux availability operationally important rather than merely an installation prerequisite. Agents that are not running in tmux may also appear through the project's heartbeat-based standalone-agent mechanism, but the exact integration steps depend on the agent and are outside the evidence available for this installation workflow.
When several agents work on the same codebase, avoid pointing all of them at the same mutable working directory unless the project's workflow explicitly calls for that arrangement. Independent clones and branches reduce the chance that one agent overwrites another agent's uncommitted work. Git then becomes the deliberate integration boundary.
Multi-machine orchestration also requires each participating machine to be prepared for the software it runs. A central dashboard cannot compensate for a missing compiler, unavailable repository credentials, stopped agent process, or inaccessible working directory on another host.
Add remote dashboard access with a Localtonet HTTP tunnel
Once AI Maestro works at http://localhost:23000, you can place a Localtonet HTTP tunnel in front of it. Our client establishes an outbound connection to a selected relay server, so this workflow does not require inbound router port forwarding, a public IP address, VPN setup, or firewall changes for inbound internet traffic.
The client must run on the AI Maestro host or on another device that can reach the AI Maestro service at the configured local address. When both applications run on the same host, the natural target is the local service on port 23000. Do not enter localhost if our client is running on a different machine, container, or isolated network namespace, because in that situation localhost refers to the client environment rather than the AI Maestro host.
Current dashboard labels and available relay servers can change by client version, region, and plan. Obtain the relay selection and device token from your current Localtonet dashboard rather than copying either value from an article. Tokens are device-specific secrets and must never be published.
Install and run our client
Install the Localtonet client on the device that can reach the verified AI Maestro dashboard. Keep the client running whenever remote access is required.
Authenticate or select the device
Use the device-specific authentication token supplied through your Localtonet account, or select the already connected device in the dashboard. Do not place the token in scripts, screenshots, logs, or this article's example commands.
Select an available relay server
Choose from the server or region values currently offered in your dashboard. Availability can vary, so this guide does not hardcode a server code.
Create an HTTP tunnel to AI Maestro
Configure the local target as the IP address that reaches AI Maestro and port 23000. Use the HTTP tunnel family because the verified local endpoint is an HTTP web application.
Start the tunnel
Creating a tunnel does not mean it is active. Use the dashboard's Start button and wait for the selected device and tunnel to be connected.
Test the assigned public address
Open the assigned public URL from a separate browser or network and verify that it reaches the intended AI Maestro dashboard. Stop or delete the tunnel when public reachability is no longer required.
HTTP tunnels can use a random subdomain, a supported custom subdomain, or a custom domain. These process types serve the same local content at a public HTTPS address. Custom-domain DNS requirements must be checked against the current Localtonet documentation before changing DNS records, so this guide does not invent record types or validation steps.
For the current product workflow and field names, consult our HTTP tunnel documentation .
The public address is available only while the selected client device is connected and the tunnel is running. Creating the configuration alone is not enough. Stopping AI Maestro, stopping the tunnel, closing the client, or taking the host offline interrupts access.
Secure remote access before sharing the URL
The available AI Maestro evidence does not establish that the dashboard enforces authentication or authorization before granting access to agent information and controls. We therefore must not treat the dashboard as safe for unrestricted public exposure by default.
This matters because an orchestration dashboard can display sensitive operational context. Depending on how the project is configured, that context may include agent names, repository information, terminal output, conversation history, working directories, messages, or controls capable of influencing active sessions. Even if no secret is intentionally displayed, logs and terminal history can contain credentials or private code.
Do not share the assigned URL until you have verified the current AI Maestro release's access-control behavior and applied suitable protection. A difficult-to-guess URL is not a substitute for authentication. Use least privilege, restrict who receives access, remove credentials from terminal output, and stop the tunnel when it is not needed.
Update before exposing a deployment
AI Maestro release 0.62.0 documented security hardening for unsafe identifiers, path handling, and shell-command construction. Its release guidance specifically advises users who expose AI Maestro beyond a trusted network to update. The same release also corrected multiple headless-mode route behaviors and added tests for route parity, hostile identifiers, and real-server startup.
Before remote exposure, identify the version you are actually running and review newer release notes for additional fixes. Do not assume that cloning the repository months ago leaves you on a secure current revision. Back up important state and understand the project's upgrade procedure before updating an active environment.
Apply least-exposure principles
Localtonet solves reachability. It does not automatically define who should be permitted to operate AI Maestro, and a tunnel must not be described as bypassing organizational policies. Obtain authorization before exposing a workplace service, follow your network and data-handling policies, and treat access to agent controls as privileged access.
Operate and troubleshoot the combined setup
Troubleshooting is fastest when the application and tunnel are tested separately. Start at AI Maestro, move outward to our client, and only then test the public address.
| Symptom | Likely area | What to check |
|---|---|---|
localhost:23000 refuses the connection |
AI Maestro startup | Confirm the process is still running, inspect terminal output, and check whether port 23000 is occupied by another service. |
| The local page works but the public URL does not | Localtonet client or tunnel | Confirm the selected device is connected, the HTTP tunnel is started, and the target address and port are correct. |
| The public URL reaches the wrong application | Target or port collision | Verify that AI Maestro is the service answering on port 23000 and that the tunnel points to the intended host. |
| Windows browser cannot reach the WSL service | Windows-to-WSL networking | Test from inside WSL first, confirm AI Maestro is running there, and then investigate the current WSL localhost integration. |
| Yarn installation fails while compiling a dependency | Build prerequisites | On Debian or Ubuntu-style Linux, verify build-essential is installed and review the first meaningful error in the Yarn output. |
| Agents or tmux sessions do not appear | Runtime environment | Confirm tmux exists in the same environment and user context as AI Maestro, then verify that the expected sessions are actually running. |
| Remote access stops after closing a terminal | Process lifecycle | Determine whether that terminal was running yarn dev, our client, or both. The evidence does not establish an automatic service configuration for the manual install. |
Use a layered diagnostic sequence
First, confirm that the AI Maestro process is alive. For a manual setup, inspect the terminal that launched yarn dev. Next, request http://localhost:23000 on the same host. If that succeeds, verify that our client is connected and that the tunnel has been started. Finally, test the assigned public URL from a different network.
This sequence prevents a common diagnostic mistake: changing a correct tunnel while the underlying application is stopped. It also prevents the reverse mistake of repeatedly reinstalling AI Maestro when only the tunnel configuration is inactive.
Understand address scope
localhost always refers to the environment in which the requesting process runs. If AI Maestro and our client run on the same operating-system network stack, a loopback target can be appropriate. If our client runs in a container, on another computer, or in a differently isolated environment, point the tunnel at an address that is reachable from that client environment.
The project evidence supplied for this guide confirms the local endpoint but does not establish all bind-address, container, firewall, or alternative-port options. If your architecture requires AI Maestro to listen beyond loopback, verify the project's current supported configuration instead of guessing an environment variable.
Plan for restarts and updates
A manually started yarn dev process normally depends on the shell that launched it unless you deliberately supervise it. The project evidence does not document a universal boot-time service configuration, so test restart behavior rather than assuming AI Maestro will return after a reboot.
After an update, repeat local verification before starting the tunnel. Confirm the dashboard opens, expected agents appear, and critical operations behave normally. Then start remote access and test it from outside the host network.
Stop access cleanly
When remote access is no longer needed, stop the Localtonet tunnel. Delete it if you do not intend to reuse the configuration. If you are also ending the AI Maestro session, stop the application using the process and service method appropriate to the installation path. Avoid abruptly terminating active agents without first checking whether they have uncommitted work.
Frequently asked questions
What port does AI Maestro use?
The documented dashboard endpoint is http://localhost:23000, so the HTTP service uses local port 23000 in the standard workflow covered here. The available evidence does not establish a supported alternative-port setting, so this guide does not invent one.
Does AI Maestro require Claude Code?
No. AI Maestro is presented as supporting multiple terminal-based AI agents. Claude Code is optional for the general platform, although some Claude-specific plugin and inbox functionality naturally depends on a compatible Claude Code installation.
Can I install AI Maestro directly on Windows?
The documented Windows path uses WSL2 and an Ubuntu shell. Install WSL2, restart when required, then run the Linux-oriented installer inside the WSL environment. The project recommends keeping agent files in the WSL Linux filesystem rather than under mounted Windows directories for better performance.
Should I use the remote installer or the manual installation?
The remote installer is the project's recommended quick-start path and installs the complete stack. The manual Git and Yarn path gives you a visible source checkout and an opportunity to review the code before installation. Use the manual method when auditability or change control is more important than one-command convenience.
Is it safe to expose the AI Maestro dashboard publicly?
Do not assume so. The evidence available for this guide does not establish built-in dashboard authentication or authorization. Verify the behavior of your installed release, update to a version containing relevant security fixes, add appropriate access controls, use least privilege, and limit how long the tunnel runs.
Does Localtonet require router port forwarding?
No. Our client establishes an outbound connection to a Localtonet relay server. The resulting tunnel provides a public URL without requiring inbound router port forwarding, inbound firewall changes, VPN setup, or a public IP address.
Will the public URL remain available if I close AI Maestro or the Localtonet client?
No. The tunnel is useful only while AI Maestro is running at the configured local target, the selected device is connected, and the tunnel is started. Closing the application or our client, stopping the tunnel, disconnecting the host, or allowing the host to sleep will interrupt access.
Can the Localtonet client run on a different machine?
Yes, provided that device can reach the AI Maestro host and port. In that design, do not configure the target as localhost, because it would refer to the Localtonet client machine. Use an authorized network address that reaches the AI Maestro service and verify local network access before starting the tunnel.
Connect your verified AI Maestro dashboard with Localtonet
Install and test AI Maestro locally first, review its current security controls, then use an HTTP tunnel when you need controlled remote reachability without configuring inbound router port forwarding.
Get Started Free →

