

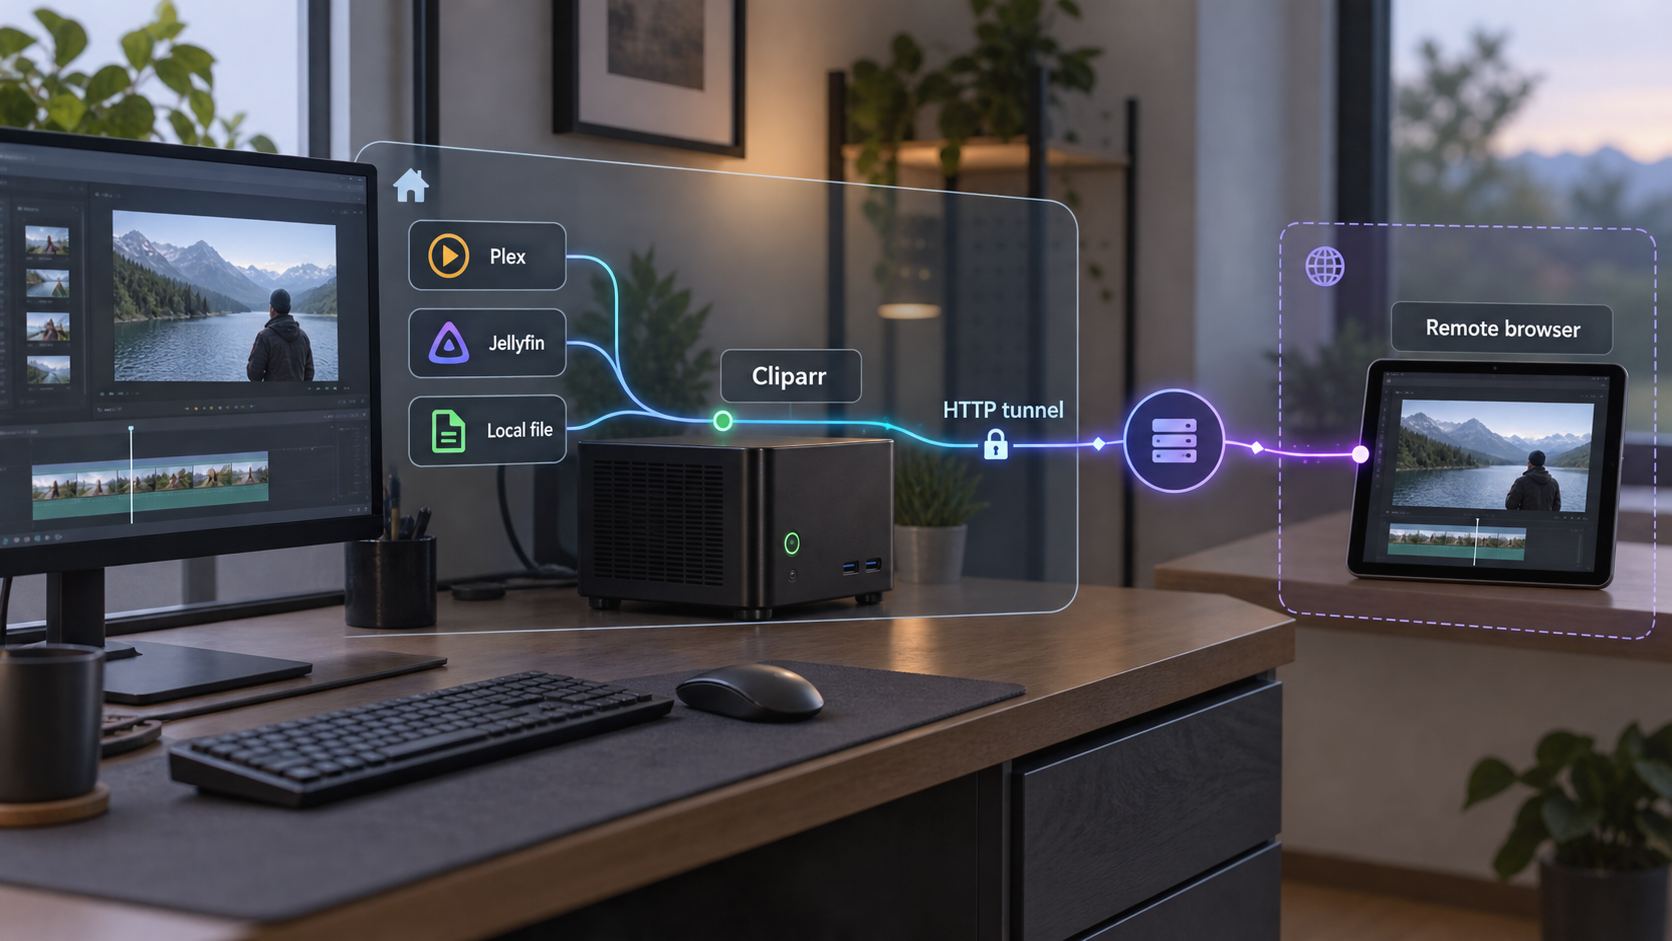
Turn Plex, Jellyfin, or local media into browser-generated clips from your own server
Cliparr is a self-hosted browser application for trimming media, creating subtitles, and exporting video, audio, or GIF clips. In this guide, we install Cliparr with its supported Docker image, preserve its application data and encryption key, connect a Plex or Jellyfin server, and verify that editing works locally. Once the local deployment is working, we expose it through a Localtonet HTTP tunnel so remote browsers receive the HTTPS address required for editing from another device. We also cover provider requirements, upgrades, routine operations, and the failure modes most likely to interrupt playback discovery or exports.
📋 What's in this guide
Understand the Cliparr architecture before installing it
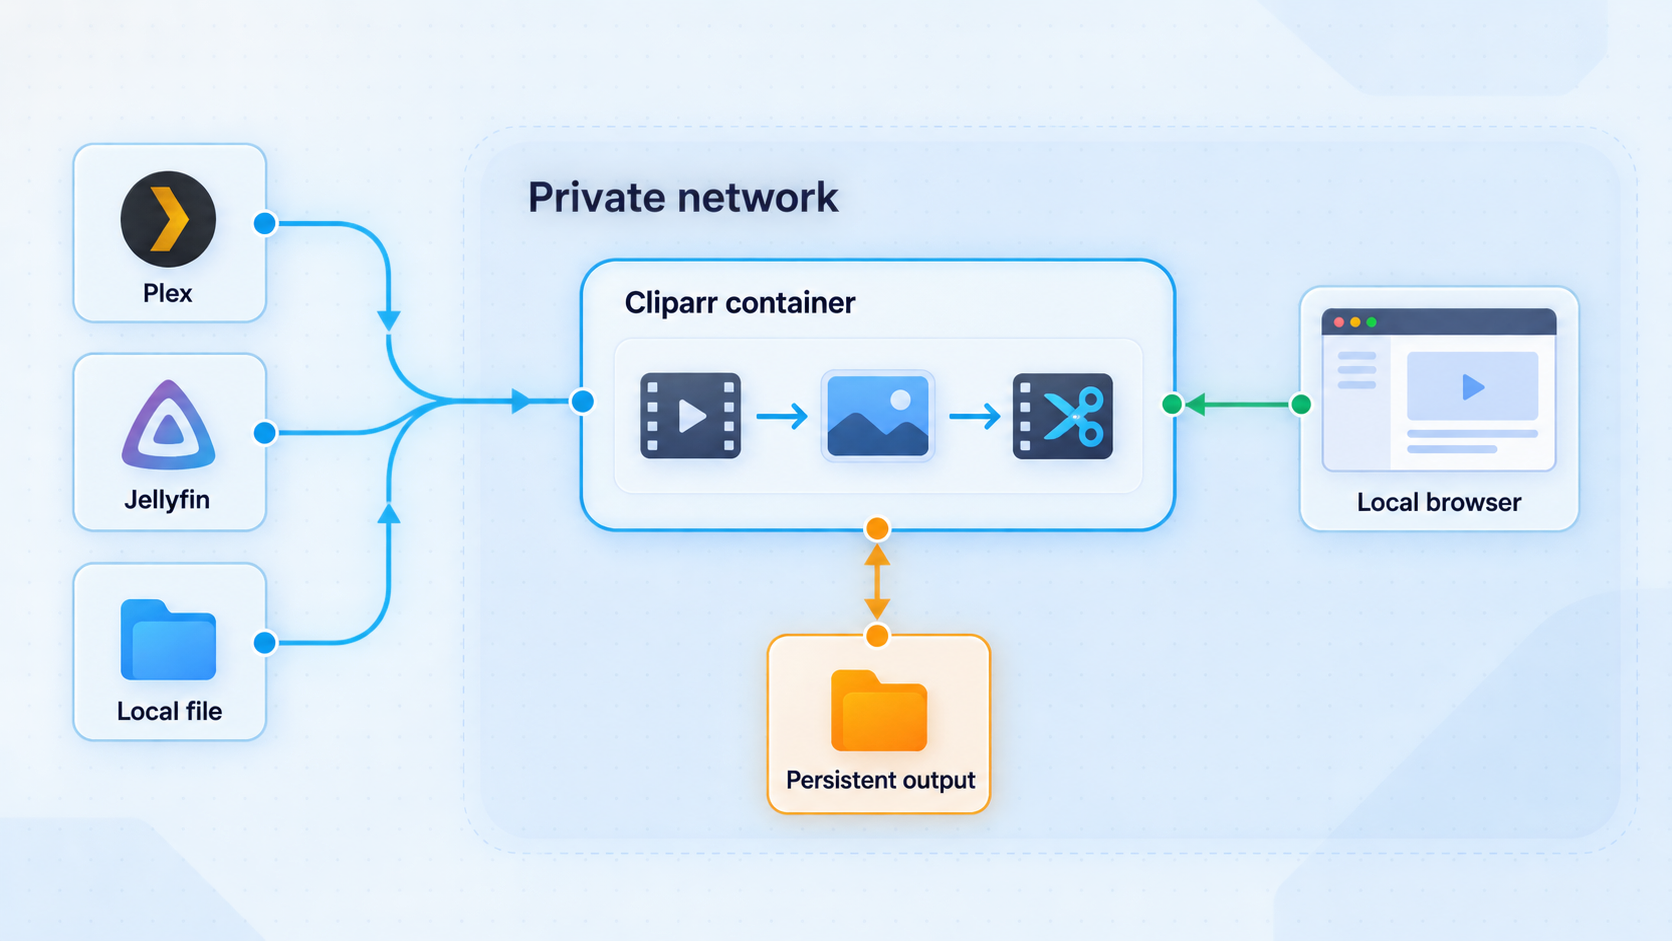
Cliparr is designed for creating clips from media on a personal media server or from a file available directly to the browser. Its supported sources include Plex, Jellyfin, and local video files. The editing interface can trim and fine-tune a range on a timeline, author or import subtitles, burn supported subtitles into a clip, and export video, audio, or GIF output.
The division of work between the Cliparr server and the browser is important. The self-hosted server manages media-server authentication, encrypted provider records, active playback discovery, and proxy routes that help the browser reach authenticated media. Editing and export processing run in the browser. Local files are read directly by the browser instead of first being uploaded to Cliparr. Plex, Jellyfin, and direct media URL sources can pass through the server's media proxy so the browser can preview and export them.
Because processing happens in the browser, Cliparr does not require FFmpeg to be installed on the Docker host for its documented clipping workflow. The browser still needs enough memory and compatible media capabilities for the selected source and output. Larger exports can consume substantial browser memory, and supported formats depend partly on browser codec support.
Cliparr can be opened locally at http://localhost:7171, but its documentation states that editing from other devices requires HTTPS. A plain remote HTTP address is therefore not a complete remote-access setup. Later in this guide, we connect the local service to a Localtonet HTTP tunnel and use the public HTTPS address assigned to that tunnel.
Prerequisites and deployment decisions
The supported quick-start deployment uses Docker and the published Linux container image. You need a machine that can run Docker with Linux containers, enough local storage for Cliparr's persistent application data, and a browser from which you can open the interface. TCP port 7171 must be available on the Docker host if you use the documented port mapping unchanged.
Plex and Jellyfin are optional. You can verify the editor with a local video even if no media server is available. If you do connect a provider, the Cliparr container must be able to reach the address you enter for that media server. This is a server-side networking requirement, not merely a browser requirement.
| Requirement | Why it is needed | What to prepare |
|---|---|---|
| Docker with Linux containers | Runs the supported Cliparr container image | Confirm that the Docker engine is running before creating the container |
| Stable APP_KEY | Protects provider information stored by Cliparr | Generate a random secret of at least 32 characters and retain it securely |
| Persistent Docker volume | Preserves Cliparr data between container replacements | Use the documented cliparr-data volume mounted at /data |
| Available host port | Publishes the Cliparr HTTP service locally | Make sure host port 7171 is not already assigned to another container or process |
| Compatible browser | Performs editing and export processing | Use a current browser and allow enough device memory for the intended export |
| Reachable media server | Allows Cliparr to authenticate, discover sessions, and proxy provider media | Use a Plex or Jellyfin address reachable from inside the Cliparr container |
Generate and retain the application key
Cliparr requires an APP_KEY containing a random secret of at least 32 characters. On a system with OpenSSL installed, the documented example for generating one is:
openssl rand -base64 32Copy the generated value into a password manager or another protected secret store before creating the container. Do not publish it, commit it to a repository, paste it into screenshots, or include it in support messages. The examples below deliberately use a placeholder.
Keep the same key and the same data volume when replacing or updating the container. Changing APP_KEY requires reconnecting your media servers. Treat the key as deployment state, not as a disposable command-line value.
Choose a media-server address the container can reach
A common container networking mistake is entering localhost for a Plex or Jellyfin server that runs somewhere else. From inside the Cliparr container, localhost refers to that container itself. If the media server is on the same LAN, use its private LAN address or another address that resolves and routes correctly from the container.
Cliparr 3 requires explicit opt-in for loopback media-server URLs. Plex loopback connections use CLIPARR_ALLOW_LOOPBACK_PLEX_URLS=true, while Jellyfin loopback connections use CLIPARR_ALLOW_LOOPBACK_JELLYFIN_URLS=true. These settings should be enabled only when every signed-in user is trusted. Private LAN addresses do not require those loopback flags.
This guide does not add either variable to the basic deployment because most installations should use a reachable LAN address rather than relax loopback validation. If your architecture genuinely requires a loopback URL, review who can sign in before enabling the relevant option.
Install Cliparr with Docker
The official quick start uses the image ghcr.io/techsquidtv/cliparr:latest, publishes container port 7171 on host port 7171, and mounts the named volume cliparr-data at /data. The following sequence keeps those documented values unchanged.
Create a stable random APP_KEY
Generate a random secret containing at least 32 characters. Save it securely before proceeding because the same value should be retained when the container is recreated.
Run the Cliparr container
Use the documented image, port publication, application key variable, and persistent data volume. Replace the placeholder with your generated secret without exposing it in shared records.
Open the local interface
On the Docker host, browse to http://localhost:7171. If the page does not load, inspect the container state and logs before attempting remote access.
Connect a provider or open a local video
Add Plex or Jellyfin if you want playback discovery and provider media, or choose Open Video to validate the editor with a file available to your browser.
macOS or Linux command
docker run -d \
  --name cliparr \
  -p 7171:7171 \
  -e APP_KEY="your-32-char-stable-random-secret" \
  -v cliparr-data:/data \
  ghcr.io/techsquidtv/cliparr:latest
PowerShell command
docker run -d `
  --name cliparr `
  -p 7171:7171 `
  -e APP_KEY="your-32-char-stable-random-secret" `
  -v cliparr-data:/data `
  ghcr.io/techsquidtv/cliparr:latest
The named volume is created automatically if it does not already exist. Docker then starts the container in detached mode under the name cliparr. The port mapping makes the application available through port 7171 on the host.
Check that the container remains running:
docker ps --filter name=cliparrIf it exits or repeatedly restarts, inspect its logs:
docker logs cliparrDo not proceed to a Localtonet tunnel until the service loads locally. Tunneling cannot repair a stopped container, an invalid application key, a host port conflict, or a media-server address that the container cannot reach.
Connect Plex, Jellyfin, or a local file
Plex requirements
Connect the Plex account through Cliparr and select the appropriate server. Live session discovery requires a Plex server administrator account. Once connected, Cliparr can discover active playback sessions, open the current media, and begin clipping around the current playback position.
Media visibility follows the signed-in provider account. If a Plex server or source that was previously visible appears to be missing, verify that Cliparr is signed in with the account that originally added it. Cliparr does not treat all provider accounts as interchangeable.
Jellyfin requirements
Connect a Jellyfin server using a server address reachable from the Cliparr container and the intended Jellyfin account. Regular Jellyfin accounts require Jellyfin 10.11 or newer for live session updates. For an older Jellyfin server, upgrade Jellyfin or connect an administrator account.
Use the final Jellyfin address directly. Redirects to a different localhost address or port are rejected, even when loopback access has been explicitly enabled. In a container network, a service name such as http://jellyfin:8096 can be appropriate only when that hostname and port actually exist in your Docker environment. Do not copy that example unless your own container network defines it.
Local video workflow
For the simplest functional test, choose Open Video and select a video from the device running the browser. The browser reads that file directly. This is useful for separating editor problems from provider authentication or network problems.
A successful local-file test confirms that the Cliparr interface loads and that the browser can enter the editing workflow. It does not prove that Plex or Jellyfin connectivity is correct, because provider sources add server authentication, session discovery, and media proxying.
| Source | Account or access requirement | How media reaches the editor |
|---|---|---|
| Local video | Browser access to the selected file | The browser reads the local file directly without first uploading it to Cliparr |
| Plex | Connected Plex account; administrator account for session discovery | Cliparr handles provider authentication and can proxy authenticated media routes |
| Jellyfin | Connected Jellyfin account; version and account requirements apply to live updates | Cliparr discovers sessions and helps the browser reach authenticated provider media |
| Direct media URL | Provider sign-in when the source requires authenticated access | The source can route through the self-hosted Cliparr server's media proxy |
Verify Cliparr locally before publishing it
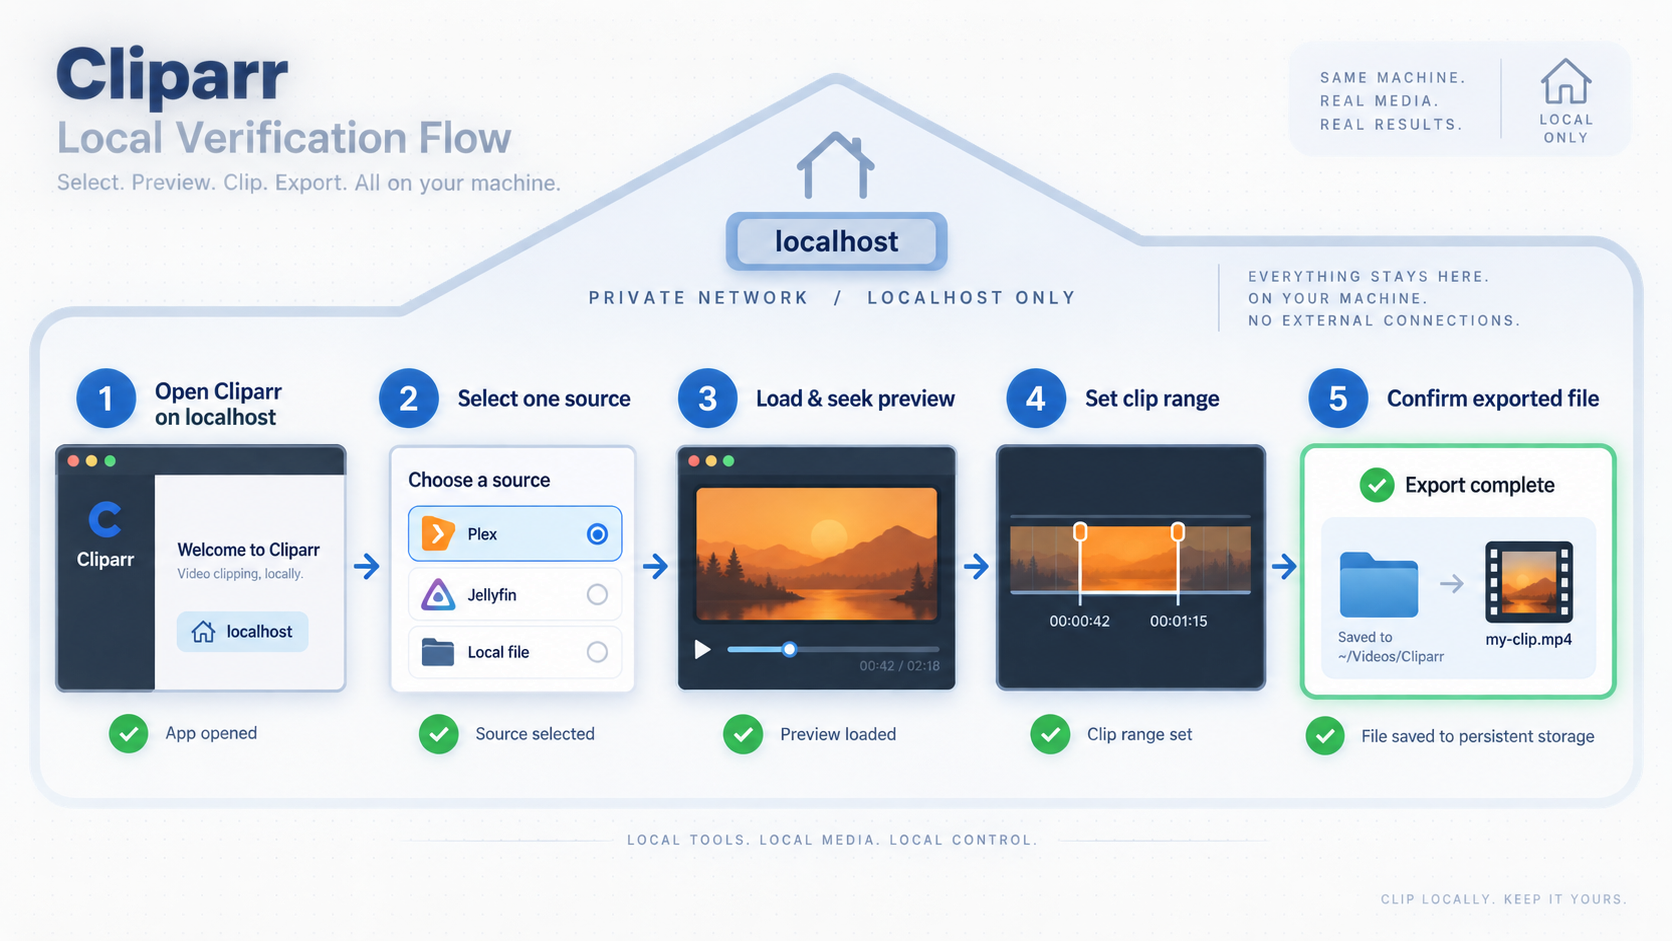
Local verification should exercise more than the landing page. A complete test confirms source loading, timeline interaction, playback, and at least one export. This creates a known-good baseline before HTTPS and remote networking are introduced.
Load the interface locally
Open http://localhost:7171 on the Docker host. If you are testing from another LAN device before setting up HTTPS, remember that Cliparr specifically requires HTTPS for editing from other devices. Perform the initial editing test on the host through localhost.
Open a known source
Select a small local video for the least complex test, or start playback in Plex or Jellyfin and confirm that the active session appears in Cliparr.
Adjust the clip range
Move the start and end points, zoom the timeline if needed, and preview the selected range. This verifies that the browser has loaded enough media for interactive editing.
Test subtitles if they are part of your workflow
Import a supported subtitle track or create captions, preview the text, and confirm that the intended captions overlap the selected clip range.
Export a short clip
Start with a short selection and a format supported by your browser. Open the downloaded result and confirm its duration, picture, audio, subtitle behavior, and metadata relevant to your use case.
Cliparr can preserve source details, artwork, credits, and millisecond clip timing in supported video and audio containers. When provider data is available and valid, supported exports can also include IMDb, TMDB, and TVDB identifiers and critic or audience ratings. GIF exports do not include transcript metadata.
Audio-only exports support MP3, M4A/AAC, Ogg/Opus, FLAC, and WAV. Mix down to stereo is enabled by default in Cliparr 3. Surround audio is therefore converted to stereo unless that option is disabled for a supported AAC or FLAC workflow. MP3, WAV, and Opus exports currently require mono or stereo.
Exports remain in browser memory. Large jobs can exceed the resources available to a browser tab or mobile device. WAV also has a 4 GiB file-size limit. Validate the workflow with a short range first, then increase the duration while monitoring the browser's memory guidance.
Expose the working Cliparr service with Localtonet
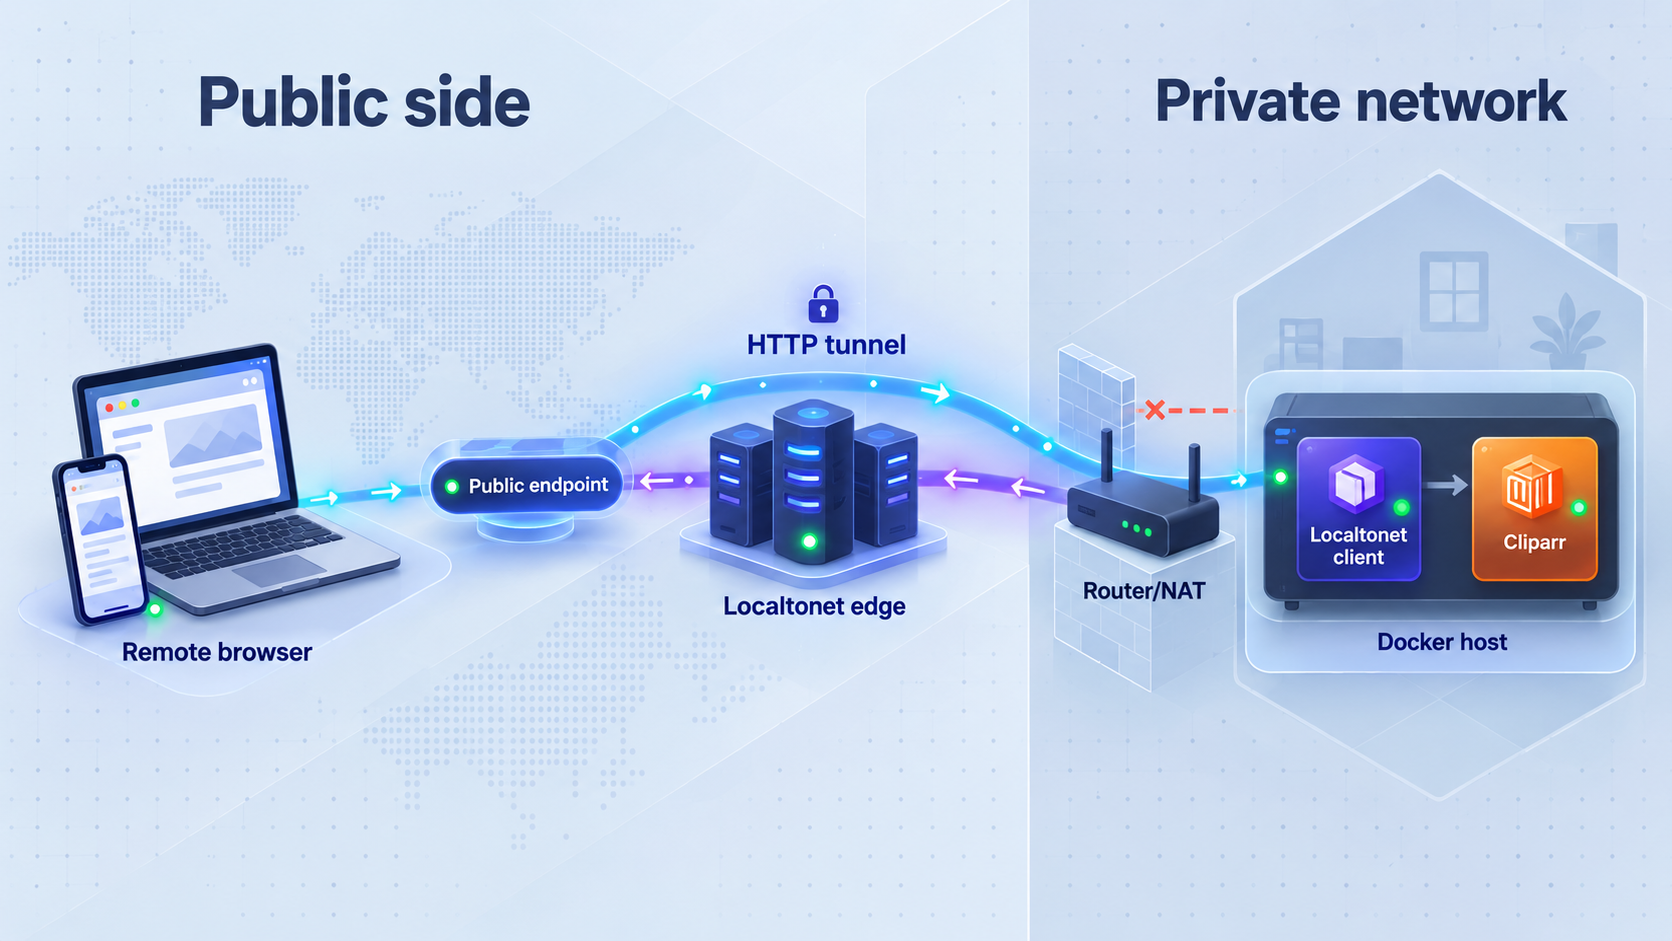
After Cliparr works at http://localhost:7171, the next step is to give remote browsers an HTTPS-facing address. With Localtonet, the client on the Cliparr host establishes an outbound connection to one of our relay servers. This means the normal workflow does not require inbound router port forwarding, a public IP address, firewall changes, or VPN setup.
An HTTP tunnel points to the local Cliparr IP address and port. HTTP tunnel process types can use a random subdomain, a custom subdomain where supported, or a custom domain. All three serve the target through a public HTTPS address. Availability can vary by plan or current dashboard configuration, so select only an option shown for your account. Do not guess a relay server code or domain value.
Install and run the Localtonet client
Install our client on the Docker host or on another device that can reliably reach the Cliparr service. The client must remain connected for the tunnel to stay available.
Authenticate or select the client device
Use the device-specific authentication token supplied through your Localtonet account and select the intended device. Never publish the token or place it in an article, screenshot, public repository, or shared command history.
Select an available relay server
Choose a relay server or region currently offered in the dashboard. Available values can change, so use the live product selection rather than copying a hardcoded server code from another deployment.
Create an HTTP tunnel to Cliparr
Select an HTTP tunnel and point its local target to the Cliparr address and port reachable from the Localtonet client. When both applications run on the same host, that target is normally 127.0.0.1 on port 7171. If the client runs on another device, use a reachable private address instead of localhost.
Start the tunnel
Creating a tunnel does not start it. Press Start, wait for the selected client and tunnel to show as connected, and copy the assigned public HTTPS URL.
Test from an external device
Open the HTTPS URL from a phone or computer outside the host's local context. Load a source, preview a short range, and complete a small export to verify that remote editing works rather than checking only the initial page.
For the current product workflow and available options, consult the Localtonet documentation. Exact client installation commands, relay choices, domain configuration, and plan availability should always be taken from the current dashboard or documentation rather than copied from an older tutorial.
Cliparr must be running and reachable at the configured local target, and the selected Localtonet client must remain connected with the tunnel started. If either side stops, the public address cannot deliver the application.
Verify the HTTPS workflow, not just connectivity
A successful page load confirms that the public URL reaches Cliparr, but it does not fully validate editing. Provider playback discovery may use persistent connections, and exports exercise media routes that the landing page does not. Test the exact workflow users will perform:
- Open the assigned
https://URL from another device. - Sign in to the intended Plex or Jellyfin provider if required.
- Confirm that the expected server and active session appear.
- Preview media and move the timeline range.
- Create a short export and open the downloaded result.
- Repeat with subtitles if subtitle import or authoring is required.
If the public interface opens but live sessions update late or disconnect, investigate the complete connection path. Cliparr requires reverse proxies to support persistent notification connections. Jellyfin communication needs WebSocket support, while Plex-to-Cliparr and Cliparr-to-browser event updates use unbuffered server-sent events. Do not assume that a successful static page request proves those longer-lived connections are healthy.
Routine operations, persistence, and upgrades
Start, stop, and inspect the container
Standard Docker lifecycle commands can be used to stop and start the existing container without deleting its named data volume:
docker stop cliparr
docker start cliparr
docker logs cliparr
Stopping Cliparr leaves the Localtonet tunnel configuration intact, but the tunnel target will be unavailable until Cliparr starts again. Stopping the Localtonet client or the tunnel makes the public URL unavailable even if Cliparr continues to work locally.
The named volume and the stable APP_KEY are separate pieces of deployment state. Preserve both. Retaining the volume while losing the key can force provider reconnection, while retaining the key but deleting the volume does not restore the database stored in that volume.
Back up what cannot be reconstructed easily
Keep the application key in a protected secret store. Use a Docker-volume backup process appropriate to your operating environment for the cliparr-data volume. A backup should be tested through a controlled restoration process before it is treated as reliable.
Export any important draft clips before a major upgrade. Cliparr's 2.x to 3.x migration is explicitly destructive for the old database, and saved clip ranges or subtitle edits from earlier versions cannot be restored after that migration.
Understand the Cliparr 2.x to 3.x migration
The Cliparr 3 release instructions state that an existing 2.x database must be deleted. For a Docker deployment, this means destroying the old application-data volume and attaching a new empty volume. Export existing drafts before upgrading because earlier saved ranges and subtitle edits cannot be restored.
Original media, already downloaded clips, and subtitle style preferences are preserved according to the Cliparr 3 upgrade notes, but saved editing drafts are not. Reopening provider media may import the preferred supported subtitle track again, while local videos begin without subtitles.
Remembered provider logins created or renewed under Cliparr 3 last 30 days rather than one year. Existing remembered logins retain their previous expiry until they are renewed. If a remembered login expires, reconnect the provider.
Do not delete a current data volume merely as a routine update procedure. The empty-volume requirement applies specifically to the documented 2.x to 3.x migration. For later releases, read the release notes for the exact version transition before replacing containers or changing stored data.
Troubleshooting Cliparr and remote access
The local page does not open
Begin with docker ps --filter name=cliparr. If the container is absent from the running list, inspect docker logs cliparr. Check that Docker is using Linux containers, that port 7171 was published, and that another process did not already claim the host port.
Verify the exact local address before changing tunnel settings:
http://localhost:7171A Localtonet configuration change is not the correct fix when this local endpoint is already unavailable.
The interface opens, but Plex or Jellyfin cannot connect
Confirm that the media-server URL is reachable from the Cliparr container, not only from the host browser. Replace an inappropriate localhost address with a private LAN address or a valid container-network name. If loopback is genuinely required, use the provider-specific opt-in variable and only do so when all signed-in users are trusted.
For Jellyfin, configure the final address directly rather than relying on a redirect to another localhost address or port. For Plex session discovery, use a server administrator account. For regular Jellyfin accounts, use Jellyfin 10.11 or newer for live updates.
Playback sessions are missing or stale
First verify that playback is active and that Cliparr is signed in with the provider account that added the media source. Disconnected servers can retain their last known sessions with a connection status, so an old session on screen does not necessarily prove that the provider is currently connected.
If the problem appears only through a proxy path, inspect support for persistent connections. Jellyfin requires WebSockets in the relevant path. Plex and browser updates depend on unbuffered server-sent events. Buffering, short proxy timeouts, or dropped long-lived connections can produce delayed updates even though ordinary page requests succeed.
The public Localtonet URL does not load
Check the layers in order:
- Confirm that Cliparr loads locally at port
7171. - Confirm that the Localtonet client device is connected.
- Confirm that the HTTP tunnel was started after being created.
- Verify that the tunnel target uses the correct IP address and port.
- If the client is on another machine, confirm that it can reach the Cliparr host over the private network.
- Retest using the assigned HTTPS URL rather than a guessed hostname.
Remember that 127.0.0.1 refers to the machine running the Localtonet client. It is correct only when that same machine can reach Cliparr on its own loopback interface.
Editing works locally but not remotely
Make sure the remote browser is using the Localtonet https:// address. Cliparr documents HTTPS as a requirement for editing from other devices. Then test source loading separately from export. If a local file works but a provider source fails, focus on provider authentication and media proxy reachability rather than the editor itself.
A FLAC export fails
Cliparr documents a boundary-related FLAC limitation. If an export fails, choose WAV or adjust the clip's start or end time. If Cliparr cannot read the ending of a standalone FLAC file, shorten the selection so it ends before the unreadable area. Merely changing the output format cannot recover audio that Cliparr could not read.
A large export fails or the browser becomes unstable
Shorten the selected range and retry. Exports remain in browser memory, so the browser device can become the limiting resource even when the server has substantial RAM. Pay attention to Cliparr's memory guidance for large audio jobs. For WAV, remain below the 4 GiB format limit.
Subtitles are missing from Plex
Prefer SRT/SubRip or WebVTT when available. Some other text subtitle formats require Plex to convert them before Cliparr can use them. Certain embedded text tracks may become available only after selecting the track during playback in Plex.
A server disappeared after signing in again
Media sources are associated with the signed-in Plex or Jellyfin account. Reconnect using the account that originally added the server. Also consider whether a remembered login has reached the newer 30-day expiration period and now needs to be renewed.
Security checklist for a remotely accessible editor
A public HTTPS URL improves transport and browser compatibility, but it does not make every application appropriate for unrestricted public exposure. Cliparr stores provider connections and can proxy authenticated media routes. Treat access to its interface as access to a meaningful part of your personal media environment.
Never expose the Localtonet device token, Cliparr application key, Plex credentials, Jellyfin credentials, provider tokens, or private media endpoints. If one of these secrets is accidentally disclosed, revoke or rotate it through the system that issued it and update the deployment as needed.
Review the public workflow after configuration changes. An update can affect provider sessions, login duration, subtitle compatibility, metadata, browser memory behavior, or persistent connection requirements. A short end-to-end export through the HTTPS URL is a better health check than merely confirming that the home page returns a successful response.
Frequently asked questions
Does Cliparr require FFmpeg on the server?
No. Cliparr performs video, audio, and GIF export processing in the browser. Its server handles provider authentication, encrypted provider records, playback discovery, and media proxy routes, but the documented workflow does not require installing FFmpeg on the Docker host.
What local port does Cliparr use in the Docker quick start?
The documented Docker command publishes port 7171, making the application available at http://localhost:7171 on the Docker host. If you intentionally change the host-side mapping, the Localtonet tunnel target must use the resulting reachable port.
Why must APP_KEY remain stable?
Cliparr uses the key as part of protecting stored provider information. It must contain at least 32 characters. Changing it requires reconnecting media servers, so retain the key securely along with the persistent data volume.
Can Cliparr edit a local video without Plex or Jellyfin?
Yes. Choose Open Video and select a file accessible to the browser. The browser reads the local file directly rather than uploading it to the Cliparr server first. This is also a useful way to test the editor independently of provider authentication.
Why should remote Cliparr access use HTTPS?
Cliparr's documentation states that access from other devices requires HTTPS for editing. A Localtonet HTTP tunnel gives the working local HTTP service a public HTTPS address, allowing remote browsers to use the required secure context without exposing an inbound router port.
Does creating a Localtonet tunnel make it immediately available?
No. Tunnel creation and tunnel operation are separate lifecycle states. After creating the HTTP tunnel, press Start. The selected Localtonet client must also remain connected, and Cliparr must remain reachable at the configured local target.
Can the Localtonet client run on a different device from Cliparr?
Yes, provided that the client device can reach Cliparr over the private network. In that design, configure the tunnel with the Cliparr host's reachable private IP address and port 7171. Do not use 127.0.0.1, because it would refer to the Localtonet client device itself.
What must I do when upgrading Cliparr 2.x to 3.x?
Export important drafts first. The documented migration requires deleting the existing 2.x database. Docker users must destroy the old data volume and attach a new empty volume. Saved clip ranges and subtitle edits from earlier versions cannot be restored after the upgrade.
Why do live sessions work locally but update poorly through another proxy?
Live discovery depends on persistent notification connections. Jellyfin paths require WebSocket support, while Plex-to-Cliparr and Cliparr-to-browser updates use unbuffered server-sent events. Buffering or terminating those long-lived connections can delay updates even when ordinary pages still load.
Give your Cliparr deployment an HTTPS remote address
Verify Cliparr locally on port 7171, then connect that working service to a Localtonet HTTP tunnel. You can provide remote browser access without configuring inbound router port forwarding or requiring a public IP address.
Get Started Free →

