

Run a webhook gateway on infrastructure you control, validate it locally, and publish only the route remote senders need
Convoy is a self-hosted webhook gateway for receiving, persisting, routing, debugging, and delivering events. This guide anchors version-specific statements to Convoy v26.7.6, the latest release identified by the reviewed primary evidence, and separates Community capabilities from licensed or experimental features. It covers the official quick installer, deployment validation, initial incoming-webhook configuration, local testing, Localtonet HTTP tunneling, recovery planning, upgrades, and troubleshooting. Where Convoy's current public quick-start material does not publish an exact command, path, port, or configuration key, we identify the required value without inventing it.
📋 What's in this guide
How Convoy and Localtonet fit together
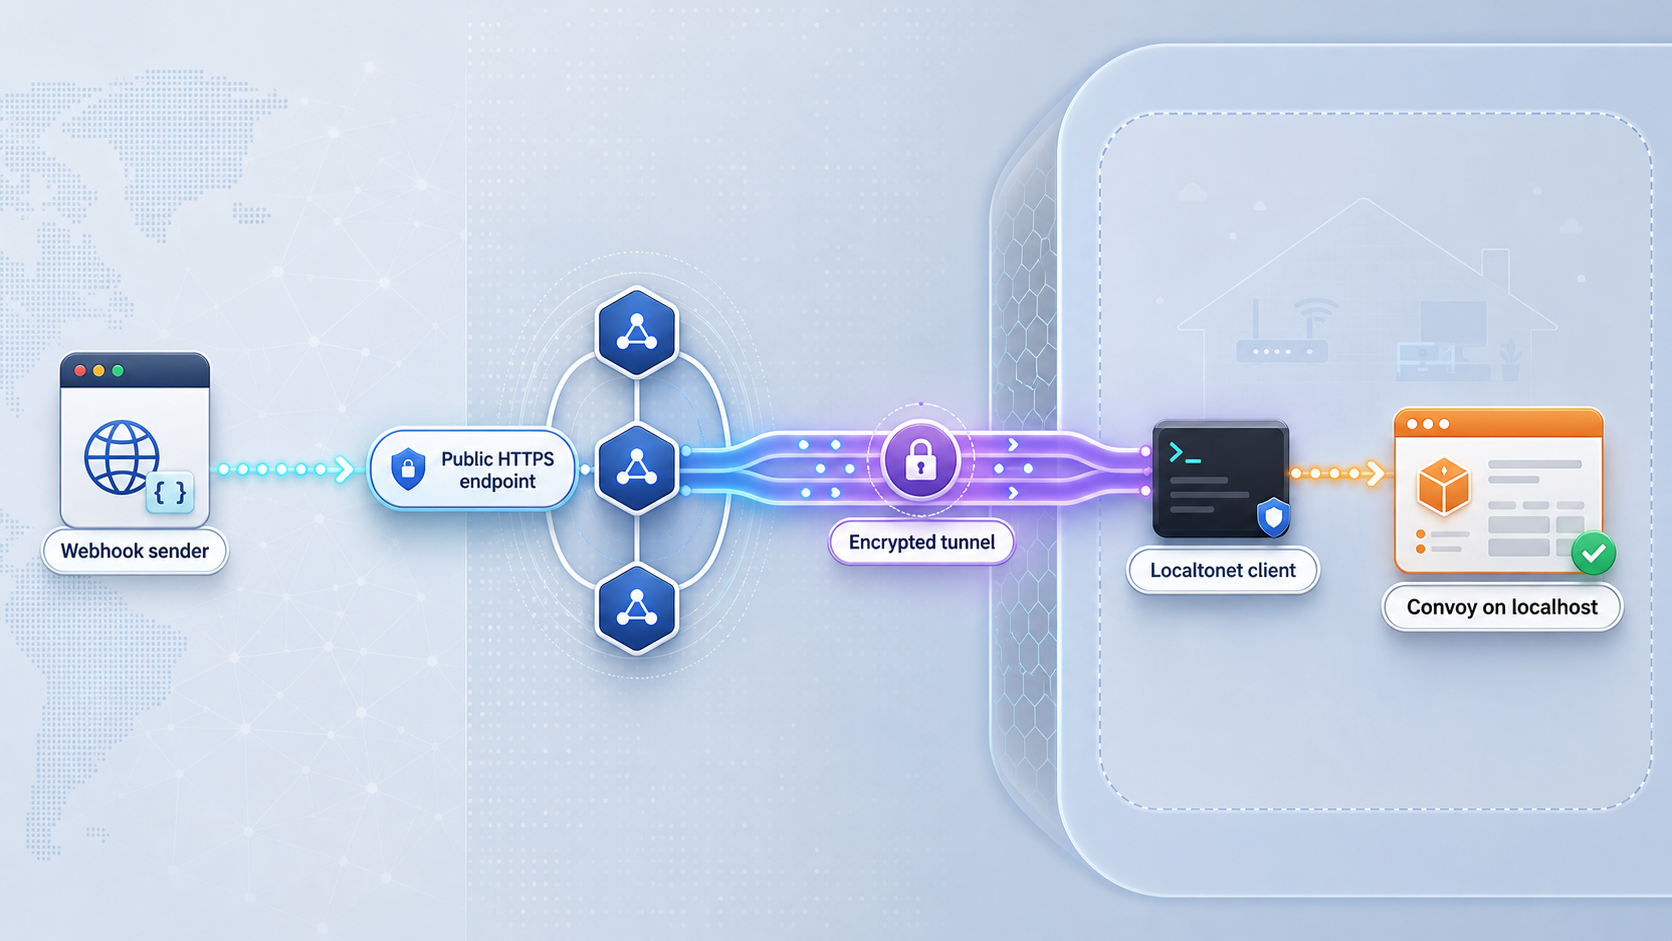
A webhook sender makes an HTTP request when an event occurs. For that request to succeed, the sender needs a reachable URL, the receiver must recognize the requested path, and both sides must agree on authentication and payload format. Reliable delivery also requires a plan for retries, duplicates, failed destinations, and operational visibility.
Convoy provides the webhook application layer. Its current project description covers incoming and outgoing webhooks, event persistence, search, filters, JavaScript transforms, fan-out delivery, rate limiting, retries, batch retries, circuit breaking, endpoint failure notifications, payload signing, bearer-token authentication, OAuth2, mutual TLS, dynamic endpoints, generated SDKs, and independently scalable server and agent components.
Localtonet addresses a different part of the system. Our client runs on a machine that can reach Convoy and establishes an outbound connection to a Localtonet relay server. An HTTP tunnel maps a public HTTPS address to the selected local IP address and port. This removes the need for inbound router port forwarding, internet-edge firewall changes, VPN setup, or a public IP address.
The tunnel does not install Convoy, create a Convoy source, validate provider signatures, select subscriptions, or deliver events to downstream applications. Those remain Convoy and application responsibilities. Conversely, a healthy Convoy deployment does not become internet-reachable until the Localtonet client is connected and the tunnel has been started.
The public URL should contain the exact incoming source path required by the sender. A dashboard page, API root, health route, and webhook ingestion route are not interchangeable. If administration and ingestion share a listener in your deployment, use Convoy authentication and available routing controls to limit access. Keep administrative credentials out of webhook configuration and public tests.
Release, license, and feature boundaries
This revision uses Convoy v26.7.6 as its release reference because the reviewed Convoy repository identifies that tag as the latest release. The release includes changes involving retention configuration, event identifiers, instance configuration, control-plane behavior, and dashboard administration. Interface labels and configuration behavior from older screenshots may therefore differ.
Convoy's repository currently identifies the project license as Elastic License v2.0. It also distinguishes the free Community deployment from Self-Hosted Premium. The current repository description states that Community remains free for one user, one organisation, and two projects. A license key enables paid self-hosted features.
Feature names in the project overview do not prove that every capability is enabled in every installation. For example, the repository describes a PostgreSQL-backed delivery queue as experimental and requiring a license. Static IP functionality, embedded customer-facing dashboards, Google SSO, and other advanced controls can also depend on edition, license, instance configuration, or deployment environment. Confirm the active license and available controls in the running v26.7.6 instance before designing around them.
| Area | Current verified statement | Operational consequence |
|---|---|---|
| Release reference | v26.7.6 is identified as the latest release in the reviewed repository evidence | Pin and record the deployed version rather than following an unversioned screenshot |
| License | The repository identifies Elastic License v2.0 | Review the license terms before redistribution or commercial deployment |
| Community limits | One user, one organisation, and two projects | Design the initial administrative structure within those limits unless a license is added |
| Self-Hosted Premium | A license key enables paid features on a self-hosted instance | Do not assume premium controls are available on Community |
| PostgreSQL queue | Experimental and license-dependent | Do not enable it as a routine Community configuration without confirming eligibility and support expectations |
This distinction is especially important for recovery and upgrades. A configuration exported from a licensed instance can include behavior that is not active in an unlicensed replacement. Record the Convoy version, license state, enabled experimental features, and instance configuration with each backup.
Prerequisites and deployment plan
Convoy currently lists Docker and Kubernetes with Helm as installation paths. Its website also publishes a shell-based one-line installer. This tutorial follows that published quick installer because it is the only installation command established by the reviewed primary evidence. Kubernetes and hand-assembled Docker deployments require exact chart values, image tags, service definitions, secrets, and storage configuration that are not present in that evidence, so they are not mixed into the quick-install procedure.
The one-line installer is suitable for evaluating Convoy on a host you administer. It should not be treated as a complete production runbook until you have inspected the current script and documented the artifacts it creates. Convoy's public quick-start text does not establish a universal operating-system matrix, minimum CPU or memory requirement, generated directory, host port, default administrator credential, shutdown command, or restoration command.
Required host conditions
- A dedicated or appropriately isolated host that you administer.
- A shell environment capable of running
bash. curlwith outbound HTTPS access to retrieve the installer.- Permission to install and run every dependency selected by the current installer.
- Enough storage for the database, retained webhook payloads, logs, and future growth.
- A backup destination separate from the Convoy host.
- A local network path from the Localtonet client to Convoy's eventual listener.
- Network access from Convoy to every downstream endpoint it must call.
Values to record during installation
Create an installation record before running the script. The record should contain the Convoy release, installer retrieval time, installed component names, container or service status commands, local bind address, host-published HTTP port, persistent directories or volumes, database location, configuration path, secret storage location, startup command, shutdown command, and upgrade procedure.
These values must come from the reviewed installer and resulting deployment. Do not infer them from an old tutorial. In particular, a port exposed inside a container is not necessarily published on the host, and a service bound to 127.0.0.1 cannot be reached directly from a different LAN device.
The official quick start downloads a remote script and passes it directly to Bash. For a controlled deployment, download the script first, inspect its current contents, verify the host changes it will make, and preserve an approved copy. Confirm its dependencies, image or package versions, data locations, listener configuration, generated credentials, and lifecycle commands before running it with elevated privileges.
Choose where the Localtonet client will run
Running the Localtonet client on the Convoy host allows the tunnel to target a loopback listener if the deployment supports one. This keeps Convoy from being generally reachable across the LAN. If the client runs on another device, Convoy must listen on an address reachable from that device, and the host firewall should permit only the required local source and port.
For a Kubernetes deployment, a cluster-only service name is reachable only from an appropriate cluster network context. For a Docker deployment, use the host-published port rather than an internal-only container address. This tutorial does not invent Kubernetes service names or Docker mappings that differ by installation.
Install the Convoy v26.7.6 quick-start deployment
Convoy's website currently publishes one exact quick-start action:
Run the reviewed official installer
After retrieving and reviewing the current script, run the official installation command on the prepared host. Preserve the complete output and compare the installed version with the intended v26.7.6 release reference.
curl -fsSL https://getconvoy.io/install | bashThis is intentionally a one-step installation sequence. The current public quick-start presents one command, so we do not turn surrounding validation tasks into fictional installer steps. Host preparation, initial Convoy configuration, testing, backup, and Localtonet setup are separate procedures below.
Validate the installed components
Preserve the installer output and identify the exact runtime it selected. If the installation uses Docker, the following standard commands can display active containers and host port mappings:
docker ps
docker ps --format 'table {{.Names}}\t{{.Status}}\t{{.Ports}}'
Every required Convoy component should remain running. Convoy describes server and agent components that can be scaled independently, and the selected installer may add supporting services. Repeated restarts, database connection failures, migration errors, unhealthy dependencies, or missing port mappings indicate that the installation is not ready.
Use the actual component names from the installation when viewing logs. Do not paste an assumed container name into an operational script. Record the command printed or installed for starting and stopping the deployment. The reviewed quick-start evidence does not provide those lifecycle commands, so a production operator must obtain them from the inspected v26.7.6 installer before approving the deployment.
Do not proceed to production if you cannot identify the startup command, graceful shutdown command, database storage, configuration storage, secret location, and restore procedure. The public one-liner establishes how installation begins, but it does not replace a deployment-specific operating record.
Create the administrator, project, source, endpoint, and subscription
A running process is not yet an incoming-webhook gateway. You need an administrative account, an organisation, a project, an incoming source, a destination endpoint, and a subscription that associates matching events with that endpoint.
Convoy v26.7.6 can differ from older releases in dashboard arrangement. Use the terminology shown by the running instance. The sequence below describes the required logical objects without inventing field names that are not established by the current evidence.
- Open the local Convoy interface at the host and port reported by the installation. Complete the initial administrator setup if the fresh instance presents that workflow. Store the administrator credential in an approved password manager.
- Create or select the organisation that will own the project. Community currently permits one organisation and one user, so plan the initial structure accordingly.
- Create an incoming-webhook project or select the equivalent incoming project type shown by v26.7.6. Community currently permits two projects.
- Create an incoming source for a nonproduction test provider. Record the source identifier and the exact webhook URL or path generated by the instance.
- Configure the authentication mechanism supported by the provider and the active Convoy edition. Convoy documents bearer-token authentication for authenticated webhook endpoints. It also documents security capabilities including payload signing, OAuth2, and mutual TLS for applicable endpoint workflows.
- Add a disposable destination endpoint that Convoy can reach. Use a controlled receiver that records the request and returns an intentional HTTP result.
- Create a subscription connecting the incoming event stream to the destination. Begin without a complex filter or transform so that the basic path can be proven first.
- Save the generated incoming route, required HTTP method, authentication material, expected content type, destination URL, and subscription rule in the deployment record.
Authentication and payload validation
Network reachability is not sender authentication. Protect the source using a mechanism compatible with the webhook provider. If the provider signs requests, preserve the raw request body where its signature procedure requires it. A parser, proxy, or transform that changes bytes before verification can invalidate an otherwise legitimate signature.
Keep source credentials, bearer tokens, signing secrets, OAuth credentials, database passwords, administrator credentials, and Localtonet device tokens out of repositories, shell history, screenshots, and webhook payloads. Use the secret-management mechanism appropriate to the installed deployment.
Subscriptions, filters, and transforms
Convoy subscriptions can filter on request body, headers, query values, and path data, and can run a JavaScript transform before delivery. Events that do not match a configured filter are dropped. Begin with a test subscription that matches a clearly identified event, then add narrow filters one condition at a time.
Convoy can also fan one event out to multiple endpoints. Use that deliberately because each destination can create separate retries and side effects. Make downstream handlers idempotent so a repeated event does not repeat a payment, account change, notification, or other irreversible action.
Verify the local webhook path
Test from the Convoy host first. Then, if the Localtonet client will run on another machine, repeat the same request from that client machine. Both tests must use the listener and source path produced by the installed instance.
Start with a basic request to the local interface. A response confirms that an HTTP service is present, but only a request to the real incoming source proves webhook ingestion. Use the following parameterized request after replacing every placeholder with values from your v26.7.6 instance:
curl -i \
  -X POST \
  -H 'Content-Type: application/json' \
  -H 'Authorization: Bearer YOUR_TEST_CREDENTIAL' \
  --data '{"event":"localtonet.convoy.test","test":true}' \
  'http://LOCAL_IP:LOCAL_PORT/EXACT_CONVOY_WEBHOOK_PATH'
If the source uses another documented authentication method, replace or omit the authorization header as required. The exact route cannot safely be hardcoded because it belongs to the source created in your instance.
A complete local verification proves all of the following:
- The Convoy listener is reachable at the recorded local address and port.
- The requested path belongs to the intended incoming source.
- The request passes the source authentication policy.
- Convoy records the event and returns the expected ingestion response.
- The intended subscription matches the event.
- Any enabled filter or transform behaves as expected.
- Convoy attempts delivery to the configured destination.
- The destination receives the event and correlates it with Convoy's event record.
| Result | Meaning | Next check |
|---|---|---|
| Connection refused | No reachable listener exists at that address and port | Check component status, bind address, and host port publishing |
| Timeout | Traffic may be filtered, routed incorrectly, or reaching an unresponsive process | Compare tests from the Convoy host and Localtonet client host |
| 404 | The HTTP service answered, but the path was not found | Copy the exact incoming source route from Convoy |
| 401 or 403 | The route is reachable but authentication or authorization failed | Check the source credential, signature, and applicable policy |
| Accepted event, failed delivery | Ingress worked but the downstream workflow failed | Inspect endpoint reachability, subscription matching, retries, and circuit state |
Expose Convoy through a Localtonet HTTP tunnel
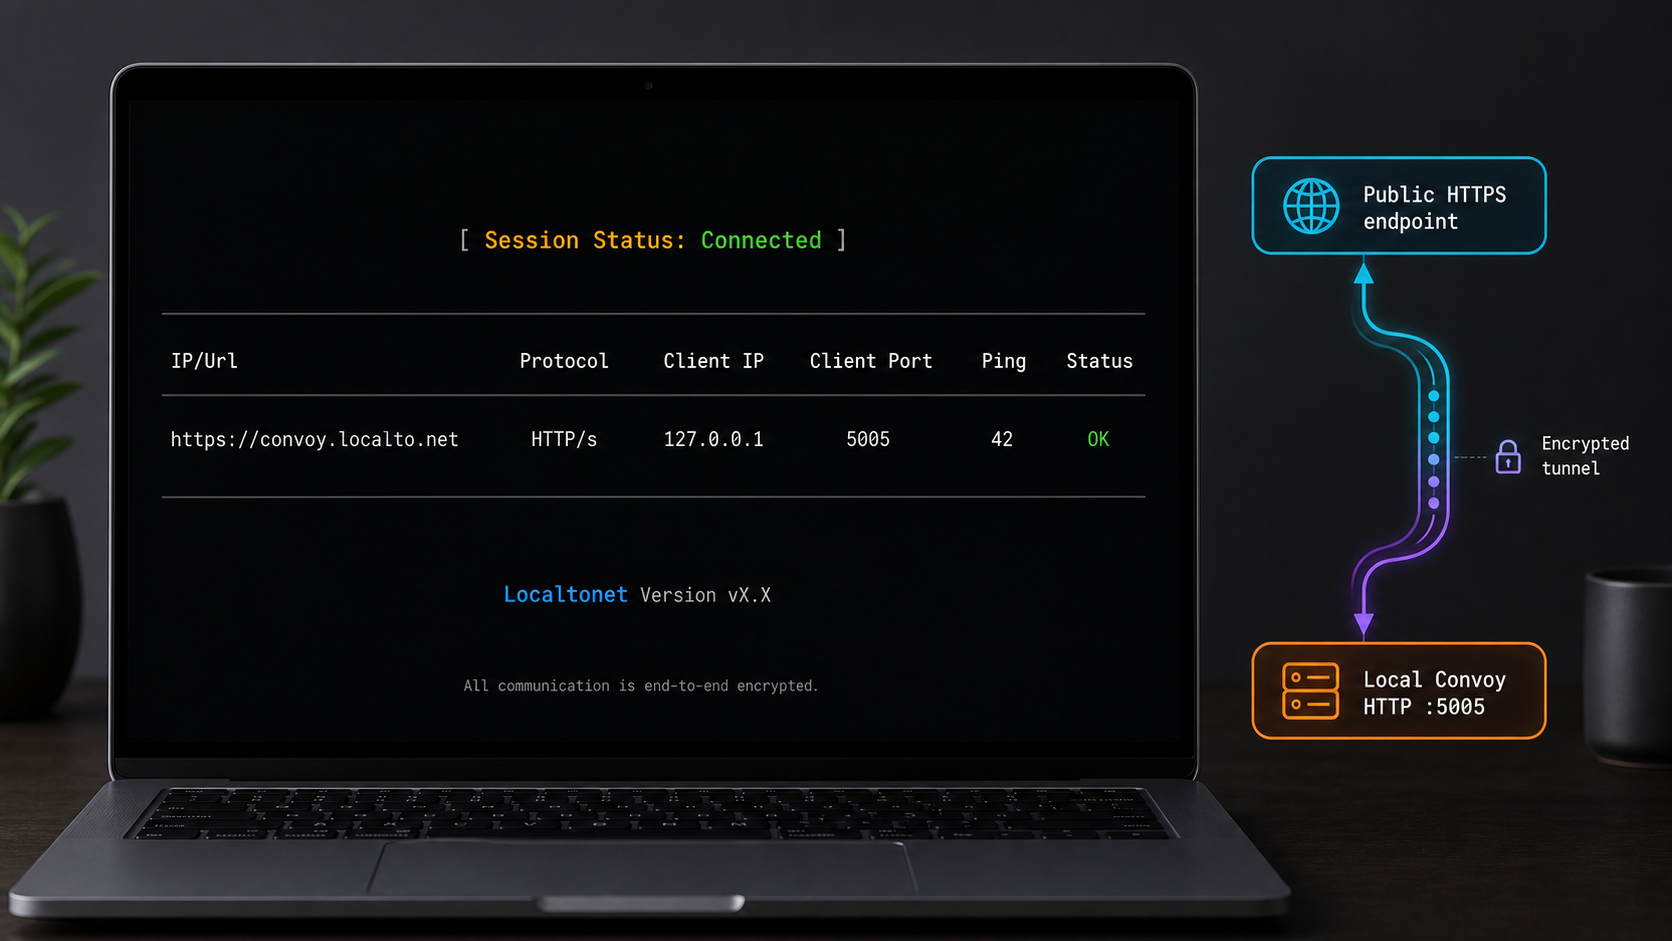
Install and run our client on the Convoy host or on a device that can reach the verified listener. HTTP tunnels can use a random subdomain, a custom subdomain where supported, or a custom domain. Available choices can vary by account, plan, and current dashboard options.
Install and run the Localtonet client
Use a device that can reach Convoy's verified local listener. The client must remain connected while remote webhook delivery is required.
Select the client device
Authenticate or select the device using its device-specific token. Treat the token as a credential and never place it in Convoy payloads or public examples.
Select an available relay server
Choose a server or region shown in the current dashboard. Do not hardcode a server code copied from another account or tutorial.
Create the HTTP tunnel
Select the HTTP tunnel family and an available process type. A generated subdomain is a practical starting point when you do not need custom-domain DNS.
Enter the verified local target
Set the local IP address and port to the exact values that passed local testing. Use a host-published port, not an inaccessible container-only or cluster-only address.
Start the tunnel
Creating a tunnel does not start it. Use the Start button, confirm that the selected device and tunnel are connected, and copy the assigned public HTTPS address.
See our HTTP tunnel documentation alongside this workflow for the current dashboard presentation. Use the server values and terminology displayed in your account.
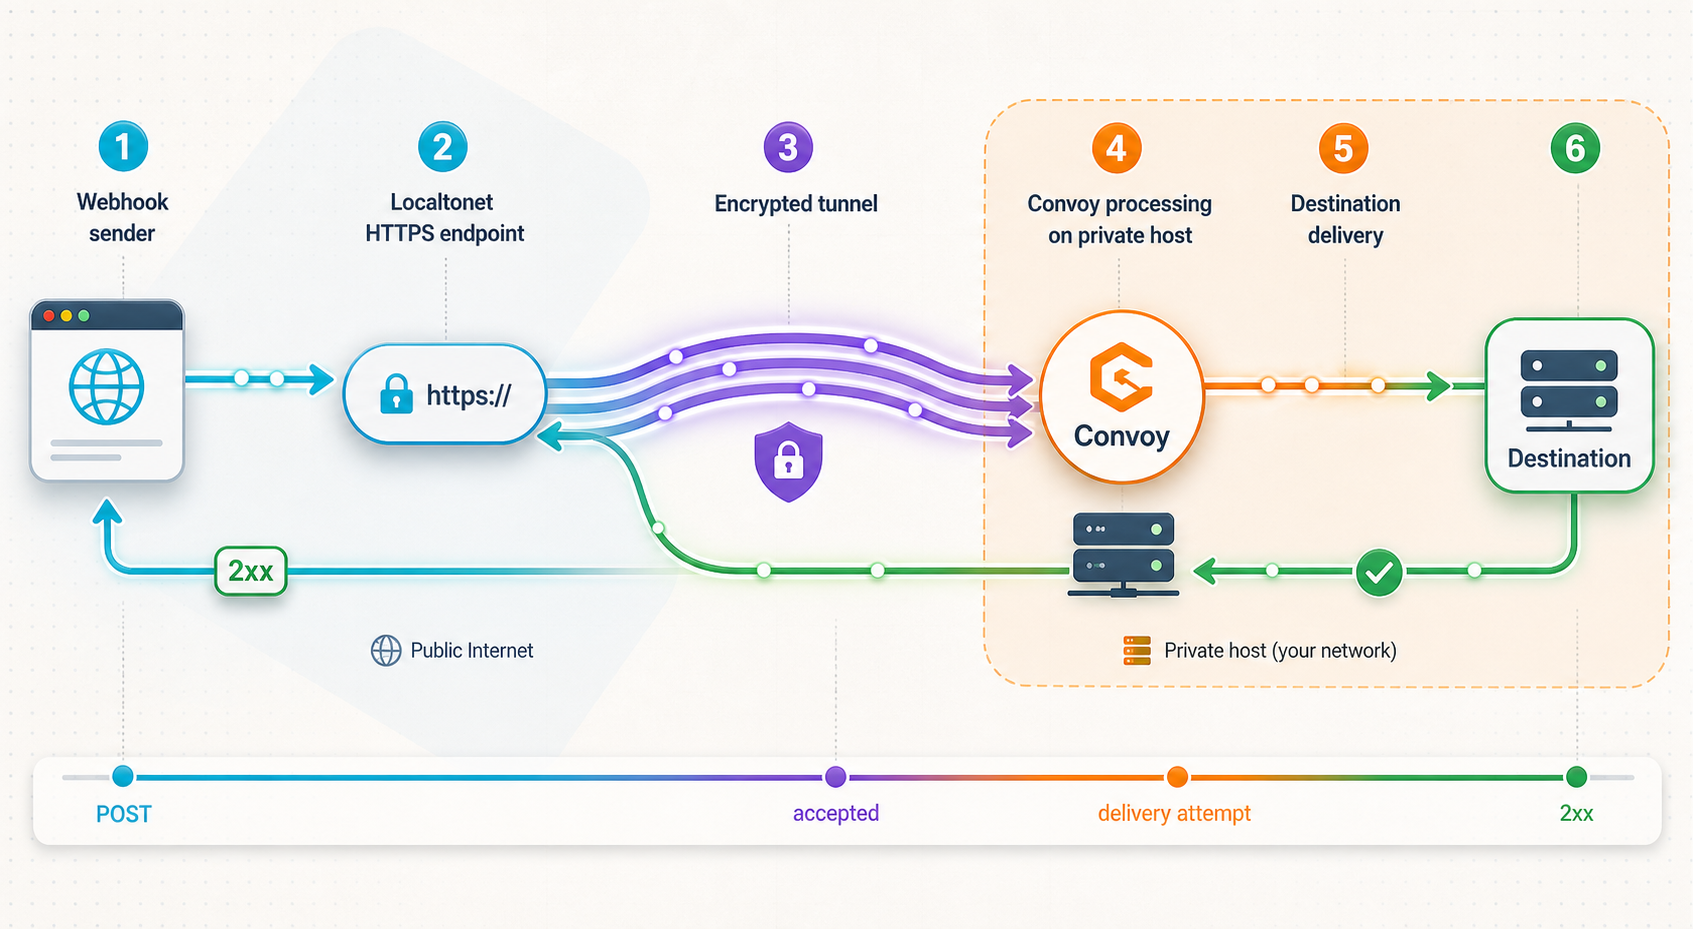
Append the exact Convoy incoming source path to the assigned Localtonet HTTPS address. Do not replace the source path with the dashboard root, and do not assume that opening the base URL in a browser tests webhook ingestion.
Run the remote request
curl -i \
  -X POST \
  -H 'Content-Type: application/json' \
  -H 'Authorization: Bearer YOUR_TEST_CREDENTIAL' \
  --data '{"event":"localtonet.convoy.test","test":true}' \
  'https://YOUR_PUBLIC_HOST/EXACT_CONVOY_WEBHOOK_PATH'
Use a test credential and synthetic payload. Confirm the immediate HTTP result, find the event in Convoy, verify the matched subscription, and inspect the downstream receiver. Convoy supports searching by values including event ID, type, source, and idempotency key, subject to the data available in the event.
Repeat the test with an invalid credential and confirm rejection. Then repeat the valid event using the same stable identifier, if your provider format supports one, and verify that the destination handles duplicates safely.
Back up, restore, upgrade, and operate the deployment
Back up durable state
Back up both configuration and database-backed state. Event history, users, organisations, projects, sources, endpoints, subscriptions, retry state, circuit state, and instance settings may not all live in one file. Identify the exact database and persistent storage created by the reviewed installer.
A restoration-safe backup procedure should record the Convoy version, license state, enabled experimental features, configuration files, secret references, persistent volume locations, database backup method, and integrity check. Store the backup separately from the host and protect it because webhook payloads and destination credentials can contain sensitive information.
Use a controlled restoration procedure
- Prepare an isolated replacement host compatible with the recorded deployment.
- Install the same Convoy release before attempting a version-changing restore.
- Restore configuration, secrets, and persistent database state using the deployment's documented database tooling.
- Confirm ownership and permissions on every restored path or volume.
- Start Convoy using the command recorded from the installed deployment.
- Verify the administrator login, organisation, projects, sources, subscriptions, endpoints, and event state.
- Run a local synthetic webhook before reconnecting the Localtonet tunnel.
- Run a remote synthetic webhook and verify destination delivery.
The current public quick-start evidence does not publish a database-specific backup or restoration command. Do not guess one. Extract the actual database topology and lifecycle commands from the inspected v26.7.6 installer, then test restoration before calling the deployment recoverable.
Start and stop safely
Use the startup and graceful shutdown procedure produced by the selected deployment. Stop accepting new public requests before maintenance by stopping the Localtonet tunnel. Then allow active work to settle according to Convoy's operational behavior before stopping its components and dependencies.
After maintenance, start dependencies and Convoy with the recorded deployment procedure, verify local ingestion and destination delivery, start the Localtonet tunnel, and repeat the remote test. Stopping a tunnel does not stop Convoy. Deleting a Convoy source does not delete the Localtonet tunnel. Treat these as separate lifecycle operations.
Upgrade deliberately
Before changing versions, review the Convoy release notes, identify database migration requirements, create and test a backup, record the current image or package version, and prepare a rollback plan compatible with schema changes. Experimental or licensed capabilities deserve additional validation.
After an upgrade, verify more than process health. Test administrator access, sources, authentication, subscriptions, filters, transforms, retries, event search, destination delivery, and the public Localtonet path. Confirm that instance configuration did not change unexpectedly.
Monitor both layers
Monitor Convoy component health, database capacity, queue behavior, retained event growth, endpoint failures, retries, and circuit state. Separately monitor the Localtonet device and tunnel lifecycle. Localtonet platform Token and Tunnel webhooks can report Connected and Disconnected changes for a selected Token Group. Those lifecycle notifications are not Convoy events and should not be merged with the webhook payload flow described here.
Troubleshooting the deployment
The installer finishes but no local service responds
Review the full installer output and component status. Confirm that all required dependencies are running and that the intended host port is actually published. Check for database connection errors, failed migrations, repeated restarts, permission problems, port conflicts, and exhausted disk space.
The Localtonet client cannot reach Convoy
Test the recorded local URL from the Localtonet client device. If Convoy is bound only to loopback on another host, it will not be reachable. If it runs in Docker, confirm the host-side port mapping. If it runs in Kubernetes, confirm that the target is reachable from the client's network context.
The public base URL responds but the webhook returns 404
The tunnel is probably reaching an HTTP listener, but the requested path is wrong. Copy the incoming source path from the current Convoy project. Preserve path segments and required query values when replacing the local base address with the Localtonet public address.
Convoy accepts the event but no destination receives it
Inspect subscription matching, filters, transforms, endpoint status, destination authentication, rate limits, retry state, and circuit state. Test the destination from Convoy's own network context. Inside a container or pod, 127.0.0.1 refers to that container or pod, not automatically to a service on the host.
The sender reports duplicates
A provider can retry after a timeout even if the first request eventually entered Convoy. Convoy also supports constant-time retries and exponential backoff with jitter for failed destination delivery. Correlate provider records, Convoy event identifiers, and destination logs. Make the destination idempotent rather than relying on exactly-once transport.
The tunnel disconnects intermittently
Confirm that the Localtonet client is supervised and that the host is not sleeping or losing outbound connectivity. Check device state and tunnel state separately. If Convoy remains reachable locally during the incident, focus on the client connection and tunnel lifecycle. If local requests also fail, investigate Convoy and its host first.
Do not expose an unauthenticated dashboard or disable verification across a production source. Use a disposable source, synthetic payloads, narrowly scoped configuration changes, and short-lived test credentials. Restore every modified control after testing.
Frequently asked questions
Which Convoy release does this guide target?
Version v26.7.6 is the release reference used for this revision because the reviewed Convoy repository identifies it as the latest release. Record the exact version installed by the quick installer and review later release notes before upgrading.
Is Convoy Community unlimited?
No. The current Convoy repository states that Community remains free for one user, one organisation, and two projects. Self-Hosted Premium uses a license key to enable paid features. The PostgreSQL queue is described as experimental and license-dependent.
Which port should I enter in Localtonet?
Enter the host port reported or published by your actual Convoy deployment and confirmed by local testing. Do not assume that an internal container port is reachable from the Localtonet client.
Does Localtonet configure Convoy authentication?
No. Our HTTP tunnel provides network reachability to the configured local service. Convoy and the sending provider remain responsible for source authentication, signature verification, subscriptions, filters, transforms, retries, and destination delivery.
Can the Localtonet client run on another machine?
Yes. The client device must be able to reach Convoy's local IP address and port. A Convoy listener bound only to loopback cannot be reached directly from another machine.
Do I need router port forwarding or a public IP address?
No. The Localtonet client establishes an outbound connection to our relay infrastructure. The HTTP tunnel can provide a public URL without inbound router port forwarding, internet-edge firewall changes, VPN setup, or a public IP address.
What happens when the tunnel stops?
The public path becomes unavailable when the selected device disconnects or the tunnel is stopped. Convoy can continue processing locally, but remote providers cannot reach it through that tunnel until both the client and tunnel are running.
Is this HTTP tunnel a VPN?
No. This workflow forwards a selected local HTTP service through a public URL. Localtonet VPN Manager is our separate private mesh VPN feature.
Connect your verified Convoy gateway with Localtonet
Install and document the Convoy deployment, create and test an incoming source locally, then use a Localtonet HTTP tunnel to provide the public HTTPS reachability your remote webhook sender needs.
Get Started Free →

