

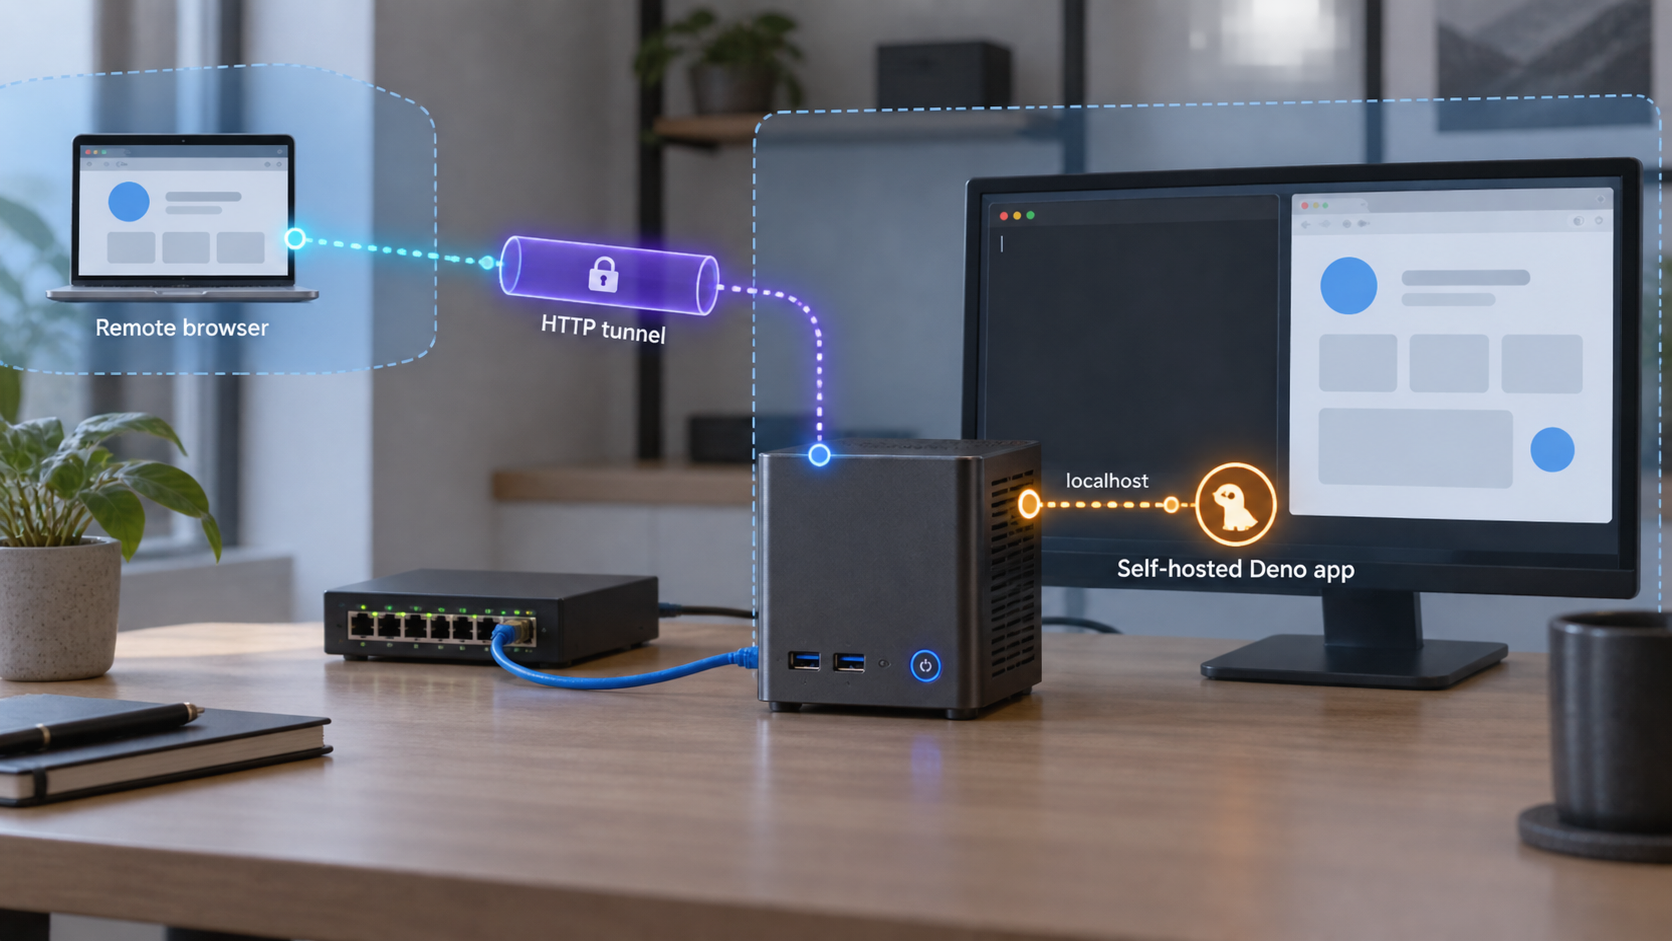
Move your Deno HTTP service to infrastructure you control, validate it locally, and give it a public HTTPS address
Self-hosting a Deno application involves more than copying TypeScript files to another computer. You need to identify runtime and provider dependencies, transfer persistent data, reproduce configuration, supervise the process, test the application on localhost, and prepare a rollback path. This guide walks through that migration boundary and uses a small Deno HTTP server as a verifiable example. Once the application works locally, we show how to publish it with a Localtonet HTTP tunnel without requiring inbound router port forwarding, firewall changes, a VPN, or a public IP address.
📋 What's in this guide
Plan what self-hosting actually needs to move
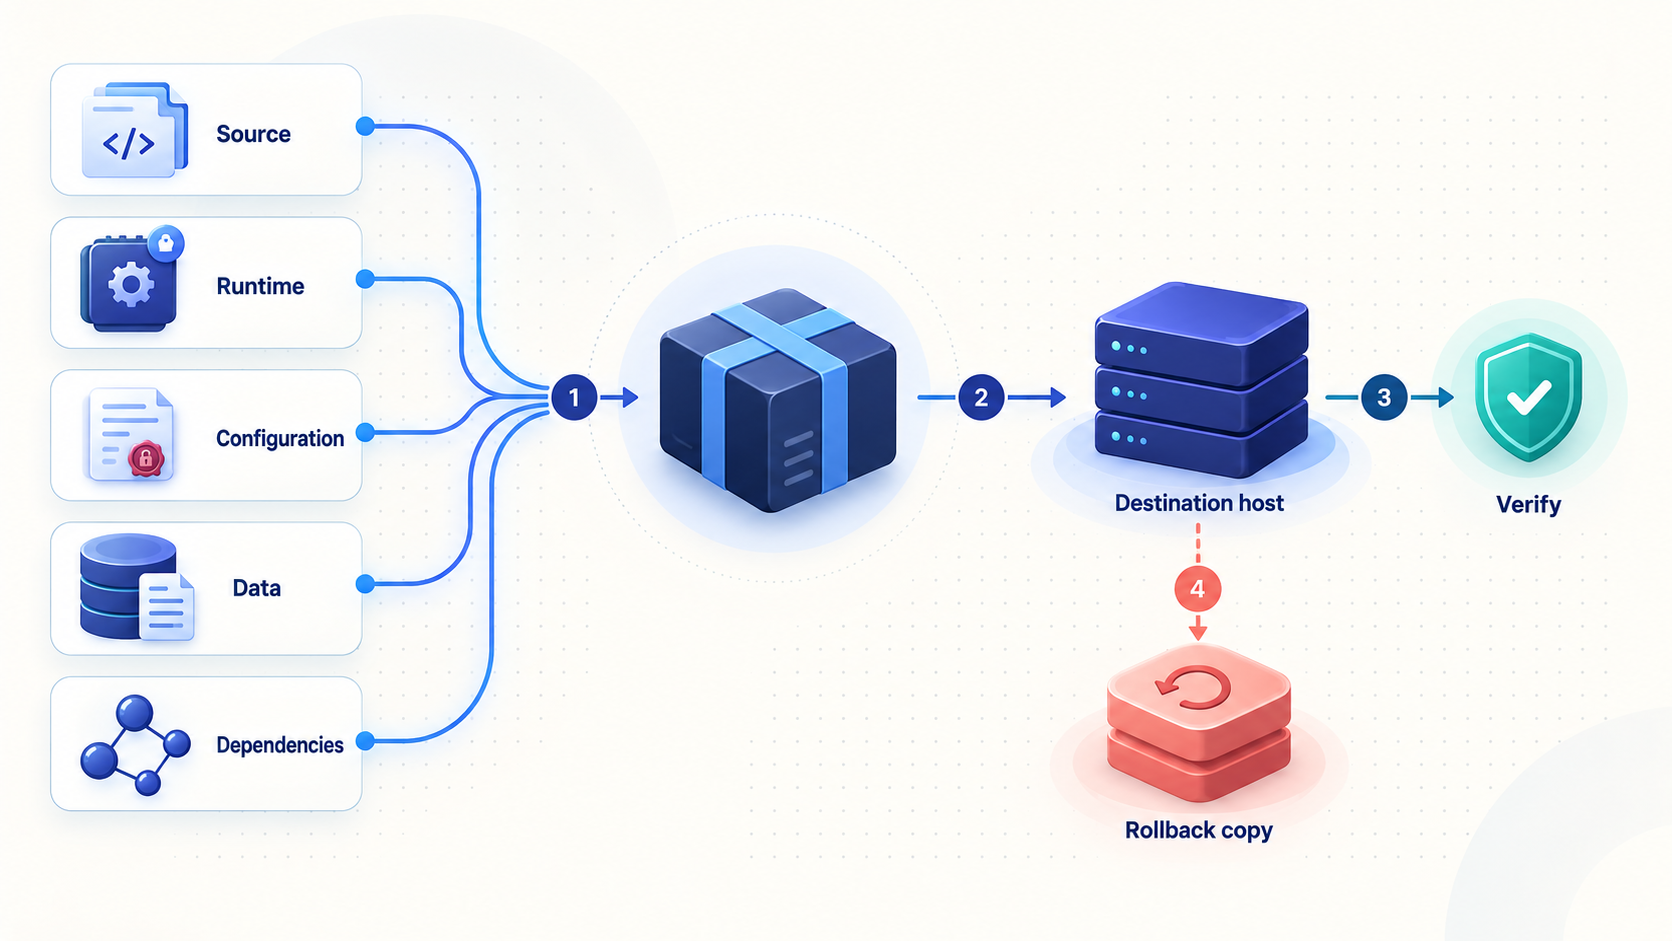
A Deno application is not necessarily a single portable unit. The HTTP handler and business logic may run anywhere a compatible Deno runtime is available, but the complete deployed system can also depend on managed databases, object storage, queues, scheduled jobs, secrets, identity services, edge APIs, and provider-specific networking. Moving the runtime does not automatically move those services.
Begin by treating the current deployment as a collection of dependencies. Inventory each component, decide whether it remains where it is, and identify anything that needs a self-hosted or independently managed replacement. This prevents a common migration failure in which the web process starts correctly but cannot perform useful work because a database, secret, storage bucket, or callback endpoint was overlooked.
Classify code by portability
One useful review technique is to divide the code into three broad categories. Web-standard APIs such as Request, Response, URL, and fetch are generally the most portable. Package imports require checking how versions are resolved and whether installation or cache preparation is needed. Calls through the Deno namespace are runtime-specific and deserve direct review because they can involve process permissions, environment access, file access, networking, subprocesses, or Deno-specific storage.
You can search a TypeScript codebase for direct Deno API usage before migration:
grep -R -n --include="*.ts" "Deno\." .
This search is an inventory aid, not a compatibility verdict. A result such as Deno.env.get may work unchanged on another Deno host after the correct permission is granted. A provider-specific database or deployment API may require a separate migration even when it does not appear as a Deno.* call.
Create a dependency worksheet
| Dependency | Questions to answer | Migration decision |
|---|---|---|
| Deno runtime | Which version, entry point, task, and permissions are required? | Install and test a compatible version on the new host. |
| Environment variables | Which values are required, optional, secret, or environment-specific? | Recreate them through a protected host or supervisor configuration. |
| Database | Is it local, remotely managed, or tied to the current provider? | Retain it temporarily or migrate schema and data separately. |
| File storage | Where are uploads and generated files stored? | Copy, verify, back up, and mount storage at a deliberate path. |
| Jobs and queues | What launches them, and can duplicate execution cause damage? | Move them independently and define a safe handover point. |
| Public endpoint | Which users, webhooks, redirects, and clients call it? | Test the new address before updating dependent systems. |
| Observability | Where do logs and health signals go today? | Provide host-level logging, retention, and failure detection. |
Keep production credentials out of source control, example files, shell history, screenshots, and support messages. Create new credentials on the destination where practical, grant only the access the application needs, and revoke obsolete credentials after a successful cutover.
Prepare the destination host and migration inputs
The destination can be a workstation, home server, virtual machine, or another system you control. It must remain powered on, have outbound internet connectivity, and be able to run both the Deno application and the Localtonet client. The Localtonet client can also run on another device, provided that device can reach the Deno service over the local network. Keeping both processes on the same host is usually the simplest arrangement because the tunnel can target the loopback interface.
Before changing the current production endpoint, prepare the following:
- A supported operating system account with permission to install and run Deno.
- The complete application source at the exact revision selected for migration.
- A record of the existing Deno version and application startup command.
- A list of required Deno permissions, such as network, environment, read, or write access.
- A protected inventory of environment variable names and where their values will come from.
- Backups or exports for persistent data, plus a documented restoration procedure.
- Enough disk space for the source, dependencies, logs, temporary files, and application data.
- A process supervision method appropriate for the destination operating system.
- A Localtonet account and client device that can reach the application.
- A test plan covering health checks, normal requests, authentication, writes, jobs, and external callbacks.
Record a known-good baseline
Test the existing deployment before migration. Record representative requests and expected responses, including status codes and relevant headers. If the application has a health endpoint, capture its normal output. Also test at least one read operation and, where safe, one reversible write operation. A migration test is much more useful when you know precisely what behavior the replacement must reproduce.
Take a backup before copying data. A file copy performed while a database or application is actively writing may not be consistent. Use the database or storage system's supported backup mechanism, then test that the result can be restored. The correct procedure depends on the service in use, so there is no universal Deno command that can make an arbitrary provider-managed data service portable.
It is often safer to move the HTTP process first while temporarily retaining an existing remote database or storage service. Data can then be migrated as a separate, tested operation. This staged approach is only appropriate when network access, latency, service terms, and security controls allow the self-hosted application to keep using the existing dependency.
Install and validate the Deno runtime
Install Deno using the current official installation method for the destination operating system. Installation commands and supported package-manager paths can change, so this draft intentionally does not freeze an unverified installer command. Before publication or production use, confirm the current operating-system-specific procedure in the official Deno documentation. Avoid downloading an installer from an unofficial mirror.
After installation, open a new terminal if the installer changed your executable path and verify that Deno is available:
deno --versionCompare the reported version with the source environment. Using the same version for the first migration test reduces the number of variables being changed at once. If you plan to upgrade Deno, first reproduce the application on the previous known-good version, run the tests, and then evaluate the upgrade separately.
Restore the source without carrying over transient state
Check out or securely copy the selected application revision. Prefer a repeatable source artifact or a version-control commit over copying a working directory with unknown local changes. Do not assume that generated files, cached dependencies, temporary directories, or local development environment files belong in production.
Inspect the project for the files that define its behavior. Depending on the project, these can include a Deno configuration file, import mappings, lock data, task definitions, application-specific configuration, migration scripts, and static assets. Preserve lock information when the project uses it so the destination resolves the intended dependencies.
Run the project's existing checks before starting the service. The exact tasks are project-specific, so inspect the project's Deno task definitions rather than guessing their names. If a task named test is defined, for example, it can be invoked as follows:
deno task test
Do not assume every repository defines that task. Use deno task to inspect the tasks available in the current project:
deno taskDeno permissions are part of the application's security boundary. Determine which environment variables, directories, hosts, and subprocesses the service actually needs. Do not use broad permissions merely to suppress an error without understanding why access is required.
Make the Deno HTTP service portable and explicit
A self-hosted service should take environment-specific values from configuration rather than embedding them in source code. At minimum, make the listening port explicit. If the service is intended to be reached only by software on the same machine, bind it to the loopback interface. This keeps the application from unintentionally listening on every network interface while Localtonet provides the controlled public route.
The following minimal server uses Deno's built-in HTTP serving API. It reads the port from an environment variable, defaults to 8000, and binds to IPv4 loopback:
const hostname = "127.0.0.1";
const port = Number(Deno.env.get("PORT") ?? "8000");

if (!Number.isInteger(port) || port < 1 || port > 65535) {
  throw new Error("PORT must be an integer between 1 and 65535");
}

Deno.serve({ hostname, port }, (request) => {
  const url = new URL(request.url);

  if (url.pathname === "/health") {
    return Response.json({ ok: true });
  }

  if (url.pathname === "/") {
    return new Response("Deno app is running\n", {
      headers: {
        "content-type": "text/plain; charset=utf-8",
      },
    });
  }

  return new Response("Not found\n", { status: 404 });
});
Save this example as main.ts. Because it reads PORT and opens a listening socket, grant the corresponding environment and network permissions:
deno run --allow-env=PORT --allow-net=127.0.0.1:8000 main.tsThat command matches the default port in the example. If you set a different port, update the network permission and subsequent verification commands to match. An existing application may need additional permissions for specific directories, remote database hosts, subprocesses, or other environment variables. Derive those permissions from actual application behavior instead of copying the example unchanged.
Environment variable design
Treat environment variables as an interface. Document each variable's name, purpose, required format, whether it is secret, and what happens when it is absent. Validate critical values during startup so a misconfigured process fails clearly rather than accepting requests in a partially functioning state.
| Configuration type | Recommended handling | Example concern |
|---|---|---|
| Port and bind address | Use explicit, validated configuration and prefer loopback when the tunnel client is local. | A port mismatch prevents the tunnel from reaching the service. |
| Secrets | Load them through protected host or supervisor configuration. | Never commit API keys, passwords, or Localtonet device tokens. |
| Dependency endpoints | Configure database, storage, and API addresses per environment. | The old provider hostname may be unreachable from the new host. |
| Filesystem paths | Use deliberate persistent paths and document ownership and backup. | A relative path can place data inside a temporary working directory. |
| Public origin | Update only after the Localtonet public address is known and tested. | OAuth redirects and generated links may still reference the old endpoint. |
Persistent data is not part of the process
Any data that must survive a restart needs a durable home outside transient build or cache directories. Define the storage location, filesystem ownership, backup schedule, retention policy, and restoration procedure. If the application writes uploaded files, confirm that the Deno process has access only to the required directory rather than the entire filesystem.
Provider-specific storage, databases, and queues need explicit replacement plans. There is no general command that converts one managed service into another. Review schemas, consistency requirements, indexes, transaction behavior, object metadata, event delivery, and failure semantics. A replacement that exposes similar method names can still behave differently under concurrent writes or partial failures.
Verify the application locally before creating a tunnel
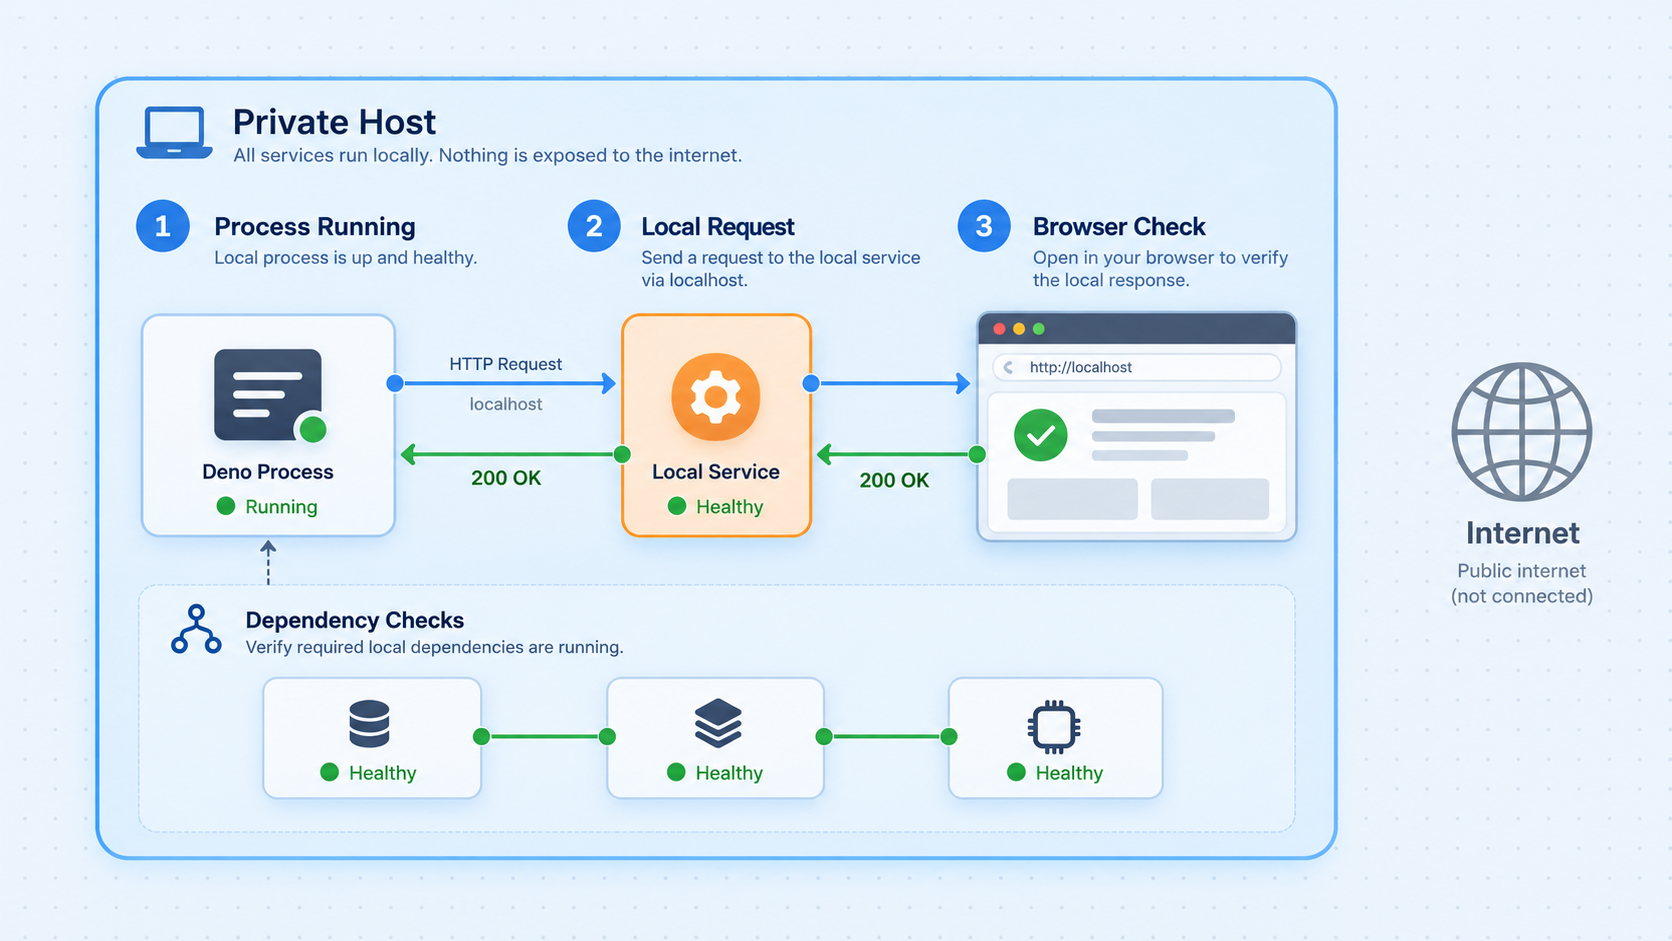
Do not use the public tunnel as the first test of the migrated application. Local verification separates application problems from tunnel configuration problems. If the service cannot answer on localhost, a public endpoint cannot make it healthy.
Start the application in the foreground
Run the exact intended entry point with the minimum permissions established during configuration. Keep the terminal visible so startup errors and request logs can be reviewed immediately.
Call the loopback endpoint
Request the health endpoint using the same host and port that the Localtonet tunnel will target. For the example application, use curl -i http://127.0.0.1:8000/health.
Exercise representative behavior
Test authentication, normal reads, a reversible write, static files, database access, uploads, and external API calls as applicable. Compare the results with the recorded baseline.
Test failure and restart behavior
Stop and restart the process, then confirm that durable data remains available and the application does not depend on an interactive terminal or an undeclared environment value.
The minimal example should return a successful response similar to the following:
curl -i http://127.0.0.1:8000/health{"ok":true}Also test the negative path. Request a route that does not exist and confirm that it returns the application's expected not-found status rather than a successful response. If authentication protects the application, verify both an authorized request and an unauthorized request.
Check reachability from the tunnel device
If the Localtonet client runs on the same computer, use 127.0.0.1 as the local target. If it runs on another device, loopback will refer to that other device, not the Deno host. In that arrangement, the Deno application must listen on a suitable local-network interface, and the Localtonet client device must be able to reach the Deno host's LAN address and port.
Binding the Deno server beyond loopback can make it reachable by other devices on the local network. Apply host firewall rules and application authentication appropriate to that environment. Use loopback whenever the application and Localtonet client run on the same machine.
Run the application reliably on your own infrastructure
A successful foreground test proves that the application can start, but it does not make the service production-ready. A long-running deployment needs process supervision, predictable startup, logs, backups, monitoring, and controlled updates.
Use a process supervisor
Configure the operating system's service manager or another trusted process supervisor to launch the tested Deno command. The supervisor should use a dedicated, minimally privileged account, an explicit working directory, protected environment configuration, and an intentional restart policy. It should also capture standard output and standard error somewhere operators can review.
Supervisor formats vary by operating system and deployment tool. This guide does not provide a universal service file because user names, executable paths, working directories, environment storage, and restart policies cannot be safely guessed. Build the service definition from the exact foreground command that passed local verification, then inspect the supervisor's effective configuration before enabling automatic startup.
After enabling supervision, reboot the host during a maintenance window and verify all of the following:
- The Deno service starts without an interactive login.
- The required environment values are present without appearing in public logs.
- The service listens on the expected address and port.
- The health endpoint responds after startup.
- The Localtonet client reconnects and the selected tunnel can run.
- Persistent data remains present and writable where appropriate.
Define routine operations
Document how an operator starts, stops, restarts, and checks the application. Include the source revision, runtime version, deployment time, database migration state, and rollback artifact for every release. A small self-hosted service still benefits from a release record because it lets you distinguish application changes from host, network, and tunnel changes.
Keep logs useful but avoid recording passwords, authorization headers, session tokens, full private request bodies, or Localtonet authentication tokens. Decide how long logs are retained and what happens when storage fills. Monitor free disk space because an application can appear healthy until logs or uploaded files consume the filesystem.
Back up and restore
A backup is only useful if it can be restored. Schedule backups for every persistent dependency, store at least one copy separately from the application host, and periodically perform a restoration test. Record whether an application pause is required to obtain a consistent snapshot.
Before an update, preserve the previous application artifact and any compatible configuration. If the release includes an irreversible data migration, the rollback plan must address the data format, not only the TypeScript source. Rolling the process back while leaving an incompatible schema in place can create a second outage.
Publish the verified Deno app with a Localtonet HTTP tunnel
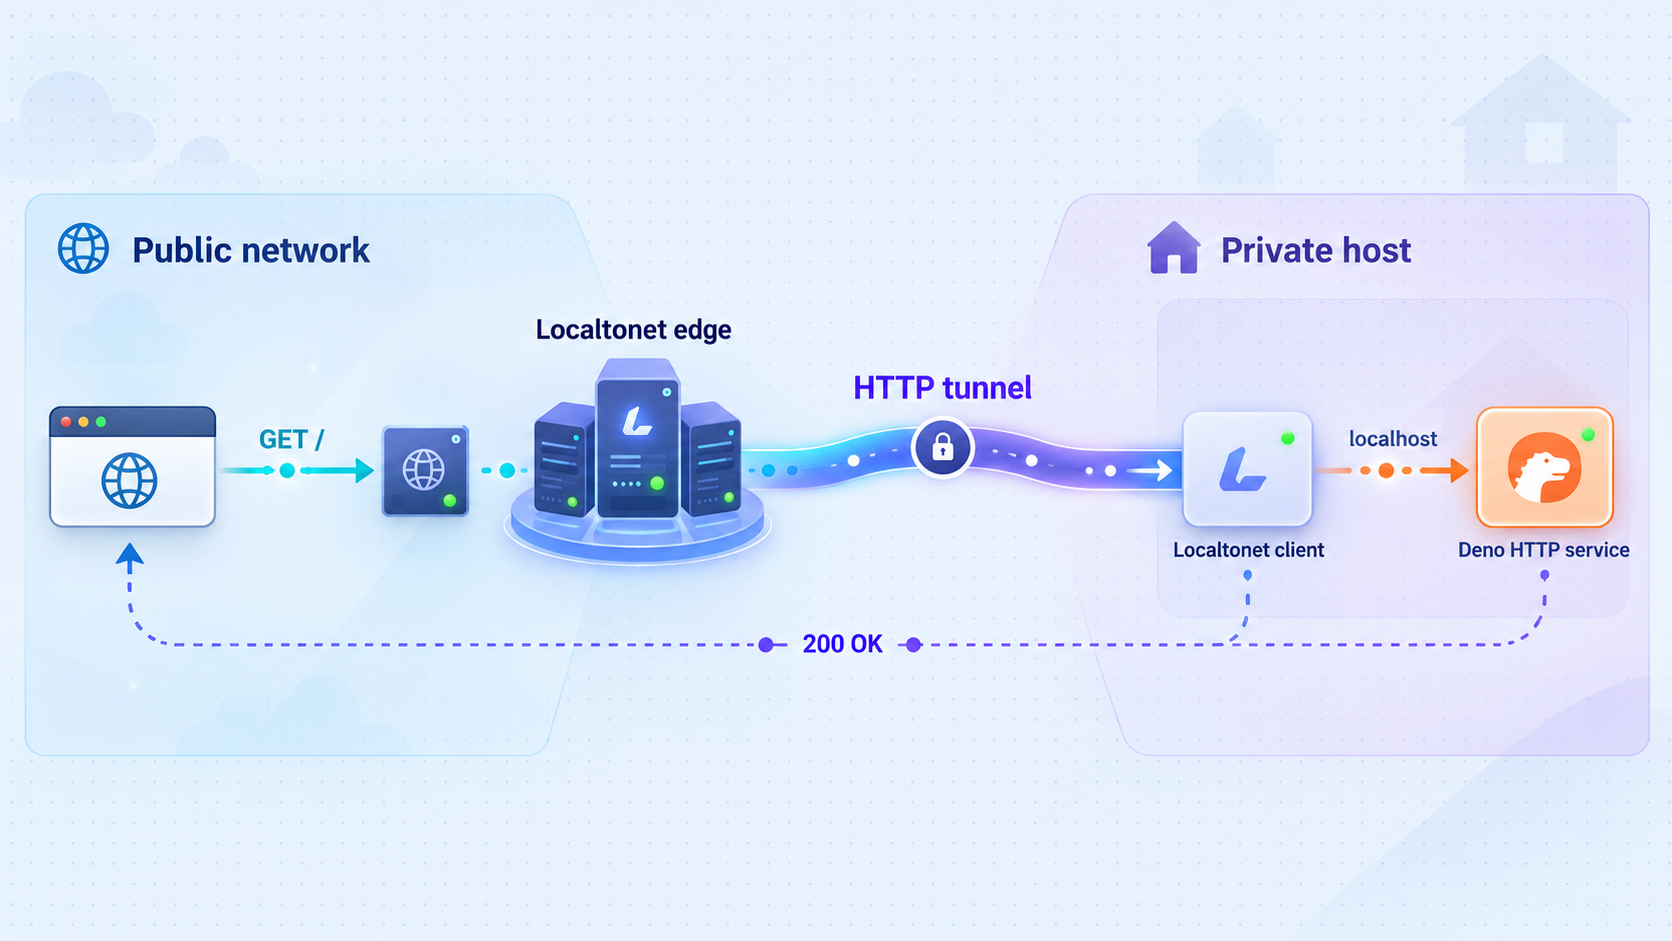
Once the Deno service responds correctly on its local address, an HTTP tunnel can give it a public HTTPS address. The Localtonet client establishes an outbound connection to our relay server, so the workflow does not require inbound router port forwarding, firewall changes, VPN setup, or a public IP address.
Creating a tunnel configuration does not automatically make it available. You must start the tunnel, and the selected client device must remain connected. The public endpoint is available only while that client and tunnel are running.
Install and run the Localtonet client
Install our client on the Deno host or on another device that can reach it. Run the client and keep the device connected. Use the current operating-system installation guidance rather than an unverified command copied from another environment.
Open the HTTP tunnel configuration
In the Localtonet dashboard, create an HTTP tunnel for the already verified Deno service. HTTP is appropriate because the local target is an HTTP application.
Select the process type
Choose Random Sub Domain, Custom Sub Domain, or Custom Domain according to the options currently available to your account and workflow. All three process types serve the content at a public HTTPS address. Check current documentation before configuring custom-domain DNS because exact DNS requirements are not fixed in this guide.
Select the device token and relay server
Select the authentication token belonging to the client device that can reach the Deno service, then choose an available server or region from the current dashboard. Tokens are device-specific and must not be guessed, published, or placed in article examples.
Enter the local target
Enter the Deno service's local IP address and port. For the example running on the same device as the Localtonet client, use 127.0.0.1 and 8000. Use different values only when they match the address and port you verified.
Start and test the tunnel
Press Start, wait for the tunnel to be running, and use the assigned public HTTPS address. Test the public health endpoint and representative application routes while watching both the Deno application logs and tunnel status.
For the current dashboard workflow, consult our HTTP tunnel documentation. The dashboard is the authoritative place to obtain available relay server values and the assigned public address.
Local and public verification should match
Request the same routes through both paths:
curl -i http://127.0.0.1:8000/health
curl -i https://your-assigned-public-address.example/health
Replace the second URL with the address actually assigned by the dashboard. It is a placeholder and not a real Localtonet endpoint. Compare response status, content type, body, redirects, cookies, and application behavior. If localhost works but the public URL does not, focus on tunnel state, device connectivity, and the configured local target before changing application code.
Do not expose an administrative panel, development console, database browser, debug endpoint, or unauthenticated write API merely because it is convenient to tunnel. Require application-level authentication, apply least privilege, remove debug behavior, validate input, and review what data every public route can reveal.
A saved tunnel is not necessarily running. The Deno process, Localtonet client, and selected tunnel must all be active. Stopping the tunnel or disconnecting the selected device makes the assigned route unavailable until the required components are running again.
Cut over public traffic with a rollback path
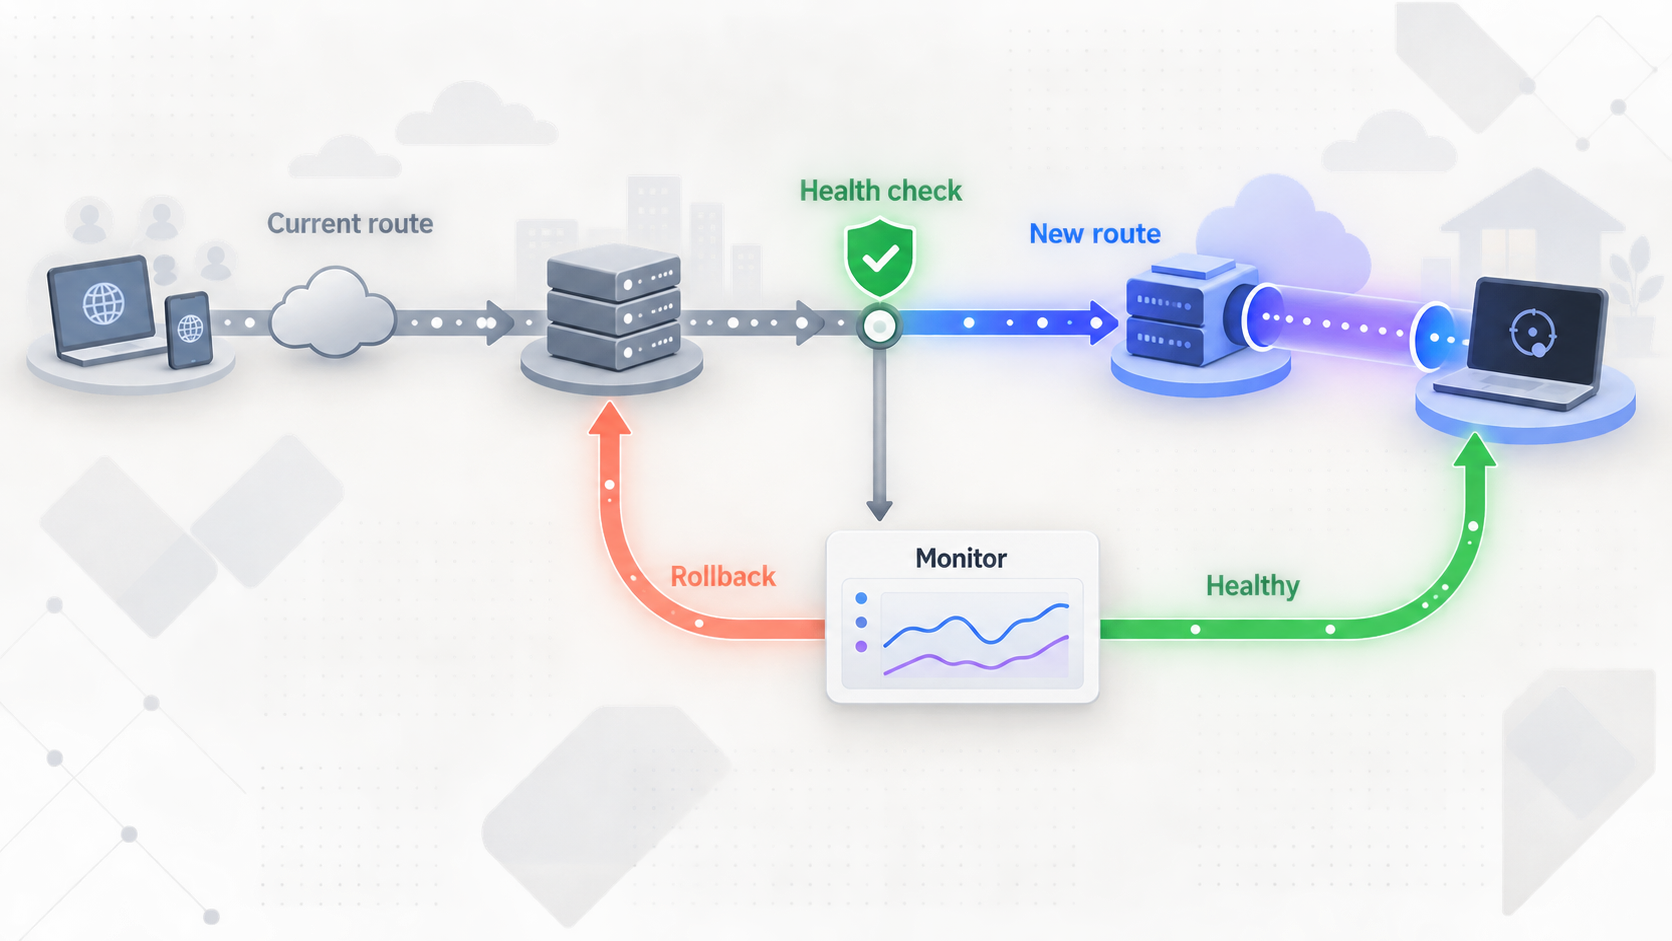
Treat tunnel creation as the beginning of public testing, not the end of migration. Keep the old endpoint active while you validate the new one whenever the application architecture allows both environments to coexist safely.
Run a structured pre-cutover test
Use the assigned Localtonet HTTPS address to test the application from outside the host and, ideally, outside its local network. Cover the following areas:
- Health and readiness behavior.
- Authentication, logout, session expiration, and account recovery.
- Expected HTTP methods, routes, query parameters, and request body sizes.
- Static assets, downloads, uploads, and generated URLs.
- Database reads and reversible writes.
- Outbound email, API, storage, and payment integrations where applicable.
- Inbound webhooks after updating a test integration.
- OAuth callback and allowed-origin settings.
- Restart behavior for both the Deno service and Localtonet client.
- Failure behavior when a dependency becomes unavailable.
Prevent split-brain writes
Running old and new HTTP instances at the same time can be safe for read-only tests, but it may be dangerous when both execute scheduled jobs or write to independently copied databases. Decide which environment owns writes, queue consumption, and scheduled work at each stage. Pause duplicate workers before changing traffic.
If you copied a database rather than continuing to use one shared system, define a final synchronization or maintenance window. Any write accepted by the old environment after the final copy may otherwise be absent from the new environment.
Update dependent endpoints deliberately
External services may need the new public address. Update webhook destinations, OAuth redirect addresses, application base URLs, CORS origin lists, generated-link settings, and client configuration as applicable. Change one dependency at a time where possible and verify delivery before moving to the next.
If you need a custom domain, verify the current Localtonet DNS procedure before making production DNS changes. DNS record types and validation requirements must come from current product documentation or the dashboard, so this guide does not invent them.
Define rollback triggers
Write down the conditions that cause rollback before cutover. Examples include failed authentication, missing data, repeated process restarts, unacceptable dependency errors, failed callbacks, or inability to restore service within the maintenance window. Also identify the person authorized to make that decision.
A practical rollback can involve restoring the previous public endpoint, re-enabling old workers, reverting integration callbacks, and reconciling writes accepted by the replacement. Do not delete the old environment, revoke its credentials, or discard its final backup until the new deployment has passed the agreed observation period.
| Phase | Primary action | Safe fallback |
|---|---|---|
| Local validation | Test the application on loopback. | Fix the destination without affecting the current public service. |
| Public validation | Test through the assigned Localtonet address. | Stop the tunnel while keeping the old endpoint active. |
| Integration update | Move callbacks and clients in controlled groups. | Restore the previous endpoint configuration. |
| Traffic cutover | Direct intended users to the replacement. | Return traffic to the old deployment if rollback criteria are met. |
| Decommissioning | Retire old services only after validation. | Retain tested backups and deployment records. |
Troubleshoot common Deno and tunnel failures
The Deno executable is not found
Open a new terminal and run deno --version. If the command is still unavailable, confirm that the installation completed for the current user and that the installation directory is present in the executable search path. Do not work around the issue by downloading an unknown binary. Recheck the current official Deno installation instructions for the destination operating system.
The application reports a permission error
Read the error carefully and determine whether the program needs access to an environment variable, network address, file, directory, or subprocess. Grant only the required resource. For example, the sample server needs permission to read PORT and listen on its configured loopback address. A real application may need more, but unrestricted access should not be the automatic response.
The configured port is already in use
Another process is listening on the selected port, or an old copy of the Deno service is still running. Identify the process through the operating system's networking tools. Stop the unintended instance or choose a different application port, then update the Deno permission, Localtonet target, health checks, and supervisor configuration consistently.
Localhost returns connection refused
Confirm that the Deno process is running and did not exit after a startup error. Verify the exact bind address and port. Requests to 127.0.0.1:8000 will fail if the application is listening on another port, another address family, or another machine. Inspect the application logs before changing the tunnel.
The app works locally but not through Localtonet
Check that the Localtonet client is connected, the correct device token is selected, and the HTTP tunnel has been started. Verify that its local target exactly matches the working local address and port. If the client runs on another device, do not use 127.0.0.1 unless the Deno service also runs on that device.
The tunnel works until the terminal closes
The Deno service, Localtonet client, or both may still be attached to an interactive session. Configure each long-running component according to its supported startup behavior on the destination operating system. Reboot and test rather than assuming background execution will survive logout.
The public route works but redirects to localhost
The application may have a base URL, canonical origin, callback URL, or proxy-awareness setting that still references the local endpoint. Review environment configuration and URL generation. Do not hardcode the temporary public address into source code. When an application interprets forwarded request information, confirm its framework-specific trust and proxy settings from that framework's official documentation before enabling them.
Authentication cookies fail on the public address
Check cookie domain, path, secure, and same-site behavior, plus the application's configured public origin. A cookie scoped to localhost or the old hostname will not automatically apply to a different public hostname. Make the smallest configuration change needed and retest both sign-in and sign-out.
Files or database records disappear after restart
The application is probably writing to a transient path, an unexpected working directory, an in-memory service, or storage that was not restored. Locate the actual write destination, stop accepting new writes if necessary, restore from a known-good backup, and move persistent data to a deliberate location with documented ownership and backup.
The new deployment behaves differently from the old one
Compare the runtime version, lock data, environment variables, permissions, working directory, operating system, dependency endpoints, and data schema. Change one variable at a time. The tunnel transports requests to the configured local service, but it does not reproduce provider-specific runtime behavior, databases, queues, storage, scheduled tasks, or edge APIs.
Frequently asked questions
Can I self-host a standard Deno HTTP application without rewriting it?
Often, yes, when the application already runs as a conventional Deno process and its dependencies are available from the new host. You still need to reproduce the compatible runtime, permissions, environment configuration, persistent data, and startup behavior. Provider-specific databases, storage, queues, schedules, identity services, or edge APIs require separate evaluation and may need replacement work.
Does Localtonet move my Deno application or database?
No. You install, configure, and run the Deno application on infrastructure you control. Databases and other dependencies must also be retained or migrated separately. Our HTTP tunnel publishes the already running local HTTP service through an assigned public address.
Do I need router port forwarding or a public IP address?
No. The Localtonet client establishes an outbound connection to our relay server. This allows the tunnel to provide a public URL without inbound router port forwarding, firewall changes, VPN setup, or a public IP address.
Should the Deno server listen on 127.0.0.1 or a LAN address?
Use 127.0.0.1 when the Deno service and Localtonet client run on the same machine. If the client runs on another device, the service must listen on an address reachable from that device, and the tunnel target must use the Deno host's reachable LAN address. LAN listening can expose the service to other local devices, so apply appropriate firewall and authentication controls.
Is creating a Localtonet tunnel enough to make it available?
No. The tunnel must be started, the selected client device must be connected, and the Deno service must be running at the configured local target. A tunnel can later be stopped or deleted when access is no longer required.
Can I use a custom domain for the Deno application?
HTTP tunnels support Random Sub Domain, Custom Sub Domain, and Custom Domain process types. Available options can vary, and exact custom-domain DNS requirements must be checked against the current Localtonet documentation and dashboard before changing DNS records.
Does a public HTTPS address replace application authentication?
No. Transport through a public HTTPS address does not decide who should be allowed to use your application. Protect sensitive routes with appropriate application authentication and authorization, remove development endpoints, apply least privilege, and expose only the functionality intended for remote users.
What should I preserve for rollback?
Preserve the previous deployment, its configuration, a tested data backup, the old integration endpoint settings, and the exact application revision used before cutover. If both environments can accept writes, define how those writes will be reconciled. Keep the fallback available until the new deployment has passed functional checks and the agreed observation period.
Publish your verified Deno service with Localtonet
Run and test the application locally first, then create an HTTP tunnel to its confirmed IP address and port. With Localtonet, you can provide a public HTTPS address without configuring inbound router port forwarding or requiring a public IP.
Get Started Free →

