

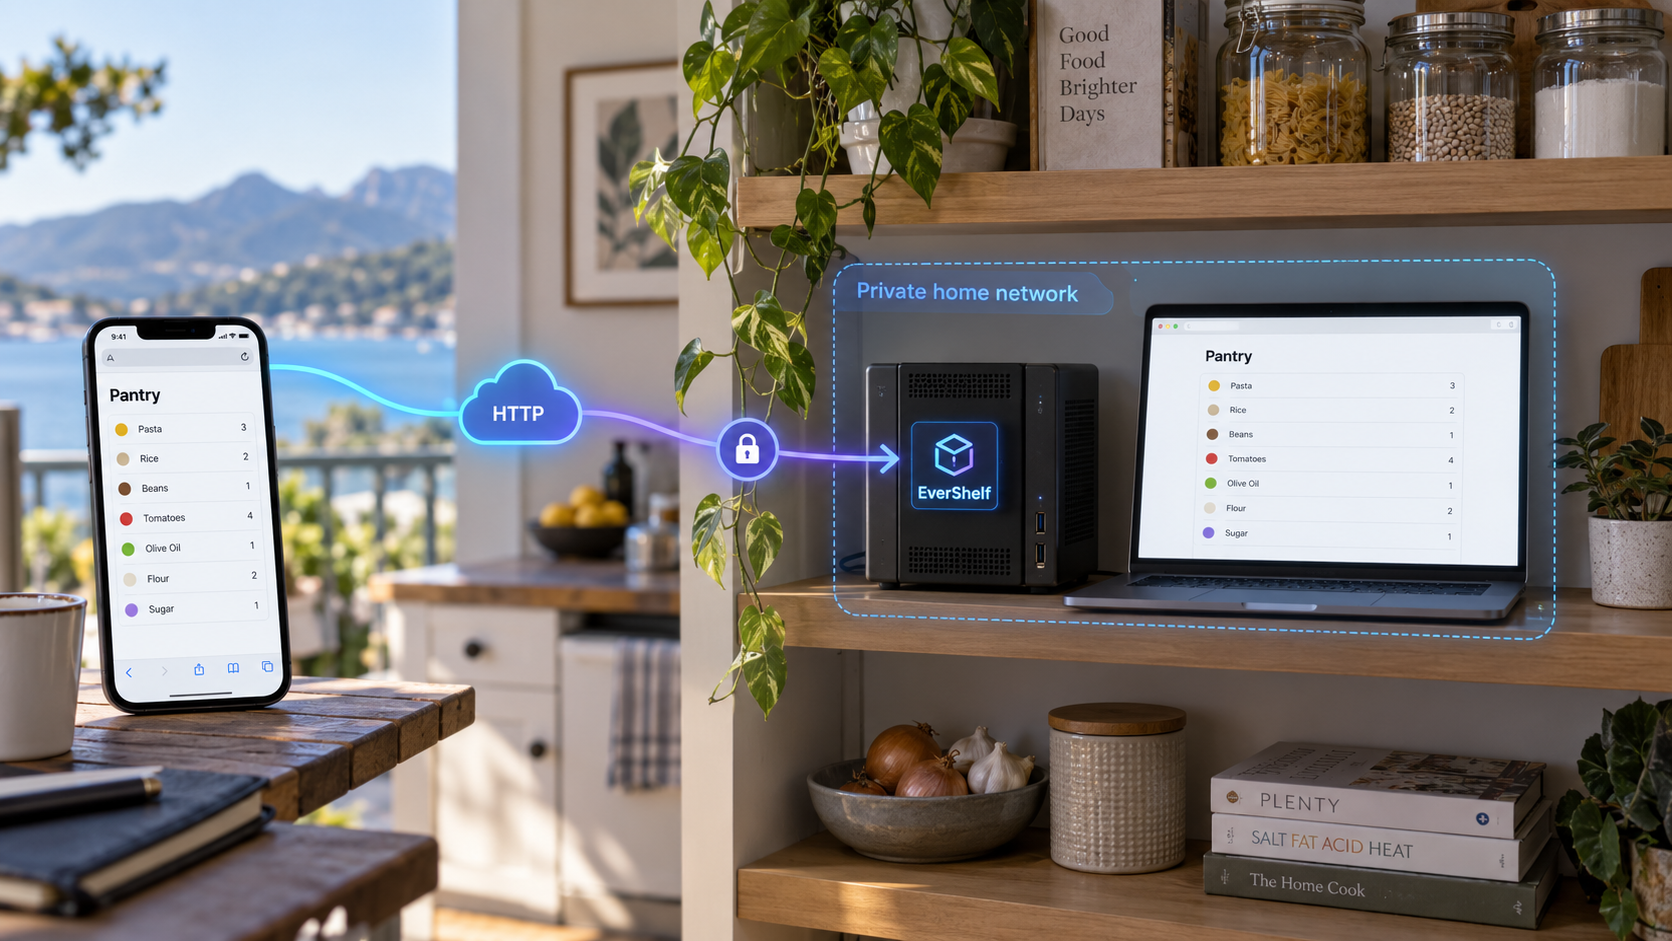
Run your pantry manager at home, verify it locally, and make it available when you are away
EverShelf is an open-source pantry and inventory management web application that can track stock, locations, expiry dates, shopping items, and recipes. This guide uses the project's recommended Docker Compose workflow, explains the important configuration choices, verifies the application at its documented local address, and covers routine updates and troubleshooting. After EverShelf works correctly on the host, we connect it to a Localtonet HTTP tunnel as a separate remote-access step. This keeps installation problems distinct from tunnel problems and avoids requiring inbound router port forwarding, firewall changes, a VPN, or a public IP address.
📋 What's in this guide
What EverShelf provides
EverShelf is a self-hosted web application focused on pantry, refrigerator, freezer, shopping, and cooking workflows. Its inventory features include product scanning, custom storage locations, expiry tracking, opened packs, favourites, and CSV import and export. Shopping features can respond to depleted stock, while recipe tools can work from ingredients already recorded in the pantry. The application is also installable as a progressive web app and supports an offline queue for relevant operations.
Optional AI functionality can identify products, read expiry information, produce recipes, and support chat-based interactions. The project documents Gemini, OpenAI, and Llama as provider choices. These integrations are optional services rather than a requirement for the core pantry and barcode features. If you enable one, you are responsible for obtaining and protecting any provider credential required by that service.
Other documented integrations include Home Assistant, Bring!, an Android kiosk workflow, an MCP component, an ICS or WebCal expiry calendar feed, ntfy alerts, and JSON webhooks. This guide does not configure those optional integrations because each introduces its own credentials and operating requirements. The goal here is narrower: get the core EverShelf web service running reliably, confirm that it works on the local machine, and then publish that verified service through an HTTP tunnel.
The current project layout identifies the browser interface as a single-page application, a PHP API entry point, and SQLite storage under data/. The supplied Docker configuration packages those parts into the recommended deployment path. That makes Docker Compose the most reproducible option for this tutorial and avoids requiring us to reconstruct a web server, PHP runtime, and permissions model manually.
Prerequisites and deployment plan
Choose a host that will remain powered on whenever EverShelf should be available. This might be a home server, small always-on computer, or another Docker-capable machine. Remote access cannot keep the underlying application available if the host is asleep, disconnected, or shut down.
For the documented Docker workflow, prepare the following:
- A functioning Docker installation with Docker Compose support through the
docker composecommand. - Git, which is used to clone the EverShelf repository.
- A terminal account allowed to run Docker commands.
- Enough local storage for the container image, application files, SQLite data, logs, and future backups.
- A browser on the host or another device that can reach the host over the local network.
- A text editor for reviewing and changing the copied
.envfile. - The Localtonet client later, installed on the same machine or on another device that can reach the EverShelf address and port.
Docker installation commands differ by operating system and distribution, and the supplied EverShelf evidence does not establish one universal Docker installation command. Install a current Docker environment using the instructions appropriate to your platform, then verify that both Docker and its Compose command are available:
docker --version
docker compose version
git --version
Each command should return version information. If docker compose version fails, resolve the Docker Compose installation before proceeding. The EverShelf commands below use the modern space-separated form, docker compose, exactly as documented by the project.
First make EverShelf work at its documented local endpoint. Only after that verification should you create the Localtonet tunnel. This order gives you a clear fault boundary: if the local page fails, repair EverShelf or Docker; if the local page works but the public address fails, inspect the tunnel and network path.
Choose where to place the repository
Run the installation from a directory where you want the EverShelf repository folder to remain. Do not treat the cloned directory as a temporary installer. Its Compose file, environment configuration, application tree, data directory, and related files are part of the deployment.
The project also mentions a manual web-server installation, but the available installation evidence only gives a compact outline: clone the repository, copy .env.example to .env, set data/ to mode 755, and point the web server at the repository root. It does not provide enough detail here to establish an exact supported PHP version, server module list, virtual-host configuration, or complete hardening procedure. For that reason, this article uses Docker Compose rather than guessing the missing manual-installation details.
Install EverShelf with Docker Compose
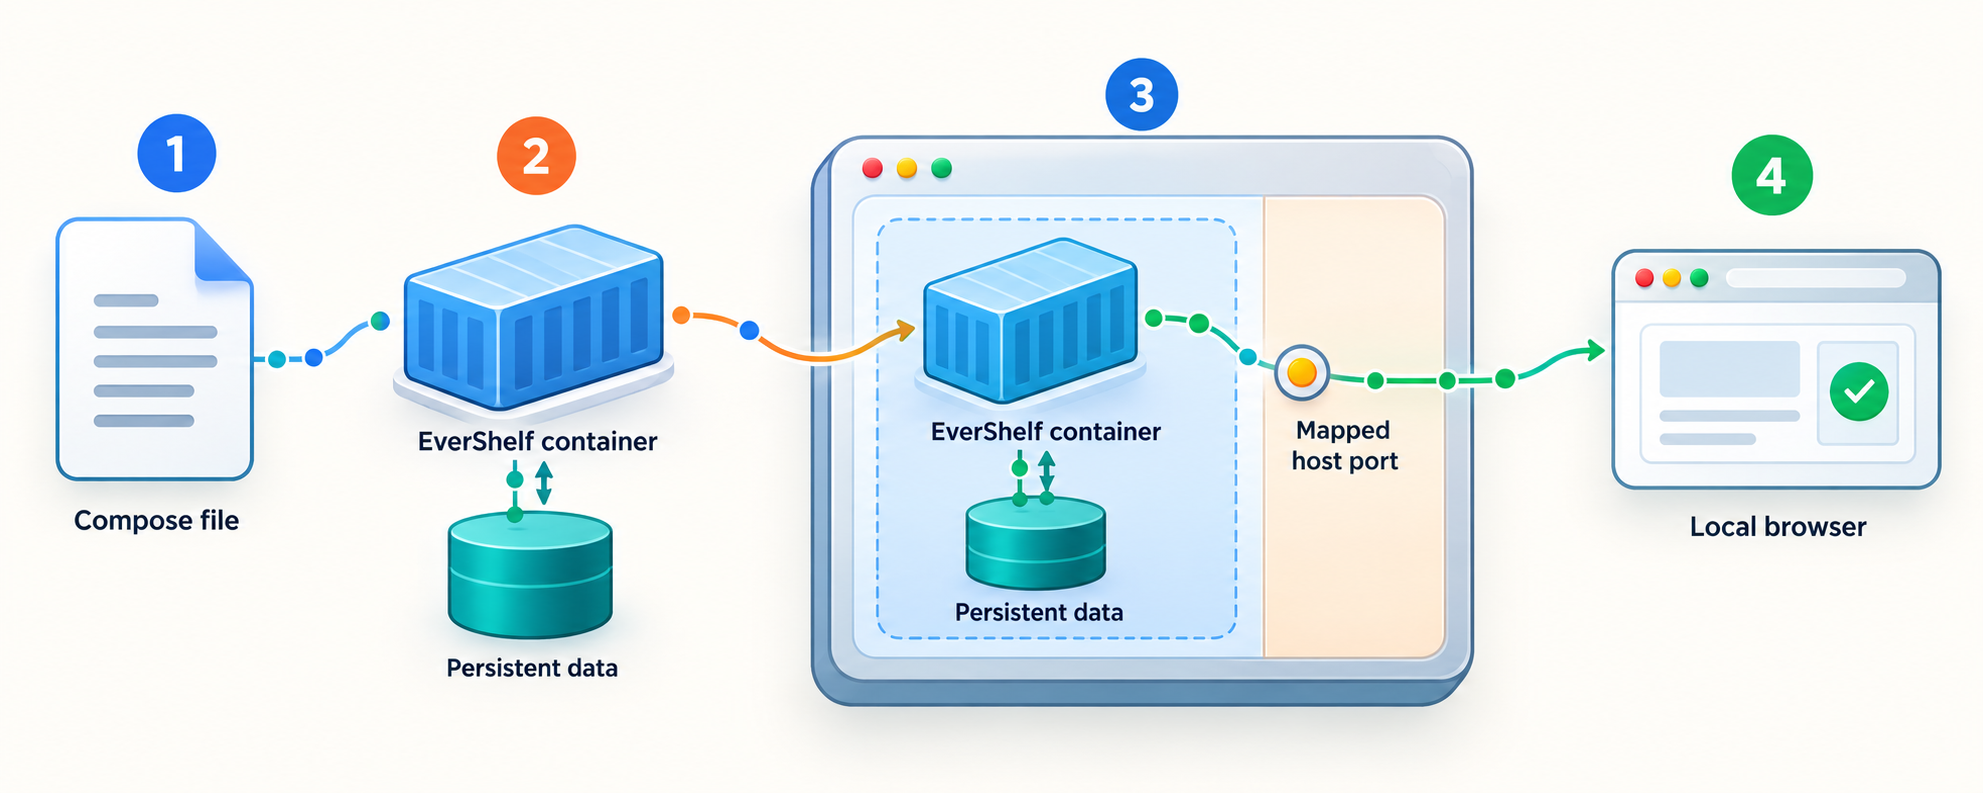
The recommended project workflow is short: clone the repository, enter it, copy the environment template, and start the Compose deployment. We split those commands into visible stages so that you can inspect configuration before the service starts.
Clone the EverShelf repository
Download the project from its official repository into a new local EverShelf directory.
git clone https://github.com/dadaloop82/EverShelf.gitEnter the project directory
The supplied Compose file and environment example are in the cloned repository, so subsequent commands must run from this directory.
cd EverShelfCreate the active environment file
Copy the project's example configuration to .env. Preserve .env.example as a reference and edit the new file rather than the template.
cp .env.example .envReview configuration before startup
Open .env in your preferred text editor. Decide whether AI and optional integrations should be enabled, replace required placeholders only with real values, and avoid committing secrets to source control.
Start EverShelf in detached mode
Start the Compose application in the background. Docker will perform the image or build work described by the repository's Compose configuration.
docker compose up -dThe project's compact quick-start form combines the same repository, copy, and startup actions:
git clone https://github.com/dadaloop82/EverShelf.git && cd EverShelf
cp .env.example .env && docker compose up -d
Use the expanded sequence when installing for real because it creates a deliberate pause for configuration review. Starting directly from the copied example may be useful for evaluation, but it can also leave placeholder or optional integration settings that do not match your intended deployment.
Configure EverShelf without exposing secrets
The .env file is the deployment's local configuration layer. The repository documents AI-related entries such as AI_ENABLED, AI_PROVIDER, and GEMINI_API_KEY, plus optional entries including API_TOKEN and SHOPPING_MODE. Treat the current .env.example in your cloned release as the definitive list of recognized variables because available settings can change between releases.
AI configuration
EverShelf's core inventory and barcode capabilities do not require AI. If you do not want external AI calls, keep that functionality disabled according to the values and comments in the checked-out environment template. If you enable it, select a provider supported by that release and supply the corresponding credential.
Never paste a real AI key into documentation, screenshots, support messages, shell history examples, or a publicly accessible repository. Restrict access to the environment file at the operating-system level and rotate a credential if it is accidentally disclosed.
API token and first-run pairing
EverShelf documents a pairing flow when API_TOKEN is set. An unpaired web interface requests a one-time pairing code rather than receiving the token anonymously. On a device that is already paired, the live code is available under Settings → System → Security and under the information area documented by the project.
For a Docker deployment, the project documents the following log query for finding the latest pairing-code message:
docker logs evershelf 2>&1 | grep -i " pairing code " | tail -1
Run that command only on a trusted administrative terminal. A pairing code is temporary security information and should not be copied into a public issue or chat. The command assumes the documented container name evershelf. If your deployment changes the Compose project or container naming, inspect docker compose ps and use the actual name shown for your instance.
The project documents API_BOOTSTRAP_OPEN=true as an opt-out intended for a fully trusted LAN, and warns that it re-exposes the API token. Do not use that shortcut for an EverShelf instance that will be reachable through a public tunnel. Keep the pairing protection in place and complete pairing from a trusted device.
Reverse-proxy settings
EverShelf documents TRUSTED_PROXIES for deployments behind a reverse proxy so that application rate limiting can identify real client addresses. It also documents EVERSHELF_CANONICAL_HOST in the Apache virtual-host configuration at docker/apache-evershelf.conf for its forced-HTTPS redirect behavior.
Do not guess a proxy address, CIDR, canonical hostname, or forwarded-header behavior. The correct trusted-proxy value depends on the actual network path and which address EverShelf sees as its immediate proxy. The Localtonet product context supplied for this guide does not establish a universal relay address or CIDR that can safely be copied into TRUSTED_PROXIES. Confirm the behavior of your selected deployment and current documentation before trusting an address range. An overly broad trusted-proxy setting can allow untrusted clients to influence address headers used by application controls.
Optional scheduled job
The project mentions running api/cron_smart_shopping.php every five minutes for its optional smart-shopping automation. That is not required merely to bring up and verify the web interface. Add the scheduled task only if you use the associated feature and after checking the current release documentation for the appropriate execution context. This article does not invent a host cron entry because the correct PHP execution path can differ between Docker and manual installations.
Verify EverShelf locally before creating a tunnel
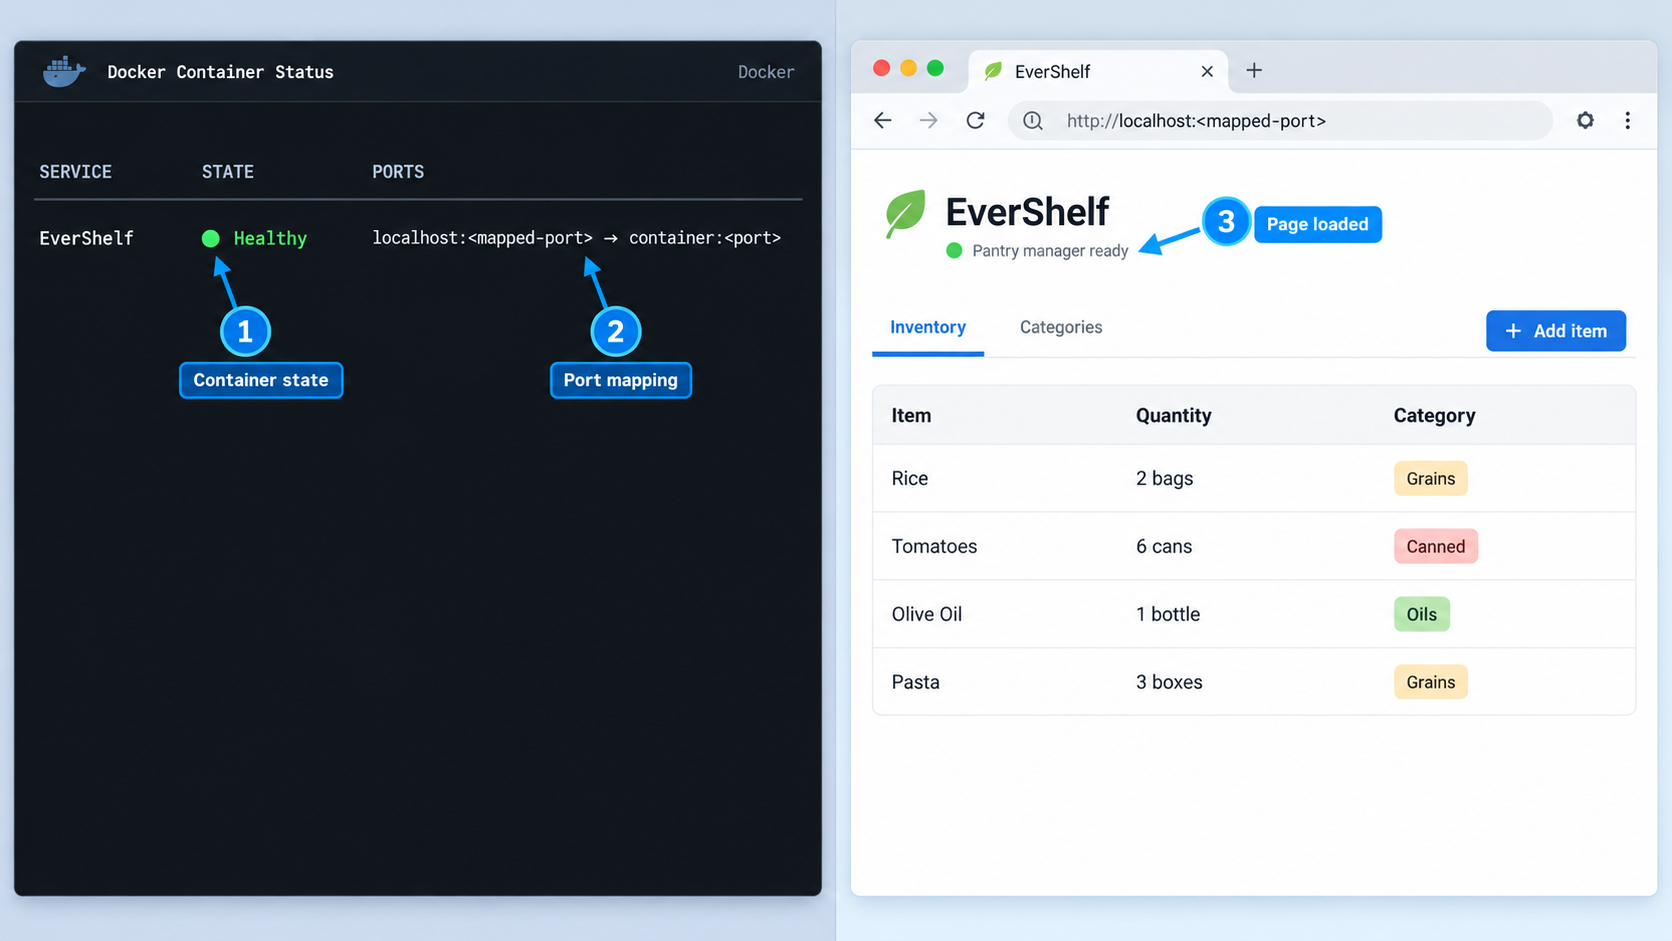
EverShelf documents its local web endpoint as http://localhost:8080. Verification should include both container state and actual browser behavior. A running container alone does not prove that the application finished initialization or can serve requests.
Inspect Compose service state
From the EverShelf repository directory, list the deployment's containers and confirm that the expected service is running rather than repeatedly restarting or exiting.
docker compose psRead startup logs
Review recent service output for configuration, permission, port, or initialization errors.
docker compose logsOpen the documented local URL
On the Docker host, visit http://localhost:8080. Confirm that the EverShelf interface loads and that navigation works instead of relying only on an HTTP status or container listing.
Complete pairing if requested
If you configured API_TOKEN, use the one-time pairing flow. Obtain the code from an already paired device or the local server log, and keep it private.
Test a core workflow
Open the inventory interface and verify that normal application navigation responds. If this is a disposable first installation, add a small test record and confirm it remains available after refreshing the page.
When accessing EverShelf from another device on the same LAN, localhost refers to that second device, not to the Docker host. Use the Docker host's LAN address with port 8080 if the host firewall, Docker port publication, and network policy allow it. The evidence supplied for this article does not define the host's LAN address or operating-system firewall procedure, so determine those from your own network rather than copying a made-up value.
If the application loads at http://localhost:8080, Docker is publishing the documented port and EverShelf is responding on the host. If another machine will run the Localtonet client, also test from that machine using an address it can route to. The tunnel client must be able to reach the same local target that you configure in the dashboard.
Operate and update the deployment
Routine administration should be performed from the cloned EverShelf directory because that is where the Compose file and environment configuration reside. Keep the directory in a known location and document it for anyone responsible for the server.
View current status and logs
docker compose ps
docker compose logs
If you are investigating behavior that occurs during startup, stop and start only after preserving any useful error output. Logs can contain operational details and pairing information, so do not publish an unreviewed log dump.
Stop or restart EverShelf
To stop the Compose application and remove its running containers and network, use:
docker compose downStart it again with:
docker compose up -dStopping the application also makes the public tunnel destination unavailable. A Localtonet HTTP tunnel does not replace the application process and cannot serve EverShelf while its container is stopped.
Update to the currently available container or build definition
The EverShelf installation instructions document pulling through Compose and then starting in detached mode:
docker compose pull
docker compose up -d
Before updating, review the release notes for the version you intend to deploy and preserve a recoverable copy of important local configuration and data. The repository includes a backup.sh file, but the supplied evidence does not establish its exact invocation, output location, retention behavior, or restore procedure. We therefore do not present guessed backup commands. Verify the backup and restore instructions for your checked-out release before relying on them.
A sensible update check includes confirming the container state, opening the local interface, checking the displayed application behavior, and testing a normal inventory operation. If remote access is enabled, test the public URL only after the local checks pass.
Understand persistence before destructive maintenance
EverShelf stores SQLite data under data/ in the project architecture. Do not delete the repository, its data directory, Docker volumes, or bind-mounted paths until you understand which location contains your active data. Commands that remove volumes or clean Docker storage can be destructive. The basic update commands above do not include volume-removal flags.
Expose the verified service with a Localtonet HTTP tunnel
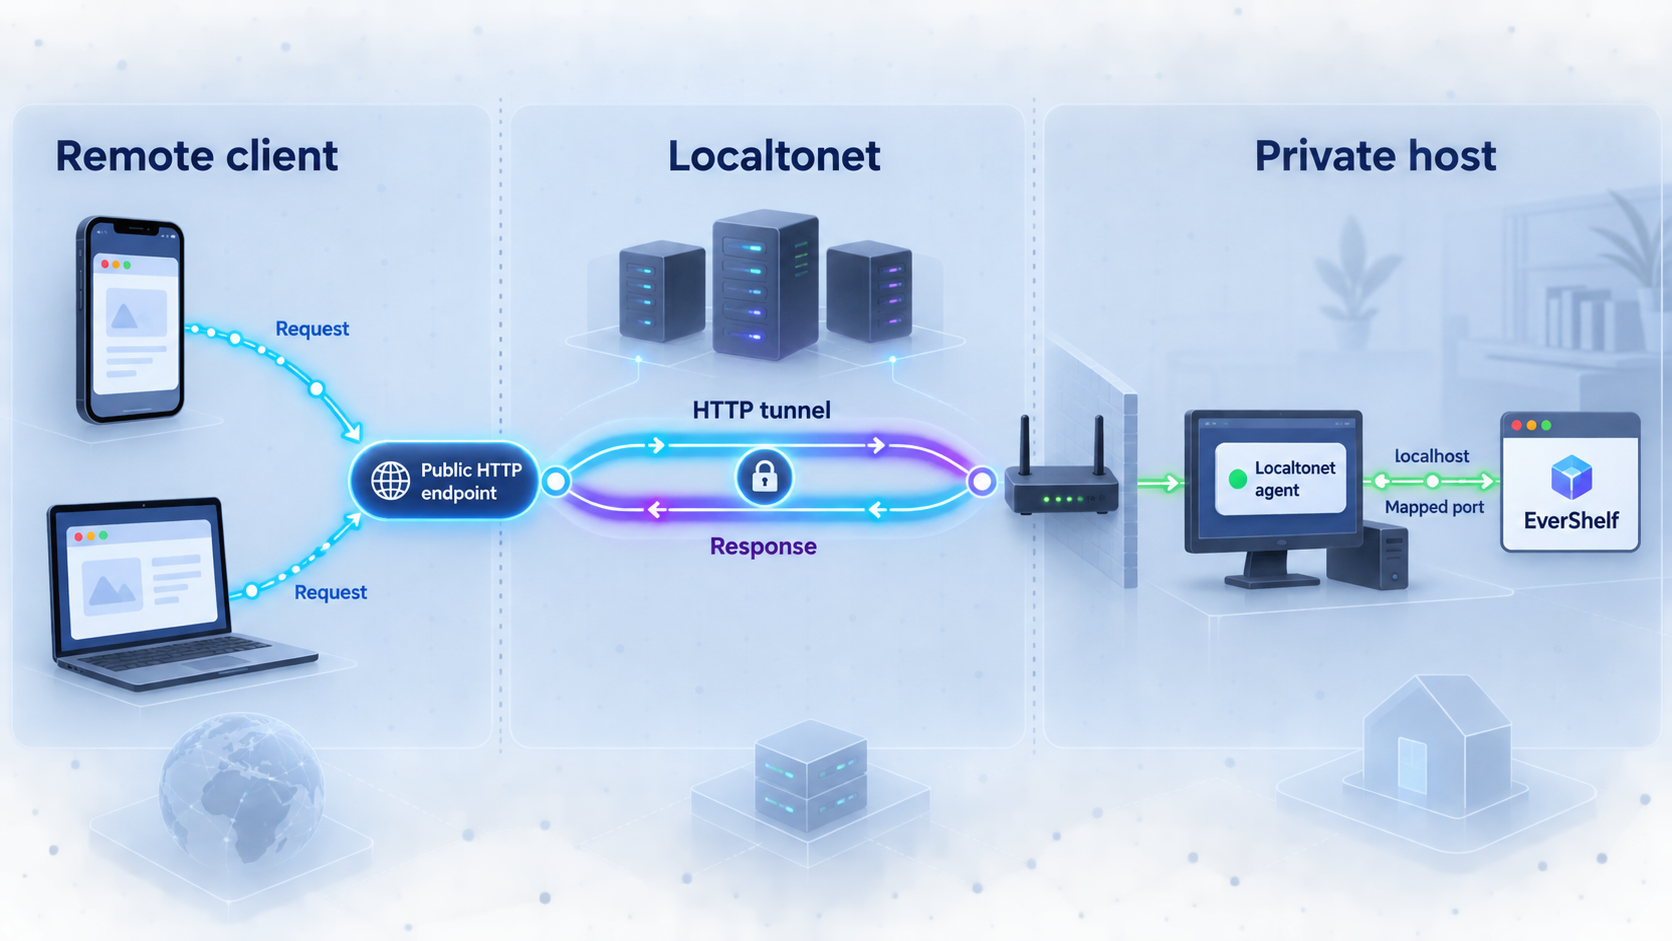
Once EverShelf works locally, an HTTP tunnel can provide a public HTTPS address for the web application. The Localtonet client establishes an outbound connection to one of our relay servers, so this workflow does not require inbound router port forwarding, firewall changes, VPN setup, or a public IP address.
The tunnel remains available only while the selected client device is connected and the tunnel is running. EverShelf must also remain active and reachable from that client. Creating a tunnel configuration does not start it automatically.
| Layer | Role | Verification |
|---|---|---|
| EverShelf | Serves the pantry web application | Open http://localhost:8080 on the Docker host |
| Docker Compose | Runs and manages the EverShelf container deployment | Check docker compose ps and service logs |
| Localtonet client | Connects the local target to our relay using an outbound connection | Confirm the selected device is connected |
| HTTP tunnel | Provides the public HTTPS address | Start the tunnel, then open its assigned public URL |
Install and run the Localtonet client
Install our client on the EverShelf host or on another device that can reach the EverShelf service. Keep the client running whenever remote access is required.
Authenticate or select the client device
Use the device-specific authentication token associated with the client that will run the tunnel. Do not paste the token into this article, a public issue, a screenshot, or an untrusted terminal. Tokens must never be guessed or shared.
Select an available relay server
Choose a currently available server or region in the Localtonet dashboard. Available server codes and regions can vary, so obtain the current value from the product instead of copying a hardcoded example.
Create an HTTP tunnel to EverShelf
Select the HTTP tunnel family and set its local target to the IP address and port reachable from the Localtonet client. If the client runs directly on the EverShelf host, use the loopback target corresponding to localhost and port 8080. If it runs elsewhere, use a reachable LAN address and port 8080. Select the desired HTTP Process Type from the currently available Random Sub Domain, Custom Sub Domain, or Custom Domain options.
Start the tunnel and test its public URL
Press Start. After the tunnel is running, open the assigned public HTTPS address in a private browser window or on a device outside the home network. Confirm that EverShelf loads and that authentication or pairing behaves as expected.
Stop or delete access when it is no longer needed
Stop the tunnel to make the public route unavailable while retaining its configuration, or delete it if you no longer need that route. Remember that tunnel creation and tunnel runtime are separate states.
Random Sub Domain, Custom Sub Domain, and Custom Domain process types all serve the local content through a public HTTPS address. Custom-domain DNS requirements can change and are not established in the supplied evidence, so consult the current dashboard and our documentation before editing DNS records. Do not invent a CNAME destination or verification record.
For the current dashboard workflow and field descriptions, consult the
Localtonet HTTP tunnel documentation.
The important target for this deployment is the address that reaches EverShelf on port 8080 from the Localtonet client device.
Security considerations for remote EverShelf access
Moving from a LAN-only service to a public URL changes the risk profile. A generated address is not an authentication mechanism, and obscurity should not be treated as access control. Before sharing the URL, review EverShelf's authentication and API-token configuration, complete pairing only on trusted devices, and disable integrations you do not use.
TRUSTED_PROXIES only after identifying the actual proxy addresses or ranges that should be trusted. Never use an unrestricted value merely to make headers appear correct.
Localtonet HTTP and File Server process types provide public HTTPS addresses, but transport to a public address is only one part of a secure deployment. Keep EverShelf's pairing and token controls enabled, apply project updates, protect the host, review integrations, and avoid storing credentials in places served by the web application.
Also consider who can reach the host locally. If the Localtonet client runs on another machine, EverShelf must be reachable across the LAN, which may expose port 8080 to more local devices than a loopback-only deployment. Apply least-privilege network rules appropriate to your environment. The exact firewall syntax depends on the host operating system and is not established by the supplied project evidence, so this guide does not fabricate commands.
Troubleshoot installation and remote-access problems
The docker compose command is unavailable
Confirm that Docker is installed and that the Compose integration responds to docker compose version. Do not silently substitute unrelated command syntax without checking your Docker installation. Also verify that your current user has permission to communicate with Docker.
The container exits or repeatedly restarts
Run docker compose ps, followed by docker compose logs. Look for invalid environment values, missing credentials for a feature you enabled, data-directory permissions, port conflicts, or initialization failures. Correct the first meaningful error rather than repeatedly restarting the same configuration.
Port 8080 is already in use
Another local service may already be bound to the published port. Identify the conflicting service using operating-system tools appropriate to the host. The documented EverShelf endpoint for this Compose workflow is port 8080; the supplied evidence does not document an official alternate-port procedure, so do not make an unsupported Compose edit without reviewing the current project configuration.
The browser cannot open http://localhost:8080
Make sure the browser is running on the Docker host. If it is on another device, localhost points to that device. Use the host's reachable LAN address, confirm the Compose service is running, and inspect host firewall and Docker port publication. If neither the host nor another local client can load EverShelf, leave the tunnel stopped and repair the local service first.
The interface asks for a pairing code
This is expected when an API token is configured and the browser has not been paired. Obtain the one-time code from an already paired device under Settings → System → Security, or inspect the local Docker log with the documented pairing-code command. Do not weaken the deployment with open bootstrap merely to avoid pairing over a public connection.
EverShelf works locally but not through Localtonet
Confirm that the Localtonet client shows as connected, the HTTP tunnel has been started, and its local target matches the address reachable from that client. If the client runs in a different machine or container, its own localhost does not refer to the EverShelf host. Test the target directly from the client machine, then reopen the assigned public URL.
The public page redirects incorrectly
Review EverShelf's proxy-related settings, especially the documented canonical-host configuration and trusted-proxy behavior. Do not guess hostnames or broad proxy ranges. Compare the host header, scheme behavior, and immediate network path against the configuration supported by the installed release. Because the supplied Localtonet evidence does not specify a universal trusted proxy CIDR, derive the correct value from observed deployment behavior and current documentation.
Remote access disappears after a reboot
Check each layer separately: the Docker service, the EverShelf Compose application, the Localtonet client, and the tunnel runtime state. The public route requires a connected client and a running tunnel, while the destination requires a running EverShelf service. The evidence supplied here does not establish a universal startup-service configuration for every operating system, so configure automatic startup according to the host platform and verify it with a real reboot test.
An update completes but the application behaves unexpectedly
Inspect the release notes for migrations or behavior changes, check logs, and verify that the expected image or application version is active. Test locally before involving the tunnel. If a rollback is required, use a backup and release procedure that you have already validated. Do not attempt an improvised SQLite or volume rollback without understanding where the active data resides.
Frequently asked questions
What is the recommended way to install EverShelf?
The project recommends Docker Compose. Clone the official repository, enter the EverShelf directory, copy .env.example to .env, review the configuration, and run docker compose up -d. A manual web-server installation is mentioned, but the available evidence does not provide enough complete runtime and server details for this guide to recommend it over Docker.
What local port does EverShelf use in the documented Docker setup?
The documented local endpoint is http://localhost:8080. Use port 8080 as the Localtonet HTTP tunnel target, paired with the IP address that is reachable from the Localtonet client.
Does EverShelf require an AI provider?
No. AI assistance is optional. Core inventory and barcode functionality can be used without enabling an AI provider. If you enable AI features, select a provider supported by the installed release and protect its API credential.
Do I need router port forwarding for remote EverShelf access?
No. With Localtonet, our client establishes an outbound connection to a relay server. The HTTP tunnel can expose the local EverShelf service without inbound router port forwarding, firewall changes, VPN setup, or a public IP address.
Must the Localtonet client run on the EverShelf host?
No. It can run on the EverShelf host or another device that can reach EverShelf. When it runs on the same host, the loopback address and port 8080 can be used as the target. When it runs elsewhere, configure the EverShelf host's reachable LAN address and verify that local networking permits the connection.
Is creating a Localtonet tunnel enough to make it active?
No. Tunnel creation and tunnel runtime are separate lifecycle states. After creating the configuration, press Start. The public address works only while the selected client is connected, the tunnel is running, and EverShelf remains available at the configured local target.
Should I set API_BOOTSTRAP_OPEN to avoid pairing?
Not for a publicly reachable deployment. EverShelf documents that option for a fully trusted LAN and warns that it re-exposes the token. Retain the one-time pairing flow when publishing EverShelf through an HTTP tunnel.
How do I update EverShelf?
From the deployment directory, the project documents docker compose pull followed by docker compose up -d. Review release notes and create a recoverable backup before updating, then verify container state, local application behavior, and remote access in that order.
Access your self-hosted EverShelf remotely
Finish the local Docker Compose installation first, confirm EverShelf at http://localhost:8080, and then use a Localtonet HTTP tunnel to provide a public HTTPS address without configuring inbound router port forwarding.


