

Run your own media library, validate it locally, and provide controlled remote access through a public HTTPS address
Fireshare is a self-hosted video and image library that gives media files unique shareable URLs. This guide installs Fireshare with Docker, prepares persistent storage, verifies the local application, configures its public hostname, and covers practical backup and update procedures. After the local service works, we connect its complete HTTP endpoint to a Localtonet tunnel without inbound router port forwarding, firewall changes, VPN setup, or a public IP address. Fireshare remains responsible for deciding which media is public, link-only, password-protected, or restricted to authenticated users.
📋 What's in this guide
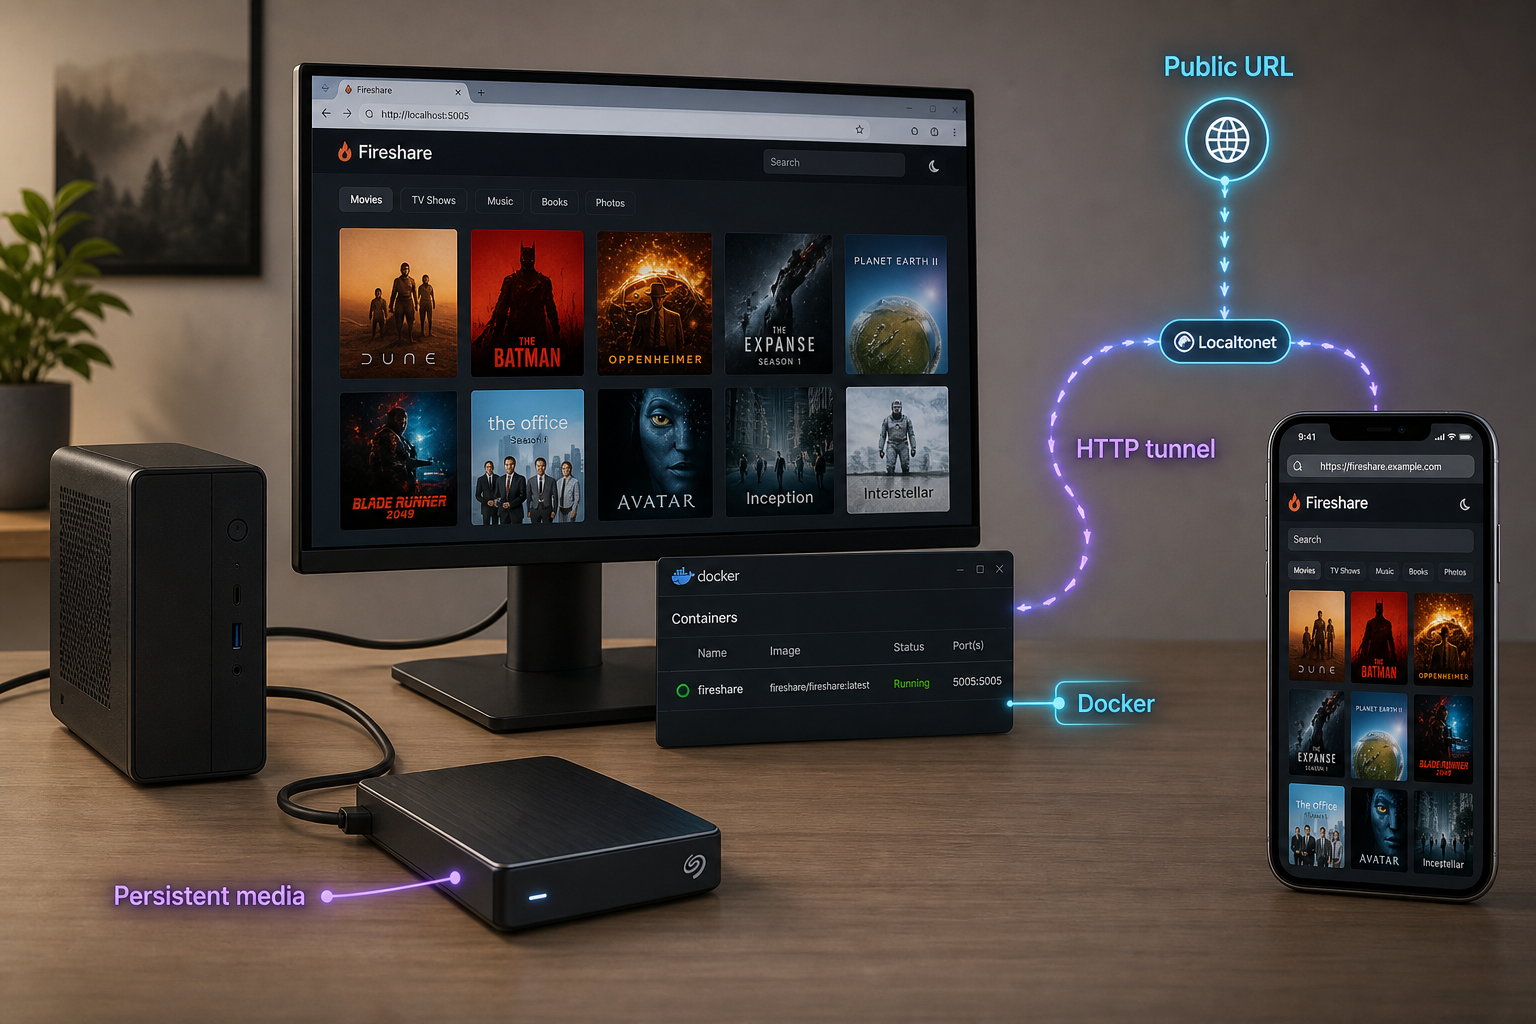
How the Fireshare and Localtonet setup works
Fireshare runs as a containerized web application on hardware you control. It scans mounted video and image directories, presents the media through a browser interface, and assigns unique URLs to individual files. Its documented capabilities include public and private feeds, link-only private media, password-protected videos, folder sharing, optional uploads, tags, search, view counts, mobile support, optional transcoding, TOTP two-factor authentication, login IP whitelisting, LDAP support, RSS feeds, and webhook-compatible notifications.
Docker publishes the container's internal HTTP listener through a port on the host. The upstream configuration maps host port 8080 to container port 80, which produces the local endpoint http://localhost:8080. Test this endpoint before creating a tunnel. Doing so separates Fireshare, storage, and Docker problems from remote connectivity problems.
After Fireshare responds locally, the Localtonet client on the same machine, or on another device that can reach it, establishes an outbound connection to a Localtonet relay server. A Localtonet HTTP tunnel points to the Fireshare host and port and provides a public HTTPS address while the tunnel is running and the selected client device remains connected.
Localtonet does not selectively publish individual Fireshare links. The HTTP tunnel makes the configured Fireshare web endpoint reachable. Fireshare then decides what an incoming visitor may see through its public feed, link-only visibility, per-video passwords, login requirements, and other application settings.
8080 on the reachable Docker host.
Prepare Docker and the host
Use a machine that can remain online whenever the media library needs to be available. Fireshare's supported installation path is Docker. Docker Desktop provides Docker Engine and the current Compose plugin on supported desktop platforms. Linux users can install Docker Engine and the Compose plugin from Docker's platform-specific packages or repositories.
Follow the official Docker Engine installation guidance for the host operating system. If Compose is not already included, use the official Docker Compose installation guidance. Avoid copying package commands written for a different operating system or Linux distribution.
Understand the two Compose command spellings
Current Docker installations normally use Compose v2 as a Docker CLI plugin. Its command contains a space:
docker compose versionFireshare's upstream instructions currently show the older standalone spelling with a hyphen:
docker-compose up -dOn a current installation, use the equivalent plugin command:
docker compose up -d
If docker compose version succeeds, use docker compose for the rest of this guide. If only docker-compose version succeeds, use the legacy hyphenated spelling for the same lifecycle actions. Do not alternate between two unrelated Compose projects or run both commands from different directories without understanding which configuration each command is loading. Docker documents current behavior in its Compose documentation.
Create absolute host directories
Fireshare requires persistent locations for its internal database, generated content, source videos, and source images. Absolute paths make the relationship between the host and container explicit. On Linux, one possible layout is:
sudo mkdir -p /srv/fireshare/data
sudo mkdir -p /srv/fireshare/processed
sudo mkdir -p /srv/fireshare/videos
sudo mkdir -p /srv/fireshare/images
You may instead mount existing video and image directories. Do not move or duplicate a large library merely to match the example. Replace the paths in the Compose file with the real absolute paths used on your host.
Docker Desktop users should choose absolute paths that Docker can access through the host's file-sharing configuration. Windows paths, macOS paths, NAS mounts, and Linux paths use different syntax. Verify the resolved paths with the Compose configuration check before starting the service.
Find the intended UID and GID
Fireshare's PUID and PGID values identify the user and group under which the container writes mounted files. On a Linux host, run:
id
Use the numeric UID and GID belonging to the account that should own the Fireshare files. The example value 1000 is common on some Linux systems but is not universal. Make sure the selected account can traverse the parent directories and can read or write each mount as required.
If you created the example directories with elevated privileges, assign them to the intended account using host-appropriate ownership and permission tools. Do not solve a permissions error by granting unrestricted access to every local user. The exact ownership command depends on the account and platform, so substitute verified local values rather than copying a guessed identity.
Confirm that port 8080 is available
The documented mapping uses host port 8080. Check that another service is not already listening there. Suitable host-specific checks include:
# Linux
ss -ltn

# macOS
lsof -nP -iTCP:8080 -sTCP:LISTEN
# Windows PowerShell
Get-NetTCPConnection -LocalPort 8080 -ErrorAction SilentlyContinue
If another service owns the port, either stop that service or choose a different unused host port. For example, changing "8080:80" to "8081:80" changes the local address to http://localhost:8081. The container-side port remains 80.
Fireshare also has an internal FIRESHARE_PORT setting that defaults to 80. Upstream guidance says to leave it alone and change the host-side mapping unless using host networking, where normal Compose port mappings are ignored.
Generate a private secret key
The Compose configuration includes SECRET_KEY. Generate a private random value rather than entering the example string literally. One platform-neutral approach on a machine with OpenSSL is:
openssl rand -hex 32Copy the generated value into a protected deployment configuration or secrets workflow. Do not commit it to a public repository, paste it into support messages, or show it in screenshots. Protect the administrator password, Localtonet device token, share passwords, and LDAP credentials in the same way.
Before continuing, you should have:
- A working Docker Engine installation.
- A working
docker composecommand, or the legacydocker-composecommand used consistently. - Absolute host paths for
/data,/processed,/videos, and/images. - Verified numeric PUID and PGID values where applicable.
- An unused host port, normally
8080. - A unique administrator username and strong administrator password.
- A private random
SECRET_KEY. - The Localtonet client for the later remote-access stage.
Values such as admin, your-admin-password, and replace_with_random_string_can_be_anything are placeholders, not safe credentials. Replace them before the first start and keep the resulting Compose file readable only by appropriate administrators.
Plan Fireshare's persistent storage
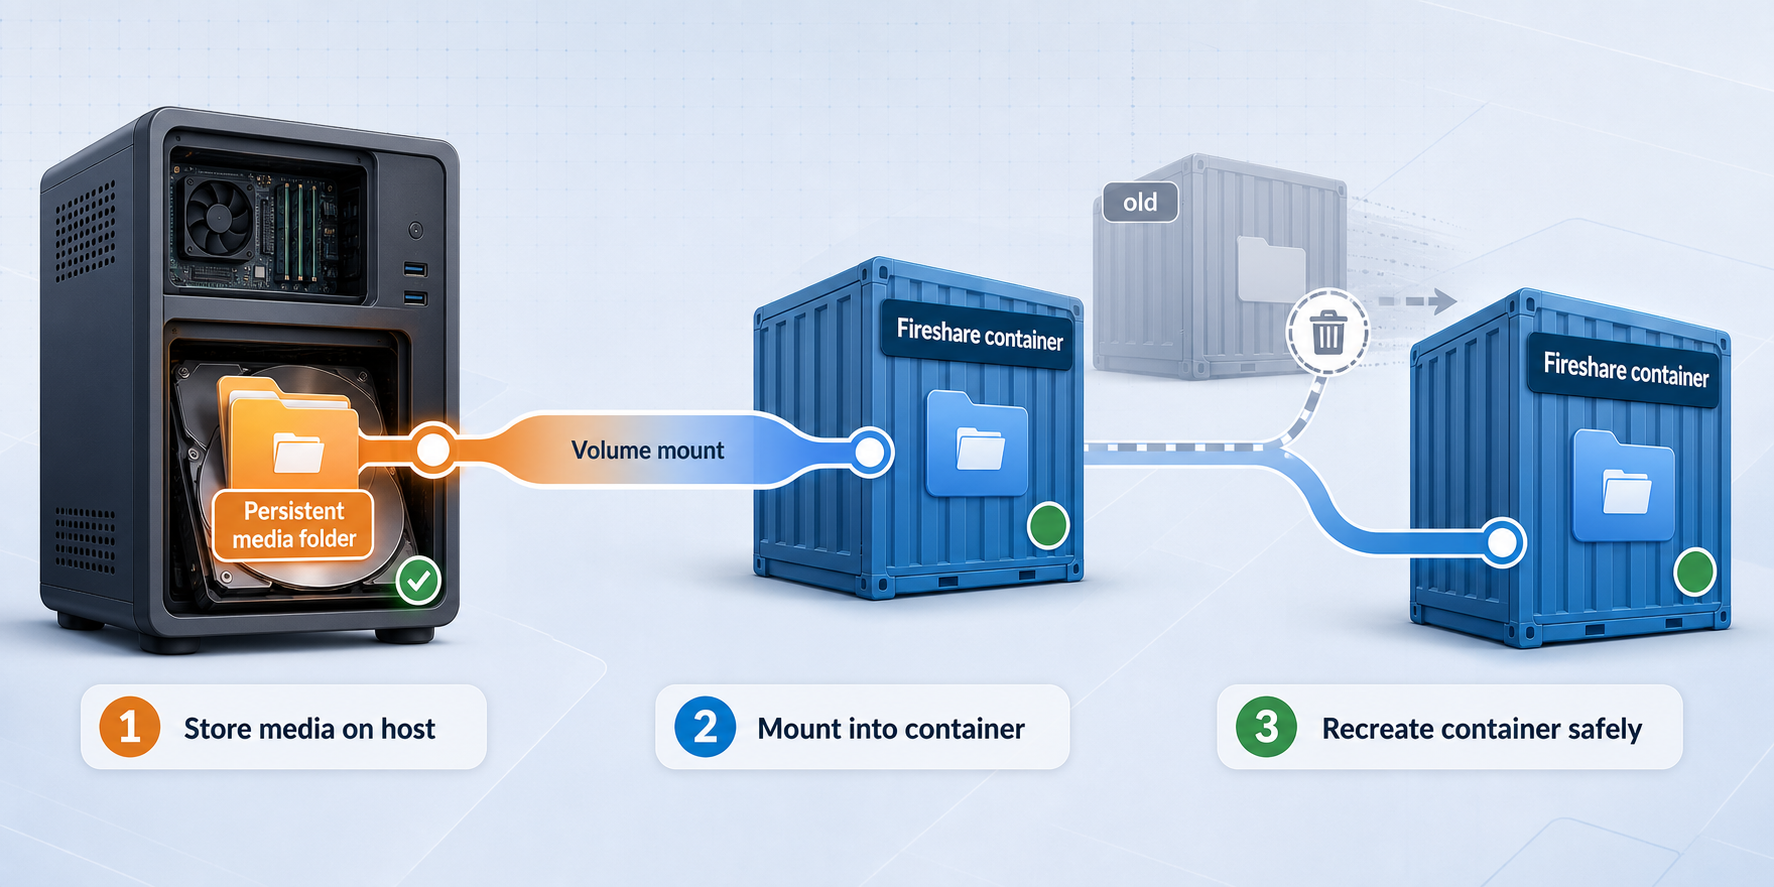
A container filesystem is disposable. Fireshare therefore uses four host-mounted directories so application state and media survive container recreation. Treat the mounts as separate recovery assets because they have different purposes.
| Container path | Purpose | Operational consideration |
|---|---|---|
/data |
Internal database | Contains persistent application state. Include it in consistent backups and protect it from accidental deletion. |
/processed |
Generated posters and metadata files | Allow capacity for generated content and include it when preserving the exact current state matters. |
/videos |
Source video directory to scan | The configured identity needs the access required for scanning, uploads, cropping, and other enabled operations. |
/images |
Source image directory to scan | Use a real host path and confirm Docker can access it before indexing a large library. |
A bind mount connects a host directory to a fixed path inside the container. For example, /srv/fireshare/data on the host can appear as /data inside Fireshare. Fireshare works with the container path, while you manage persistence, permissions, free space, snapshots, and backups at the host path.
The documented examples use read-write mounts. This supports functions that write to mounted storage, including optional uploads and generated files. If you want to make a media mount read-only, test every intended feature before relying on that configuration. The supplied Fireshare documentation does not establish a universal read-only mount design that supports every upload, crop, scan, and media-management workflow.
Plan additional space if you enable transcoding. Fireshare leaves original media unchanged and generates lower-quality versions for adaptive playback. Generated posters and metadata also consume storage. Actual capacity depends on the size and composition of your library, so no single allocation is correct for every deployment.
Install Fireshare with Docker
Docker Compose is the recommended approach for a maintainable deployment because the image, ports, mounts, environment variables, and identity settings remain in one declarative file. Docker Run is also documented, but a long one-time command is easier to lose or reproduce incorrectly. Choose one method and do not start duplicate Fireshare containers with both.
The complete upstream installation example and current configuration notes are available in the Fireshare repository. The Fireshare environment-variable documentation should be checked before adding optional settings because supported names and behavior can change between releases.
Recommended: Docker Compose with the Lite image
The documented Compose example uses shaneisrael/fireshare:latest-lite. Create a deployment directory, place a file named compose.yaml in it, and update every placeholder before starting the application.
services:
  fireshare:
    container_name: fireshare
    image: shaneisrael/fireshare:latest-lite
    ports:
      - "8080:80"
    volumes:
      - /srv/fireshare/data:/data
      - /srv/fireshare/processed:/processed
      - /srv/fireshare/videos:/videos
      - /srv/fireshare/images:/images
    environment:
      - ADMIN_USERNAME=your-admin-username
      - ADMIN_PASSWORD=your-admin-password
      - SECRET_KEY=replace-with-your-private-random-value
      - DOMAIN=
      - PUID=1000
      - PGID=1000
Replace the four sample host paths with your absolute paths. Replace the administrator credentials, secret key, PUID, and PGID. Leave DOMAIN empty during initial local validation. It will be set after the public hostname is known.
From the directory containing compose.yaml, ask Compose to resolve and validate the configuration:
docker compose configReview the output carefully because resolved configuration can contain sensitive environment values. Do not publish or paste it without redacting credentials. If the configuration is valid, start the service:
docker compose up -dUsers with only the legacy standalone tool can run the upstream spelling instead:
docker-compose up -dDetached mode returns control to the terminal while the container continues running. Docker downloads the selected image if it is not already present.
Alternative: Docker Run with the standard image
The documented Docker Run example uses shaneisrael/fireshare:latest. The following command retains the upstream relative paths for data and processed. Run it from the parent directory where those locations should be created, and replace all other placeholders:
docker run --name fireshare \
  -v "$(pwd)/fireshare/data:/data:rw" \
  -v "$(pwd)/fireshare/processed:/processed:rw" \
  -v /path/to/my/videos:/videos:rw \
  -v /path/to/my/images:/images:rw \
  -p 8080:80 \
  -e ADMIN_USERNAME=your-admin-username \
  -e ADMIN_PASSWORD=your-admin-password \
  -e PUID=user-id-with-read-write-permissions \
  -e PGID=group-id-with-read-write-permissions \
  -d shaneisrael/fireshare:latest
This creates a container named fireshare, maps host port 8080 to container port 80, mounts the four storage locations, and starts the standard image in detached mode. The shown Docker Run configuration does not include every setting from the Compose example. If you need SECRET_KEY, DOMAIN, or another supported environment variable, add it deliberately after checking the current Fireshare documentation, then recreate the container.
Choose between the standard and Lite images
| Image | CPU transcoding | NVIDIA GPU transcoding | Image characteristic |
|---|---|---|---|
shaneisrael/fireshare:latest-lite |
Supported | Not available | Smaller image using the system-provided FFmpeg |
shaneisrael/fireshare:latest |
Supported | Supported with compatible NVIDIA NVENC hardware | Larger image containing CUDA libraries |
The Lite image supports CPU transcoding, but GPU transcoding is permanently disabled. Setting TRANSCODE_GPU=true does not enable it. Use the standard image when compatible NVIDIA NVENC transcoding is required.
Transcoding is disabled by default. To enable CPU transcoding, add the following variable to the chosen container configuration:
ENABLE_TRANSCODING=trueThe standard image can request GPU mode with:
ENABLE_TRANSCODING=true
TRANSCODE_GPU=true
GPU mode requires a compatible NVIDIA GPU with NVENC support. Fireshare selects an available encoder and can fall back to CPU processing if GPU encoding fails. Confirm the codec support of the actual hardware rather than assuming every NVIDIA model has identical capabilities.
Documented video containers are MP4 with .mp4, Apple MP4 with .m4v, QuickTime with .mov, and WebM with .webm. Documented encodings include H.264, H.265, AV1, and VP9. Fireshare always serves the original file directly and does not modify it when transcoding is enabled. The source therefore still needs to use a supported container and encoding.
Verify Fireshare before remote exposure
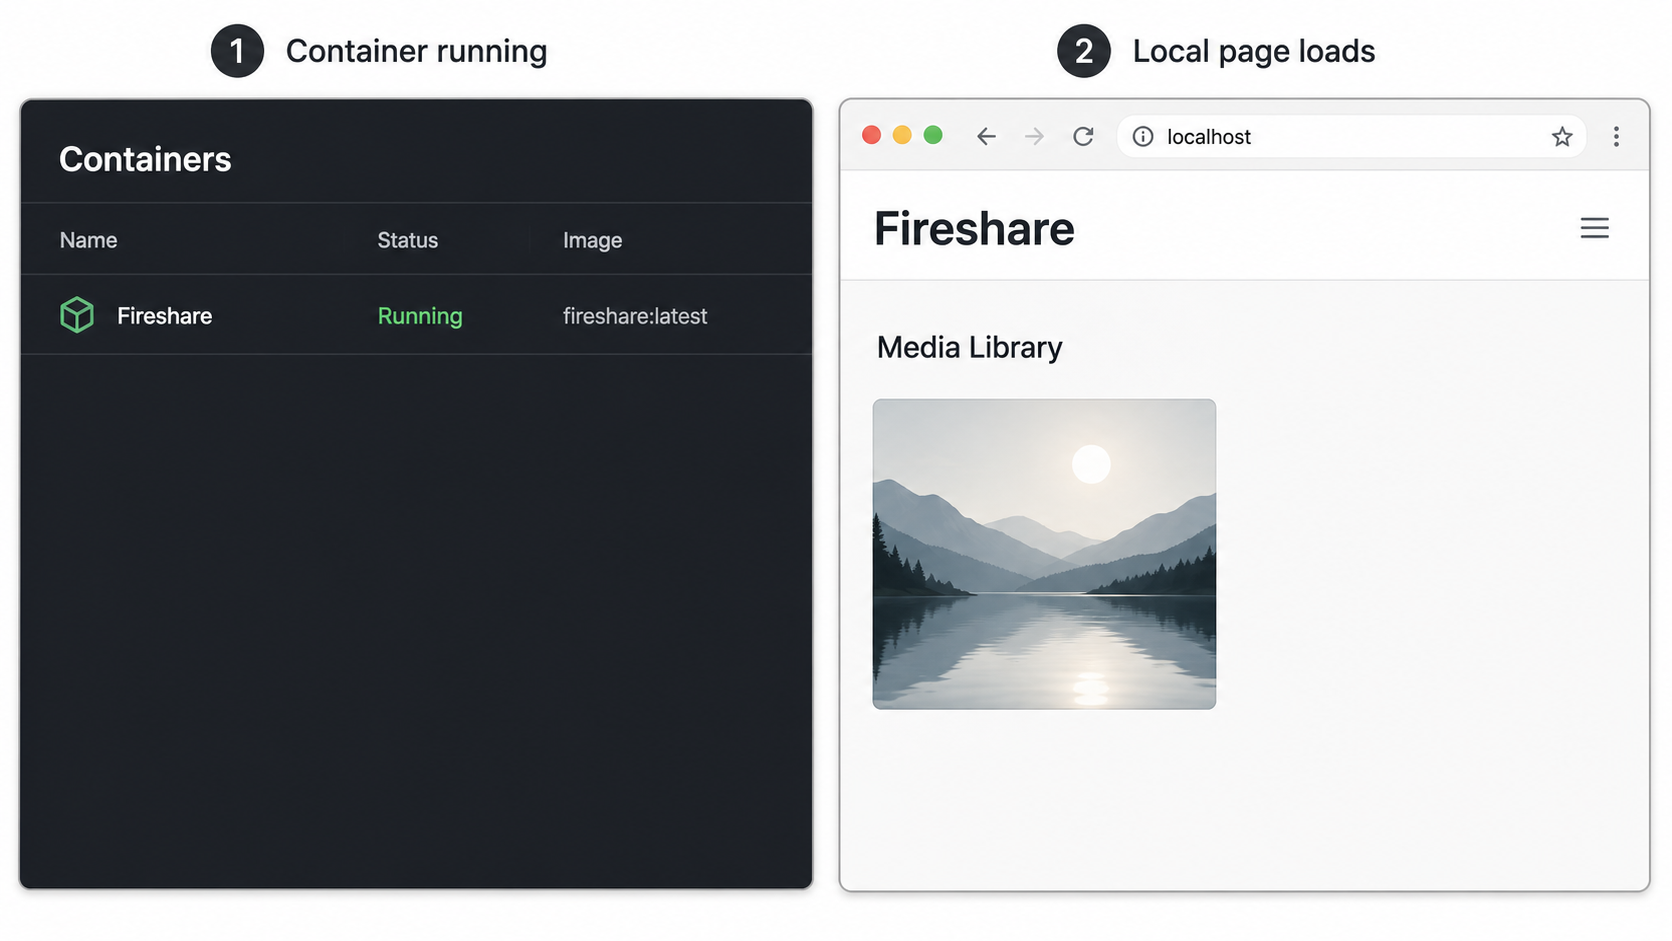
Open the documented local address from the Docker host:
http://localhost:8080
If the browser is on another device, localhost refers to that device rather than the Docker host. Use the Docker host's reachable LAN address and port instead, provided local networking policy permits that connection.
Confirm the service state
From the Compose directory, run docker compose ps. Verify that the Fireshare container is running instead of repeatedly restarting or exiting.
Read startup logs
Run docker compose logs fireshare and look for clear port, database, mount, scanning, or permission errors. Review logs for sensitive information before sharing them.
Open the local HTTP endpoint
Visit http://localhost:8080 from the Docker host. A successful response confirms that the host-to-container port mapping works.
Sign in and verify storage
Authenticate with the configured administrator account. Confirm that Fireshare can access the video and image directories and write its database and processed content.
Test a representative media page
Open a supported file, test playback, and verify the visibility or password behavior you expect to use remotely. This checks more than the home page alone.
Useful Compose checks include:
docker compose ps
docker compose logs --tail=200 fireshare
docker compose logs -f fireshare
Press Ctrl+C to stop following logs. This does not stop the running container. For a Docker Run deployment, use:
docker ps -a
docker logs --tail=200 fireshare
docker logs -f fireshare
Configure sharing, access, and the public hostname
Before exposing the service, decide who may sign in, whether uploads are needed, and which media should be public, link-only, password-protected, or available only through authenticated workflows. Review the current Fireshare security configuration guidance before enabling TOTP or login IP whitelisting.
Understand what each access mode does
Fireshare supports public and private feeds. Public media can be presented through the public interface. Private media is link-only, which keeps it out of the public feed but still allows a person with the direct URL to reach it. Individual videos can also be protected with a password.
A hard-to-guess URL is not equivalent to authorization. A recipient can copy or forward a link. Use Fireshare's password and account controls when possession of a URL alone should not be sufficient.
Test each intended access mode in a private browser window where no administrator session is active. Confirm that an unauthenticated visitor sees exactly what you expect. Repeat this test through the public tunnel after it is created.
Set DOMAIN in the expected format
Fireshare documents DOMAIN as the domain where the instance is hosted and gives a hostname-style example such as demo.fireshare.net. It is required for Open Graph metadata to work correctly on shared links. Based on that current guidance, enter the public hostname without an http:// or https:// scheme unless the documentation for your installed release explicitly says otherwise.
First create and test the Localtonet HTTP tunnel so you know the hostname viewers will use. If the assigned URL is conceptually https://your-host.example, the Fireshare setting should follow this form:
- DOMAIN=your-host.exampleChanging a Compose environment value does not modify the environment of an existing container. Save the updated configuration, validate it, and recreate the service:
docker compose config
docker compose up -d --force-recreate
docker compose ps
docker compose logs --tail=200 fireshare
A simple docker restart fireshare restarts the same container with its original environment. It does not apply a changed DOMAIN from compose.yaml. For a Docker Run deployment, stop and remove the existing container, then create a replacement with the complete original mount, port, identity, credential, and environment configuration plus the updated domain.
If you use a generated hostname that later changes, Fireshare's stored configuration may still generate links or Open Graph metadata for the old hostname. Update DOMAIN, recreate the container, and retest previews whenever the public hostname changes. Where your current Localtonet plan and dashboard support a selected subdomain or custom domain, a stable hostname is easier to operate. Check current DNS requirements before configuring a custom domain.
Test account protections through the final path
Fireshare supports TOTP two-factor authentication and login IP whitelisting with individual addresses or CIDR ranges. IP-based rules require additional care when an application is reached through a relay or reverse proxy because the address interpreted by the application can depend on request forwarding behavior.
Establish remote access, test the observed behavior safely, and retain an administrative recovery path before enforcing a restrictive allowlist. The available evidence does not establish one universal client-IP result for every Fireshare and Localtonet deployment.
Expose the working Fireshare HTTP endpoint with Localtonet
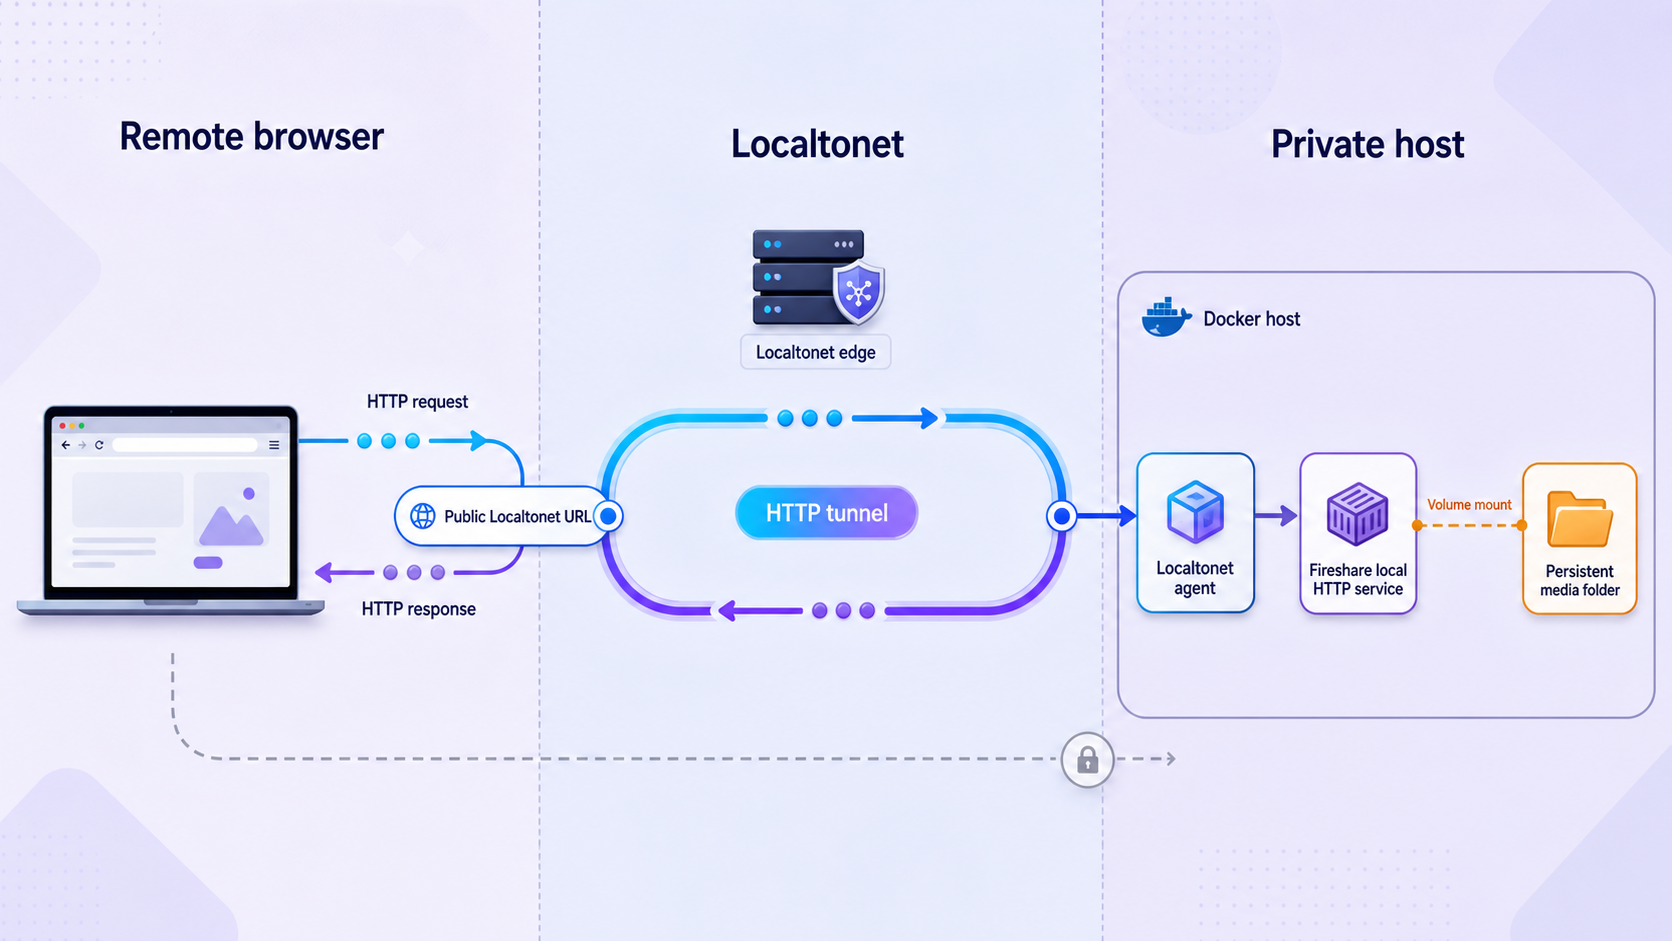
Once the local endpoint works, configure a Localtonet HTTP tunnel. Install our client on the Docker host or on another device that can reach the Fireshare host. If the client and Fireshare run on the same machine, the target can use the local address and host port. If they run on different devices, use the Docker host's network address as seen from the Localtonet client.
Current authentication tokens, relay servers, server codes, regions, and available process types must be selected from the Localtonet dashboard. Availability can vary by plan, client version, region, and deployment, so do not copy those values from an old tutorial.
Install and run the Localtonet client
Run our client on a device that can reach the verified Fireshare service. The device must remain online whenever remote access is required.
Open the HTTP Tunnel configuration
In the Localtonet dashboard, go to the HTTP Tunnel page and begin an HTTP tunnel configuration for the Fireshare web application.
Select the process type
Choose Random Sub Domain, Custom Sub Domain, or Custom Domain according to the options currently available to your account. Each process type serves the configured content through a public HTTPS address.
Select the AuthToken and server
Select the device-specific AuthToken for the client that can reach Fireshare, then select an available Localtonet server from the dashboard. Never expose the token in screenshots or shared files.
Enter the local IP address and port
Use the Fireshare address reachable from the selected Localtonet client and port 8080 when using the documented mapping. Use loopback only when the client can reach Fireshare through that same machine's loopback interface.
Start and test the tunnel
Creating the tunnel does not mean it is running. Use the Start button, wait for the connected state, and test the assigned public HTTPS address from a private session or another network.
For current dashboard behavior and configuration fields, use the Localtonet HTTP tunnel documentation. Exact custom-domain DNS instructions are not reproduced here because they must be checked against the current dashboard and documentation.
The Localtonet tunnel forwards the Fireshare endpoint as configured. It does not inspect the library and publish only links you selected. After the endpoint is reachable, test the home page, login behavior, one public item, one link-only item, one password-protected item, and a representative media stream. Fireshare's own controls should produce the expected result for each request.
Fireshare must be running, the Docker host must be awake and connected, the selected Localtonet client must be connected, and the tunnel must be started. A failure in any one of these components interrupts public access.
Operate, update, back up, and restore Fireshare
Use explicit Compose lifecycle commands
Run Compose commands from the directory containing the deployment file. The current plugin commands are:
# Start or reconcile the service
docker compose up -d

# Show service state
docker compose ps

# Follow logs
docker compose logs -f fireshare

# Stop the container without removing it
docker compose stop fireshare

# Start a stopped container
docker compose start fireshare

# Recreate after an environment or configuration change
docker compose up -d --force-recreate

# Stop and remove project containers and networks
docker compose down
Replace docker compose with docker-compose only if the host uses the legacy standalone tool. Avoid down -v unless you fully understand every attached volume. Bind-mounted source data is outside the container, but removing named volumes can still destroy persistent data used by other Compose configurations.
Stop the Localtonet tunnel during maintenance when you do not want remote requests reaching an incomplete update or restore. Start it again only after local validation succeeds.
Perform a controlled image update
A floating tag such as latest-lite can point to a newer image after a pull. Treat an update as a controlled change rather than combining it with unrelated storage, credential, and networking edits.
- Read the relevant Fireshare release notes, including authentication, environment-variable, LDAP, and database-related changes.
- Record the current Compose file, image reference, and available image identity information.
- Create a cold backup of persistent data.
- Pull the configured image.
- Recreate the service from the unchanged configuration.
- Review logs and test locally.
- Test the public path before resuming normal sharing.
docker compose images
docker compose pull fireshare
docker compose up -d
docker compose ps
docker compose logs --tail=200 fireshare
For stricter control, use an explicit Fireshare image tag only when that tag is actually published and documented for the selected image variant. Test it before production use. Do not invent a Docker tag by assuming every GitHub release name has a corresponding standard and Lite image.
Create a cold backup
Fireshare's supplied documentation does not define an application-specific online backup command or guarantee that copying a live database produces a consistent restore point. A conservative filesystem procedure is therefore a cold backup with the application stopped.
- Stop or temporarily disable the Localtonet tunnel so new remote requests do not arrive.
- Stop Fireshare with
docker compose stop fireshare. - Confirm that the container has stopped.
- Back up
/data,/processed,/videos, and/imagesaccording to your recovery requirements. - Back up the Compose file and any protected environment file separately.
- Preserve ownership, permissions, timestamps, and enough metadata to reconstruct the mounts.
- Start Fireshare, verify it locally, and then restart the tunnel.
Original media may already be protected by another storage backup system. Even so, document whether the Fireshare backup includes originals or only application state. A backup plan that silently excludes a large media mount may be acceptable for one operator and a serious recovery gap for another.
A Compose file or environment file can contain the administrator password, SECRET_KEY, LDAP credentials, and other sensitive values. Encrypt or otherwise restrict backup access and never store those files in a public source repository.
Validate a restore instead of assuming the backup works
A backup is not proven until it can be restored. Perform restore testing on an isolated host or isolated directory set. Do not point a test deployment at the active production database or writable production media directories.
- Prepare separate empty target directories with appropriate ownership and permissions.
- Restore the backed-up data into those directories.
- Copy the protected deployment definition and change its bind mounts to the restored test paths.
- Use an unused test host port so the restore cannot collide with the active service.
- Keep the test deployment disconnected from the production Localtonet tunnel.
- Start the restored instance and inspect its logs.
- Verify administrator login, library records, representative images, representative videos, and any critical visibility settings.
- Remove or secure the isolated test deployment after validation.
The available Fireshare documentation does not define a separate restore command, database repair procedure, or guaranteed compatibility matrix between every database state and image version. Preserve the image identity used with each backup and test the exact recovery combination you expect to use.
Plan rollback before an update
Container rollback and data rollback are related but different. Replacing a new image with an older image does not necessarily reverse database changes made by the newer application. A safe rollback plan therefore includes both the previous known-good image identity and a pre-update cold backup.
If an update fails before changing persistent state, restoring the prior image may be sufficient. If the new version has modified the database or processed content, stop the service and restore the matching pre-update backup before starting the prior image. Do not run two Fireshare containers against the same writable /data directory at the same time.
Troubleshoot common failures
If Fireshare does not open at http://localhost:8080, check docker compose ps and the logs. Verify the host port, bind-mount paths, directory existence, and permissions. If you changed the host-side port, both the browser URL and Localtonet target must use the new port.
If the interface opens but media is missing, confirm that videos and images were not reversed and that the configured PUID and PGID can traverse the complete host path. Current Fireshare releases support on-demand scanning from the administration interface. The documented setting MINUTES_BETWEEN_VIDEO_SCANS=0 disables automatic scanning, so review it if content appears only after a manual scan.
If Fireshare works locally but not through Localtonet, confirm that the selected client is connected and that the tunnel has been started. Test the target from the Localtonet client device itself. A target of 127.0.0.1:8080 is appropriate only when Fireshare is reachable through that device's loopback interface.
If the page loads remotely but playback fails, test the same file locally. Local failure points to media compatibility, filesystem access, transcoding, or Fireshare rather than the tunnel. If local playback works, compare a representative public request and review Fireshare logs without exposing sensitive information.
If shared links generate an old hostname, verify DOMAIN, confirm the service was recreated rather than merely restarted, and account for preview caches maintained by chat or social platforms.
Security checklist before sharing the public URL
Remote access changes who can send requests to the application. Treat Fireshare as internet-reachable whenever the Localtonet tunnel is running, even if most individual items are link-only.
A private Fireshare item can remain reachable through its direct URL, and a recipient can forward that URL. Use password protection and appropriate account controls for sensitive content. Test access without an administrator session before distributing links.
Keep Docker, the host operating system, Fireshare, and the Localtonet client maintained. Review release notes before upgrades, especially when authentication, LDAP, environment parsing, scanning, or database behavior changes. Apply significant changes locally first and verify them before depending on the public tunnel.
Frequently asked questions
Does Localtonet publish only the Fireshare links I select?
No. The HTTP tunnel publishes the configured Fireshare web endpoint. Fireshare controls which media is public, link-only, password-protected, or subject to login requirements. Review and test those application controls before sharing the public hostname.
Should I use docker compose or docker-compose?
Current Docker installations normally use the Compose v2 plugin command docker compose. Fireshare's upstream instructions show the legacy standalone spelling docker-compose. Use the command available on your host consistently. Check with docker compose version first.
What port does Fireshare use in this setup?
The documented Docker configuration maps host port 8080 to container port 80. That makes the service available at http://localhost:8080 on the Docker host. If you change the host-side port, use the new host port for local testing and the Localtonet target.
Why did changing DOMAIN and restarting the container not work?
Restarting an existing container preserves its original environment. After changing DOMAIN in the Compose configuration, recreate the service with docker compose up -d --force-recreate. Use the public hostname format documented by Fireshare, normally without the URL scheme.
What happens if my generated Localtonet hostname changes?
Existing distributed links may point to the old hostname, and Fireshare's Open Graph metadata may continue using the old DOMAIN. Update the setting, recreate Fireshare, and retest. A stable selected subdomain or custom domain is easier to operate where supported by the current dashboard and plan.
Should I use the standard or Lite Fireshare image?
Use the Lite image when you want a smaller image and do not need NVIDIA GPU transcoding. It supports CPU transcoding. Use the standard image when compatible NVIDIA NVENC transcoding is required. Setting TRANSCODE_GPU=true cannot enable GPU support in the Lite image.
Does Localtonet require router port forwarding?
No. Our client establishes an outbound connection to a Localtonet relay server. This workflow provides a public address without inbound router port forwarding, firewall changes, VPN setup, or a public IP address.
Can the Localtonet client run on a different machine?
Yes, provided the client device can reach the Fireshare host and port. Configure the tunnel with the Fireshare machine's reachable network address. Do not use localhost when the Localtonet client is on another machine.
Does creating a Localtonet tunnel start it automatically?
No. Creating the configuration does not mean the tunnel is running. Use the Start button. The public address remains available only while the tunnel is running and the selected Localtonet client is connected.
What should a Fireshare backup contain?
At minimum, document and protect the /data state, the deployment configuration, required secrets, and the media needed for recovery. Include /processed when preserving generated content matters. Because Fireshare does not document an application-specific online backup command in the supplied evidence, use a stopped-container cold backup and validate restoration on isolated paths.
Connect your verified Fireshare server to Localtonet
Once Fireshare works locally and its access rules have been tested, configure its reachable IP address and port as a Localtonet HTTP tunnel target, start the tunnel, and validate the public HTTPS path from an unauthenticated session.
Get Started Free →

