

Build GameFrameX locally, validate its Unity demonstration, and publish only the required application endpoints
GameFrameX combines a .NET multiplayer server, MongoDB-backed player data, HTTP APIs, and a Unity client in one aggregated repository. This guide starts with the application rather than the tunnel: clone the project, isolate and start MongoDB, compile the server, verify its local TCP and HTTP listeners, and run the included Unity scene. After that local loop works, we configure separate Localtonet tunnels for the long-lived TCP connection and the HTTP API. The current repository evidence confirms the default endpoints, but it does not expose a stable, documented Unity setting for replacing both endpoints, so the remote-client section clearly identifies that revision-sensitive boundary instead of inventing a file or Inspector field.
📋 What's in this guide
How the GameFrameX client-server workflow fits together
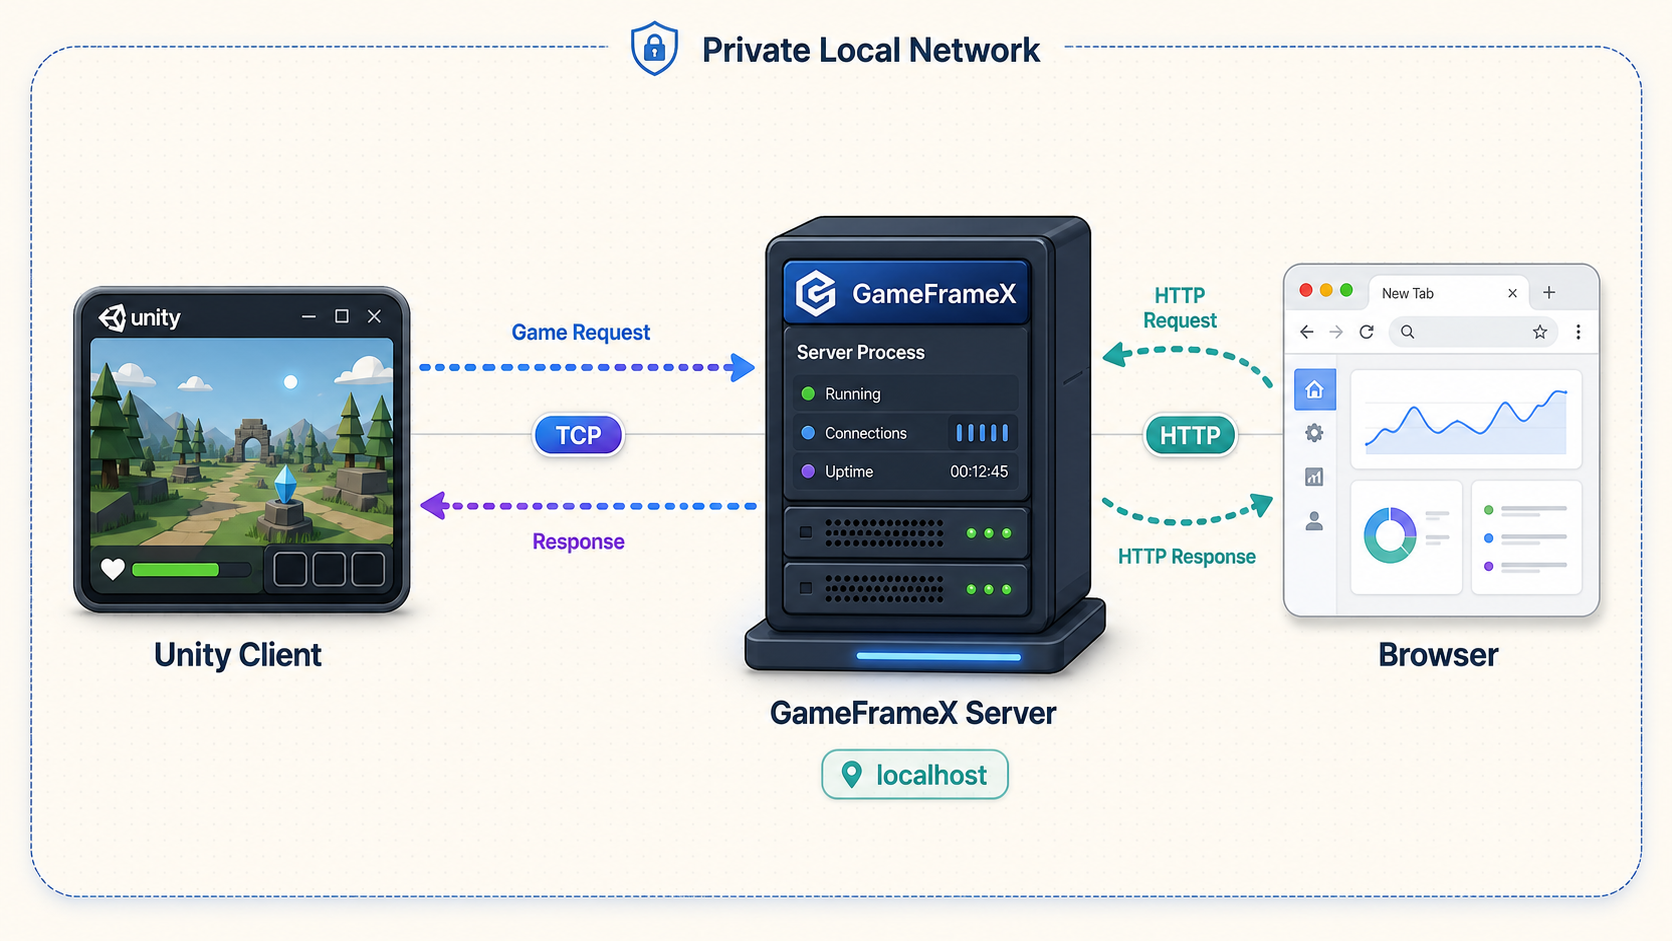
The aggregated GameFrameX repository is an open-source game development toolbox containing the .NET server, Unity project, Docker resources, protocol definitions, tools, and related project files. It is the appropriate source for this walkthrough because its quick start is designed around the complete repository rather than a collection of independently assembled components.
This guide was checked against the moving main branch as reviewed on August 20, 2026. The supplied repository evidence did not include an immutable commit hash. That matters because requirements, source paths, and client configuration can change after publication. After cloning, record the exact revision you tested:
git rev-parse HEADPinning or recording that commit makes later troubleshooting reproducible. If a future checkout differs from this guide, compare its README, Compose file, launcher defaults, and Unity source with the recorded revision instead of assuming that the moving branch still behaves identically.
The default server uses more than one application endpoint. Port 29100 accepts the long-lived TCP game-client connection. Port 28080 provides HTTP login and related APIs under paths such as /game/api/.... These are different protocols with different public endpoint formats. A remote client that uses both must receive both a TCP destination and an HTTP base address.
GameFrameX also documents an optional WebSocket service on port 29110, disabled by default, and an optional metrics and health listener on port 29090. Neither optional listener is needed for the repository quick start. Supporting a listener does not mean it should be enabled or published.
--IsEnableWebSocket true startup option.
The most reliable implementation is staged. First prove that the database and server work on the host. Then prove that the included Unity client completes its local workflow. Only after those tests pass should you expose the application listeners. This makes it possible to distinguish database, build, application, Unity, tunnel, and public-network failures.
| Default port | Protocol and purpose | Default state | Remote-access guidance |
|---|---|---|---|
29100 |
TCP, long-lived game-client connections | On | Use a Localtonet TCP tunnel when remote game clients require this listener. |
28080 |
HTTP, login and related game APIs | On | Use a separate Localtonet HTTP tunnel when the client calls these APIs remotely. |
29110 |
WebSocket service | Off | Leave private unless the application is deliberately configured to use it. |
29090 |
Metrics and health service | Off | Keep private unless a protected observability design specifically requires access. |
27017 |
MongoDB used by the server | Started by the supplied Compose setup | Never create a public game tunnel for the database. |
Prerequisites for the server and Unity walkthrough
Install each dependency before building the project. A missing SDK, inactive Docker engine, incomplete Unity import, or disconnected Localtonet client can otherwise appear to be a GameFrameX networking problem.
.NET SDK 10.0 or newer
The current GameFrameX repository declares .NET SDK 10.0 or newer as a hard requirement for the server and table-generation tooling. Install the SDK from the official .NET download page, then confirm which version the active shell resolves:
dotnet --version
The major version must be 10 or newer for the reviewed repository. Installing only a .NET runtime is insufficient because the procedure invokes dotnet build. If multiple SDKs are installed, run the check in the same terminal that will build GameFrameX.
Docker with Docker Compose
GameFrameX supplies a Docker Compose definition for MongoDB. Install Docker from its official website and ensure the installation provides the current docker compose command. Docker Desktop is the usual supported route on Windows and macOS. On Linux, use Docker's installation guidance for your distribution and install the Compose plugin where it is not already included.
docker compose version
Start the Docker engine before continuing. This walkthrough uses the MongoDB resources under docker/mongo. The repository also contains PostgreSQL resources for an administrative backend, but PostgreSQL is not required for the documented game-server and Unity quick start covered here.
Git or a ZIP extraction tool
Git provides the easiest way to clone the project and record its commit. The repository also supports downloading the complete project as a ZIP. Whichever method you choose, the extracted root should include Server, Unity, and docker.
Unity 2019.4.40f1 for this demonstration
Install Unity 2019.4.40f1 through Unity Hub using the resources on the official Unity download page. The separately maintained GameFrameX Unity framework repository describes compatibility with Unity 2019.4 and above, but the aggregated repository's complete demonstration specifically names Unity 2019.4.40f1. Use that exact editor version for this test to remove an avoidable variable.
The first project opening downloads packages and can take longer than later launches. It requires internet access. Wait for package resolution, asset import, and script compilation to finish before entering Play mode.
Localtonet account and client
Create a Localtonet account and install our client on the GameFrameX host or on another trusted machine that can reach the host. Use the Localtonet documentation to select the current client instructions for your operating system. Localtonet clients are available for supported desktop and server operating systems, but installation packages and commands can change, so use the current Windows, macOS, or Linux instructions shown there rather than copying an unverified command from an older article.
After installation, launch the client and associate it with its device-specific authentication token. Confirm that the device appears connected before configuring a tunnel. Never place that token in Unity source, GameFrameX configuration, a shell transcript, a screenshot, or version control.
You can start MongoDB, build GameFrameX, launch the server, and verify ports 29100 and 28080 without opening Unity or creating a tunnel. Unity is needed for the complete included client-server demonstration. Localtonet is needed only after the local application works.
Install and start the GameFrameX server
The following procedure follows the current aggregated-repository quick start. Run each command from the stated directory. Relative paths work only when the preceding directory change succeeded.
Download the complete repository
Clone or extract the aggregated GameFrameX project, enter its root directory, and record the tested commit.
Review and start MongoDB
Enter docker/mongo, inspect how the supplied Compose definition publishes port 27017, restrict it to the host when necessary, and start the service in detached mode.
Build the .NET server
Move to the repository's Server directory and run dotnet build. Resolve SDK or compilation failures before launching the output.
Launch with the local database URL
Enter Server/bin/app_debug and start GameFrameX.Launcher.dll with the local MongoDB connection string.
Clone and record the repository revision
git clone https://github.com/GameFrameX/GameFrameX.git
cd GameFrameX
git rev-parse HEAD
Save the resulting commit hash with your deployment notes. If Git is unavailable, download the ZIP from the GameFrameX repository page, extract it, and open a terminal in the extracted root. A ZIP does not automatically give you a local Git commit record, so note its download date and branch.
Inspect and start MongoDB
cd docker/mongo
docker compose config
Review the rendered ports configuration before starting the database. The repository quick start connects to MongoDB through localhost:27017, but that connection string alone does not prove that Docker publishes the port only on loopback. A mapping displayed as 0.0.0.0:27017 or [::]:27017 can make the database reachable through host network interfaces, subject to the host firewall. A mapping displayed as 127.0.0.1:27017 restricts the published IPv4 socket to local processes.
When the .NET launcher runs directly on the same host, the safer Compose publication is a loopback-bound mapping:
ports:
  - "127.0.0.1:27017:27017"
Apply that form to the MongoDB service in your local Compose configuration if the supplied file publishes on all interfaces. Preserve the rest of the repository's database settings. A host firewall rule that blocks inbound access to port 27017 provides another boundary, but it should not replace a correctly scoped container publication.
Start the service and inspect its effective publication:
docker compose up -d
docker compose ps
The documented development instance uses admin as both username and password. Its data is stored beneath docker/mongo/database/. Treat those credentials and that storage arrangement as quick-start defaults, not a production design.
Verify the effective Docker port mapping with docker compose config and docker compose ps. Bind port 27017 to loopback when the host process is the only consumer, block it with the host firewall, and never create a Localtonet tunnel, router rule, or public firewall rule for MongoDB.
Build the server
From docker/mongo, move to the server directory and compile:
cd ../../Server
dotnet build
Let the build finish before proceeding. The documented launch output is under Server/bin/app_debug. If the directory or launcher assembly is missing, review the build result rather than creating an arbitrary replacement path.
Launch GameFrameX against local MongoDB
cd bin/app_debug
dotnet GameFrameX.Launcher.dll --DataBaseUrl="mongodb://admin:admin@localhost:27017/?authSource=admin"
The explicit --DataBaseUrl override is important. The repository states that the source default points to a public demonstration database. This self-hosted workflow deliberately directs the server to the local MongoDB instance. The application listeners use their defaults, so the basic launch does not require separate port arguments.
Keep the launcher terminal running. Stopping the process closes the application listeners, and no tunnel can make an inactive target available.
Optional IDE startup
GameFrameX also documents opening Server/Server.slnx in Rider or Visual Studio, or Server.sln if the IDE does not support the newer solution format. Set GameFrameX.Launcher as the startup project and use Server/bin/app_debug as the working directory.
The documented IDE route changes the default DataBaseUrl in Server/GameFrameX.Launcher/StartUp/AppStartUpGame.cs and launches without arguments. The command-line override above is preferable for a temporary test because it avoids committing a local development credential or machine-specific database destination to source control.
Verify GameFrameX locally before creating tunnels
A successful build proves only that the code compiled. It does not prove that MongoDB accepted the connection, server startup completed, or the required listeners opened. Validate those layers while the launcher remains active.
Check the default TCP listeners
On a system with Netcat, run the repository's documented reachability checks:
nc -z localhost 29100
nc -z localhost 28080
Success on port 29100 confirms that a process accepts TCP connections at the game endpoint. Success on port 28080 confirms transport reachability to the HTTP listener. Neither command validates a login request or a complete game protocol exchange.
If Netcat is unavailable, use an operating-system utility that tests TCP connectivity or inspect the GameFrameX output for startup and listener messages. Package names and installation commands differ across operating systems, so this guide does not prescribe a universal Netcat installation command.
Separate HTTP transport from HTTP behavior
A successful connection to port 28080 does not establish that a particular URL is valid. The repository identifies API paths under /game/api/..., but the supplied evidence does not identify a stable unauthenticated health or test route. Do not invent one. Use the Unity login workflow as the application-level HTTP test, or use a known route from the exact GameFrameX revision you recorded.
| Observed result | What it establishes | Next action |
|---|---|---|
| Both ports accept connections | The core application listeners are active | Proceed to the local Unity test. |
| Neither port accepts connections | Startup likely failed or the process stopped | Inspect the launcher output, build artifacts, and database connection. |
| 29100 works but 28080 fails | The game listener is active, but the HTTP listener is unavailable | Resolve the HTTP startup problem before testing login. |
| 28080 works but 29100 fails | The HTTP listener is active, but the game listener is unavailable | Do not configure the public TCP tunnel yet. |
| Both ports work but Unity fails | Transport works, but client configuration or application behavior does not | Finish imports and inspect the Unity console and server log. |
Port checks establish transport reachability. The strongest documented local verification is the included Unity flow: reach the login screen, create a character, and enter the main city.
Connect and test the included Unity client locally
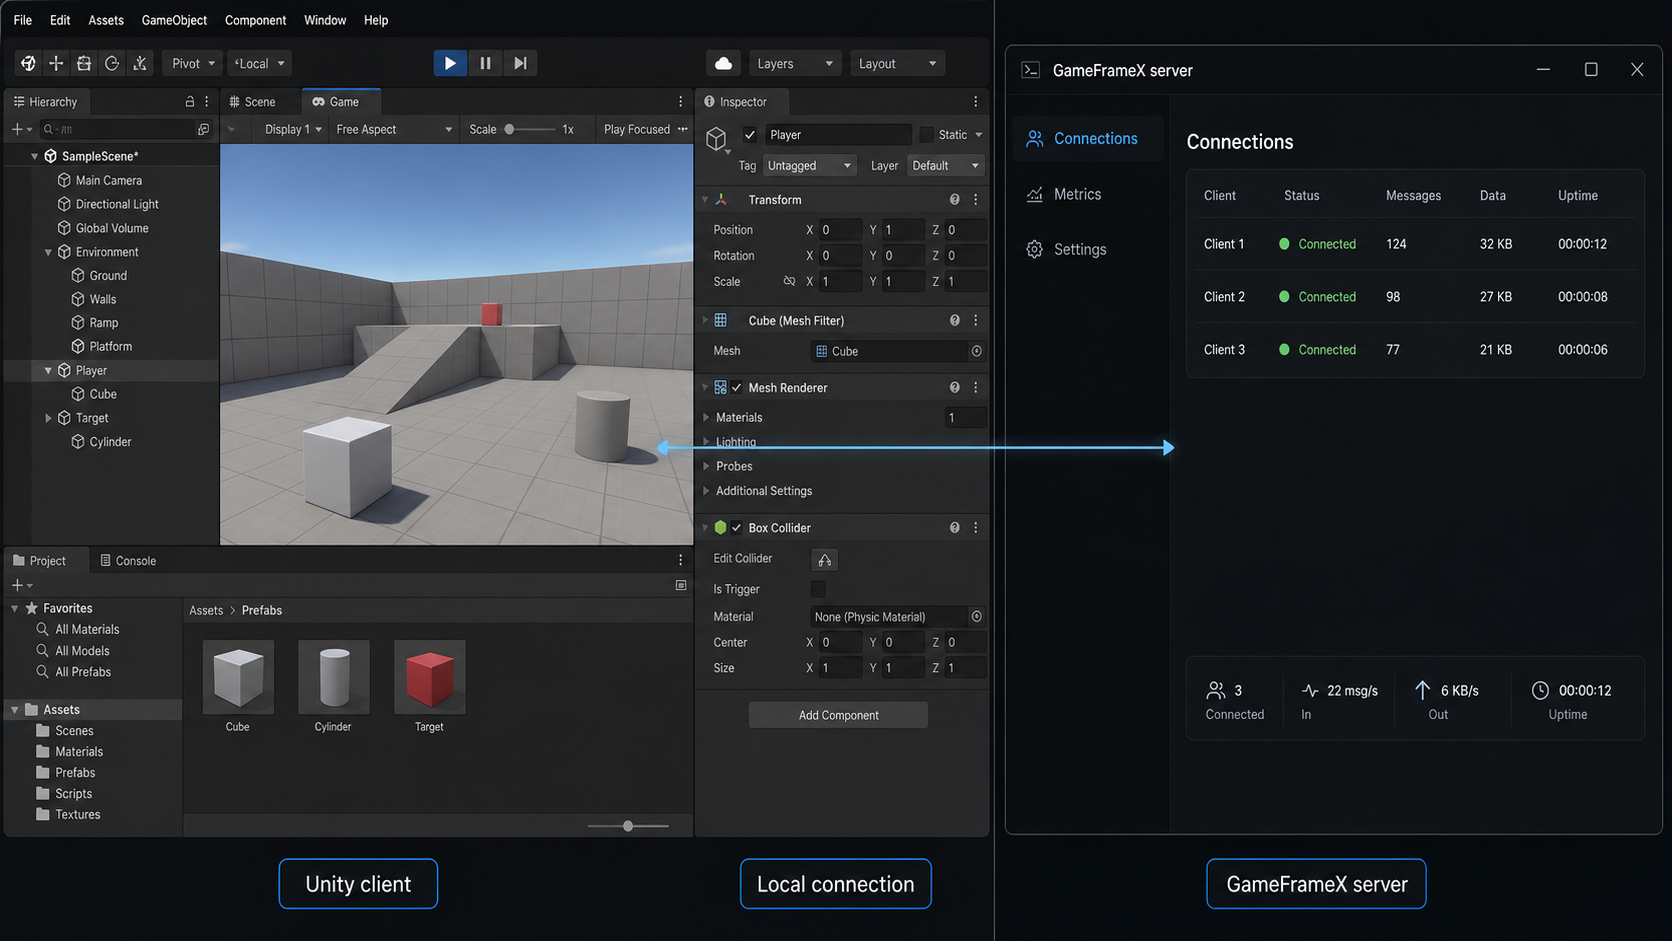
The aggregated repository includes a Unity project configured around the documented local defaults. Use it as the integration test before making any revision-sensitive endpoint changes.
Add the project through Unity Hub
Select the repository's Unity/ directory and open it with Unity 2019.4.40f1.
Wait for the first import
Allow Unity to download packages, import assets, and compile scripts. Do not enter Play mode while imports or compilation are still active.
Open the launcher scene
Load Assets/Scenes/Launcher.unity while MongoDB and the GameFrameX server remain running on the same machine.
Complete the documented local flow
Press Play. The reviewed project defaults to 127.0.0.1, TCP port 29100, and HTTP port 28080. Reach login, create a character, and enter the main city.
Do not change the client to public endpoints before this succeeds. Introducing remote networking too early creates too many possible failure points, including Unity package resolution, compilation, MongoDB, server startup, HTTP behavior, TCP behavior, client settings, DNS, and tunnel lifecycle.
Scope of endpoint reconfiguration in this tutorial
The reviewed repository documentation confirms the Unity defaults but does not identify one stable, supported file, ScriptableObject, Inspector field, or runtime menu for replacing both destinations. The supplied snapshot of the current source also does not provide enough evidence to verify an exact configuration location. We therefore narrow this tutorial at that boundary: it fully covers local GameFrameX installation, local Unity validation, publication of the confirmed ports, and layered remote tunnel verification, but it does not claim an exact source edit that has not been verified.
Before changing a client checkout, search the exact recorded revision for the existing values 127.0.0.1, 29100, and 28080. Inspect how those values are consumed before editing anything. They may be source constants, serialized Unity values, generated configuration, hot-update data, or values returned by another application layer. Change the authoritative setting already used by that revision, not every search result.
Replacing every occurrence of 127.0.0.1 or a default port can alter tests, server defaults, generated files, editor tooling, or unrelated services. Make a small change in a separate branch, preserve the local values for rollback, and review the diff before building the remote client.
Configure separate Localtonet tunnels for GameFrameX
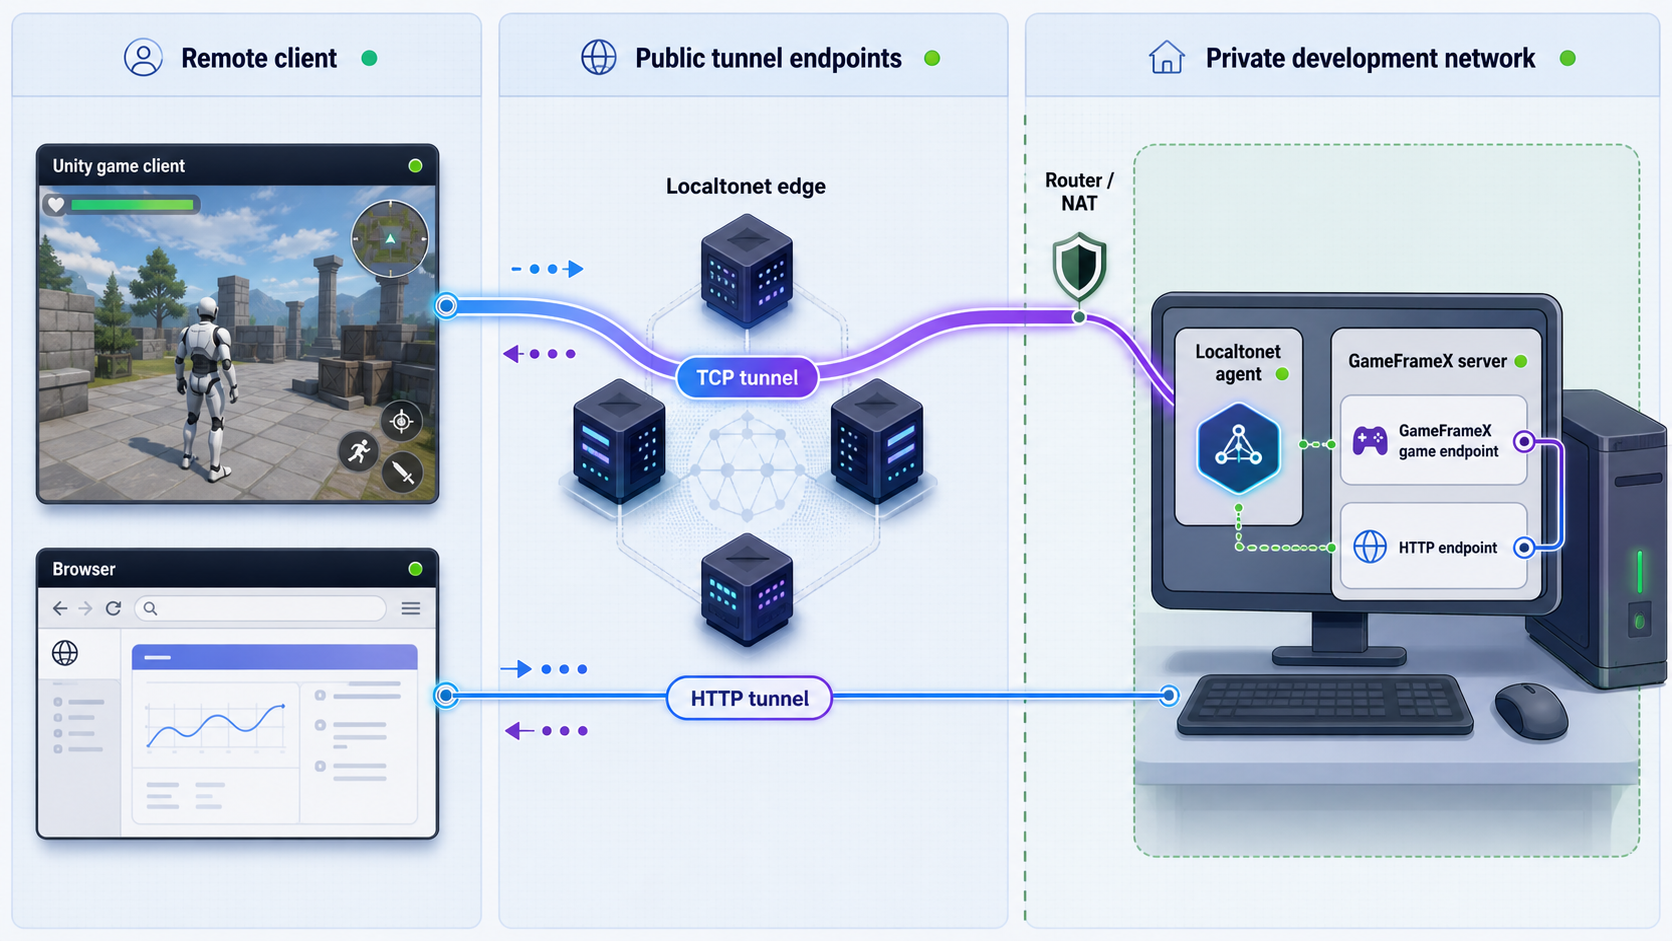
Our client establishes an outbound connection from the selected device to a Localtonet relay. A TCP tunnel returns a public host and port that forward to GameFrameX port 29100. An HTTP tunnel returns a public HTTPS address that forwards to port 28080. The server host does not need inbound router port forwarding, firewall changes, VPN setup, or a public IP address.
Creating a tunnel does not mean it is running. Configuration and lifecycle are separate. The selected device must be connected, and the tunnel must be started before the public endpoint becomes available.
Create the TCP tunnel
Follow the current Localtonet TCP tunnel documentation alongside the configuration below. Dashboard availability, relay choices, and plan-dependent options can change, so select values presented in your account rather than copying a hardcoded server code.
Install and run the Localtonet client
Run our current client on the GameFrameX host or another trusted device that can reach the GameFrameX host.
Select the connected device token
Open the TCP tunnel configuration and select the device-specific authentication token belonging to the running client.
Select an available relay server
Choose a server or region currently offered in the dashboard. Do not hardcode a relay code from another account or article.
Set the local TCP target
Enter the GameFrameX host address and port 29100. Use 127.0.0.1 only when our client runs on the same host and can reach GameFrameX through loopback.
Create and start the tunnel
Create the TCP configuration, then use the Start control. Record the assigned public TCP host and public port without exposing the device token.
Public testing is intentionally outside these configuration steps. Finish configuring both required tunnels before moving to the remote-verification section.
Create the HTTP tunnel
Use the current Localtonet HTTP tunnel documentation for the dashboard workflow. HTTP tunnels can use a random subdomain, custom subdomain, or custom domain as their process type, and each serves the target through a public HTTPS address. Availability can vary by account or plan.
Open the HTTP tunnel configuration
Use the same connected client device that can reach the GameFrameX HTTP listener.
Choose the process type
Select Random Sub Domain, Custom Sub Domain, or Custom Domain according to the options currently available in your dashboard.
Select the device authentication token
Select the token belonging to the connected Localtonet client. Keep the token out of Unity and GameFrameX configuration.
Select an available relay server
Choose a currently available server or region from the dashboard instead of relying on a hardcoded value.
Set the local HTTP target
Enter the GameFrameX host address and port 28080. Use 127.0.0.1 only when our client and GameFrameX run on the same host.
Create and start the tunnel
Create the HTTP configuration, use the Start control, and record the assigned public HTTPS address.
The public HTTPS address maps to local port 28080 and accepts HTTP traffic. The long-lived game connection must use the public host and port assigned to the TCP tunnel for local port 29100. An HTTPS URL cannot replace the raw TCP destination.
Prepare a remote Unity configuration carefully
The intended mapping is clear even though the exact Unity configuration location is revision-sensitive:
- Replace the local game destination
127.0.0.1:29100with the assigned public TCP host and public TCP port. - Replace the local HTTP base address using port
28080with the public HTTPS address assigned to the HTTP tunnel. - Do not append the local port to the public HTTPS address unless the generated address explicitly requires it.
- Do not substitute local port 29100 for the assigned public TCP port.
Make those substitutions only in the authoritative endpoint settings identified in your recorded GameFrameX revision. If the client receives a game server address from an API response, changing only a visible HTTP base URL may not change the later TCP destination. Observe the local flow and inspect the revision before assuming one setting controls both connections.
Verify tunnel status, transport, HTTP behavior, and the Unity session separately
Remote verification should answer four different questions. A green dashboard status does not prove that the local service responds. A successful port connection does not prove the GameFrameX protocol. An HTTP response does not prove that the TCP game session works.
1. Confirm the tunnel lifecycle
In the Localtonet dashboard, confirm that the expected device is connected and that both configured tunnels are running. If either tunnel is stopped, start it. If the device is disconnected, restore the Localtonet client before investigating Unity.
This check establishes only the control-plane state. It does not establish that GameFrameX is running or that the local target was entered correctly.
2. Test public TCP transport
From a genuinely different device or network, test the public host and port assigned to the TCP tunnel. Use a TCP connectivity utility available on that remote operating system. A successful connection establishes a path through the relay to a listening local target.
It does not establish a valid GameFrameX session because a generic port probe does not perform the application's protocol exchange. If the transport test fails, verify the public port exactly as assigned, the tunnel target, the selected device, and local reachability to port 29100.
3. Check the public HTTPS endpoint
Open or request the public HTTPS address. Any HTTP response proves more than a failed connection because it demonstrates that the public HTTP endpoint reaches an HTTP-speaking service. However, the root path may legitimately return an application error or an unhelpful response. The reviewed evidence does not identify a stable public health route, so this guide does not invent one.
The meaningful application-level HTTP test is the same login flow that worked locally, now using the public HTTPS base address. Compare the Unity console and server logs to determine whether the request reached GameFrameX and whether the application accepted it.
4. Complete the remote Unity session
A complete result requires the remote Unity client to reproduce the local outcome:
- The client reaches the login flow through the configured public HTTPS address.
- The client establishes its game connection through the assigned public TCP host and port.
- Character creation succeeds.
- The client enters the main city as it did during local verification.
Test from another machine or network rather than from the GameFrameX host. A same-host test can hide endpoint mistakes and local routing differences. Keep the server log, Unity console, and Localtonet dashboard visible so that each transition can be correlated.
| Result | What it proves | What it does not prove |
|---|---|---|
| Tunnel shows running | The configuration is started on a connected device | That GameFrameX is listening or responding correctly |
| Public TCP port accepts a connection | TCP transport reaches a listener | That the GameFrameX game protocol succeeds |
| Public HTTPS address returns HTTP | The HTTP tunnel reaches an HTTP service | That login, authorization, or a specific API operation succeeds |
| Login succeeds | The relevant HTTP application flow works | That the long-lived TCP game connection works |
| Character enters the main city | The documented end-to-end Unity flow completed | That the setup is production-ready or secured for unrestricted public use |
Security boundaries for remote GameFrameX development
A tunnel avoids inbound router configuration, but it does not remove the need for application security. A running public endpoint can receive traffic from outside the local network. Publish only the listeners needed for the current test and stop them afterward.
Isolate the quick-start database
The supplied MongoDB username and password are development credentials. Restrict the Docker publication to loopback when GameFrameX runs on the same host, block inbound access with the host firewall, and verify the effective binding after every Compose change. Do not rely on the word localhost in the application connection string as proof that the container itself is inaccessible from the LAN.
Before production use, replace default credentials, manage secrets outside source control and exposed command histories where appropriate, define database backups, review data retention, and follow deployment guidance for the exact GameFrameX revision. This tutorial reproduces a development quick start, not a complete production database architecture.
Keep metrics private
Metrics can reveal service names, runtime behavior, and operation patterns. The GameFrameX metrics listener is disabled by default, and this guide leaves it disabled. If a later design enables --IsOpenTelemetryMetrics true with --MetricsPort 29090, protect it separately rather than exposing it beside the game service without review.
Do not enable WebSocket without a requirement
WebSocket on port 29110 is disabled by default. GameFrameX documents enabling it with --IsEnableWebSocket true, but enabling a listener does not prove that the included Unity workflow uses it. Keep it disabled until the client architecture specifically requires it.
Apply application-level access controls
Localtonet transports traffic to the selected service. It does not replace GameFrameX authentication, authorization, input validation, rate controls, account protections, or operational monitoring. Use test accounts with limited privileges, avoid publishing administrative interfaces, and review what the HTTP API permits before sharing its public address.
Routine operation and troubleshooting
Recommended startup and shutdown order
- Start Docker and the MongoDB Compose service.
- Verify that MongoDB remains bound according to your isolation policy.
- Launch
GameFrameX.Launcher.dllwith the local database URL. - Verify local ports 29100 and 28080.
- Complete the local Unity test after application or client changes.
- Run the Localtonet client and confirm that its device is connected.
- Start the TCP tunnel and, when required, the HTTP tunnel.
- Run the layered remote checks before attempting a full Unity session.
When ending a test, close remote clients, stop the public tunnels, stop GameFrameX when it is no longer needed, and then stop MongoDB if no other local process depends on it.
MongoDB does not start
Run docker compose ps from docker/mongo and inspect the container logs. Confirm that the Docker engine is active and that another process is not already using port 27017. Database startup and .NET compilation are separate layers, so rebuilding the server will not repair a stopped database container.
The server cannot connect to MongoDB
Confirm that the container is running and that the launcher receives the complete URL:
mongodb://admin:admin@localhost:27017/?authSource=admin
The authSource=admin portion is relevant because the supplied credentials authenticate against the administrative database. This URL assumes that the .NET process runs directly on the same host as the published MongoDB port.
The build does not create the launcher
Check dotnet --version and confirm .NET SDK 10.0 or newer for the reviewed repository. Ensure the build command ran from Server. Do not troubleshoot Localtonet at this stage because no working local target exists until the application builds and starts.
Local ports work, but the public TCP endpoint does not
Confirm that the selected token belongs to the currently connected Localtonet client, the tunnel is started, and its local target is the correct host and port 29100. If our client runs on another machine, 127.0.0.1 refers to that other machine. Use the GameFrameX host's private address that is reachable from the Localtonet client device.
The HTTP tunnel responds, but login fails
Check whether the remote client still uses 127.0.0.1:28080. On a remote computer, that destination refers to the remote computer itself. Confirm that the client uses the public HTTPS address and that the HTTP tunnel targets GameFrameX port 28080. Then compare the Unity console with the server log to distinguish transport from application rejection.
Login works, but gameplay cannot connect
Confirm that the Unity client uses the public TCP host and public TCP port exactly as assigned. Do not substitute local port 29100 for the public port unless the dashboard actually assigned that number. Also investigate whether the login response supplies a different game destination that overrides the client value.
The tunnel worked and then became unavailable
Check the entire lifecycle. GameFrameX must still be running, the Localtonet client must retain outbound connectivity, its device must appear connected, and the tunnel must remain started. Closing the client, stopping the tunnel, losing connectivity, or stopping GameFrameX makes the endpoint unavailable.
The Unity project reports first-import errors
Confirm that Unity 2019.4.40f1 opened the repository's Unity/ folder. Wait for package downloads and compilation to settle. If the project was opened with a different editor, reproduce the issue with the documented version before treating it as a networking failure.
A later checkout behaves differently
Compare git rev-parse HEAD with the revision recorded during the working setup. Review changes to the README, docker/mongo, AppStartUpGame.cs, Unity endpoint handling, and launcher output. Do not assume requirements from the moving main branch remain fixed.
Test MongoDB, server startup, local transport, local Unity behavior, tunnel lifecycle, public TCP transport, public HTTP behavior, and the remote Unity flow in that order. Investigation should usually remain at the first layer that fails.
Frequently asked questions
Which GameFrameX port should I expose for a remote Unity client?
Use a Localtonet TCP tunnel for local port 29100. If the client performs login or related API calls through the default HTTP service, create a separate HTTP tunnel for local port 28080.
Can one HTTP tunnel handle both GameFrameX ports?
No. Port 28080 uses HTTP, while the persistent game connection on port 29100 uses raw TCP. The remote client needs the appropriate public endpoint for each protocol it uses.
Where exactly do I change the Unity TCP and HTTP endpoints?
The reviewed repository evidence confirms the defaults but does not document one stable configuration file or Inspector field for both endpoints. Record your commit, search that revision for the existing host and port values, trace how they are consumed, and change only the authoritative settings. Avoid a global replacement.
Do I need to expose MongoDB?
No. MongoDB is a server-side dependency. Keep port 27017 private, verify the Docker bind address, prefer a loopback-only publication for a same-host server, and never create a public tunnel for it.
Is Unity required to self-host the GameFrameX server?
No. Unity is not required to compile or launch the server. Unity 2019.4.40f1 is used for the complete included demonstration that validates login, character creation, and entry into the main city.
Does a running tunnel status prove GameFrameX works remotely?
No. It confirms only that the selected device is connected and the tunnel is started. Test public TCP reachability, HTTP behavior, and the complete Unity workflow separately.
Does creating a Localtonet tunnel start it automatically?
No. Creating and starting are separate actions. Use the Start control after configuration. The endpoint remains available only while the selected client is connected and the tunnel is running.
Do I need router port forwarding or a public IP address?
No. Our client establishes an outbound connection to a Localtonet relay, so the selected local services can receive traffic through assigned public endpoints without inbound router port forwarding, firewall changes, VPN setup, or a public IP address.
Should I enable GameFrameX WebSocket port 29110?
Not for this default walkthrough. WebSocket is disabled by default and requires --IsEnableWebSocket true. Enable and expose it only when the application and client are intentionally configured to use it.
Can the Localtonet client run on another machine?
Yes, provided that the client device can reach the GameFrameX host and required ports. Target the GameFrameX host's reachable private address. In that topology, 127.0.0.1 would refer to the separate Localtonet client machine.
Connect your verified GameFrameX server with Localtonet
Once MongoDB is isolated, the local listeners respond, and the included Unity flow works, map a TCP tunnel to port 29100 and add an HTTP tunnel for port 28080 when the client needs login and API access. Test each layer independently and stop the public tunnels when the remote development session is complete.
Get Started Free →

