

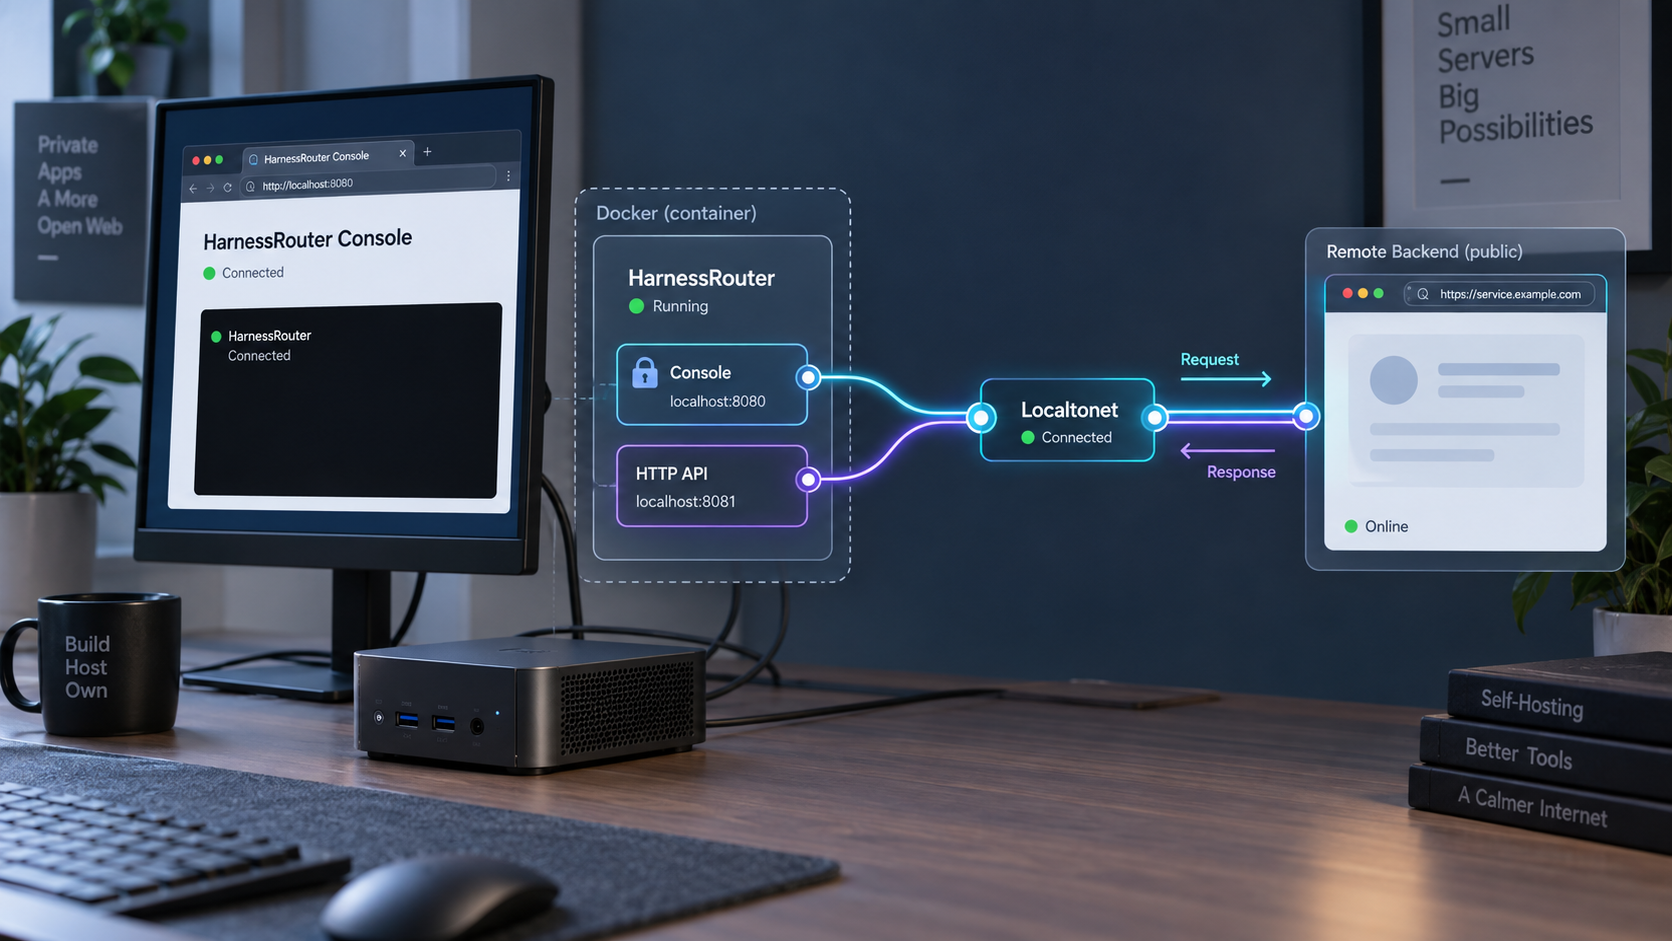
Run agent harnesses on your own infrastructure, verify them locally, and expose only the HTTP endpoint you intend to use
HarnessRouter Community Edition provides a unified, self-hosted interface for agent harnesses such as Codex and Claude Code. In this guide, we install it with Docker, preserve its state in a named volume, secure the default console account, connect a model provider, and verify both the browser console and API documentation locally. After the local deployment is working, we configure a separate Localtonet HTTP tunnel so authorized remote users or backend services can reach it without inbound router port forwarding, firewall changes, VPN setup, or a public IP address.
📋 What's in this guide
What HarnessRouter provides and how this deployment works
A model and an agent harness are related but different parts of an agent system. A model generates responses, while an agent harness surrounds that model with an execution loop, tools, files, sessions, progress reporting, and other runtime behavior. Codex and Claude Code are examples of harnesses. HarnessRouter sits between an application and supported harnesses, giving the application a consistent interface instead of requiring a separate integration for every runtime.
The self-hosted Community Edition implements the Unified Harness Protocol and provides an OpenAI Responses-compatible HTTP API. Its documented responsibilities include persistent sessions, streaming progress, files, artifacts, cancellation, and structured failure handling. A product can select a built-in or custom harness while continuing to use the same API contract.
The deployment in this guide has two deliberate phases. First, Docker runs HarnessRouter locally and publishes container port 3000 only on the host loopback interface at 127.0.0.1:3000. This local-only binding is important during initial setup because the documented account starts with default credentials. Second, after the password has been changed and a task has been tested, the Localtonet client on that host connects the local HTTP service to one of our relay servers through an outbound connection.
harnessrouter/harnessrouter image, a named volume for persistent state, and container port 3000.
The Localtonet tunnel does not replace HarnessRouter authentication. It provides a network path to the application. HarnessRouter remains responsible for authenticating console users and API requests, while the connected model provider remains responsible for authorizing model usage through its provider key.
Complete the Docker installation, password change, provider configuration, and local task test before creating a public tunnel. If the application does not work at http://localhost:3000, adding a tunnel only introduces another network layer and makes diagnosis harder.
Prerequisites and deployment decisions
The documented HarnessRouter Community Edition quickstart requires Docker, approximately 4 GB of disk space, and an API key from a supported model provider. No HarnessRouter account is required for this self-hosted setup. Community Edition does not include a bundled model or trial provider key, so a provider integration is necessary before an agent can execute a model-backed task.
Docker must be installed and its daemon must be running on the deployment host. Docker installation differs by operating system and distribution, and the supplied HarnessRouter evidence does not define a universal Docker installation command or supported host matrix. Use the Docker installation procedure appropriate for the host, then confirm that ordinary Docker commands can communicate with the daemon before continuing.
Plan for the following resources and responsibilities:
- A host that can run Docker and has about 4 GB of available disk space for the initial deployment.
- A supported model-provider API key that is authorized for the models you intend to use.
- Local access to a browser for the first sign-in and password change.
- A secure password-management process for the console password and all API keys.
- The Localtonet client on the same host if you want to preserve the documented loopback-only Docker port binding.
- A backend application, API client, or another controlled consumer if you intend to use the Responses-compatible API remotely.
| Credential | Purpose | Safe handling |
|---|---|---|
| HarnessRouter console password | Signs a user into the browser console | Change the default before remote exposure and store the replacement securely. |
| Model-provider API key | Authorizes requests and usage with the selected model provider | Add it through Bring Your Own Key and do not confuse it with a HarnessRouter API key. |
| HarnessRouter API key | Authorizes a product backend to call the self-hosted HarnessRouter API | Store the secret when it is shown, keep it in backend configuration, and never embed it in browser code. |
| Localtonet device token | Identifies the Localtonet client device that runs the tunnel | Treat it as device-specific secret material and never place it in an article, repository, screenshot, or client-side application. |
Decide whether the remote endpoint is intended for interactive console access, backend API calls, or both. They are served by the same local HTTP service, but the risk profiles differ. A browser console is an administrative surface. An API endpoint may be consumed continuously by software and can initiate agent work that uses provider resources. Expose no more than the intended service, use strong credentials, and stop the tunnel when remote access is not required.
The initial username and password are both harnessrouter. HarnessRouter explicitly advises keeping the instance local until the default password has been changed. Do not start the Localtonet tunnel, publish port 3000 on a LAN-facing interface, or place the service behind another public endpoint while those credentials remain active.
Install HarnessRouter with Docker
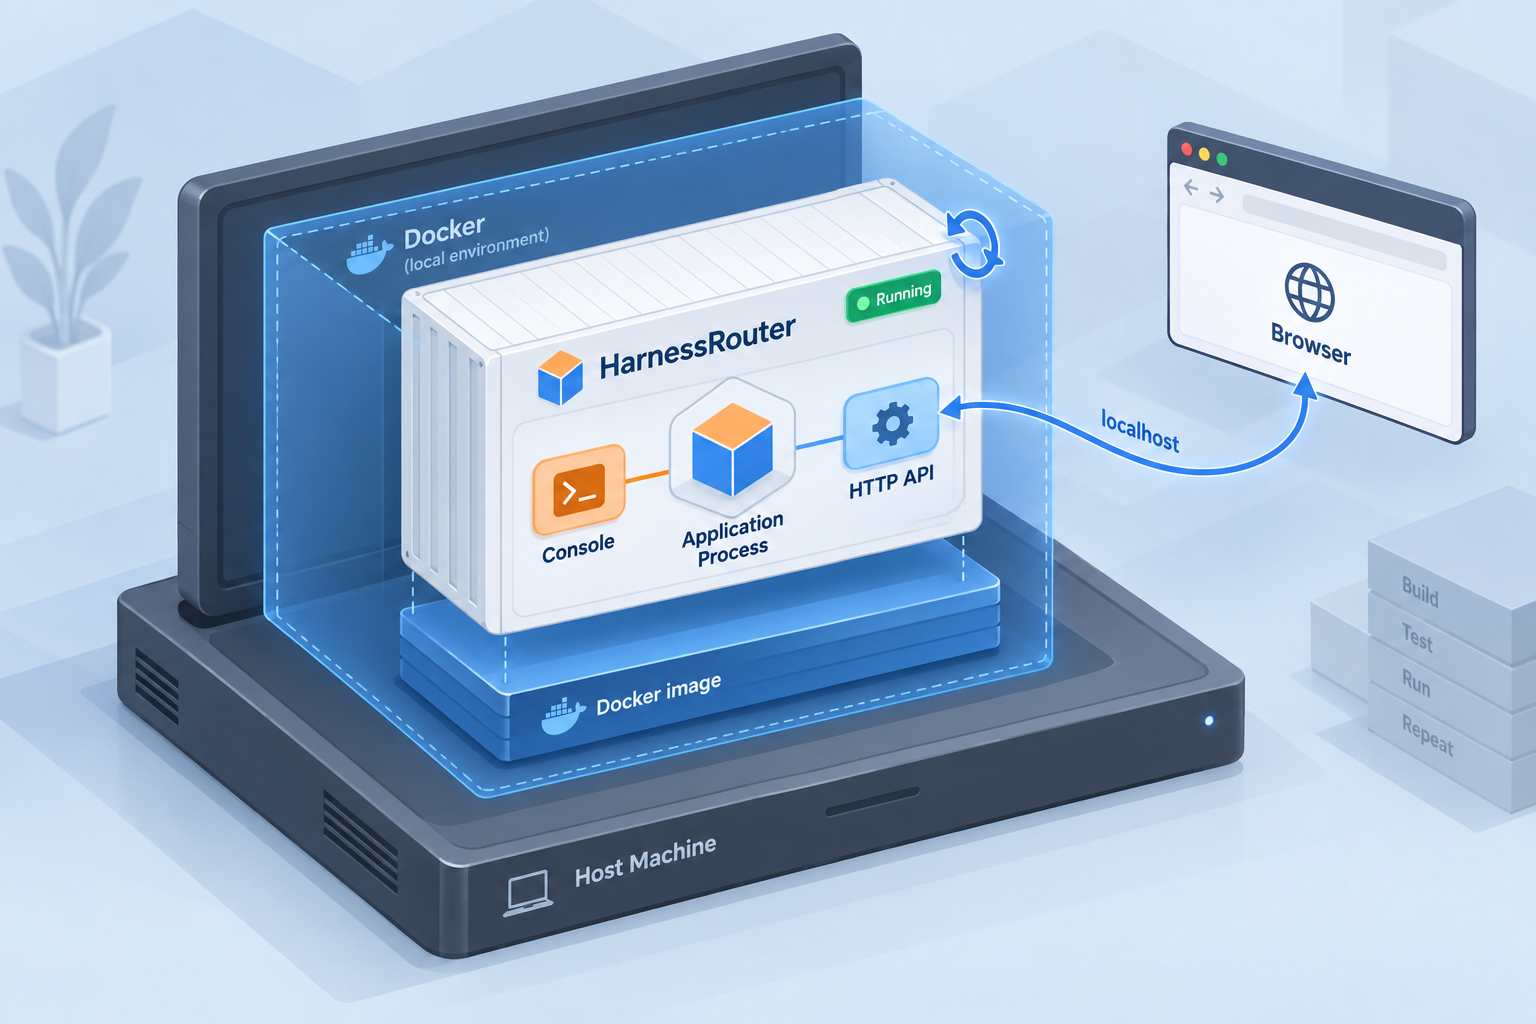
The official quickstart uses one Docker container and a named volume. The host mapping binds port 3000 only to 127.0.0.1, which means the service is reachable from the Docker host but is not directly published on every network interface.
Start the HarnessRouter container
Run the documented Docker command on the host. Docker downloads the image if it is not already present, names the container harnessrouter, publishes the service on local host port 3000, and attaches the named volume harnessrouter at /data.
Follow the first-launch logs
The first launch installs the enabled harness command-line tools. Follow the container output and wait until it reports [harnessrouter] ready on :3000. Pressing Ctrl+C stops log following but does not stop the container.
Open the local console
Browse to http://localhost:3000 from the Docker host. If you used the documented alternate host port because 3000 was occupied, open that chosen port instead.
docker run -d --name harnessrouter \
  -p 127.0.0.1:3000:3000 \
  -v harnessrouter:/data \
  harnessrouter/harnessrouter
The named volume is not incidental. It preserves the application database, files, installed harness command-line tools, and workspaces between container restarts. Removing or replacing the container is therefore different from removing the volume. Treat the volume as persistent application state and include it in your backup planning.
Follow the startup output with:
docker logs -f harnessrouterContinue only after the logs contain:
[harnessrouter] ready on :3000If port 3000 is already in use, the documented alternative is to map another loopback-only host port, such as 3100, to container port 3000:
docker run -d --name harnessrouter \
  -p 127.0.0.1:3100:3000 \
  -v harnessrouter:/data \
  harnessrouter/harnessrouter
With that mapping, use http://localhost:3100 locally and configure any later Localtonet HTTP tunnel to target port 3100. Do not configure the tunnel for 3000 merely because that is the container port. Localtonet connects to the published host port.
--user option
HarnessRouter documents that its entrypoint and Runner need root inside the container to manage per-session users. The Console and Gateway run unprivileged, and agent processes run as the user assigned to their session. Adding --user changes the documented execution model and can prevent the deployment from working.
The one-command quickstart does not pin an explicit image version. HarnessRouter refers readers who require version pinning, Compose, or scripted deployment to its current setup guidance. Because tag names and upgrade details can change, this guide does not invent a pinned tag or an unsupported Compose file.
Secure the console and configure a model provider
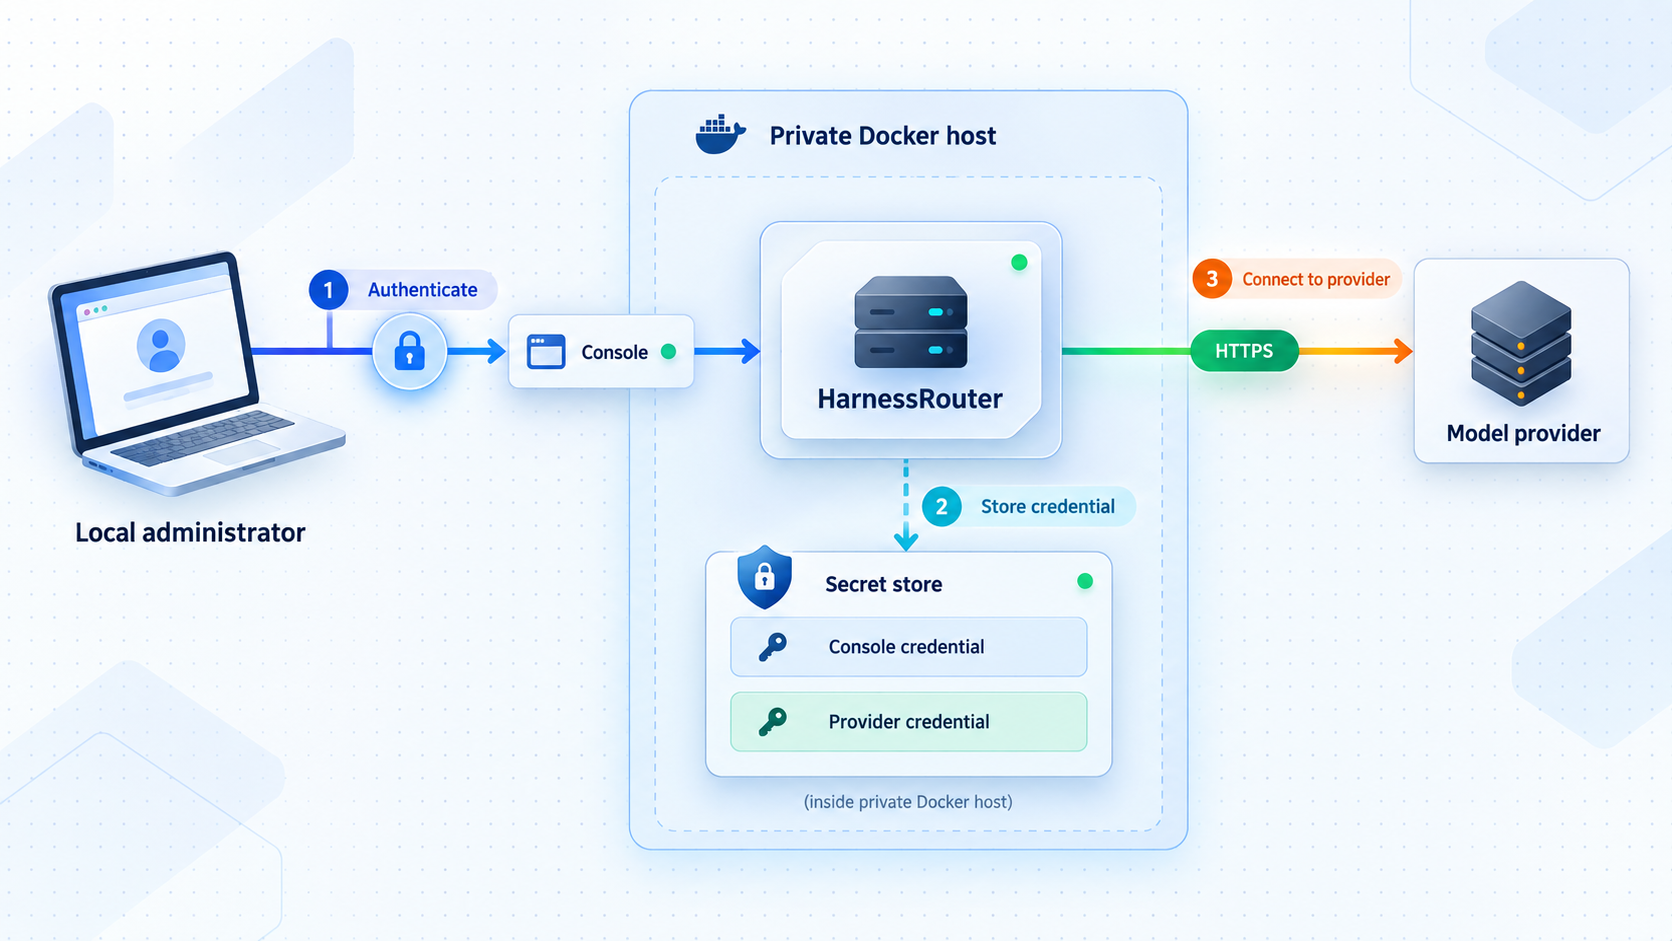
Once the readiness message appears, open the local console. The initial sign-in values documented by HarnessRouter are:
- Username:
harnessrouter - Password:
harnessrouter
These are bootstrap credentials, not values to retain. Sign in locally, open Profile, and replace the default password with a strong, unique password. Saving the change briefly restarts the Console and signs out other browsers, so a short interruption at this point is expected. Sign in again with the new password and verify that the old password no longer provides access.
Next, connect the provider that will supply the model used by your harness:
Open Bring Your Own Key
In the HarnessRouter sidebar, open Bring Your Own Key and select Add Integration.
Choose the provider
Select the provider supported by the key you control. Available providers and models can change, so use the choices shown by the running HarnessRouter version rather than assuming a provider is present.
Name the integration and add its key
Give the integration a recognizable name and enter the provider API key. This key authorizes model requests and is separate from both the console password and any HarnessRouter API key.
Confirm that models become available
After the integration is saved, its supported models should become selectable in the Console. If no model appears, review the provider integration and the container logs before attempting a task.
Avoid putting provider credentials in shell history, public environment examples, source control, frontend code, task prompts, or screenshots. A provider key can authorize billable model requests, so rotate it through the provider if you suspect it has been disclosed.
Run the first agent task
Open Agent harnesses, select a supported harness, and choose New task. Pick an available model from the provider integration, then enter a small and concrete test instruction. A deterministic request, such as asking for a short file or a precisely formatted response, is easier to verify than an open-ended task.
Follow the task's live progress and inspect any files it creates in the same session. This verifies more than the sign-in page: it confirms that the selected harness can start, that the provider integration can authorize a model request, and that the session can return progress and results.
Optional custom harness configuration
Built-in harnesses do not require a custom harness. If reusable behavior is needed, select New harness in Agent harnesses. In Add harness, set the name, base harness, and default model together, then select Create and configure.
In Harness Settings, add agent instructions, configure tools, optionally add an MCP server through Add MCP, and add skills as needed. Save the configuration and use Run Task to test it. The default model can be changed later in Settings, but the base harness cannot be changed after the custom harness is created. Choose that base deliberately.
Verify the local console and HTTP endpoints
Local verification should cover the application surface you intend to expose. A successful container start is necessary, but it does not prove that sign-in, provider access, harness execution, or API discovery works.
| Check | Local address or action | Expected result |
|---|---|---|
| Console | http://localhost:3000 |
The sign-in screen loads, and the replacement password authenticates successfully. |
| Container readiness | docker logs -f harnessrouter |
The logs report [harnessrouter] ready on :3000. |
| Provider integration | Review Bring Your Own Key and model selection | Models supported by the configured integration are available for selection. |
| Agent execution | Run a small task from Agent harnesses | The task starts, reports progress, and returns a result or files without an authorization failure. |
| API documentation | http://localhost:3000/api/harness/v1/docs |
The documentation for the local API is available. |
| OpenAPI document | http://localhost:3000/api/harness/v1/openapi.json |
The machine-readable API description is available to an authorized user or client as required by the running version. |
If you selected host port 3100, replace 3000 with 3100 in the browser addresses. The path does not change because Docker is only translating the host port to container port 3000.
Do not use the remote tunnel as the first test. A browser error at the public address could be caused by HarnessRouter startup, Docker port publication, Localtonet client connectivity, tunnel state, or application authentication. A successful local check narrows the remaining problem to the tunneling layer.
Verify at least one model-backed task before treating the deployment as ready. The console can load even when a provider key is invalid, a selected model is unavailable, or a harness command-line component failed to install during first launch.
Prepare HarnessRouter API access for a backend
The documented API base for the default local deployment is:
http://localhost:3000/api/harness
The API documentation and OpenAPI description are under /v1/docs and /v1/openapi.json relative to that base. Use the OpenAPI description from the running version when implementing a client. It is more reliable than copying a request body from a different release because request fields can evolve.
Once a harness runs successfully in the Console, open API Keys in the sidebar of the same Community Edition instance and choose Create API key. Store the secret when it is displayed. The key is distinct from the console password and from the model-provider key.
A product request selects a harness using metadata.harness_id and specifies a model served by the connected provider. Use the harness identifier shown in your own Console. Do not assume that a display name, an example identifier, or an identifier from another deployment is valid for your instance.
For a local backend, the base URL can be stored as an environment variable:
export HARNESSROUTER_BASE_URL=http://localhost:3000/api/harnessStore the generated HarnessRouter API secret in the backend's secret-management mechanism. Do not commit it to a repository, insert it into JavaScript sent to a browser, place it in a public mobile application, or include it in a remotely shared URL. Browser code cannot reliably keep a bearer secret confidential.
Before building a production request, inspect the API documentation exposed by the exact running version. The supplied evidence establishes the API base, documentation paths, bearer-key workflow, harness selection through metadata.harness_id, and the need to specify a provider-backed model. It does not establish every current request field for every release, so this article intentionally does not invent a complete payload.
Anyone who obtains a valid HarnessRouter API key may be able to submit authorized work to the instance and consume provider-backed resources. Use separate backend secrets, apply least privilege wherever the surrounding environment supports it, rotate exposed keys, and review the application and provider activity associated with unexpected usage.
Expose the working HTTP service with Localtonet
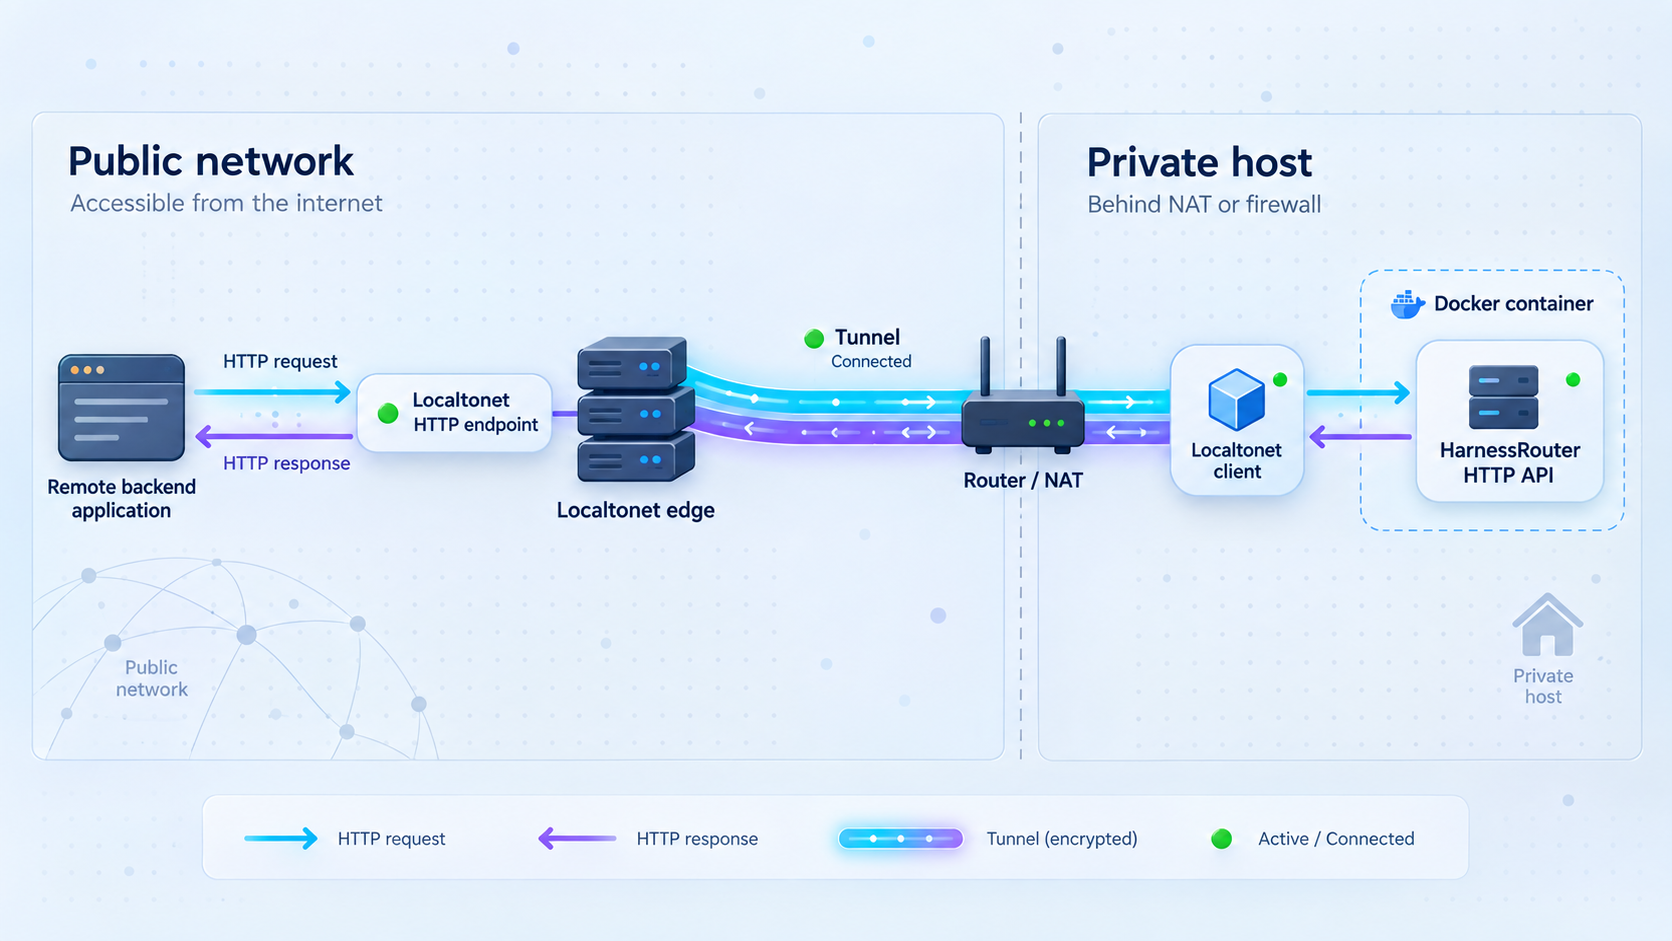
After the password has been changed and the local checks pass, Localtonet can provide remote HTTP access. Our client establishes an outbound connection from the HarnessRouter host to a Localtonet relay server. The resulting HTTP tunnel supplies a public HTTPS address while HarnessRouter continues to run locally.
This approach does not require an inbound router port-forwarding rule, a public IP address, firewall changes, or VPN setup. The public endpoint remains available only while the selected Localtonet client device is connected and the tunnel is running.
Keep the Localtonet client on the same host as Docker for this workflow. The Docker command binds HarnessRouter to 127.0.0.1, and loopback always refers to the machine or network namespace from which a connection is made. A Localtonet client on another physical machine cannot reach the Docker host by using its own 127.0.0.1.
Install and run the Localtonet client on the HarnessRouter host
Run our client on the same device that can open the local HarnessRouter address. This preserves the loopback-only Docker binding and avoids publishing the application directly to the local network.
Authenticate or select the client device
Use the device-specific authentication token associated with the client that will run the tunnel. Keep that token secret and select the connected device in the dashboard.
Create an HTTP tunnel configuration
Choose an HTTP tunnel and select the required Process Type. Random Sub Domain, Custom Sub Domain, and Custom Domain all serve the target content at a public HTTPS address, but availability can vary by current product configuration or plan.
Select an available relay server and enter the local target
Select a currently available server or region from the dashboard. Set the local target to 127.0.0.1 and port 3000, or to the alternate host port you selected during Docker installation. Do not hardcode a server code from an unrelated example.
Start the tunnel
Creating a tunnel does not make it active. Use the Start control, then confirm that both the Localtonet client and the tunnel report a connected or running state.
Test the assigned public address
Open the assigned HTTPS address from a different network or an authorized remote device. Confirm that HarnessRouter requests authentication, sign in with the replacement password, and run only the minimum test needed to establish that the remote path works.
For the current dashboard workflow, consult our Localtonet HTTP tunnel documentation. Exact relay choices and domain configuration can change, so select current values from the dashboard rather than copying an old server code or DNS record.
| HTTP Process Type | Address behavior | Important consideration |
|---|---|---|
| Random Sub Domain | Uses a generated public HTTPS subdomain | Useful when a generated address is acceptable for testing or controlled access. |
| Custom Sub Domain | Uses a selected subdomain where supported | Availability and naming choices must be confirmed in the current dashboard. |
| Custom Domain | Serves the same target through a custom public domain | Check current Localtonet DNS instructions before adding or changing records. |
If a remote product backend will call the API, change its base URL from the local origin to the assigned Localtonet HTTPS origin while retaining the /api/harness path. Do not append the path twice. For example, if the assigned origin is represented as https://your-assigned-host, the conceptual API base becomes https://your-assigned-host/api/harness. Use the actual address assigned to your tunnel rather than this placeholder.
Keep HarnessRouter authentication enabled, protect its API keys, and avoid sharing the assigned public address unnecessarily. Stop the tunnel when remote access is no longer required. If a public address or credential is disclosed, stopping the tunnel immediately removes the active route, but compromised application credentials should still be changed or rotated.
Routine operation, upgrades, and troubleshooting
Start, stop, restart, and inspect the container
The container was created with the name harnessrouter, so routine Docker operations can refer to that name:
docker stop harnessrouter
docker start harnessrouter
docker restart harnessrouter
docker logs -f harnessrouter
Stopping the container makes the local application unavailable. A Localtonet tunnel may still be configured or running, but it cannot deliver a working HarnessRouter page while the local target is down. Conversely, stopping the Localtonet tunnel removes the public route without stopping the local HarnessRouter container.
This separation is useful operationally. For local maintenance, stop the tunnel first so the service is no longer publicly reachable, then restart or update the application. After local verification passes again, restart the tunnel and perform a minimal remote check.
Back up before an upgrade
Running docker pull harnessrouter/harnessrouter downloads the current image but does not upgrade an already running container. Replacing a container safely requires attention to the persistent volume and the release-specific upgrade procedure.
The supplied evidence points to a dedicated HarnessRouter upgrade and backup guide but does not establish the complete current backup command, retention process, or container-replacement sequence. We therefore do not invent those commands here. Before upgrading, consult the procedure for the version you are running, back up the named volume and any external configuration it identifies, and verify that the backup can be restored.
Console does not open locally
- Wait a few seconds after the readiness sequence because the Console may still be finishing startup.
- Review
docker logs -f harnessrouterfor startup errors. - Confirm that you are using the host port selected in the Docker mapping.
- If you mapped
127.0.0.1:3100:3000, open port 3100, not port 3000. - Confirm that another container with the same name did not prevent the documented container from being created.
A harness is missing or a task cannot start
The first launch installs enabled harness command-line tools. Check the logs for requested-but-not-installed warnings and review the available backends shown by the running application. Do not assume that every harness named by the project is installed, enabled, or compatible with every model in every release.
If the task starts but the model request fails, verify the provider integration separately. Confirm that the provider key remains valid, the selected model is available through that integration, and the provider account is authorized for the request. A HarnessRouter API key cannot substitute for a provider key.
The local service works but the public URL does not
- Confirm that the Localtonet client device is connected.
- Confirm that the tunnel was started, not merely created.
- Check that the local target is
127.0.0.1on the published host port. - Ensure the Localtonet client is on the same host when the target uses loopback.
- Open the local address again to rule out a stopped or restarting HarnessRouter container.
- If using a custom domain, verify the current DNS instructions rather than guessing records.
The public console opens but API calls fail
First separate network reachability from application authorization. If the console loads, the HTTP tunnel can reach the service. An API failure is then more likely to involve the base path, bearer key, harness identifier, selected model, request contract, or provider authorization.
Confirm that the remote API base ends with /api/harness, inspect /v1/docs or /v1/openapi.json on the running instance, and verify that the backend sends the Community Edition API key rather than the console password or provider key. Use the Harness ID shown in the same Console and a model exposed by the configured provider.
Remote access stopped unexpectedly
A Localtonet tunnel is available only while the selected client is connected and the tunnel is running. Check both states. Also verify that Docker is still running, the HarnessRouter container is active, and the local host port has not changed. A host reboot may affect both the application container and the Localtonet client depending on how each was configured to start, and no automatic-start behavior should be assumed without verifying the host configuration.
Frequently asked questions
Does self-hosted HarnessRouter include a model or trial provider key?
No. The Community Edition quickstart requires your own model-provider API key. Add it through Bring Your Own Key before running a model-backed task. The provider key is separate from the console password and from the HarnessRouter API key used by a product backend.
Why does the Docker command bind to 127.0.0.1?
The loopback binding keeps port 3000 from being published directly on every host network interface. This is especially important during initial setup because HarnessRouter starts with documented default console credentials. Change the password locally before enabling remote access.
Must the Localtonet client run on the same machine as HarnessRouter?
For the documented Docker mapping to 127.0.0.1, running our client on the same host is the straightforward configuration. A client on another machine would interpret 127.0.0.1 as that other machine, not the Docker host. Localtonet can target a service reachable from its client device, but changing HarnessRouter to a network-facing bind requires a separate security decision and is outside this loopback-focused guide.
Does the Localtonet HTTP tunnel replace the HarnessRouter password or API key?
No. The tunnel provides network connectivity to the local HTTP service. HarnessRouter still authenticates console users with its console credentials and API clients with its own API keys. Keep both layers configured and protect all credentials.
Can I use a different local port?
Yes. HarnessRouter documents mapping 127.0.0.1:3100 to container port 3000 when host port 3000 is busy. Open http://localhost:3100 and configure the Localtonet target for port 3100. The application paths remain the same.
Where are HarnessRouter files and state preserved?
The quickstart mounts the named Docker volume harnessrouter at /data. It preserves the database, files, installed harness command-line tools, and workspaces between restarts. Back up that state according to the current HarnessRouter upgrade and backup procedure before replacing or upgrading the deployment.
Can frontend browser code call the HarnessRouter API directly?
Do not expose the HarnessRouter API key in browser code. The project instructs users to store the generated key in a product backend. A browser-delivered secret can be inspected and reused by the user or by malicious code running in that browser context.
Is the public HarnessRouter address permanent?
The endpoint is available only while the selected Localtonet client is connected and the tunnel is running. Address behavior also depends on the chosen HTTP Process Type. Use the current dashboard to determine which generated subdomain, selected subdomain, or custom-domain options are available for your configuration.
Connect your secured HarnessRouter deployment with Localtonet
Finish the local installation and password change first, then create an HTTP tunnel to the verified loopback service when controlled remote access is required.
Get Started Free →

