

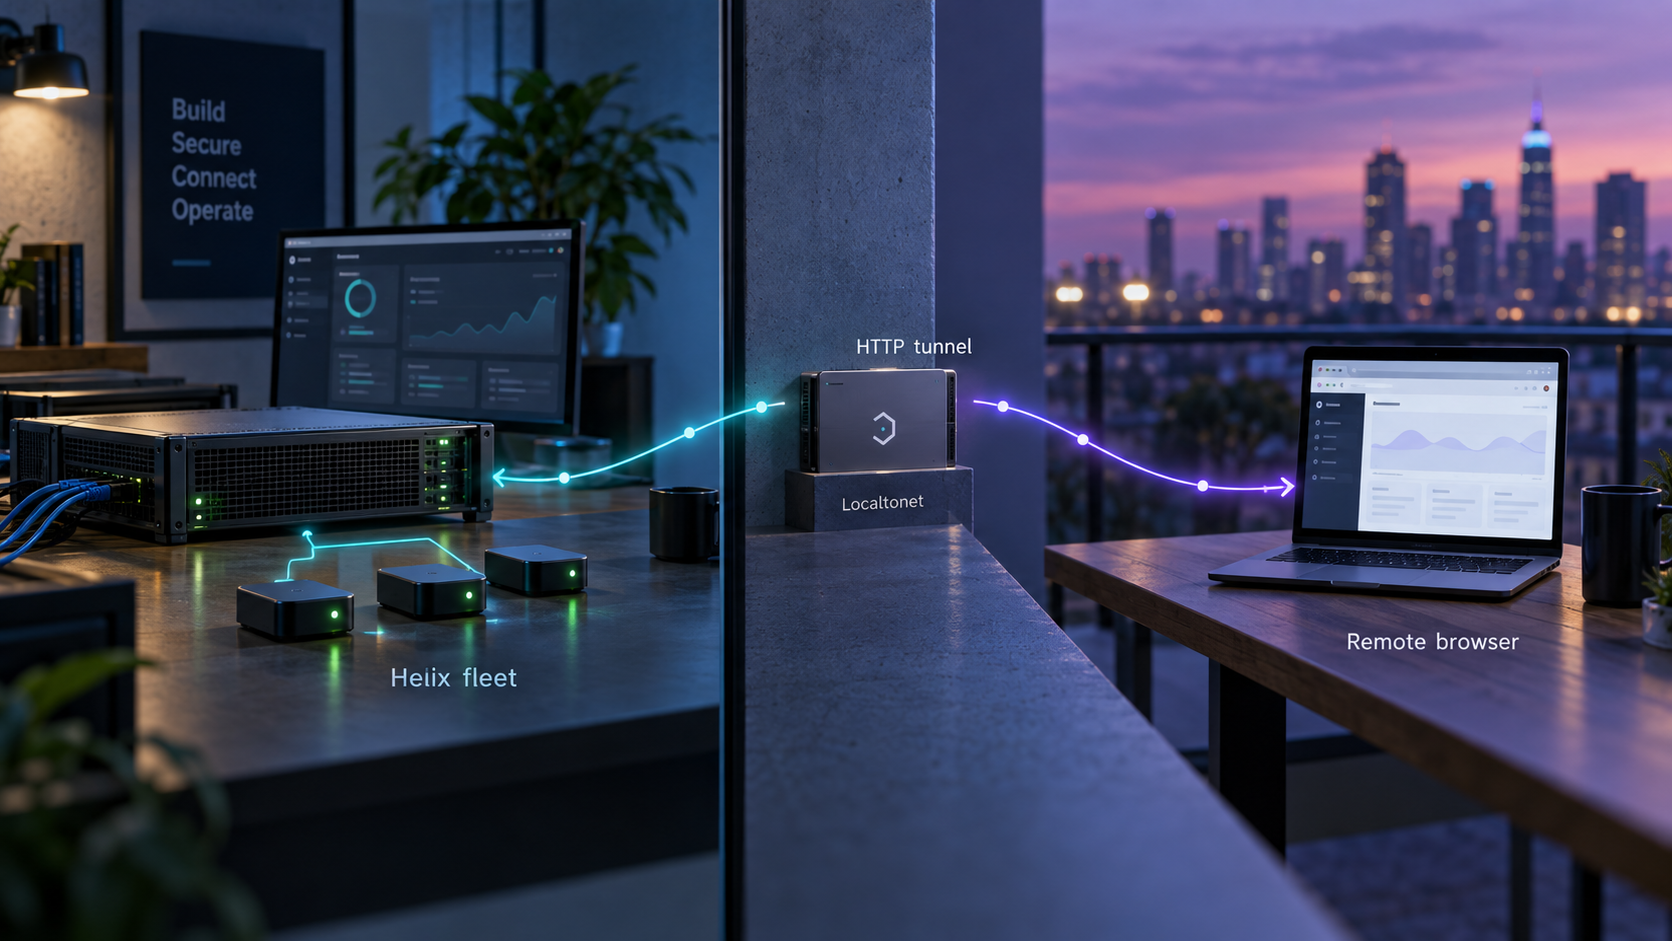
Run an agent control plane on your infrastructure, verify it locally, and publish only the dashboard endpoint you intend to share
Helix provides a browser-based control plane for organizing coding agents, reviewing spec-driven work, and observing isolated agent desktops. In this guide, we install the documented single-server deployment, connect it to an inference option, verify the dashboard at http://localhost:8080, and cover the first operational checks that matter. After the local installation works, we configure a Localtonet HTTP tunnel as a separate step so authorized remote users can reach the dashboard without inbound router port forwarding, firewall changes, VPN setup, or a public IP address.
📋 What's in this guide
What a self-hosted Helix agent fleet includes
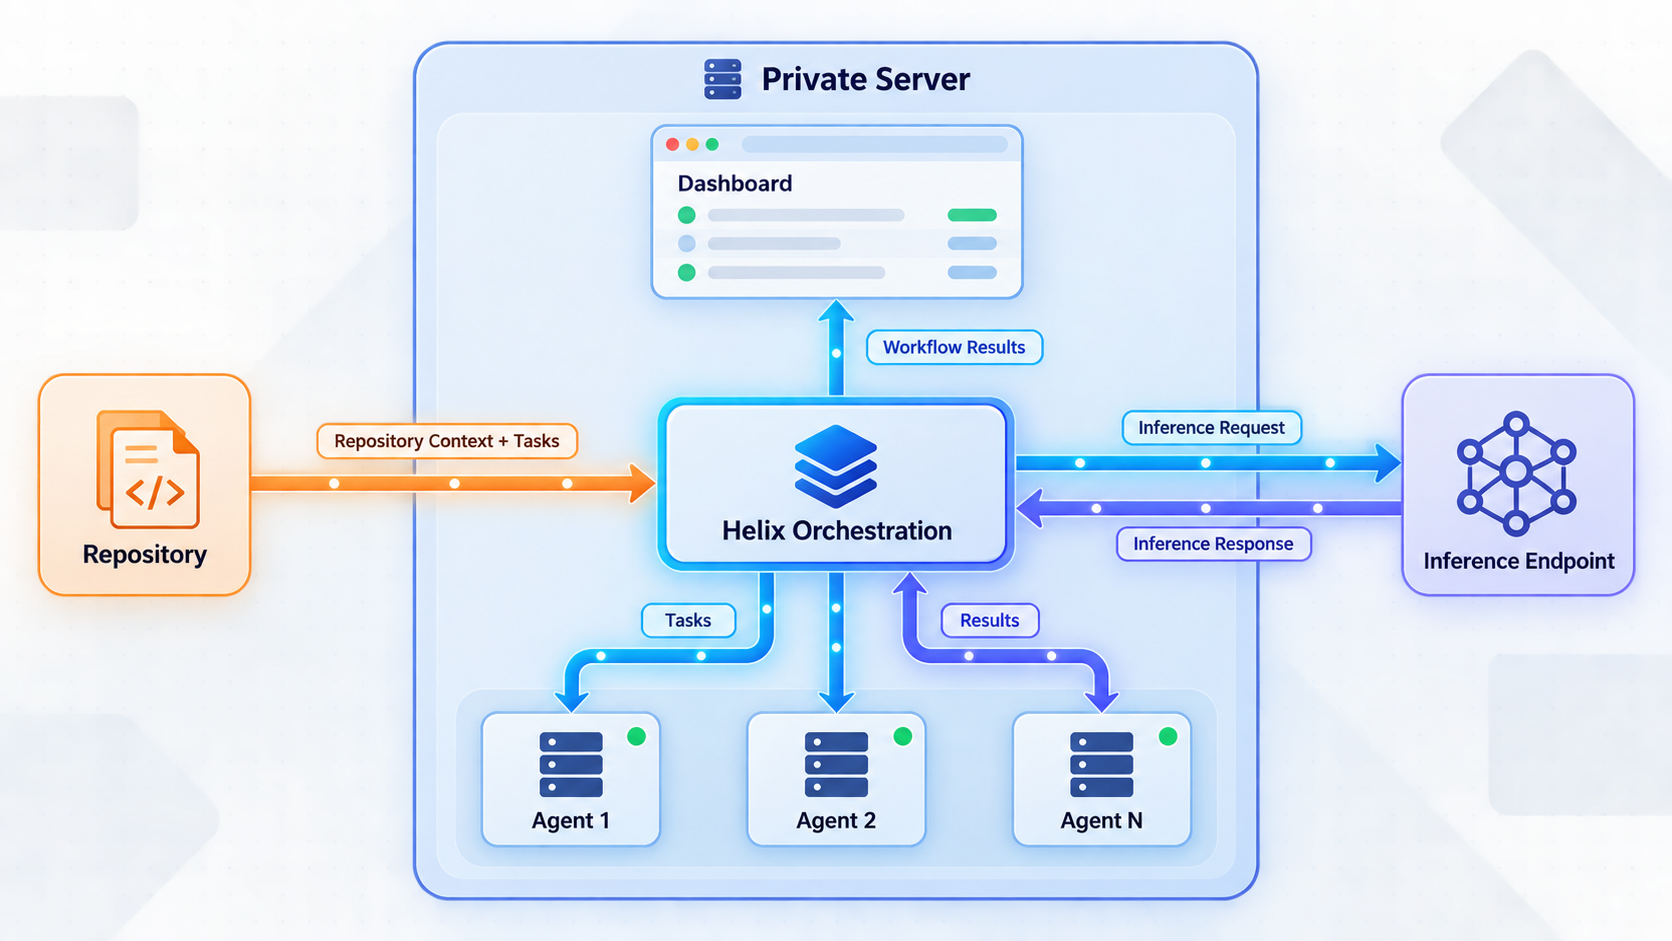
Helix is an AI agent orchestration platform built around a shared control plane. Instead of requiring each developer to run one agent in a terminal on a personal laptop, Helix runs agent workloads on shared infrastructure. A team can create projects, arrange work on a Kanban board, dispatch multiple tasks, inspect agent activity, review plans, and retain a human pull-request review gate.
For code-agent workflows, each thread receives an isolated environment with a Linux desktop, terminal, browser, filesystem, and its own branch. Agents can work in parallel, while users observe their progress from the web dashboard. Helix supports several agent harnesses, including Claude Code, OpenAI Codex, Gemini CLI, Qwen Code, Goose, Zed Agent, and software that speaks the Agent Client Protocol. Actual availability and provider requirements can change between Helix releases, so confirm the current compatibility matrix before standardizing a production fleet.
The platform also describes agent apps and persistent organizational workers. Those workloads share the same general foundation of isolated execution, fleet-level visibility, and operator-controlled infrastructure, but they are not identical deployment patterns. This tutorial concentrates on the browser control plane and coding-agent fleet rather than attempting to configure every Helix workload type.
Self-hosting changes the operational boundary, but it does not remove operational responsibility. The machine running Helix may process source code, repository credentials, provider credentials, prompts, model responses, and live desktop sessions. The host, dashboard authentication, connected repositories, inference providers, backups, updates, and public access policy all need deliberate administration.
The Helix source is publicly available, but the project license includes restrictions affecting some commercial and competitive uses. Do not assume that publicly visible source automatically means unrestricted conventional open-source licensing. Review the current LICENSE.md in the exact Helix release you plan to deploy and obtain any required license before production use.
Prerequisites and deployment decisions
The current Helix self-hosting material directs operators to Linux servers or Kubernetes. The project provides a quick-start installer for a single server and Helm charts for Kubernetes installations. This guide uses the single-server installer because it is the shortest documented path to a working local dashboard. Production teams that already operate Kubernetes should evaluate the official control-plane and sandbox charts instead of translating the single-server procedure into an unofficial cluster deployment.
Documented control-plane baseline
Helix's documented quick-start requirements for the control plane include Docker, at least 4 CPUs, 8 GB of RAM, and 50 GB or more of free disk space. The control plane includes the API, web interface, and PostgreSQL data layer. These numbers are an installation baseline, not a promise that every agent fleet will run comfortably at that size. Concurrent desktops, repository size, container images, model runtimes, logs, and task volume can increase CPU, memory, and storage requirements considerably.
You also need an inference path. Helix documentation describes three broad choices: private GPU-backed Helix runners, a locally reachable runtime such as Ollama, or a compatible external inference provider. A GPU is therefore not necessarily required merely to bring up the control plane, but local model execution and GPU-accelerated agent workloads have separate hardware requirements.
Private runner requirements depend heavily on the model. The documented examples range from 8 GB of GPU memory for some smaller models to substantially larger capacities for larger models and fine-tuning. Runner images and model files can also consume significant disk space. Capacity planning must be based on the exact model, context size, concurrency, desktop workload, and release you will operate rather than on a generic minimum.
| Deployment path | Best fit | Important considerations |
|---|---|---|
| Single Linux server installer | Evaluation, labs, and operators starting with one Docker host | Fastest self-hosted path in this guide. The host must have sufficient CPU, memory, storage, and access to the selected inference service. |
| Kubernetes with Helm | Teams already operating Kubernetes or planning a production-scale deployment | Helix publishes separate control-plane and sandbox chart guidance. Use the current official chart values rather than adapting commands from the single-server installer. |
| Air-gapped or enterprise deployment | Organizations with strict on-premises or disconnected-environment requirements | Requires additional planning for images, packages, licensing, inference, authentication, updates, and all dependencies that normally require network access. |
Checklist before running the installer
- A supported Linux server for the single-server path used here.
- Administrative access because the documented installation is run with
sudo. - Docker installed, running, and able to create containers and persistent storage.
- At least 4 CPUs, 8 GB RAM, and 50 GB of free disk for the documented control-plane baseline.
- More capacity if you plan to run multiple desktops, local models, large repositories, or GPU runners.
- A current Helix license or license key when required by the selected release and deployment.
- One supported inference option, with the endpoint and credentials prepared if an external provider will be used.
- A plan for repository access and provider credentials that avoids placing secrets in source repositories.
- Local access to port
8080, which is the documented default dashboard endpoint. - A backup and recovery plan before treating the installation as a production service.
The documented installer runs with administrative privileges and can make system changes. Download it as a file, inspect the script, verify that it came from the expected Helix domain, and understand the prompts before using sudo. Avoid piping a remote script directly into an elevated shell when you can download and review it first.
Install Helix on a single server
Run these steps directly on the Linux host that will operate Helix. Commands shown here follow the documented quick-start sequence: download the installer, mark it executable, run it with administrative privileges, and follow its interactive prompts. The installer can change over time, so read every prompt instead of assuming that a previous release behaves identically.
Download the official installer
Change to a directory where you can inspect and run the installer, then download install.sh from the documented Helix installer domain.
Make the downloaded file executable
Apply executable permission to the downloaded script. Open and review the script before proceeding, especially because the next step uses administrative privileges.
Run the installer with sudo
Start the installer using the documented command. The installer prompts before making changes, so read the detected configuration and each requested choice carefully.
Complete the interactive configuration
Follow the prompts for the release you downloaded. Do not copy unknown license values, provider credentials, hostnames, or model settings from another deployment. Use values issued for your environment and record the resulting configuration securely.
curl -sL -O https://get.helixml.tech/install.sh
chmod +x install.sh
sudo ./install.sh
The installer also documents a help option. Use it when you need to inspect supported installer switches before changing the default workflow:
./install.sh --helpWe intentionally do not reproduce additional installer flags here. Supported switches and defaults can vary by Helix version, and inventing or carrying forward obsolete options can produce an unsupported deployment. Treat the output of the downloaded installer and the documentation matching your selected release as authoritative.
What a successful installation should produce
At the end of installation, Docker should be running the components required by the selected Helix configuration, and the browser dashboard should be available at the documented default endpoint:
http://localhost:8080
If you are working directly on a server without a desktop browser, localhost refers to that server, not to your laptop. Perform the first HTTP check on the server itself. Keep remote publication separate until the local endpoint responds reliably.
The Helix quick start requires Docker, but Docker installation commands vary by Linux distribution and Docker release. Install Docker from the appropriate vendor or operating-system instructions, start it, and verify that the current user can perform the required administrative workflow before running the Helix installer.
Configure inference, repositories, and the first fleet workflow
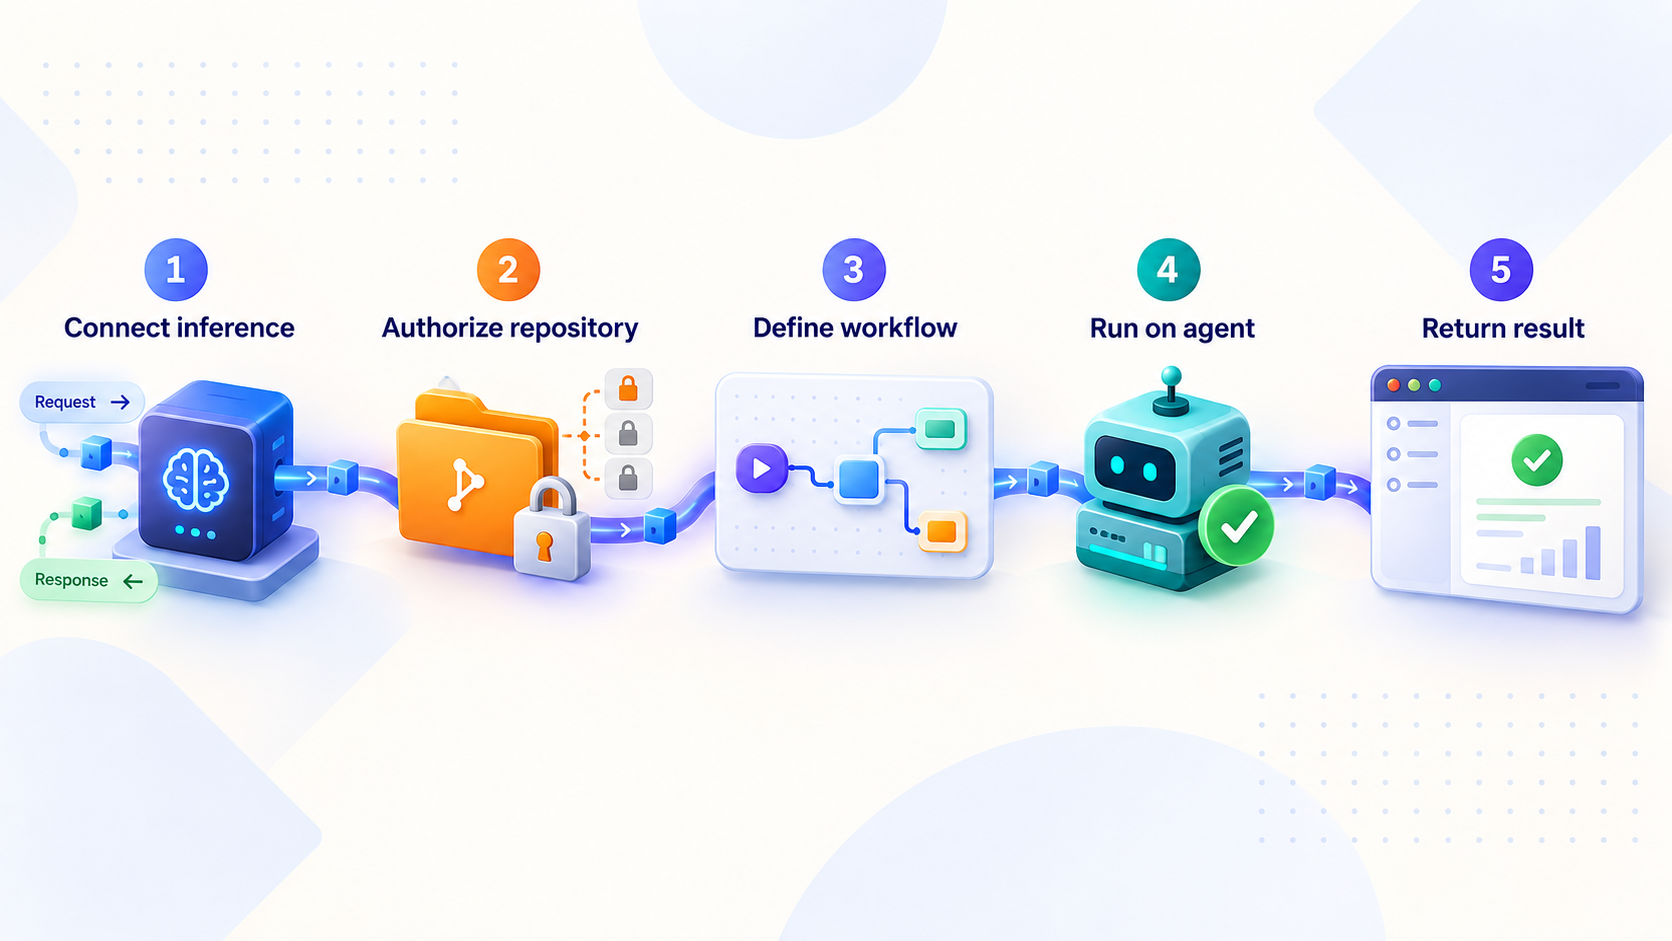
A reachable dashboard is only the control-plane check. An operational fleet also needs an inference provider, an agent harness, repository connectivity, and an access model for the people who will use it. Exact screens and configuration fields can change between Helix releases, so this section explains the required decisions without inventing version-specific labels.
Choose an inference strategy
Decide where model inference will occur before inviting a team. An external provider can reduce local GPU requirements, but prompts and selected context are sent to that provider according to its service terms. A local runtime or private Helix runner can keep inference on infrastructure you control, but you must supply enough GPU memory, system memory, disk space, cooling, drivers, and operational capacity.
Helix supports multiple provider scopes in current product material, including user, organization, and installation-level configuration. Use the narrowest practical scope. A personal provider credential should not automatically become available to every project or user. Likewise, avoid storing provider API keys in a repository, task description, container image, shell history, or copied configuration example.
Connect source control carefully
A coding agent needs repository access to read code, create branches, implement changes, and open pull requests. Grant only the repository permissions required by the workflow. Prefer dedicated credentials or applications that can be revoked independently, and do not provide broad organization-wide access merely for convenience.
The pull request should remain the review boundary. An agent-generated branch is not equivalent to approved code. Require tests, policy checks, secret scanning, and human review before merge. If the repository can trigger deployments, package publication, infrastructure changes, or production automation, review those downstream permissions as part of the agent threat model.
Create a small validation project first
Begin with a disposable or low-risk repository. Create one clearly bounded task whose result can be checked objectively, such as adding a small test or updating non-sensitive documentation. This validates repository cloning, branch creation, inference, sandbox startup, task history, and pull-request creation without placing a critical codebase at risk.
Helix's documented spec flow moves work through backlog, planning, spec review, implementation, pull request, and merge. During the first run, inspect the proposed plan before approval. Watch the live desktop or task activity, verify the resulting diff, and confirm that the pull request contains only the intended change.
Repositories, issue text, websites, documents, tool output, and prompts can contain instructions that influence an agent. Limit available credentials and network access, review tool calls and diffs, protect deployment secrets, and keep a human approval gate around consequential actions.
Verify the dashboard and agent workflow locally
Verification should proceed in layers. First confirm that the HTTP control plane responds. Then confirm that the browser interface loads. Finally test the dependencies required for real agent work. This separation makes failures easier to diagnose and prevents tunnel troubleshooting from masking a broken local installation.
Check the local HTTP endpoint
On the Helix host, request the documented local address:
curl -I http://localhost:8080An HTTP response confirms that something is listening and responding on that endpoint. The exact status code can depend on the release, route, and authentication behavior, so do not treat one universal status code as the only valid result. A connection refusal or timeout indicates that the local service is not ready, is not bound to that endpoint, or cannot be reached from the current context.
Next, open http://localhost:8080 in a browser running on the Helix host. If the server is headless, perform an approved private connectivity test from an administrative network before adding public access. Do not temporarily expose the port directly through a router just to complete this test.
Validate the control plane
- Confirm that the main interface loads without repeated browser errors.
- Complete the current release's initial account or authentication flow.
- Confirm that unauthorized users cannot enter the dashboard.
- Verify that the selected inference provider is reachable without revealing its credentials.
- Create a test project connected only to a low-risk repository.
- Start a small planning task and verify that the plan can be reviewed.
- Confirm that a sandbox starts and that its desktop or task activity is visible.
- Inspect the generated branch and pull request before merging anything.
Record a known-good baseline
Before changing networking, record the installed Helix version, host resources, inference method, expected local URL, authentication behavior, and a timestamped result from the test project. Do not include secrets in this record. This baseline gives you a clear comparison if remote behavior differs from local behavior.
| Verification layer | What to test | What failure usually narrows down |
|---|---|---|
| Local HTTP | Request http://localhost:8080 from the Helix host |
Service startup, port binding, Docker health, or local host configuration |
| Browser dashboard | Load the interface and complete authentication | Frontend loading, API reachability, browser policy, or application configuration |
| Inference | Run a small, controlled request through the configured provider | Provider endpoint, credentials, model availability, capacity, or network access |
| Agent sandbox | Start one low-risk task and observe its environment | Sandbox images, compute resources, runner configuration, storage, or permissions |
| Repository workflow | Create a branch and review a test pull request | Source-control credentials, repository permissions, branch rules, or integration configuration |
Operate the fleet safely
An AI agent fleet is a persistent service rather than a one-time demo. Routine operation includes capacity monitoring, credential rotation, repository permission review, backups, release management, and cleanup of unused tasks and environments. Establish these practices before the dashboard becomes a shared production dependency.
Monitor resource pressure
Watch host CPU, memory, disk capacity, GPU memory where applicable, container health, and the number of concurrent sandboxes. A control plane that loads successfully with no active tasks may become unstable when several desktop environments, builds, browsers, and model workloads start at once. Set concurrency according to measured capacity rather than the number of tasks users would ideally like to launch.
Protect persistent data
Identify the persistent Docker volumes and configuration created by your exact Helix release before designing backups. The supplied evidence does not establish one universal backup command or volume layout, so this guide does not guess one. Test both backup and restoration using the official operational guidance for the deployed release. A backup that has never been restored is not a verified recovery plan.
Plan upgrades as controlled changes
Check release notes before upgrading. Record the current version and configuration, protect persistent data, schedule a maintenance window, and test the new release in a non-production environment when possible. Do not assume that rerunning an installer, pulling an image, or replacing a chart is always a complete upgrade procedure. Follow the instructions attached to the target release.
Review access regularly
Remove users who no longer need the fleet, rotate provider and source-control credentials, inspect organization roles, and review which projects can access which secrets. Stop or delete remote tunnels that are no longer needed. Localtonet tunnels are available only while the selected client device is connected and the tunnel is running, but application-level authorization remains necessary whenever the dashboard is exposed.
Expose the verified Helix dashboard with Localtonet
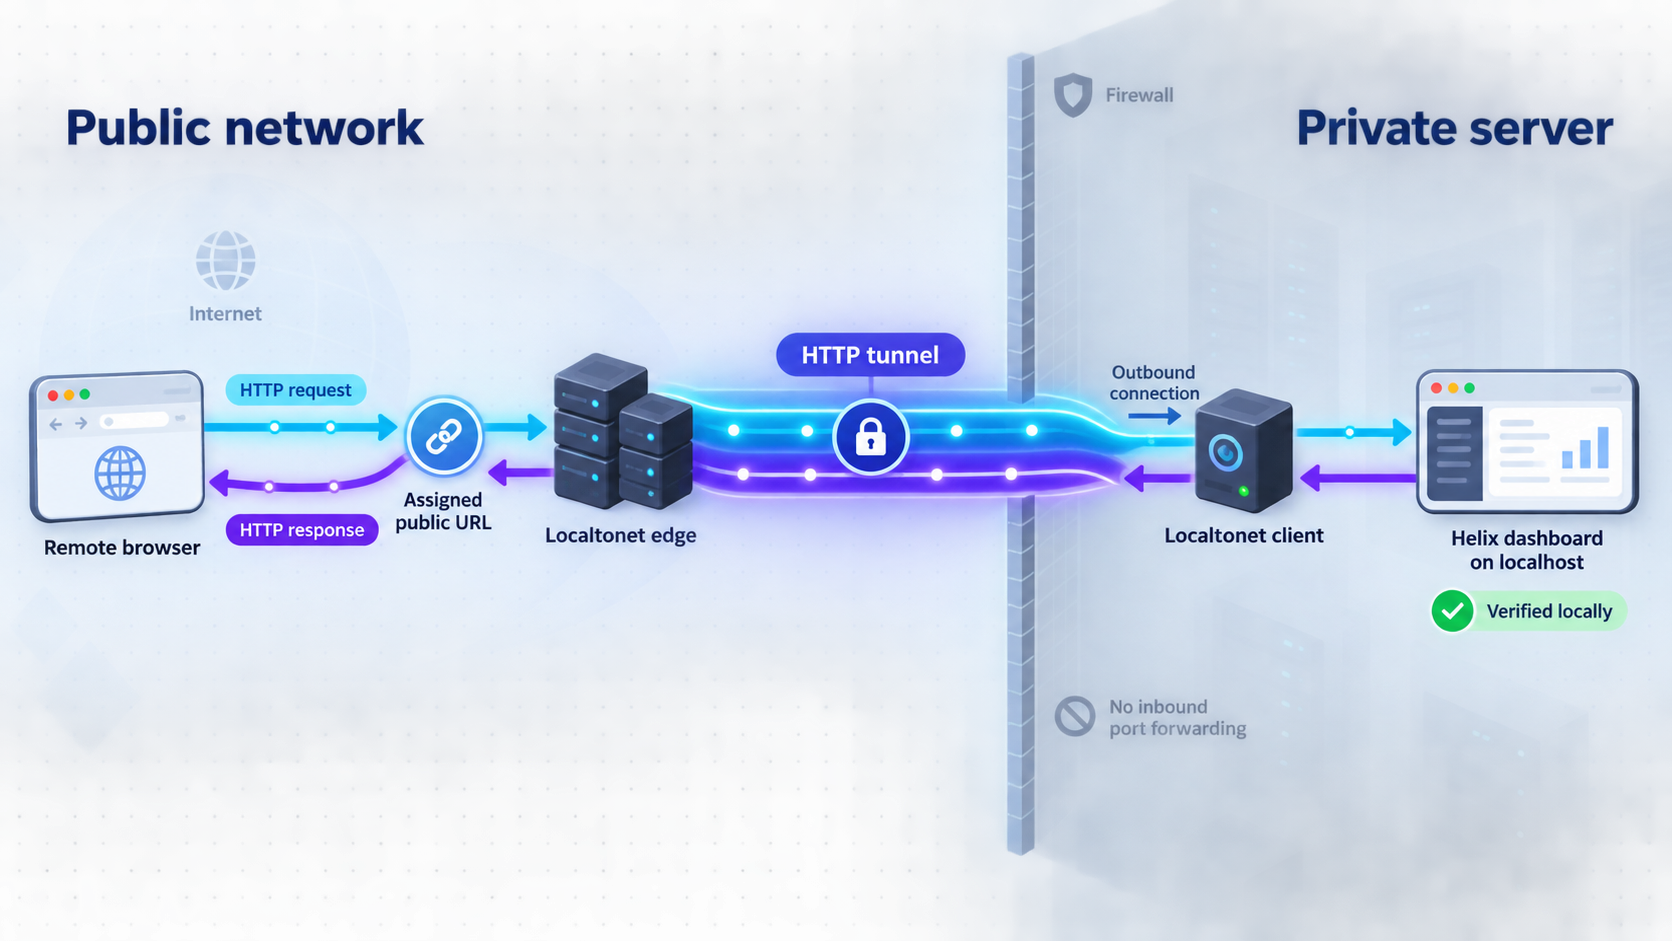
Add remote access only after http://localhost:8080 works on the Helix host. With Localtonet, our client establishes an outbound connection to a relay server. The resulting HTTP tunnel provides a public HTTPS address without requiring inbound router port forwarding, firewall changes, VPN setup, or a public IP address.
The simplest topology is to run our client on the same machine as Helix and point the HTTP tunnel to 127.0.0.1 on port 8080. If the Localtonet client runs on a different device, the target can instead be an IP address and port reachable from that client device. In that case, verify private network routing and host firewall policy before creating the tunnel.
Install and run the Localtonet client
Install our current client on the Helix host or on another trusted device that can reach the Helix dashboard. Use the current installation instructions for that operating system rather than an unverified command copied from an older article.
Authenticate and select the client device
Use the device-specific authentication token issued through your Localtonet account and select the device that will run the tunnel. Never publish, share, or place that token in a command example, repository, screenshot, or support message.
Select an available relay server
Choose from the relay servers or regions currently available in your dashboard. Availability can vary, so this guide does not hardcode a server code or claim that every location is included with every plan.
Create an HTTP tunnel to Helix
Create an HTTP tunnel and set the local target to 127.0.0.1 with port 8080 when our client runs on the Helix host. Select the appropriate process type, such as a generated subdomain, supported custom subdomain, or custom domain. Check current DNS requirements before using a custom domain.
Start the tunnel
Creating a tunnel does not make it active. Use the Start button and confirm that both the selected client device and tunnel report a connected state.
Test the assigned public address
Open the assigned public HTTPS address from a separate network and complete the normal Helix authentication flow. Test the dashboard, one non-sensitive task, and any live desktop behavior your users require. Stop or delete the tunnel when remote access is no longer needed.
For the current dashboard workflow, see our Localtonet HTTP tunnel documentation. The public address depends on the process type and current configuration. Do not publish a placeholder URL or assume a particular relay region, hostname, or domain record.
A public address can be discovered or shared beyond its intended audience. Confirm Helix authentication before starting the tunnel, use least-privilege user and repository permissions, keep secrets out of tasks, and review access regularly. Do not rely on an obscure URL as the only protection for source code, credentials, agent desktops, or administrative controls.
The Helix public address is available only while the selected Localtonet client is connected and the tunnel is running. If the client stops, the host loses connectivity, or the tunnel is stopped, remote users cannot reach the dashboard through that tunnel even if Helix itself is still healthy locally.
Troubleshoot installation and remote-access problems
The installer does not start
Confirm that the download completed, that the file is the expected Helix installer, and that executable permission was applied. If sudo is unavailable or denied, use the administrative process approved for that server rather than weakening host security. Run ./install.sh --help to inspect the options supported by that downloaded version.
Docker is unavailable or unhealthy
Verify that Docker is installed for the server's Linux distribution, that its service is running, and that the host has enough free disk space. Check for a failed image download, storage exhaustion, DNS failure, proxy restrictions, or permission errors. Avoid repeatedly rerunning the Helix installer until the underlying Docker problem is understood.
Nothing responds on localhost:8080
First determine whether the Helix containers completed startup. Inspect the container status and logs using the Docker administration workflow for your environment. Look for configuration, database, license, image, or port-binding errors. Also confirm that another process is not already using port 8080. Do not change the port based on an undocumented guess. If a different endpoint is configured intentionally, use the value established by the matching Helix configuration.
The dashboard loads, but inference fails
Separate control-plane health from provider health. Verify the selected model exists, the provider endpoint is reachable from the Helix host, credentials are valid, and the account or local runtime has capacity. Check whether outbound network policy, DNS, certificate trust, provider limits, or GPU exhaustion is blocking the request. Never paste full provider credentials into logs or public support conversations.
A sandbox or live desktop does not start
Check available CPU, memory, disk, GPU resources, required images, and runner connectivity. A working dashboard does not prove that sandbox infrastructure is healthy. Reduce the test to one task, use a small low-risk repository, and inspect the corresponding service logs. If the release requires additional sandbox configuration, follow the documentation matching that release instead of adding unverified container privileges.
The Localtonet tunnel starts, but the public page fails
Return to the client device and request the exact configured local target from that device. When our client runs on the Helix host, verify http://127.0.0.1:8080. When it runs elsewhere, remember that 127.0.0.1 refers to the client device itself, not the Helix server. Use the Helix server's reachable private address only when network policy permits it.
Then confirm that the selected Localtonet device is connected, the HTTP tunnel is running, and the target IP and port are correct. Tunnel creation alone is not enough. If the public dashboard HTML loads but a particular interactive feature fails, compare the browser console and network behavior between local and remote sessions. Helix releases may have origin, callback, streaming, or application URL requirements that need release-specific configuration. The supplied evidence does not establish universal values for those settings, so do not guess them.
Remote users see an authentication or callback problem
If Helix is connected to an external identity provider, its redirect and callback configuration may need to recognize the public hostname. Exact variable names and identity-provider steps are version-specific and are not established by the evidence for this guide. Consult the authentication documentation for the deployed Helix release and add only the assigned hostname you actually use.
The public URL suddenly becomes unavailable
Check the two services independently. Request Helix locally at http://localhost:8080, then check whether the Localtonet client is connected and the tunnel is running. If local access works but public access does not, focus on the client and tunnel lifecycle. If local access also fails, troubleshoot Helix or the host before changing the tunnel.
Frequently asked questions
Does self-hosting Helix require a GPU?
Not necessarily for the control plane. Helix can use an external compatible inference provider or a reachable local runtime. Private model runners and GPU-accelerated workloads have separate hardware requirements that depend on the selected model, workload, and concurrency.
What is the default local Helix dashboard address?
The documented default endpoint is http://localhost:8080. Test it on the Helix host before configuring remote access. If your deployment intentionally changes the endpoint, use the value established by that configuration.
Should I use the installer or Kubernetes Helm charts?
The installer is the straightforward documented path for a single server and is appropriate for an initial self-hosted evaluation. Teams already operating Kubernetes or planning a larger production deployment should evaluate the official Helix control-plane and sandbox Helm charts.
Is Helix conventional open-source software?
Its source is publicly available, but its license includes restrictions relevant to some commercial and competitive uses. Review the current license in the exact release you intend to deploy rather than assuming unrestricted open-source rights.
Does a Localtonet tunnel require router port forwarding?
No. Our client creates an outbound connection to a Localtonet relay server, so this workflow does not require inbound router port forwarding, firewall changes, VPN setup, or a public IP address.
Should the Localtonet client run on the same server as Helix?
That is the simplest arrangement because the HTTP target can be 127.0.0.1:8080. The client may also run on another trusted device that can reach the Helix server, but then the tunnel must target a reachable private IP address rather than that device's loopback address.
Does creating a tunnel immediately publish the dashboard?
No. Creating a Localtonet tunnel does not mean it is running. You must start it, and the selected client device must remain connected. You can later stop or delete the tunnel when remote access is no longer required.
Is the public tunnel URL enough to secure Helix?
No. The tunnel provides connectivity, not a replacement for application authorization. Configure Helix authentication, restrict user and repository permissions, protect provider credentials, retain human review gates, and stop the tunnel when it is not needed.
Connect your verified Helix dashboard with Localtonet
Once Helix is healthy at http://localhost:8080 and its authentication is ready, create an HTTP tunnel to give authorized remote users a stable browser entry point without opening an inbound router port.


