

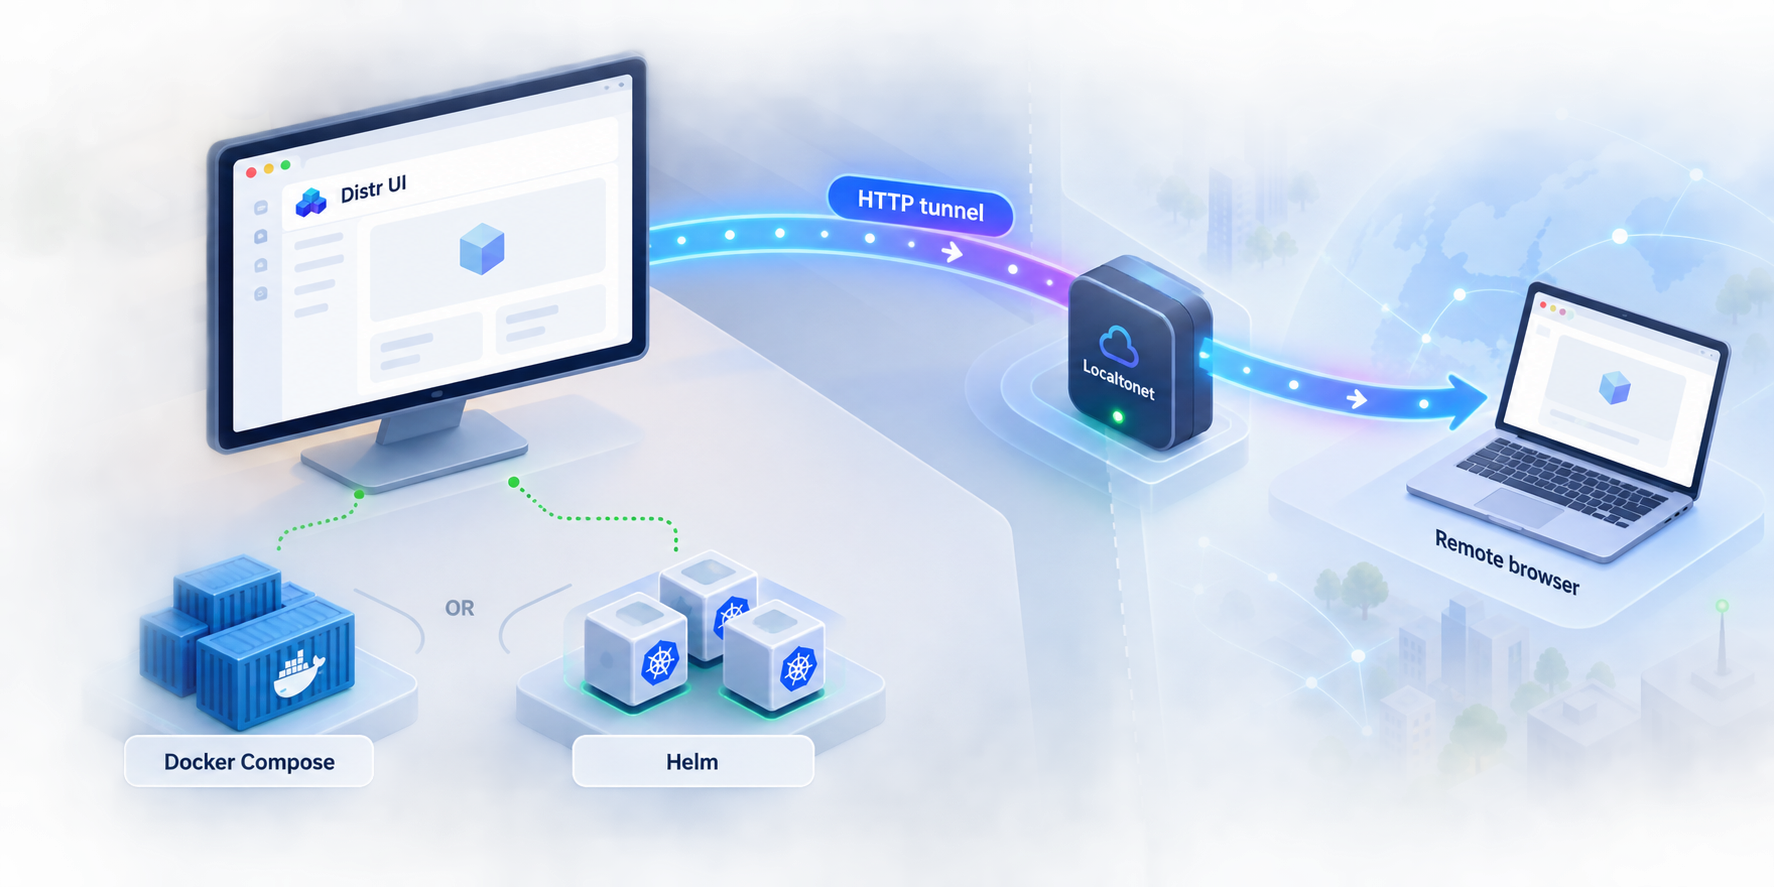
Build a working Distr deployment first, verify it locally, and then make its web interface available through a controlled HTTP tunnel
Distr is an open-source software distribution platform for self-managed, BYOC, air-gapped, and edge deployment scenarios. This guide explains how to install the self-hosted platform using its official Docker Compose quickstart or OCI-hosted Helm chart, open the documented registration page, and identify common startup problems. After Distr works locally, we show how to publish its web interface with a Localtonet HTTP tunnel without configuring inbound router port forwarding or requiring a public IP address. Production hardening and access control remain separate responsibilities, so we also explain what must be reviewed before exposing the service beyond a trusted test environment.
📋 What's in this guide
What Distr does and what this installation creates
Distr is an open-source control plane for distributing software into environments that a software vendor does not directly operate. Those environments can include customer-managed infrastructure, bring-your-own-cloud deployments, disconnected or air-gapped systems, and edge installations. The platform is designed to fill the operational gap that appears when a vendor cannot rely on its own internal deployment pipelines, container registry, cloud account, or direct infrastructure access.
Its documented capabilities include distributing Docker Compose files, Helm charts, Zarf packages, container images, and other OCI artifacts. Distr also supports deployment agents, application and artifact entitlements, signed license keys, remote diagnostics, customer-facing portals, and visibility into deployment status and versions. The Community Edition is open source under the Apache-2.0 license.
The self-hosted architecture is more than a static website. The project describes the core installation as a Distr application together with PostgreSQL, object storage, and Loki log storage. The Docker Compose quickstart packages an example deployment, while the documented Helm command enables PostgreSQL and RustFS as chart-managed components for a quick test installation. This matters because successful installation depends on all required services starting correctly, not only on the web container accepting a connection.
This tutorial focuses on installing the Distr control plane itself. It does not attempt to configure a complete commercial distribution workflow, enroll a deployment agent, publish an application, or define customer entitlements. Those operations come after the platform is running and an initial account has been registered.
Installing Distr creates the distribution control plane. Applications managed by Distr are separate workloads deployed through its agents and artifact workflows. A Localtonet tunnel in this guide publishes the Distr web interface; it does not automatically expose applications managed by Distr.
Choose Docker Compose or Kubernetes with Helm
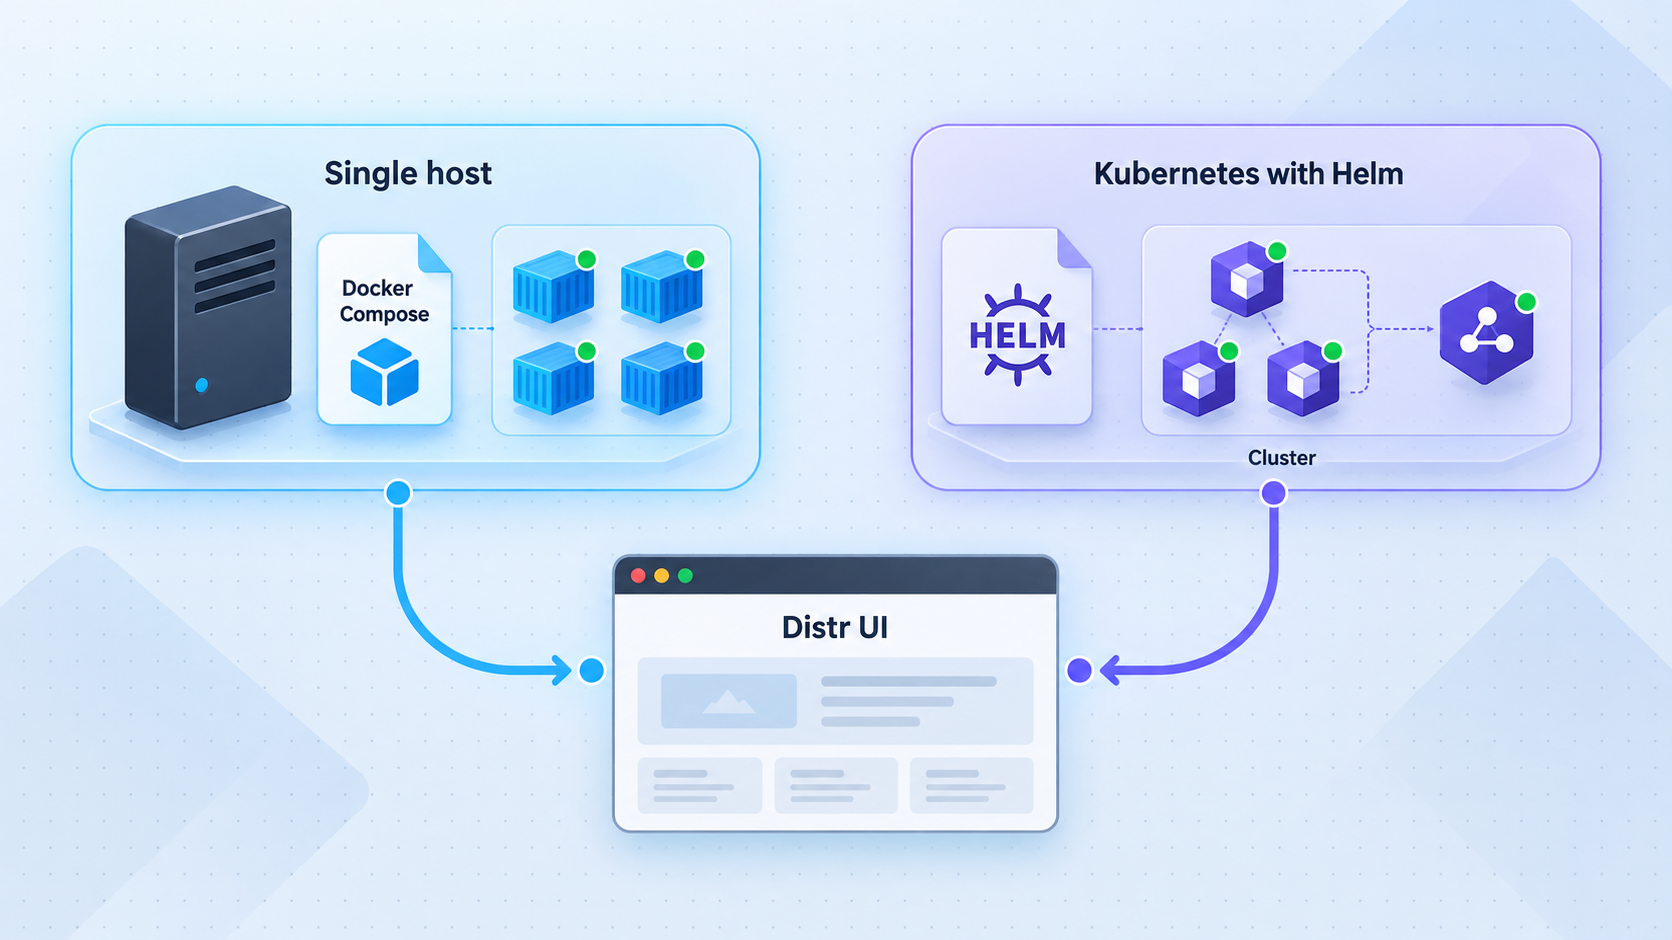
Distr documents two direct self-hosting paths. The Docker Compose quickstart is the simpler route for a first evaluation on a single Docker host. The Kubernetes route installs an OCI-hosted Helm chart into a cluster and is a better starting point when Kubernetes is already the operating environment.
| Installation path | Best fit | What the documented quickstart does | Production consideration |
|---|---|---|---|
| Docker Compose | Local evaluation, proof of concept, or a Docker host | Downloads the release quickstart archive, extracts its files, and starts the Compose project in detached mode | The supplied environment file must be reviewed and changed where necessary before startup |
| Kubernetes with Helm | An existing Kubernetes cluster and Helm-based operations | Installs or upgrades the distr release in the distr namespace and enables PostgreSQL and RustFS |
The project explicitly says to review all chart values and adapt them for production |
| Build from source | Contributors or teams modifying Distr itself | The project recommends using mise and defines dependency versions and build tasks in mise.toml |
This is not required for ordinary self-hosting and is outside the installation scope of this guide |
Use Docker Compose if your immediate goal is to evaluate the interface and understand the platform. Choose Helm if you already have a suitable cluster, know how storage and service exposure work in that cluster, and want Distr to fit an existing Kubernetes operational model.
Do not interpret either quickstart as a complete production architecture. A successful startup proves that the selected package can run in your environment. It does not establish backup policy, high availability, external identity integration, durable storage design, domain configuration, monitoring, or a suitable public access policy.
Prerequisites and decisions to make before installation
Requirements for the Docker Compose route
The documented Docker command assumes a Unix-like shell with mkdir, cd, curl, and tar. The host must also have Docker with the Compose subcommand available, and the account running the command must be permitted to create and manage containers.
You also need enough storage and memory for the application and its supporting services. The supplied project evidence does not state a universal minimum CPU, memory, or disk requirement, so we will not invent one. Capacity depends on the selected configuration, stored artifacts, logs, number of users, and expected deployment activity. Check current Distr documentation and test with representative workloads before choosing production resources.
The quickstart archive contains a .env file that the project instructs users to change as necessary. The extracted evidence does not enumerate its variables or prescribe values for a specific environment. Open the actual file from the release you downloaded, read its comments, and compare it with the current self-hosting documentation. Do not copy credentials or secret values from an unrelated tutorial.
Requirements for the Kubernetes route
For Helm installation, you need a working Kubernetes cluster, a Helm client that can access that cluster, and authorization to create a namespace and the resources defined by the chart. Your environment must also be able to retrieve the OCI-hosted chart and required workload images from their registries.
Persistent storage, ingress, service exposure, resource policies, backup integration, and secret management vary between Kubernetes platforms. The quick testing command enables PostgreSQL and RustFS, but it does not eliminate the need to understand how their data is stored in your cluster. Before using the deployment for important data, inspect the current chart values and map them to your storage classes, security policies, and recovery requirements.
Requirements for Localtonet remote access
Install the Localtonet client on the same machine as Distr or on another device that can reach Distr's local HTTP endpoint. The client establishes an outbound connection to our relay, so you do not need to create an inbound router port-forwarding rule, change the firewall to admit unsolicited internet traffic, configure a VPN, or obtain a public IP address.
A Localtonet device authentication token identifies the client device and must be kept private. You will also select an available relay server or region from the current dashboard. Available values can vary, so this guide does not hardcode a server code or region.
Distr documents its first-account page at http://localhost:8080/register. Treat an initial registration page as security-sensitive. Verify the installation locally and decide who is allowed to create the first account before making the interface reachable from the public internet. The supplied project evidence does not document a universal registration-disable procedure, so consult the configuration for your installed release rather than assuming a setting name.
Install Distr with Docker Compose
The official Docker quickstart creates a directory named distr, enters it, downloads the latest release archive, extracts the archive into the current directory, and then starts the Compose project. The following sequence preserves the documented order.
Create and enter the working directory
Use a dedicated directory so the quickstart configuration, environment file, and Compose definition remain together.
mkdir distr && cd distrDownload and extract the current quickstart
The official command retrieves the deploy-quickstart.tar asset from the latest GitHub release and passes it to tar for extraction.
curl -fsSL https://github.com/distr-sh/distr/releases/latest/download/deploy-quickstart.tar | tar -xReview and change the environment file
Open the extracted .env file and make the changes required for your environment. Review every value related to secrets, storage, hostnames, and service behavior that appears in the actual release file. Exact variable names are intentionally not guessed here because they must match the version you downloaded.
Start the Compose project
From the extracted quickstart directory, start the defined services in detached mode.
docker compose up -dThe download URL intentionally points to the latest release. That is convenient for a new evaluation, but it also means the retrieved version can change over time. For repeatable production deployment, define and test an explicit release-management process rather than assuming that the latest release will always behave identically to a previously validated installation.
Before running a downloaded archive in a sensitive environment, it is reasonable to download it separately and inspect its contents, configuration, and release information. The official one-line command is optimized for convenience, not for documenting your organization's software approval process.
Check the Compose deployment after startup
Detached mode returns control to the shell without proving that every service is healthy. Use Docker's normal Compose inspection and log facilities to confirm that the project services remain running and that no component is repeatedly restarting. The exact service names are defined by the downloaded Compose file and can change between releases, so inspect the file and actual Compose output rather than relying on names copied from an older guide.
If a service fails, read its current logs before changing the configuration. Common categories include an invalid or missing environment value, occupied host ports, inability to pull an image, storage permission failures, or a supporting service that has not become ready. Preserve the first useful error message. Repeatedly restarting without understanding that error can hide the original cause.
The files extracted from the latest release are the authoritative inputs for that installation. If their environment variables or topology differ from an older tutorial, follow the downloaded release and current Distr documentation. Do not add guessed variables merely because a similarly named project uses them.
Install Distr on Kubernetes with Helm
Distr publishes its Helm chart as an OCI artifact through ghcr.io. The documented testing command installs or upgrades a release named distr, waits for the operation, creates the distr namespace if needed, and enables the chart's PostgreSQL and RustFS components.
Confirm cluster access and deployment permissions
Select the intended Kubernetes context and verify that your account is authorized to create the namespace and chart resources. Also confirm that the cluster has a suitable storage implementation and network access for the required images and chart.
Review the chart values for the intended environment
For quick testing, Distr says that values do not need to be modified. For production, review the current reference values.yaml and adapt all relevant settings. The correct choices depend on your cluster, so this guide does not invent storage classes, ingress names, credentials, resource requests, or domain values.
Install the OCI-hosted Helm chart
Run the official command as a single Helm operation:
helm upgrade --install --wait --namespace distr --create-namespace \
  distr oci://ghcr.io/distr-sh/charts/distr \
--set postgresql.enabled=true --set rustfs.enabled=trueConfirm that the release becomes ready
Because the command uses --wait, Helm waits for applicable resources to become ready or reports a failure. If it fails, inspect the release resources and Kubernetes events in the distr namespace before retrying.
The flags enabling PostgreSQL and RustFS are suitable for the documented quick testing setup. They should not be read as a universal recommendation for every production cluster. Production database topology, object storage, backups, credentials, persistence, resource limits, and availability objectives are architecture decisions that require explicit review.
The project evidence identifies the browser endpoint as http://localhost:8080/register, but it does not establish one universal way that every Kubernetes cluster maps the chart service to that workstation address. Cluster service types, ingress controllers, development-cluster integrations, and port-forwarding practices differ. Establish a supported route from your browser or Localtonet client to the Distr HTTP service using the current chart values and your cluster's networking model. Do not assume that installing the chart automatically creates a public endpoint.
Service names, service types, ingress fields, TLS configuration, and chart values can change. Inspect the chart version you are installing. This guide does not provide an unverified ingress manifest or assume a particular cloud load balancer.
Verify the Distr web interface locally
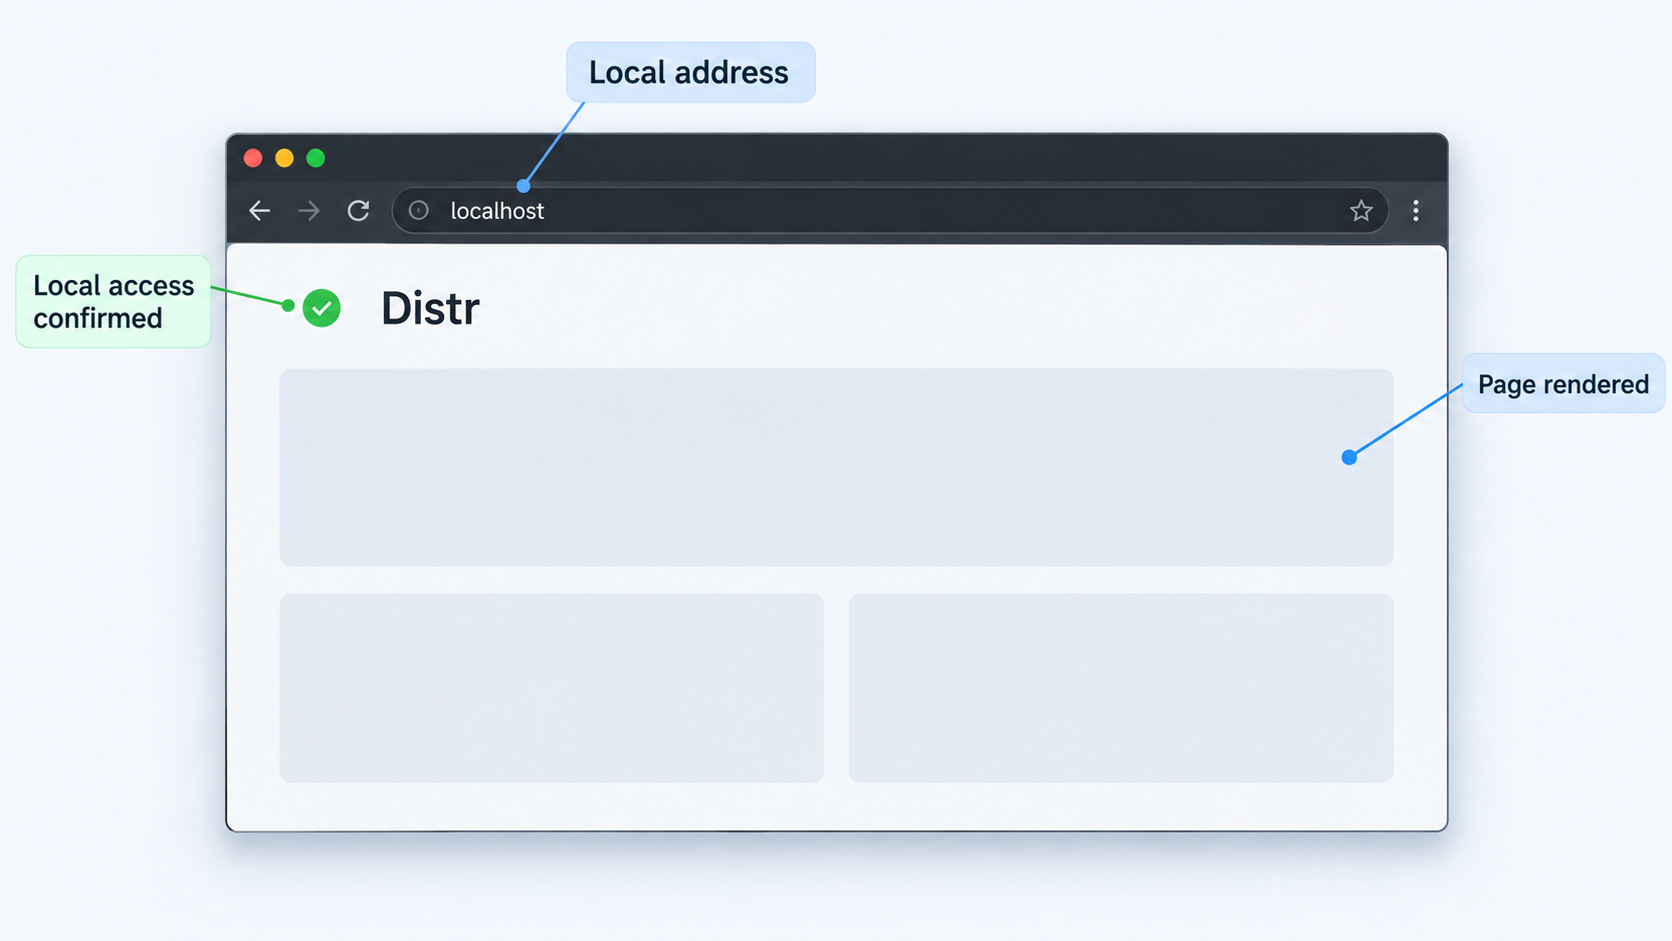
Remote access should be the final connectivity step, not the first diagnostic step. Confirm that Distr works through its local or cluster-reachable address before involving DNS, a relay, or a public URL. This creates a clear boundary between an application problem and a tunnel problem.
For the documented quickstart endpoint, open the following URL in a browser on the host where the endpoint is available:
http://localhost:8080/register
You should reach the page for registering the first account. If the browser cannot connect, do not create a Localtonet tunnel yet. Return to the container or Kubernetes layer and determine whether the application is running, whether port 8080 is reachable in your selected deployment model, and whether another process is already using that host port.
An optional HTTP header check can help distinguish a network failure from a browser-specific issue:
curl -I http://localhost:8080/registerThe exact successful HTTP status can depend on application routing and redirects, so do not require one guessed status code. A returned HTTP response proves that something is listening and responding. Confirm in a browser that the content is actually the expected Distr interface rather than another service bound to the same port.
Complete an application-level check
A visible registration page is stronger evidence than an open TCP port, but it is still only the first application check. Follow the current Distr onboarding flow to create the intended initial account, sign in, and confirm that the interface loads without obvious backend errors. Use credentials created specifically for this deployment and store them according to your normal secret-management policy.
Avoid using public exposure as a workaround for failed local access. Localtonet forwards requests to the local target you configure. If that target is unavailable, misconfigured, or serving the wrong application, the tunnel cannot repair the underlying service.
Publish the working Distr UI with a Localtonet HTTP tunnel
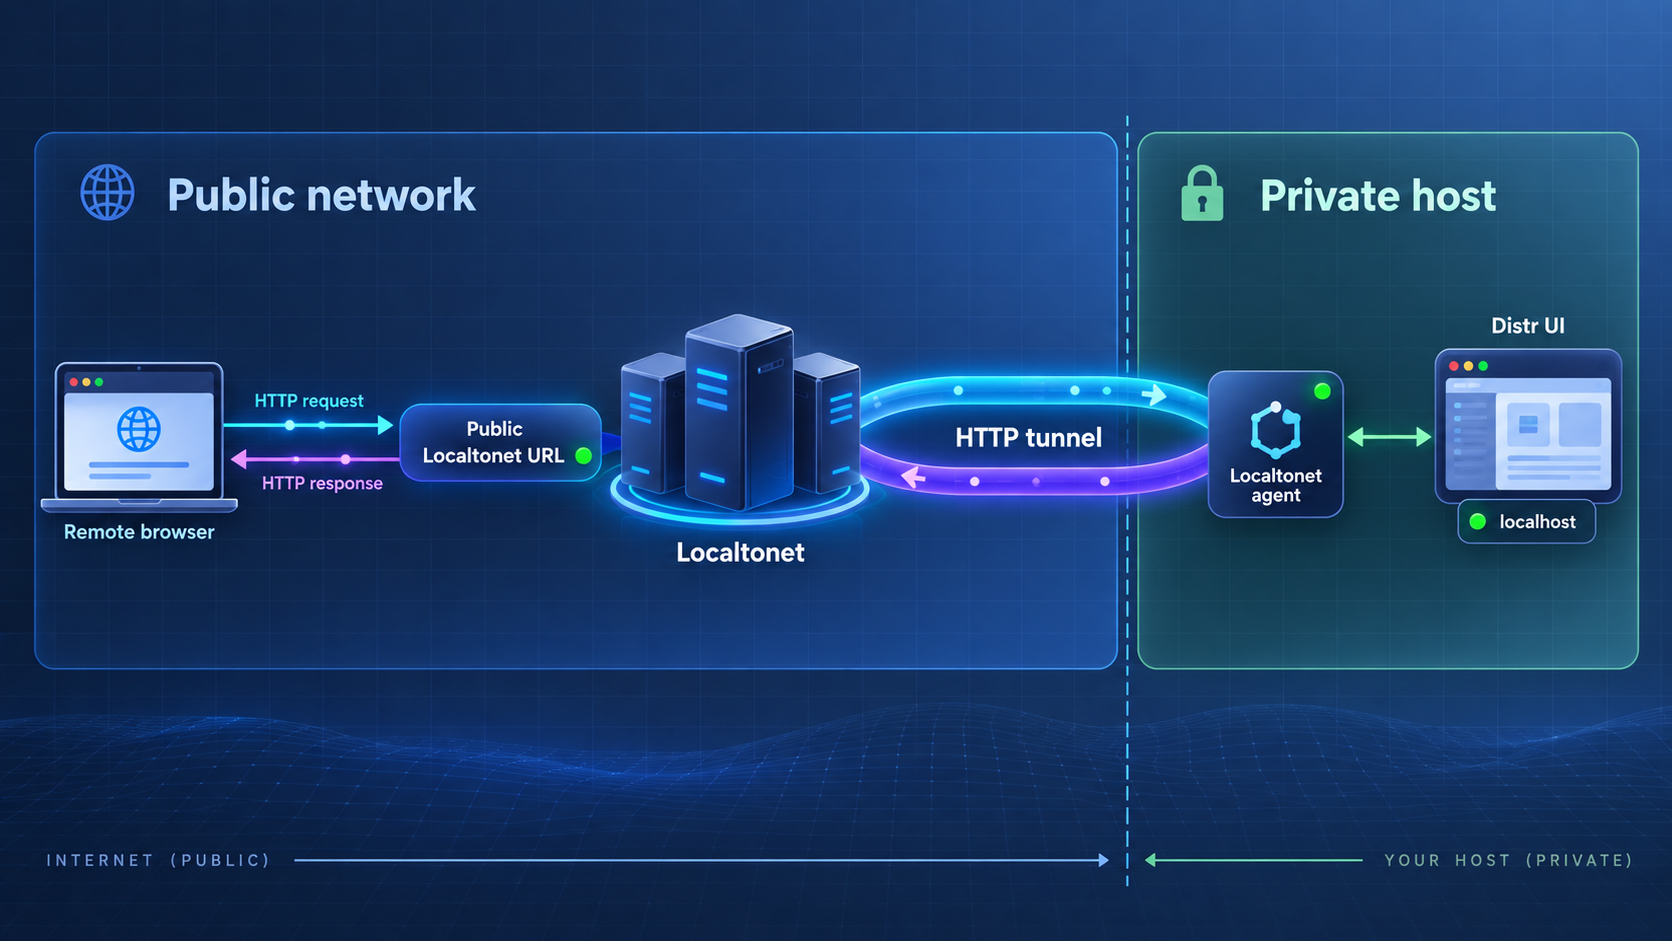
Once Distr responds correctly on a local address, an HTTP tunnel can make that interface reachable remotely. The Localtonet client runs on a device that can reach Distr and establishes an outbound connection to our relay server. The tunnel then provides a public HTTPS address that forwards HTTP traffic to the configured local IP address and port.
This avoids inbound router port forwarding, public-IP requirements, firewall changes for unsolicited inbound internet connections, and VPN setup. The tunnel remains available only while the selected Localtonet client is connected and the tunnel is running.
HTTP tunnels support Random Sub Domain, Custom Sub Domain, and Custom Domain process types. These process types serve the same local content at a public HTTPS address. Availability can vary by plan or current product configuration, and custom-domain DNS requirements must be checked against current Localtonet documentation before making DNS changes. For a straightforward evaluation, use an available generated-address option shown in the dashboard rather than assuming a custom-domain procedure.
Install and run the Localtonet client
Install our client on the Distr host or another device that can directly reach the Distr HTTP service. Use the current installation instructions for that operating system rather than an unverified command copied from an older article.
Authenticate the intended device
Select or authenticate the client using its device-specific token. Keep that token secret and never place it in screenshots, public configuration files, shell history examples, or support messages.
Create an HTTP tunnel configuration
Choose the HTTP tunnel family and an available process type for the public address. A generated subdomain is appropriate when you do not need to configure a custom domain.
Select the device and relay server
Choose the authenticated device that can reach Distr, then select an available relay server or region from the current dashboard. Do not hardcode a server code from another installation because available choices can change.
Enter the local Distr target
If the Localtonet client runs on the Docker host and Distr is available at the documented endpoint, point the HTTP tunnel to 127.0.0.1 on port 8080. If the client is on another machine or Distr is in Kubernetes, use the IP address and port that are actually reachable from the client device. Verify that route locally before continuing.
Start the tunnel and test its assigned address
Creating the tunnel does not start it. Press Start, wait for the selected client and tunnel to be connected, and then open the assigned public HTTPS address. Test the expected Distr page and authenticated workflow from a separate network if remote use is the objective.
For the current dashboard workflow and available options, consult our Localtonet HTTP tunnel documentation. The dashboard is also the correct place to obtain current device, relay, address, and plan-specific choices.
The Localtonet client must be connected and the tunnel must be running. If the public address stops working, check both states before changing Distr. Stopping or deleting the tunnel removes that remote path without requiring changes to the local application.
How to isolate a failed remote test
Test the same target from the Localtonet client device. If http://127.0.0.1:8080/register works there and the tunnel points to that address and port, investigate client connectivity, tunnel state, and the selected configuration. If the client runs elsewhere, test the exact network address assigned as the tunnel target from that client device.
If the target fails locally from the client device, fix routing, service exposure, or application startup first. In a Kubernetes deployment, this often means verifying that the chosen service path is intentionally reachable from the device running Localtonet. The correct method depends on the cluster and chart configuration, so no universal Kubernetes address should be assumed.
Security and production planning
A working public URL changes the service's exposure. Before starting a tunnel, decide whether the interface is appropriate for public internet reachability and whether its own authentication and authorization controls meet your requirements. A tunnel transports traffic to the selected target; it does not replace application authentication, user lifecycle controls, least privilege, audit procedures, or a secure initial-account process.
Use strong, unique credentials for Distr accounts. Limit administrative access to people who need it, review the platform's current security and authentication settings, and avoid sharing registration or administrative URLs casually. If your deployment supports additional application-level access controls, configure them according to the current Distr documentation rather than assuming defaults.
Keep Localtonet device tokens private. A token identifies the client device that operates a tunnel. Do not put it in source control, public documentation, container images, or copied terminal output. If you believe a credential has been exposed, replace it through the appropriate current account workflow.
Also protect the self-hosted data layer. PostgreSQL, object storage, and log storage can contain operationally sensitive information. Define where data is persisted, who can access it, how it is backed up, how restoration is tested, and how retention is managed. A container or Helm release is not itself a backup strategy.
| Area | Quickstart proves | Production review still needed |
|---|---|---|
| Application startup | The packaged components can start in the selected environment | Resource sizing, upgrades, monitoring, availability, and rollback |
| Database and object storage | Supporting services can be enabled by the documented setup | Persistence, encryption policy, credentials, backups, retention, and recovery testing |
| Browser access | The Distr interface responds at a reachable HTTP endpoint | Authentication policy, account lifecycle, session controls, and authorized audience |
| Localtonet tunnel | A public address can forward to the chosen local target while the client and tunnel run | Exposure approval, application access controls, device-token protection, and operational ownership |
| Release management | The latest quickstart or current chart can be installed | Version pinning, change review, staging, compatibility checks, and tested rollback |
Control the tunnel lifecycle
Stop the Localtonet tunnel when remote access is no longer required. Delete it if the endpoint should not be retained. Remember that tunnel configuration and tunnel runtime are separate states: creating a tunnel does not make it active, and stopping it does not necessarily delete its configuration.
For temporary evaluation, this lifecycle is useful because remote access can be enabled only during a supervised session. For ongoing operations, assign responsibility for client uptime, application updates, account review, monitoring, and incident response.
Plan upgrades instead of tracking latest automatically
The Docker quickstart URL uses the latest release, and the Helm chart reference does not pin a chart version in the documented quick testing command. That simplicity is useful during evaluation. In a controlled environment, record the version you tested, read release notes, back up applicable data, validate the upgrade in a non-production environment, and maintain a rollback plan.
Distr's release contents and chart values can evolve. Revisit current documentation before an upgrade rather than assuming that an older environment file or values file remains complete.
Troubleshooting installation and remote access
The Docker download or extraction fails
Confirm that the host has outbound HTTPS access to GitHub, that curl and tar are installed, and that the current user can write to the working directory. A proxy, TLS inspection system, DNS failure, or unavailable release asset can also interrupt the pipeline. Because the official command streams the archive directly into tar, either side of that pipeline can be the source of the failure.
docker compose up -d returns an error
Make sure the Docker daemon is running, the Compose subcommand is available, and your account can communicate with Docker. Read the exact error before using elevated privileges. If the error refers to configuration, inspect the downloaded .env and Compose files. If it refers to an image, verify registry and network access. If it refers to a port, identify whether another local process is already bound to that port.
The containers start but the registration page does not open
Confirm that all Compose services remain running and inspect their logs. A frontend or API can fail because a database, object store, or logging dependency is not ready. Verify that the browser is running on the expected host and that localhost refers to the machine exposing port 8080. If you open that address on another computer, its localhost points to that other computer, not to the Distr server.
The Helm installation times out or fails
Inspect workloads, events, storage claims, scheduling decisions, and image-pull results in the distr namespace. Typical infrastructure categories include unavailable persistent storage, insufficient cluster resources, image registry access failures, admission-policy rejection, or components that cannot become ready. Use the error reported by Helm and Kubernetes as the starting point rather than changing unrelated chart values.
Distr works locally, but the Localtonet address does not
Confirm that the selected Localtonet client is connected, the tunnel has been started, and the target IP address and port match the working local endpoint. If the client runs on the Distr host, test the target there. If it runs on another device, verify that the same device can reach Distr over the local network. A target of 127.0.0.1 always refers to the Localtonet client device itself.
The public URL opens the wrong application
Another process may be listening on the configured port, or the tunnel may point to a different host than intended. Compare the content returned by the public URL with the exact local target. Correct the local IP address or port only after identifying which process owns that endpoint.
The tunnel worked and then became unavailable
Check whether the Localtonet client device is online, whether the client remains connected, and whether the tunnel is still running. Then verify that Distr and its dependencies remain healthy. The public endpoint is available only while the selected client is connected and the tunnel is active.
Frequently asked questions
What is the fastest documented way to install Distr?
For a single Docker host, use the official Docker Compose quickstart: create a directory, download and extract the latest release archive, review its .env file, and run docker compose up -d. For an existing Kubernetes environment, use the documented OCI-hosted Helm chart command.
Where do I register the first Distr account?
Distr documents the initial registration URL as http://localhost:8080/register. The endpoint must be reachable from your browser. With Kubernetes, the exact method for making the chart's service available at a local address depends on the cluster and current chart configuration.
Does the Docker Compose quickstart require changes to the environment file?
The project instructs users to make necessary changes to the extracted .env file. The required changes depend on the release and deployment environment. Review the actual file and current documentation rather than using guessed variable names or copied credentials.
Is the documented Helm command production-ready?
It is documented as a quick testing setup, and Distr says that values do not need to be modified for that purpose. For production, the project explicitly instructs operators to revisit all available chart values and adapt them. Storage, database design, object storage, backups, credentials, resources, exposure, and availability require environment-specific planning.
Does Localtonet require router port forwarding for Distr?
No. Our client establishes an outbound connection to a Localtonet relay server. The HTTP tunnel provides a public address without requiring inbound router port forwarding, a public IP address, firewall changes for unsolicited inbound connections, or VPN setup.
Should I expose the Distr registration page publicly?
Only after deciding who should be able to create the first account and reviewing the security settings for your installed Distr release. A registration route is sensitive. Complete local verification first, use strong credentials, and apply application-level access controls appropriate to your environment.
Can the Localtonet client run on a different machine from Distr?
Yes, provided that the client device can reach Distr at the configured local IP address and port. In that arrangement, do not use 127.0.0.1 unless Distr also runs on the client device. Use an address that is genuinely reachable from the client and verify it before starting the tunnel.
Does creating a Localtonet tunnel immediately make Distr public?
No. Creating the configuration does not mean the tunnel is running. The selected client must be connected, and you must start the tunnel. You can later stop or delete it when remote access is no longer required.
Does the HTTP tunnel replace Distr authentication?
No. The tunnel forwards HTTP traffic to the configured local service. Distr remains responsible for its account, authentication, authorization, and session behavior. Treat the public URL as an exposure path, not as a substitute for application security.
Publish your verified Distr interface with Localtonet
Install Distr with Docker Compose or Helm, confirm the registration and authenticated interface locally, and then create an HTTP tunnel from a device that can reach the service. Keep the device token private, review access controls, and start the tunnel only when remote access is intended.
Get Started Free →

