

Build a private media shelf, prove that it works locally, and expose only the K7 web endpoint you intend to share
K7 is an open-source media server for movies, television, and music owned by a small circle of family and friends. This guide follows the project's Docker Compose quick start, verifies the service at http://localhost:7080, and explains the storage, permissions, first-run, backup, and update decisions that must be resolved before you depend on it. After K7 works locally, we connect its HTTP interface to Localtonet without inbound router port forwarding, firewall changes, VPN setup, or a public IP address. The result is a practical deployment with clear boundaries between the application, its persistent data, and remote connectivity.
📋 What's in this guide
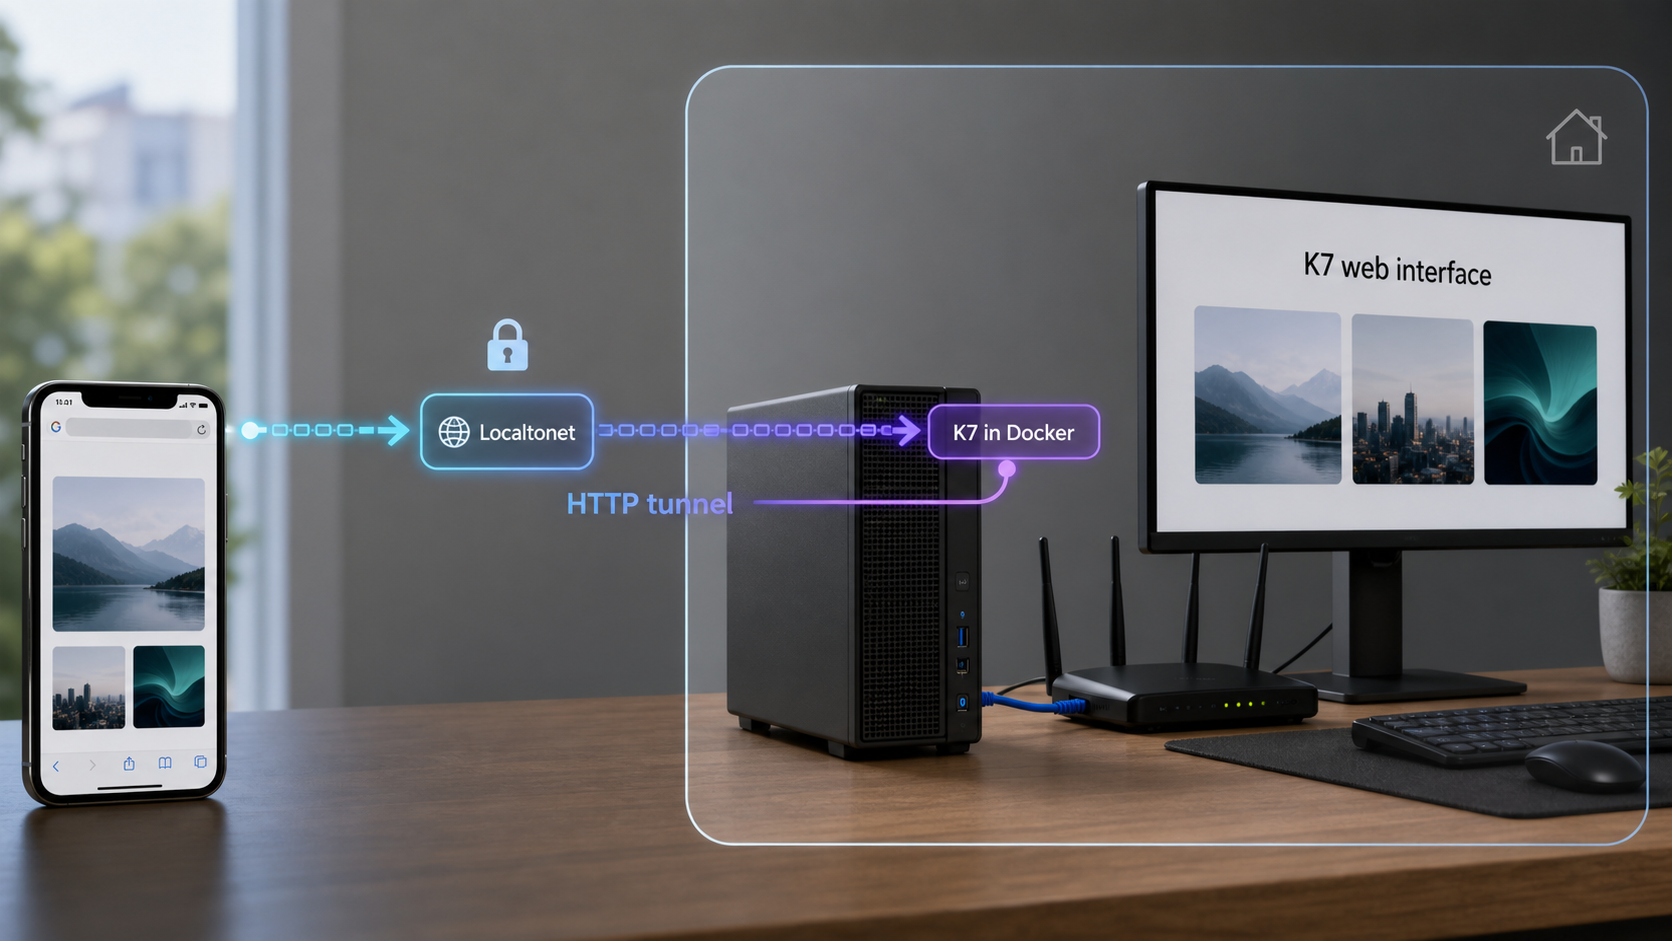
What you are building
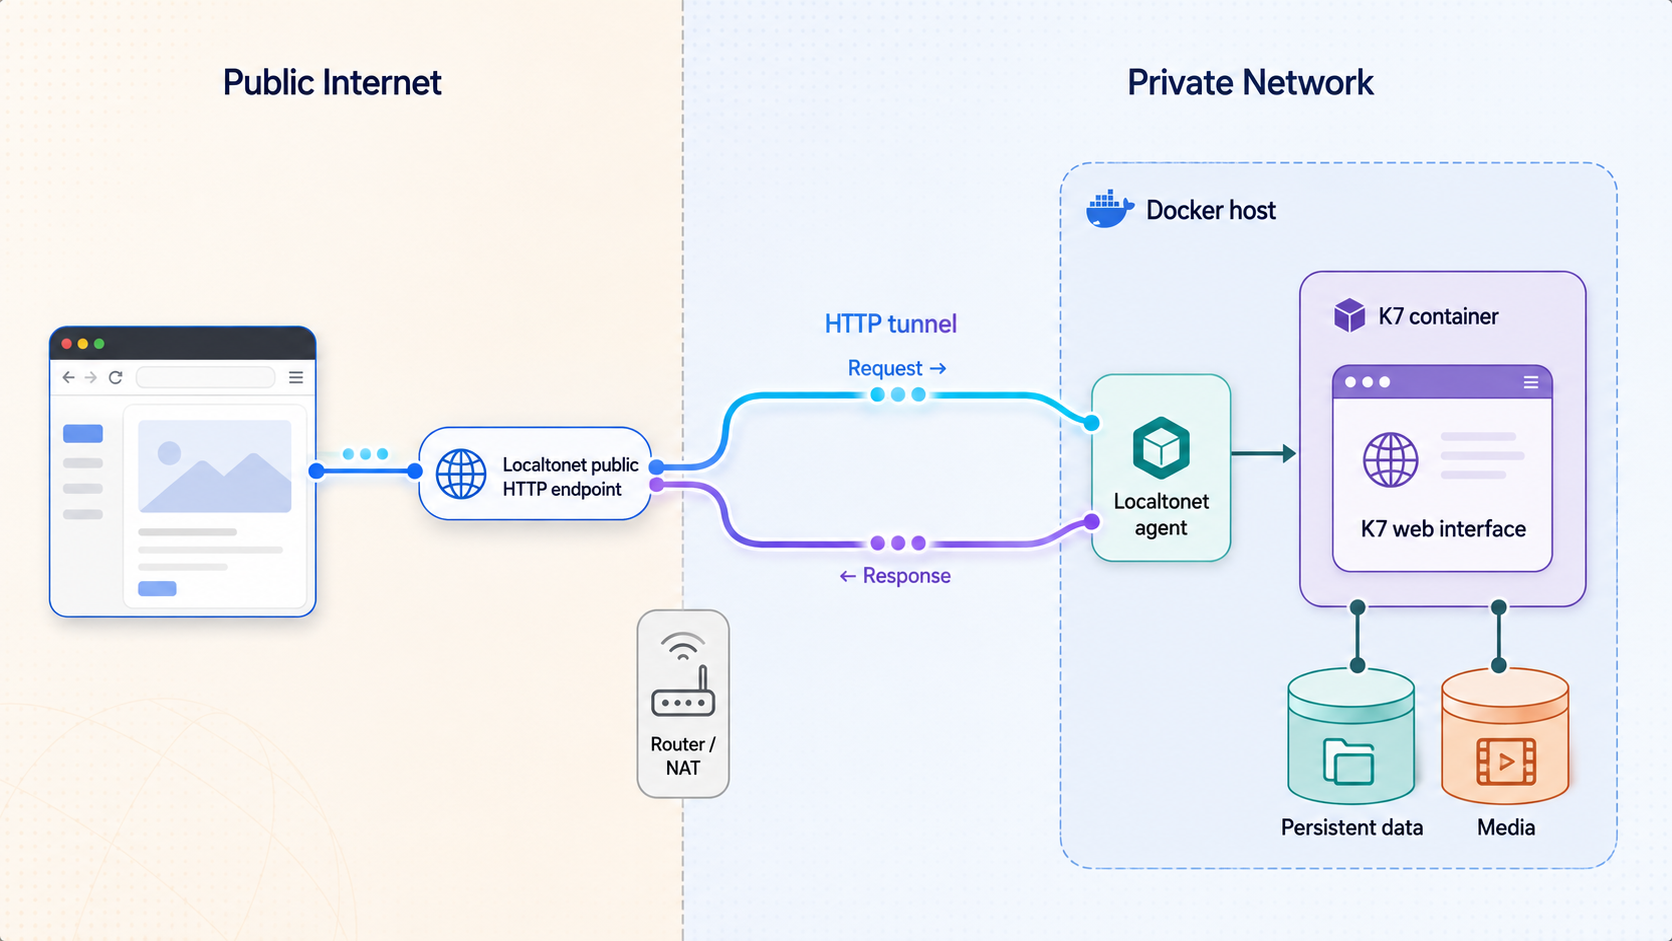
K7 describes itself as a self-hosted media server for a small circle of family and friends. Its name refers to the French pronunciation of cassette, reflecting the idea of a personal shelf containing media that belongs to you. The application supports movies, television series, and music stored on infrastructure you control.
The deployment in this tutorial has two independent layers. Docker Compose starts K7 and the supporting services declared by the project's current Compose file. K7 then presents its browser interface at http://localhost:7080. The application, database, persistent storage, media paths, accounts, and permissions belong to this local layer.
Localtonet provides the connectivity layer. Our client runs on the K7 host or another device that can reach it, establishes an outbound connection to a Localtonet relay, and forwards an assigned public HTTPS address to K7's local HTTP endpoint. The tunnel does not replace K7 authentication, storage, backups, health checks, or application administration.
Why local verification comes first
A tunnel can only forward traffic to a service that is already running and reachable from the selected Localtonet client. If K7 has not started, its database cannot initialize, or its storage is inaccessible, creating a public tunnel will not repair the application.
Test K7 on the server first. If Localtonet will run on another device, test K7 from that device second. Test the public URL only after both local checks succeed. This sequence identifies whether a failure belongs to K7, Docker, the local network path, the Localtonet client, or the tunnel configuration.
| Layer | Responsibility | Primary check |
|---|---|---|
| K7 | Media management, playback, accounts, and administration | Open http://localhost:7080 |
| Docker Compose | Creates and manages the services declared by K7 | Run docker compose ps |
| Persistent storage | Retains database and application data across container replacement | Inspect the rendered Compose configuration and backup coverage |
| Media attachment | Makes your media files available to K7 | Confirm the container can read each configured path |
| Localtonet client | Creates the outbound relay connection | Confirm that the selected device is connected |
| HTTP tunnel | Maps a public HTTPS address to K7 | Confirm that it targets the verified IP and port 7080 |
Verify prerequisites before installing K7
K7's published quick start uses Docker Compose and the command form docker compose. That is the Docker Compose v2 interface integrated with the Docker CLI. The older standalone command is usually written as docker-compose, with a hyphen. Because K7 documents the v2 form, verify that exact command before proceeding.
Run these checks on the future K7 host:
docker --version
docker compose version
docker info
The first command confirms that the Docker CLI is available. The second confirms that the Compose v2 subcommand is installed. The third asks the client to communicate with Docker Engine. A version string alone does not prove that the engine is running or that your current account can use it.
If docker info reports a daemon connection or permission error, correct the Docker installation or account permissions before cloning K7. Use the official Docker installation method for your operating system. K7's own installation details are maintained in the K7 administrator installation guide, while the repository's current Docker Compose file is the authoritative declaration for the revision you download.
This tutorial uses docker compose because that is the command documented by K7. If only docker-compose works on your host, update or verify your Docker installation rather than assuming both implementations behave identically with the current project file.
Prepare the following before installation:
- A host with a working Docker Engine and Docker Compose v2 command.
- Enough storage for K7's persistent application data and your media library.
- A local copy of the K7 repository, obtained with Git or downloaded from the project page.
- Permission to run Docker commands and read the media directories.
- A strong, unique PostgreSQL password for the local
.envfile. - A browser that can reach the initial K7 endpoint.
- A backup destination separate from the active application data.
- A Localtonet account and a supported client device for the later remote-access stage.
Check ports and disk space
K7's quick start publishes its web interface on host port 7080. If another process already occupies that port, the Compose project may fail to start. Docker can show existing containers and published ports:
docker psOperating-system tools can provide a second view of listening ports. Their availability and syntax vary, so use the appropriate tool for your host. Do not improvise an alternative K7 port until you have checked the current installation documentation and understood how that change affects clients and the Localtonet target.
The reviewed K7 material does not establish one universal CPU, memory, GPU, or disk minimum. Requirements depend on library size, active users, media formats, and whether playback uses direct play, remuxing, or transcoding. FFmpeg transcoding generally creates more work for the server than direct play, so test with representative files and clients before relying on the system.
Plan persistent data, media mounts, and permissions
Containers are replaceable runtime units. Your database, application state, and media library must not depend on the writable layer of a disposable container. Before starting K7, inspect the Compose configuration that belongs to the exact repository revision you downloaded.
Render the effective configuration after creating the environment file:
docker compose config
This expands the Compose model so you can review services, published ports, named volumes, bind mounts, and environment interpolation. Because rendered output can include sensitive values from .env, do not paste it into a public issue without redacting credentials.
Distinguish persistent application data from media
These storage categories have different purposes:
- Database storage retains PostgreSQL records used by the application.
- Application storage may retain state or generated files declared by the current K7 configuration.
- Media-library storage contains the movies, television episodes, and music that K7 scans and serves.
- Backup storage contains recoverable copies and should not be the same live volume being protected.
A K7 v1.7.5 release note specifically records a deployment fix that mounts PostgreSQL 18 storage at /var/lib/postgresql. That fact is relevant when evaluating old and new deployment definitions, but it does not establish the host-side path, volume name, or migration procedure for every current revision. Inspect your checked-out Compose file instead of copying a volume declaration from an older release.
Database image layout can change between versions. Do not move, rename, or remap a database volume based only on a historical release note. Confirm the current Compose declaration and the version-specific K7 upgrade guidance before changing an existing deployment.
Attach an existing media library carefully
K7 can organize locally owned movies, television series, and music, but the reviewed public quick-start does not provide a universal host directory or one container destination that applies to every operator. Media attachment must follow the mount declarations and library workflow documented for the K7 revision you install.
Before importing media, confirm all of the following:
- The intended host directory exists and contains the expected files.
- The current Compose file maps that directory into the K7 service where required.
- The path selected in K7 refers to the container-visible path, not an unrelated host-only path.
- The account used inside the container can traverse directories and read the files.
- Write access is granted only where the documented K7 workflow actually requires it.
- The mount does not accidentally expose unrelated home directories, credentials, or backups.
Do not guess a media destination or add a broad root-directory mount merely to make files appear. A narrowly scoped read-only mount is safer when K7 only needs to read media, but whether read-only access is compatible with every K7 library operation is not established by the supplied project evidence. Follow the current administrator documentation for the actual mount mode and path.
Resolve filesystem permissions before scanning
A path can exist on the host but still be inaccessible inside the container. Parent directories require traversal permission, and the files require the access expected by the application. Network shares can add another identity and permission layer.
The reviewed evidence does not define a universal K7 container user ID, group ID, ownership command, or permission mode. Applying a generic recursive chmod or chown command could expose private files or break another service. Instead, compare the identity and volume settings in the current Compose file with the ownership and permissions on the specific media directories.
After startup, use K7's interface to attach or create libraries according to the fields displayed by your installed version. Select the corresponding container-visible directories and run a limited test scan before importing a large collection. Verify titles, seasons, tracks, metadata, and playback against a small representative sample.
The reviewed quick-start confirms that first-run setup occurs at http://localhost:7080, but it does not expose the current first-run field names, a fixed media mount destination, or universal permission commands. This guide therefore identifies the required checks without inventing UI labels, paths, user IDs, or modes.
Install K7 with Docker Compose
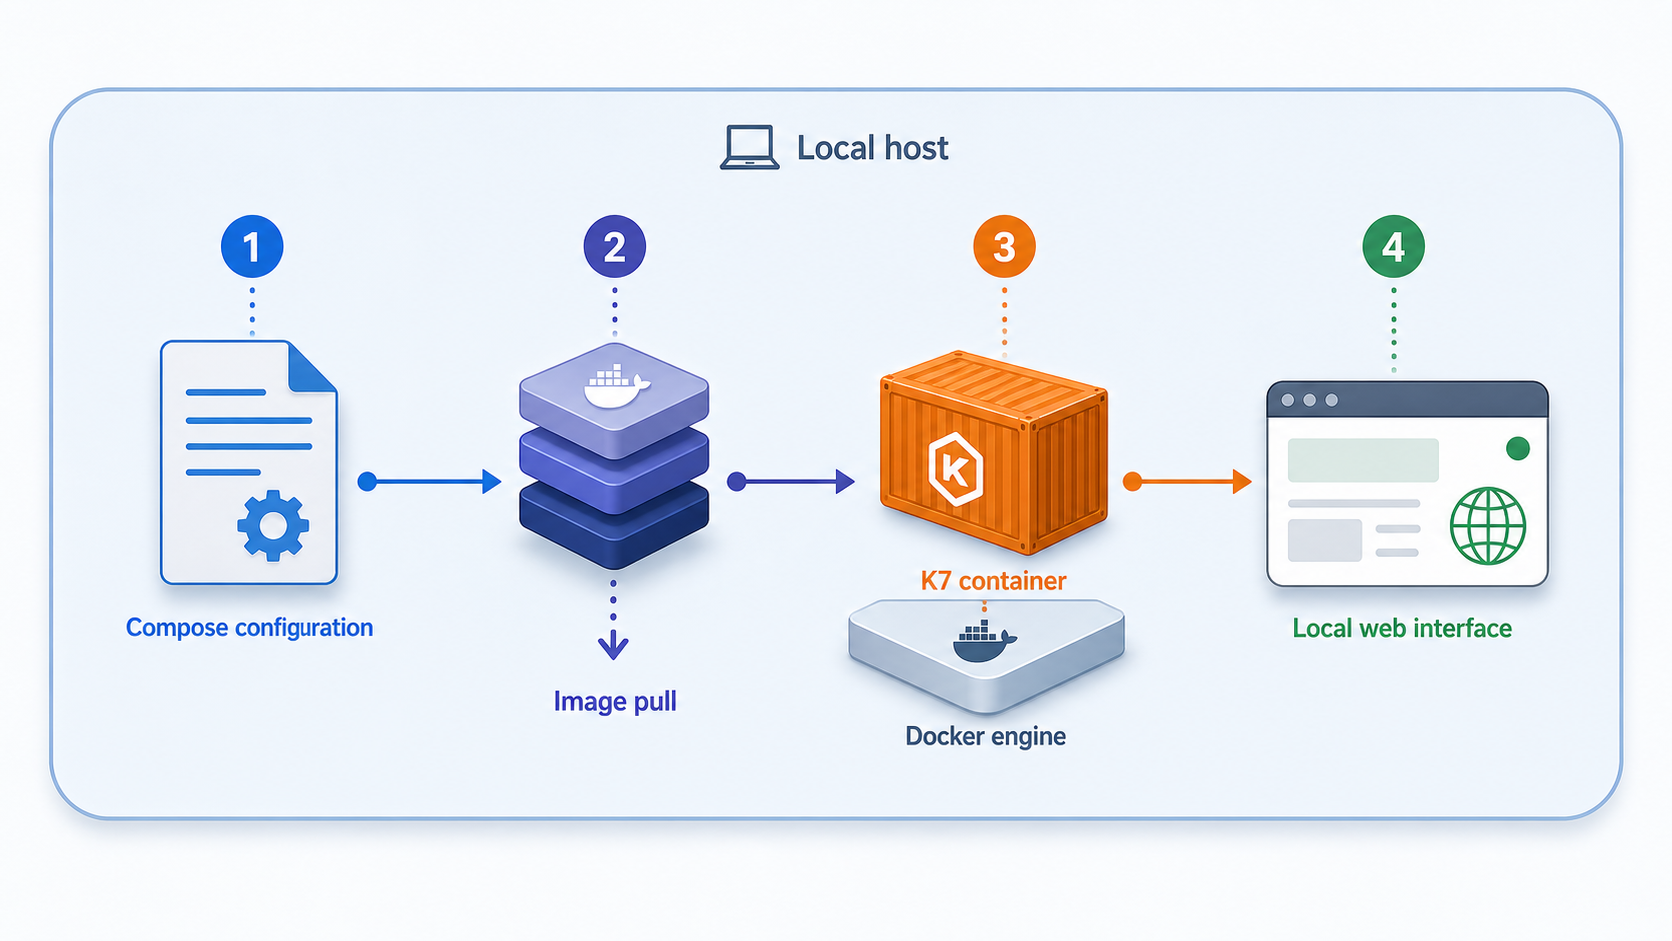
K7's official quick start follows five actions: obtain the repository, copy the environment template, set the PostgreSQL password, start the Compose project, and complete first-run setup in a browser.
Obtain the K7 repository
Clone the public repository or download and extract it from the project page. Enter the repository root containing .env.example and docker-compose.yaml.
Copy the environment template
Copy .env.example to .env. Keep the original template unchanged as a reference for the repository revision you downloaded.
Set POSTGRES_PASSWORD
Open .env in a local editor and assign a strong, unique value to POSTGRES_PASSWORD. Review other variables in the current template, but do not change unfamiliar settings without version-specific documentation.
Start the K7 stack
Run docker compose up -d from the repository root. The current quick-start states that this pulls ghcr.io/kaybi-gh/k7:latest and starts the project in detached mode.
Open K7 and complete first-run setup
Visit http://localhost:7080. Complete the administrator, server, and library configuration presented by your installed revision, then test with a small media sample before importing the full library.
Clone the repository with Git:
git clone https://github.com/kaybi-gh/K7.git
cd K7
On Linux or macOS, copy the example environment file:
cp .env.example .envOn Windows PowerShell:
Copy-Item .env.example .env
Edit .env locally and replace the placeholder for POSTGRES_PASSWORD. This guide deliberately does not provide an example password because example credentials are often copied into real deployments.
Validate the effective Compose model before startup:
docker compose configIf validation succeeds and the storage declarations match your intended deployment, start K7:
docker compose up -d
The current K7 quick start names ghcr.io/kaybi-gh/k7:latest, while the project also published a versioned ghcr.io/kaybi-gh/k7:1.7.5 artifact. The v1.7.5 release page reports many subsequent commits, so it must not be described as the current release without checking again. Confirm the current Compose file, release notes, supported image tag, and upgrade guidance immediately before publication or deployment.
Complete first-run setup and verify K7 locally
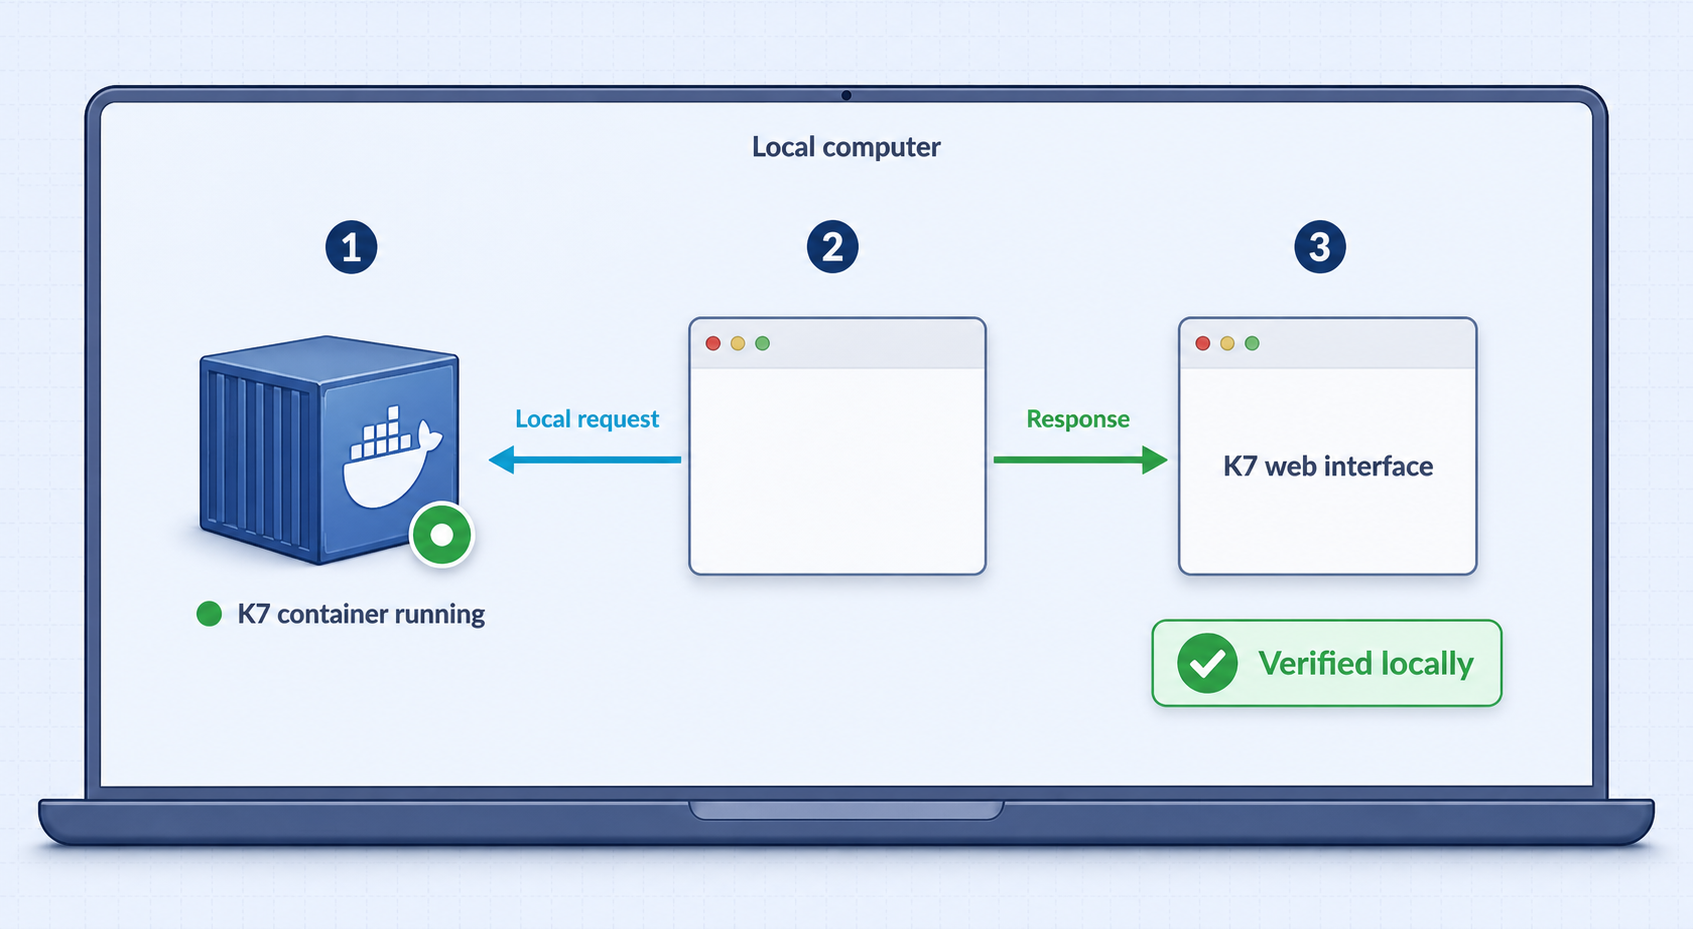
Inspect service state and logs
From the deployment directory, run:
docker compose ps
docker compose logs
Review the actual services and states displayed by your Compose project. Service names can change with the project configuration, so do not depend on a list copied from a different revision. A service that exits, repeatedly restarts, or reports an unhealthy state requires investigation.
Follow new log output while reproducing a problem:
docker compose logs -fK7 documents a dashboard, diagnostics, and background tasks for observing server activity. Use these facilities after the interface becomes available, particularly during library scans or playback tests. The reviewed material does not identify a separate unauthenticated HTTP health-check endpoint, so this article does not invent one.
Complete the first-run interface
Open the documented local endpoint on the server:
http://localhost:7080Complete the first-run workflow shown by the installed version. At minimum, do not consider setup complete until you have established administrative access, can sign in again, can open the administration area, and can configure a test library using a verified container-visible media path.
The exact first-run screen sequence and field names are not present in the reviewed public evidence. Follow the live interface and the administrator guide associated with your checked-out revision rather than a screenshot from another version. If the interface requests a value not explained by that documentation, stop and resolve it before exposing the application.
Test a limited media sample
Begin with a small library or directory containing representative media. Include the formats and track combinations your users will actually play. Confirm that K7 can scan the files, display expected metadata, and play them with the intended client.
Playback can differ by client. K7 documents web, Android phone and TV, Windows, iOS, and Mac clients. The maintainer notes that iOS and Mac builds exist but are not tested by the maintainer because Apple hardware is unavailable. Chromecast is documented for web and Android. OpenSubsonic-compatible clients can use an app password created under K7's external-client settings.
Direct play depends on client, browser, container, and codec support. When direct play is not possible, K7 can use FFmpeg and HLS for remuxing or transcoding. A successful home page therefore does not prove that every media file will play remotely.
Test from the Localtonet client device
If Localtonet will run on the K7 host, test http://127.0.0.1:7080 there. If our client will run on another device, 127.0.0.1 refers to that other device. Use a reachable private address for the K7 host and test it from the exact client device.
Configure 127.0.0.1:7080 only when K7 and the Localtonet client share a host and that address works there. Otherwise, use the verified private address of the K7 server. A relay cannot repair an unreachable local target.
Operate, back up, restore, and update K7
Self-hosting makes you responsible for storage health, application availability, updates, backups, and recovery. K7 and Localtonet also have independent lifecycles. Stopping the tunnel removes remote reachability without stopping K7. Stopping K7 leaves the tunnel with no functioning local target.
Routine Docker Compose commands
View current service state and logs:
docker compose ps
docker compose logs
Restart the declared services:
docker compose restartStop and later start the existing containers:
docker compose stop
docker compose start
Remove the project's containers and network according to normal Compose behavior:
docker compose downDo not add volume-removal options unless you have identified every affected volume and intend to delete its data. Run commands from the correct deployment directory so that you do not manage another Compose project by mistake.
Define backup coverage before adding real users
A useful K7 recovery plan must account for more than media files. Include the persistent PostgreSQL data and every additional volume or bind-mounted application directory declared by the current Compose file. Keep the corresponding docker-compose.yaml and a protected record of required configuration, but never place plaintext secrets in an unprotected archive.
Media files may be recoverable from their original source, but database-backed user records, history, playlists, configuration, custom metadata, and other application state may not be. A copy of the media library alone should not be treated as a complete K7 backup.
The reviewed project evidence does not define a verified universal K7 backup command, database dump command, restore wizard, snapshot schedule, or automated retention policy. It also does not establish whether a filesystem-level copy taken while PostgreSQL is running is application-consistent. Use the backup and restore procedure documented for the exact K7 and PostgreSQL versions you deploy.
Test restoration, not only backup creation
Record the application image reference, repository revision, effective storage declarations, and backup time. Restore into an isolated environment where it cannot overwrite the active server. Confirm that K7 starts, accepts the expected administrator login, displays the test library, and retains the application state you intended to protect.
If the K7 documentation for your revision does not define a restore procedure, treat that as an operational limitation. Do not assume that copying a named Docker volume between database versions is safe. Establish and test a database-supported recovery process before calling the deployment production-ready.
Plan updates and rollback before pulling images
A safe update starts with current release notes, a tested backup, and a record of the running image. Stop the Localtonet tunnel during maintenance so users do not reach a partially upgraded application.
The quick-start's latest tag is mutable. Pulling it later may retrieve a different image. The supplied evidence does not establish a universal K7 migration, downgrade, or rollback procedure, so this tutorial does not prescribe commands such as pulling a new image and immediately recreating the stack.
Restoring an old image while retaining a database modified by a newer release can be unsafe. Before an update, confirm version compatibility, database migration behavior, the correct PostgreSQL storage path, and the project's documented rollback or restore method. If those details are absent, postpone the update or test it on a recoverable copy.
Connect the verified K7 interface to Localtonet
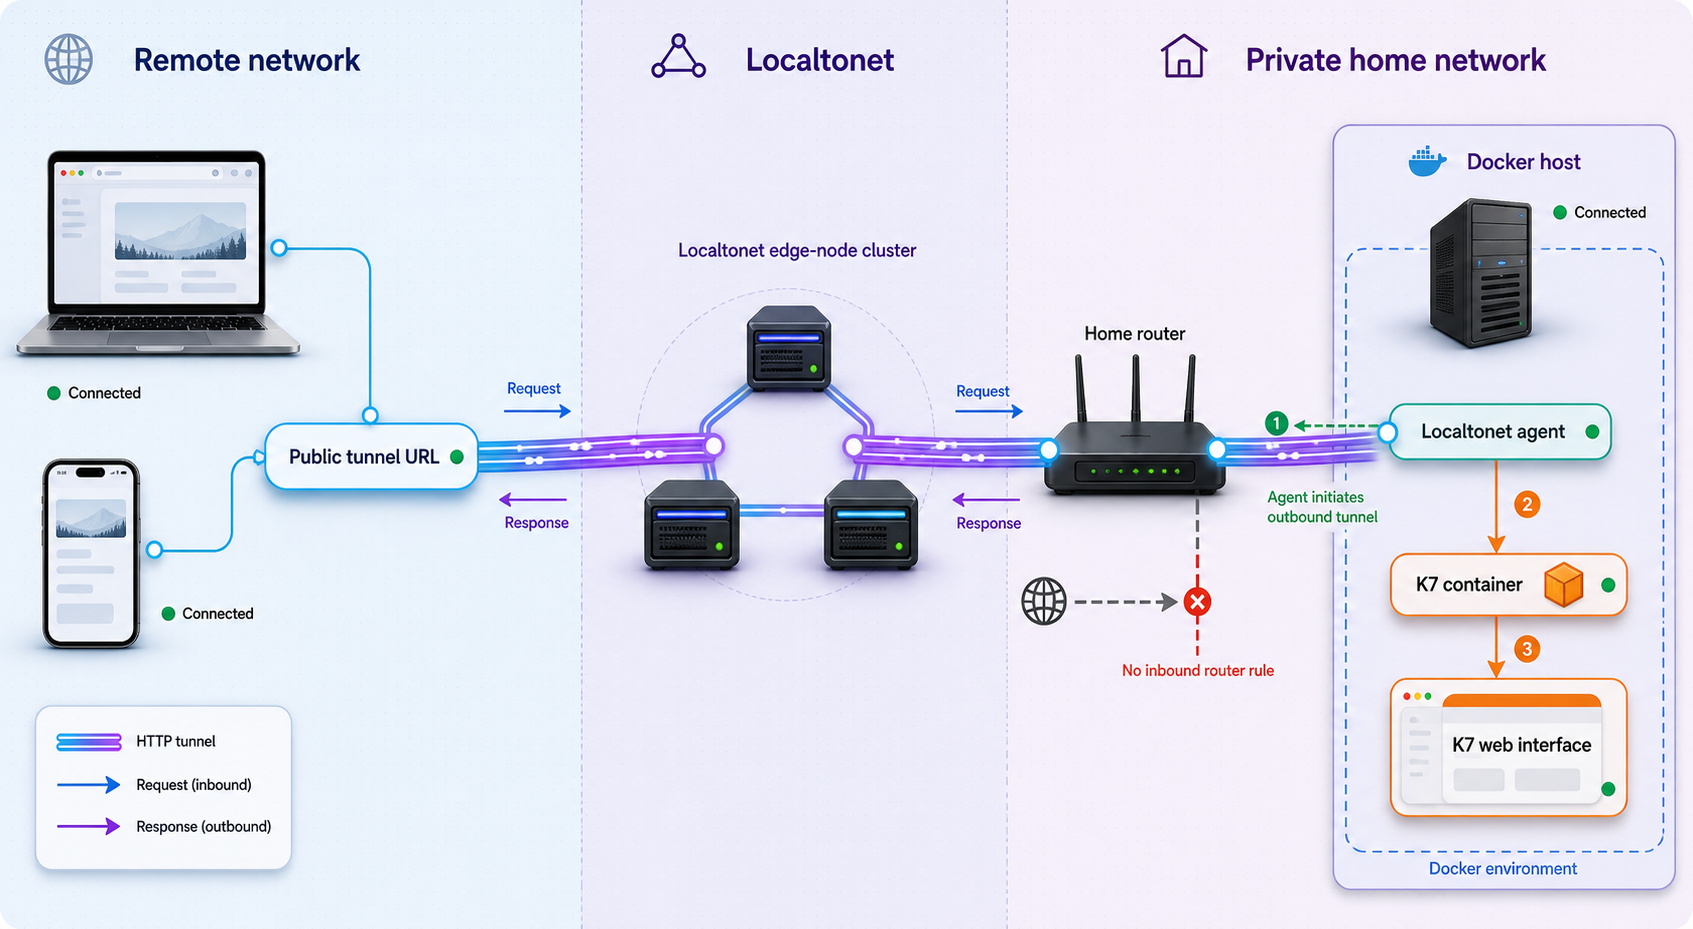
Use an HTTP tunnel for the browser-based K7 interface. Localtonet HTTP tunnels point to a local IP address and port and provide a public HTTPS address. Process Type can be Random Sub Domain, Custom Sub Domain, or Custom Domain. All three serve the same target content, although option availability can vary.
Our documented workflow is to install and run the client, identify the device with its authentication token, select a currently available relay, configure the HTTP target, start the tunnel, and use the assigned address. Creating a tunnel does not start it.
Install and run the Localtonet client
Sign in to Localtonet and install the current client build offered for the operating system that will carry the tunnel. Run it on the K7 host or another device that can already reach K7. Installation packaging and commands can change by operating system and client version, so use the current download path presented by your Localtonet account rather than copying an old command.
Authenticate and select the device
Use the device-specific authentication token assigned through Localtonet, then select that connected device for the tunnel. Never publish, guess, or include the token in screenshots or command examples.
Select an available relay server
Choose a server or region from the values currently available in the dashboard. Do not copy a relay code from another tutorial because available values can vary by plan, client version, region, or deployment.
Create the HTTP tunnel configuration
Choose an HTTP tunnel, select the required Process Type, and enter the local IP address through which the selected client reaches K7. Set the local port to 7080. Use 127.0.0.1 only when the client and K7 share a host and that endpoint has already been verified.
Start the tunnel
Review the selected device, relay, Process Type, local IP address, and port, then use the Start button. Creation and startup are separate lifecycle actions.
Test and manage the assigned address
Open the assigned public HTTPS address from an external network and sign in with a limited K7 account. Keep the client connected and the tunnel running while access is required. Stop or delete the tunnel when it is no longer needed.
Check our current HTTP tunnel documentation while configuring the tunnel so that dashboard terminology matches the interface you see. This guide does not hardcode server codes, plan availability, device tokens, or custom-domain DNS records.
The outbound tunnel removes the need for inbound router configuration, but it does not replace application authorization. Configure K7 accounts, strong credentials, appropriate library restrictions, and any chosen 2FA or OIDC controls before starting the tunnel.
Validate the complete route
Test from a device that is not using the K7 server's local network. Open the exact public HTTPS address and confirm that the expected K7 sign-in or welcome interface appears. Use a fresh browser session so an existing administrator cookie does not conceal an authorization problem.
Sign in with a limited test account. Check library visibility, profile restrictions, ordinary page navigation, playback, seeking, subtitles, and audio-track selection where applicable. A loaded page does not prove that large streams or transcoding will work under the available server and network capacity.
Stop the tunnel and verify that the public route is no longer available. Start it again and repeat a short test. This confirms that you understand the tunnel lifecycle before relying on it during maintenance or scheduled access.
Secure K7 before sharing it
Remote access changes K7 from a local service into an internet-reachable application. Expose only the required HTTP endpoint, keep administrative access limited, and make the public route easy to disable.
Use separate user accounts
Avoid sharing one administrator login among family members. Individual accounts make revocation practical and allow K7's library, profile, personalization, and visibility controls to be applied to the intended person. Reserve administrative privileges for operators who maintain the server.
Evaluate K7 authentication options
K7 documents local authentication with optional two-factor authentication and optional OIDC. Local authentication can work without an external identity provider. OIDC can connect K7 to an identity provider when centralized sign-in is needed.
The reviewed evidence does not establish exact OIDC variables, provider claims, redirect addresses, or a version-independent 2FA enrollment sequence. Follow the current K7 administration documentation and test account recovery before requiring a new method for every user.
Make guest mode an explicit choice
K7 includes optional administrator-controlled guest access. Guest mode should not be interpreted as automatic authorization for every visitor who receives the public URL. Inspect what guests can see, test from a private browser session, and disable the option if it does not fit your sharing model.
Protect all credentials independently
The PostgreSQL password in .env, K7 passwords, external-client app passwords, OIDC secrets, and the Localtonet device token have different purposes. Do not reuse them. Keep .env out of source control, support messages, screenshots, and shared media directories.
Limit storage exposure
Mount only directories K7 needs. Do not expose an entire home directory or filesystem root to solve a permission problem. Keep database files, backups, SSH material, Localtonet credentials, and unrelated personal files outside media mounts.
| Control | What it protects | Recommended practice |
|---|---|---|
| K7 user accounts | Application and personal media access | Create individual accounts and minimize administrator use |
| Optional K7 2FA | Sign-in after password compromise | Evaluate it for administrators and remote users |
| Optional K7 OIDC | Central identity policy | Use only with a correctly configured provider |
| Library and profile restrictions | Which content each person can access | Grant only the required libraries and features |
| Filesystem mounts | Host files visible inside K7 | Mount only verified media and application paths |
| Localtonet device token | Identification of the tunnel client | Store it as a secret and replace it if exposed |
| Tunnel lifecycle | Availability of the public route | Stop or delete access when it is not needed |
Troubleshoot K7 and the Localtonet tunnel
Docker Compose is unavailable
Run docker compose version. If Docker reports that compose is not a recognized command, install or update the Compose v2 plugin using Docker's current instructions for your operating system. If docker info fails, resolve the Docker Engine or account-permission issue first.
K7 does not open on port 7080
Run docker compose ps and docker compose logs from the repository root. Confirm that .env exists and that POSTGRES_PASSWORD has a value. Do not disclose that value while requesting help.
If Docker reports a port conflict, identify the process already using 7080. Do not invent an alternative environment variable or port mapping without checking the current K7 deployment documentation.
The database fails after an image or configuration change
Inspect the application and PostgreSQL logs. A changed password, changed database image, or incompatible storage mount can prevent startup. The v1.7.5 deployment note about PostgreSQL 18's /var/lib/postgresql mount is a reason to verify the exact current declaration.
Do not repeatedly delete volumes to clear authentication or initialization errors. That can destroy the data required for recovery. Preserve the current storage, record the running and attempted versions, and use the version-specific restore or migration guidance.
K7 sees no media files
Confirm that the host path exists, that it is mounted into the correct K7 service, and that the path entered in K7 is the container-visible path. Verify directory traversal and read permission without applying broad recursive permission changes.
If the files are on network storage, confirm that the share is mounted on the Docker host before K7 starts and that its local mount point is the path used by Compose. Network-share credentials and host mounting are separate from K7 and should not be embedded in public Compose examples.
K7 works on the server but not from the Localtonet client device
If Localtonet runs elsewhere, 127.0.0.1 points to that other device. Test the K7 host's private address from the client device and confirm that K7 is reachable across the local network. The reviewed quick start does not establish a universal K7 bind-address variable, so consult the current Compose and installation documentation rather than guessing one.
The public URL does not open
- Confirm that
http://localhost:7080works on the K7 host. - Confirm that the configured target works from the Localtonet client device.
- Confirm that the intended device token is connected.
- Confirm that the tunnel uses the verified K7 IP address and port
7080. - Confirm that a currently available relay was selected.
- Confirm that the tunnel was started rather than only created.
- Retest the assigned public HTTPS address from another network.
The interface loads, but playback is slow or fails
Check K7 diagnostics and logs while reproducing the issue. Determine whether the client is direct-playing, remuxing, or transcoding the file. Test one file, one account, and one client at a time. Browser and native-client playback pipelines can differ, so a problem in one client does not by itself prove that the HTTP tunnel is failing.
Users can see content they should not see
Stop the tunnel while correcting authorization. Review K7 accounts, guest mode, library restrictions, profile restrictions, shared profiles, and visibility controls. Test from a private browser session using the affected account rather than an existing administrator session.
The tunnel stops unexpectedly
A Localtonet tunnel remains available only while the selected client is connected and the tunnel is running. Check whether the client process stopped, the host restarted, connectivity was lost, or the tunnel was manually stopped. Confirm that you are inspecting the same device and tunnel used during setup.
Test K7 on its host, test the target from the Localtonet client device, and then test the public URL. This order prevents application, storage, local-network, and tunnel problems from being mixed together.
Frequently asked questions
What port does K7 use in its Docker quick start?
K7 documents its local web interface at http://localhost:7080. Verify that endpoint before configuring a Localtonet HTTP tunnel.
Does K7 require Docker Compose v2?
The K7 quick start uses the Compose v2 command form docker compose. Confirm it with docker compose version and verify Docker Engine connectivity with docker info.
What must I configure before starting K7?
Copy .env.example to .env, set a strong and unique POSTGRES_PASSWORD, review the effective Compose storage configuration, and verify any required media mounts. Then run docker compose up -d.
Where should K7 media directories be mounted?
The reviewed quick-start evidence does not define one universal host path or container destination. Use the current K7 Compose file and administrator documentation for your revision, then select the corresponding container-visible path in K7. Do not expose a broad filesystem path merely to avoid resolving permissions.
Does K7 document a universal backup and rollback procedure?
Not in the reviewed evidence. Backups must cover PostgreSQL and every persistent application path, not only media. Confirm version-specific backup, restore, migration, and rollback guidance before updating, and test recovery in an isolated environment.
Do I need to forward port 7080 on my router?
No. Our Localtonet client establishes an outbound connection to a relay. The HTTP tunnel provides a public address without inbound router port forwarding, firewall changes, VPN setup, or a public IP address.
Should the Localtonet target use localhost or the K7 server's private IP address?
Use 127.0.0.1 or localhost only when the Localtonet client and K7 run on the same host and the endpoint works there. If the client runs on another device, use the K7 host's reachable private address and test it from that device first.
Does creating a Localtonet tunnel start it automatically?
No. Creation and startup are separate lifecycle actions. Configure the correct device, relay, Process Type, local IP address, and port, then use the Start button. The tunnel works only while the selected client is connected and the tunnel is running.
Will every K7 client work through the same HTTP tunnel?
This tutorial validates K7's web interface through an HTTP tunnel. Native clients, Chromecast, OpenSubsonic, federation, remote control, and offline synchronization can have distinct requirements. Test every intended client and workflow independently.
Make your verified K7 server accessible with Localtonet
After K7 works locally, its storage is protected, and user permissions have been tested, install our client on a device that can reach port 7080 and create an HTTP tunnel for controlled remote access.


