

Evaluate Monoscope locally, verify its Docker Compose deployment, and prepare controlled dashboard access through an HTTP tunnel
Monoscope is an open-source observability platform for ingesting and exploring logs, traces, and metrics stored in S3-compatible storage. This guide follows the current repository quick start, verifies the web dashboard locally, and shows how to configure Localtonet for the confirmed web interface on port 8080. The repository describes authentication for self-hosted deployments as DIY, but the available project documentation does not provide a verified credential-change, durable storage, or backup procedure for this quick start. The tutorial is therefore intentionally limited to an evaluation deployment, and public access must remain stopped while the documented default credentials are valid.
📋 What's in this guide
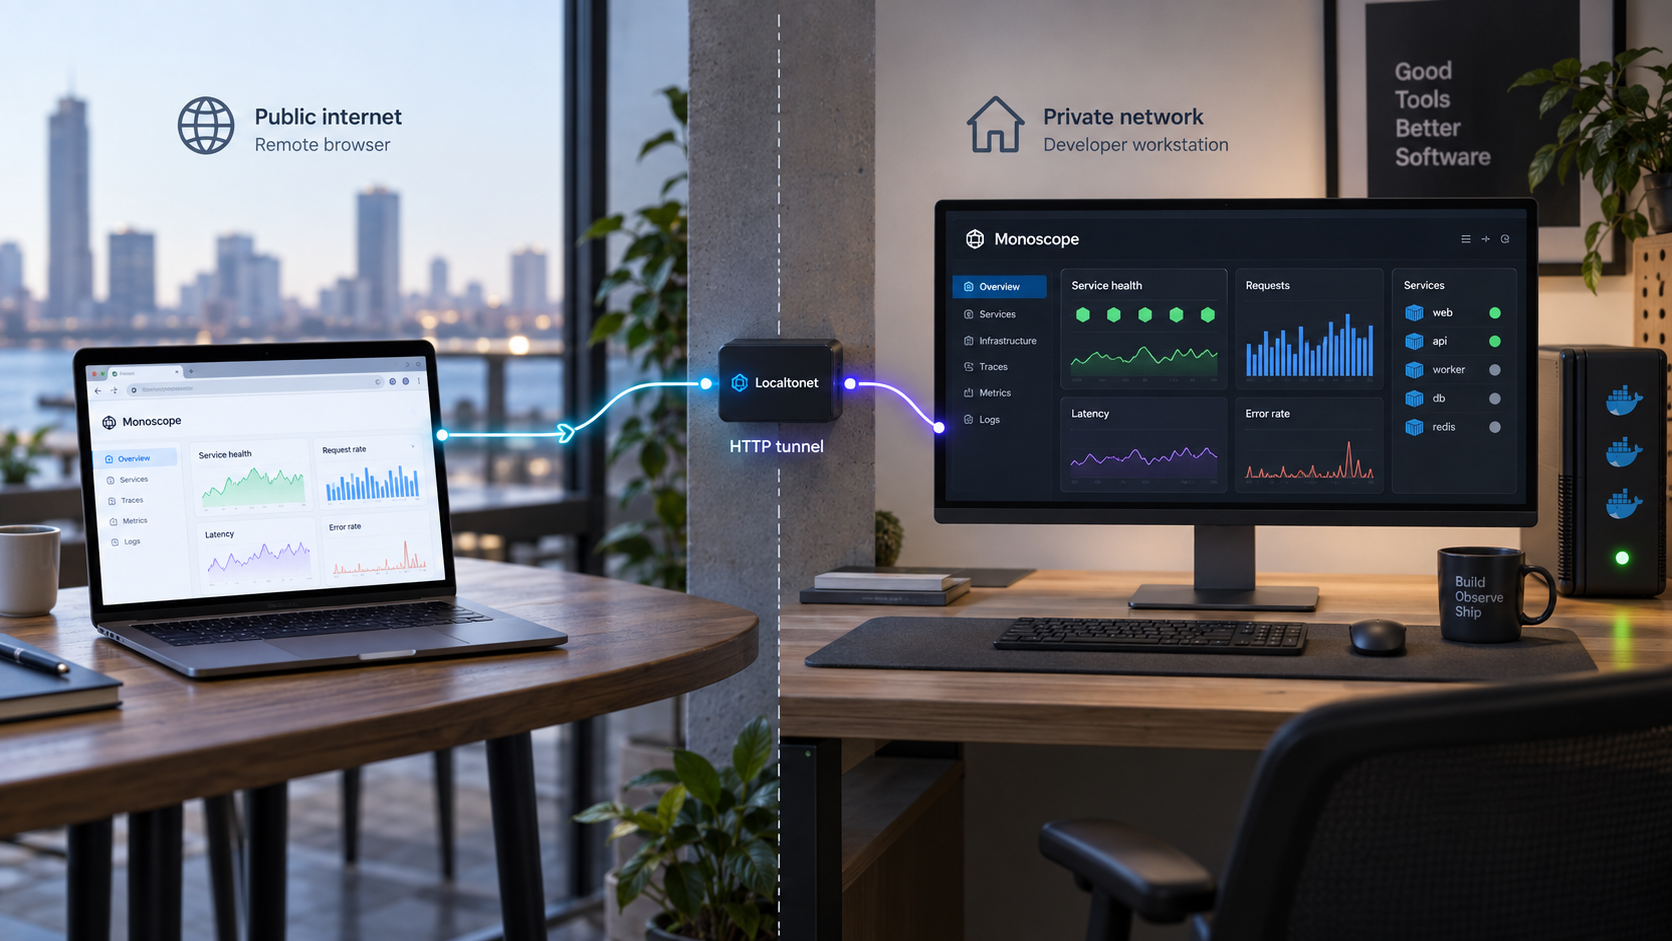
Architecture, evidence, and the limits of this evaluation
Monoscope's public repository describes an open-source observability platform that stores telemetry in S3-compatible storage. Its listed capabilities include logs, traces, metrics, natural-language queries, scheduled AI agents, email reports, live tailing, and correlated telemetry views. In the self-hosted model, you manage the compute environment and bring your own storage.
The current repository quick start consists of cloning the project, entering its directory, running docker-compose up, and visiting http://localhost:8080. It documents the initial sign-in as admin with the password changeme. Those instructions are enough to evaluate whether the supplied Compose stack starts and whether its browser interface responds. They are not, by themselves, a complete production deployment procedure.
In particular, the currently available evidence does not establish a supported quick-start procedure for changing the self-hosted password, configuring a specific S3-compatible provider, proving which application state survives container replacement, or backing up and restoring the complete deployment. The repository comparison also labels self-hosted authentication and SSO as DIY. We will not invent environment variables, configuration files, storage credentials, or account-management controls to fill those gaps.
Complete the local quick start on an isolated or otherwise appropriately controlled host. Do not start a public tunnel while admin/changeme remains valid. A production deployment requires a credential-change method, storage configuration, persistence model, backup process, and upgrade plan verified against the exact Monoscope version you operate.
http://localhost:8080.
8080 after application authentication has been secured.
Dashboard access is not telemetry ingestion
This tutorial covers only remote browser access to the dashboard. It does not expose a telemetry receiver, object-storage service, database, container API, or internal management interface. Although port 4317 is commonly associated with OTLP over gRPC in OpenTelemetry environments, a port convention is not proof of Monoscope's listener, transport, TLS, or authentication configuration.
The current evidence supplied for this revision does not establish a complete self-hosted Monoscope ingestion procedure for port 4317. For that reason, this guide makes no Localtonet tunnel recommendation for that port. Confirm the listener and authentication requirements in the documentation for your selected Monoscope version before connecting any exporter.
A moving branch and a pinned release are not the same deployment
The quick-start clone command checks out the repository's default master branch. That branch changes as new commits are merged. Running the same clone command on different dates can therefore produce different application code, Compose definitions, images, and configuration expectations.
At the time of the supplied evidence, GitHub identified
Monoscope v0.6.27
as the latest release and reported that the master branch already contained additional commits after that release. The release page is useful context, but this article does not assert that v0.6.27 is still latest when you read it. Check the repository's current release information before choosing a version.
| Approach | Behavior | Appropriate use |
|---|---|---|
| Clone the default branch | Retrieves the branch state available when the command runs. | Short-lived evaluation of the current repository quick start. |
| Deploy a reviewed release tag | Associates the source checkout with a specific published tag. | Repeatable testing after reviewing that release's files and notes. |
| Deploy a reviewed commit | Associates the source with an exact commit identifier. | Controlled environments that record and test an exact revision. |
Pinning source code is only one part of reproducibility. Container image tags, generated files, external services, secrets, and storage configuration can also affect the result. Record the exact revision and inspect the Compose files used by that revision before treating an evaluation as a controlled deployment.
Prerequisites for the Monoscope quick start
Use a machine where you are authorized to install and run containers. The project evidence does not provide one universal minimum for CPU, memory, or disk. Observability requirements vary with telemetry volume, retention, enabled services, and query activity, so production capacity should be measured against your workload.
The documented quick start requires Git, Docker, and the hyphenated docker-compose command. Confirm that the required commands are available:
git --version
docker-compose --version
Also verify that the Docker service or desktop application is running and that your user is authorized to use it. The repository documentation used for this tutorial explicitly shows docker-compose up, so the steps preserve that command rather than silently replacing it with another Compose invocation.
| Requirement | Purpose | Preflight check |
|---|---|---|
| Git | Retrieves the official repository and its Compose files. | git --version completes successfully. |
| Docker environment | Runs the containers defined by the project. | The Docker engine is active and accessible to your user. |
| Docker Compose | Starts the repository's multi-container stack. | docker-compose --version completes successfully. |
| Available TCP port 8080 | Provides the documented local dashboard endpoint. | No unrelated service is already listening on the required host port. |
| Controlled evaluation host | Limits the impact of default credentials and unverified persistence. | The host and local network match your security policy for evaluation software. |
| Localtonet-capable device | Runs the outbound client connection for later remote access. | The device can reach the exact Monoscope address and port used as the tunnel target. |
Choose where the Localtonet client will run
The simplest topology is a supported Debian or Ubuntu host that runs both Monoscope and our Localtonet client. In that arrangement, the tunnel target can be 127.0.0.1 with port 8080. The client establishes an outbound connection to our relay, so inbound router port forwarding, a public IP address, firewall changes, and VPN setup are not required for the tunnel workflow.
Our client can instead run on another device that has network access to the Monoscope host. In that topology, 127.0.0.1 refers to the Localtonet device itself, not the Monoscope machine. You must use an address that the client device can reach and test that exact address before creating the tunnel.
Install and start Monoscope with Docker Compose
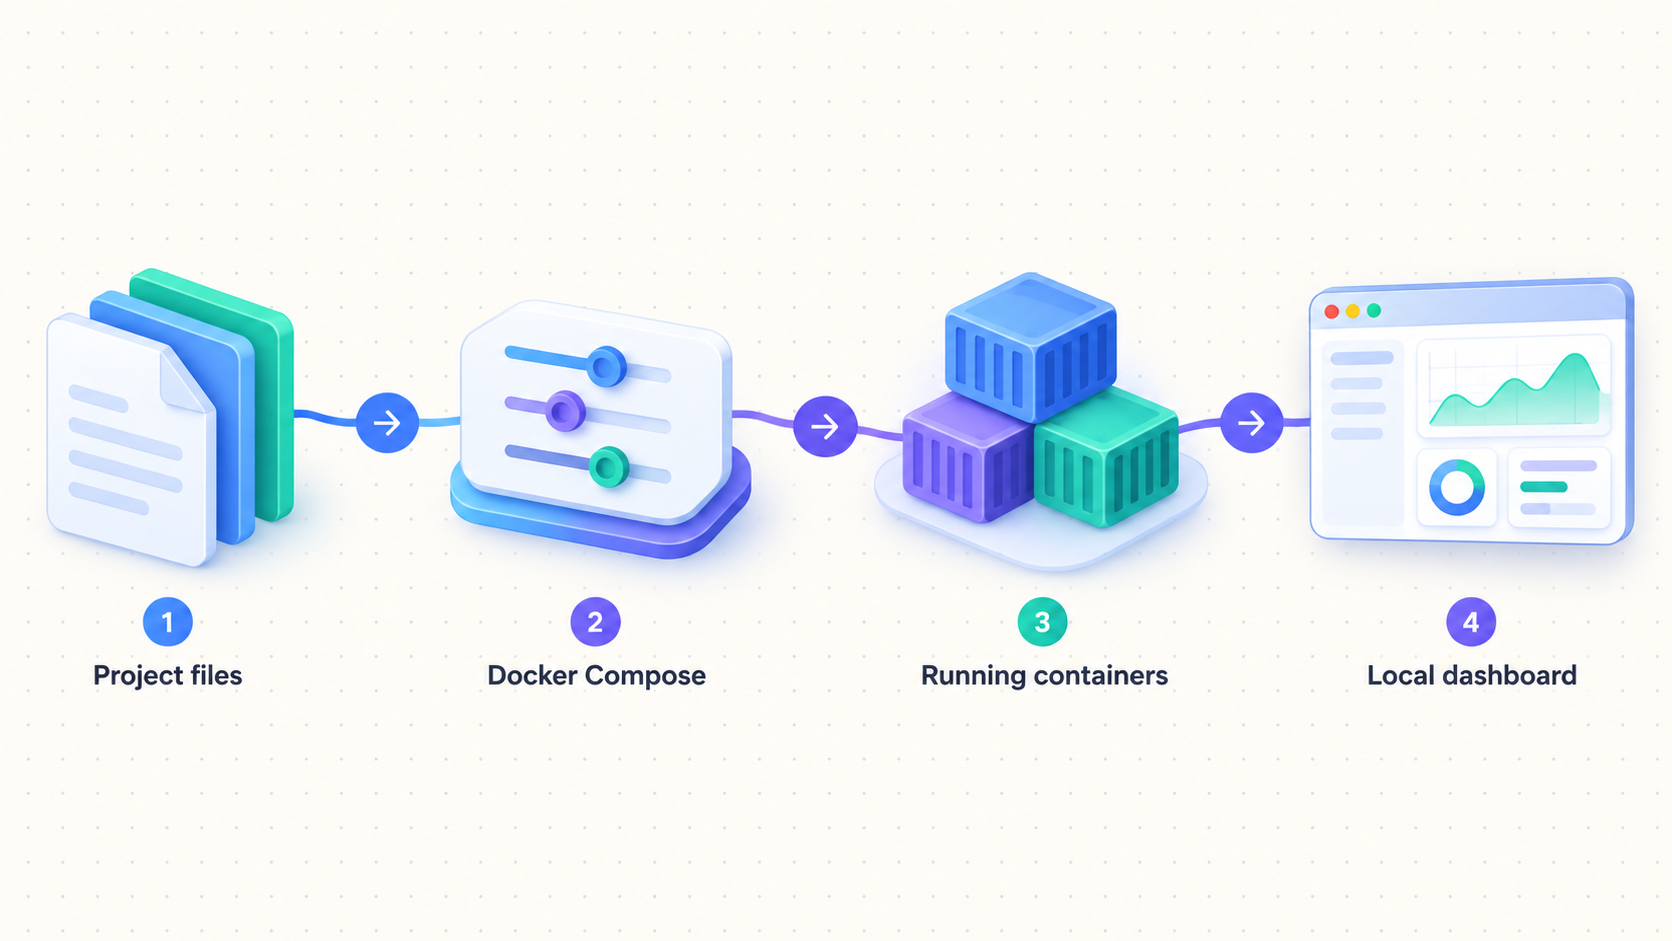
The following three steps preserve the sequence in the current repository quick start. They use the moving default branch and are therefore suitable for evaluation rather than a version-controlled production rollout.
Clone the official Monoscope repository
Download the project from its official GitHub location:
git clone https://github.com/monoscope-tech/monoscope.git
This creates a local directory named monoscope. Because no tag or commit is specified, Git checks out the repository's current default branch.
Enter the repository directory
Change to the directory containing the supplied Compose definition:
cd monoscopeRun the next command from this directory so Docker Compose can locate the project configuration.
Start the stack
Run the startup command documented by Monoscope:
docker-compose upKeep the terminal open during initial evaluation. Watch for image retrieval failures, build errors, port conflicts, initialization failures, and services that repeatedly exit.
Do not assume that successful acceptance of the command means every service is ready. Wait for initial startup activity to settle, then verify the dashboard independently. If Compose reports an error, resolve that error before configuring Localtonet.
What the quick start does not prove
The command sequence proves only that you attempted to start the repository's current Compose application. It does not establish durable storage, secure authentication, automatic startup after a reboot, backup coverage, a supported upgrade path, or production capacity.
Keep the initial foreground process available while testing. Interrupting an attached Compose session can stop its services. For long-term operation, choose a startup and supervision approach that fits your host, but verify it against the exact Monoscope and Docker configuration you deploy.
Verify the Monoscope dashboard locally
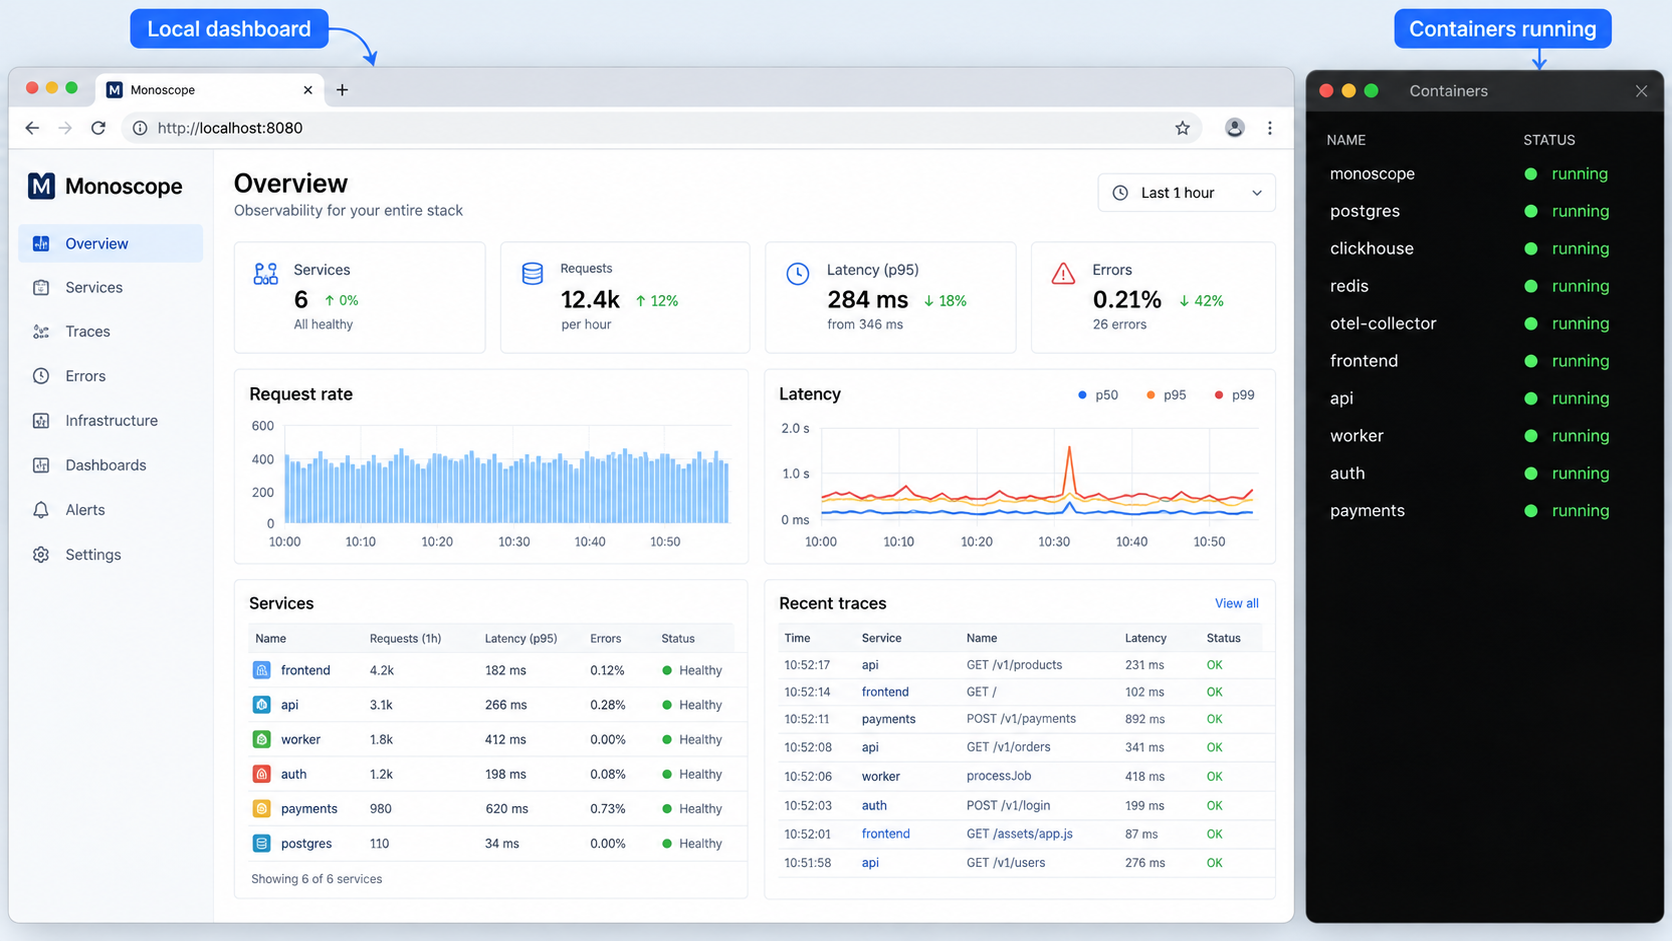
On the Monoscope host, open the dashboard URL documented by the repository:
http://localhost:8080The documented bootstrap credentials are:
Username: admin
Password: changeme
Use these credentials only to confirm the local evaluation interface. The current project evidence does not provide a verified procedure for replacing this password in the self-hosted quick start. Do not guess an environment variable or edit an undocumented database record.
A publicly documented password is not a safe remote-access credential. Keep the Localtonet tunnel stopped unless you have applied and tested a credential-change method documented for the exact Monoscope revision you selected.
Complete a meaningful local check
Confirm that the expected sign-in page appears, that the local bootstrap sign-in succeeds, and that authenticated dashboard pages respond. Continue monitoring the Compose output while navigating. A browser can receive an initial page even when a dependent service is failing.
Investigate repeated restarts, authentication exceptions, storage failures, or incomplete pages before continuing. A tunnel forwards requests to the configured service, but it cannot repair an unavailable container or an unhealthy application dependency.
Test from the Monoscope host first. If the Localtonet client will run elsewhere, test from that client device second. Test the public endpoint only after the first two checks succeed and secure Monoscope authentication has been verified.
Why the optional CLI test workflow is not included
The repository currently shows a CLI installer and sample commands such as monoscope auth login, monoscope send-event, and monoscope telemetrygen. However, the supplied evidence does not establish a verified option, environment variable, or configuration procedure that makes the CLI authenticate specifically against this local self-hosted quick-start instance.
Running the installer alone would not prove which service receives authentication or test telemetry. To avoid sending data to an unintended endpoint, this tutorial omits the CLI test-data workflow. Use it only after current Monoscope CLI documentation explicitly identifies how to select and authenticate to your self-hosted endpoint.
Storage, persistence, and version control
Monoscope describes S3-compatible buckets as the storage location for telemetry data. It also says that self-hosted users manage the compute environment. Those product-level statements do not reveal the exact provider settings, credentials, bucket policy, persistence behavior, or recovery process for the quick-start Compose stack.
Do not invent S3 settings
S3-compatible services differ in endpoint format, region handling, certificate configuration, path-style behavior, credential scope, and bucket policy. A working configuration can also depend on Monoscope's exact revision. This article therefore does not provide placeholder environment variables that have not been verified against the project.
Before sending important telemetry, identify the exact Monoscope configuration keys for your selected version, create the required bucket or buckets, grant only the documented permissions, and test both writes and reads. Keep access keys out of Git, images, screenshots, shell history, and public issue reports.
Do not assume container storage is durable
A container continuing to run after initial startup does not prove that its state survives recreation. Review the Compose definition from your pinned revision and identify every named volume, bind mount, object-storage dependency, and generated configuration file. Determine which components contain replaceable cache data and which contain state required for recovery.
Do not remove volumes or delete storage during experimentation unless you understand the consequences. The available evidence does not provide a complete Monoscope backup and restore procedure, so this guide cannot certify one. Until restoration has been tested, treat the deployment as disposable.
Record the exact revision before testing changes
A default-branch clone is a moving deployment. Record the commit you evaluated and compare current release information before updating. Review changes to Compose files, authentication, migrations, and storage configuration before applying them.
An application update and a tunnel change are separate operations. Stop the Localtonet tunnel before maintenance, verify Monoscope locally after the update, and restore remote access only when secure authentication and expected dashboard behavior have been confirmed.
Install the Localtonet client on Debian or Ubuntu
Our current installation documentation provides packages for several operating systems and architectures. The reproducible path below uses the documented Debian or Ubuntu package with systemd. Current requirements for this package path include systemd 247 or newer and OpenSSL 3, such as Debian 12 or Ubuntu 22.04 and later.
Choose the x64 or ARM64 package that matches the host architecture from the documentation page. Do not substitute one architecture for another, and do not invent a package URL because available downloads can change.
Install the downloaded package
Open a terminal in the directory containing the correct package. For an x64 package, use:
sudo apt install ./localtonet-linux-x64.debOn an ARM64 host, use the documented ARM64 package filename instead. Confirm your architecture before installation.
Store and validate the device AuthToken
Edit /etc/localtonet/auth-token as root and replace its placeholder with the device-specific token on one line. Never place the real token in an article, screenshot, source repository, or shared command transcript. Protect the file and validate the configuration:
sudo chmod 600 /etc/localtonet/auth-token
sudo localtonet --headless --authtoken-file /etc/localtonet/auth-token --check-config
Continue only after the configuration check succeeds.
Enable and start the service
Start the standard Localtonet service and inspect its journal:
sudo systemctl enable --now localtonet.service
sudo journalctl -u localtonet.service
This standard tunneling workflow does not use the separate VPN service. Keep the service running so the selected device can remain connected.
If the Localtonet client runs directly on the Monoscope host, verify http://127.0.0.1:8080 there. If the client runs on another machine, open the exact LAN address you plan to enter as the tunnel target from that machine. Do not proceed merely because the URL works from a different device.
Configure the Localtonet HTTP tunnel
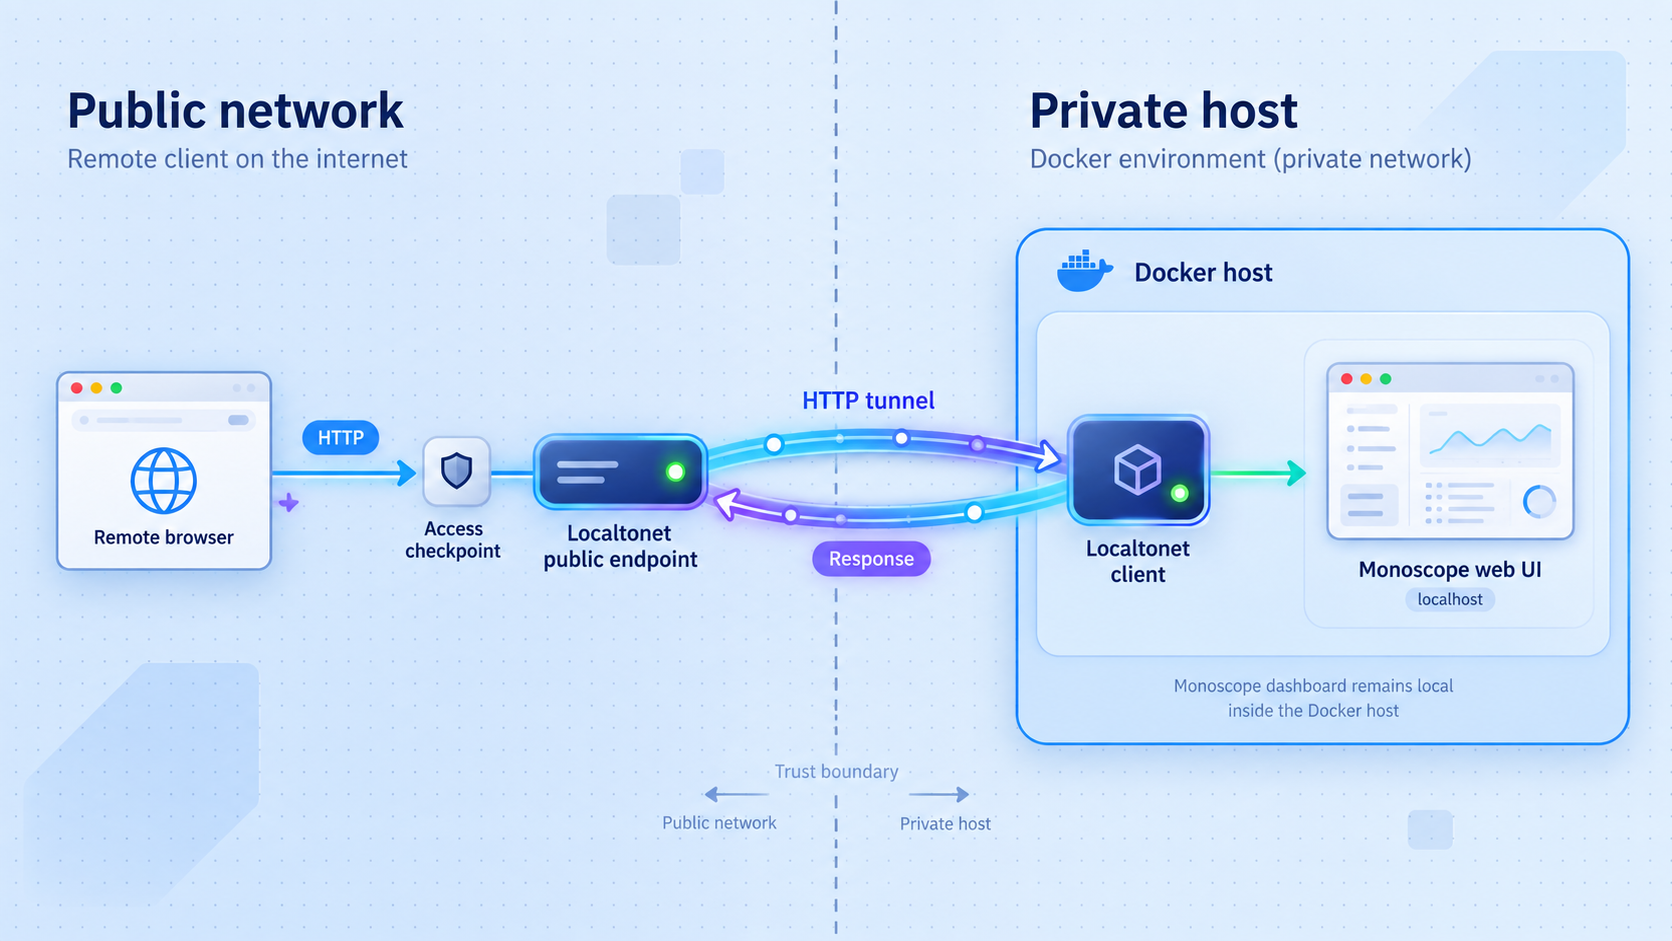
Use the Localtonet HTTP tunnel documentation alongside the sequence below. The dashboard and current documentation are authoritative for options available to your account. Do not assume that every process type, domain option, relay, region, or capability is included in every subscription plan.
The configuration sequence distinguishes creating the tunnel from starting it. For this Monoscope evaluation, you may complete the configuration and leave it stopped. Press Start only after the default Monoscope password no longer works and secure authentication has been tested locally.
Open the HTTP Tunnel page
Sign in to the Localtonet dashboard and open the HTTP tunnel configuration page. Use HTTP because the confirmed target is Monoscope's browser interface at local port 8080.
Select the Process Type
Choose Random Sub Domain, Custom Sub Domain, or Custom Domain as available in the current dashboard. Each process type serves the same local content through a public HTTPS address. Random Sub Domain is the simplest evaluation choice when available. Custom domain DNS requirements must be taken from the current documentation rather than inferred here.
Select the AuthToken
Select the device-specific AuthToken for the client that can reach Monoscope. The token identifies the client device that will run the tunnel. Keep it secret and confirm that the corresponding client is connected.
Select an available relay server
Choose a server or region from the values currently shown in the dashboard. Do not copy a hardcoded server code from an old tutorial because available values can vary by account, plan, client version, or deployment.
Enter the local IP address and port
If the Localtonet client runs on the Monoscope host, enter 127.0.0.1 as the local IP and 8080 as the local port. If the client runs elsewhere, enter the Monoscope host address that you already verified from the client device, with port 8080.
Create the tunnel configuration
Save or create the HTTP tunnel using the selected process type, AuthToken, relay, local IP, and port. Creation records the configuration but does not mean that the tunnel is running.
Start the tunnel and verify connected state
After secure Monoscope authentication has been configured and tested, press Start. Wait for the selected client and tunnel to show a connected state. If the default password still works, leave the tunnel stopped.
Test the public HTTPS address externally
Open the assigned URL from a separate network when possible. Confirm that the expected Monoscope sign-in page appears, unauthorized access is rejected, and approved credentials work. Stop the tunnel immediately if the wrong application appears or authentication is not behaving as expected.
Stop or delete the tunnel when appropriate
Stop the tunnel to remove the public route while retaining its configuration for later use. Delete it when the configuration is no longer needed. Stopping or deleting the tunnel does not remove the Monoscope containers, and stopping Monoscope does not delete the tunnel configuration.
Choose the correct local target
| Client location | HTTP target | Required verification |
|---|---|---|
| On the Monoscope host | 127.0.0.1:8080 |
Open http://127.0.0.1:8080 on that host. |
| On another LAN device | Reachable Monoscope host address on port 8080 |
Open that exact address from the Localtonet client device. |
| Inside an isolated container | A host or service address reachable from that container | Test from the client's network namespace, not only from the Docker host. |
Loopback always refers to the machine or network namespace where the connecting process runs. If Monoscope works at localhost:8080 in the host browser but Localtonet runs in a separate container, the client's 127.0.0.1 can refer to the Localtonet container rather than the host.
Security and operational checklist
Observability systems can reveal service names, request paths, error messages, infrastructure relationships, user behavior, and operational failures. Treat the dashboard as an administrative system rather than a public website.
admin/changeme remains valid. Use a method documented for your exact Monoscope revision.
8080. Do not include object storage, databases, Docker control interfaces, or unverified telemetry listeners.
A tunnel is not an authorization layer
Localtonet provides connectivity from a public endpoint to the selected local target. It does not replace Monoscope authentication, authorize users, secure weak application credentials, or determine what authenticated users may view.
Do not use a tunnel to bypass organizational security controls. Obtain authorization before exposing an internal observability system, follow applicable data-handling policy, and limit access according to the sensitivity of the telemetry.
Before pressing Start, confirm that the default password no longer works, sensitive secrets are not displayed unnecessarily, storage credentials use least privilege, the target is exactly the intended web service, and the selected Localtonet client is under your control.
Understand the complete availability chain
Remote access depends on Monoscope, its supporting services, the local network path to port 8080, the Localtonet client, the client's outbound connection, and the running tunnel. If any link becomes unavailable, the public dashboard will stop responding.
Stop and deletion also have different purposes. Stop a tunnel when remote access should be temporarily unavailable. Delete it when you no longer need its configuration. Neither operation is a backup or shutdown procedure for Monoscope.
Troubleshoot the deployment methodically
The repository does not clone
Confirm that Git is installed, outbound access to GitHub is permitted, and the repository URL is exact. Check that the current directory is writable and that an existing nonempty monoscope directory is not causing confusion. Do not substitute an unofficial archive.
docker-compose is not recognized
The current quick start uses the hyphenated command. Verify that your Docker distribution provides it and that docker-compose --version succeeds. Docker packaging varies by operating system, so install a compatible Compose implementation using your platform's supported procedure.
Compose cannot connect to Docker
Make sure the Docker engine or desktop application is running and that your account is authorized to access it. This failure occurs before Monoscope starts, so changing the web port or tunnel configuration will not help.
Port 8080 is already in use
Identify the process currently listening on port 8080 and confirm whether the page belongs to Monoscope. Stop or reconfigure the conflicting service according to its own documentation.
This article does not invent a Monoscope port-remapping procedure. If the exact version you deploy documents a supported remapping method, use the resulting host port consistently for local verification and as the Localtonet target.
The local dashboard does not open
Confirm that the Compose process remains active and inspect its output for failed initialization, image errors, storage problems, or containers that exited. Verify that the URL uses HTTP and port 8080. Test from the Monoscope host before involving another device or Localtonet.
The local dashboard works, but the client device cannot reach it
This is a host binding, local routing, namespace, or policy problem rather than a public tunnel problem. Remember that 127.0.0.1 on the client device is not the Monoscope host. Use an authorized LAN address that is reachable from the device running our client.
The Localtonet service does not connect
Review sudo journalctl -u localtonet.service, confirm that the AuthToken file contains the correct device token on one line, check its permissions, and rerun the documented configuration check. Make sure the host has outbound connectivity.
Do not disclose the real AuthToken while asking for help. Redact it from terminal output, screenshots, and copied configuration.
The tunnel exists, but the public URL does not work
Confirm that the selected client is connected and that you explicitly pressed Start. A created tunnel is not automatically active. Then test the configured IP and port from the device running Localtonet.
Verify that the tunnel family is HTTP and the port is 8080. Do not substitute an assumed OpenTelemetry endpoint for the confirmed browser interface.
The public URL shows the wrong application
Stop the tunnel immediately. Check which process owns the configured local address and port. Localtonet forwards to the target you selected, so a different listener at that target can expose a different application.
Authentication fails through the public endpoint
Test the same account locally. If local authentication fails, troubleshoot Monoscope while the tunnel remains stopped. If it works locally but fails remotely, compare the exact application URL and browser session, then inspect Monoscope's output for rejected requests.
Never restore changeme as a troubleshooting shortcut. Public access should remain unavailable until secure authentication works consistently.
The tunnel worked and later stopped
Test each boundary in order. First verify Monoscope on its local address. Next verify the target from the Localtonet client device. Then confirm that the client is connected and the tunnel is running. Finally test the public URL.
A host reboot, interrupted foreground Compose session, stopped Localtonet service, disconnected device, or manually stopped tunnel can interrupt access. Changing several settings at once makes the original failure harder to identify.
Frequently asked questions
Is this Monoscope deployment production-ready?
No. This tutorial follows the repository's evaluation quick start. The available evidence does not provide a complete supported procedure for changing self-hosted credentials, configuring production S3 storage, proving persistence, or restoring backups. Complete and test those requirements for a pinned version before production use.
What is the documented local Monoscope URL?
The current repository quick start directs users to http://localhost:8080. Verify that address on the Monoscope host before configuring a tunnel.
Can I expose Monoscope with the default password?
No. The repository publicly documents admin/changeme. Keep the tunnel stopped until you have used a supported credential-change method for your exact version and confirmed locally that the default password no longer works.
Why does this guide clone the master branch?
That is the current repository quick-start command. It creates a moving evaluation deployment because the default branch changes over time. For repeatable testing, review current release information and use an explicitly selected tag or commit according to the project's version guidance.
Which Localtonet tunnel type should I use?
Use an HTTP tunnel for the confirmed Monoscope browser dashboard. When our client runs on the Monoscope host, use local IP 127.0.0.1 and port 8080. When it runs elsewhere, use an address that the client device can reach.
Should I expose port 4317 with the same tunnel?
No recommendation is made here. A commonly used OpenTelemetry port does not establish Monoscope's actual listener, transport, TLS, or authentication settings. Confirm the current Monoscope ingestion documentation before selecting any tunnel type or exposing an ingestion endpoint.
Does creating a Localtonet tunnel start it?
No. Creation stores the configuration. You must press Start, and the selected client device must remain connected. You can stop the tunnel without deleting it or delete the configuration when it is no longer needed.
Do I need router port forwarding or a public IP?
No. The Localtonet client establishes an outbound connection to our relay server. The tunnel can provide a public URL without inbound router port forwarding, firewall changes, VPN setup, or a public IP address.
Does Localtonet replace Monoscope authentication?
No. Localtonet provides connectivity to the selected local service. Monoscope remains responsible for application sign-in and authorization, and you remain responsible for configuring secure credentials and deciding who may access the dashboard.
Why are the Monoscope CLI test commands omitted?
The current evidence includes a CLI installer and sample commands but does not provide a verified procedure for targeting this self-hosted quick-start instance. The workflow is omitted to avoid authenticating to or sending test data to an unintended endpoint.
Prepare controlled Monoscope dashboard access
Verify Monoscope locally, secure its application authentication using documentation for your selected version, then configure a Localtonet HTTP tunnel to the confirmed dashboard target on port 8080.
Get Started Free →

