

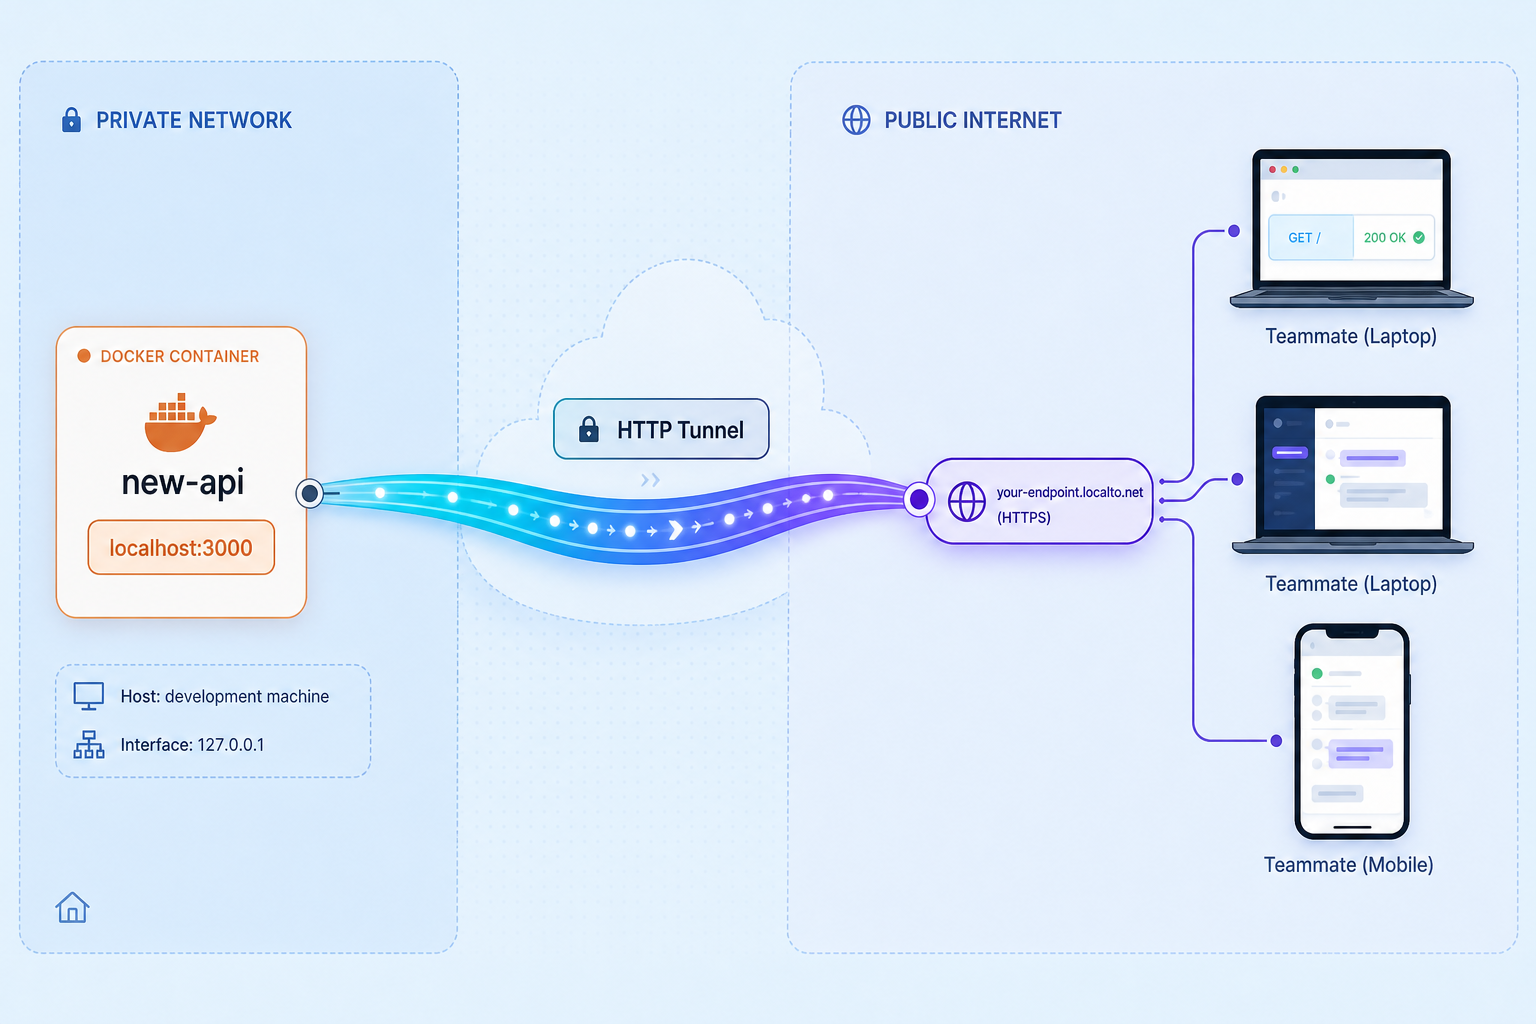
Run your own OpenAI-compatible gateway locally first, then give your team a public HTTPS address
new-api is an open-source, self-hosted AI gateway that puts OpenAI-, Claude- and Gemini-compatible APIs, model routing, access control, usage tracking and cost accounting behind one service. This guide installs it with Docker or Docker Compose, checks it locally, and only then adds remote access as a separate step. We use a Localtonet HTTP tunnel for that step, so teammates can reach the console and the API without router port forwarding, firewall changes or a public IP on your machine.
📋 What's in this guide
Why share a self-hosted AI gateway with your team
Once more than one person or tool talks to large language model providers, you accumulate provider keys in many places, you lose sight of who spent what, and every application has to learn a different API shape. A gateway fixes that by sitting in the middle. Applications talk to one OpenAI-compatible endpoint, and the gateway decides which upstream provider handles the request, who may call it, and how usage is recorded.
new-api is one such gateway. Its repository describes it as an open-source AI gateway with OpenAI-, Claude- and Gemini-compatible APIs, model routing, access control, usage tracking and cost accounting. Its project website adds that it unifies access to more than 30 AI providers and is compatible with tools such as Open WebUI, Dify, n8n and Cherry Studio. We have not tested each of those integrations ourselves, so treat that list as the project's own claim.
The practical problem this article addresses comes after installation. A gateway running on a workstation, a home server or a lab machine at http://localhost:3000 is useful only to the person sitting at that machine. Teammates on another network cannot reach it, and opening an inbound port on your router just to host a console that stores upstream credentials is not something we would recommend. With Localtonet, the client on your machine opens an outbound connection to a relay server, and the tunnel provides a public URL that forwards to the local port while the tunnel is running.
The order matters. We install and verify new-api entirely on the local machine first, because a tunnel only forwards traffic to whatever is already there. If the service is broken locally, the tunnel will faithfully expose a broken service. Remote access is a distinct next step, and the new-api README does not mention Localtonet or tunneling at all, so the pairing described here is our own proposed workflow and not an official instruction from the project.
Prerequisites
The official README evidences two installation paths, and both are container-based. That defines what you need.
- Docker Engine on the machine that will host the gateway. Both the quick trial and the Compose route use it.
- Docker Compose (the
docker composecommand) if you want the longer-lived setup. The default Compose stack is new-api plus PostgreSQL plus Redis. - Git for the Compose route, because that route starts by cloning the repository so you can edit
docker-compose.yml. - A free local port 3000 for the quick trial. The Compose published port is not stated in the README excerpt we worked from, so you will confirm it in the file itself.
- A Localtonet account and the Localtonet client installed on the device that can reach the gateway. You only need this for the remote access step.
- At least one upstream provider credential if you want real model responses. new-api routes to providers, so without a configured channel there is nothing for it to forward to.
The repository also contains Go source, a web frontend directory, an electron directory, a new-api.service file and a .env.example. The evidence we worked from did not include their contents, so we do not describe a from-source build, a systemd installation, or the full list of environment variables. We also do not state any default admin credentials or first-run screens, because the evidence does not establish them. Where this article reaches the edge of verified detail, it says so and points you to the repository files.
Option 1: a quick local trial with a single container
The README's first path is a quick trial: one container from the calciumion/new-api:latest image, using SQLite for storage, with a data volume mounted at /data and the service bound to 127.0.0.1:3000. SQLite means there is no separate database or cache to run, which makes it a good way to see the console and API before committing to a fuller stack.
Binding to 127.0.0.1 is a deliberate safety property. It means the port is reachable only from the same machine, not from the LAN. That is exactly what you want while you are still setting things up.
The command below is assembled from those documented facts (image name, /data volume, loopback binding on port 3000) using standard Docker syntax. Compare it with the current command in the project README before running it, since the README may include additional options such as a container name or restart policy that we cannot confirm here.
mkdir -p ./new-api-data

docker run -d \
  -p 127.0.0.1:3000:3000 \
  -v "$(pwd)/new-api-data:/data" \
  calciumion/new-api:latest
Two details deserve attention. The host directory on the left of the volume mapping is where the SQLite database and other persistent data end up, so keep it somewhere you back up. If you omit the volume, your data lives only inside the container and disappears when the container is removed. And the :3000 after the loopback address is the host side; the container-side port of 3000 is our reading of the documented setup, which is another reason to check the README command.
The Compose route in the README is the one that exposes the session-secret and secure-cookie settings. For a gateway that several people will log in to over HTTPS, move to the Compose setup below instead of publishing the trial container through a tunnel.
Option 2: install with Docker Compose
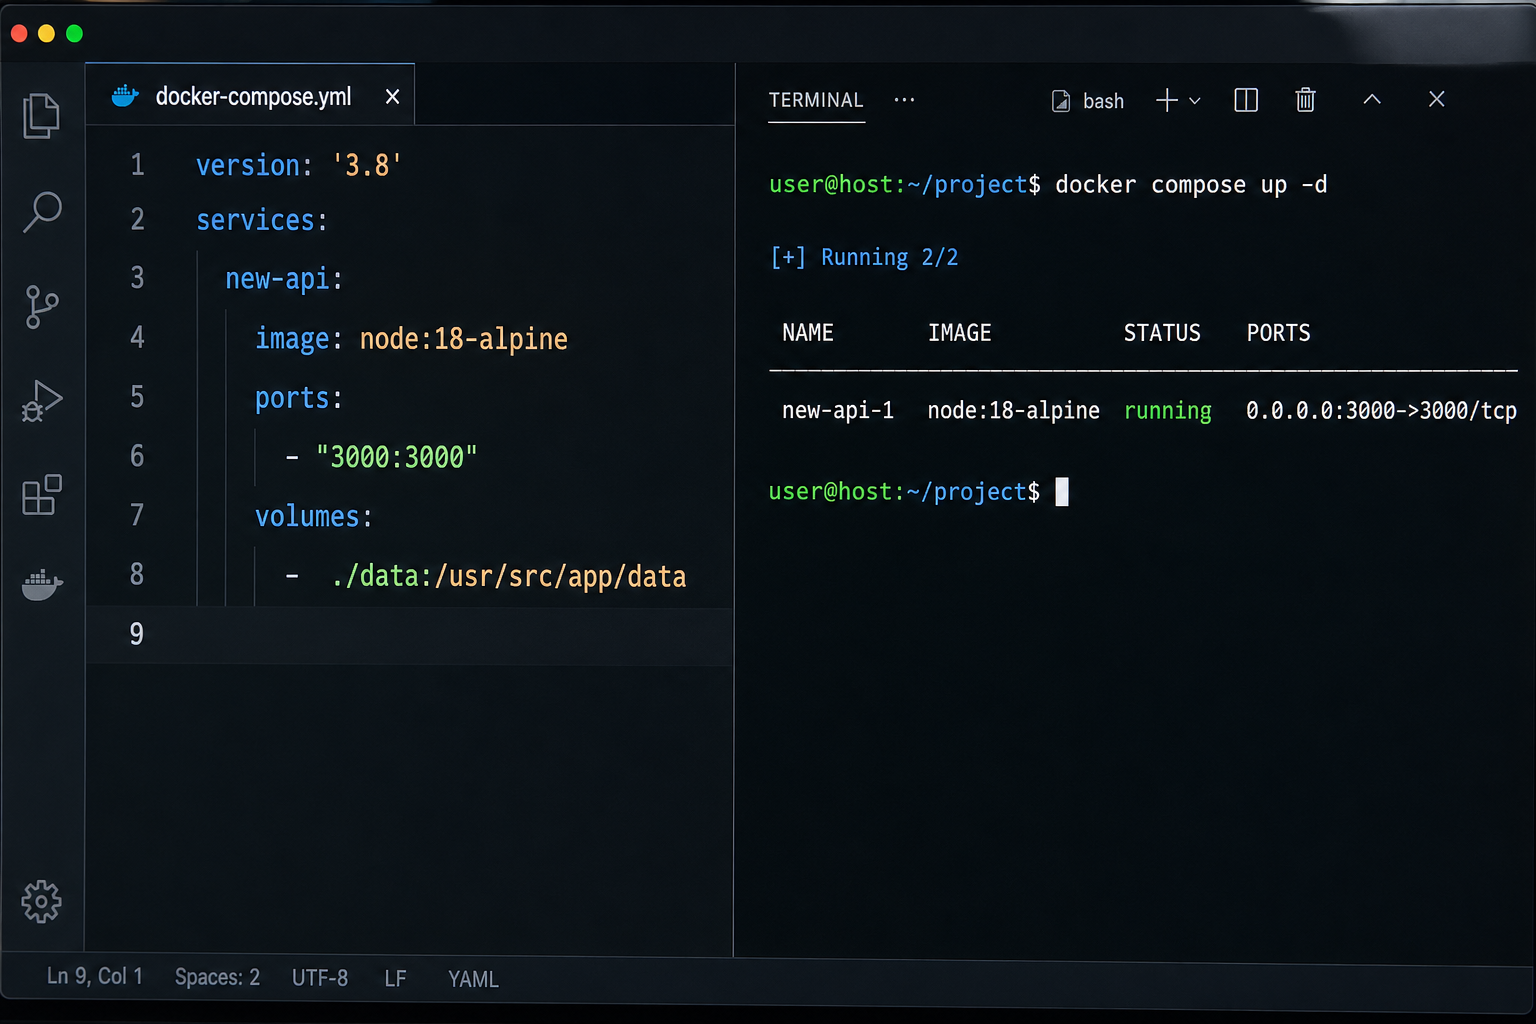
The README's second path is the one to use for a deployment other people depend on. The default Compose stack runs three services: new-api, PostgreSQL and Redis. The workflow is to clone the repository, edit docker-compose.yml before first start, and then bring the stack up in the background.
Clone the repository
git clone https://github.com/QuantumNous/new-api.git
cd new-api
Edit docker-compose.yml before the first start
Open docker-compose.yml in an editor. The README calls out these changes, and we recommend making them before the first up, not afterwards:
- Change the database password and the Redis password from their shipped values. The file contains example credentials for the bundled PostgreSQL and Redis services, and those should not remain in place on anything reachable by other people. Where the same password appears in both the database service and the new-api connection settings, update every occurrence so they stay consistent.
- Set a persistent random
SESSION_SECRET. Generate a long random value and keep it stable across restarts. If it changes, existing login sessions are affected, so do not regenerate it on every deploy. - If the console will be served over HTTPS, set
SESSION_COOKIE_SECURE=trueand setSESSION_COOKIE_TRUSTED_URLto the exact public HTTPS origin, for examplehttps://your-public-hostnamewith no path. This is the documented pair for an HTTPS console, and it is the one that matters when you later publish the gateway through a tunnel.
A convenient way to produce a random secret on a Unix-like system is the general-purpose OpenSSL tool:
openssl rand -hex 32
Paste the output into the SESSION_SECRET value in the environment section of the new-api service. We deliberately do not show a full edited compose file, because we cannot reproduce the current file's exact structure and an invented layout would be worse than none. The lines you add or change look like this, in whatever form the file uses for environment entries:
SESSION_SECRET=paste-your-long-random-value-here
SESSION_COOKIE_SECURE=true
SESSION_COOKIE_TRUSTED_URL=https://your-public-hostname
Leave the last two lines out until you know your public address. The next section explains the order of operations.
Check which port is published
The README excerpt states port 3000 for the single-container example but does not explicitly state the Compose published port. Look at the ports mapping of the new-api service in docker-compose.yml and note the host-side port. Everywhere this article says 3000, substitute that number if your file differs. Also note whether the mapping includes a host address such as 127.0.0.1 or leaves it open to all interfaces, because that determines whether other machines on your LAN can reach the gateway directly.
Start the stack
docker compose up -dThe first start pulls images and creates the PostgreSQL and Redis services alongside new-api, so it takes longer than later starts. When it returns, the containers are running in the background.
You can start the stack without SESSION_COOKIE_SECURE and SESSION_COOKIE_TRUSTED_URL, verify everything on localhost, create the tunnel, learn the public origin, and then add those two settings and run docker compose up -d again. If you plan to use a custom domain or a custom subdomain, you can decide the exact origin in advance and set it from the start.
Verify the gateway locally
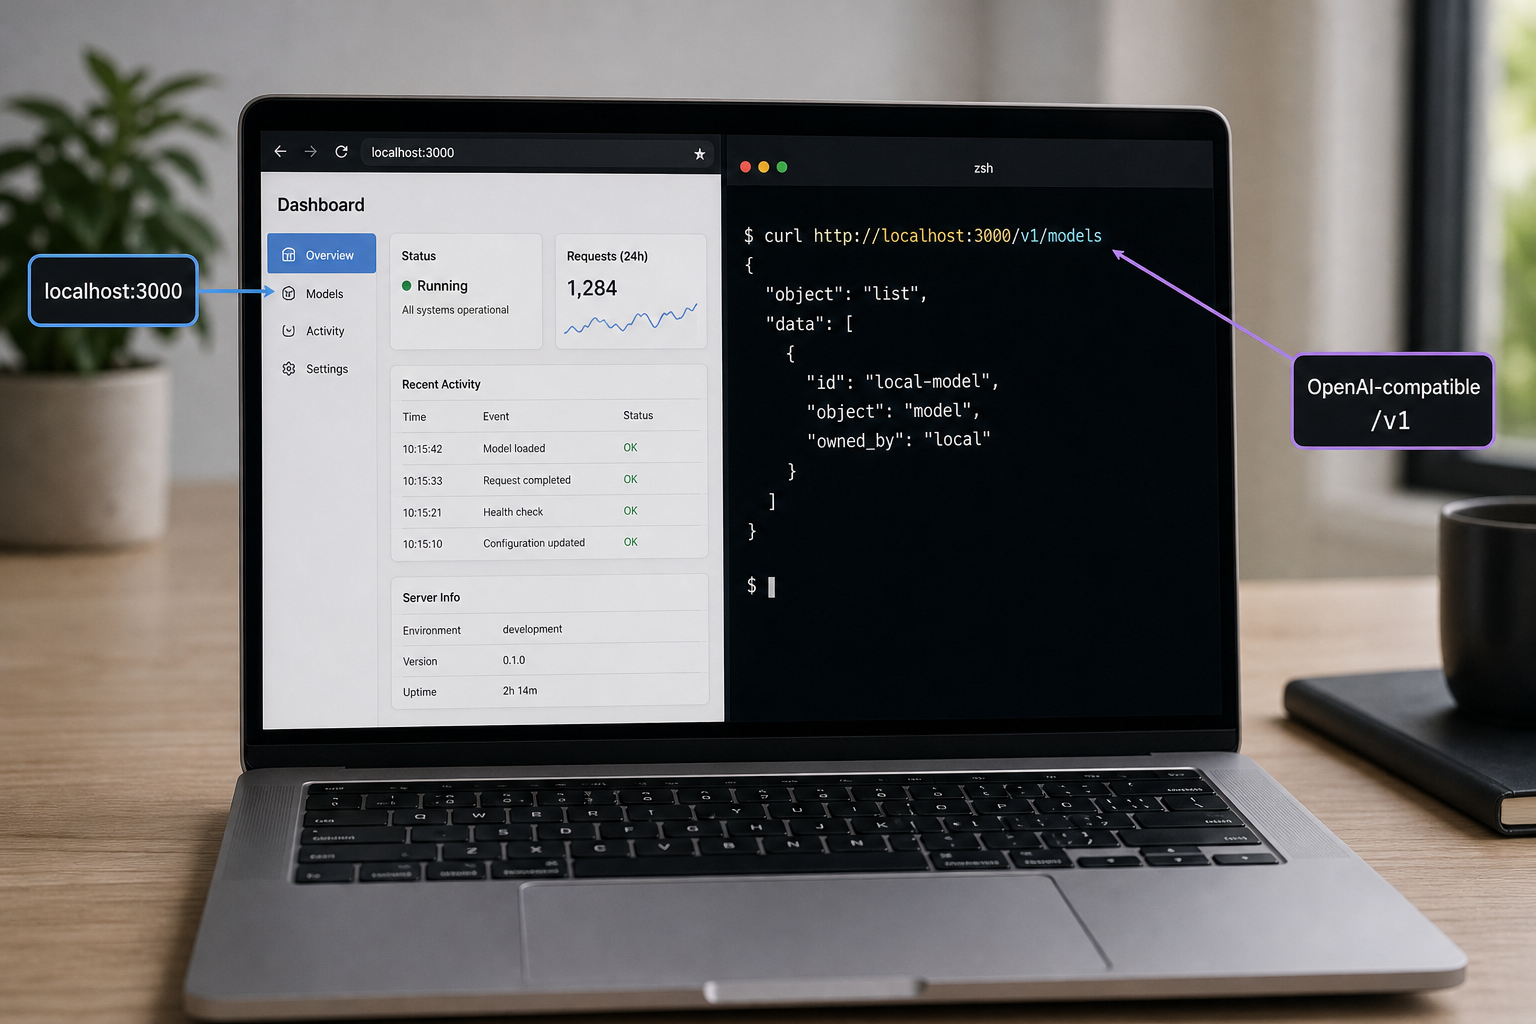
Do all of these checks on the host machine before any tunnel exists. If one fails, fix it here, because the cause will be easier to isolate without a relay in the path.
1. Confirm the containers are running
docker ps
docker compose ps
docker ps works for both installation options. docker compose ps applies to the Compose route and should list new-api, PostgreSQL and Redis. A service that keeps restarting or has exited points to a configuration problem, usually mismatched database credentials after editing the file.
2. Read the logs
docker compose logs --tail=100
For the single-container trial, use docker logs with the container name or ID shown by docker ps. You are looking for evidence that the service started and is listening, and for any database or Redis connection errors.
3. Request the console over HTTP
curl -i http://localhost:3000/
An HTTP response with a success status or a redirect to a login page means the web console is being served. Open http://localhost:3000 in a browser as well. The evidence we have does not describe the first-run flow or any default administrator credentials, so follow what the console presents on first visit and consult the repository documentation for account setup. Do not assume a default password and do not leave anything that looks like one in place.
4. Add a channel and create a token
The project describes its workflow as configuring channels (the upstream providers you connect, with priority and weight settings) and then integrating applications through the compatible API. Release notes also refer to per-token and per-model settings, pricing, and usage logs, so those concepts exist in the console. Add at least one channel with a real upstream credential, make sure the model you want is priced if billing is in play, and create a gateway token for clients. Exact menu names and field labels may differ between releases, so we describe them by concept and not by click path. The release we checked was v1.0.0-rc.47, a release candidate, which is a reminder that this project moves quickly.
5. Call the OpenAI-compatible endpoint
With a token in hand, list models through the compatible API. Replace the placeholder with your own token and never paste real tokens into shared notes or chat:
curl http://localhost:3000/v1/models \
  -H "Authorization: Bearer YOUR_NEW_API_TOKEN"
The endpoint paths named in the project material are /v1/models, /v1/responses and /v1/chat/completions. Once models list correctly, try a short chat completion against a model you configured:
curl http://localhost:3000/v1/chat/completions \
  -H "Authorization: Bearer YOUR_NEW_API_TOKEN" \
  -H "Content-Type: application/json" \
  -d '{"model":"YOUR_MODEL_NAME","messages":[{"role":"user","content":"Say hello in one sentence."}]}'
If this returns a model answer, the local gateway is working end to end: client to new-api, new-api to the upstream provider, and the result recorded in the usage log. Open the usage log in the console and confirm the call appears. That log is the foundation of the shared cost visibility you want before more people start using the service.
| Check | What success looks like | What failure usually suggests |
|---|---|---|
| docker compose ps | new-api, PostgreSQL and Redis all running | A service is restarting, often from mismatched database or Redis passwords after editing the compose file |
| curl to http://localhost:3000/ | HTTP response from the console | Wrong host port, port already in use, or the container is not up yet |
| GET /v1/models with a token | A JSON list of models | Invalid or missing token, or no channel and model configured yet |
| POST /v1/chat/completions | A model reply and a new usage log entry | Upstream credential problem, unpriced model, or a model name that no channel serves |
Share the gateway with Localtonet over an HTTP tunnel
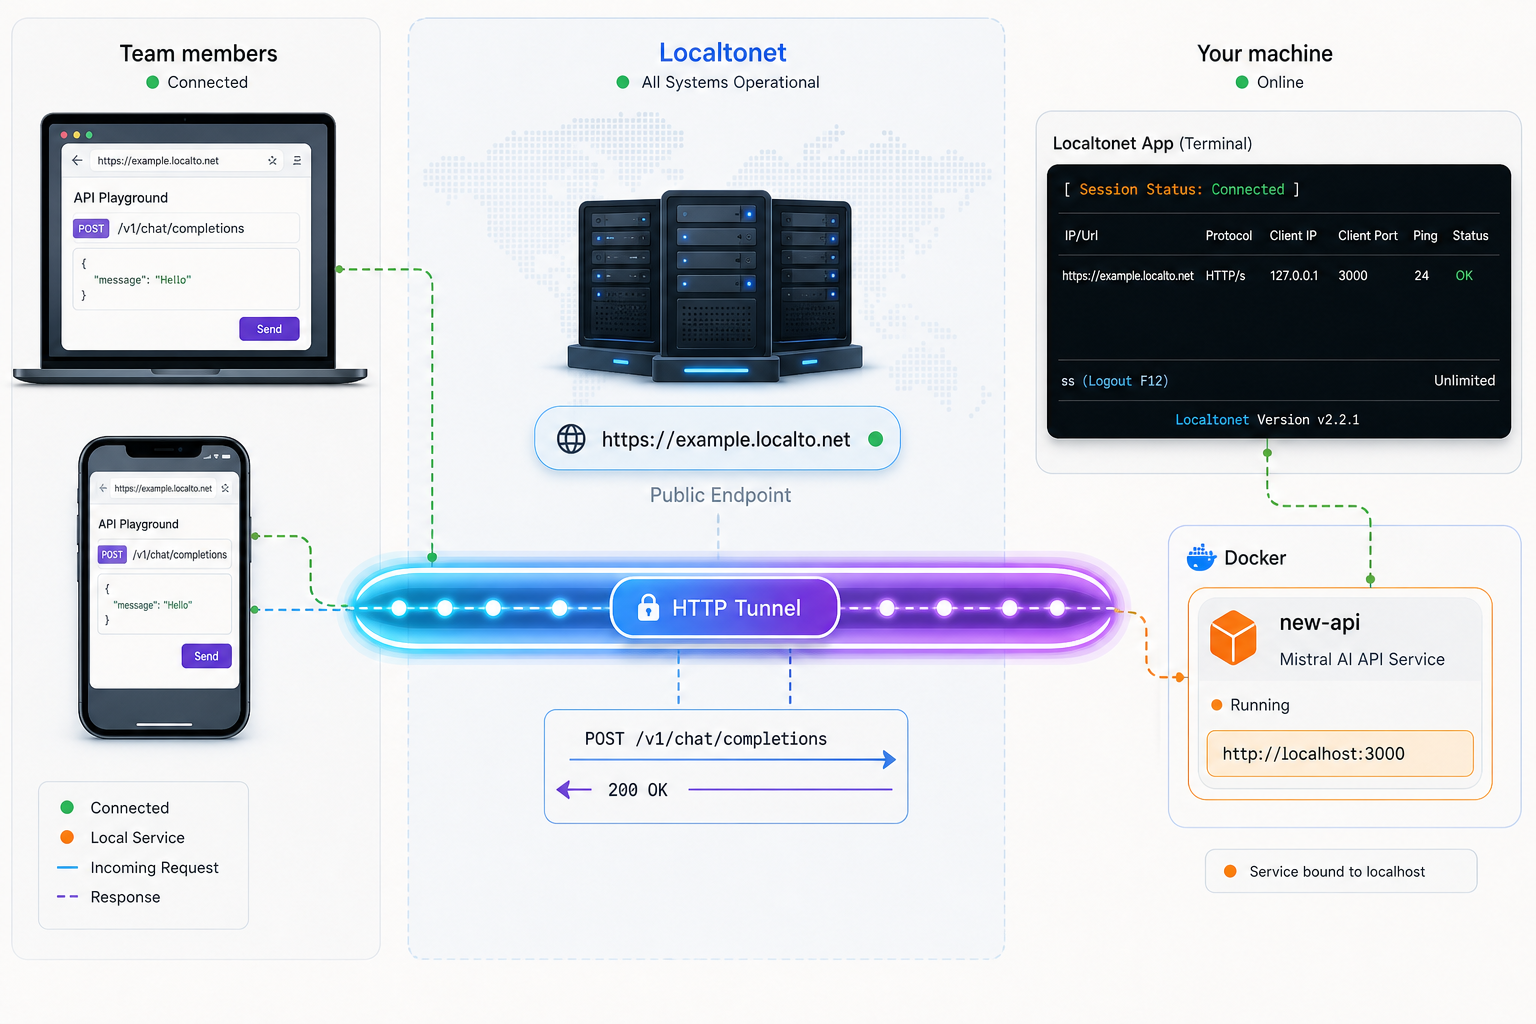
The local service is verified, so now we add remote access. The right tunnel type is HTTP, because the thing you are publishing is a web console plus an HTTP API. The tunnel forwards to a local IP address and port reachable from the device running the Localtonet client, and it is available only while that client is connected and the tunnel is started. For the complete HTTP configuration reference, see the Localtonet HTTP tunnel documentation.
Before you begin, decide where the Localtonet client will run. The simplest arrangement is on the same machine as Docker, with the tunnel targeting 127.0.0.1 and port 3000. That works even with the loopback-bound quick trial, because the client reaches the service from inside the same host. If you run the client on a different machine, the gateway must be reachable from that machine, which means a non-loopback binding in your port mapping and a conscious decision about LAN exposure.
Install and run the Localtonet client
Install the Localtonet client on the device that can reach the new-api service. The download and install options are listed on our website. The client makes the outbound connection to our relay server, so no inbound firewall rule is needed.
Authenticate the device with its token
Use the auth token for this device from your Localtonet dashboard. The token identifies the client device that runs the tunnel, so treat it as a secret and never paste it into tickets, screenshots or repositories.
Select a relay server
Choose from the relay servers currently offered in the dashboard. Available values change over time, so pick from the list shown there and not from a value remembered from an older guide.
Create an HTTP tunnel to the local gateway
Create a new HTTP tunnel, select your auth token and server, and set the local target to 127.0.0.1 with the port of your new-api service, 3000 unless your compose file publishes a different one. Choose a Process Type: Random Sub Domain, Custom Sub Domain, or Custom Domain. All three serve the same content at a public HTTPS address.
Start the tunnel
Creating a tunnel does not run it. Press Start, then copy the public HTTPS address that the dashboard shows for the tunnel.
Stop or delete the tunnel when finished
Stop the tunnel to take the gateway offline for outside users without touching the local service. Delete it if you no longer need the address.
Tell new-api its public HTTPS origin
This is the part that is specific to new-api, and it is where we stay strictly with the documented variables. The README says that for an HTTPS console you set SESSION_COOKIE_SECURE=true and set SESSION_COOKIE_TRUSTED_URL to the exact public HTTPS origin. After the tunnel is started, take the HTTPS address from the dashboard, use only its origin (scheme and host, no path and no trailing path segments), put it in SESSION_COOKIE_TRUSTED_URL, and apply the change:
docker compose up -d
Re-running up -d after editing the file recreates the affected containers with the new environment. Keep SESSION_SECRET exactly as it was.
What we cannot tell you is whether any additional proxy-related setting, such as trusted proxy headers or forwarded client IP handling, is required or beneficial when new-api sits behind a Localtonet tunnel. The README provides no Localtonet-specific session-cookie or trusted-proxy guidance, so we have not invented any. If you notice that client IP addresses in usage logs look wrong, or login behaves oddly, check the repository documentation and the .env.example file for proxy-related settings and test carefully.
Because SESSION_COOKIE_TRUSTED_URL must match the public origin exactly, an address that changes means a compose edit each time. For a team deployment, a Custom Sub Domain or Custom Domain gives you an origin you can set once. For custom domains, check the current Localtonet documentation for the exact DNS requirements before you configure records; we do not restate them here.
Test the public address
From a different network if possible, such as a phone on mobile data, open the public HTTPS address and log in to the console. Then call the API the same way you did locally, replacing the host:
curl https://YOUR-PUBLIC-ADDRESS/v1/models \
  -H "Authorization: Bearer YOUR_NEW_API_TOKEN"
Two behaviors are worth testing explicitly, because gateways are often used with them. The first is streaming: send a chat completion with streaming enabled and confirm tokens arrive progressively and the request completes cleanly. The second is the realtime WebSocket upgrade that new-api supports. The Localtonet context we work from does not document WebSocket behavior for HTTP tunnels one way or the other, so do not assume it; test your realtime client against the public address before you rely on it.
Security checklist before your team starts using it
An AI gateway is a more sensitive thing to publish than a typical web demo. It holds upstream provider credentials and can spend real money on your behalf. A tunnel does not change who is allowed to do what; it only changes who can reach the login page. These practices are general hardening, not Localtonet-specific features.
- Use a strong administrator password and do not reuse it. If the console shows any initial or sample credential on first run, replace it immediately.
- Issue one gateway token per person or application, not a shared one, so you can revoke a single token and attribute usage in the logs.
- Keep upstream provider keys inside the gateway and out of client configuration. This is the main reason to run a gateway at all.
- Replace the shipped database and Redis passwords and keep those services unpublished. In a typical Compose layout they need only be reachable from the new-api container; check your file for any ports mapped to the host for PostgreSQL or Redis, and remove those mappings unless you need them.
- Keep
SESSION_SECRETprivate and stable. Treat it like a credential, back it up with your other secrets, and do not commit the edited compose file to a public repository. - Back up the persistent data: the
/datavolume for the trial, or the PostgreSQL data for the Compose stack. - Stop the tunnel when it is not needed. A tunnel is reachable only while it is running, so a stopped tunnel is a simple way to take the gateway off the public internet outside working hours.
- Review usage logs regularly for unfamiliar models, spikes in volume or unexpected callers.
A random subdomain is hard to guess but is not a secret. Anyone who obtains the address can reach your login page and API endpoint. Authentication in new-api, strong credentials and per-user tokens are what actually protect the gateway. Check the access-control options available on your Localtonet plan and dashboard for additional restrictions, and do not assume any specific one exists without confirming it there.
One small note from the project's release notes is relevant to anyone exposing a gateway: version v1.0.0-rc.47 lists a fix so that access logs no longer store credentials appearing in a URL query string. That is a good reminder to prefer sending tokens in the Authorization header, as in the examples above, and not as URL parameters, and to keep running a reasonably current release.
Day-to-day operations
Start, stop and restart
docker compose stop
docker compose start
docker compose restart
These control the Compose stack without deleting data. Stopping the stack does not stop the Localtonet tunnel, but while new-api is down the public address will have nothing to forward to. Visitors would see an error, which is the expected result. Remember that the tunnel and the gateway have independent lifecycles: the tunnel runs only while the Localtonet client is connected and the tunnel is started.
Updating
The project ships frequent releases. The most recent we examined, v1.0.0-rc.47, includes changes such as selecting channels by priority and weight across regular channels and task plugins, a separate price for OpenAI's 12-hour prompt cache at 2.5 times the input price, a longer default wait of 72 hours before refunding video tasks (an existing TASK_TIMEOUT_MINUTES setting is left as it is), and several streaming and logging fixes. Read the release notes before upgrading, because pricing and channel behavior can change, and one note there says that a regular channel returns a price error and does not charge if a model is still priced only for a task plugin.
A cautious update routine is: back up your data, read the release notes, pull the newer images, and recreate the stack:
docker compose pull
docker compose up -d
This assumes your compose file references images that update by tag. If you track the latest tag, you receive whatever is newest at pull time, including release candidates, so consider whether you prefer a specific version tag. We do not list the project's tag scheme here because the evidence we used does not establish it; check the registry and releases page.
Rotating secrets and adding people
To add a teammate, create a token for them in the console and share the public address plus that token through a private channel. To remove access, delete or disable that token. If an upstream key leaks, rotate it at the provider and update the channel in the console. If you ever suspect the session secret was exposed, changing it is possible but will affect existing sessions, so do it at a quiet time.
Choosing between the two installation options
| Aspect | Single container (docker run) | Docker Compose stack |
|---|---|---|
| Components | new-api only | new-api, PostgreSQL and Redis by default |
| Storage | SQLite, with the data volume at /data | PostgreSQL service defined in docker-compose.yml |
| Network binding in the documented example | 127.0.0.1:3000 | Check the ports mapping in the file; the published port is not stated in the README excerpt |
| Configuration | Minimal | Change database and Redis passwords, set SESSION_SECRET, and for HTTPS set SESSION_COOKIE_SECURE and SESSION_COOKIE_TRUSTED_URL |
| Best for | Trying the console and API on one machine | A gateway that a team will rely on |
Choosing a Process Type for the tunnel
The HTTP tunnel offers three Process Types, and the choice affects how stable your new-api origin is. This matters more here than for a throwaway demo, because the session cookie settings are tied to the exact public origin.
| Process Type | Good fit for new-api when | Consideration |
|---|---|---|
| Random Sub Domain | You are testing the setup or doing a short trial with a few colleagues | You must set SESSION_COOKIE_TRUSTED_URL to whatever address you are given, and update it if the address changes |
| Custom Sub Domain | You want a readable, stable address for the team | Set the origin once in your compose file; availability of the name you want depends on the dashboard at the time |
| Custom Domain | The gateway should live under your own organization's domain | Requires DNS changes; confirm the current requirements in the Localtonet documentation before configuring records |
Troubleshooting
Work from the inside out: container, local port, tunnel, public address. The cause listed below is the most likely one, not a guarantee.
The container exits or restarts repeatedly
In the Compose stack, look at the logs for database or Redis connection errors. The most common self-inflicted cause is changing a password in the PostgreSQL or Redis service block but not in the matching new-api connection setting. If you change the database password after the database has already initialized its data directory, the stored password may not change with the file, so a clean first start with the final passwords is easiest. Be careful before deleting volumes, since that destroys data.
Port 3000 is already in use
Another process holds the port. Either stop that process or change the host-side port in the mapping, and then use the new number as the local target in the Localtonet tunnel.
The local curl works but the public address fails
Check that the Localtonet client is connected, that the tunnel was actually started (creating a tunnel does not start it), and that the local target IP and port are right. If the client runs on a different machine from Docker, confirm that machine can reach the gateway's address and port, and remember that a 127.0.0.1 binding is not reachable from other machines.
You can load the login page publicly but login fails or loops
This points at session cookie handling. With HTTPS, set SESSION_COOKIE_SECURE=true and make SESSION_COOKIE_TRUSTED_URL match the public origin exactly, including the scheme and host, and then recreate the stack. Check for typos, a trailing path, or an origin left over from a previous random subdomain. Also confirm that SESSION_SECRET did not change between restarts.
API calls return authentication errors
Verify the token, make sure it is sent as a Bearer token in the Authorization header, and check whether that token is allowed to use the model you requested.
The API works but responses are errors about pricing or models
Confirm that a channel serves the model name you requested and that the model has a price configured. The v1.0.0-rc.47 notes specifically mention that a price written only for a task plugin leads to a price error on a regular channel.
Streaming or realtime clients misbehave through the tunnel
Compare the same request against http://localhost:3000. If it works locally and not publicly, narrow down whether the problem is the streaming mode, a client timeout, or the WebSocket upgrade. We have no verified statement of how tunnels handle WebSocket upgrades, so report the specific behavior to our support with the exact protocol you use.
Usage logs show a client address that is not the real user
When traffic arrives through a relay, the gateway may see the forwarding hop rather than the original client. The README gives no tunnel-specific guidance for this, so check the repository documentation for proxy or forwarded-header settings and test any change before relying on IP-based logging.
Frequently asked questions
How do I install new-api with Docker?
The README documents two paths. For a quick trial, run a single container from the calciumion/new-api:latest image with SQLite, a data volume at /data and a loopback binding on 127.0.0.1:3000. For a longer-lived setup, clone the repository, edit docker-compose.yml (change the database and Redis passwords, set a persistent random SESSION_SECRET, and for an HTTPS console set SESSION_COOKIE_SECURE=true and SESSION_COOKIE_TRUSTED_URL), then run docker compose up -d.
Which services does the default Compose setup start?
The default Compose stack is new-api plus PostgreSQL plus Redis. Check docker-compose.yml in your cloned copy for the exact service definitions and published ports, since the README excerpt does not state the Compose host port.
Which Localtonet tunnel type should I use for new-api?
Use an HTTP tunnel. new-api serves a web console and an HTTP API, and the tunnel gives you a public HTTPS address that forwards to the local IP and port, normally 127.0.0.1 and 3000. You choose a Process Type of Random Sub Domain, Custom Sub Domain or Custom Domain, and you must start the tunnel after creating it.
Do I need to change anything in new-api when I put it behind a tunnel?
For an HTTPS console, the README documents setting SESSION_COOKIE_SECURE=true and SESSION_COOKIE_TRUSTED_URL to the exact public HTTPS origin. Beyond those documented variables, the README has no Localtonet-specific or trusted-proxy guidance, so we do not claim any further change is required. Test login and API calls through the public address and consult the repository documentation if something behaves unexpectedly.
Is it safe to expose an AI gateway to the internet?
It can be, but only with care. A gateway stores upstream credentials and can spend money. Use a strong administrator password, issue per-user tokens, replace default database and Redis passwords, keep the session secret private, stop the tunnel when it is not needed, and watch the usage logs. A tunnel makes the login page reachable; it does not replace the gateway's own authentication.
Will the gateway stay reachable if I close my terminal?
Containers started with the detached flag keep running in the background. The public address works only while the Localtonet client on the device is connected and the tunnel is started, so the machine and the client both need to stay up for continuous access.
Can I use the public address as the base URL in other tools?
The gateway exposes OpenAI-compatible paths such as /v1/models, /v1/responses and /v1/chat/completions, so tools that accept a custom OpenAI-style base URL and API key can in principle point at the public HTTPS address with a gateway token. Whether a specific tool works with your chosen upstream models is something to verify with a small test call first.
Start with Localtonet
Get your new-api gateway running and verified on localhost, then create a Localtonet HTTP tunnel to port 3000 so your team can reach the console and the OpenAI-compatible endpoint at a public HTTPS address.
Get Started Free →