

Build a declarative NixOS media stack, verify every local dependency, and publish only the web endpoint you intend to share
Nixflix configures services such as Jellyfin, Seerr, Sonarr, Radarr, Lidarr, and Prowlarr through NixOS options. This guide covers release-aware module installation, configuration placement, secret files, storage permissions, rebuilding, local verification, recovery, and routine operation. After the selected web service works from the device that will carry traffic, we show how to connect it to a Localtonet HTTP tunnel without inbound router port forwarding or a public IP address. Nixflix does not provide one universal service address, so the tunnel target must be taken from your verified deployment rather than copied from an assumed default.
📋 What's in this guide
What Nixflix configures on NixOS
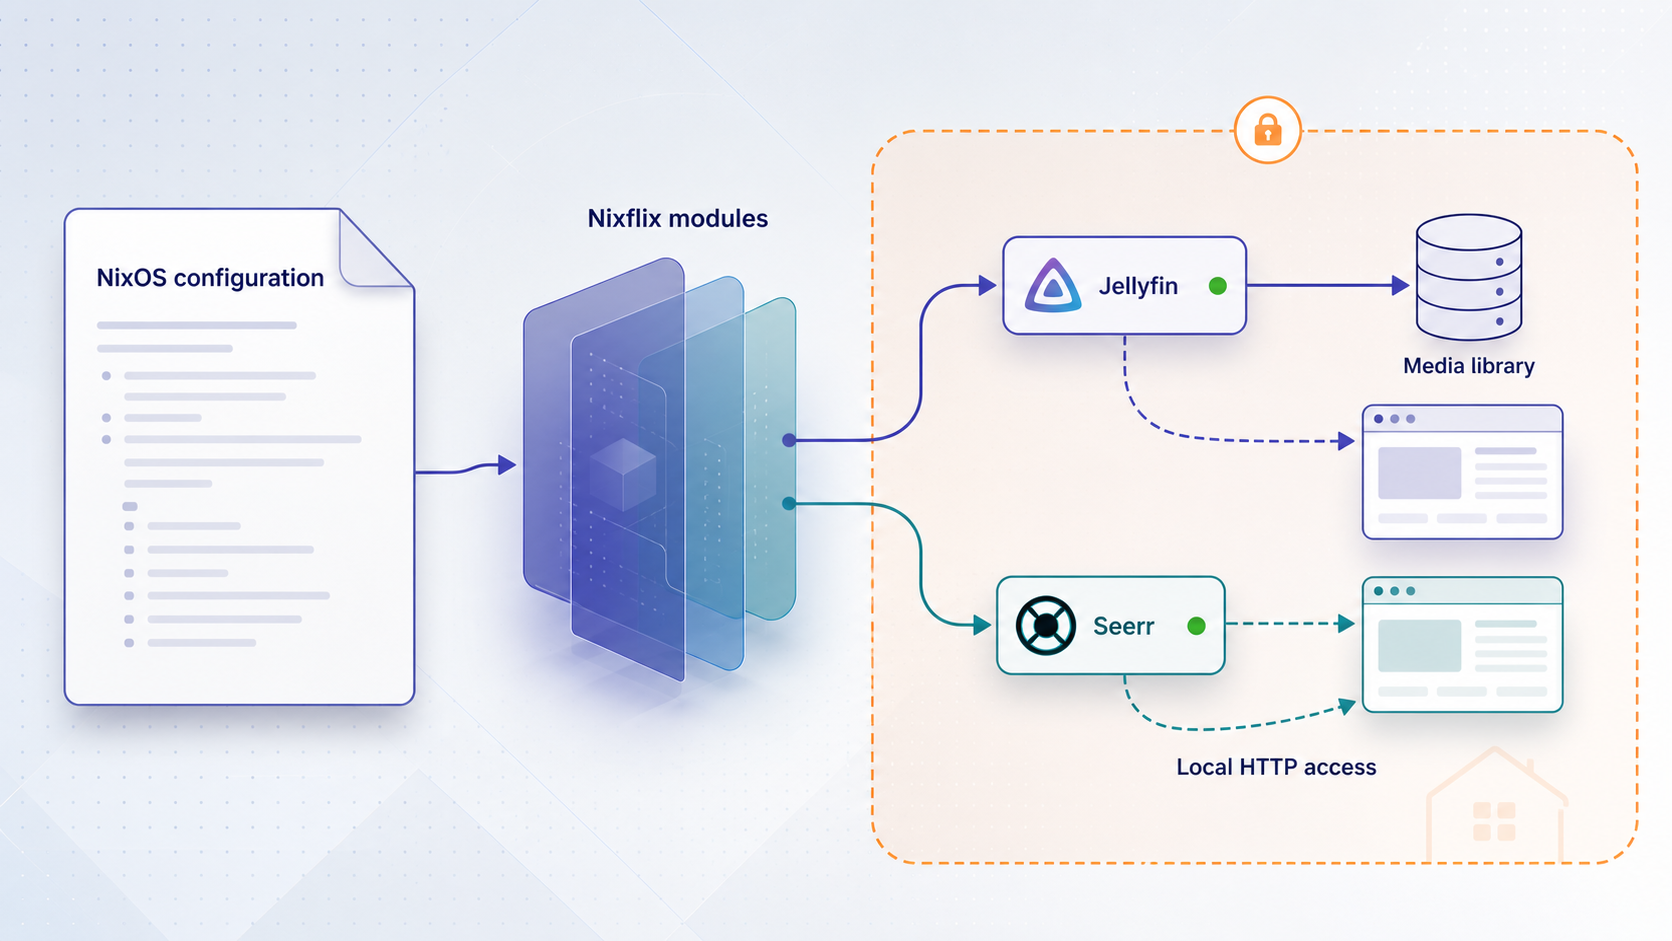
Nixflix is a declarative media server configuration manager for NixOS. It is designed to automate the connective configuration required to make supported media applications work together. The project supports a Starr stack containing Sonarr, Radarr, Lidarr, and Prowlarr, along with user-facing and supporting services such as Jellyfin, Seerr, Navidrome, SABnzbd, qBittorrent, and Maintainerr.
Nixflix uses the official REST APIs of supported services, with a small number of exceptions documented by the project, to apply configuration represented through NixOS options. The process is designed to be idempotent, which means the declared configuration can be applied repeatedly while remaining the intended source of truth. Nixflix can also create media and state directories, establish root folders, configure relationships between services, and define custom systemd service dependencies.
Nixflix is not one monolithic web application. It can configure several independent services, each with its own role, account model, listener, and security implications. Jellyfin is typically the user-facing interface for browsing and streaming a personal media library. Seerr provides media request management and can integrate with Jellyfin libraries and Starr services. Sonarr, Radarr, and Prowlarr are administrative automation tools with access to libraries, indexers, download clients, and application API keys.
This separation determines how remote access should be designed. A Localtonet HTTP tunnel forwards to one selected local HTTP endpoint. It does not expose an abstract “Nixflix stack,” discover every service, or decide which application should be public. You must identify the specific service or reverse-proxy listener that remote users need and keep the rest of the stack private unless there is a separate, justified access requirement.
Prerequisites and deployment decisions
Begin with a functioning NixOS system that you can rebuild and recover. You need administrative access, a known-good previous system generation, sufficient storage for application state and media, and a deliberate backup policy for configuration and irreplaceable data. Confirm that the intended media files are yours to host and share and that your use complies with applicable law and service terms.
The current project entry points are the Nixflix documentation and the Nixflix repository. The documentation links to its installation instructions, copy-ready examples, and complete option reference. Use the reference for the exact options supported by the release you select rather than assuming that an option found in an old configuration remains valid.
Choose a release and keep it pinned
Treat Nixflix as a versioned NixOS dependency. A flake-based system normally records the resolved source revision in flake.lock. Review and commit that lock-file change with the related configuration so that a later rebuild resolves the same Nixflix revision. If your established NixOS workflow uses another pinning mechanism, preserve its source revision with the system configuration.
Do not silently move an existing server from one major Nixflix release to another. Read the release notes first and test the proposed system generation before making it the active configuration. In particular, the Nixflix v3.0.0 release notes identify a breaking change: the Jellyfin manifest is pulled from the main Nixflix repository instead of the separate repository that was deleted. Existing deployments using the old source must update to v3.0.0 or later and remove assumptions tied to the deleted repository.
The verified evidence supplied for this revision establishes the module workflow, documented quick configuration, project entry points, and v3.0.0 migration requirement, but it does not include the current installation page’s literal flake input and exported module attribute. Those identifiers must be copied verbatim from the installation page for the selected release. Guessing an output name or import path would create a Nix evaluation failure. The complete placement, pinning, configuration, validation, and recovery process is documented below so that only those release-specific identifiers need to come from the current project page.
Plan services, accounts, and storage
Start with the smallest stack that meets your needs. Jellyfin alone is easier to validate than Jellyfin plus every Arr service, multiple download clients, request management, theming, and a reverse proxy. Add one related group at a time after the initial service remains healthy across a rebuild.
Choose persistent media and state paths before enabling the module. The example below uses /data/media for media and /var/lib for state because those values appear in the project’s quick example. They are not universal recommendations. A separate filesystem mounted under /data must be available before dependent services start, and its ownership and permissions must permit the relevant service accounts to traverse directories and read or write only what they require.
Decide where secrets will come from before adding API-backed integrations. The documented example refers to files under /run/secrets. Nixflix does not make those files appear merely because a path is declared. Your existing secret-provisioning mechanism must create each file with the expected content and restrictive permissions before the dependent configuration unit reads it.
Do not paste API keys, passwords, device tokens, or private URLs directly into a configuration that may be committed or copied into the Nix store. Use the secret-file mechanism supported by the relevant Nixflix option and provision the referenced file outside public source control. A Localtonet device authentication token is separate from Nixflix application secrets and must also remain private.
Install and configure Nixflix
Nixflix must be both included as a NixOS module and configured through the system’s module tree. Adding a source input without adding the exported NixOS module does not make the nixflix option available. Likewise, importing the module without declaring any Nixflix options does not create the intended stack.
Back up the current configuration and identify a recoverable generation
Commit or otherwise preserve the working NixOS configuration, its lock file, and your storage mount declarations. Confirm that the bootloader presents older NixOS generations or that you have another tested recovery route. Do this before changing the module graph.
Select and pin the Nixflix release
Use the installation syntax published by the current Nixflix documentation for your NixOS configuration style. Pin the selected source through the system’s normal dependency mechanism and preserve the resulting lock or revision metadata. For an existing deployment crossing v3.0.0, apply the documented Jellyfin manifest migration before rebuilding.
Include the exported NixOS module in the host definition
Place the module reference in the module list for the NixOS host that will run the media stack. In a multi-host flake, add it to the intended server’s module list rather than globally attaching it to unrelated machines. In a non-flake module tree, place the documented import alongside the host’s other module imports. Use the exact exported module name or path published for the pinned release.
Add the Nixflix configuration to a loaded NixOS module
Put the nixflix attribute set in configuration.nix or in a separate file that the host configuration imports. Confirm that the containing file is actually part of the evaluated module tree. Choose explicit media and state directories and enable only the initial services you are prepared to verify.
Provision every referenced secret file
Create each API-key file through your established secret-management process before dependent units start. Match the path declared in the Nixflix option, restrict access to the necessary account, and confirm that the file is present after activation. Never substitute a placeholder value and assume the integration will configure itself later.
Prepare storage mounts and permissions
Ensure the media and state paths exist on the intended filesystems. Verify directory traversal, read, write, and ownership requirements for each enabled service. If media resides on an external drive, declare and mount it consistently rather than relying on a desktop-session mount that may not exist during system startup.
Evaluate and test the new system generation
Run the standard validation used by your NixOS configuration and resolve unknown options, missing imports, failed assertions, and dependency errors. Test the generation before committing to it where your operating procedure allows. A successful evaluation confirms module syntax, but it does not prove that application APIs, secret files, storage, and HTTP listeners work.
Switch only after the test generation is healthy
Apply the generation, inspect failed systemd units, and verify the applications locally. If activation disrupts the server, return to the previous generation from the bootloader or use the established NixOS rollback procedure, then correct the declaration before trying again.
The following starter configuration is reproduced from the project’s documented quick example. It shows the shape of a small stack with Sonarr, Prowlarr, SABnzbd, and Jellyfin. It also demonstrates file references for secrets rather than embedding API keys directly:
{ nixflix = {
  enable = true;
  mediaDir = "/data/media";
  stateDir = "/var/lib";

  sonarr = {
    enable = true;
    config.apiKey = {
      _secret = "/run/secrets/sonarr-api-key";
    };
  };

  prowlarr = {
    enable = true;
    config.apiKey = {
      _secret = "/run/secrets/prowlarr-api-key";
    };
  };

  sabnzbd = {
    enable = true;
    settings.misc.api_key = {
      _secret = "/run/secrets/sabnzbd-api-key";
    };
  };

  jellyfin.enable = true;
}; }
Treat this as a configuration example, not a complete production policy. Replace paths only after checking the permissions and mount behavior on your server. Remove services you do not need. The referenced files must contain real application secrets before the API-backed integrations run. Use the project’s Nixflix examples for larger deployment patterns and the Nixflix option reference for exact service-specific options.
The repository documents nix develop, nix fmt, and nix flake check for developing, formatting, and checking the Nixflix project itself. Running those commands in a repository checkout does not add Nixflix to your NixOS host. End-user installation requires the release source, exported module inclusion, host configuration, and system rebuild described above.
Rebuild and verify local operation
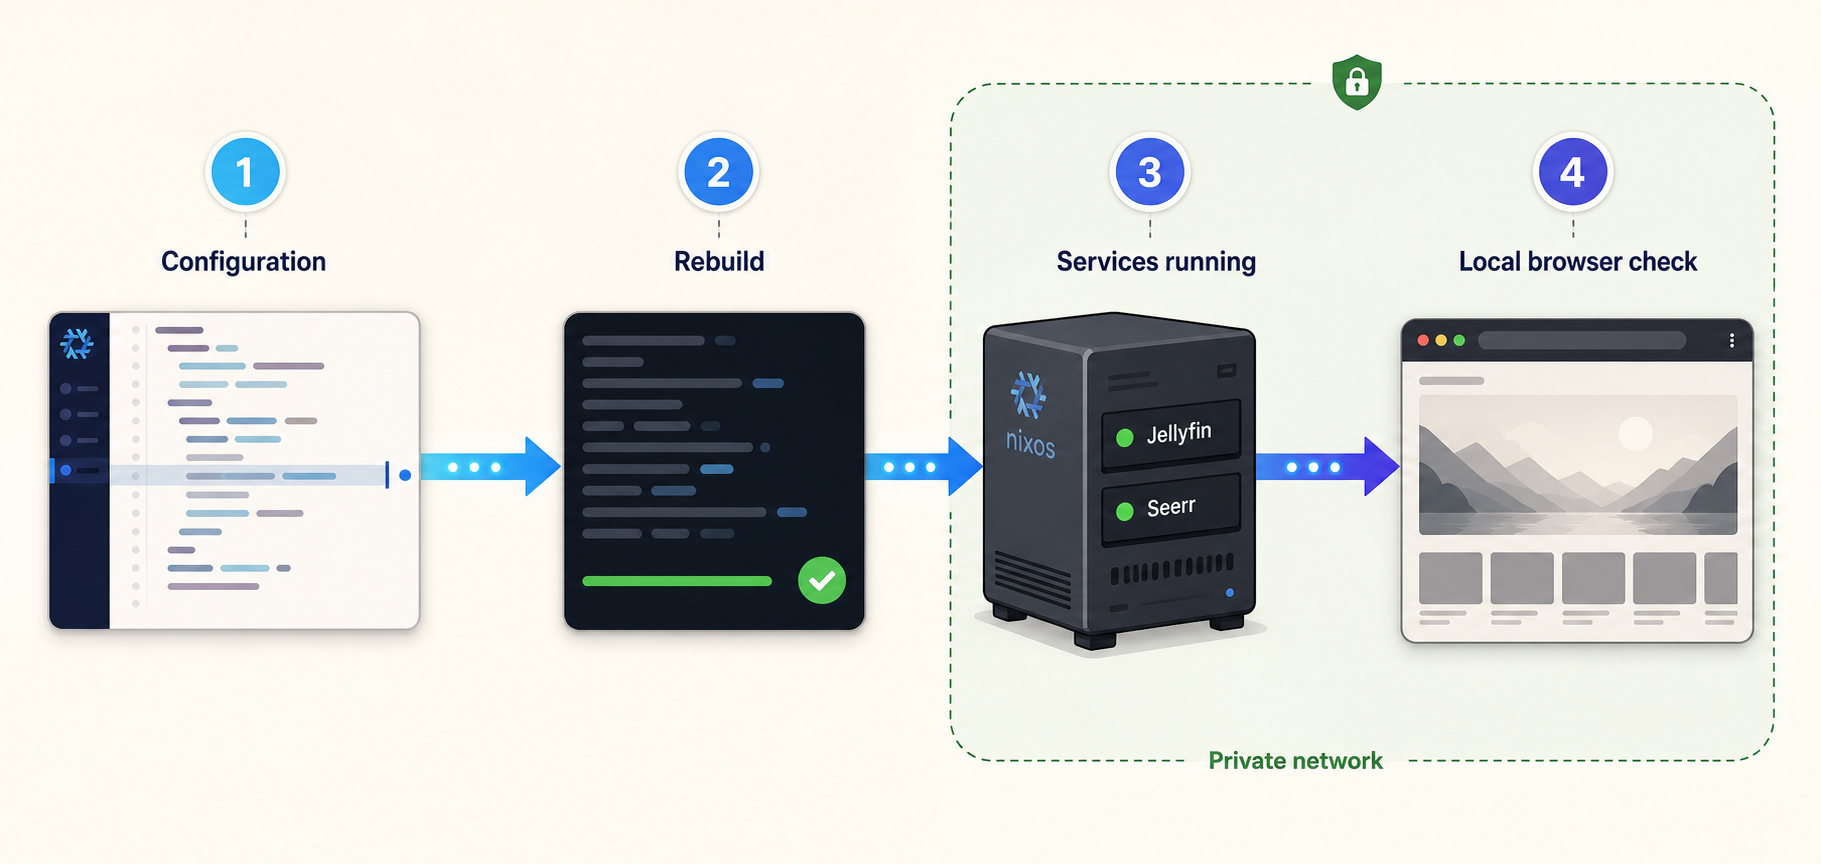
After the module source, import, options, secrets, and storage are prepared, apply the NixOS configuration with the normal rebuild command:
sudo nixos-rebuild switch
If the command reports an evaluation error, do not continue to Localtonet. Read the first relevant Nix error rather than only the final stack trace. An unknown nixflix option usually means the Nixflix module was not included in the evaluated host module list, the wrong exported module was selected, or the configuration file containing the option was not imported. A missing attribute can indicate that installation syntax from a different release was combined with the currently pinned source.
Once the rebuild succeeds, inspect the systemd units for the services you enabled. For Jellyfin, use:
sudo systemctl status jellyfinIf a unit is failed, inspect its journal and its declared dependencies before attempting public access:
sudo journalctl -u jellyfin -bApply the same status and journal approach to the actual unit that failed. A Nixflix deployment may have application units plus configuration or initialization units that call service APIs. A healthy application process does not automatically prove that every declarative API operation completed. Look for failures caused by an absent secret file, an unavailable dependency, an incorrect API key, an unwritable state path, or a service API that was not ready when expected.
A standard NixOS Jellyfin installation listens on port 8096 by default and can normally be checked at http://localhost:8096. Nixflix can also configure nginx or Caddy, and its options may produce a different effective route. Therefore, port 8096 is a verification candidate, not a value to copy blindly into a tunnel.
Test the intended route from the device that will run the Localtonet client. If that client runs on the same server, a loopback endpoint may work. If the client runs on another LAN device, test the server’s LAN address from that device. Confirm that the expected application loads, authentication succeeds, authorized media is visible, and a representative playback or request workflow functions.
Localtonet avoids inbound router port forwarding and edge firewall changes for internet access. It does not make an otherwise blocked LAN listener reachable. If our client runs on another device, the selected Nixflix service or reverse-proxy port must be reachable from that device. You may need a narrowly scoped NixOS host-firewall rule and a service listener bound to an appropriate LAN interface. Do not open unrelated media-management ports.
The supplied verified evidence does not establish a current native Localtonet client installation method for NixOS. Do not assume that an installer for another Linux distribution is compatible. Use a currently supported Localtonet client device that can reach the NixOS endpoint, unless the current Localtonet download or documentation page explicitly provides a verified NixOS-compatible method.
Choose the smallest useful endpoint
Expose only the interface required by remote users. Jellyfin is the usual choice when authenticated users need to browse or stream a personal library. Seerr is a narrower choice when users need to submit and manage requests without direct access to the broader automation stack. An nginx or Caddy listener can be suitable when Nixflix already places the selected application behind a correctly configured reverse proxy.
| Endpoint | Typical purpose | Remote-access consideration |
|---|---|---|
| Jellyfin | Browse and stream a personal media library | Verify account authentication, library permissions, playback, and the actual local endpoint before tunneling. |
| Seerr | Media request management | Prefer this narrower interface when remote users only need to request content. |
| nginx or Caddy | Route requests to a selected application | Confirm the listener, path, host handling, forwarded headers, and upstream route from the Localtonet client device. |
| Sonarr or Radarr | Administrative media automation | These interfaces can alter libraries and automation. Keep them private unless remote administration is necessary and strongly controlled. |
| Prowlarr | Indexer and application integration management | It contains sensitive operational configuration and should not be the default public target. |
Reverse-proxy routing requires special attention. A proxy can choose an upstream according to the request host or path. A request to the proxy’s LAN IP might therefore behave differently from a request using its configured hostname. Before tunneling it, test the same route and host behavior expected through the public URL. If the application uses forwarded headers to determine its external scheme or client address, configure trusted proxy behavior according to that application and proxy documentation rather than trusting forwarded headers from arbitrary network peers.
Set strong credentials and least-privilege accounts before starting the tunnel. Never place API keys in a public URL, browser bookmark, article, or shared configuration. Administrative applications should remain private unless their exposure is necessary and protected by appropriate access controls.
Add Localtonet remote HTTP access
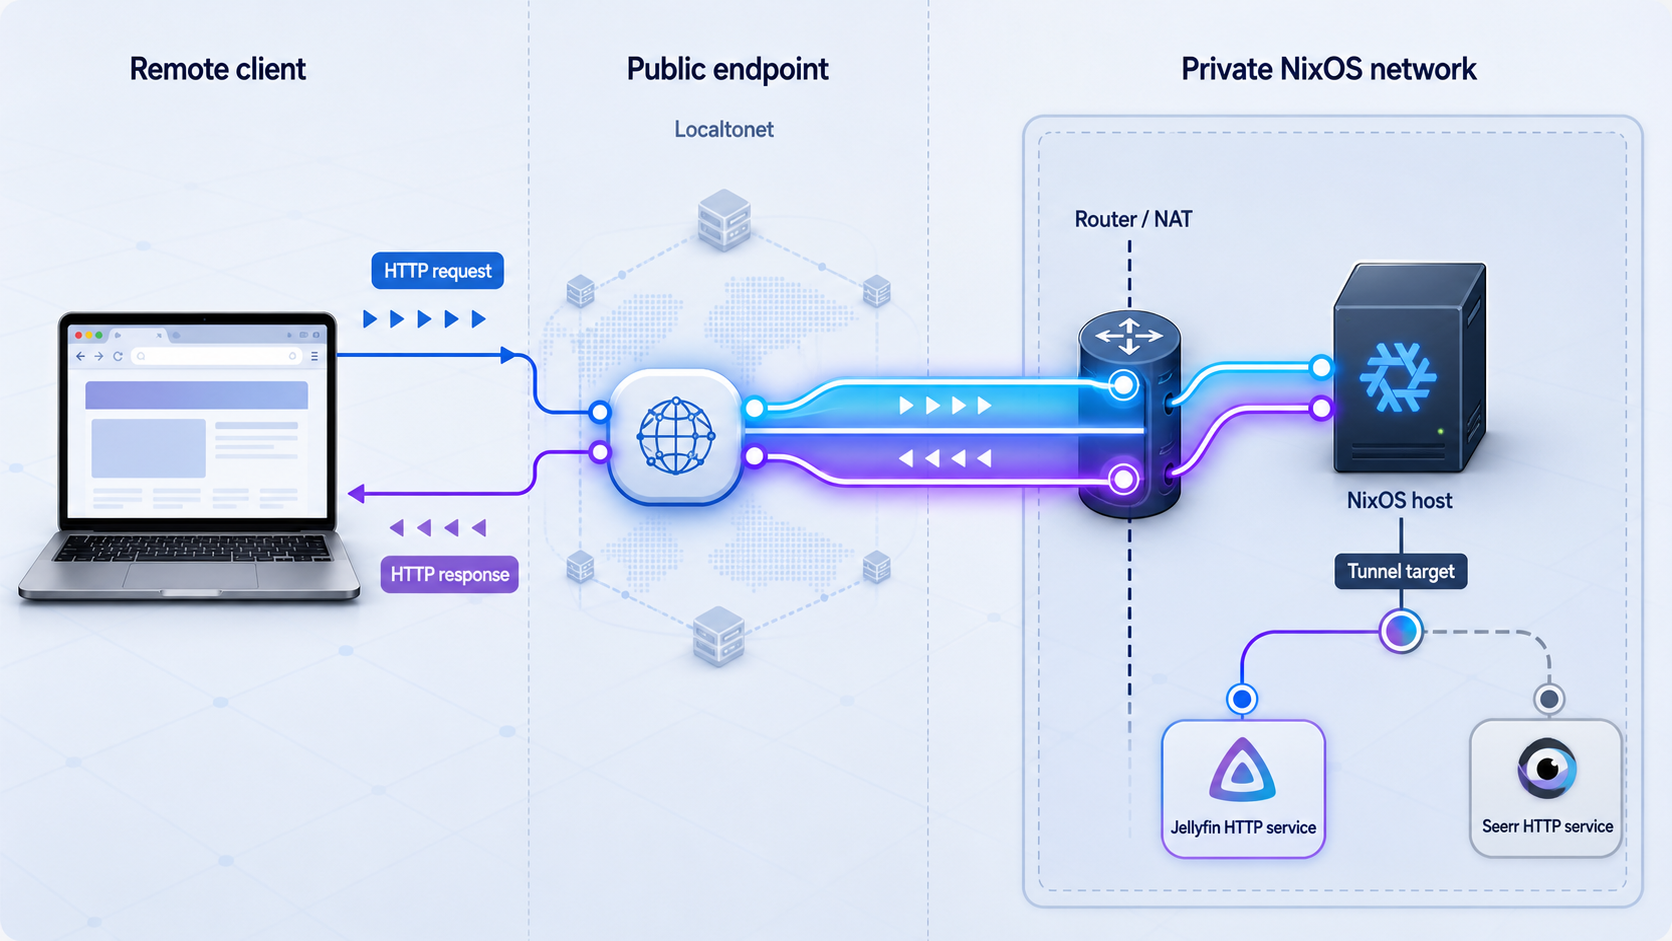
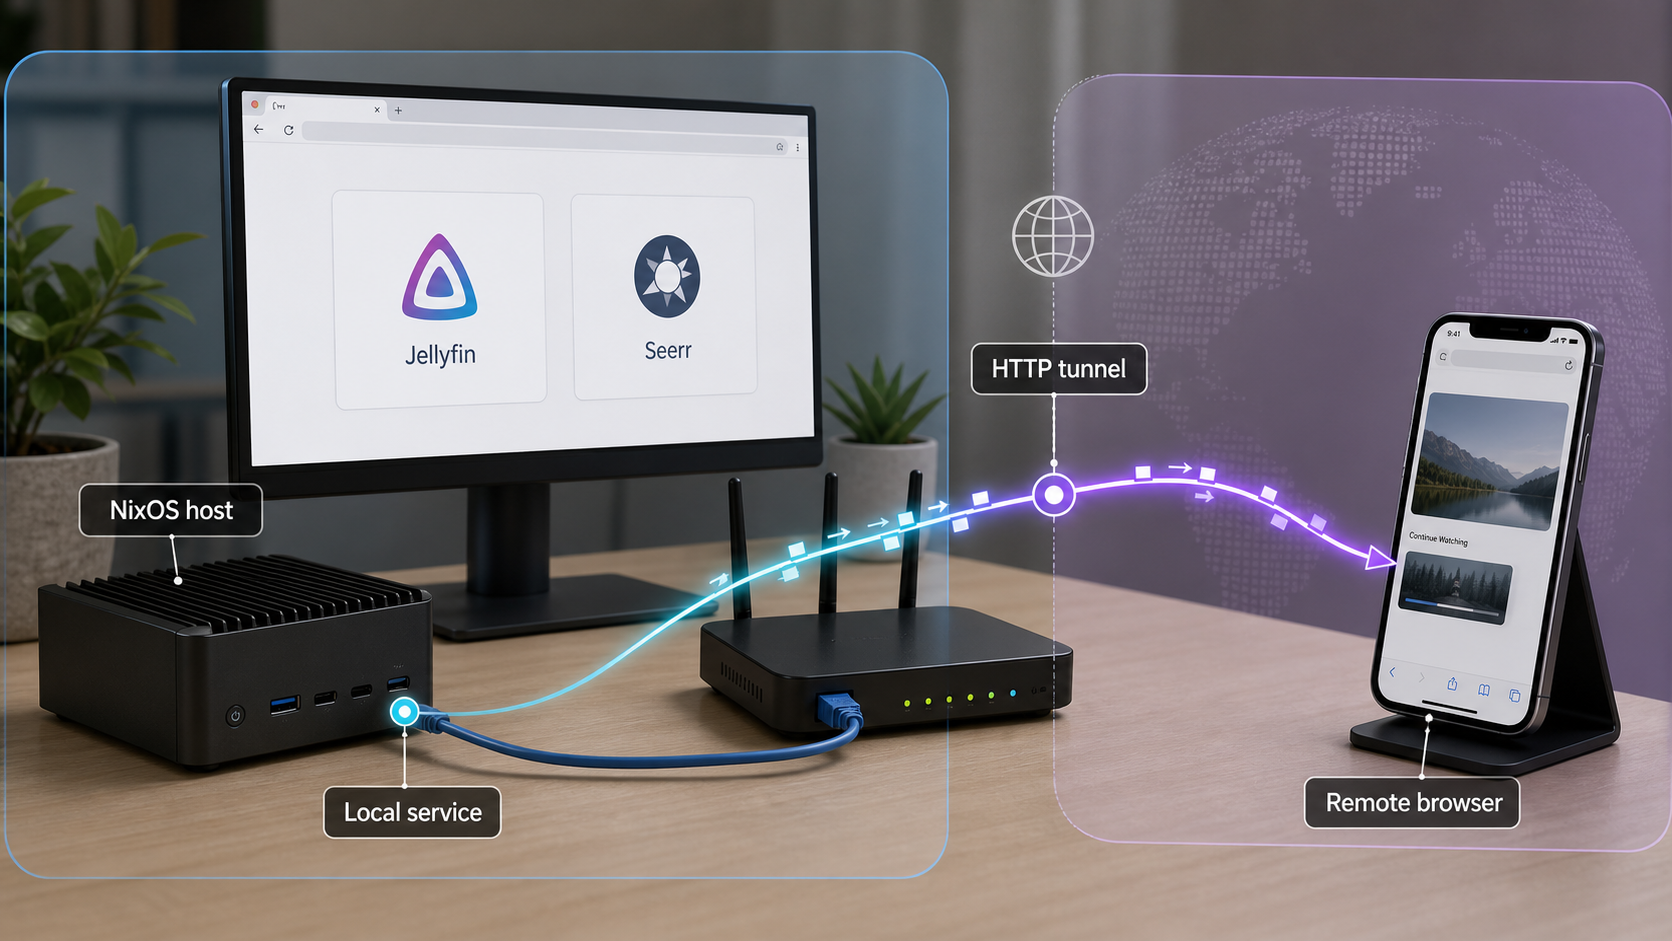
Once the selected service works locally, an HTTP tunnel is the appropriate Localtonet family for a browser-based Jellyfin, Seerr, nginx, or Caddy endpoint. Our client establishes an outbound connection to a Localtonet relay server. This avoids inbound router port forwarding, edge firewall changes, VPN setup, and the need for a public IP address.
If the Localtonet client is on another LAN device, the traffic path has two distinct segments: the outbound connection from that device to our relay, and the LAN connection from that device to the NixOS endpoint. The first segment does not require an inbound router rule. The second still depends on local routing, the NixOS firewall, the service bind address, and any reverse-proxy policy.
Install our client on a currently supported device
Select a supported computer or device that can remain online and reach the verified NixOS HTTP endpoint. Because native NixOS client compatibility is not established by the supplied evidence, use another currently supported client device unless current Localtonet documentation explicitly confirms a NixOS installation path.
Authenticate the client device
Use the device-specific authentication token assigned through our platform. Treat it as a secret. Do not place it in the Nixflix configuration, commit it to a repository, or expose it in logs and screenshots.
Select an available relay server
Choose a currently available server or region from the dashboard. Available values can vary, so obtain the selection from the current product instead of copying a server code from an older tutorial.
Create an HTTP tunnel for the observed target
Enter the IP address or hostname and port that successfully served the application from the client device. Do not guess the target or use localhost when the service is on a different machine. Select the available HTTP process type appropriate to your public address requirements.
Start the tunnel and test the public HTTPS address
Creating a tunnel does not start it. Press Start, then use the assigned public address from an external connection. Verify the HTTPS endpoint, expected application identity, sign-in flow, account permissions, navigation, and a representative playback or request action.
Stop or delete access when it is no longer needed
Stop the tunnel to make the public endpoint unavailable while retaining its configuration, or delete the tunnel when the configuration is no longer required. The endpoint is available only while the selected client is connected and the tunnel is running.
Consult the Localtonet HTTP tunnel documentation for the current dashboard workflow. HTTP and File Server process types can include a generated subdomain, a supported custom subdomain, or a custom domain, but exact availability and custom-domain DNS requirements must be taken from the current dashboard and documentation.
Harden a publicly reachable media service
Public access changes the operational risk of a media server. Internet users can reach the selected login page, consume server and network resources, trigger password attempts, and exercise any application feature granted to their account. Media streaming can also produce sustained upload traffic and CPU or GPU load when transcoding is required. Confirm that the server, connection, and intended usage can support that workload without disrupting other services.
Use application authentication and least privilege
Give each remote user an individual account where the application supports it. Grant access only to the libraries and capabilities that person needs. Avoid sharing an administrator account for ordinary playback or requests. Review permissions after adding libraries, plugins, users, or integrations because a configuration that was appropriate for LAN-only use may be too broad for a public endpoint.
Maintain NixOS, Nixflix, and the applications
A declarative system still requires maintenance. Review NixOS and application updates, Nixflix release notes, and breaking changes before updating the pinned dependency. Test the new generation locally, verify service health, and retest the public route. Keep a known-good generation available until the updated stack has completed representative playback, request, and integration checks.
Verify HTTPS from outside the LAN
Open the assigned public HTTPS address from a network that does not rely on the server’s local routing. Confirm that the browser reaches the expected hostname without a certificate warning and that login credentials are submitted only to that address. If an application displays or generates absolute external links, check that the resulting scheme and host are correct.
Configure reverse-proxy trust deliberately
When nginx or Caddy sits between Localtonet and an application, review how the application interprets forwarded host, scheme, and client-address headers. Trust only the proxy path that legitimately supplies those values. Do not broadly trust arbitrary clients merely to make generated links or logs appear correct. Host-based routing must also accept the host used by the public request or map it intentionally to the selected upstream.
Keep administrative surfaces and secrets private
Avoid exposing Sonarr, Radarr, Prowlarr, download clients, databases, NixOS administration interfaces, or secret-management tools as part of a user-facing media route. A tunnel should target a specific application listener, not a broad dashboard that links to every internal component. Keep Nixflix API keys, download-client credentials, Localtonet device tokens, and application administrator passwords out of public repositories and support captures.
Share only media you are authorized to host and transmit. Monitor storage, upload capacity, CPU or GPU utilization, application logs, and account activity. Stop the tunnel if unexpected traffic, an application vulnerability, a compromised account, or an incorrect route is discovered.
Routine operation, updates, and recovery
Treat the NixOS declaration, pinned Nixflix dependency, secret inventory, storage mounts, application state, and Localtonet tunnel as separate layers. A healthy tunnel cannot compensate for a failed application. A healthy Jellyfin process cannot compensate for an unavailable media mount. A successful Nix evaluation cannot prove that external HTTPS routing works.
| When | Check | Expected result |
|---|---|---|
| After every rebuild | Failed units, application status, secrets, mounts, and local HTTP route | The intended application starts and serves the verified endpoint. |
| After a Nixflix update | Release notes, option changes, lock-file revision, and API configuration units | The new generation applies without migration or unknown-option failures. |
| After a proxy change | Host routing, paths, forwarded headers, authentication, and public HTTPS | The public URL reaches only the intended upstream and generates correct links. |
| After a storage change | Mount availability, ownership, traversal, read and write access | Libraries scan and playback without permission or missing-file errors. |
| When remote access is not needed | Localtonet tunnel state | The tunnel is stopped or deleted according to the access requirement. |
Before an update, preserve the working configuration and lock file, read release notes, and avoid combining unrelated storage, proxy, and application changes in one generation. Smaller changes produce clearer failures and simpler rollback decisions. After switching, check systemd units first, then local HTTP access, then client-to-target access, and finally the public URL.
If the new generation prevents normal operation, return to a previous NixOS generation using your established recovery workflow or the bootloader generation menu. Once the server is stable, correct the module import, option, secret, storage, or proxy change and build a new generation. Do not modify generated files inside the Nix store as a repair. The declarative source should remain the durable fix.
Symptom-based troubleshooting
Nix reports that the nixflix option does not exist
Confirm that the pinned Nixflix source is available to the host definition, that the release’s exported NixOS module was added to the correct host module list, and that the file containing the nixflix configuration is imported. Do not mix an import expression from one release with another release’s source. Compare the selected release’s installation instructions with the evaluated host configuration.
Evaluation fails after an update
Read the release notes between the old and new revisions. Check for renamed or removed options and changed module outputs. If moving from an older release to v3.0.0 or later, account for the Jellyfin manifest source change. Restore the previous lock file or pinned revision if necessary, rebuild the prior generation, then apply the migration as a separate reviewed change.
A secret file is missing or unreadable
Compare the path in the Nixflix option with the file created at runtime. Confirm that the secret-management service ran, the file exists in the expected generation, and the dependent service account can read it. Inspect the failed unit’s journal for “no such file,” permission, or invalid credential errors. Do not solve the problem by embedding the secret directly in a public Nix expression.
A systemd unit fails after the rebuild
Use systemctl status and journalctl -u for that exact unit. Identify whether the failure belongs to the application, a Nixflix configuration unit, the reverse proxy, a mount, or another dependency. Check ordering, required services, API readiness, credentials, and writable state directories. Restart only after correcting the cause so that a transient restart does not hide a reproducible activation problem.
Jellyfin starts but cannot see media
Verify that the filesystem is mounted at the declared path and remains mounted outside an interactive desktop session. Check every parent directory for traversal permission and the media tree for required read access. If Jellyfin must write metadata or modify a directory, grant only the necessary write access. The official NixOS Jellyfin guidance notes that external drives mounted for a desktop user can be inaccessible to the default jellyfin system account.
The service works on the NixOS host but not from the Localtonet client
Check whether the application is bound only to loopback. Test the NixOS LAN address and selected port directly from the client device. Verify local routing and permit the specific service or reverse-proxy port through the NixOS host firewall if required. Do not open the entire stack. If the client is on a separate network segment or VLAN, confirm that network policy permits the intended path.
The reverse proxy returns the wrong site or an error
Test the proxy locally using the hostname and path it expects. Confirm that nginx or Caddy is listening on the target address, its upstream application is healthy, and host-based routing matches the incoming request. A direct request by LAN IP may reach a default virtual host even though a request using the configured name works. Correct the proxy route before changing the tunnel target repeatedly.
The Localtonet tunnel exists but the public URL is unavailable
Confirm that the selected client device is connected and that the tunnel was explicitly started. Creating the tunnel is not enough. Then retest the configured IP address and port from that client device. Check whether a rebuild changed the service listener, reverse-proxy route, or firewall behavior. The public endpoint remains available only while the client is connected and the tunnel is running.
The public URL loads, but authentication or links behave incorrectly
Confirm that you reached the intended application and not a proxy default site. Test the HTTPS URL directly, clear stale browser state where appropriate, and review the application’s external URL and trusted-proxy behavior. Incorrect forwarded scheme or host handling can cause redirects to a LAN address or generate insecure links. Adjust trust and routing narrowly rather than disabling authentication.
Playback works locally but fails remotely
Test account library permissions, a small direct-play item, and an item that requires transcoding. Inspect Jellyfin logs and server resource usage. Remote playback can expose upload-capacity, transcoding, codec, storage-throughput, and client-compatibility limits that do not appear during a simple login test. Do not assume the tunnel is at fault if the public page loads and application logs show a media or transcoding error.
Frequently asked questions
Does Nixflix have one default port for the entire media stack?
No. Nixflix configures multiple independent services, and reverse-proxy or network options can change their effective endpoints. Determine the address and port from the deployed service and verify them from the Localtonet client device.
Can I use Jellyfin port 8096 as the Localtonet target?
Jellyfin uses port 8096 by default in a standard NixOS setup, but use it only if your deployed configuration actually serves Jellyfin there. If nginx, Caddy, a custom listener, or another override is active, target the endpoint you confirmed locally.
Should I expose Jellyfin or Seerr?
Use Jellyfin when authorized users need library and streaming access. Use Seerr when they only need media request management. Expose the narrower authenticated interface when it satisfies the requirement.
Does Localtonet require router port forwarding?
No. Our client establishes an outbound connection to a relay server, so standard tunneling does not require inbound router port forwarding, VPN setup, or a public IP address. If the client runs on another LAN device, the NixOS endpoint must still be reachable from that device and may require a narrow host-firewall rule.
Can I install the Localtonet client directly on NixOS?
Native NixOS client compatibility is not established by the verified evidence supplied for this guide. Use a currently supported Localtonet client device that can reach the NixOS service unless current Localtonet documentation explicitly provides a verified NixOS-compatible installation method.
Will creating a tunnel immediately make Nixflix available?
No. The selected client must be connected and the tunnel must be started. The target service must also remain healthy and reachable from that client device. Creating a tunnel configuration does not start it or repair the local application.
Can Localtonet fix a failed Nixflix or Jellyfin service?
No. Localtonet forwards traffic to the configured target. Nix evaluation errors, failed units, missing secrets, storage permissions, application authentication, and reverse-proxy problems must be corrected on the local system first.
What should I retest after updating Nixflix?
Check the release notes and pinned revision, rebuild health, failed units, secret provisioning, storage mounts, API configuration units, the local HTTP route, client-to-target reachability, public HTTPS, authentication, permissions, and a representative playback or request workflow.
Connect your verified Nixflix service with Localtonet
Finish the NixOS deployment, verify Jellyfin, Seerr, or your selected reverse proxy from a supported client device, and create an HTTP tunnel for that exact endpoint. Keep application authentication enabled, monitor public use, and stop the tunnel whenever remote access is not required.
Get Started Free →

