

Run a versioned onWatch deployment, protect its SQLite history, and make the dashboard remotely available only when needed
This tutorial installs onWatch v2.14.5 with Docker Compose, verifies the actual port published by the checked-out Compose file, configures provider and dashboard credentials, and documents routine container operations. It also shows how to identify, back up, restore, update, and roll back the persistent storage mounted at /data. After the local dashboard works, we connect it to a Localtonet HTTP tunnel without inbound router port forwarding or a public IP address. Separate networking paths cover a same-host Localtonet client with a loopback-only Docker port and a client running on another trusted device.
📋 What's in this guide
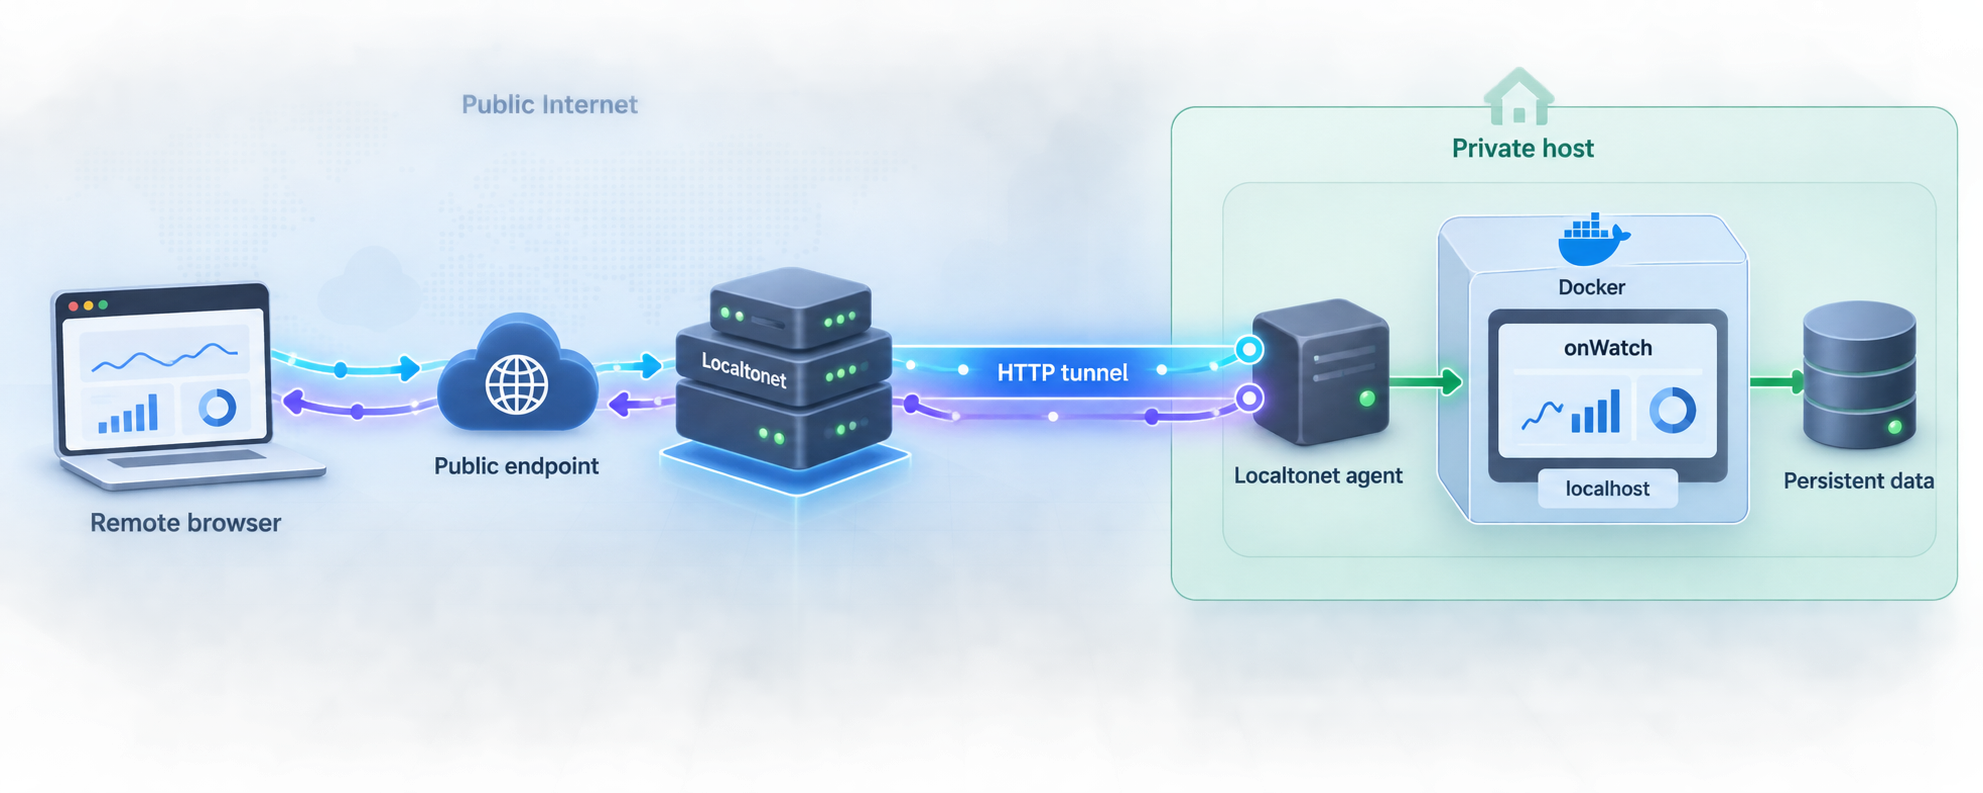
How this deployment works, and which version it covers
onWatch is an open-source AI quota monitoring application. It runs as a background service, polls configured providers, stores historical measurements in SQLite, and presents quota cycles, burn rates, resets, sessions, and trends through a browser dashboard. Its repository describes a lightweight service with local storage and no application telemetry.
This tutorial is pinned to the repository tag v2.14.5, associated with commit d830952. Pinning matters because onWatch identifies itself as beta software, and its Compose file, provider integrations, ports, and environment template can change. Commands that inspect the effective Compose configuration are included throughout so that the checked-out files, rather than an old screenshot or website example, remain the authority for your deployment.
Current official onWatch surfaces are inconsistent. The repository documentation opens the dashboard at http://localhost:9211, while the project website displays localhost:9191 for an earlier displayed version. For the pinned repository workflow in this guide, inspect the host-side mapping in docker-compose.yml and confirm it with Docker Compose. Use the published host port reported by your checkout for local testing and for the Localtonet target.
In the repository workflow documented for this release line, the dashboard is expected on host port 9211, persistent application data is mounted at /data inside the container, and logs go to standard output. The commands below verify each assumption before remote access is enabled.
The deployment has four distinct layers:
/data.
Localtonet changes how the dashboard is reached. It does not install onWatch, repair an unhealthy container, provide provider credentials, or replace the onWatch login. The public route depends on the onWatch container serving HTTP, the selected Localtonet client being connected, and the tunnel being started.
Current provider coverage is broader than the original environment example
The current onWatch project advertises coverage for Synthetic, Z.ai, Anthropic, Codex, GitHub Copilot, MiniMax, Gemini CLI, Cursor, Grok, Kimi Code, Antigravity, OpenRouter, OpenCode Go, Ollama Cloud, Moonshot, and DeepSeek. It also supports local API Integration events for custom workflows. Different providers use different credential sources, including API keys, OAuth sessions, local authentication files, desktop credential stores, cookies with workspace information, or provider-specific tokens.
The five commonly shown variables, SYNTHETIC_API_KEY, ZAI_API_KEY, ANTHROPIC_TOKEN, CODEX_TOKEN, and COPILOT_TOKEN, are examples rather than the full provider catalog. Do not infer the configuration variable for another provider from its name. Use the comments and entries in the .env.docker.example file shipped with the pinned checkout and the provider's current project setup guidance.
Auto-detection deserves special care in a container. A native onWatch process may be able to read a host keychain, local CLI session, SQLite credential store, or authentication file. A Docker container has a separate filesystem and does not automatically receive those resources. If the checked-out Compose file does not explicitly mount a required credential location, do not assume that host-side auto-detection will work inside the container.
Prerequisites and deployment decisions
Prepare the host and decide where the Localtonet client will run before modifying the port mapping. The safest simple arrangement is to run Docker and Localtonet on the same machine, then bind the onWatch host port only to loopback. A Localtonet client on another machine requires the Docker host to publish on a network interface reachable from that client.
| Requirement | Purpose | Validation |
|---|---|---|
| Git | Retrieves the repository and checks out the pinned tag. | Run git --version. |
| Docker Engine | Runs the onWatch container and persistent mount. | Run docker version and confirm the daemon responds. |
| Docker Compose | Applies the project service definition. | Run docker-compose version. |
| Provider authentication | Allows onWatch to retrieve quota information. | Use a method supported by the selected provider and the pinned environment template. |
| Dashboard credentials | Protect the browser interface. | Set unique values for ONWATCH_ADMIN_USER and ONWATCH_ADMIN_PASS. |
| Localtonet client | Creates the outbound connection for optional remote access. | Install it on the Docker host or a trusted device that can reach the published port. |
The onWatch repository documents docker-compose, so this guide uses that spelling. Docker installations that provide Compose as docker compose can perform the equivalent operations. Use one form consistently and do not run two independently named Compose projects against the same files.
Keep the repository in a stable directory. Compose project names and relative bind mounts can depend on that location. Moving the directory or invoking Compose with a different project name can cause Docker to create or select different resources, including an empty named volume.
Install onWatch v2.14.5 with Docker Compose
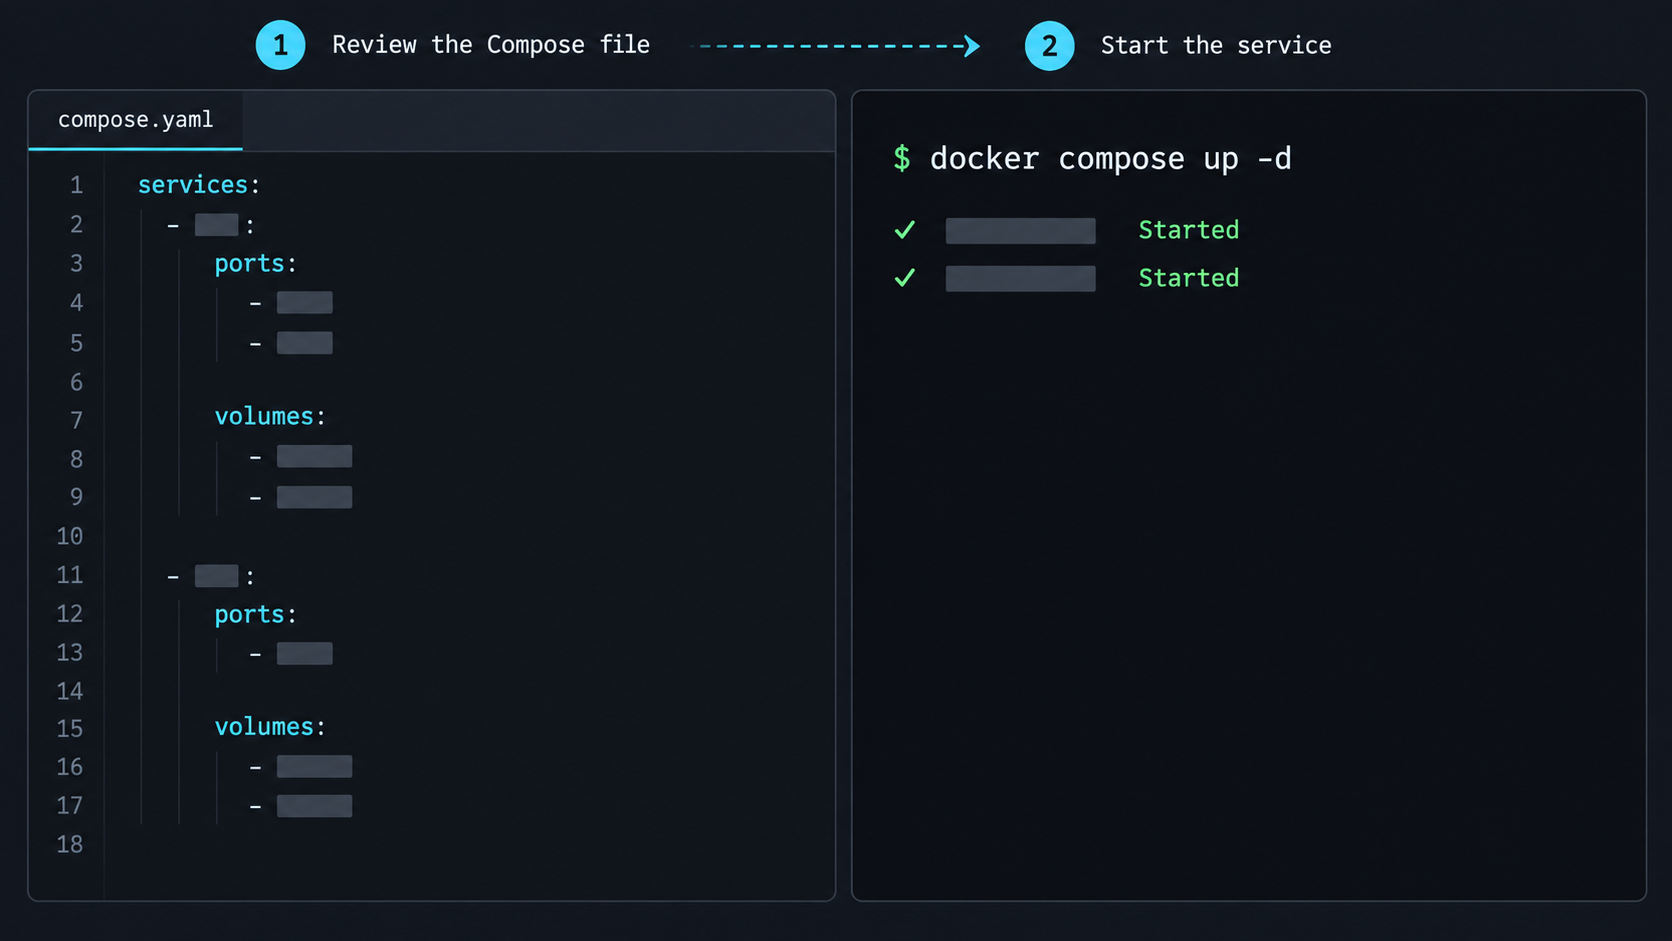
Clone the official repository
Clone onWatch and enter its repository directory.
git clone https://github.com/onllm-dev/onWatch.git
cd onWatchCheck out the version used by this tutorial
Fetch the release tags and select v2.14.5. The final command should print the tag rather than main.
git fetch --tags origin
git checkout v2.14.5
git describe --tags --exact-match
Expected result:
v2.14.5Create the runtime environment file
Copy the Docker-specific template to .env, leaving the original template unchanged.
cp .env.docker.example .envConfigure a provider and the dashboard login
Open .env in a local editor. Set at least one provider using a variable and authentication method present in the pinned template. Set a unique dashboard username and password. The following names are documented examples, not a complete current provider list:
SYNTHETIC_API_KEY=syn_your_key_here
ZAI_API_KEY=your_zai_key_here
ANTHROPIC_TOKEN=your_token_here
CODEX_TOKEN=your_token_here
COPILOT_TOKEN=ghp_your_token_here

ONWATCH_ADMIN_USER=replace_with_your_username
ONWATCH_ADMIN_PASS=replace_with_a_long_unique_password
Configure only the providers you use. Copilot's documented token path requires a classic GitHub Personal Access Token with the copilot scope. Codex-only configurations can use CODEX_TOKEN. Other current providers may use different mechanisms, so follow the pinned template and provider-specific project guidance.
Inspect the effective Compose configuration
Render the merged configuration and list its service names before starting anything.
docker-compose config --services
docker-compose config
Confirm that the onWatch service exists, that its environment file is recognized, that a host port is published for the dashboard, and that storage is attached to /data. Do not paste the rendered output into a public issue because expanded configuration may reveal secrets.
Start the deployment
Start or build the service in detached mode using the project workflow.
docker-compose up -dSuccessful container creation is not the final test. Continue with status, log, port, and browser checks.
The project also documents ./app.sh --docker --run. Use either the direct Compose workflow or the wrapper consistently. The direct Compose path is used throughout this tutorial because it makes status, recreation, backup preparation, and rollback actions explicit.
Never commit .env, include it in a container image, paste it into a ticket, or display it in a screenshot. If a provider key, dashboard password, or Localtonet device token is disclosed, revoke or rotate it through the relevant system.
Verify the container, logs, port, and dashboard
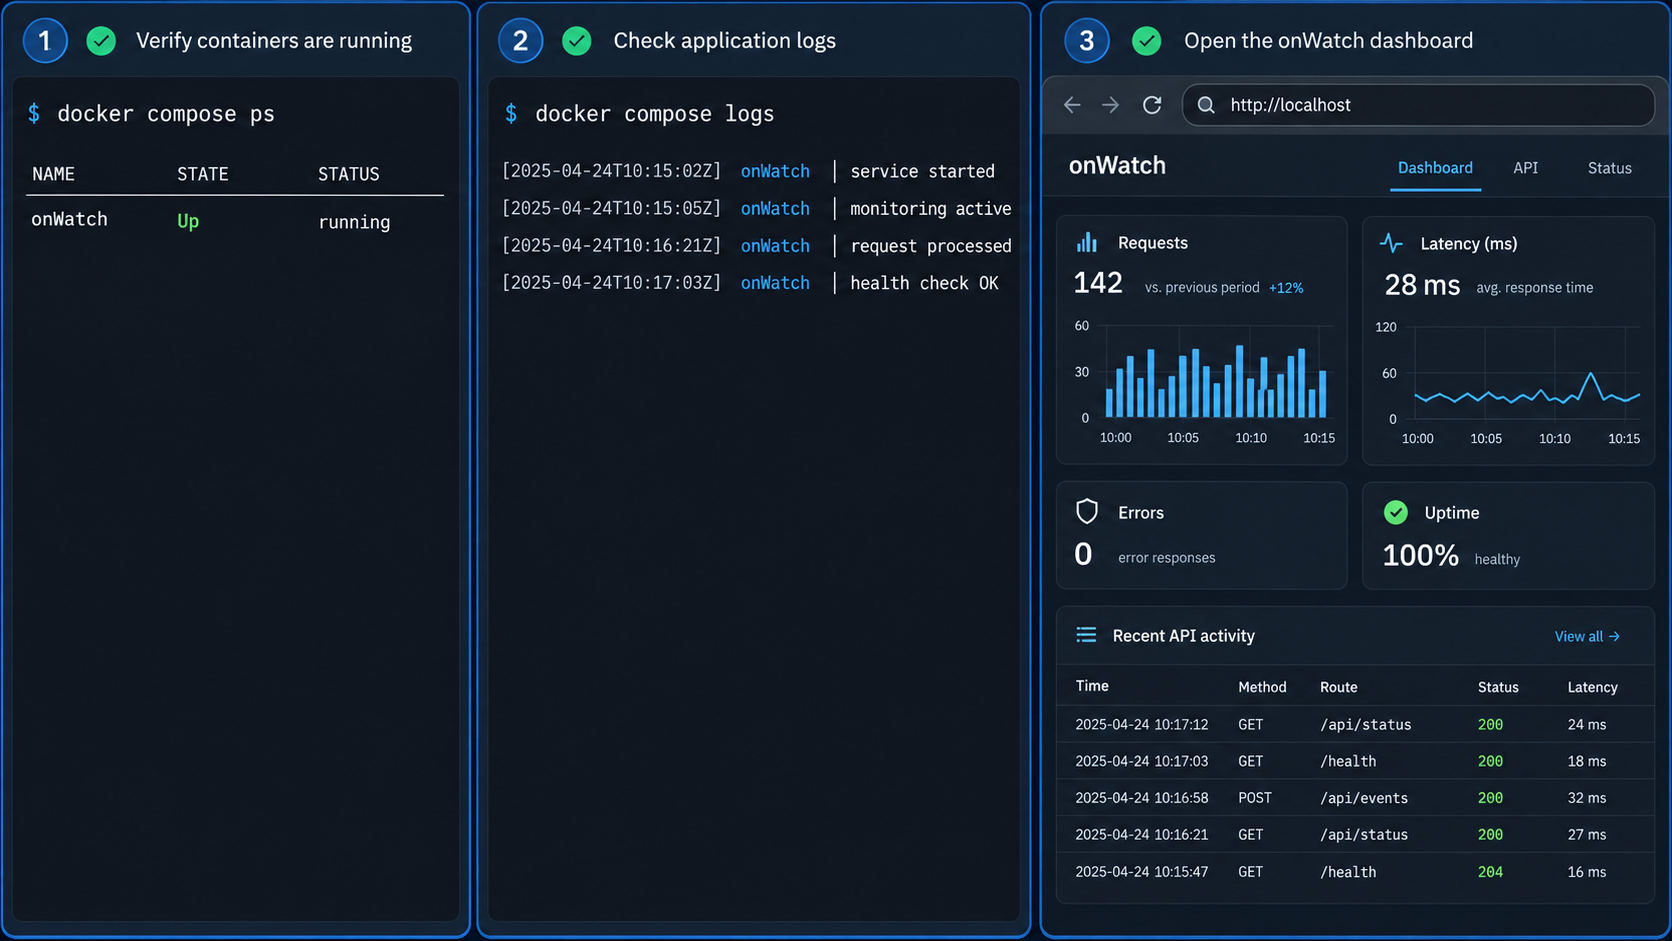
Check container status
docker-compose psThe onWatch service should be listed as running. If it is absent, exited, or repeatedly restarting, inspect the logs before opening a browser. The exact status wording varies between Compose versions, but an exited container is not a successful deployment.
Review startup logs
The project sends container logs to standard output and documents the container name onwatch:
docker logs --tail 100 onwatch
docker logs -f onwatch
The first command prints recent output and exits. The second follows new output until you interrupt the display. Interrupting docker logs -f does not stop the container. Look for malformed configuration, unavailable credentials, provider authentication failures, port conflicts, or repeated startup failures.
Confirm the published host port
Query Docker rather than relying on the website's 9191 example or assuming every release uses 9211:
docker port onwatch
docker inspect onwatch --format '{{json .NetworkSettings.Ports}}'
For the repository workflow covered here, expect a published dashboard port corresponding to 9211. The output also reveals the bind address. A result using 0.0.0.0 or :: means Docker is publishing on network interfaces beyond loopback. A result using 127.0.0.1 limits IPv4 access to the Docker host.
Test HTTP on the Docker host
curl -I http://127.0.0.1:9211/Any valid HTTP response proves that a server answered at that address. The precise status may depend on authentication and application routing. A refused connection means the host port is wrong, the container is not listening, or the publication is missing.
Then open the same verified address in a browser:
http://localhost:9211
Sign in using ONWATCH_ADMIN_USER and ONWATCH_ADMIN_PASS. Confirm that the intended provider appears and that onWatch can retrieve meaningful quota information. A new deployment may not yet contain enough observations for long-range historical charts.
A Localtonet tunnel cannot make an unhealthy application healthy. Resolve container startup, port publication, login, and provider configuration locally before adding another networking layer.
Choose the correct Docker and Localtonet network path
The correct bind address depends on where the Localtonet client runs. These two topologies are not interchangeable. A loopback-only Docker port is preferred when Localtonet runs on the Docker host, but that same restriction prevents a client on another machine from reaching onWatch.
| Topology | Docker host publication | Localtonet target | Security implication |
|---|---|---|---|
| Localtonet on the Docker host | 127.0.0.1:9211:9211 |
127.0.0.1, port 9211 |
The dashboard is not intentionally published to other LAN devices. |
| Localtonet on another trusted device | A host or LAN bind reachable from that device | The Docker host's tested private IP and published port | The LAN path must be restricted with host and network firewall policy. |
| Local browser only, no tunnel | Prefer a loopback bind | Not applicable | No public Localtonet route exists. |
Recommended path: Localtonet on the Docker host
Open the checked-out docker-compose.yml and locate the onWatch service's ports entry. If it publishes 9211:9211, change that entry to an explicit loopback bind:
services:
  onwatch:
    ports:
      - "127.0.0.1:9211:9211"
Preserve the rest of the project Compose file. Do not replace the complete file with this partial example. The three values mean host bind address, host port, and container port. The Localtonet client on the same host can reach 127.0.0.1:9211, while another LAN device cannot connect to that loopback address.
Render the effective configuration and verify that only the intended mapping remains:
docker-compose config
docker-compose up -d --force-recreate
docker port onwatch
The final output should show a loopback host binding rather than an all-interface binding. Test it again:
curl -I http://127.0.0.1:9211/
Adding an override without checking the rendered Compose configuration can leave both the original broad mapping and the new loopback mapping. Always inspect docker-compose config and docker port onwatch. The goal is one intentional host publication, not two.
Alternative path: Localtonet on another device
If the Localtonet client runs on a different computer, it cannot use the Docker host's 127.0.0.1. The onWatch port must be published on an interface reachable from that client. The repository's unqualified mapping, such as 9211:9211, commonly results in Docker publishing on all host interfaces. That is convenient, but broader than necessary.
If your host has a stable private address and the Compose implementation supports binding to it, use the specific host address instead of every interface. Replace the example private address with the actual address assigned to the Docker host:
services:
  onwatch:
    ports:
      - "192.168.1.20:9211:9211"
Recreate the service, inspect the mapping, and test from the device that will run Localtonet:
docker-compose up -d --force-recreate
docker port onwatch
From the Localtonet client device, open or request:
http://192.168.1.20:9211Replace the example address with the tested private address. Configure the Docker host firewall and any intervening network controls to permit only the required source device or trusted subnet. Docker networking and firewall integration vary by host platform, so verify the effective rule from another device rather than assuming that a host firewall rule applies as intended.
Do not use a public host address or router port forwarding for this workflow. The Localtonet client needs only a private path to the service and establishes the internet-facing relay connection outbound.
Operate, reconfigure, stop, restart, update, and roll back onWatch
Run these commands from the repository directory that contains docker-compose.yml and .env. Keeping operations tied to that directory prevents accidental management of a different Compose project.
Check status and recent logs
docker-compose ps
docker logs --tail 100 onwatch
Use the first command to confirm the service is running and the second to check application health. To follow live output during a provider test or restart, use:
docker logs -f onwatchApply an environment configuration change
Editing .env does not modify the environment of an already created process. After changing a provider credential or dashboard setting, recreate the service:
docker-compose up -d --force-recreate
docker-compose ps
docker logs --tail 100 onwatch
The expected result is a running replacement container using the same persistent mount. Sign in again and confirm that the changed provider or setting behaves as intended. If dashboard credentials changed, a browser password manager may continue submitting the old value.
Restart without changing configuration
docker-compose restart
docker-compose ps
A restart stops and starts the existing service. Use it for a controlled process restart when the Compose definition and environment do not need to be reapplied.
Stop the service while preserving its Compose resources
docker-compose stop
docker-compose ps
The container should no longer be running, but it remains available for a later start:
docker-compose start
docker-compose ps
Remove and recreate the container without deleting persistent volumes
docker-compose down
docker-compose up -d
Do not add the volume-removal option when you intend to preserve onWatch history. Before using down, identify the active mount and maintain a backup. Removing a container is usually safe only because the application data is stored outside the container's writable layer.
Commands that remove Compose volumes can erase the SQLite history and application state. Do not use a volume-removal option as routine cleanup. Verify the mount and complete a recoverable backup first.
Prepare for an update
Check for local changes, save the exact current commit, preserve the effective configuration, and back up the persistent data before switching versions:
mkdir -p backups
git status --short
git rev-parse HEAD > backups/pre-update-commit.txt
docker-compose config > backups/pre-update-compose.txt
docker inspect onwatch --format '{{range .Mounts}}{{println .Type "|" .Name "|" .Source "|" .Destination}}{{end}}' > backups/pre-update-mounts.txt
The rendered Compose file can contain expanded values from the environment. Protect the backup directory and inspect the file before transferring it. Do not place it in a public repository.
Update to an explicitly selected release
Replace the example target with a release you have reviewed. Do not update blindly from a moving branch:
git fetch --tags origin
TARGET_TAG=v2.14.5
git checkout "$TARGET_TAG"
docker-compose up -d --build
docker-compose ps
docker logs --tail 100 onwatch
If moving beyond the pinned release, compare the updated .env.docker.example and docker-compose.yml with your working configuration before starting. Do not overwrite .env with an example file because that can replace real credentials with placeholders or discard newly required settings.
After the update, repeat the port inspection, local HTTP test, login, and provider checks. Also confirm that the container still mounts the expected storage at /data.
Roll back the repository revision
If the updated release fails and its data format remains compatible with the older version, return to the recorded commit and rebuild:
git checkout "$(cat backups/pre-update-commit.txt)"
docker-compose up -d --build --force-recreate
docker-compose ps
docker logs --tail 100 onwatch
Application data compatibility cannot be assumed across every future release. If an update migrated or changed persistent data, restore the pre-update storage backup before starting the older application. Review the relevant release notes before deciding whether a binary rollback alone is safe.
Identify, back up, and recover persistent onWatch data
The container-side path is /data, but the host-side storage can be a Docker named volume or a bind-mounted directory. Identify the active type rather than assuming a path from the volume name.
Identify the active mount
docker inspect onwatch --format '{{range .Mounts}}{{println "type=" .Type "name=" .Name "source=" .Source "destination=" .Destination}}{{end}}'
Find the line whose destination is /data. A named volume reports type=volume and includes a volume name. A bind mount reports type=bind and shows the host directory in source=.
You can also inspect the Compose declaration without expanding secrets:
grep -n -A 8 -B 2 '/data' docker-compose.ymlCreate a consistent backup
SQLite can be active while the service is running. For a straightforward filesystem archive, stop onWatch before copying its data:
mkdir -p backups
docker-compose stop
Back up a named Docker volume
Set VOLUME_NAME to the exact name printed by docker inspect:
VOLUME_NAME=replace_with_actual_volume_name
docker run --rm \
  -v "${VOLUME_NAME}:/source:ro" \
  -v "$PWD/backups:/backup" \
  alpine \
  tar -czf /backup/onwatch-data.tar.gz -C /source .
This helper container mounts the onWatch volume read-only and writes the archive to the repository's backups directory. The first execution may retrieve the Alpine image. Check that the archive exists before restarting:
ls -lh backups/onwatch-data.tar.gz
tar -tzf backups/onwatch-data.tar.gz | head
docker-compose start
Back up a bind-mounted directory
Set DATA_SOURCE to the exact host source shown by Docker:
DATA_SOURCE=/replace/with/actual/source
tar -czf backups/onwatch-data.tar.gz -C "$DATA_SOURCE" .
tar -tzf backups/onwatch-data.tar.gz | head
docker-compose start
Run the archive command with an account that can read the complete directory. Do not change ownership or permissions casually, since the onWatch image runs as a non-root user and must retain access after recovery.
Recover a named volume
Stop the service and confirm the destination volume name. Preserve the current contents separately before clearing anything:
docker-compose stop
VOLUME_NAME=replace_with_actual_volume_name
docker run --rm \
  -v "${VOLUME_NAME}:/destination" \
  -v "$PWD/backups:/backup:ro" \
  alpine \
  sh -c 'find /destination -mindepth 1 -maxdepth 1 -exec rm -rf {} + && tar -xzf /backup/onwatch-data.tar.gz -C /destination'
docker-compose start
docker-compose ps
docker logs --tail 100 onwatch
The removal step is destructive to the selected volume. Double-check VOLUME_NAME before running it. Then sign in and confirm that historical data is present.
Recover a bind-mounted directory
docker-compose stop
DATA_SOURCE=/replace/with/actual/source
tar -czf backups/onwatch-data-before-restore.tar.gz -C "$DATA_SOURCE" .
find "$DATA_SOURCE" -mindepth 1 -maxdepth 1 -exec rm -rf {} +
tar -xzf backups/onwatch-data.tar.gz -C "$DATA_SOURCE"
docker-compose start
docker-compose ps
docker logs --tail 100 onwatch
Verify the restored directory's owner and permissions against a known working backup or the previous deployment. If the container starts but cannot open its database, inspect the logs before changing permissions.
The data archive protects the content mounted at /data. It does not necessarily include .env, the Compose file, or your Localtonet configuration. Store a protected inventory of provider setup and dashboard settings through an approved secrets process. Avoid placing an unencrypted credential file in a general-purpose backup archive.
Create and start a Localtonet HTTP tunnel
Use an HTTP tunnel because onWatch serves a browser-based HTTP application. The local target must be the address and host-side port that the selected Localtonet client can reach. Confirm that path immediately before creating the tunnel.
HTTP tunnels can use Random Sub Domain, Custom Sub Domain, or Custom Domain as the Process Type. All three serve the target content through a public HTTPS address. Available options can vary by current product configuration or plan, so select from the values shown in your dashboard. Check current documentation before applying custom-domain DNS settings.
Install and run the Localtonet client
Install the Localtonet application on the Docker host for the loopback topology, or on the trusted device from which you tested the Docker host's private address. Keep the client running because it establishes the outbound relay connection.
Open the HTTP tunnel configuration
In the Localtonet dashboard, create an HTTP tunnel and choose the Process Type offered for the public address.
Select the device and relay server
Select the device-specific AuthToken associated with the client that will carry the tunnel, then select an available server or region from the current dashboard. Do not expose or guess a token, server code, or private endpoint.
Enter the verified local IP address and port
For a same-host loopback deployment, use 127.0.0.1 and the verified host port, expected to be 9211 for this pinned workflow. For a client on another device, use the Docker host's tested private address and the published host port. Do not use the container's internal address or the Localtonet public URL as the target.
Create, then start, the tunnel
Save the tunnel configuration, then press Start. Creating a tunnel does not mean it is running. The selected client must be connected and the tunnel must be started before the assigned public HTTPS address can reach onWatch.
Open the assigned public HTTPS URL and sign in with the onWatch dashboard credentials. Verify an authenticated dashboard page, not only the login form. For the current interface and field sequence, see our HTTP tunnel documentation.
Stop the tunnel when remote access is no longer required. Delete it when the route should not be retained. Stopping the tunnel does not stop onWatch, and stopping onWatch does not delete the Localtonet configuration.
Remote browsers use the assigned public HTTPS URL. Localtonet forwards those requests to the tested local IP address and port. The public URL must never be entered as its own local target.
Secure the dashboard, credentials, network path, and history
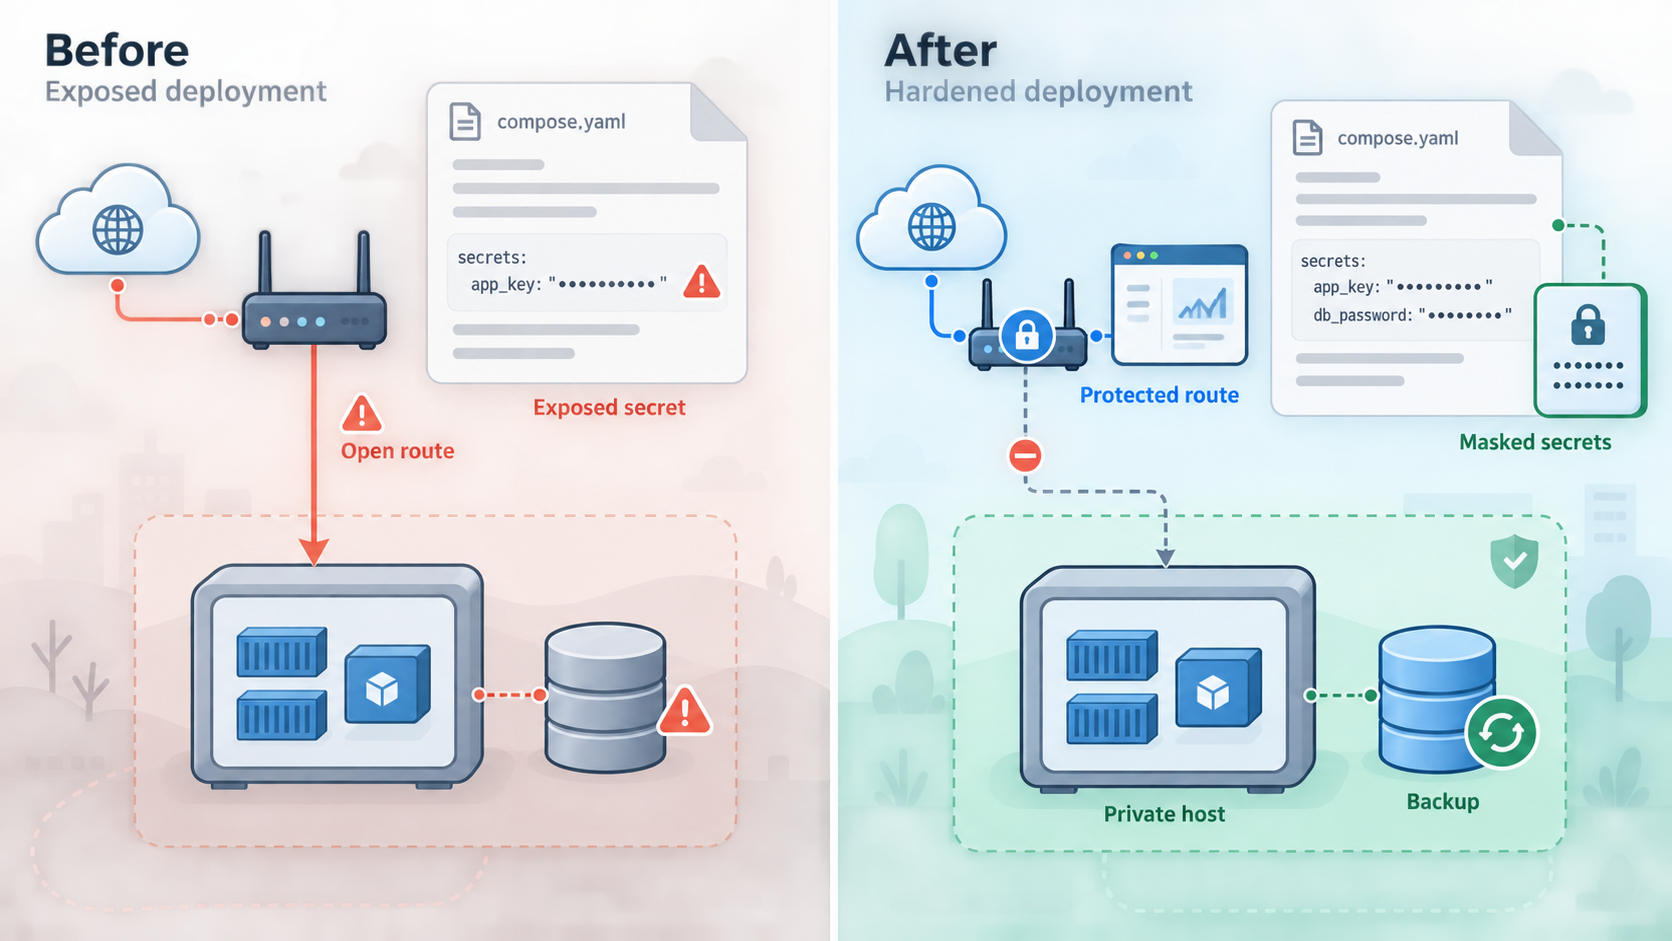
onWatch can reveal which providers are configured, when they are used, quota consumption, session behavior, and historical activity. Its environment file can contain credentials that authorize provider access. Treat the dashboard, SQLite data, Compose configuration, backups, and tunnel credentials as sensitive.
Keep onWatch authentication enabled
Use a unique dashboard username and a long password that is not reused for email, provider, source-control, or Localtonet accounts. An obscure subdomain is not an access-control mechanism. Public URLs can appear in browser history, logs, screenshots, and copied messages.
Prefer loopback for same-host tunneling
If Localtonet runs on the Docker host, bind Docker to 127.0.0.1. This avoids opening the dashboard across the LAN solely to make tunneling possible. Verify the effective mapping after every Compose update because an upstream file change can reintroduce a broad publication.
Restrict a remote-client LAN path
If the Localtonet client runs elsewhere, bind to a specific private interface when practical and allow only the client's source address through host and network firewall rules. Do not expose the onWatch port through a router. Test both allowed and disallowed paths after changing the firewall.
Minimize credential access
Configure only needed providers and use the least privilege supported by each integration. Limit filesystem access to .env and backup archives. Device AuthTokens identify Localtonet clients and must not appear in articles, source code, screenshots, issue reports, or command history.
Use the tunnel lifecycle as a control
The endpoint is available only while the selected client is connected and the tunnel is running. Start remote access when needed, stop it afterward, and delete obsolete routes. This reduces the time during which the login endpoint is publicly reachable.
A Localtonet HTTP tunnel provides a public HTTPS address, but transport protection and user authorization solve different problems. Keep the onWatch login enabled, protect provider credentials, restrict local network access, and share the public endpoint only with authorized users.
Troubleshoot from Docker outward
Diagnose in this order: Compose configuration, container status, logs, port publication, local HTTP, dashboard authentication, provider integration, reachability from the Localtonet client, and finally the public tunnel.
The container does not exist or start
docker-compose config --services
docker-compose ps
docker-compose up -d
docker logs --tail 100 onwatch
Confirm that you are in the correct repository directory and that .env exists. If the service has a different name in a future checkout, use the name printed by docker-compose config --services. If no container was created, review the full output from docker-compose up -d.
onWatch reports missing provider configuration
Compare the configured variable with .env.docker.example from the exact checked-out tag. Check for placeholder values, accidental quotes, unsupported auto-detection assumptions, missing container mounts, or expired provider authentication. Recreate the service after editing:
docker-compose up -d --force-recreate
docker logs --tail 100 onwatch
The expected port is already in use
Another process may own the host port. Confirm the current Compose mapping and inspect Docker's publication:
docker-compose config
docker port onwatch
If you intentionally choose a different host port, change only the host-side value and use that new value consistently for local verification and the Localtonet target. Do not assume that the container port must change with it.
The website says 9191, but the repository says 9211
Use the Compose file from the checked-out release and the output of docker port onwatch. The project website's displayed 9191 example and repository's 9211 instructions are not consistent. Neither should override the effective configuration running on your host.
Localhost works, but another device cannot connect
A loopback binding is intentionally available only on the Docker host. That is correct for a same-host Localtonet client. If a remote client is required, bind the service to a suitable private host address, permit the exact trusted path through the firewall, recreate the container, and test from that device.
The login works, but provider data is missing
Review recent logs for provider authentication or permission errors. Confirm that the selected integration's credential mechanism is usable inside Docker. A provider detected automatically by a native installation may require an explicit environment value or supported mount in a container. A fresh deployment can also lack historical charts until enough observations have been collected.
The public URL does not load
Confirm that onWatch works from the Localtonet client device. Then verify that the correct Localtonet device is connected, the tunnel has been started, and the HTTP target matches the tested host address and port. Creating the tunnel alone is not enough.
The public login loads, but assets or requests fail
Compare the same action through the local URL. If it fails locally, troubleshoot onWatch. If it fails only through Localtonet, confirm that the complete assigned HTTPS URL is being used and review the client and tunnel connection state. Remove credentials, cookies, authorization headers, provider tokens, and AuthTokens from any diagnostic material.
History disappeared after an update
Stop making changes and inspect the active /data mount. A different repository directory, Compose project name, host path, or volume name can attach empty storage. Compare the current mount with backups/pre-update-mounts.txt. If the old storage cannot be reattached safely, recover from the verified pre-update archive.
Frequently asked questions
Does onWatch use port 9211 or 9191?
Official project surfaces currently disagree. The repository documents localhost:9211, while the project website displays localhost:9191. This tutorial is pinned to v2.14.5 and expects the repository Compose workflow to publish 9211, but you should confirm the checked-out docker-compose.yml and run docker port onwatch. Use the reported host port.
Why pin onWatch to a tag instead of using main?
A tag makes the Compose file, environment template, provider behavior, and rollback point reproducible. onWatch is under active beta development, so a moving branch can change after a tutorial is published.
Where does Dockerized onWatch store its history?
The container-side persistent path is /data. Its host-side source can be a named Docker volume or a bind-mounted directory. Use docker inspect onwatch to identify the active mount before backup, update, migration, or recovery.
Do I need to stop onWatch before backing up SQLite data?
The procedures in this guide stop the service before archiving the mounted filesystem. That creates a simple, consistent backup boundary. Restart the service after checking that the archive exists and can be listed.
Can Localtonet run on a different device from Docker?
Yes. The selected Localtonet client must be able to reach the Docker host's private address and published port. In this topology, the client's localhost refers to the client machine, not the onWatch host. Bind onWatch to an appropriate private interface and restrict the path with firewall policy.
Should I bind the onWatch port to 127.0.0.1?
Yes, when the browser and Localtonet client both run on the Docker host. A mapping such as 127.0.0.1:9211:9211 avoids intentionally publishing the dashboard to the LAN. Do not use that mapping when a Localtonet client on another device must connect.
Does onWatch support more than the five provider variables commonly shown?
Yes. The current project advertises 16 provider integrations plus local API Integration events. Authentication methods differ by provider, and several do not use one of the five original example variables. Use the environment template and provider guidance shipped with your selected onWatch version.
Does a Localtonet tunnel replace the onWatch login?
No. Localtonet provides connectivity to the local HTTP service. Keep onWatch authentication enabled and use a unique, strong password. The public HTTPS address is not a substitute for application authorization.
Is a newly created Localtonet tunnel immediately available?
No. The selected client device must be connected and the tunnel must be started. You can stop the tunnel without deleting it, or delete it when the route should no longer exist.
Connect your verified onWatch deployment with Localtonet
Pin the onWatch version, confirm the real Docker port and persistent mount, complete a tested backup, and verify the dashboard locally. Then create a Localtonet HTTP tunnel to the exact address reachable from your selected client, keep onWatch authentication enabled, and stop the tunnel whenever remote access is not required.
Get Started Free →

