

Run parallel Codex sessions locally, verify every interactive path, and choose a controlled remote-access model
MulmoTerminal provides a browser terminal grid for supervising multiple coding-agent sessions, including Codex. This guide covers the verified Node.js requirement, Codex preparation, MulmoTerminal startup, configuration, local testing, session operation, and recovery from common failures. It then explains two distinct Localtonet access models: private connectivity through VPN Manager, or a temporary public HTTP tunnel used only after the protection decision has been resolved. Because each terminal cell controls a real PTY and the available MulmoTerminal evidence does not establish built-in authentication for the main web interface, this guide does not recommend leaving an unprotected HTTP tunnel running.
📋 What's in this guide
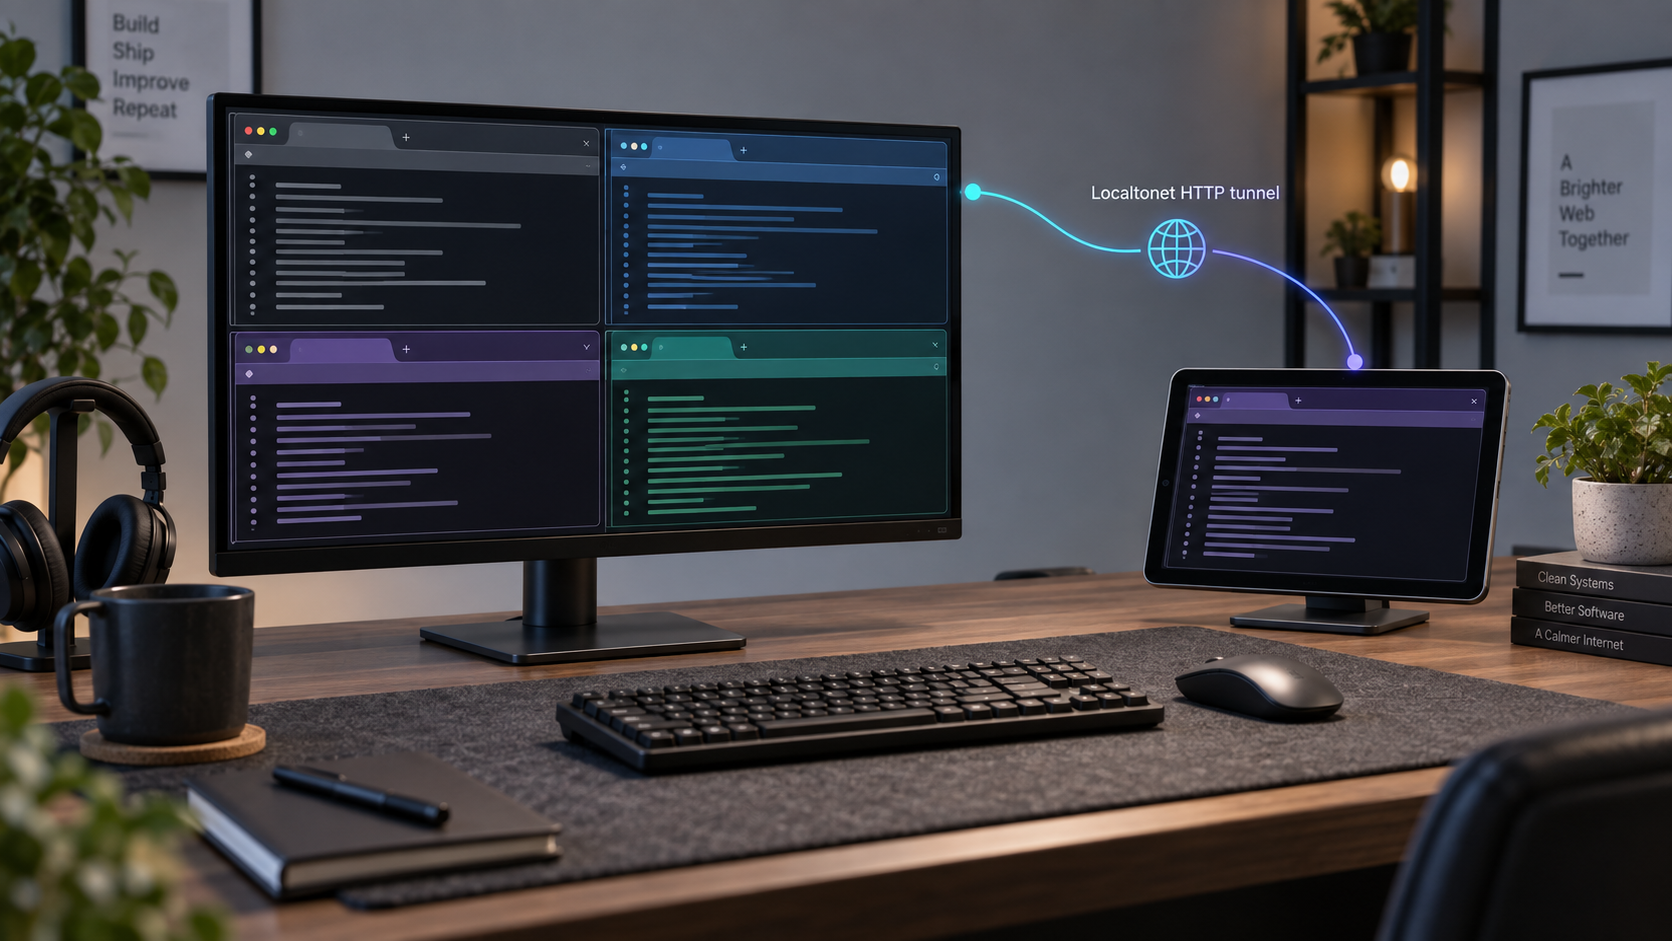
How MulmoTerminal, Codex, and Localtonet fit together
MulmoTerminal is a self-hosted browser application for running several coding-agent sessions in parallel. Its grid shows live sessions side by side and identifies states such as working, waiting for input, done, unreviewed, or idle. When you focus on one terminal, its cockpit roster can preserve a compact view of other sessions, including available context such as the latest prompt, response, summary, and pull-request phase.
The important security and compatibility detail is that a terminal cell is not a read-only status card. According to the official MulmoTerminal repository, every cell is a real pseudoterminal, usually abbreviated as PTY. A shell, Codex process, development server, Git interface, or another terminal application can run inside it. A person who can control the browser terminal may be able to execute commands with the permissions of the account running MulmoTerminal.
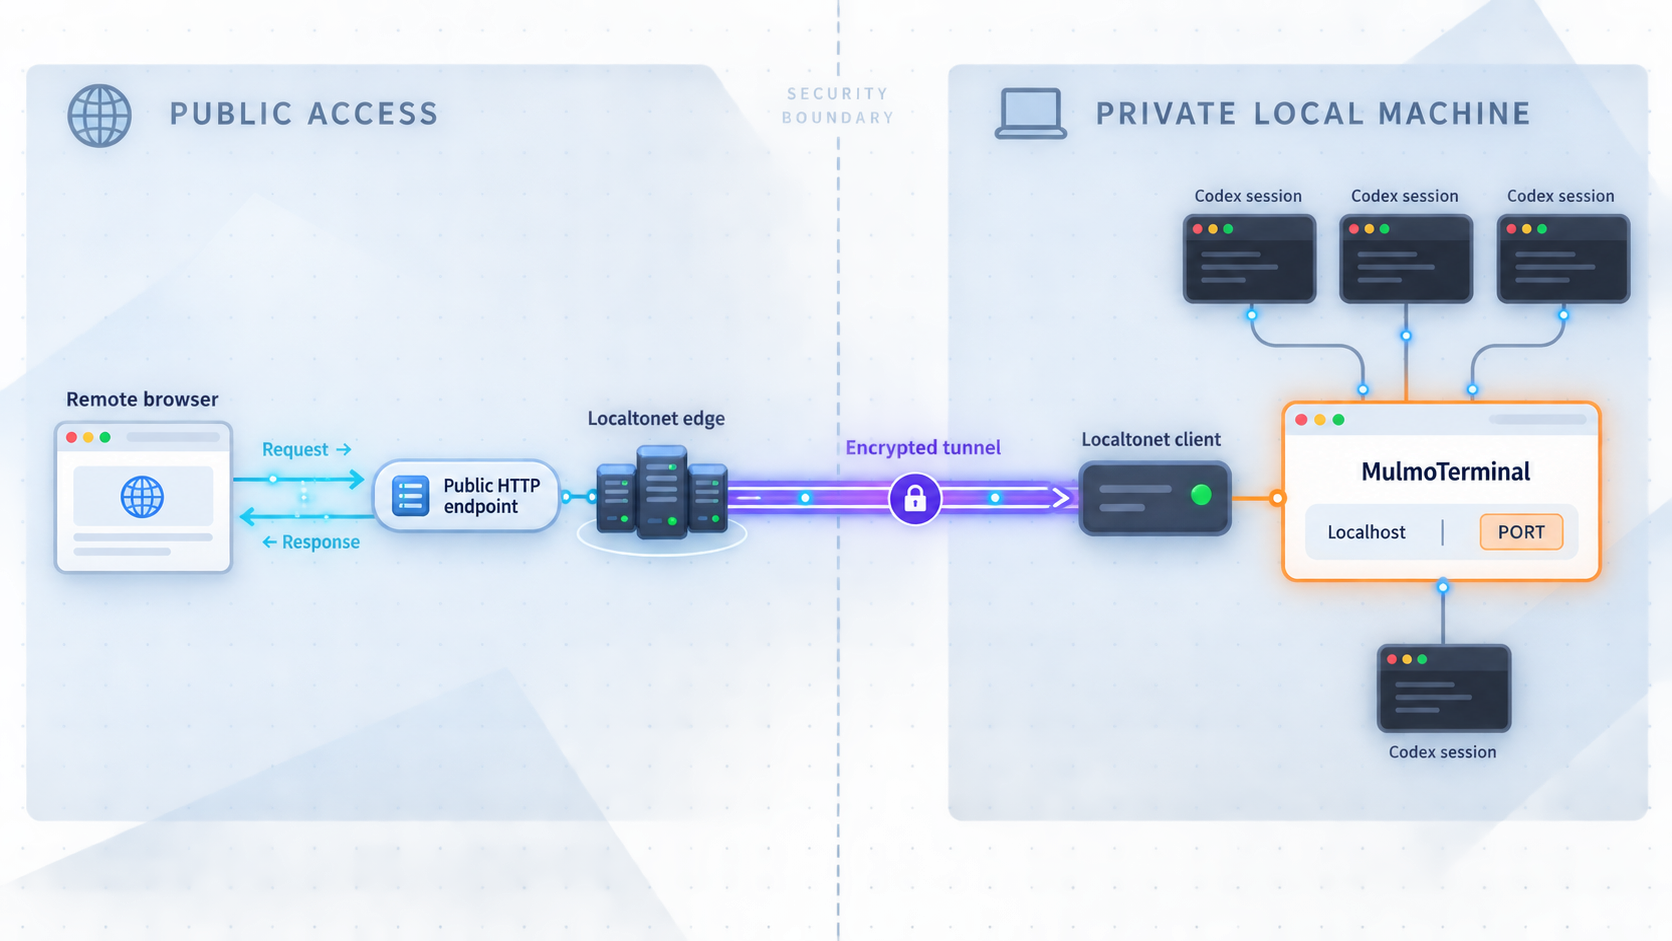
MulmoTerminal normally starts at http://localhost:34567. The application and its terminal processes remain on your computer. If Localtonet is used, our client runs on a device that can reach that service and establishes an outbound connection to our platform. That means standard Localtonet tunneling does not require inbound router port forwarding, unsolicited inbound firewall changes, a public IP address, or a separately configured VPN.
That statement describes connectivity, not access control. A Localtonet HTTP tunnel creates a public route to the configured local target. It does not add application authentication to MulmoTerminal. An assigned address, including a randomly generated or difficult-to-guess address, must not be treated as a password.
localhost:34567.
The available primary evidence does not establish built-in authentication or authorization for the main MulmoTerminal web interface. Do not publish it as an unattended public service. This tutorial limits an unprotected HTTP tunnel to a controlled compatibility test using non-sensitive data, with the tunnel stopped immediately afterward. Long-running public access requires an independently verified authentication and authorization layer that is outside the documented scope of this guide.
Install and verify the prerequisites
Prepare the complete local environment before configuring remote access. This keeps application, agent, credential, and network problems separate. If MulmoTerminal cannot control Codex through a local browser, a tunnel cannot repair the underlying problem.
Install Node.js 22.12 or newer
MulmoTerminal requires Node.js 22.12 or newer. Use the official Node.js download and installation page to select an installation method supported by your operating system. Platform-specific package-manager commands change over time, so follow the current instructions presented for your platform rather than copying an older command.
Open a new terminal after installation and check the active version:
node --versionThe result must be version 22.12 or newer. Opening a new terminal matters because an existing shell can retain an older executable path. If several Node.js installations exist, verify which one is active under the account that will start MulmoTerminal.
The documented quick start uses npx. Confirm that it is available in the same terminal:
npx --versionInstall and authenticate Codex
Use the current installation instructions in the official OpenAI Codex repository. The supported installation and login choices can change independently of MulmoTerminal, so the primary Codex instructions should control when they differ from a cached package command or an older tutorial.
The official npm installation path for the Codex CLI is:
npm install -g @openai/codexAfter installation, start Codex locally:
codexComplete the supported sign-in flow presented by Codex. Depending on the current Codex release and your account configuration, the available authentication choices can differ. Do not place an API key, session token, Localtonet device token, or other credential in this article's MulmoTerminal commands.
Confirm that Codex can be found from the same environment that will launch MulmoTerminal:
codex --version
A successful version check confirms that the executable is on PATH. It does not by itself prove that login is complete, so also start Codex directly and confirm that it reaches its normal interactive state before closing it.
Check Git and GitHub CLI availability
The MulmoTerminal project lists git and gh among the command-line tools expected for repository and GitHub workflows. Confirm their availability:
git --version
gh --version
Authenticate the GitHub CLI locally if you intend to use pull-request or other GitHub operations. MulmoTerminal does not replace the authentication requirements of Codex, Git, GitHub CLI, package registries, or cloud tools.
Decide whether you need tmux
MulmoTerminal uses tmux, when available, to support persistent and reattachable terminal sessions. The project describes persistence across browser reloads, reconnects, and server restarts. Actual behavior can vary with the MulmoTerminal release, operating system, tmux installation, and the way the server was stopped, so test the recovery behavior you need before relying on it.
The project also identifies ffmpeg as useful for video rendering and ollama for local-model workflows. Neither is required merely to launch MulmoTerminal with Codex.
Prepare a Localtonet account and client only if remote access is required
If you need remote access, create a Localtonet account and use the current dashboard instructions to download and install the client for the device that can reach MulmoTerminal. We do not reproduce an operating-system-specific client command here because no current cross-platform command was supplied for this revision.
The client device is identified by a device-specific authentication token. Keep that token secret. Do not paste it into source files, screenshots, issue reports, chat messages, terminal recordings, or public shell history.
| Component | Status | Purpose | Verification |
|---|---|---|---|
| Node.js 22.12 or newer | Required | Runs MulmoTerminal | node --version |
| npx | Required by the quick start | Retrieves and starts the published package | npx --version |
| Codex CLI | Required for this workflow | Runs coding-agent sessions | codex --version and a successful local launch |
| git | Expected for repository workflows | Provides repository and worktree operations | git --version |
| gh | Expected for GitHub workflows | Supports applicable pull-request operations | gh --version and local authentication |
| tmux | Optional but useful | Supports persistent and reattachable sessions | Install it before testing session recovery |
| Localtonet client | Required only for Localtonet access | Establishes the outbound platform connection | The intended device appears connected |
A command available in your interactive shell may be missing from a desktop launcher, service account, scheduled task, or another user account. Start MulmoTerminal from an environment whose PATH includes Codex and the supporting tools you intend to use. The same account must also have appropriate access to the selected project directory.
Install and start MulmoTerminal with Codex
The verified quick-start path does not require cloning the source repository or installing MulmoTerminal globally. The current package can be checked and started through npx. The
official MulmoTerminal guide
and repository should be consulted for release-specific changes.
Confirm the active Node.js version
Run node --version in the terminal that will start MulmoTerminal. Continue only with Node.js 22.12 or newer.
Run the MulmoTerminal dependency check
Run npx mulmoterminal@latest init. The documented init command reports dependencies it cannot find. Resolve missing required tools before continuing.
Start with Codex selected
Run npx mulmoterminal@latest --agent codex. Selecting Codex explicitly avoids relying on the default Claude Code agent.
Open the local interface
MulmoTerminal starts at http://localhost:34567 and is documented to open a browser. If it does not open automatically, enter the address manually on the host.
Start with the dependency report:
npx mulmoterminal@latest initThen launch MulmoTerminal with Codex:
npx mulmoterminal@latest --agent codex
Keep the launching terminal open. Closing it can stop the MulmoTerminal server. A Codex process backed by tmux may have a different lifecycle from the web server, but the browser still needs a running MulmoTerminal server to reconnect and control that session.
@latest can select a newer release later
The command requests the latest published MulmoTerminal package at execution time. A future launch can therefore introduce release-dependent behavior. Review the current project guide and release information before updating a host that has access to important repositories, authenticated tools, or production credentials.
Configure the project directory, agent, and port
MulmoTerminal documents command-line options for selecting a project directory, agent, and local port. Use explicit options while establishing a repeatable setup.
Start in a specific project directory
Use --cwd to select the working directory:
npx mulmoterminal@latest --agent codex --cwd ./my-project
Replace ./my-project with the intended path. Confirm that the account running MulmoTerminal should be able to read and modify that project. A selected working directory is useful for organization, but it is not a security sandbox. A terminal process may be able to reach other files allowed by the host account.
Select another local port
Port 34567 is the documented default. If another process already uses it, select another port with --port:
npx mulmoterminal@latest --agent codex --port 34568
With this example, local verification must use http://localhost:34568. Any later Localtonet target must also use port 34568. A mismatch between the application and tunnel ports will prevent the public endpoint from reaching the service.
Use Codex as the selected agent
Claude Code is the project's documented default agent unless another agent is selected. MulmoTerminal supports --agent codex and a defaultAgent setting in ~/.mulmoterminal/config.json.
This guide uses the command-line option because it does not require assuming the full structure of an existing configuration file:
npx mulmoterminal@latest --agent codex --cwd ./my-projectIf you edit the configuration file, preserve its existing structure and follow the current MulmoTerminal configuration documentation. Do not replace an established file with an incomplete example or add credentials to it unless the relevant tool's primary documentation explicitly requires that location.
Understand release-dependent agent behavior
Current MulmoTerminal releases support Codex as a first-class coding-agent CLI, but account selection, session-launch behavior, interface controls, and agent-specific approval handling can change between releases. Verify the behavior of the exact release installed by npx. This article does not guarantee identical controls for every historical or future version.
Verify MulmoTerminal locally before any remote access
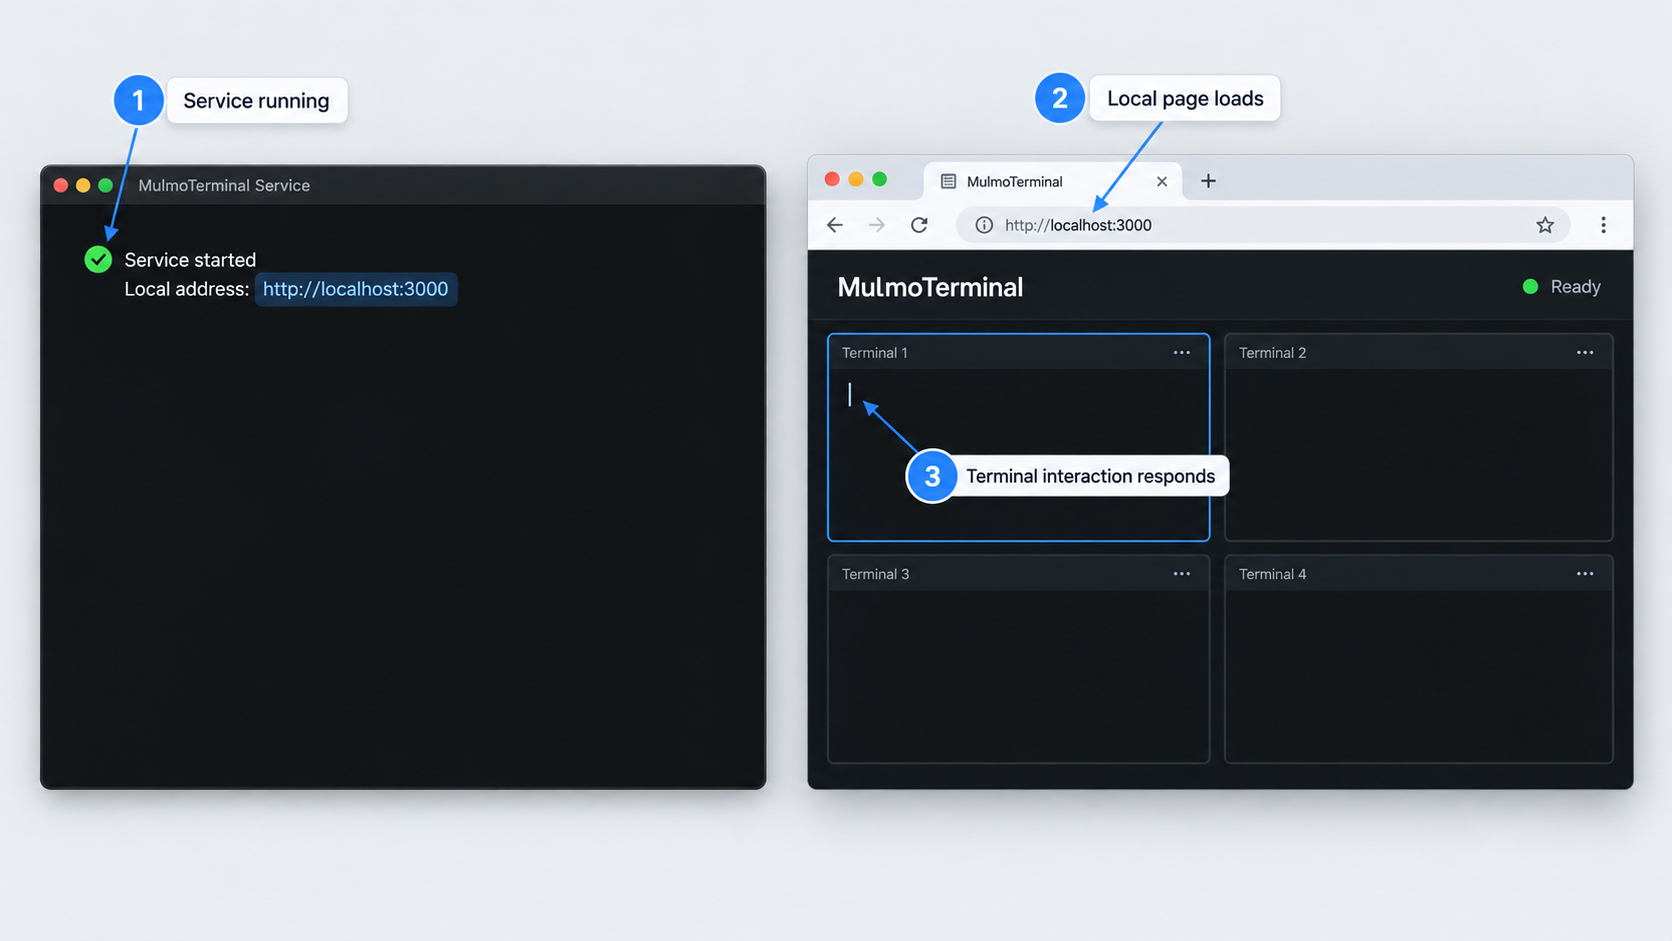
A successful startup message proves only that the server began listening. MulmoTerminal is interactive, so verification must cover the browser interface, PTY input and output, terminal geometry, agent startup, state reporting, and recovery behavior.
Load the local endpoint
Open http://localhost:34567 on the MulmoTerminal host. Use the selected custom port if you changed it. The grid should load without a connection error, blank page, or endless loading state.
Verify terminal input and output
Open or select a terminal cell. Type a harmless command appropriate for your shell and confirm that output appears. Verify that backspace, Enter, arrow keys, and ordinary text input behave correctly. This establishes that the browser is attached to a functioning PTY rather than merely displaying the initial page.
Verify terminal resizing
Resize the browser window or terminal cell and observe how a harmless full-screen or line-wrapping application responds. Incorrect dimensions can make an interactive terminal appear operational while prompts, cursor placement, or full-screen interfaces are unusable.
Start a Codex session
Launch Codex through the MulmoTerminal workflow. Confirm that the executable is found and that Codex does not stop because authentication is incomplete. If login or initial setup is requested, complete it through the current supported Codex process before considering remote access.
Observe session state
Exercise a non-sensitive test task and watch the state displayed by the grid. Current project documentation describes visible working, waiting, done, unreviewed, and idle states, but labels and visual behavior can change by release. Confirm that your installed version gives you enough information to distinguish active work from a session waiting for input.
Test reload, reconnect, and session recovery
Reload the page and confirm that the browser reconnects. If tmux is installed, test the recovery behavior you need rather than assuming it. A browser reload, temporary disconnection, MulmoTerminal restart, and full machine restart are different events and may not have identical outcomes.
| Local test | Expected result | If it fails |
|---|---|---|
| Open the local URL | The grid loads from the configured localhost port | Check the server process, startup output, and port |
| Send terminal input | Keyboard input reaches the PTY | Treat it as a local application or browser issue |
| Observe live output | Output continues updating without a page refresh | Inspect the local session and server output |
| Resize the terminal | Terminal dimensions update acceptably | Record the browser and MulmoTerminal release |
| Start Codex | Codex launches in the intended project context | Verify installation, PATH, and login |
| Reload and reconnect | The interface reconnects and expected sessions remain | Verify tmux availability and persistence expectations |
Do not configure remote access while input, output, resizing, Codex startup, reload, or session behavior is unresolved. A network path adds another failure boundary but does not correct a broken local PTY, missing dependency, incomplete login, conflicting port, or stopped server.
Operate parallel Codex sessions without losing context
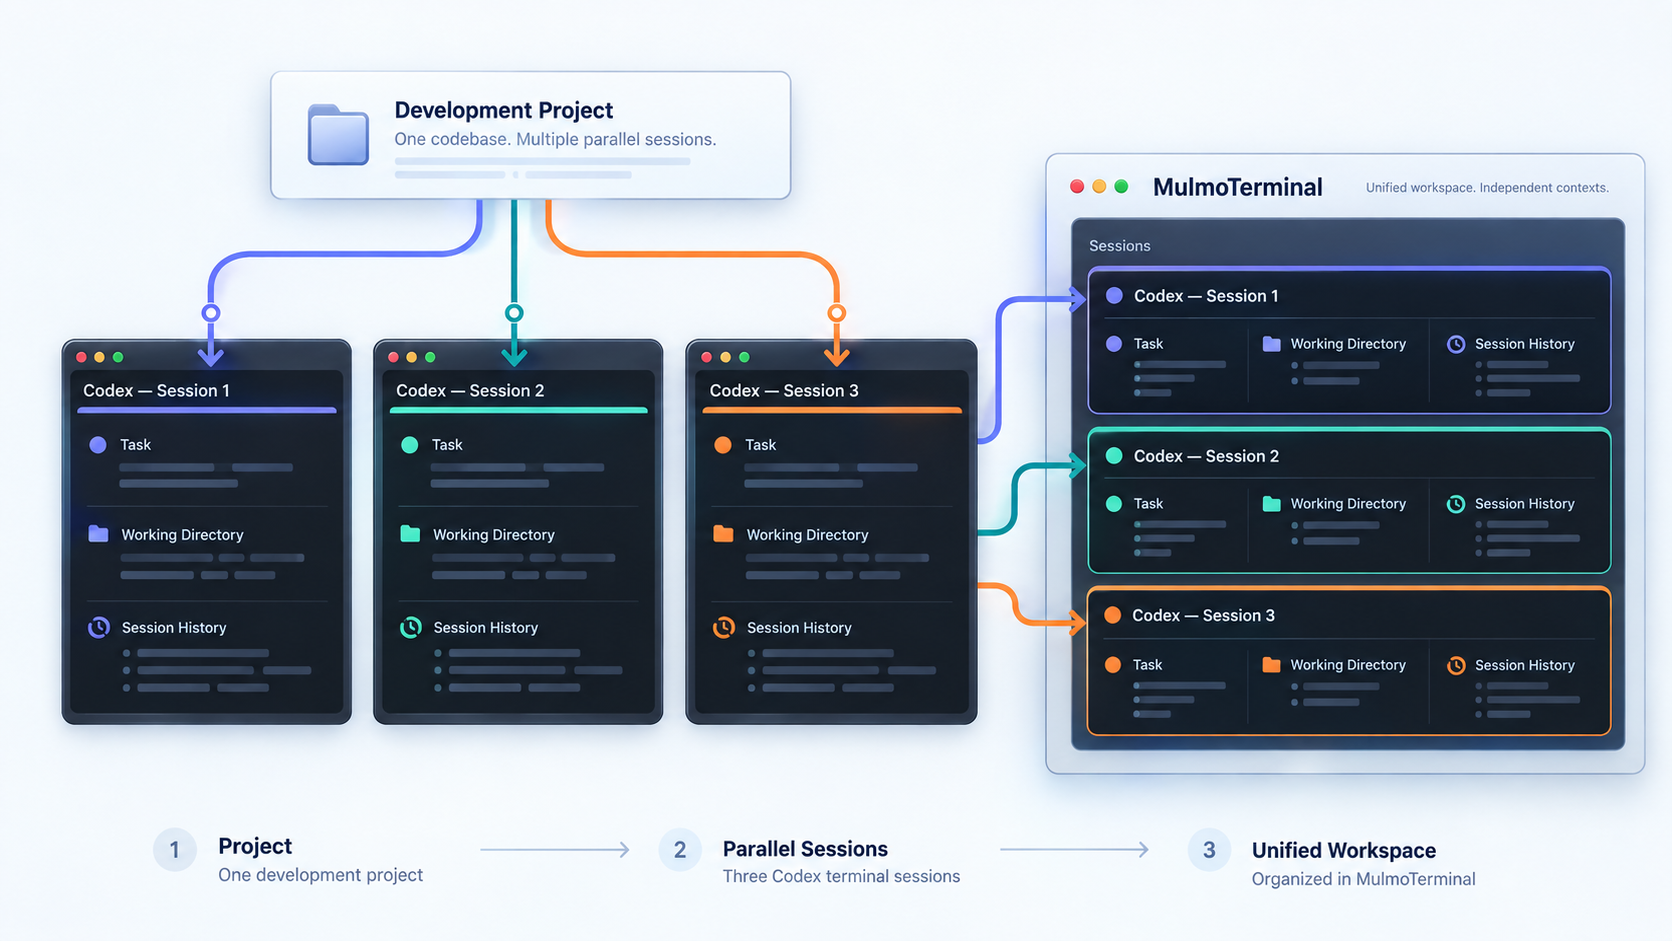
MulmoTerminal is intended for supervising several sessions, not simply placing many shells on a page. The grid can make active, completed, and input-waiting work easier to identify. The cockpit roster can retain concise context for sessions that are not currently focused.
Use separate worktrees for independent changes
MulmoTerminal supports Git worktree-oriented isolation. Separate worktrees give parallel agents distinct working directories connected to the same repository. This reduces the chance that two agents overwrite the same files or leave one checkout in a confusing branch state.
The project applies a one-agent-session-per-worktree limitation to agent sessions. Other terminal processes, such as a shell or development server, can operate in that worktree. Use this flexibility intentionally. A development server and its associated coding agent may belong together, while two unrelated agents editing the same files should normally use separate worktrees.
Keep approval and review boundaries
Parallel execution does not remove the need to inspect commands, diffs, tests, and generated changes. Review each session's project directory and branch before approving an action. Do not weaken normal change control merely because a remote browser makes it convenient to answer several sessions quickly.
Separate the application, session, and access lifecycles
Three independent layers may be involved:
- The Codex or shell process running inside a terminal session.
- The MulmoTerminal web server that presents and controls the session.
- The Localtonet connection that makes an approved address reachable remotely.
A tmux-backed session may remain alive while the MulmoTerminal browser interface is unavailable. MulmoTerminal can remain available locally while its Localtonet tunnel is stopped. A saved Localtonet tunnel configuration is not necessarily running. Understanding these boundaries helps you restart the failed layer instead of accidentally creating duplicate agents or duplicate tunnels.
Clean up after the task
Stop remote access as soon as it is no longer needed. Then review remaining MulmoTerminal and tmux sessions. Terminate unattended agents that should not continue running, inspect uncommitted changes, and close credentials or authenticated tools that are no longer required.
Choose the remote-access model before starting a tunnel
The access decision must happen before a public HTTP tunnel is started. MulmoTerminal can expose source repositories, environment variables, authenticated developer tools, agent approval prompts, shells, and every file available to its host account. A public route without verified authorization is not an acceptable long-running deployment.
| Access model | Network behavior | Appropriate use | Important limitation |
|---|---|---|---|
| Local browser only | MulmoTerminal remains on loopback | Normal local use and initial verification | No remote browser access |
| Localtonet VPN Manager | Uses a private mesh network with granular firewall rules | Private access between approved devices or networks | MulmoTerminal must be reachable through an intentionally configured private address |
| Protected HTTP tunnel | Publishes a public HTTPS address | Only when a separately verified authentication and authorization layer protects the application | The HTTP tunnel itself is not application authentication |
| Temporary unprotected HTTP test | Briefly publishes a public HTTPS address | Controlled compatibility testing with non-sensitive data | Must be stopped immediately and is not suitable for unattended use |
Prefer private access for routine remote administration
Localtonet VPN Manager provides a private mesh VPN with granular firewall rules and can bridge local networks. This is different from a standard HTTP tunnel. VPN Manager is the actual VPN feature, while HTTP tunneling publishes a specific web service through a public endpoint.
Private networking does not automatically make a loopback-only service reachable. An address such as 127.0.0.1 always refers to the device on which the browser or client is running. To reach MulmoTerminal from another VPN device, the application must be intentionally reachable through an appropriate private interface or local network path.
The supplied MulmoTerminal evidence establishes its default localhost address and its --port option, but it does not establish a supported host-binding option for every release. We therefore do not invent a bind command. Consult the current MulmoTerminal guide for the installed release before changing its listening interface. If no documented private binding is available, keep it local rather than broadening network exposure through an assumed option.
Use a verified authentication layer for persistent public HTTP access
If your organization requires a public HTTP endpoint, place a verified authentication and authorization layer in front of MulmoTerminal before starting the tunnel. Confirm that it protects the initial page and every interactive terminal connection, including reconnect paths. A login page that protects only ordinary HTTP routes but leaves an interactive stream unprotected is not sufficient.
This article does not prescribe a reverse proxy or identity provider because no supported MulmoTerminal authentication integration was supplied as evidence. An independently designed protection layer should be reviewed against the exact MulmoTerminal release, browser transport, session cookies, reconnect behavior, and organizational access policy.
Do not treat a generated URL as a credential
A random subdomain may reduce accidental discovery, but it is not an identity check. URLs can appear in browser history, logs, screenshots, copied messages, monitoring systems, and referrer data. Anyone who obtains an unprotected address may be able to reach the terminal interface.
Use least privilege even with private access
Run MulmoTerminal as a dedicated or narrowly privileged account where practical. Limit repository access, cloud permissions, package registry credentials, SSH material, and authenticated command-line tools to what the current task requires. A project directory selected with --cwd is organizational context, not process isolation.
Keep loopback when our client runs on the same host
For an HTTP tunnel, targeting 127.0.0.1 is preferable when the Localtonet client and MulmoTerminal run on the same machine. It avoids changing MulmoTerminal merely to listen on all local network interfaces. If our client is on another device, loopback refers to that other device and cannot reach MulmoTerminal on the original host.
127.0.0.1 when MulmoTerminal and our HTTP-tunnel client share the same host.
If you cannot verify effective authentication and authorization for all MulmoTerminal browser and terminal traffic, do not operate a persistent public HTTP tunnel. Use local access, evaluate VPN Manager for private connectivity, or conduct only the short controlled test described below with non-sensitive repositories and restricted credentials.
Configure Localtonet after resolving the protection decision
Proceed only after MulmoTerminal works locally and you have selected one of the access models above. The following HTTP-tunnel workflow is not a recipe for unattended public deployment. Without an independently verified authentication layer, it is limited to a controlled compatibility test that must be stopped immediately after verification.
For this test, use a non-sensitive repository, a least-privileged host account, and no broadly scoped production credentials. Keep the public address private during the test. Be ready to stop the tunnel at once.
Install and run the Localtonet client
Use the current dashboard installation path for the operating system on the device that can reach MulmoTerminal. When possible, run our client on the same host so the target can remain on loopback.
Authenticate or select the client device
Use the device-specific authentication token for the client that will run the tunnel. Keep the token secret and confirm that the intended device is connected.
Select an available relay server
Select a currently available server or region in the dashboard. Available values can vary, so do not copy a hardcoded server code from an older tutorial.
Create the HTTP tunnel without starting it
Set the local target to the address and port where MulmoTerminal is reachable. When both processes run on the same host with the default port, use 127.0.0.1 and 34567. Review the target and protection decision before continuing.
Start the controlled test
Creating a tunnel does not start it. Use the Start button only when you are present and ready to test. The assigned public address is available only while the selected client is connected and the tunnel is running.
Verify the interactive path, then stop the tunnel
From a separate browser or network, test page loading, terminal attachment, input, live output, resizing, reconnect, and session state. Stop the tunnel immediately when the test is complete or if any unexpected access behavior appears.
A generated address keeps custom DNS out of the initial diagnostic path, but it does not provide authorization. HTTP tunnels may also offer other process types, such as supported custom subdomains or custom domains. Current availability can depend on the product configuration or plan, and custom-domain DNS requirements should be checked against current documentation before making changes.
See the Localtonet HTTP tunnel documentation for the current dashboard workflow. Creating a tunnel and starting it are separate lifecycle actions. A saved configuration may remain in the dashboard while its public route is stopped.
Perform a complete remote compatibility test
Loading the grid proves only that the initial HTTP request succeeded. MulmoTerminal's browser terminal requires continuing interactive communication. Test all of the following:
- Load the grid through the assigned HTTPS address.
- Open an existing non-sensitive test session.
- Confirm that live output continues to arrive.
- Enter a harmless command and verify the result.
- Resize the terminal or browser and check dimensions.
- Reload the browser and verify reconnect behavior.
- Move between sessions and confirm that their states remain distinct.
- Stop the Localtonet tunnel immediately after the test.
- Confirm that the public address no longer provides access.
Interactive compatibility must remain qualified. The supplied evidence establishes Localtonet HTTP tunneling and MulmoTerminal's browser PTYs, but it does not provide a guarantee for every combination of MulmoTerminal release, browser, Localtonet client version, or interactive transport behavior. Repeat this test after meaningful upgrades.
You can stop the Localtonet tunnel while leaving MulmoTerminal and its local sessions running. This removes the tunnel's public route without requiring you to terminate the local application. Review persistent tmux sessions separately when the work is complete.
Troubleshoot installation, startup, and remote access
Node.js is missing or older than 22.12
Run node --version. If the command is missing, install Node.js from the official download page. If it reports an older release, update Node.js and open a new terminal. Check again to ensure an older executable earlier on PATH is not still active.
The dependency check cannot find Codex
Run:
npx mulmoterminal@latest init
If Codex is installed but not detected, compare the environment used to install it with the environment used to launch MulmoTerminal. Shell profiles sometimes modify PATH only for interactive sessions. Correct the launch environment using the current Codex installation guidance rather than inventing a binary path or undocumented environment variable.
Codex starts but is not authenticated
Start codex directly in the same user account and complete the supported login flow. Confirm normal local operation before returning to MulmoTerminal. Do not attempt to solve authentication by placing credentials in a MulmoTerminal command or Localtonet tunnel field.
MulmoTerminal starts with the wrong agent
Select Codex explicitly:
npx mulmoterminal@latest --agent codex
If you maintain a persistent configuration, review defaultAgent in ~/.mulmoterminal/config.json using the current project guide. Preserve the rest of the file.
Port 34567 is already in use
Stop the conflicting process if appropriate, or choose another port:
npx mulmoterminal@latest --agent codex --port 34568Use the same port in the local browser and Localtonet target. A port mismatch can make the tunnel fail even when both applications are otherwise healthy.
Startup fails with ERR_MODULE_NOT_FOUND
The MulmoTerminal guide explains that an interrupted first npx installation can leave a partially unpacked directory under ~/.npm/_npx/<hash>. A later launch can then fail with ERR_MODULE_NOT_FOUND.
The launcher detects this condition and prints the exact removal command for the affected cache entry. Review and run the command printed for your own installation, then retry:
npx mulmoterminal@latestDo not copy another person's hash or delete an arbitrary cache path.
The local page does not load
Confirm that the launching terminal remains open and inspect its output. Check whether a custom port was selected. Test the exact localhost URL on the MulmoTerminal host. Resolve the local failure before investigating Localtonet.
The public address does not load
Check each layer in order:
- MulmoTerminal is still running.
- The exact local URL works on the host.
- The Localtonet client is connected.
- The intended device token is associated with the tunnel.
- The HTTP tunnel targets the correct IP address and port.
- The tunnel was started rather than only created.
If our client runs on another machine, 127.0.0.1 points to that machine. It will not reach MulmoTerminal on a different host.
The page loads but the terminal does not respond
Repeat the same test locally. If local input, output, or resizing also fails, investigate MulmoTerminal, the PTY, browser, and selected agent. If local interaction works but remote interaction fails, record exactly which path is affected: attachment, keyboard input, live output, resizing, reconnect, or session switching.
Confirm the exact MulmoTerminal release, browser, operating system, and Localtonet client version used for the test. Do not present successful behavior in one release as a guarantee for every release.
Sessions disappear after a restart
Verify that tmux is installed and available to the same account that starts MulmoTerminal. Then reproduce the specific recovery event locally. A page reload, MulmoTerminal server restart, terminated tmux server, and full machine reboot are not equivalent.
The tunnel worked and then became unavailable
A Localtonet tunnel remains available only while the selected client is connected and the tunnel is running. Check whether the host slept, lost connectivity, stopped our client, or stopped the tunnel. Also confirm that MulmoTerminal still listens on the configured port.
The public test is finished but the address still works
Return to the Localtonet dashboard and stop the tunnel. Confirm its stopped state and test the address again. If the configuration is no longer needed, delete it. Also review browser tabs and terminal sessions so that an old page does not create confusion about whether the network route remains active.
Frequently asked questions
What command starts MulmoTerminal with Codex?
Run npx mulmoterminal@latest --agent codex. MulmoTerminal requires Node.js 22.12 or newer, and Codex must be installed, visible on PATH, and authenticated.
How do I check for missing MulmoTerminal dependencies?
Run npx mulmoterminal@latest init. It reports dependencies that MulmoTerminal cannot find in the launch environment.
What local port does MulmoTerminal use?
The documented default is http://localhost:34567. Use --port to select another port, then use that same port for local testing and any approved Localtonet target.
Does a Localtonet HTTP tunnel authenticate MulmoTerminal users?
No. An HTTP tunnel provides a public network route to the configured service. It does not add application authentication or authorization to MulmoTerminal.
Is a generated or hard-to-guess public address sufficient protection?
No. A URL is not an authorization mechanism. It can be copied, logged, photographed, or disclosed. Persistent public access requires a separately verified authentication and authorization layer.
Can I use Localtonet VPN Manager instead of a public HTTP tunnel?
VPN Manager provides a private mesh network with granular firewall rules and can bridge local networks. It is the appropriate Localtonet feature to evaluate for private device-to-device access. MulmoTerminal must still be intentionally reachable through a supported private address, and the available evidence does not establish a host-binding command for every MulmoTerminal release.
Should the HTTP tunnel target localhost or 127.0.0.1?
When our client runs on the same host as MulmoTerminal, use 127.0.0.1 and the configured port. If the client runs on another device, loopback points to that other device and cannot reach the MulmoTerminal host.
How should I verify interactive terminal compatibility?
Test page loading, terminal attachment, keyboard input, live output, resizing, browser reload, reconnect behavior, and movement between sessions. Repeat the test after meaningful MulmoTerminal, browser, or client upgrades.
Will sessions survive a browser or server restart?
MulmoTerminal uses tmux, when available, for persistent and reattachable sessions. Install it and test your exact recovery scenario locally. The MulmoTerminal server and the relevant Localtonet access path must still be running for remote browser control.
Can I stop remote access without stopping Codex sessions?
Yes. Stop the Localtonet tunnel to remove its public route while leaving MulmoTerminal running locally. Whether individual sessions survive a later MulmoTerminal restart depends on the local tmux and session setup.
Does Localtonet require router port forwarding or a public IP address?
No. Our client establishes an outbound connection to a Localtonet relay. Standard tunneling does not require inbound router port forwarding, a public IP address, or unsolicited inbound firewall changes.
Choose a controlled Localtonet access path
Verify MulmoTerminal and Codex locally first. For routine remote administration, evaluate VPN Manager as the private-access option. Use a public HTTP tunnel only after verifying an effective protection layer, or for a short supervised compatibility test that is stopped immediately.
Get Started Free →

