

Validate a local Xyne Spaces development environment before making its browser interface publicly reachable
Xyne Spaces is an open-source organizational context and collaboration platform for people and agents. This guide focuses on a local development deployment, not a production installation. It explains how to establish a reproducible source baseline, verify the application locally, confirm authentication before exposure, and connect the browser-facing service to a Localtonet HTTP tunnel. Because the available project evidence does not include the contents of the current package scripts, Compose files, or setup scripts, unsupported version requirements and lifecycle commands are not presented as facts.
📋 What's in this guide
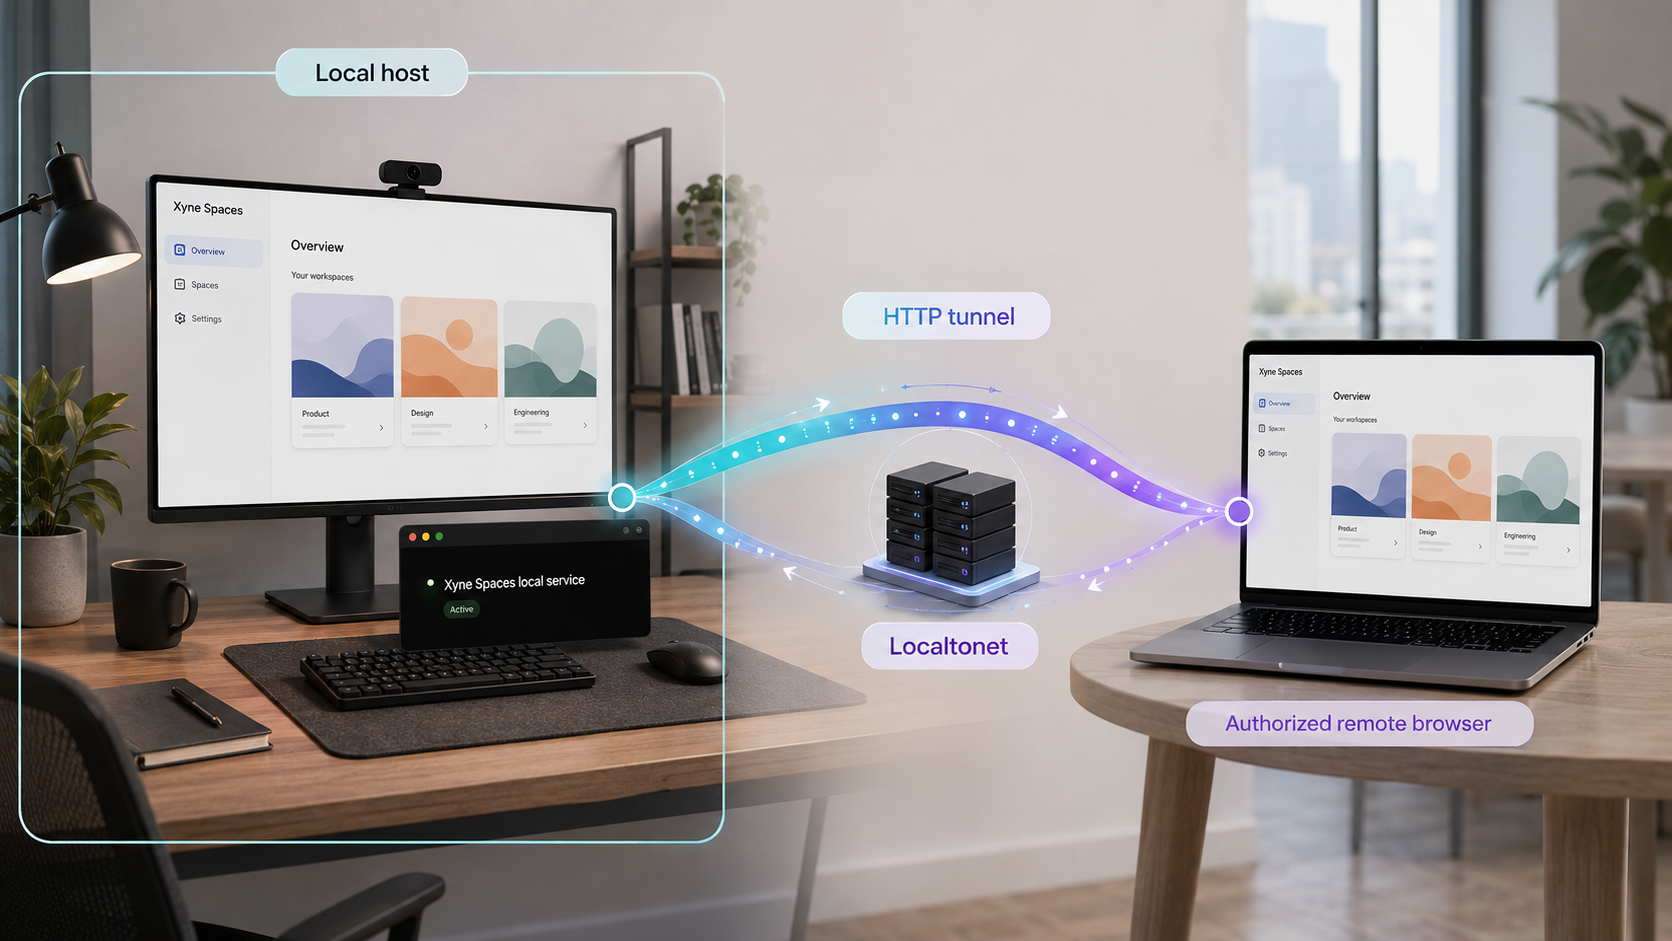
What Xyne Spaces is and what this guide covers
The canonical Xyne Spaces repository describes Xyne Spaces as an organizational operating system centered on a shared context layer. Connectors can bring information from systems such as Slack, Google Workspace, and Microsoft 365 into a normalized store. Permission-aware APIs then make the appropriate portion of that context available to users, applications, search, and agents.
The project groups its capabilities into context, collaboration, agentic workflows, and organizational productivity applications. Its published application set includes Chat, Call, Canvas, Tickets, Customer Support Desk, Agentic Search, Automations, and Claw agents. The repository also describes agents that can read repositories, execute shell commands, call internal APIs, and write files inside a separated agent architecture.
Xyne Spaces states that reads are scoped to the acting user, writes pass through a central permission layer, and agents inherit the invoking user’s access. Those are important architectural goals, but they do not prove that authentication is enabled and correctly configured in a particular development checkout. A successful local startup also does not demonstrate that account provisioning, permission rules, secrets, backups, upgrades, or recovery have been prepared for production use.
Do not treat the result as a production-ready Xyne Spaces installation. Before using confidential organizational data, separately evaluate identity management, authorization, connector permissions, secret storage, logging, backups, recovery, dependency maintenance, resource isolation, and the project’s current production guidance.
This article covers the integration boundary between a working local development deployment and Localtonet. It intentionally does not claim that one package command is a complete installation procedure, that a particular Node.js or pnpm version is current, or that four previously published port assignments remain valid. Those details must come from the exact repository revision being used.
Establish a reproducible compatibility baseline
Development repositories change quickly. A branch name such as main is not a reproducible revision because it can point to a different commit later. Record the exact Git commit before installing dependencies, changing configuration, or reporting a problem.
The private evidence supplied for this revision showed the public repository on its main branch with files including README.md, package.json, pnpm-lock.yaml, setup.sh, clone-and-setup.sh, and several Compose files. It did not include a commit SHA, the contents of those files, or a test record. For that reason, this article cannot honestly name an exact revision as tested by us.
Evidence for the repository layout and project description was reviewed in 2026. No exact Xyne Spaces commit SHA or completed compatibility test was supplied with the audit. Record your checkout’s SHA and treat it as the compatibility baseline for every prerequisite, command, port, persistence decision, and troubleshooting result.
Clone the canonical repository and print the exact commit identifier:
git clone https://github.com/juspay/xyne-spaces.git
cd xyne-spaces
git rev-parse HEAD
git status --short
Save the full output of git rev-parse HEAD with your deployment notes. The status command should produce no output immediately after a clean clone. If it lists modified or untracked files later, record those changes because they can affect whether another person can reproduce the environment.
Validate instructions against the pinned revision
Before running any project setup command, inspect the files from the recorded commit. For this repository, the relevant sources include the README, package metadata, lockfile, setup scripts, and whichever Compose file the documented development workflow uses. These files answer different questions:
README.mddescribes the workflow the project currently recommends.package.jsondefines package scripts and may declare runtime or package-manager expectations.pnpm-lock.yamlrecords the dependency resolution for the workspace.setup.shandclone-and-setup.shmay perform additional setup, but their names alone do not establish when or how they should be used.- The selected Compose file defines the services, images, ports, networks, volumes, and environment inputs used by that workflow.
Do not combine commands from different revisions or assume that every similarly named Compose file is interchangeable. The repository listing includes development, local, sandbox, and test Compose files. Those names indicate distinct configurations, not a menu of equivalent startup options.
Prepare the development host
The visible repository layout shows that Xyne Spaces uses Git, Node.js ecosystem metadata, pnpm workspace files, and Docker Compose configurations. However, the evidence supplied for this article does not expose the current version constraints from package.json or the setup scripts. The earlier claims that Node.js 22.x and pnpm 10.15.0 were mandatory could not be independently revalidated and are therefore not repeated as current requirements.
| Tool | Supported installation path | Compatibility checkpoint |
|---|---|---|
| Git | Use the official Git distribution or a maintained operating-system package. | Confirm that cloning, revision inspection, and normal working-tree operations function on the host. |
| Node.js | Use an official installer, a maintained version manager, or a supported operating-system package. | Match the version constraint declared by the exact checked-out revision. Do not assume an older article’s major version remains current. |
| pnpm | Use the installation or activation method recommended by the pinned repository revision. | Match the package-manager declaration or other explicit project requirement instead of selecting an arbitrary global version. |
| Docker Compose | Docker Desktop is a common supported path on Windows and macOS. Docker Engine with the Compose plugin is a common path on Linux. | Confirm compatibility with the Compose file used by the current development instructions. |
Docker-compatible alternatives may implement much of the same interface, but compatibility with this repository is not established by the supplied evidence. If you choose an alternative container engine or Compose implementation, treat it as an additional variable and verify every service, network, volume, and health check defined by the selected configuration.
Check the installed tools
These commands report the installed versions without starting Xyne Spaces:
git --version
node --version
pnpm --version
docker compose version
Compare the output with the requirements in the pinned repository. If a tool is absent, install it through the supported path for your operating system. If a version does not match the project requirement, change the local toolchain before editing lockfiles or dependency declarations.
Allow enough local resources
A multi-component development workspace can require storage for source files, JavaScript dependencies, container images, build layers, databases, and other service state. The available project evidence does not publish a verified minimum CPU, memory, or disk requirement, so this article does not invent one. Check available storage before the first build and monitor container resource use if services terminate unexpectedly.
Use the same host for Localtonet
For the simplest tunnel configuration, run the Localtonet client on the same machine as the browser-facing Xyne Spaces service. A loopback target such as 127.0.0.1 refers to the machine running our client. If our client runs on another device, its loopback address does not refer to the Xyne Spaces host.
A separate-client design requires a real network address, an application service listening on an appropriate interface, and host firewall rules that permit the connection. The supplied Xyne Spaces evidence does not establish a supported LAN binding procedure, so this tutorial does not recommend changing the application to listen on every interface.
Run the Xyne Spaces development setup
Use the quickstart belonging to the exact commit recorded earlier. The repository listing confirms that several setup mechanisms exist, but it does not establish which script or Compose file is the current supported entry point. In particular, the available evidence does not prove that pnpm run up remains the complete installation and startup procedure.
Clone and identify the source revision
Clone the canonical repository, enter its directory, and save the full commit SHA. Keep the checkout clean while establishing the baseline.
Match the declared tool versions
Read the pinned revision’s package metadata and development instructions. Install the Node.js, pnpm, Git, and Compose versions or capabilities explicitly required there.
Review setup inputs before execution
Identify required environment files, secrets, external services, images, host paths, published ports, and persistent volumes from the documented workflow and its referenced scripts or Compose file.
Run only the documented development entry point
Execute the startup procedure stated by the pinned revision. Do not guess a package script from an older article or combine multiple setup scripts because their names appear relevant.
Record the resulting local addresses
Obtain the browser URL and supporting service addresses from the current startup output and Compose configuration. Record the actual values instead of assuming that historical port assignments still apply.
The audit evidence does not include the current package-script definitions, Compose behavior, or setup-script contents. Publishing a specific startup command as complete would therefore be unsupported. This limitation must be resolved with a pinned source revision before treating the deployment as reproducible.
Preserve the first actionable error if startup fails. A final summary often reports only that a package script or container exited, while the earlier output identifies the actual dependency, permission, image, configuration, or port problem.
Verify the browser workflow locally
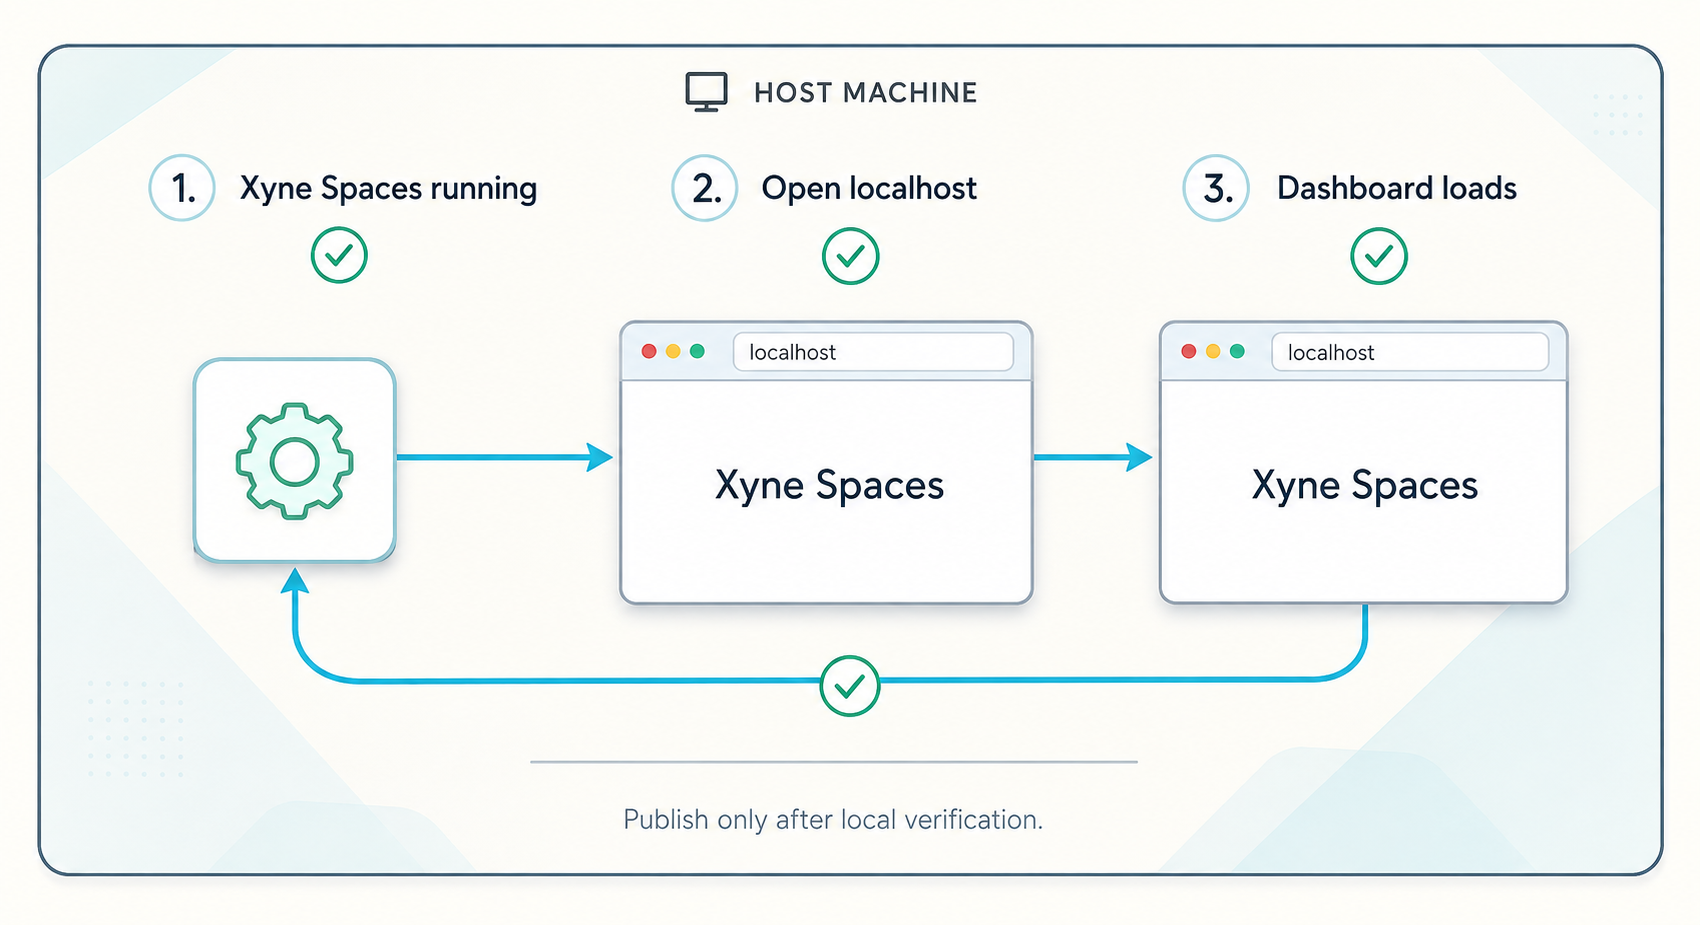
Remote access should be the final integration step. Start with the browser URL reported by the pinned Xyne Spaces development workflow. If your verified revision uses http://localhost:5173 for its dashboard, open that address on the Xyne Spaces host. If it reports another address, use the reported address instead.
Confirm the page identity
Seeing any page is not enough. Confirm that the page belongs to Xyne Spaces and corresponds with the process or container output. A different application may already own the expected port. A generic proxy page may indicate that only one layer of the stack is available.
Exercise the actual browser workflow
Check more than the landing page. Depending on the features enabled by the current development configuration, useful validation includes:
- Loading and refreshing the main browser interface without a server error.
- Completing the documented sign-in or initialization flow.
- Signing out and confirming that a protected view is no longer available.
- Opening a second private browser session to test unauthenticated behavior.
- Navigating between the application areas required for the evaluation.
- Creating only synthetic test records and confirming that they can be read by the intended account.
- Testing a non-administrative account where the development setup supports multiple roles or users.
- Watching browser developer tools for failed requests, blocked content, redirects, or calls to loopback-only supporting addresses.
A page shell can render while API calls, real-time updates, authentication callbacks, or supporting services fail. Use the browser’s network panel to distinguish a complete working workflow from a static frontend response.
Use an HTTP request as a secondary check
If curl is installed, request the browser URL reported by the development environment. For a revision that has been verified to use port 5173, the check would be:
curl -i http://127.0.0.1:5173An HTTP response proves that something is listening. It does not prove that the full browser application is healthy or that the responding process is Xyne Spaces. A connection refusal usually means no service is accepting connections at that address. An unexpected application response suggests a port collision. A server error shows that the network path exists but the application or one of its dependencies is unhealthy.
Do not configure the tunnel until the complete browser workflow works from the machine running our client. This separates Xyne Spaces setup problems from Localtonet configuration problems.
Complete the mandatory authentication checkpoint
A public Localtonet HTTP tunnel provides reachability to the configured local service. It does not establish that Xyne Spaces requires a login, that anonymous users are blocked, or that permission checks are correctly configured. Authentication must be tested before the tunnel is started.
Use synthetic data
Keep the development environment free of confidential messages, files, credentials, customer records, connector data, and internal source material while access controls are being evaluated.
Test an unauthenticated session
Open the local dashboard in a private browser session with no existing cookies. Verify that protected content and actions are not available without the intended authentication process.
Test sign-in and sign-out
Sign in using a dedicated test account, exercise the required workflow, sign out, and confirm that protected pages cannot simply be reopened from browser history or a copied local URL.
Test permission boundaries
Where supported, use separate test accounts to verify that each account can read and modify only the synthetic records intended for it. Do not rely solely on the repository’s architectural description.
Stop if anonymous access remains possible
If a private browser session can reach protected content or perform sensitive actions without authentication, do not start a public tunnel. Resolve the application configuration first.
Do not describe the assigned tunnel URL as authorized, private, or access-controlled merely because traffic passes through Localtonet. Anyone who can reach or discover a public endpoint may attempt to use it. Application authentication and authorization remain separate requirements.
Make the verified dashboard reachable with Localtonet
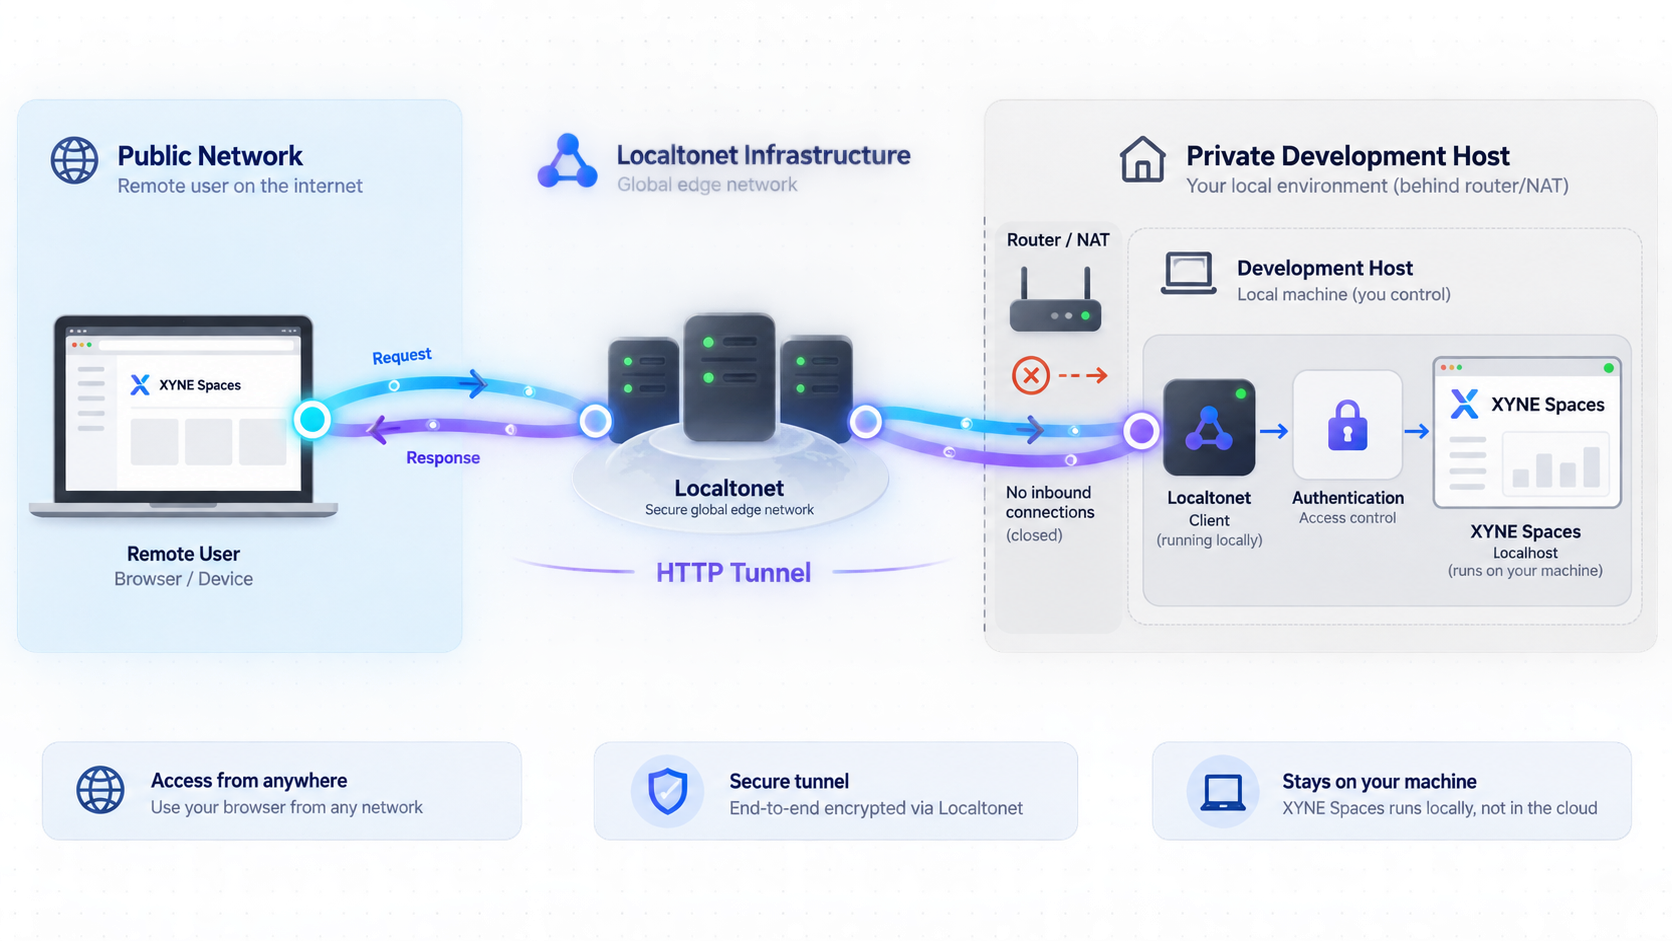
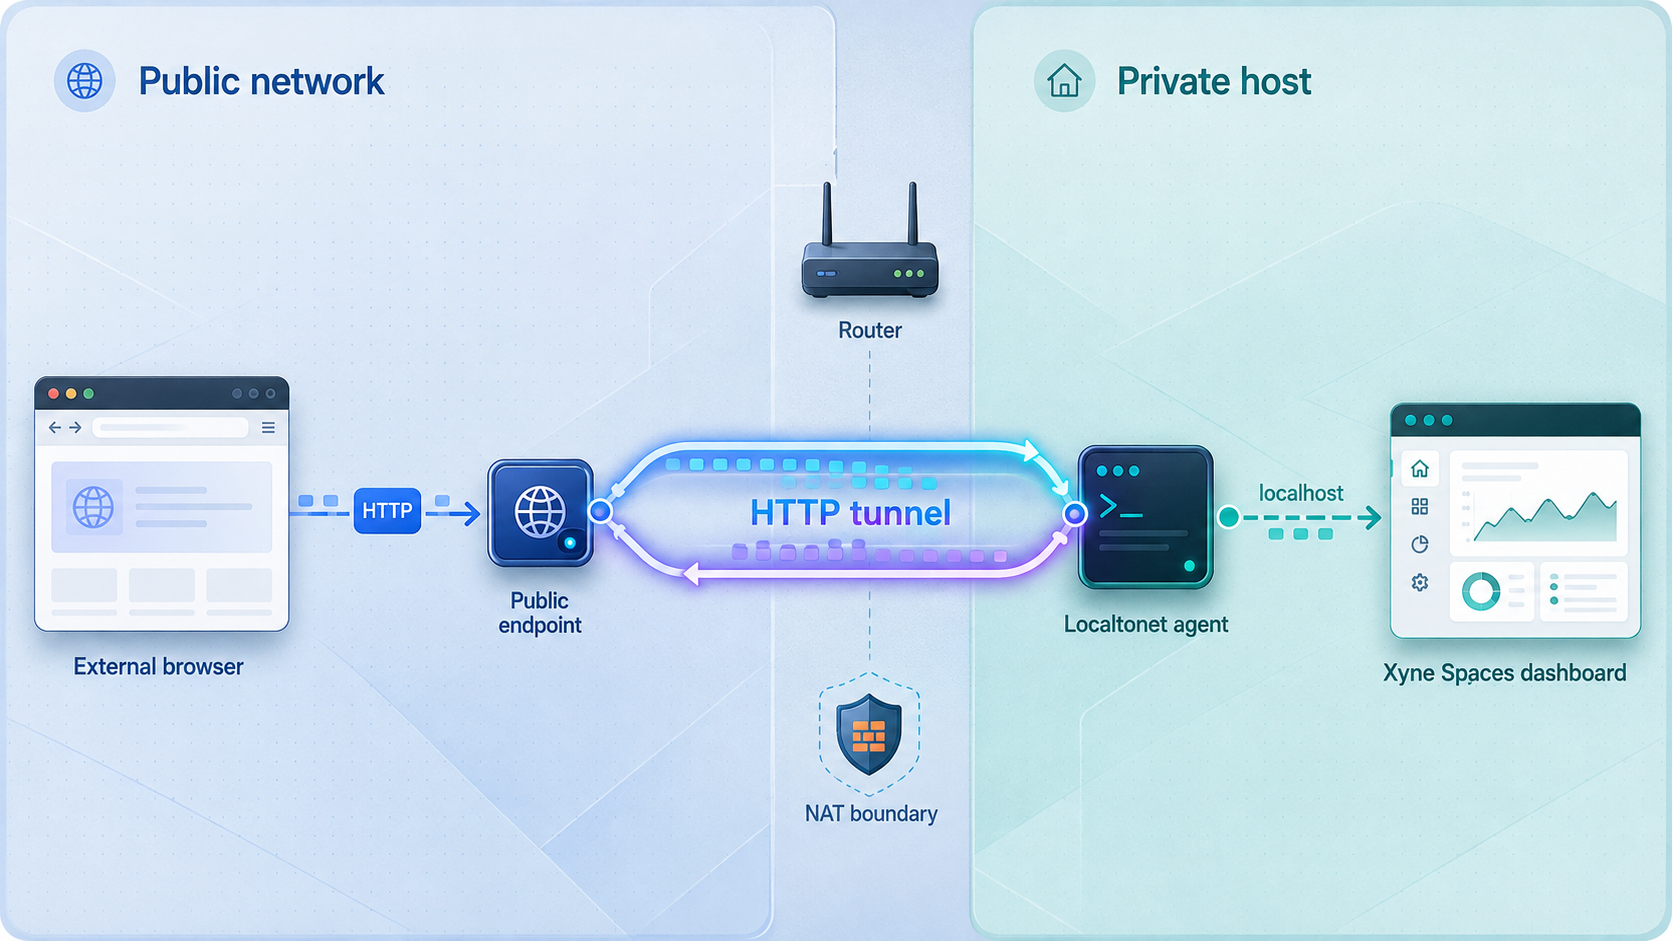
Once local functionality and authentication have passed their checks, create an HTTP tunnel for the browser-facing service. Our client establishes an outbound connection to a Localtonet relay server, so this workflow does not require inbound router port forwarding, firewall changes, VPN setup, or a public IP address.
Use the browser target verified from the pinned Xyne Spaces revision. The examples below use 127.0.0.1:5173 only when that is the confirmed local dashboard address. Do not use it merely because an older article did.
Install and run the Localtonet client
Install our client on the Xyne Spaces development host and keep it running. The same-host arrangement lets the client connect to a service bound only to the host’s loopback interface.
Select the client device
Authenticate the client with its device-specific token and select that device in the dashboard. Treat the token as a credential and keep it out of source control, screenshots, logs, issue reports, and chat messages.
Select an available relay server
Choose a server or region currently available in your Localtonet dashboard. Available values can vary, so do not copy a hardcoded server code from another deployment.
Create the HTTP tunnel
Select an HTTP tunnel and enter the verified local IP address and port. If your pinned Xyne Spaces revision serves the dashboard at http://127.0.0.1:5173, use 127.0.0.1 as the local IP and 5173 as the port.
Choose the public address process type
Use Random Sub Domain, Custom Sub Domain, or Custom Domain as available for your account and workflow. All three process types serve the configured content at a public HTTPS address. Check current documentation before making custom-domain DNS changes.
Start and test the tunnel
Press Start, then open the assigned HTTPS address from another device or an isolated browser profile. Creating the configuration alone does not start it.
Stop access after the test
Stop the tunnel when public reachability is no longer needed, or delete it when the configuration is no longer required. The route is available only while the selected client is connected and the tunnel is running.
See our HTTP tunnel documentation for the current dashboard workflow. Use the relay choices and address options shown in your account rather than relying on old screenshots or copied values.
Verify the public browser workflow
Test the assigned HTTPS address from outside the host. A separate device or private browser profile helps ensure that the result is not coming from an existing local session. Confirm all of the following:
- The expected Xyne Spaces page loads from the exact Localtonet address.
- An unauthenticated session receives the expected sign-in or access-denied behavior.
- An approved test account can sign in and sign out.
- The required browser navigation and synthetic-data workflows operate correctly.
- The browser does not attempt to contact its own
localhostor an unreachable private address. - No additional Xyne Spaces ports were exposed merely to make one failed browser request disappear.
If the page shell loads but an action fails, inspect the failed request in the browser’s network panel. Determine whether it is an authentication error, an application error, or an address-routing problem. Do not automatically publish every supporting service.
Limit the exposure of the development environment
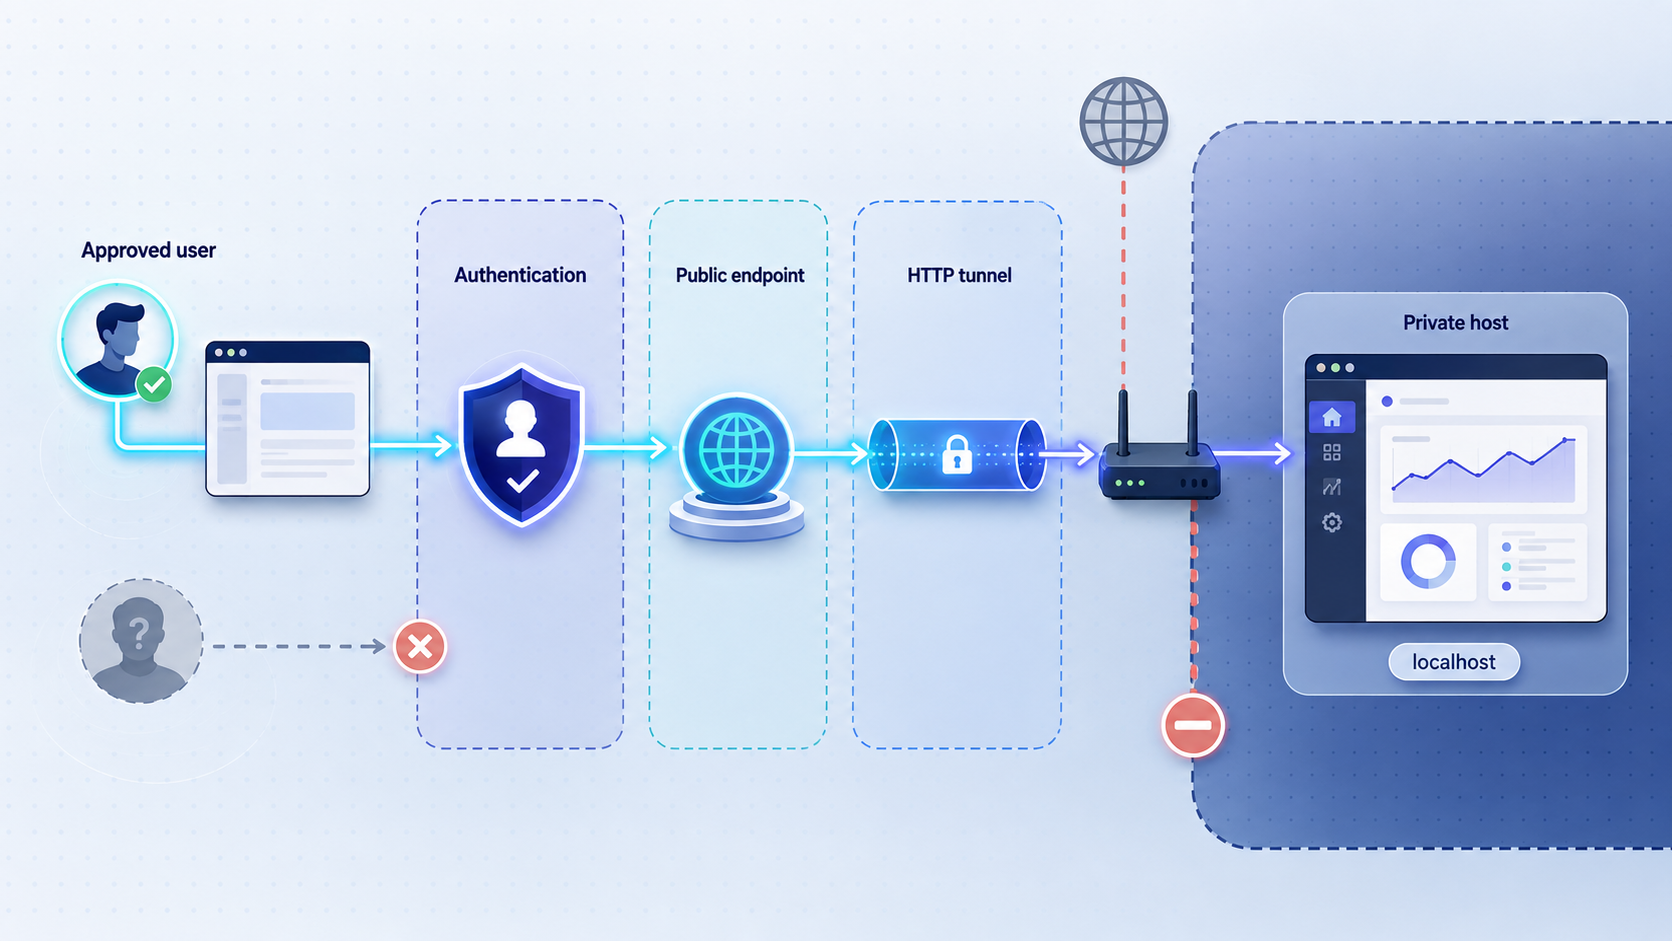
Xyne Spaces is intended to work with valuable organizational context, including messages, documents, tickets, email, calendars, call transcripts, and connected systems. A development environment should not ingest that information until storage, deletion, retention, account access, and backup behavior have been evaluated.
The project also describes agents that can execute code and interact with internal systems. Even where the published architecture separates untrusted runtime code from credentials, connected systems and host resources still require careful governance. Minimize credential scope, avoid unnecessary host mounts, require explicit approvals where supported, and keep development credentials separate from production credentials.
Start, stop, update, and preserve the environment safely
Routine operations must be derived from the exact source revision because package scripts and Compose arrangements can change. The available evidence confirms the presence of relevant files but does not expose their definitions. The table below distinguishes what can be stated from what remains unverified.
| Operation | Evidence status | Safe handling |
|---|---|---|
| Start | No current package or setup command was verified from the supplied file contents. | Use only the entry point documented by the pinned revision and record its output. |
| View logs | No project-specific logging command or log location was verified. | Preserve the startup terminal output and use only the logging procedure documented for the selected workflow. |
| Stop | No supported stop command was verified. | Do not substitute a destructive Compose command. Stop the Localtonet tunnel first, then use the revision’s documented application shutdown procedure. |
| Restart | No project-specific restart sequence was verified. | Use the documented stop and start lifecycle for the pinned revision, then repeat local and public verification. |
| Update | No supported upgrade or migration procedure was verified. | Record the old and new commit SHAs, preserve data and configuration, review changes, and do not update a working environment in place without a recovery plan. |
| Backup | Persistent paths, named volumes, databases, and backup consistency requirements were not verified. | Do not assume that copying the repository preserves application data. Identify every persistent store from the selected configuration before relying on a backup. |
| Reset or cleanup | No supported reset command or data-preservation guarantee was verified. | Avoid volume-deletion flags and broad container cleanup commands unless the pinned documentation explicitly requires them and the data impact is understood. |
Removing containers is not always equivalent to removing volumes, and deleting volumes may permanently remove databases, indexes, uploaded files, or application state. The persistence model must be established from the active Compose configuration before cleanup.
Use a two-layer shutdown sequence
The tunnel and the application have separate lifecycles. Stop the Localtonet tunnel first so no new public requests reach the development environment. Then use the Xyne Spaces shutdown procedure supported by the pinned revision. Stopping only the tunnel leaves the local application running. Stopping only Xyne Spaces leaves the tunnel configured but unable to reach its target.
Reverify after every update
An existing tunnel only proves that our client can route to an address. It does not prove that an updated application is healthy. After changing commits or dependencies, repeat the local browser test, unauthenticated-session test, sign-in and sign-out test, permission test, and remote browser test.
Troubleshoot local and remote-access problems
A prerequisite version does not match
Compare the installed versions with the declarations in the exact checked-out revision. Change the toolchain rather than editing project metadata or regenerating the lockfile as an initial fix. A newly generated lockfile can produce a dependency graph different from the one the project intended.
Docker Compose is unavailable
Run docker compose version and verify that the container engine is active. Docker Desktop may need to be started on desktop operating systems. Service-based installations may require the Docker service to be running. If you use an alternative engine, confirm that it supports the features used by the selected Compose file.
The startup procedure exits with an error
Find the first actionable error rather than focusing only on the final exit code. Common categories include an unavailable dependency, an image download failure, a missing environment value, insufficient storage, a permission error, an incompatible tool version, or a port collision. Do not expose a partially started interface through Localtonet.
The expected browser address does not open
Confirm the actual address printed by the current workflow. Verify that the relevant process or container remains running and that another application is not using the port. If the browser runs in a virtual machine, container, or different device, remember that localhost refers to that environment rather than the Xyne Spaces host.
The local dashboard works, but the public address does not
Confirm that the Localtonet client is connected, the intended device is selected, the tunnel is started, and the target matches the locally verified IP address and port. Creating a tunnel without pressing Start does not make it available.
The public page loads without asking for authentication
Stop the tunnel immediately. Recheck the application’s local unauthenticated behavior in a private browser session. Do not enter real organizational data or share the URL until the application’s authentication configuration has been corrected and retested.
The page opens, but an action fails remotely
Use browser developer tools to inspect the failed request, destination, and status. A frontend request to localhost refers to the remote user’s device, not the Xyne Spaces host. An HTTP 401 or 403 response usually indicates an authentication or authorization decision. A server error points to the application or a supporting service. A connection failure may indicate an unsuitable private or loopback destination.
Do not solve the problem by exposing every local port. Determine which routing behavior the pinned Xyne Spaces revision expects, then make the smallest justified change.
The tunnel works intermittently
Check both layers. The Localtonet client must remain connected and the tunnel must remain started. The Xyne Spaces processes and required containers must also remain healthy. Resource exhaustion, a terminated development command, a stopped container engine, or a disconnected client can each interrupt public reachability.
The wrong application appears
Open the configured local target directly on the host. If the wrong application appears locally, another process owns the port or the recorded target is incorrect. If the local page is correct, verify the tunnel’s selected device, local IP, port, and assigned public address.
Frequently asked questions
Is this a production Xyne Spaces deployment guide?
No. It covers a local development deployment and the connection between a verified browser interface and Localtonet. It does not establish production hardening, backup, recovery, monitoring, scaling, identity management, or upgrade procedures.
Which Xyne Spaces revision was tested for this article?
No exact tested commit SHA was supplied with the audit evidence. The repository layout and project description were reviewed from the public main branch in 2026, but a moving branch is not a reproducible revision. Record your checkout with git rev-parse HEAD and validate all commands, versions, ports, and lifecycle behavior against that commit.
Should I use Node.js 22.x and pnpm 10.15.0?
Do not rely on those historical values without checking the pinned repository revision. The supplied evidence did not include the current package metadata or setup-script contents, so those exact constraints could not be revalidated.
Is pnpm run up the complete Xyne Spaces installation procedure?
That claim is not established by the supplied evidence. Use the setup entry point documented by the exact commit you recorded, and review any referenced scripts, environment requirements, and Compose configuration before running it.
Which local port should I configure in Localtonet?
Use the browser-facing port verified from your pinned Xyne Spaces revision. If that revision serves the dashboard at http://127.0.0.1:5173, configure 127.0.0.1 and port 5173. Do not assume that historical port assignments apply to every revision.
Does Localtonet make an unauthenticated dashboard safe to publish?
No. An HTTP tunnel provides a public route to the configured service. It does not create Xyne Spaces accounts, add a login requirement, or enforce application permissions. If anonymous access remains possible, stop before starting the tunnel.
Does Localtonet require router port forwarding or a public IP address?
No. Our client establishes an outbound connection to a Localtonet relay server. This workflow does not require inbound router port forwarding, firewall changes, VPN setup, or a public IP address. The client must remain connected and the tunnel must be running.
Can the Localtonet client run on another machine?
It can target a service reachable from its own device, but 127.0.0.1 would then refer to the Localtonet client machine. A separate-host arrangement requires a supported Xyne Spaces network binding and a reachable LAN address. Those requirements are not established by the supplied project evidence, so this guide uses the same host.
How should I preserve Xyne Spaces development data?
First identify every persistent volume, bind mount, database, object store, and generated configuration used by the pinned workflow. The available evidence does not establish a supported backup or restore procedure, so copying only the Git repository should not be treated as a complete backup.
Connect a verified Xyne Spaces development dashboard
After the local browser workflow and authentication checks pass, run our client on the same host and create an HTTP tunnel to the verified dashboard address. Keep the exposure temporary and stop the tunnel as soon as remote testing is complete.
Get Started Free →

