

Bring your EMS heating gateway online locally first, then reach its web interface when you are away
EMS-ESP is open-source ESP32 firmware for communicating with compatible Bosch, Buderus, Nefit, Junkers, Worcester, and related EMS heating equipment. This guide covers hardware boundaries, supported installation routes, initial onboarding, network configuration, authentication, local verification, updating, and remote access through Localtonet. The Localtonet client runs on another supported device that can reach EMS-ESP over the local network. No assumed IP address, port, password, relay code, or firmware flashing command is used.
📋 What's in this guide
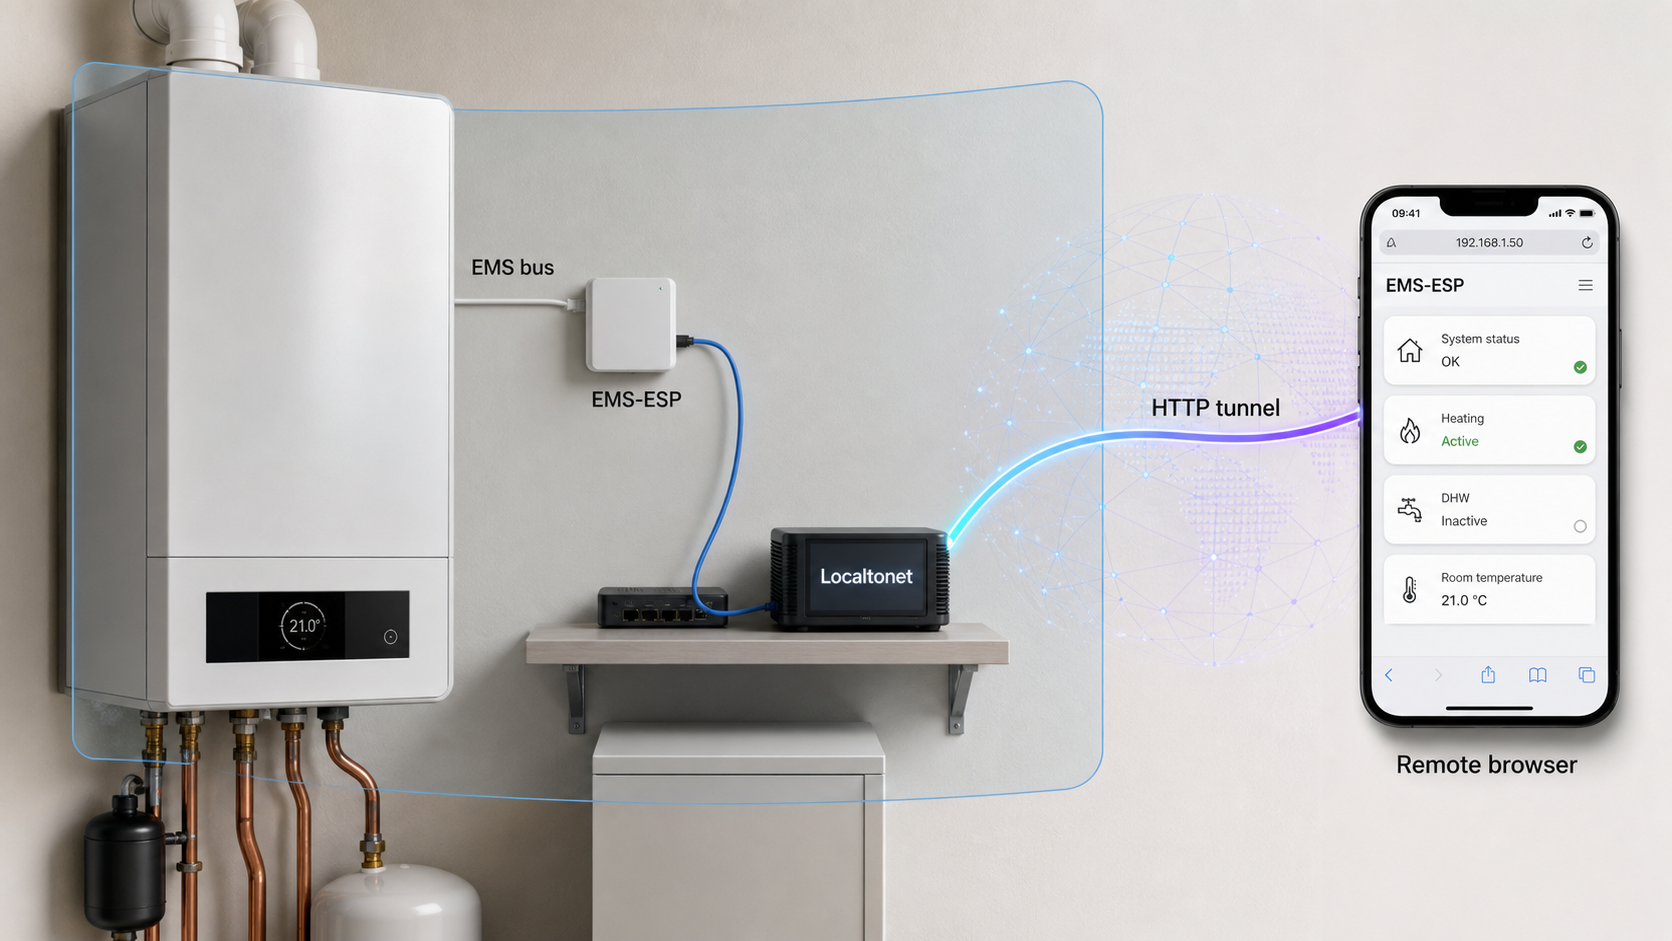
What EMS-ESP does and how remote access fits
EMS-ESP is firmware for the Espressif ESP32 microcontroller. It communicates with compatible heating equipment over the EMS bus and presents supported information and controls through a browser-based interface. The project documents compatibility with EMS, EMS+, EMS2, EMS Plus, Logamatic EMS, Junkers 2-wire, and Heatronic 3 and 4 equipment.
Supported device categories include boilers, thermostats, heat pumps, mixing units, solar modules, connect modules, ventilation units, switches, and related components. Compatibility must still be checked for the exact model and bus arrangement. A manufacturer name by itself does not prove that every product from that manufacturer uses a compatible bus or exposes the same data.
A normal installation has three distinct layers. First, the heating equipment communicates over its EMS bus. Second, a suitable gateway containing an ESP32 and the necessary interface circuit runs EMS-ESP. Third, computers and other devices on the local network reach the EMS-ESP web interface. Localtonet adds a fourth layer by forwarding HTTP requests from a public HTTPS address to that verified local web service.
The tunnel does not replace the EMS gateway, install firmware, interpret the heating bus, or repair local connectivity. It only exposes the HTTP service that EMS-ESP already provides. This distinction is important because it gives you a clear order for installation and troubleshooting: establish bus communication, establish local browser access, and only then establish remote access.
This tutorial exposes the existing EMS-ESP web interface through an HTTP tunnel. It does not publish the Serial/USB console, Telnet console, MQTT service, or another integration endpoint. Exposing only the service required for the task keeps the remote-access scope narrower.
Prerequisites, compatibility, and electrical boundaries
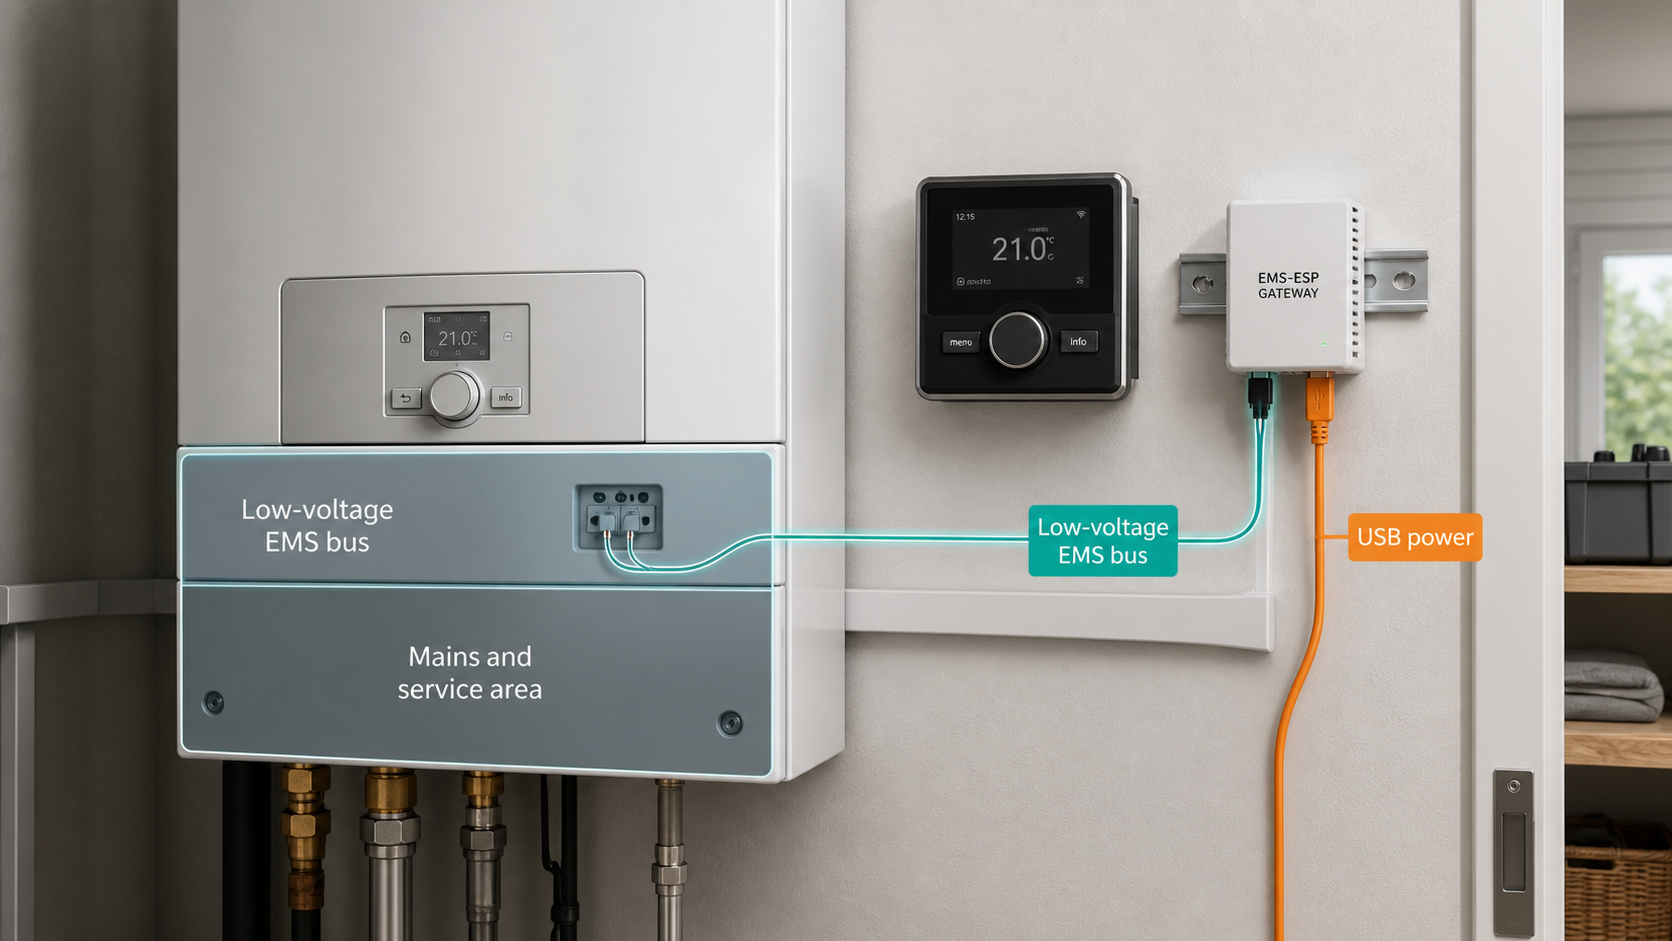
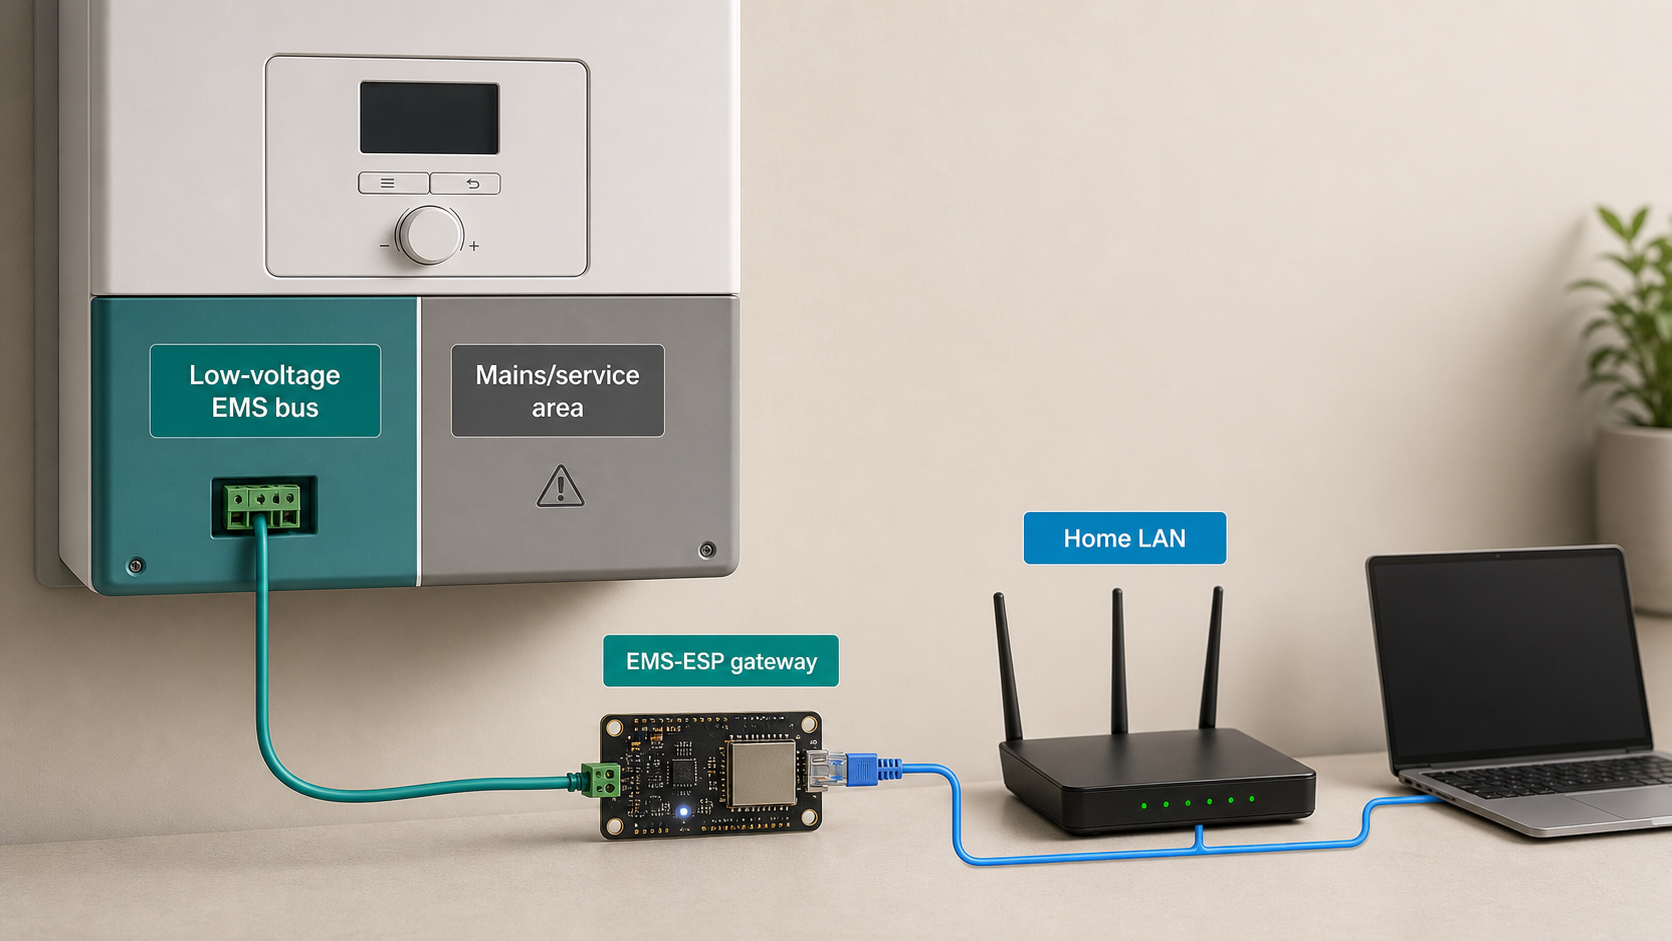
Start by identifying the exact boiler, thermostat, heat pump, controller, and other modules you intend to monitor. Compare those models and their control-bus family with the compatibility information on the official EMS-ESP website. Similar-looking systems can use different control buses, so do not choose hardware based only on the brand printed on the enclosure.
EMS-ESP requires more than a bare ESP32. The project states that a small additional circuit is required between the microcontroller and the EMS bus. Prebuilt gateway hardware from BBQKees Electronics is identified by the project as tested for use with EMS-ESP. If you use a different gateway, verify electrical compatibility and obtain wiring, flashing, and hardware support from that gateway’s manufacturer.
You also need normal local-network access. EMS-ESP must join a network that is reachable by the device that will run the Localtonet client. That client device must remain powered on and connected whenever remote access is required. It can be a supported computer or another supported device on the same reachable network, but this guide does not assume that the Localtonet client runs on the EMS-ESP microcontroller itself.
| Requirement | Why it matters | Validation before continuing |
|---|---|---|
| Compatible heating equipment | EMS-ESP must understand the bus family and connected device types. | Check the exact models and bus family against current EMS-ESP compatibility information. |
| Supported ESP32 gateway | The firmware runs on an Espressif ESP32 and depends on the gateway’s hardware design. | Confirm that the selected gateway is covered by the current installation instructions. |
| EMS bus interface circuit | A bare microcontroller must not be connected directly to the EMS bus. | Use a documented interface and follow its manufacturer’s wiring instructions. |
| Installation device and browser | Firmware installation and onboarding require a supported route for the selected gateway. | Review the official installation section before connecting or changing hardware. |
| Reachable local network | The EMS-ESP web interface must work over the LAN before it can be tunneled. | Plan to test from a second local device, not only from the installation device. |
| Localtonet client device | The client establishes the outbound connection to our relay. | Choose a supported, always-available device that can open the EMS-ESP interface locally. |
Do not connect an ESP32 directly to the EMS bus or infer terminal assignments from another heating system. Follow the gateway and heating-equipment documentation exactly. If the work requires opening an area containing mains voltage or performing internal heating-equipment service, stop and use a qualified installer.
Check the official project material before installation
The EMS-ESP32 repository is the canonical source-code repository and links to the project’s installation, building, support, and troubleshooting material. The repository’s installation section directs users to the current Installation Guide. Use that route because the supported preparation and flashing procedure depends on the gateway and firmware packaging.
This article does not provide a universal flashing command, serial-device name, binary filename, default address, or default credential. Those values are not consistently established by the supplied project evidence, and guessing them could result in an incorrect installation. The self-contained workflow below tells you what must be completed and verified at each stage while leaving hardware-specific flashing operations to the instructions supplied for the actual gateway.
Be careful with firmware version labels
There is a current version-label discrepancy in the project’s public material. During this 2026 review, the EMS-ESP website displayed version 3.8.1 as stable, while the GitHub repository identified version 3.8.4 as the latest release. Because those two first-party pages were not synchronized, this article does not label either value as the definitive current stable version.
Before installing or updating, compare the version offered by the official installation workflow with the repository’s release page and release notes. If your gateway manufacturer supplies a managed or preinstalled image, also confirm which releases that hardware supports. Do not install a build solely because its numeric version appears higher.
Install, onboard, and configure EMS-ESP
EMS-ESP distinguishes installing released firmware from building the firmware from source. For a normal gateway deployment, use the installation route linked by the project and intended for your hardware. Building from source is an advanced development path documented separately in the repository and is not required merely to operate the web interface.
Some gateways may arrive with firmware or use a manufacturer-specific preparation process, while other supported hardware may require firmware installation. The evidence available for this revision does not establish one sequence of buttons or commands that is valid for every supported gateway. Follow the route for the exact device in front of you, then use the following onboarding sequence to complete the installation safely.
Identify the gateway and its supported installation route
Record the gateway model and hardware revision. Determine whether it already contains EMS-ESP or requires firmware installation. Use the current EMS-ESP Installation Guide and the gateway manufacturer’s instructions rather than an ESP32 flashing tutorial written for unrelated hardware.
Install the firmware using the documented method
Select the released firmware and installation path approved for the gateway. Complete any required connection, device selection, erase, or programming operations exactly as the official workflow presents them. Do not substitute an unverified binary, serial path, memory layout, command, or development build.
Complete first-run network onboarding
Follow the onboarding interface presented by the installed firmware or gateway. Select the intended local network and enter its credentials through that interface. Record how the gateway reports its assigned local address. The exact onboarding address and screen sequence can vary, so use the values displayed by the installed version rather than assuming a universal default.
Configure initial authentication
Complete the account or user configuration presented by EMS-ESP. Replace any temporary or installation-specific credentials if the installed workflow provides them, and use unique credentials that are not shared with your router, Wi-Fi network, email account, or other administrative services. Keep authentication enabled because the same sign-in boundary will protect the tunneled interface.
Connect the gateway to the EMS bus
With power and electrical precautions handled according to the equipment documentation, connect the gateway only to the documented EMS bus terminals using the approved interface. Do not work inside mains-voltage areas or change boiler wiring based on assumptions.
Open the local web interface
Use the hostname or IP address discovered during onboarding or shown by your network’s device list. If a non-default port is displayed, include that exact port. Sign in and confirm that the EMS-ESP status and configuration pages load before changing advanced settings.
Confirm device discovery and basic configuration
Allow the gateway to communicate with the bus, then check whether the expected boiler, thermostat, heat pump, or other modules appear. Review the detected values for plausibility. Complete only configuration appropriate to your heating system and preserve a record of settings before making control changes.
Use the address reported by the onboarding process, the gateway interface, or your router’s connected-device list. If the address changes after a restart, rediscover it and verify it in a browser. Do not copy a private IP address from an example because it may point to a different device on your network.
Once the web interface opens, record the complete local target as observed from your own network. That means the working hostname or IP address, the port if one is explicitly required, and whether the local browser uses HTTP or HTTPS. This tutorial uses an HTTP tunnel for the evidenced EMS-ESP browser service, but the local target values must come from the installed system.
Verify EMS-ESP locally before opening remote access
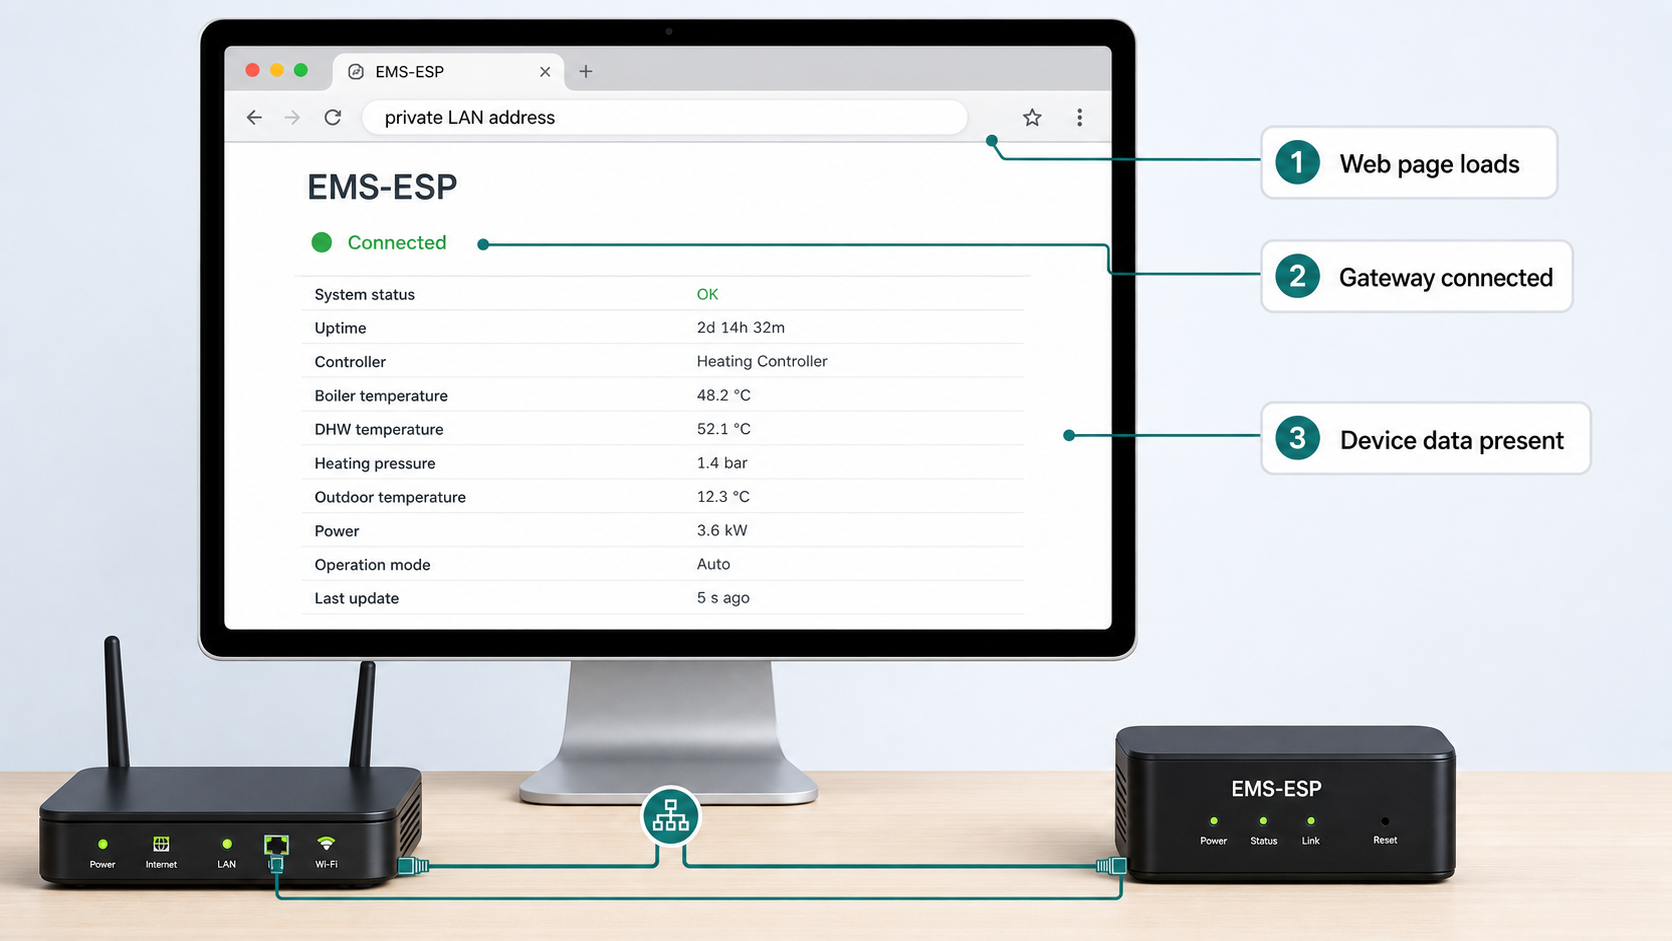
Do not create the tunnel immediately after the first successful page load. A useful local verification tests the same path that Localtonet will later use. Run the test from the computer or device on which you intend to install our client, not only from a phone or from the machine used during firmware setup.
Check the web service itself
Open the complete local address and sign in using the account you intend to retain. Navigate through the pages needed for remote monitoring or administration. Reload the page, sign out and back in, and confirm that the application remains responsive. If browser warnings, redirects, or connection failures appear locally, investigate them before adding another network layer.
Check the heating-system data
Confirm that expected devices appear and that temperatures, operating states, and other reported information are plausible. An accessible web page does not prove that the EMS bus connection is correct. Missing devices or implausible data usually point to compatibility, wiring, gateway, firmware, or EMS-ESP configuration rather than a remote-access problem.
Check the network path from the future client device
From the device that will run Localtonet, open exactly the same local address. This detects guest-network isolation, VLAN boundaries, local firewall rules, or name-resolution behavior that may differ between devices. If a hostname works on one machine but not another, test the discovered IP address and investigate local DNS rather than assuming the tunnel will repair name resolution.
Check behavior after a restart
Restart the gateway only through an appropriate documented procedure, then verify that it rejoins the network and returns to normal operation. Also check whether its IP address changed. A tunnel configured with an old address will stop reaching EMS-ESP even though both EMS-ESP and Localtonet remain operational.
| Local check | Successful result | If it fails |
|---|---|---|
| Browser connection | The sign-in page and required management pages load reliably. | Recheck the local address, port, network membership, and EMS-ESP status. |
| Authentication | The intended user can sign in and unauthorized users cannot simply bypass sign-in. | Review EMS-ESP user configuration before exposing the interface. |
| Device discovery | The expected compatible heating modules appear. | Investigate bus compatibility, gateway wiring, firmware, and project support resources. |
| Reported data | Values are plausible for the current system state. | Compare with the heating controller and check EMS-ESP configuration. |
| Client-device access | The future Localtonet host can open the exact target. | Check segmentation, guest isolation, local firewall policy, and name resolution. |
| Post-restart access | The same target works after normal gateway and client restarts. | Check for address changes and whether both devices reconnected. |
Local verification is also your baseline for later troubleshooting. Save the working local target without publishing it, and note what a healthy page looks like. When a remote test fails, you can repeat the same local test to determine whether the problem begins inside EMS-ESP or in the tunnel path.
Expose the EMS-ESP web interface with Localtonet
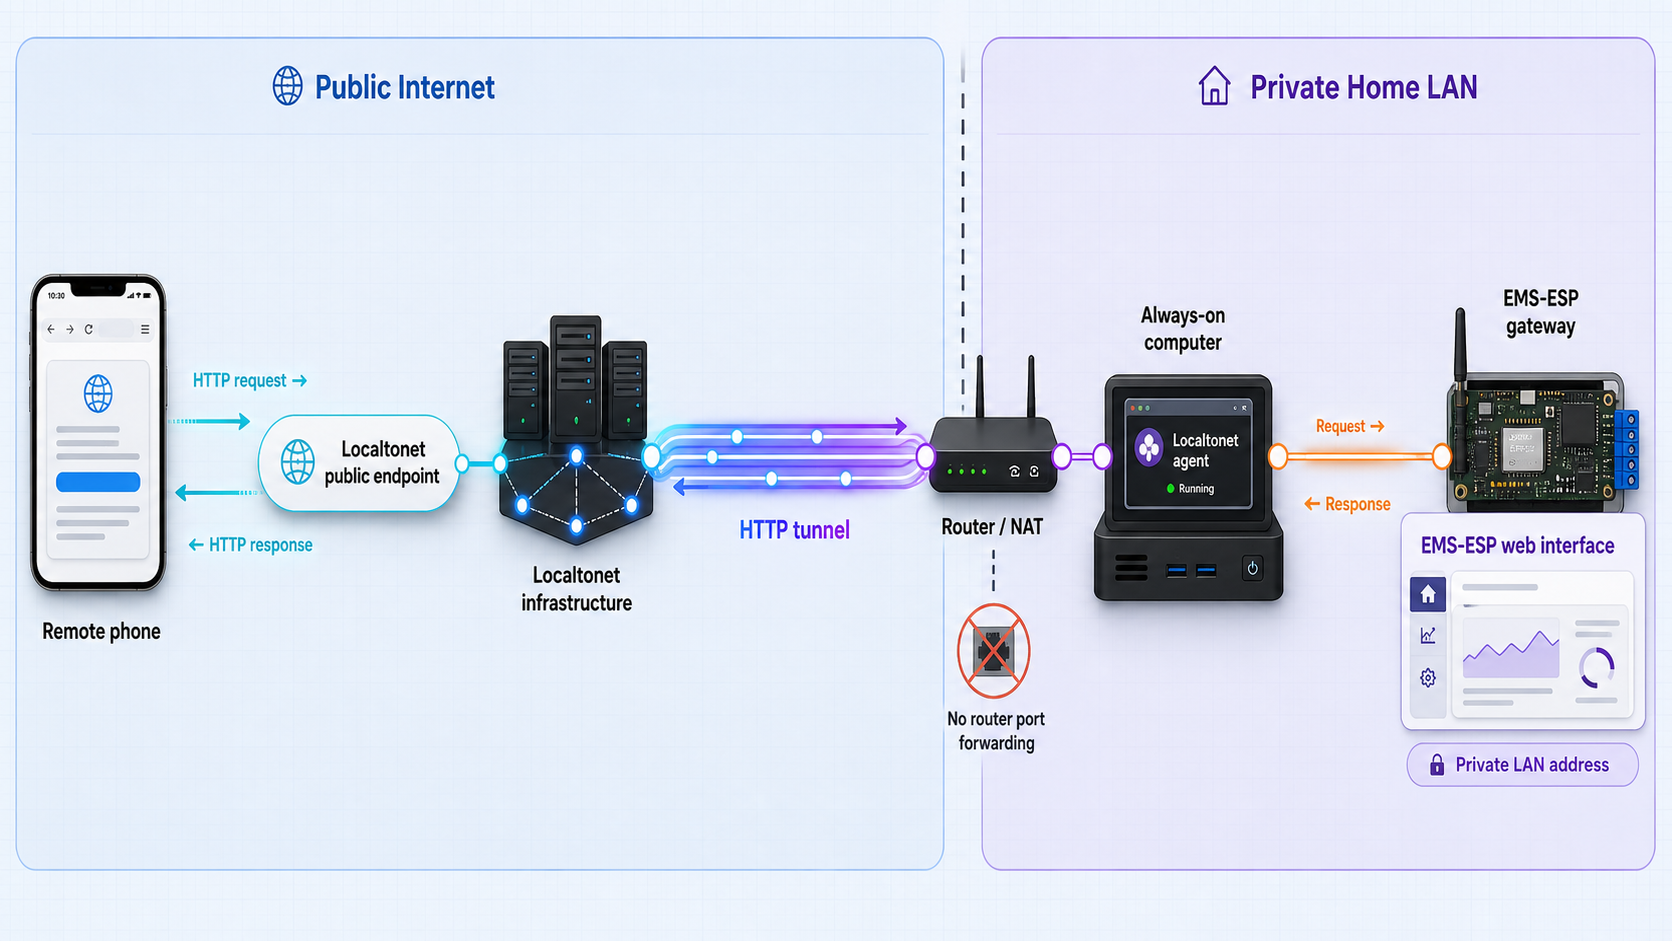
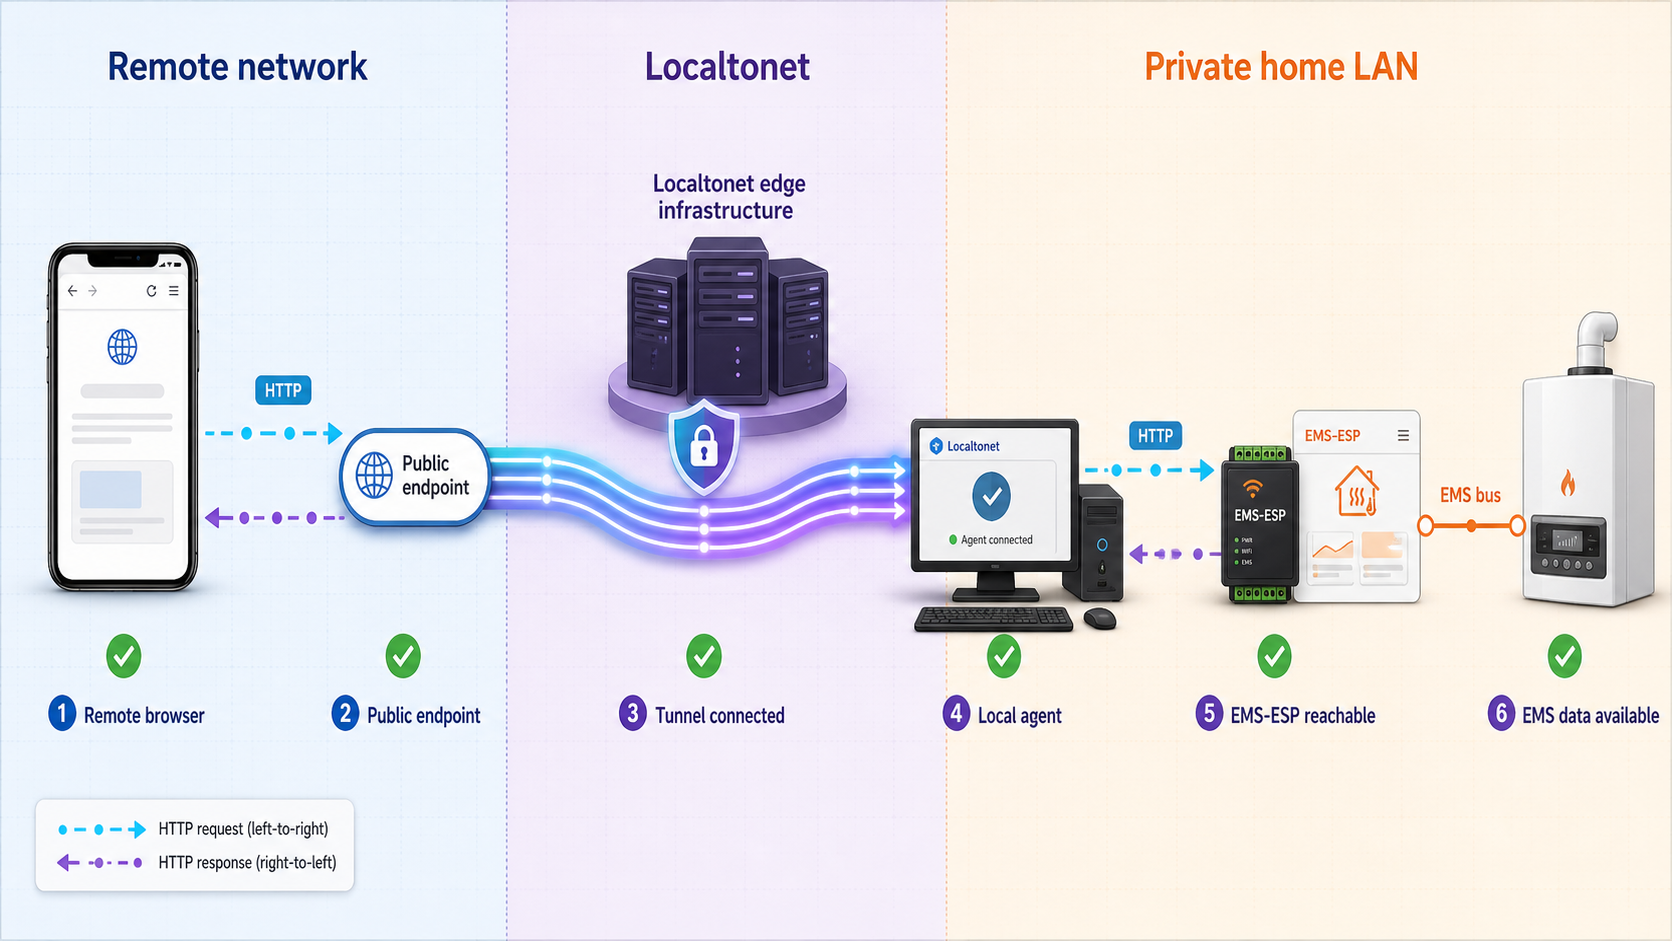
Localtonet exposes the verified service without inbound router port forwarding, firewall changes, VPN setup, or a public IP address. Our client establishes an outbound connection to a Localtonet relay server. Requests arriving at the assigned public address travel through that connection to the EMS-ESP target on your private network.
Use an HTTP tunnel for this browser-based workflow. HTTP and File Server tunnels have Process Type choices of Random Sub Domain, Custom Sub Domain, or Custom Domain, all of which serve the configured content at a public HTTPS address. Availability of options can vary, so use only the choices displayed in your current dashboard and subscription.
The sequence below follows the documented Localtonet lifecycle. Creating the configuration is not enough. You must start the tunnel, and it remains available only while the selected client is connected and the tunnel is running.
Install and run the Localtonet client
Install our client on a supported computer or device that can reach the EMS-ESP web interface over the LAN. Keep that device powered and connected whenever remote access is required. Before continuing, open EMS-ESP from this exact device one more time.
Authenticate or select the client device
Use the device-specific Localtonet authentication token to identify the client that will run the tunnel. Treat this token as a secret. Never include it in screenshots, issue reports, public configuration examples, browser bookmarks, or shared notes.
Select an available relay server
Choose a currently available Localtonet relay server or region from the dashboard. Do not copy a server code from an old article because available values can vary by current product configuration, region, or plan.
Create the HTTP tunnel
Select the HTTP tunnel type and the desired Process Type. Enter the verified EMS-ESP local IP address or hostname and its working local port as the target. Use only the values that succeeded from the Localtonet client device. Do not enter the router’s public address or an example address from another installation.
Start the tunnel
Create or save the configuration as presented, then press Start. A tunnel that has merely been created is not running. Confirm that the selected client is connected and that the tunnel reports a running state.
Test the assigned public URL externally
Open the assigned public HTTPS URL from a device that is not relying on the same LAN path, such as a phone using its mobile connection. Confirm that the EMS-ESP sign-in page appears, authentication remains required, and only the intended service is shown.
The Localtonet HTTP tunnel documentation is the companion reference for the current dashboard workflow and available fields. If you choose a custom domain, check the current documentation for its DNS requirements rather than applying instructions written for another provider or an older interface.
A useful support screenshot can show the tunnel type, target structure, selected client, and running state, but it must not reveal authentication tokens, credentials, public endpoints, private network details, or personally identifying device names.
Secure remote access to heating controls
A public URL changes the exposure of the EMS-ESP interface. The service is no longer reachable only by devices already inside your home network. Treat it as an administrative endpoint associated with physical equipment, even if you usually use it only for viewing temperatures or status.
Retain EMS-ESP authentication
Do not remove or bypass the EMS-ESP sign-in boundary for convenience. Use strong, unique credentials where supported by the installed version, and do not reuse Wi-Fi, router, email, or Localtonet account credentials. If multiple people require access, use the project’s multi-user capability rather than broadly sharing one administrative password where the installed version permits appropriate account separation.
Apply least privilege
Give access only to people who need it and only for as long as they need it. Review which heating controls are available through the account and interface you expose. Remote monitoring may carry less operational risk than giving every user the ability to change schedules, temperatures, or system settings.
Localtonet forwards the selected service. It does not redefine the permissions inside EMS-ESP. Authorization decisions within the application remain the responsibility of the EMS-ESP configuration and its users.
Expose only the required service
This workflow publishes the web interface only. Do not expose Telnet, MQTT, a development console, or other interfaces merely because they are available locally. Each additional service creates another path that must be configured, authenticated, maintained, and monitored.
Segment devices where practical
Home automation and IoT equipment can be placed on a dedicated network segment where practical, with explicit rules allowing only required communication. Segmentation must not block the Localtonet client from reaching the EMS-ESP target. Test the intended path after changing VLAN, guest-network, or local firewall rules.
Keep firmware maintained
EMS-ESP advertises automatic update capability, but update availability and behavior should be confirmed in the installed release and official documentation. Review release information before updating, preserve relevant configuration records, and verify local operation after the update before reopening remote access.
Because the website and GitHub release information were inconsistent during this review, do not rely on a single version label. Use the release notes, the version offered through the supported installation or update workflow, and any gateway-specific compatibility guidance together.
Stop the tunnel when it is not needed
A stopped tunnel removes the Localtonet public route to the local target. For occasional maintenance, start it shortly before the remote session and stop it afterward. Delete configurations that are no longer required, and keep the selected client device and its token under your control.
After starting the tunnel, use an external network to confirm that EMS-ESP authentication is still required and that the URL reaches only the intended interface. Never assume that a successful local sign-in proves the public path has the same behavior.
Updates, address changes, restarts, and routine operation
Remote access is a chain of services rather than a permanent property of the EMS-ESP gateway. EMS-ESP must be powered and connected, its web interface must be responding, the LAN path must be available, the Localtonet client must be connected, and the tunnel must be running. A failure at any one of those points makes the public URL unavailable.
Plan for local-address changes
A network may assign a different local IP address after a gateway, router, or DHCP service restarts. If the tunnel targets the old IP address, it will continue forwarding to that outdated destination. When local access stops working, check your router’s current device list or the gateway’s documented discovery method, then compare the result with the tunnel target.
If your network supports a reliable hostname or a managed address reservation, you may use the approach appropriate to your own network. This article does not prescribe router-specific reservation steps because those controls vary by router and are not Localtonet or EMS-ESP settings.
Understand client and gateway restarts
Restarting EMS-ESP temporarily removes the target service. Restarting the device that runs our client temporarily removes the outbound tunnel connection. After either restart, verify that the relevant device has rejoined the network. Then check local EMS-ESP access, client connectivity, tunnel state, and finally the public URL in that order.
Update without confusing firmware and tunnel failures
Before an EMS-ESP update, record the current working version, local target, and essential configuration. Stop the public tunnel during maintenance when remote access is unnecessary. Apply the update through the currently supported EMS-ESP workflow, allow the gateway to restart, and validate bus communication and local browser access before restarting the tunnel.
If the local interface works after the update but the public URL does not, investigate the Localtonet client and tunnel target. If the local interface itself no longer works, focus on EMS-ESP, its network connection, the gateway, and the update outcome before changing Localtonet.
Use a repeatable session checklist
Troubleshoot the complete connection path
Troubleshooting is faster when you work from the heating system outward. Do not begin by recreating the tunnel or changing several settings at once. Test each layer, preserve known-good values, and stop at the first failure.
EMS-ESP does not start or its interface never appears
Return to the installation path for the exact gateway. Confirm that the selected firmware is intended for that hardware and that the installation process completed successfully. Recheck first-run network onboarding and use the gateway’s documented discovery procedure. Avoid reflashing repeatedly with guessed binaries or settings.
The interface loads, but heating devices are missing
This is not a Localtonet problem. Confirm the exact equipment and bus compatibility, inspect the documented gateway connection, and review EMS-ESP configuration. If the gateway is not made by BBQKees, the project notes that hardware-specific support may need to come from its manufacturer.
The repository’s getting-support section directs users to the project’s community and support guidance. Reproduce the issue locally before requesting help, and redact network information, usernames, passwords, tokens, and public URLs from logs or screenshots.
EMS-ESP works on one local device but not the Localtonet host
Test the exact hostname or IP address and port from the Localtonet host. Guest Wi-Fi isolation, VLAN policy, local firewall rules, and hostname-resolution differences can block that path. Being connected to the same internet service does not guarantee that two devices can communicate directly.
The local IP address changed
Discover the gateway’s current address and open it locally. If it works, update the tunnel target to the verified address using the current dashboard workflow. Recheck any local hostname or address-reservation strategy separately. Do not assume that restarting the tunnel will redirect it automatically to a different target.
The tunnel exists, but the public URL is unavailable
Confirm that the selected Localtonet client is connected and that the tunnel has been started. Creating a tunnel does not start it. The endpoint is available only while the selected client is connected and the tunnel is running. If both conditions are satisfied, test EMS-ESP locally from the client device.
The public URL reaches the wrong page
Compare the tunnel target with the complete local address you verified. A wrong port may point to another local web service. A stale IP address may now belong to another device. Stop the tunnel while correcting the target, then repeat the local and external tests.
The sign-in page appears, but authentication fails
Try the same credentials on the local EMS-ESP interface. If they fail locally too, investigate the EMS-ESP account configuration. If local sign-in works but remote sign-in does not, compare browser behavior and confirm that the tunnel reaches the intended service. Do not disable authentication as a diagnostic shortcut.
The public interface loads, but data is stale or implausible
Compare it with the local page. If both show the same stale or incorrect information, investigate EMS-ESP bus communication and device configuration. A tunnel transports the application response but does not create, cache, or interpret heating data.
| Test | What a failure indicates | Next action |
|---|---|---|
| Expected heating devices appear in EMS-ESP | Possible compatibility, bus, gateway, or firmware issue | Review EMS-ESP and gateway documentation before working on remote access. |
| EMS-ESP opens on another LAN device | Possible EMS-ESP network or web-service issue | Rediscover the address and confirm network onboarding. |
| EMS-ESP opens from the Localtonet host | Possible segmentation, firewall, DNS, address, or port issue | Correct the local path before editing the tunnel. |
| Localtonet client is connected | Possible client shutdown, network loss, or authentication issue | Restore client connectivity without exposing its token. |
| Tunnel is running | The configuration may exist without being started | Press Start and confirm the running state. |
| Public URL works externally | Possible endpoint, target, or end-to-end path issue | Recheck each preceding test, then test from a different network. |
Frequently asked questions
Can Localtonet install EMS-ESP on an ESP32?
No. EMS-ESP installation is completed through the official project workflow and the instructions for the selected gateway. Localtonet becomes relevant after the EMS-ESP web interface is installed, configured, and reachable from the Localtonet client device.
Which EMS-ESP version should I install?
Check the current official installation workflow, GitHub release notes, and gateway compatibility guidance together. During this 2026 review, the EMS-ESP website listed 3.8.1 as stable while GitHub marked 3.8.4 as its latest release, so this article does not declare either one the definitive current stable version.
Can I connect a bare ESP32 directly to the EMS bus?
No. The EMS-ESP project states that an additional interface circuit is required between the EMS bus and the ESP32. Use compatible gateway hardware and follow its documented electrical and wiring instructions.
Can the Localtonet client run directly on EMS-ESP?
The supplied EMS-ESP evidence does not establish that our client can run inside its ESP32 firmware. Use another supported device on the same reachable LAN and verify that it can open the EMS-ESP interface.
Which local IP address and port should I enter?
Enter the address and port used by your actual EMS-ESP installation and verified from the device running our client. The available evidence does not establish one universal address or web port, so do not use an example value from another network.
Do I need router port forwarding or a public IP address?
No. The Localtonet client establishes an outbound connection to a relay server, so this workflow does not require inbound router port forwarding, firewall changes, VPN setup, or a public IP address.
Should I expose the EMS-ESP Telnet console too?
No additional console is required for this workflow. Telnet provides advanced operational access, and the supplied evidence does not establish a safe public-exposure configuration for it. Publish only the web interface needed for the task.
Will the remote URL work if the Localtonet device goes offline?
No. The tunnel is available only while the selected client device is connected and the tunnel is running. EMS-ESP must also remain powered, connected, and reachable from that client.
What should I check after updating EMS-ESP?
Verify the reported firmware version, network connection, authentication, recognized heating devices, plausible data, and local web access. Confirm that the local address has not changed. Restart and externally test the tunnel only after those local checks pass.
Connect your verified EMS-ESP interface with Localtonet
Once EMS-ESP is installed, authenticated, and working from the device that will run our client, create an HTTP tunnel to the verified local target. Test the sign-in boundary from an external network and stop the tunnel whenever remote heating-system administration is not required.
Get Started Free →

