

Protect a privileged Docker dashboard before giving it a public route
DockDash combines service discovery, health and resource history, update information, logs, container controls, file access, and terminal sessions in one self-hosted interface. Those capabilities make it an administrative application rather than a public status page. This guide deploys the current image-based Docker Compose service from a pinned DockDash release, verifies it locally, enables built-in OpenID Connect authentication, and then stages a Localtonet HTTP tunnel safely. It also covers version-controlled updates, cold backups of the persistent volume, rollback planning, and layered troubleshooting.
📋 What's in this guide
Understand what you are deploying
DockDash is a self-hosted dashboard for discovering and monitoring Docker containers, network services, Kubernetes workloads, and manually added endpoints. Its current feature set includes health and resource history, semantic-version-aware image update monitoring, release-note display, notifications, container lifecycle controls, live logs, a file explorer, text-file editing, terminal sessions, and an interactive topology canvas.
These features are useful precisely because DockDash has access to sensitive operational data and controls. A user who reaches a fully configured instance may be able to inspect logs, change container state, edit files, or open a shell inside a container. The effect depends on the connected workloads and permissions, but DockDash should always be treated as a privileged administrative interface.
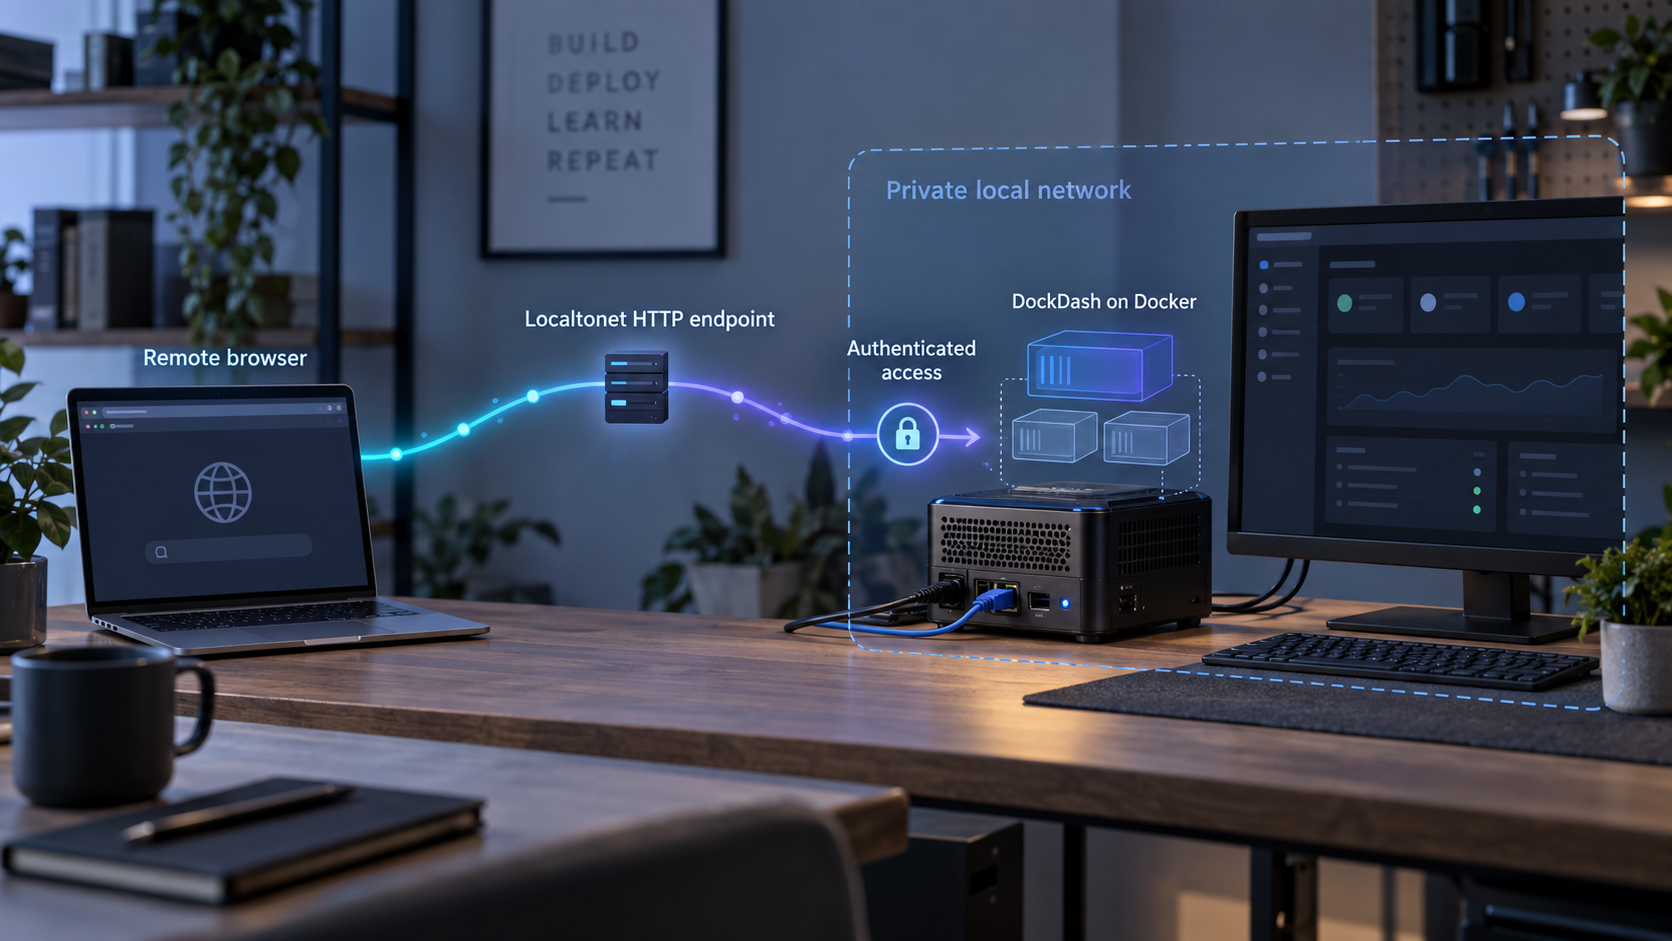
The repository's Compose service mounts /var/run/docker.sock from the host. This is what allows DockDash to discover and operate local containers. Access to the Docker daemon is highly privileged in practical terms, so an attacker who compromises the dashboard may be able to affect more than the DockDash container itself.
Do not expose a default installation to the public internet. This tutorial uses DockDash's built-in OIDC support as the reproducible authentication path. The Localtonet tunnel is started only for a controlled end-to-end authentication test, and it must be stopped immediately if an unauthenticated browser can reach DockDash.
The request path used in this guide
The browser opens the public HTTPS address assigned to the Localtonet HTTP tunnel. Localtonet forwards that request to DockDash on the protected local listener. DockDash then initiates the OIDC authorization flow and handles the callback at /auth/callback. The identity provider decides who may authenticate, while DockDash maintains the application session.
A tunnel provides network reachability. It does not decide who is authorized to use DockDash. The OIDC configuration must remain active whenever the public tunnel is running.
| Layer | Responsibility | Primary risk to control |
|---|---|---|
| Docker host | Runs DockDash and provides access to the local Docker daemon | Docker socket access can affect workloads and the host |
| DockDash | Provides monitoring, logs, files, terminals, and container operations | The application is unauthenticated unless OIDC is configured |
| OIDC provider | Authenticates users and returns the browser to the registered callback | The callback URI, client secret, and access policy must be correct |
| Localtonet client | Connects the local HTTP target to a selected relay | The device token must remain private |
| Localtonet HTTP tunnel | Provides the browser-facing public HTTPS address | A running tunnel creates reachability, not application authorization |
About authenticated reverse proxies
The DockDash authentication documentation also permits deployment behind an authenticated reverse proxy. It names products such as Caddy, Traefik, nginx, oauth2-proxy, Authelia, and Tailscale as possible authentication layers. Those products have different configuration, identity, header, cookie, and routing requirements.
This tutorial does not present a partial proxy configuration as if it were a complete security boundary. If you use that architecture, the proxy must protect every DockDash route, DockDash must not be independently reachable from an untrusted interface, and the Localtonet tunnel must target the authenticated proxy rather than DockDash. The remainder of this guide uses built-in OIDC so that one authentication path can be followed end to end.
Prepare the DockDash host and identity provider
Use a host with a working Docker Engine, the Docker Compose plugin, and Git. The current DockDash repository presents an image-based Compose service, so the normal deployment flow pulls the image referenced by the checked-out Compose file and starts it. It does not require docker compose up --build.
Install Docker using the instructions for your operating system in the official Docker Engine installation guide. If Compose is not already included, use the official Docker Compose installation guidance. Then verify the tools:
docker --version
docker compose version
git --version
The commands should complete successfully before you clone DockDash. Also confirm that your account can communicate with the Docker daemon through the authorization model used on your host. Do not make the Docker socket globally writable to solve a permissions error.
Reserve the local listener
The supplied DockDash Compose configuration publishes the web service on host port 3001. Check running containers and existing listeners before starting it:
docker psIf another service already owns port 3001, resolve the conflict deliberately. Changing the host port also changes local tests and the Localtonet target. This guide retains port 3001 and later restricts it to loopback.
Prepare an OIDC application registration
DockDash documents compatibility with standard OIDC providers such as Keycloak, Authentik, Authelia, and Google. At the provider, prepare a confidential web application registration. You will need:
- The provider issuer or discovery URL.
- A registered client ID.
- A client secret that can be supplied privately to DockDash.
- An access policy that limits sign-in to the intended users or groups.
- The exact public callback URI, which will be registered after the Localtonet hostname is assigned.
Do not register a container hostname, a private address, or http://127.0.0.1:3001 as the callback for the remote workflow. The identity provider returns the user's browser to the public HTTPS origin, not to DockDash's internal upstream address.
Plan secret storage
The OIDC client secret and DockDash session secret must not be committed to a public repository. Use the secret-management method appropriate to your environment, restrict access to local environment files, and exclude those files from version control. Do not reuse the client secret as the session secret.
A mutable master checkout can change between installations. This guide uses the published DockDash v1.5.0 release as its reproducible repository baseline. The release evidence identifies commit f9c2e65. Review newer releases before choosing them, then substitute a deliberate release tag rather than silently deploying the current branch head.
Deploy DockDash from a pinned Compose release
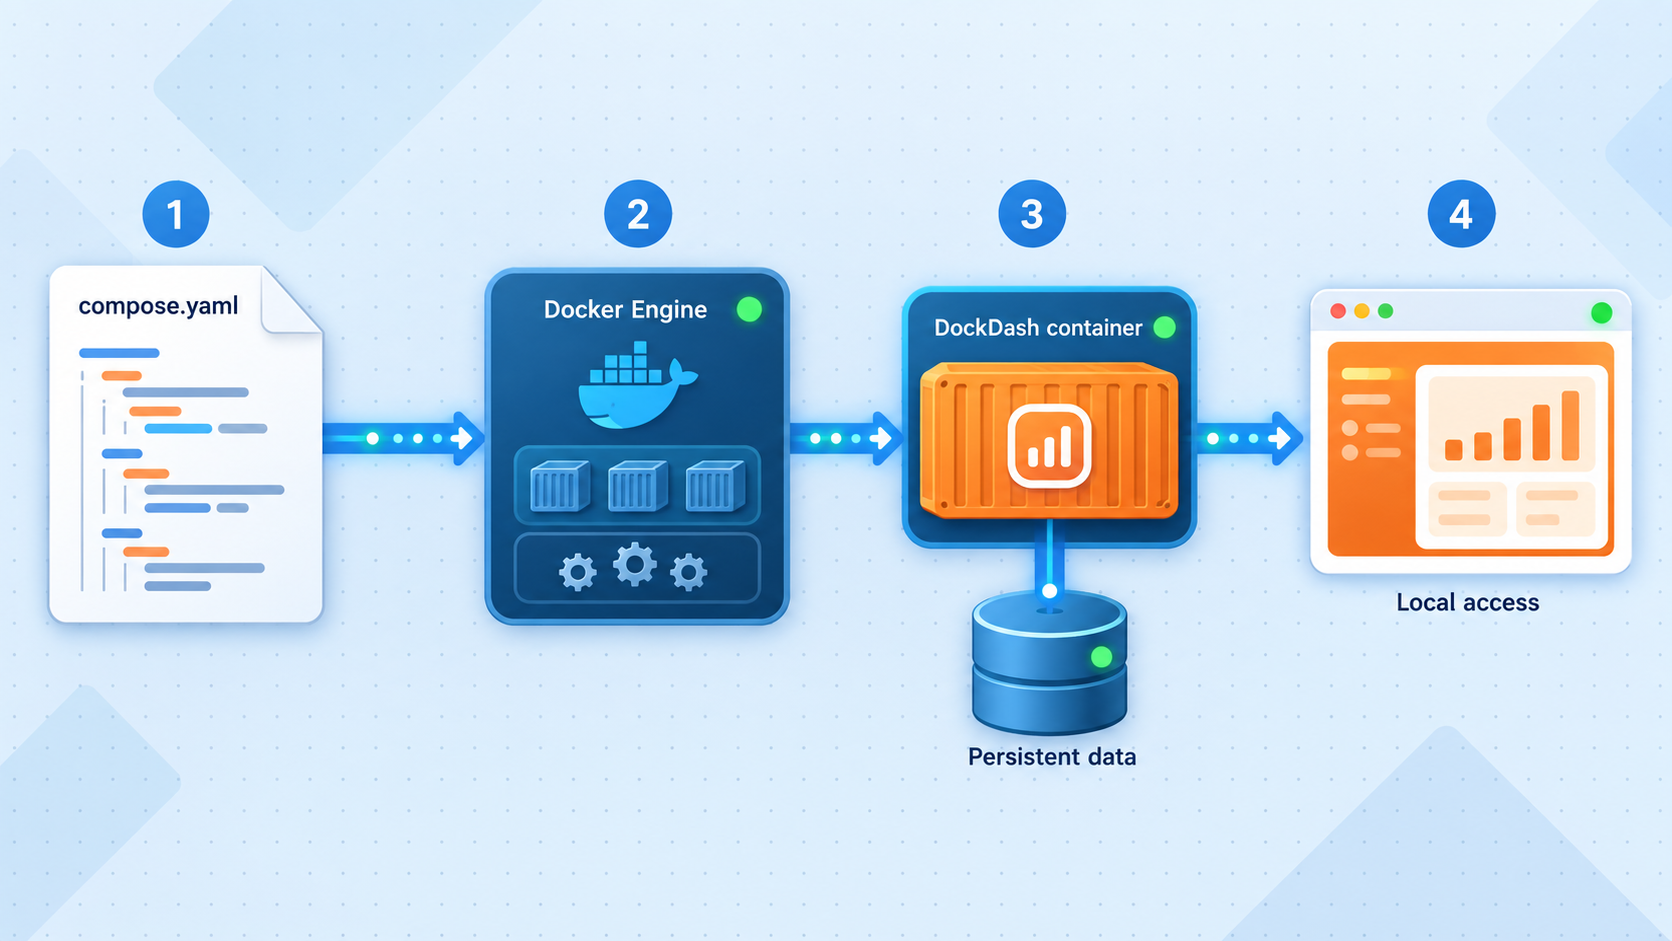
The current repository's documented Compose service uses an image declaration rather than a local build declaration. It publishes port 3001, mounts the Docker socket, and mounts the named dockdash-data volume at /app/data. It also includes settings such as LOG_LEVEL and NETWORK_CIDRS.
A Dockerfile exists in the repository, but its presence alone does not establish a supported production source-build workflow. This guide therefore uses the documented image-based Compose path. If a future DockDash release publishes separate source-build instructions, follow that release's instructions and keep the source-build procedure distinct from prebuilt-image deployment.
Clone the official repository
Clone the DockDash repository and enter the working directory. Do not start the mutable default branch as the final deployment.
Select the tested release tag
Fetch tags and check out v1.5.0 in detached mode. Confirm that the resulting short commit identifier is f9c2e65 before continuing.
Review and validate the Compose model
Inspect the image reference, port publication, Docker socket mount, persistent volume, environment settings, and network scan ranges. Use Compose validation to catch syntax and interpolation errors.
Pull the declared image
Pull the image selected by the release's Compose file. Do not add a build flag to the documented image-based workflow.
Start DockDash in detached mode
Start the service, inspect its Compose state, and read its logs before making any authentication or tunnel changes.
git clone https://github.com/dougmaitelli/DockDash.git
cd DockDash
git fetch --tags
git checkout --detach v1.5.0
git rev-parse --short HEAD

docker compose config
docker compose pull
docker compose up -d
docker compose ps
docker compose logs dockdash
The revision check should report f9c2e65 for this baseline. If it does not, stop and investigate whether the tag, repository, or local checkout differs from the reviewed release.
A Git tag pins the Compose file and repository configuration. It does not necessarily prove that every referenced container image is immutable. Record the actual image ID used by the running container as part of your deployment record:
docker inspect dockdash --format '{{.Config.Image}}'
docker inspect dockdash --format '{{.Image}}'
The first command reports the configured image reference. The second reports the local content-addressed image ID used by the container. Preserve both values with the selected DockDash tag, effective Compose configuration, and deployment date.
DockDash supports discovery across configurable CIDR ranges. Set NETWORK_CIDRS only to networks you own or are explicitly authorized to inspect. A sample private address range is not evidence that it matches your LAN, container network, or security policy.
Verify DockDash locally and restrict its listener
Before enabling authentication or remote access, verify that the base application works on the Docker host. The documented local interface is http://localhost:3001. Open it in a browser on that host or use an existing secure management path if the host is remote.
A command-line request can establish that an HTTP listener responds:
curl -I http://127.0.0.1:3001An HTTP response does not prove that container discovery, Docker permissions, application data, or authentication works. Complete a browser-based functional check as well.
Local verification checklist
- Confirm that the DockDash interface loads without a connection error.
- Confirm that expected local containers appear after discovery completes.
- Review container status and resource information.
- Open logs for a non-sensitive test container.
- Confirm that the application can read the Docker daemon without recurring permission errors.
- Make a harmless dashboard change, restart DockDash, and verify that the change persists.
- Review the Compose logs for unexpected scan activity or repeated failures.
Do not use a production workload for the first start, stop, terminal, or file-editing test. Validate administrative functions against a disposable container whose interruption cannot affect users or data.
Bind port 3001 to loopback
The repository example publishes 3001:3001, which can make the service reachable through host network interfaces depending on the host firewall and Docker configuration. When the Localtonet client runs on the same host, replace the existing port entry with a loopback-only binding:
ports:
  - "127.0.0.1:3001:3001"
Edit the existing entry rather than adding a second port mapping. Then apply the change without a source build:
docker compose config
docker compose up -d
docker compose ps
Verify that the local request still succeeds. From another machine on the LAN, confirm that direct access to the DockDash host on port 3001 no longer works.
If the Localtonet client runs on another device, 127.0.0.1 refers to that other device and cannot reach DockDash. In that architecture, provide a narrowly restricted network route to DockDash, allow only the Localtonet client device through the host firewall, and avoid broad publication to an untrusted network.
Configure built-in OIDC with the public callback
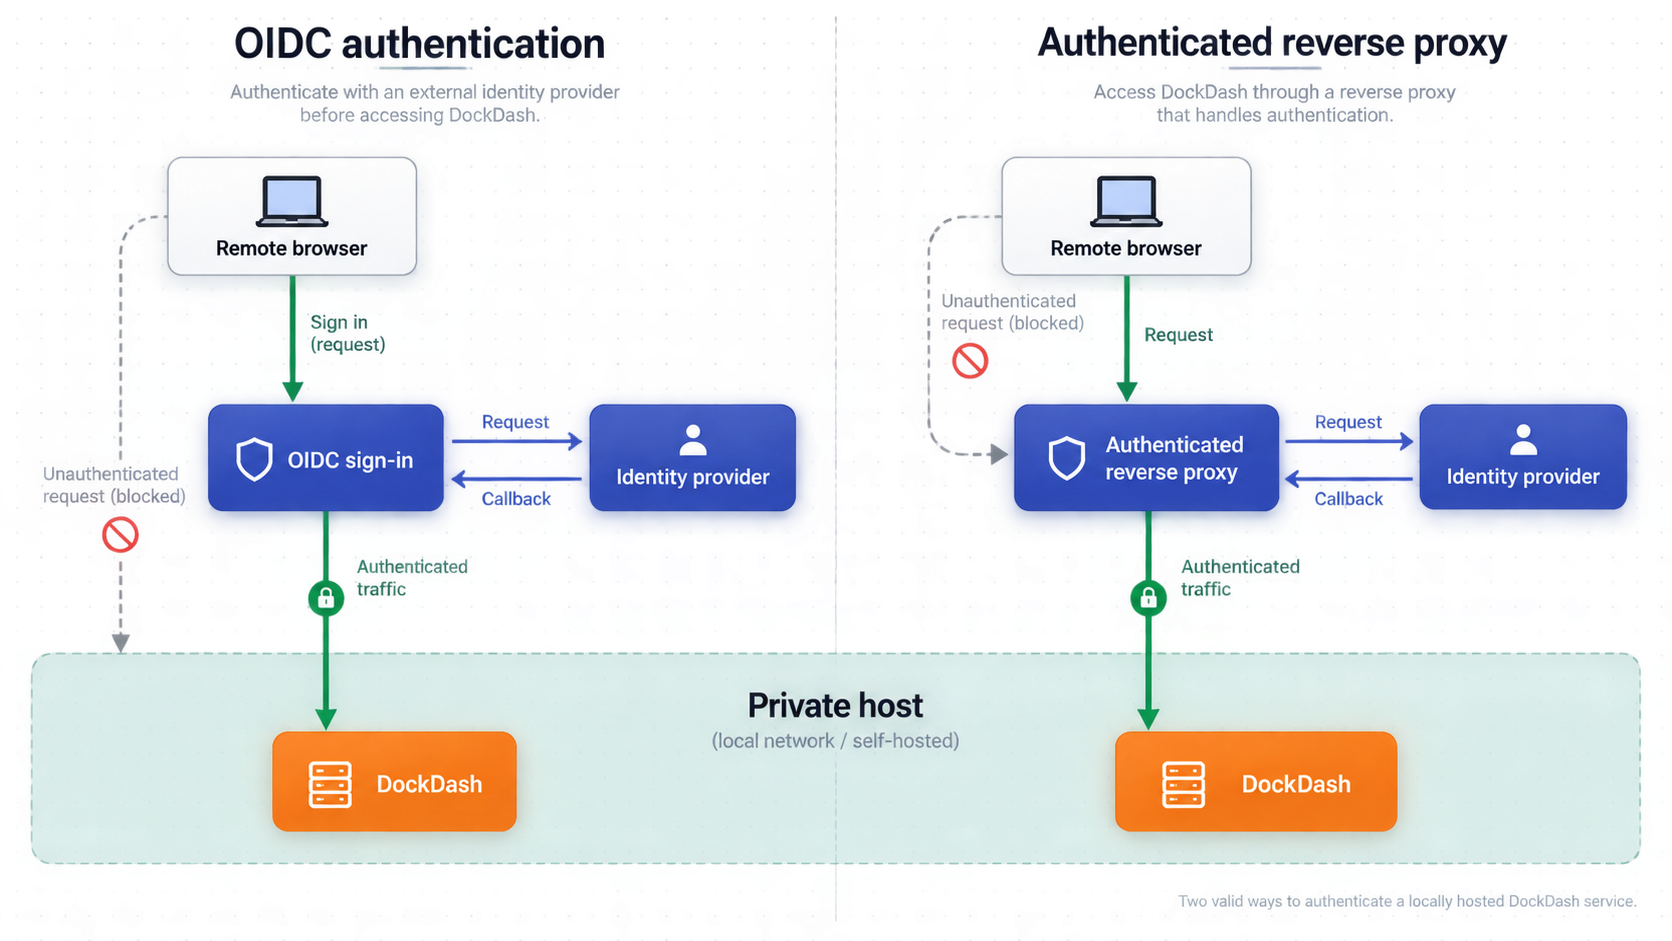
DockDash enables OIDC when all three required provider settings are present:
OIDC_ISSUER: the provider issuer or discovery URL.OIDC_CLIENT_ID: the registered client identifier.OIDC_CLIENT_SECRET: the registered client secret.
The authentication documentation also defines these supporting settings:
OIDC_REDIRECT_URIsupplies an explicit callback when the public URL should not be inferred from request or proxy headers.OIDC_SCOPESdefaults toopenid profile email.SESSION_SECRETsigns cookies and is generated per process if omitted.SESSION_MAX_AGEdefaults to28800000milliseconds, or eight hours.TRUST_PROXYdefaults toloopback, uniquelocal.
Set a stable, random SESSION_SECRET in production. If DockDash generates a new value at every process start, existing sessions become invalid after each restart.
Why the tunnel hostname must be selected first
The identity provider needs the exact browser-facing callback before it can complete the authorization flow. For this deployment, the callback has this shape:
https://your-public-host/auth/callbackThe public hostname comes from the Localtonet HTTP tunnel configuration. Creating that configuration and starting it are separate actions. The safe sequence is therefore:
- Create the Localtonet HTTP tunnel configuration and obtain its assigned public HTTPS hostname.
- Leave the tunnel stopped while DockDash remains unauthenticated.
- Register the exact public callback at the OIDC provider.
- Add the same callback and the required OIDC settings to DockDash.
- Recreate DockDash and inspect its startup logs.
- Start the tunnel only for a controlled end-to-end authentication test.
- Use a clean private browser session to verify that login is mandatory.
- Stop the tunnel immediately if authentication is skipped or fails open.
Do not delete and recreate the tunnel after registering the callback unless you are prepared to update the provider and DockDash configuration. A replacement tunnel may have a different public hostname.
Add the OIDC environment settings
Add the variables to the existing DockDash service's environment section. The following values are placeholders:
environment:
  - LOG_LEVEL=info
  - OIDC_ISSUER=https://auth.example.com/realms/homelab
  - OIDC_CLIENT_ID=dockdash
  - OIDC_CLIENT_SECRET=replace-with-provider-secret
  - SESSION_SECRET=replace-with-a-long-random-value
  - OIDC_REDIRECT_URI=https://your-public-host/auth/callback
Preserve other required environment settings from the release's Compose file. Avoid placing real secrets in screenshots, shell history, public repositories, or support messages. If you use Compose variable interpolation or a local environment file, restrict its filesystem permissions and exclude it from version control.
Apply the environment changes using the image-based deployment path:
docker compose config
docker compose up -d
docker compose ps
docker compose logs dockdash
Be careful with docker compose config when collecting diagnostic output because an effective configuration can contain resolved secrets. Do not paste unredacted output into a public ticket.
Register an exact callback
Register the same complete URI at the identity provider and in OIDC_REDIRECT_URI. Scheme, hostname, port, path, case, encoding, and trailing slash can affect callback matching. The internal upstream http://127.0.0.1:3001 is not equivalent to the public HTTPS callback.
Do not fix a mismatch by allowing broad wildcard redirects. Verify the URI sent in the authorization request, compare it with the provider registration, and correct the public-origin configuration.
You can confirm locally that DockDash starts and attempts to initiate authentication, but a provider callback that points to the Localtonet public hostname needs the tunnel to be running. Start it only after OIDC is configured, perform a controlled test in a clean browser session, and stop it immediately if DockDash content appears without authentication.
Create and test the Localtonet HTTP tunnel safely
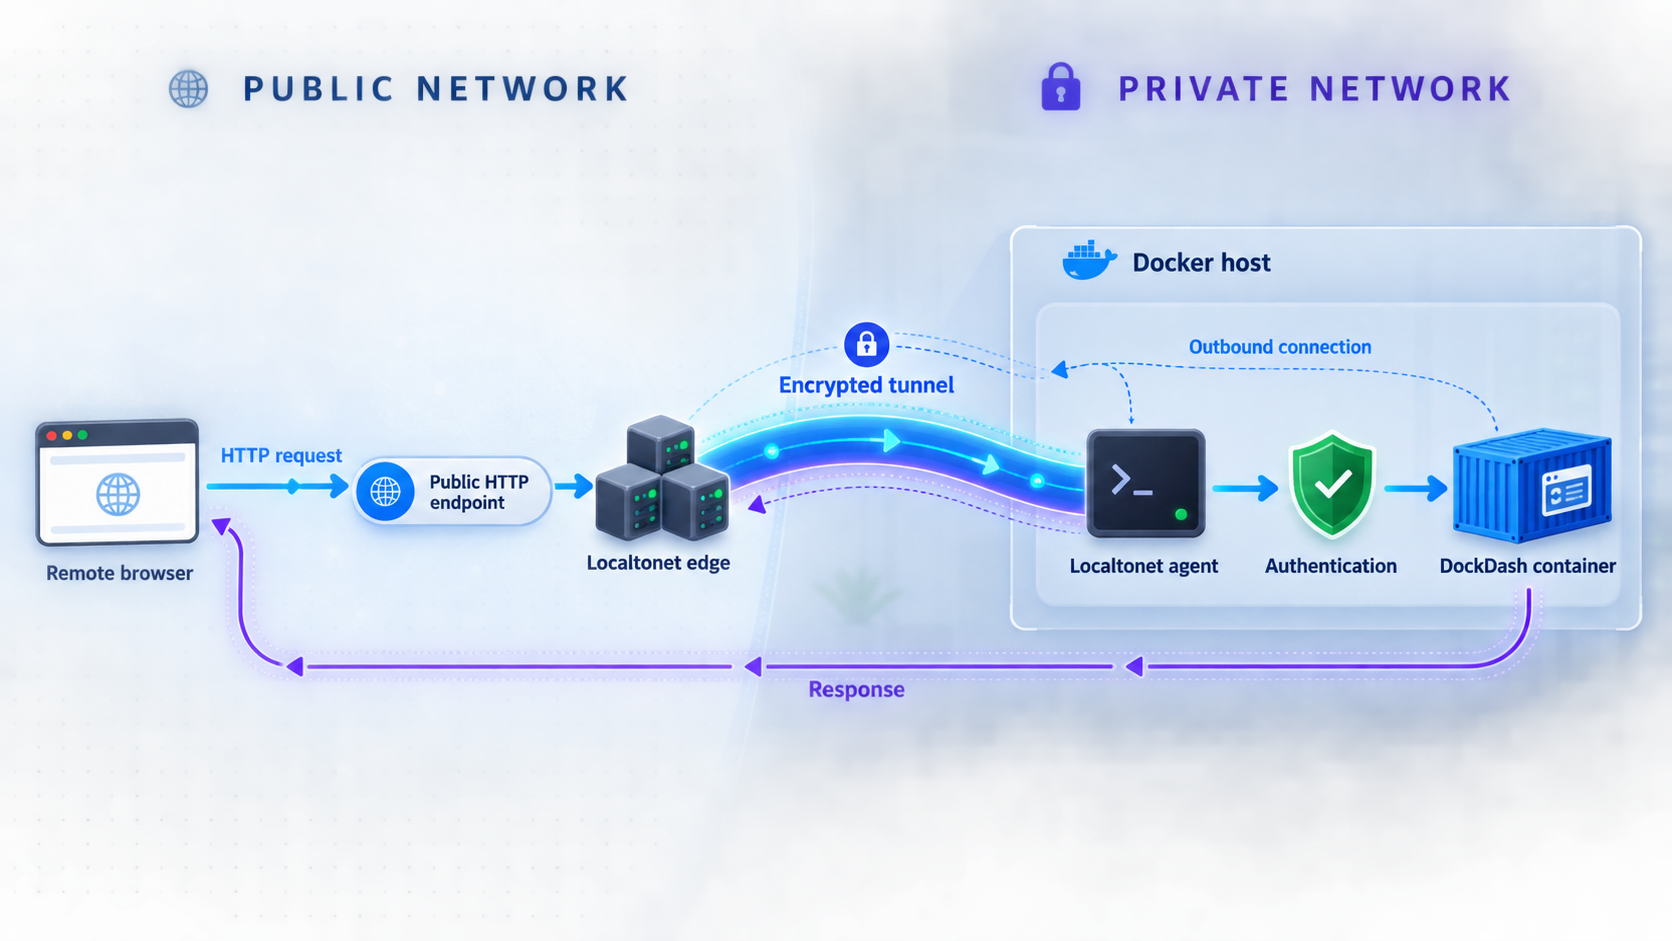
Our client application must run on the DockDash host or on another device that can securely reach its protected listener. The client establishes an outbound connection to a Localtonet relay, so the workflow does not require inbound router port forwarding, inbound firewall changes, VPN setup, or a public IP address.
Install the Localtonet client
Create or sign in to your Localtonet account, then use the dashboard-provided client installation path for the operating system on the device that will run the tunnel. Download the current client offered for that platform, install it, launch it, and authenticate the device with its device-specific token. We do not provide an unverified package command here because the installer and commands vary by operating system and client version.
If you do not yet have an account, use the Localtonet registration page. Keep the device token private. Do not commit it, embed it in an image, paste it into screenshots, or share it in support logs.
Install and run the current client
Use the client installer presented for your operating system in the Localtonet dashboard. Run it on the DockDash host when possible so it can reach the loopback-bound service.
Authenticate the intended device
Use the device-specific authentication token from your account. Confirm that the intended device appears connected before creating the tunnel.
Select a current relay server
Choose an available relay server or region from the dashboard. Obtain the current value from the product rather than copying a hardcoded server code from an article.
Create the HTTP tunnel configuration
Select the desired HTTP process type and set the local target to IP address 127.0.0.1 and port 3001 when the client runs directly on the DockDash host. Save the configuration and record the assigned public HTTPS hostname, but leave the tunnel stopped until OIDC is configured.
Start the tunnel for controlled verification
After registering the exact callback and applying the DockDash OIDC settings, press Start. Open the public address in a private browser window and verify that authentication is required before any DockDash content is shown.
Follow the current fields and process types in our HTTP tunnel documentation. HTTP tunnels may use a generated subdomain, a selected subdomain where supported, or a custom domain. Check the current documentation before making custom-domain DNS changes.
Perform the end-to-end OIDC test
- Confirm that DockDash responds locally at
http://127.0.0.1:3001. - Confirm that the running DockDash container contains the intended OIDC configuration without printing secret values.
- Confirm that the provider registration contains the exact Localtonet HTTPS callback.
- Start the Localtonet tunnel.
- Open the public URL in a new private or incognito browser window.
- Verify that DockDash redirects to the expected identity provider before showing dashboard content.
- Authenticate with an explicitly authorized test account.
- Verify that the browser returns to
/auth/callbackon the same public hostname. - Confirm that the dashboard, logs, and required real-time functions operate after login.
- Sign out and verify that protected content is no longer accessible.
Repeat the first public test with a second clean browser session. Existing identity-provider and DockDash cookies can make a session appear to bypass login even when it is reusing prior authentication.
If a clean browser can see DockDash without being authenticated, stop the Localtonet tunnel immediately. Check that the required OIDC variables are present in the running container, inspect DockDash logs, verify that the tunnel targets the intended service, and do not restart public access until the login boundary has been retested.
Creating a Localtonet tunnel does not start it. The public route is available only while the selected client is connected and the tunnel is running. Stop the tunnel when remote administration is not required, or delete it when the configuration should not be reused.
Update, back up, and operate the deployment
Routine administration should preserve the selected DockDash version, effective Compose configuration, OIDC registration, secrets recovery process, image identity, and persistent data. Avoid turning a release-pinned installation back into a mutable branch checkout during updates.
Routine Compose operations
docker compose ps
docker compose logs dockdash
docker compose logs -f dockdash
docker compose restart dockdash
docker compose stop dockdash
docker compose start dockdash
docker compose down
docker compose up -d
docker compose down removes the project containers and network but normally retains named volumes. Do not add --volumes unless you deliberately intend to remove persistent DockDash data and have already tested recovery.
Use a deliberate release update procedure
Before an update, read the DockDash release information and compare changes to the Compose file, authentication settings, volume arrangement, and Docker permissions. Then back up the persistent data and stop the Localtonet tunnel so an upgrade is not performed through an actively exposed administrative interface.
Replace vNEXT with a release tag that you have reviewed:
git fetch --tags
git diff v1.5.0..vNEXT -- docker-compose.yml
git checkout --detach vNEXT

docker compose config
docker compose pull
docker compose up -d
docker compose ps
docker compose logs dockdash
Verify DockDash locally, verify OIDC, and only then restart the Localtonet tunnel for another clean-browser test. Record the new Git commit, configured image reference, and running image ID.
For rollback, retain the previous release tag, its effective Compose configuration, and a compatible backup taken before the update. Check out the previous tag, restore the matching data only when necessary, recreate the service, and verify locally before restoring remote access. Application data written by a newer release may not always be compatible with an older release, so a tested pre-update backup is important.
Back up the named data volume
The reviewed DockDash documentation identifies the persistent mount at /app/data, but it does not publish a DockDash-specific supported backup and restore workflow. The procedure below is therefore a general cold archive of the Docker named volume, not an application-level backup guarantee. Review Docker's volume backup and restore guidance and test recovery on a non-production host.
First discover the actual runtime volume name instead of assuming that it is exactly dockdash-data. Compose may prefix the volume with the project name:
VOLUME_NAME="$(docker inspect dockdash --format '{{range .Mounts}}{{if eq .Destination "/app/data"}}{{.Name}}{{end}}{{end}}')"
printf '%s\n' "$VOLUME_NAME"
If the command returns an empty value, stop and inspect the container mounts. Do not run backup or restore commands against an unidentified volume.
For a consistent cold archive, stop DockDash, mount the volume read-only in a temporary helper container, and write the archive to a host directory:
mkdir -p backups
docker compose stop dockdash

docker run --rm \
  -v "${VOLUME_NAME}:/source:ro" \
  -v "$PWD/backups:/backup" \
  alpine:3.20 \
  sh -c 'cd /source && tar -czf /backup/dockdash-data.tar.gz .'

docker compose start dockdash
ls -lh backups/dockdash-data.tar.gz
Approve and pin helper images according to your own supply-chain policy. Copy the resulting archive to storage that is separate from the Docker host, protect it as potentially sensitive operational data, and apply an appropriate retention policy.
Test restoration without overwriting production first
The safest validation is to create a separate Docker volume on a test host, extract the archive into it, connect it to a compatible DockDash release, and verify that the application starts with the expected data. Avoid treating a successful archive command as proof of recovery.
If an authorized recovery requires restoring into the existing volume, stop DockDash first and preserve the current volume separately. The following operation removes the existing contents before extraction, so verify every variable and archive name:
docker compose stop dockdash

docker run --rm \
  -v "${VOLUME_NAME}:/target" \
  -v "$PWD/backups:/backup:ro" \
  alpine:3.20 \
  sh -c 'find /target -mindepth 1 -maxdepth 1 -exec rm -rf {} + && tar -xzf /backup/dockdash-data.tar.gz -C /target'

docker compose up -d
docker compose ps
docker compose logs dockdash
Verify the restored deployment locally and keep the Localtonet tunnel stopped until application state and OIDC behavior are confirmed. A DockDash volume backup does not back up the containers, databases, bind mounts, named volumes, Kubernetes workloads, or remote Docker hosts displayed in the dashboard. Those workloads still need their own backup procedures.
Keep the attack surface small
- Keep DockDash bound to loopback when the Localtonet client runs on the same host.
- Use identity-provider groups and policies that grant access only to administrators who need it.
- Protect the OIDC client secret, session secret, and Localtonet device token separately.
- Review access after personnel or role changes.
- Use a disposable workload when testing terminal, file-editing, and lifecycle controls.
- Stop the Localtonet tunnel when remote administration is not needed.
- Review DockDash, identity-provider, Docker, and Localtonet state after unexpected activity.
- Keep a record of the release tag, commit, image ID, Compose configuration, and backup date.
Troubleshoot each layer in order
Check the deployment from the inside out: Docker, DockDash, OIDC, Localtonet client, and tunnel. This avoids changing several layers at once and obscuring the original problem.
The Compose image cannot be pulled
Confirm that you checked out the intended release and that docker compose config resolves the image reference expected by that release. Check Docker daemon status, registry connectivity, and any required registry authentication. Do not add --build merely to work around an image pull failure unless the selected DockDash release explicitly documents a source-build workflow.
Port 3001 is already in use
Identify and stop or reconfigure the conflicting service. If you deliberately choose another host port, update the local verification commands and Localtonet target. The DockDash container port remains the value defined by the release's Compose service.
DockDash cannot discover or control containers
Verify that /var/run/docker.sock exists on the host, is mounted at the expected path in the container, and is accessible to the DockDash process. Review logs for permission errors. Do not make the socket globally writable as a shortcut.
Changes disappear after restart
Inspect the running container's mounts and confirm that /app/data is backed by the intended named volume. Confirm that you did not accidentally start a second Compose project with a different project name and therefore a different volume.
OIDC does not activate
All three required values must be present: OIDC_ISSUER, OIDC_CLIENT_ID, and OIDC_CLIENT_SECRET. Recreate the service after configuration changes and inspect startup logs. When checking effective configuration, redact secret values before sharing output.
The provider reports a redirect URI mismatch
Compare the callback sent in the authorization request with both the provider registration and OIDC_REDIRECT_URI. They must identify the same public HTTPS URI ending in /auth/callback. Do not substitute the local upstream, container name, or loopback address.
The callback URL does not respond
Confirm that the Localtonet client is connected and that the tunnel is running. The provider can return the browser to the public hostname only while that route is available. Also confirm that the hostname still matches the registered callback and that the tunnel targets the current DockDash listener.
Sessions disappear after every DockDash restart
Configure a stable, random SESSION_SECRET. When it is omitted, DockDash generates a new value per process, invalidating cookies signed by the previous process.
The public URL displays DockDash without login
Stop the tunnel immediately. Confirm that the running container has all required OIDC values, that DockDash was recreated after the settings changed, and that you are testing in a clean browser session. Do not reopen the tunnel until unauthenticated access reliably initiates the intended OIDC flow.
The public URL does not respond
Verify the layers in sequence:
- Confirm that
curl -I http://127.0.0.1:3001receives an HTTP response on the DockDash host. - Confirm that the Localtonet client runs on that host or can reach the configured target.
- Confirm that the intended Localtonet device is connected.
- Confirm that the HTTP tunnel target uses the correct local IP and port.
- Confirm that the tunnel has been started rather than only created.
Loopback works on the DockDash host but not from the Localtonet client
Determine where the client actually runs. If it runs in a container, 127.0.0.1 refers to that container. If it runs on another machine, loopback refers to that machine. Install the Localtonet client directly on the DockDash host when practical, or provide a restricted network-reachable listener protected by host firewall rules.
Login succeeds but the application behaves incorrectly afterward
Check DockDash logs, browser developer tools, and identity-provider logs while avoiding disclosure of authorization codes, tokens, cookies, client secrets, state, or nonce values. Confirm that the browser returns to the same public origin that initiated login and that no stale hostname remains in the provider registration or DockDash configuration.
Frequently asked questions
Does DockDash require authentication by default?
No. DockDash does not enforce authentication by default. Configure built-in OIDC or a fully authenticated reverse-proxy boundary before exposing it to an untrusted network.
Why does this guide use DockDash v1.5.0 instead of master?
A mutable branch can change between installations. The v1.5.0 tag and release commit f9c2e65 provide a reproducible repository baseline. You may use a newer release after reviewing it, but select an explicit tag and record the corresponding image identity.
Should I build DockDash from source?
The reviewed current Compose workflow is image-based and uses the image declared by the checked-out release. Although the repository contains a Dockerfile, that alone does not substantiate a separate supported production source-build procedure. Follow explicit source-build instructions only when the selected DockDash release provides them.
What address should Localtonet target?
When the Localtonet client runs directly on the DockDash host, target 127.0.0.1 and port 3001. If the client runs elsewhere, use a restricted network address that the client can reach and protect that listener with appropriate firewall rules.
What OIDC settings are required?
DockDash requires OIDC_ISSUER, OIDC_CLIENT_ID, and OIDC_CLIENT_SECRET. A stable SESSION_SECRET is recommended, and this public deployment should explicitly set OIDC_REDIRECT_URI to the Localtonet HTTPS callback.
Can I test the public OIDC callback while the tunnel is stopped?
No. The identity provider must return the browser to the public callback, so the Localtonet tunnel must be running for that end-to-end step. Configure OIDC first, start the tunnel for controlled verification, use a clean browser session, and stop the tunnel immediately if authentication is bypassed.
Does a Localtonet HTTP tunnel replace OIDC?
No. The tunnel provides a public route to the selected local HTTP target. DockDash and the identity provider remain responsible for authenticating users and controlling access to the administrative interface.
Does DockDash publish an official backup and restore workflow?
The reviewed documentation identifies persistent data at /app/data but does not provide a DockDash-specific supported backup and restore procedure. This guide therefore shows a general cold archive of the Docker volume. Test restoration with the matching DockDash release before relying on it for recovery.
Why is the Docker socket mount sensitive?
The socket lets DockDash communicate with the Docker daemon and enables discovery, logs, terminals, file operations, and container controls. Compromise of an application with daemon access can have serious consequences for the host and its workloads.
Will the public URL work if the Localtonet client stops?
No. The tunnel is available only while the selected Localtonet client is connected and the tunnel is running. Creating the tunnel configuration does not start it.
Connect your authenticated DockDash deployment
Pin and verify DockDash locally, register the exact public OIDC callback, and confirm that a clean browser must authenticate. Then use a Localtonet HTTP tunnel to reach the protected loopback service without opening an inbound router port.
Get Started Free →

