

Reach a wall-mounted Android kiosk remotely without opening an inbound router port
Kiosk Satellite includes an embedded Remote Administration service for managing a compatible Android kiosk from a browser. This tutorial installs and configures the kiosk first, verifies its administration interface over the local network, and then publishes that verified HTTP target through Localtonet. It also explains the public metadata exposed by the unauthenticated health endpoint, the behavior of Kiosk Satellite API tokens, and the separate failure points involved in remote access. The result is a controlled workflow in which the Android app, LAN route, Localtonet client, tunnel, and public login can each be tested independently.
📋 What's in this guide
How Kiosk Satellite remote access works
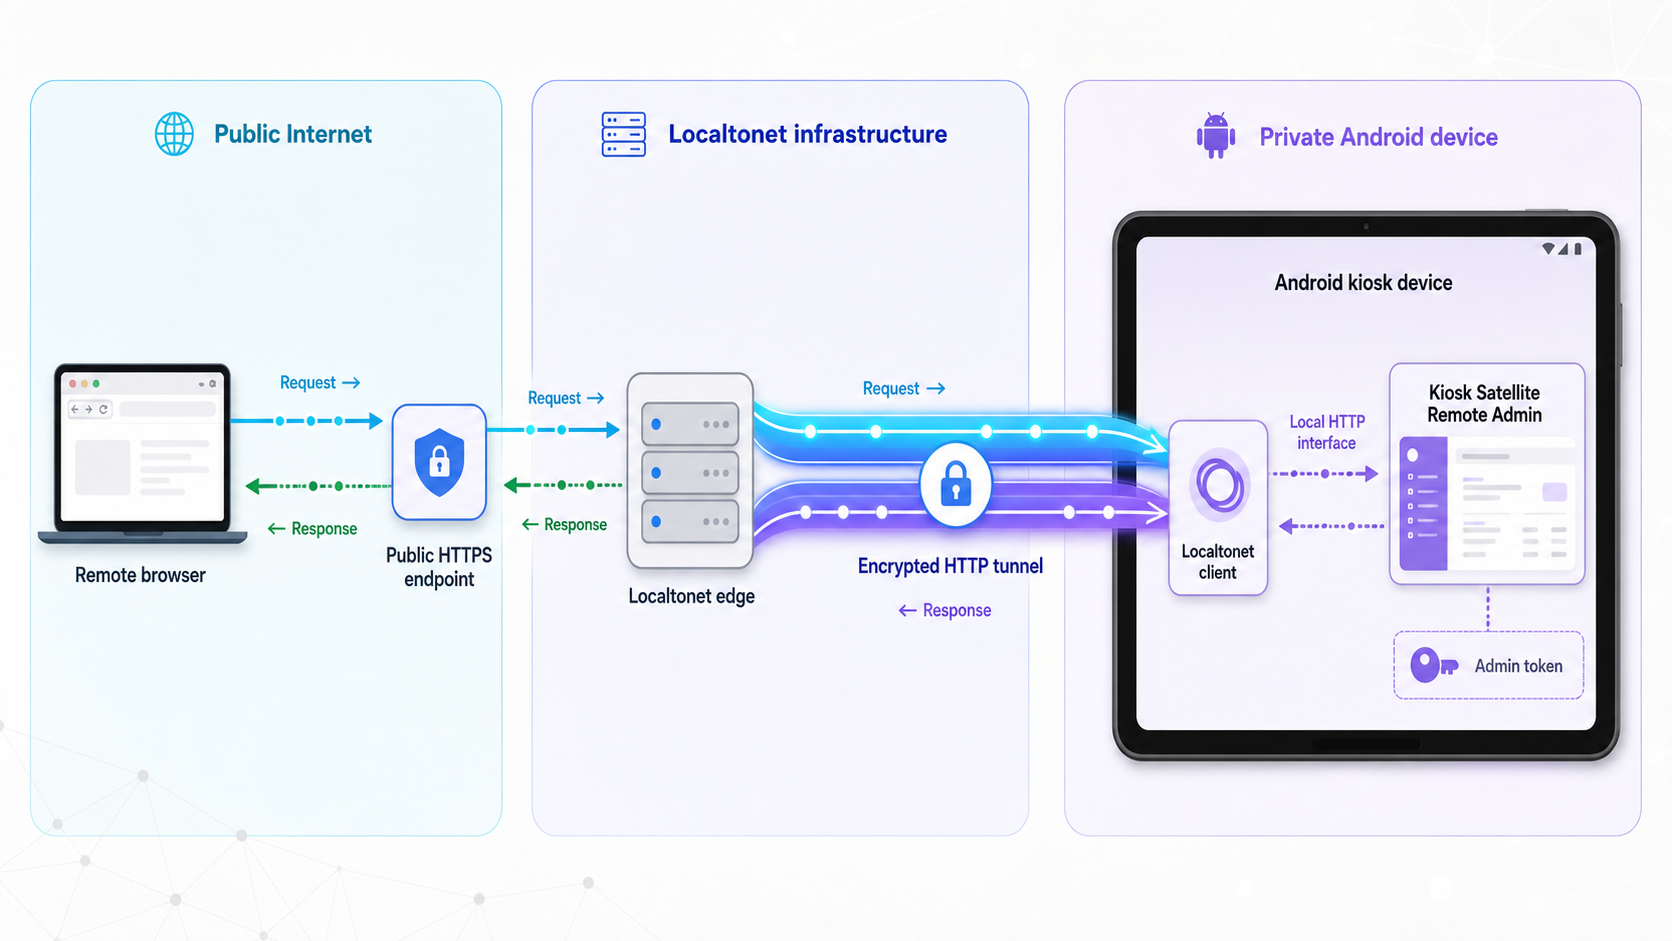
Kiosk Satellite is a free, open-source application designed to turn an Android device into a dedicated Home Assistant kiosk. Its documented capabilities include a five-step guided setup, dashboard selection, kiosk protections, screensavers, gestures, remote administration, and optional integration features. Device behavior can still vary with Android version, manufacturer restrictions, granted permissions, and the features selected during setup.
The part used in this tutorial is Kiosk Satellite's embedded Remote Administration HTTP server. Its documented default port is 2324, and the port can be changed. The root path serves a browser-based administration application. A REST API is available under /api/, a WebSocket is available at /api/ws, and a read-only health endpoint is available at /api/health.
Localtonet does not replace or configure that application service. Our client runs on a trusted device that can reach the tablet and establishes an outbound connection to a Localtonet relay server. An HTTP tunnel then maps a public HTTPS address to the tablet's private LAN address and Remote Admin port. The public tunnel is available only while the selected Localtonet client is connected and the tunnel is running.
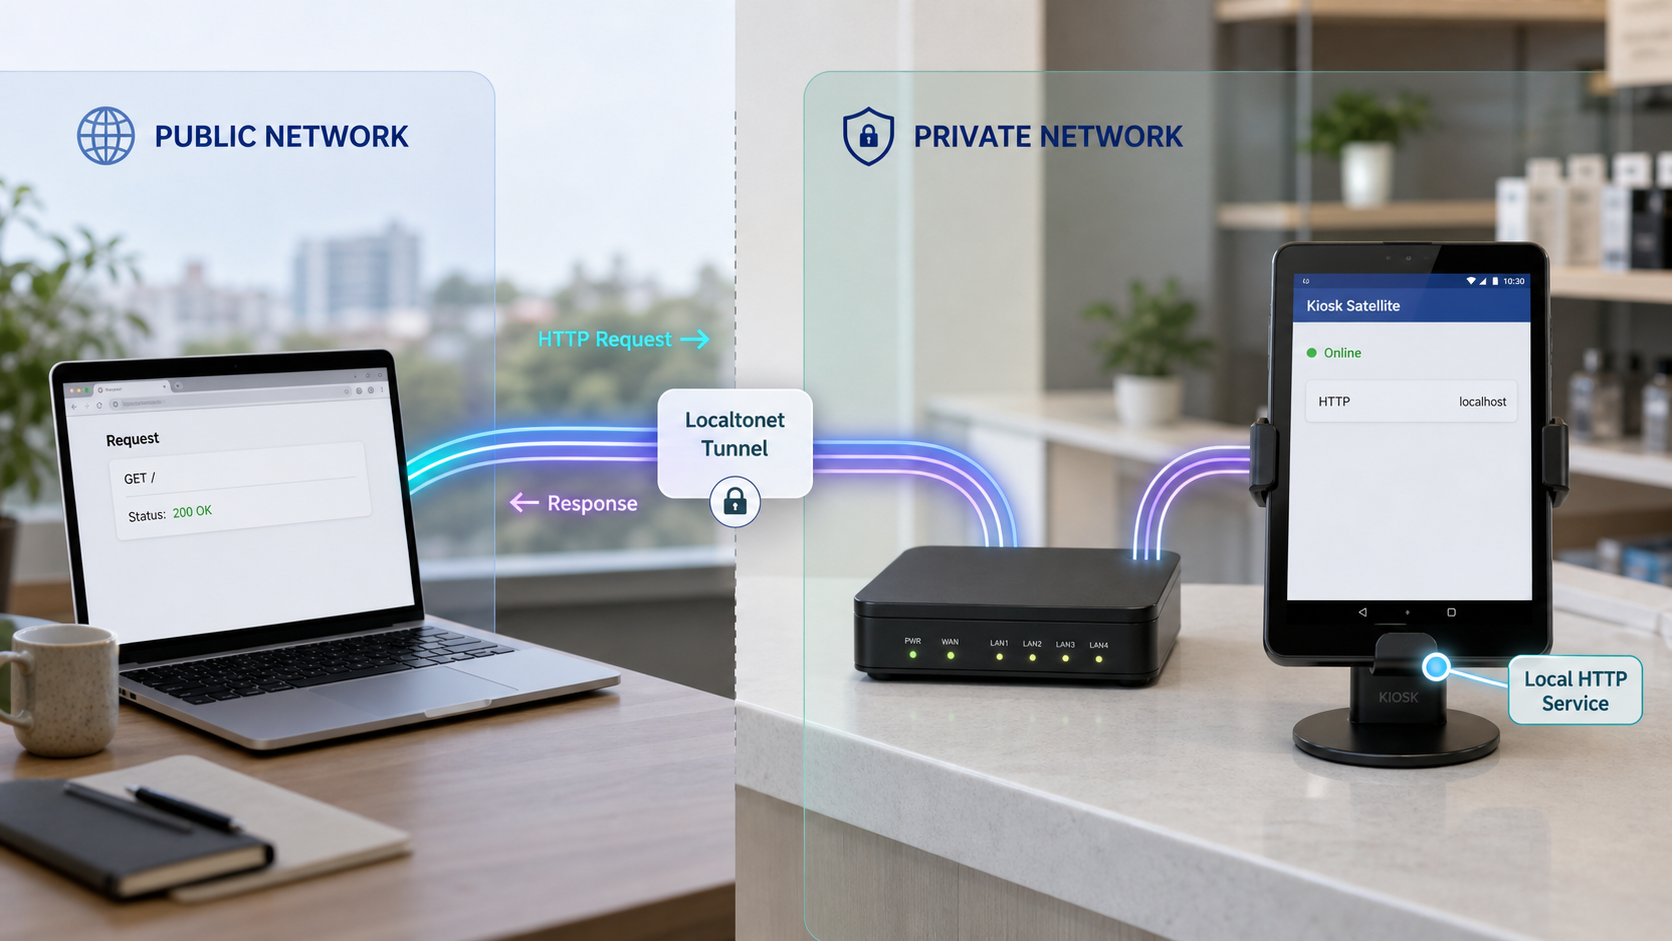
This architecture creates several distinct dependencies. Kiosk Satellite must be running and its server must have started. The Localtonet client device must be able to route to the tablet's current LAN address. The client must remain connected to our relay, and the tunnel must be started. Finally, the user must authenticate successfully to Kiosk Satellite. Testing these layers in order makes failures much easier to isolate.
Installation and network prerequisites
Prepare the kiosk and its local network before configuring public connectivity. The evidenced Android requirement is Android 7.0 or newer. Android vendors can customize installation controls, background execution, power management, screen pinning, and other kiosk-related behavior, so compatibility with every tablet model is not guaranteed by the minimum operating-system version alone.
You also need a Home Assistant instance that the Android device can reach from its current network and the credentials required by Kiosk Satellite's setup process. The current project describes a guided five-step wizard that connects to Home Assistant, selects a dashboard, detects optional Voice Satellite functionality, and requests permissions based on the features selected. Any Home Assistant long-lived access token used during setup is a credential and must not appear in screenshots, tunnel labels, shared notes, issue reports, or public URLs.
For the installation itself, use the project's current Kiosk Satellite releases page. Release filenames and requirements can change, so select the APK attached to the release you have reviewed instead of copying a package filename from an older tutorial. At the time represented by the supplied project evidence, the specifically reviewed release is Kiosk Satellite 2026.8.79. Check the current releases page before installation because a newer release may exist.
The Android device must allow installation from the source used to open the APK. Android presents this permission differently across versions and manufacturers. Follow the device's own installation prompt and limit the permission to the necessary browser or file manager. If your device-management policy requires it, remove that permission after installation.
Plan where the Localtonet client will run. It must be installed on a supported, trusted device that can open the tablet's Remote Admin address over the LAN. A desktop, small server, or another continuously available machine on the same routed network can fill this role. Do not assume that a client exists for the tablet itself. Confirm currently available Localtonet client platforms through the current dashboard and documentation.
Complete the Kiosk Satellite installation, confirm the Home Assistant dashboard, enable Remote Administration, and test it from a second LAN device before creating the tunnel. A Localtonet tunnel cannot repair an incorrect Home Assistant URL, a stopped Kiosk Satellite server, an unreachable tablet address, or a blocked LAN route.
Information to record securely
Record the installed Kiosk Satellite version, the tablet's current LAN address, the configured Remote Admin port, the device that will run our client, and the person responsible for updates. Keep passwords and tokens in an approved credential store rather than in the same operational note. This distinction makes the non-secret network configuration available to operators without unnecessarily distributing credentials.
Install and configure Kiosk Satellite on Android
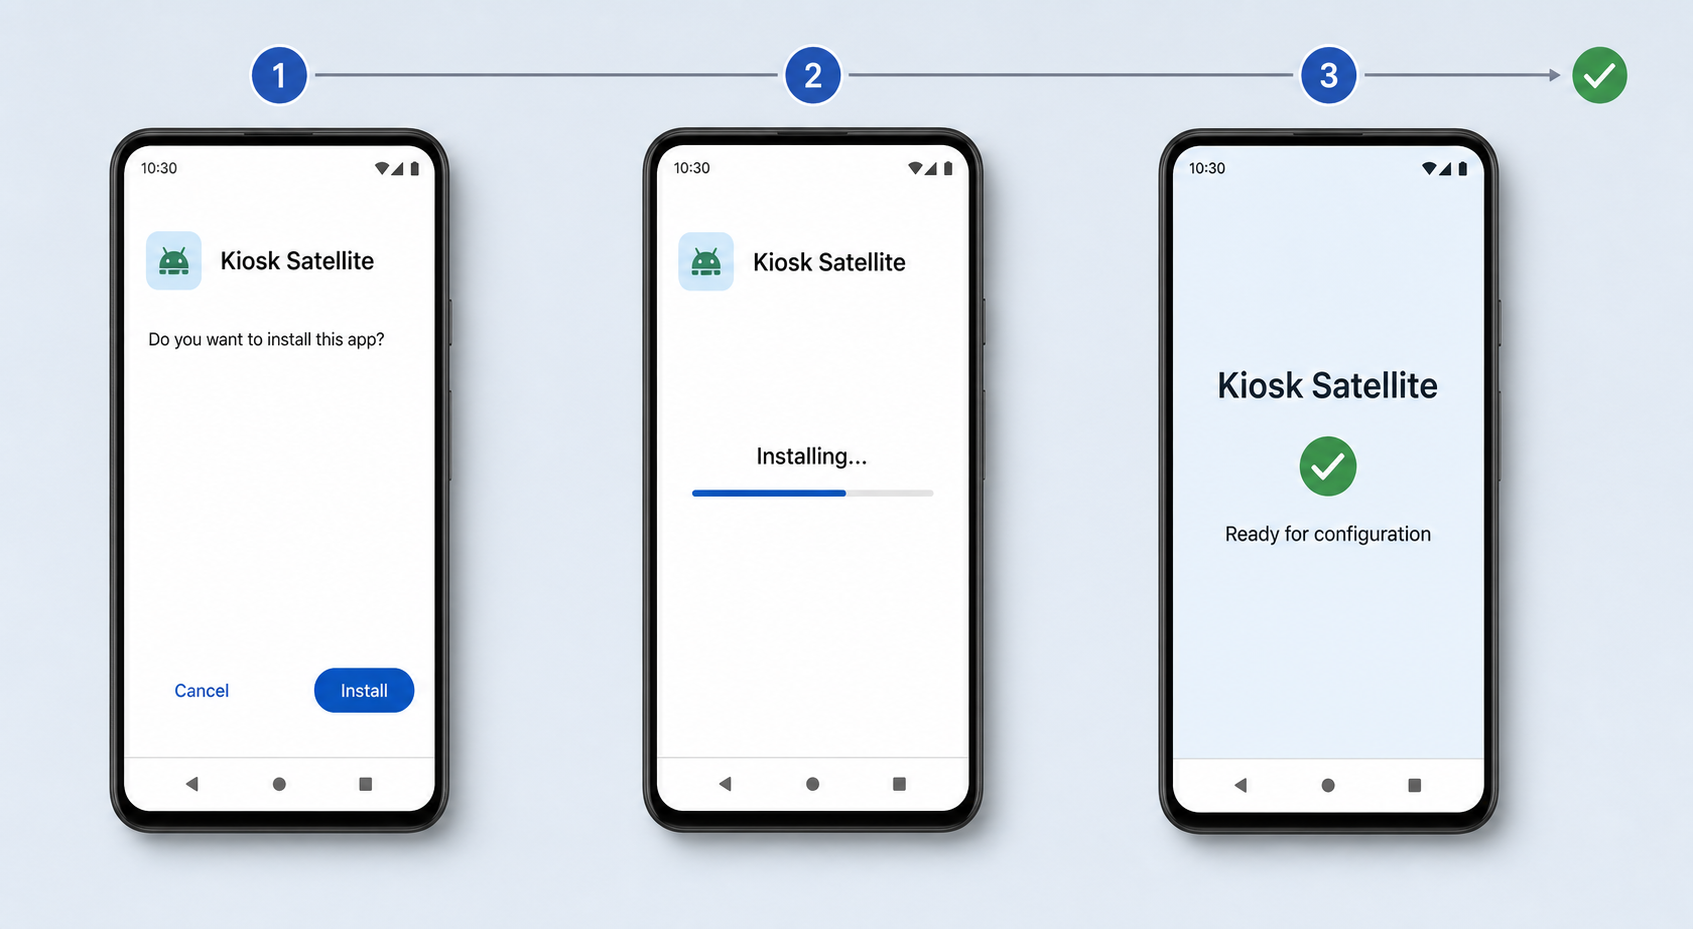
Review the project and current release
Open the official repository and its releases page. Review the current release notes, choose the version you intend to deploy, and download its APK from the official release assets. Record the selected version so later troubleshooting and updates have a known starting point.
Place the APK on the Android device
Download the file directly on the tablet or transfer the official APK using a method allowed by your environment. Before opening it, confirm that the file came from the intended Kiosk Satellite release rather than from an unrelated download mirror.
Permit installation from the selected source
If Android blocks the package, allow installation for the browser, file manager, or other source that opened the APK. The exact setting name varies by Android release and device vendor. Restrict the permission to that source and remove it afterward when required by policy.
Install and launch the application
Complete the Android package installation and open Kiosk Satellite. Review permission prompts in relation to the capabilities you plan to use. Do not grant unrelated permissions merely because the device is intended to operate as a kiosk.
Complete the five-step setup wizard
Follow the project's guided wizard to connect to the reachable Home Assistant instance, provide the required credential, choose the intended dashboard, review optional integration choices, and grant only the Android permissions required by those choices. The wizard also provides an optional Remote Admin password field.
After the wizard finishes, verify that the expected Home Assistant dashboard loads on the tablet. Test normal navigation, any intended kiosk exit control, and the features necessary for this installation. The project's Kiosk Mode and Lockdown Mode documentation explains the distinction between persistent kiosk protections and the temporary interaction-blocking lockdown control.
Android remains the final authority over some system controls. The project's kiosk documentation notes, for example, that an ordinary application cannot intercept every physical control in every situation. Evaluate the required level of physical lockdown against the deployment and follow the project's documented device-owner guidance if the kiosk must resist deliberate local escape attempts.
Kiosk Satellite documents optional integrations and a broad set of kiosk features, but this tutorial does not assume that every Android device, Home Assistant deployment, or optional integration has identical behavior. First establish a working dashboard and only then enable the features required for your installation.
Enable and verify Remote Administration locally
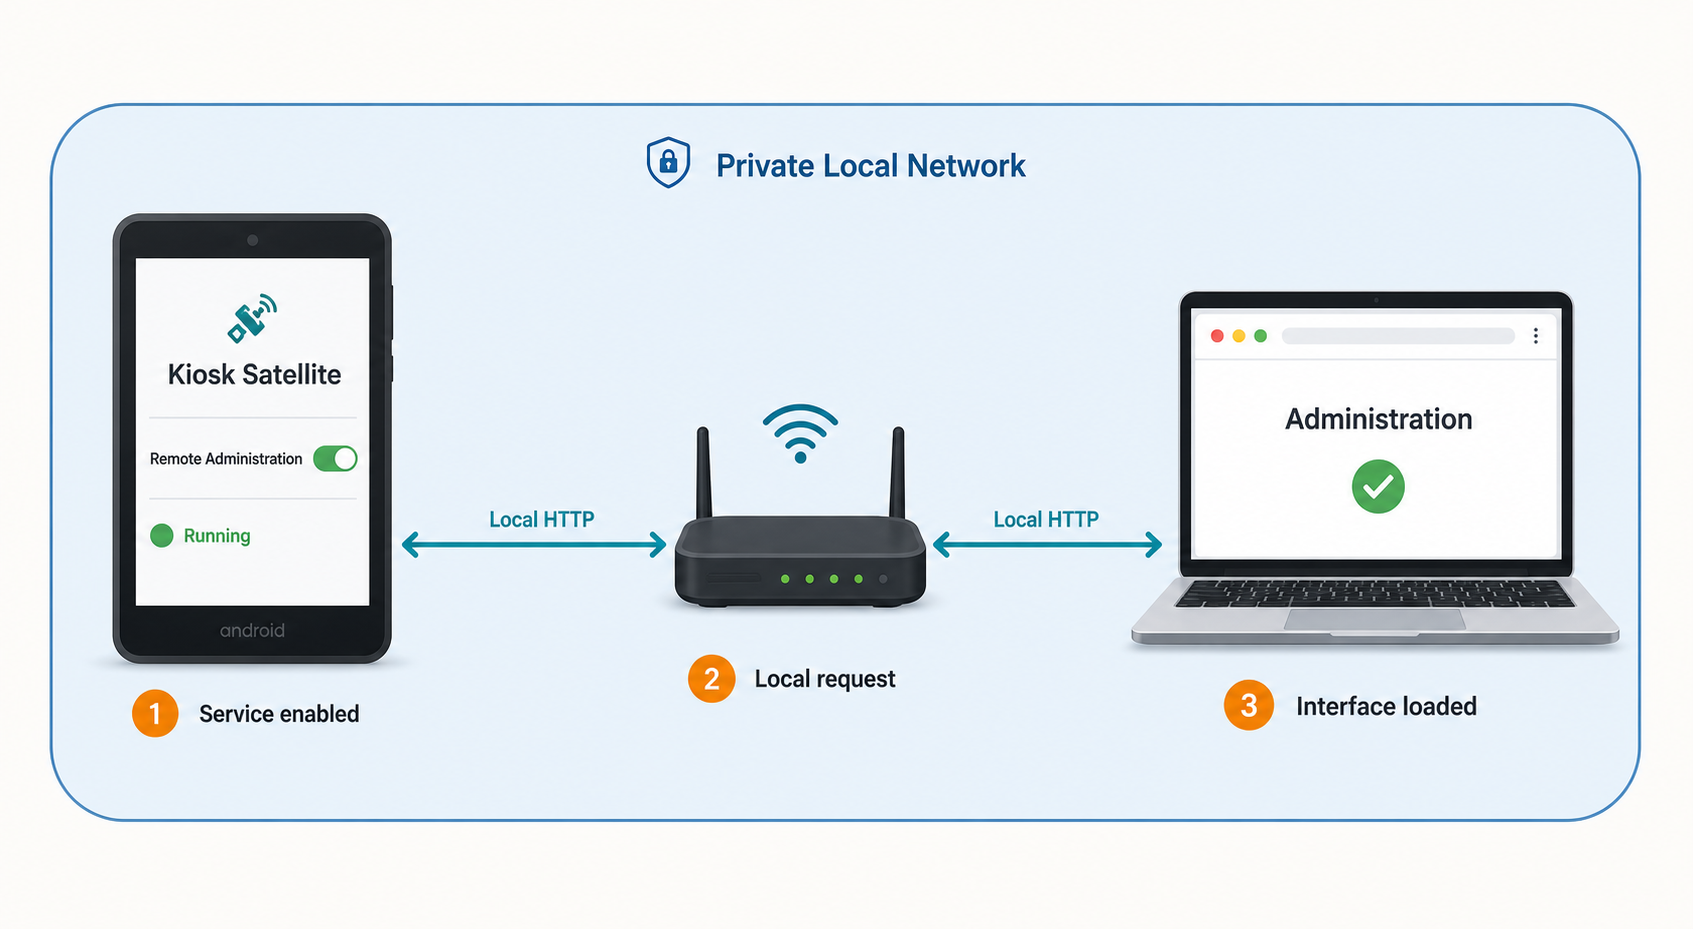
According to the current Kiosk Satellite Remote Management API documentation, the embedded server starts only when remote.enabled is on and remote.password has been set. Turning on the feature without a password is not enough.
You can supply the password through the setup wizard. On an already configured Android device, swipe from the left edge, open Settings, select Device, and then open Remote Administration. Enable the service, set a unique administration password, and confirm the configured port. The documented default is 2324.
Use a password that is not reused for Home Assistant, Localtonet, email, or another kiosk. The Remote Admin interface can change settings, display screenshots, expose logs, operate commands, transfer files when supported and permitted, and export configuration. It should be treated as an administrative origin, not as a read-only public dashboard.
Find the tablet's current LAN address
Obtain the tablet's current IP address from Android's network information or from an authorized network-management interface. Do not assume that the address remains unchanged after a reboot, Wi-Fi reconnection, lease renewal, or movement to another network. If the address changes, the Localtonet tunnel target must be updated unless your network provides a stable assignment.
Test the root administration page from a second device
From a browser on another device connected to the same routed network, open:
http://<device-ip>:2324
Replace <device-ip> with the tablet's actual LAN address. If you changed the port in Kiosk Satellite, replace 2324 as well. Do not enter the Localtonet client device's address here. The HTTP target is the tablet running the embedded Kiosk Satellite service.
Confirm that the login page appears, sign in with the Remote Admin password, and inspect a low-risk function such as device information, the current screen image, or recent logs. Reload the page once to confirm that access is stable rather than the result of a stale browser response.
Check the local health endpoint deliberately
Open the following local address in a private browser context or use an appropriate HTTP inspection tool:
http://<device-ip>:2324/api/healthThe project documents this endpoint as unauthenticated. If it returns health data without a login, that behavior is expected. This local test also demonstrates what will become publicly reachable if the root Kiosk Satellite origin is published through an unrestricted HTTP tunnel.
If the root page cannot be opened from a second LAN device, stop before configuring Localtonet. Check the Kiosk Satellite process, Remote Administration switch, password, tablet address, configured port, Wi-Fi connection, client isolation, VLAN rules, and other local routing controls.
Understand the administration surface and token behavior
Publishing the Remote Admin root origin publishes every path served by that origin, not only the visual login page. This includes the REST namespace, WebSocket endpoint, and unauthenticated health endpoint. Authentication still protects the documented administration functions that require it, but the health endpoint is intentionally an exception.
| Interface | Documented location | Authentication and purpose |
|---|---|---|
| Remote Admin application | / |
Browser-based administration interface using the device's Remote Admin authentication. |
| Login endpoint | /api/login |
Accepts the Remote Admin password and returns a signed API token. Failed logins are rate-limited per client IP with exponential backoff. |
| REST API | /api/ |
Bearer-token access to device information, settings, commands, screenshots, logs, console data, files, and configuration functions. |
| Live WebSocket | /api/ws |
Uses a token in the query parameter and carries live state, events, and log tailing. |
| Health endpoint | /api/health |
Requires no token and returns read-only hardware and uptime information for monitoring. |
What the unauthenticated health endpoint reveals
The documented health response can include device identity, addresses, battery information, screen state, RAM, storage, CPU usage and temperature, application uptime, and network uptime. Battery information can be null on a device without a battery, and network uptime is null while offline. Although this endpoint is read-only, publishing it creates public metadata exposure.
/api/health
Kiosk Satellite intentionally leaves this endpoint unauthenticated so an external monitor can poll it without performing a login. A standard HTTP tunnel to the Remote Admin origin does not hide that path. Decide whether the disclosed identity, address, hardware, power, screen, and uptime information is acceptable before making the tunnel available.
Seven-day and long-lived API tokens
A successful POST /api/login returns an HMAC-signed, stateless bearer token. The documented default token lifetime is seven days, and the persisted signing secret allows a session to survive an application or kiosk restart. Automations can request a different lifetime with ttl_days. The project clamps that requested lifetime to a maximum of 3,650 days, or ten years.
The WebSocket authenticates by receiving its token through the token query parameter. Avoid placing authenticated WebSocket URLs in logs, screenshots, analytics systems, shared browser histories, or support messages because the query string contains the credential.
The API tokens are stateless. A token already issued remains usable until its expiration even after the Remote Admin password changes. Treat every token as a password, especially a token requested for long-lived automation. If a token may have been exposed, changing only the password is not an immediate token-revocation mechanism.
Backups contain secrets
The full backup endpoint exports every setting, including secrets, together with the page's local storage. The documented restore behavior can also adopt the original device identity. When restoring the same kiosk, that identity behavior may be intentional. When provisioning a separate device from an existing export, consult the API documentation for the adoptIdentity and importLocalStorage controls so two devices do not unintentionally share identity-related configuration.
Configure the Localtonet HTTP tunnel
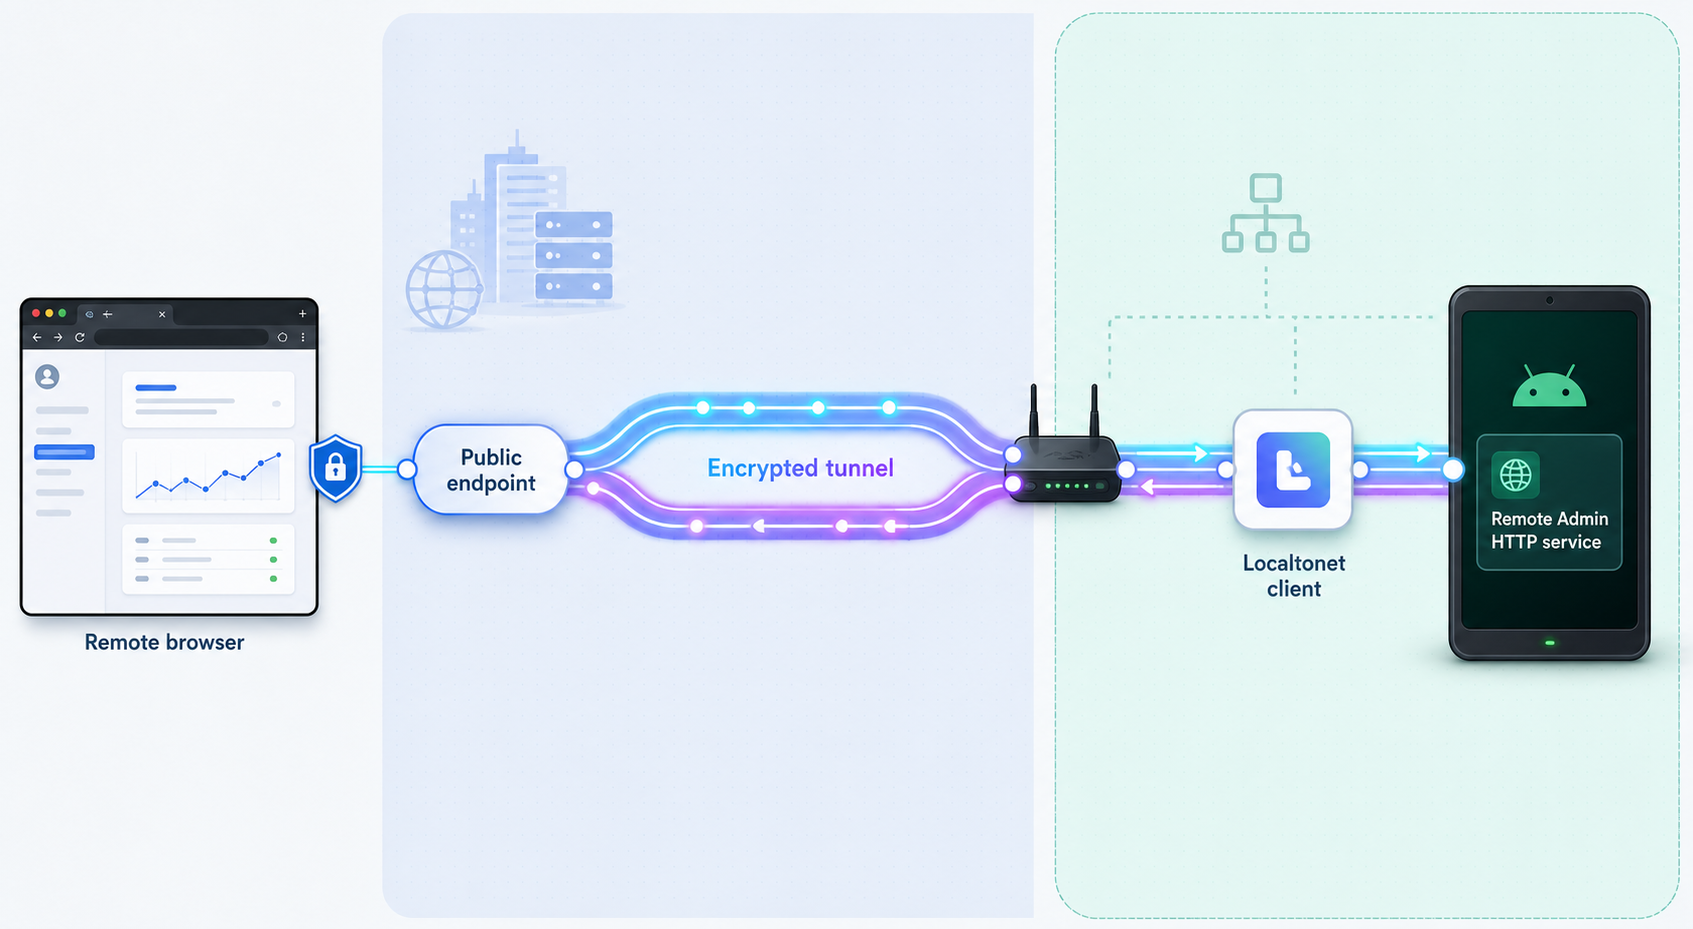
Localtonet exposes the verified HTTP service without requiring inbound router port forwarding, firewall changes, a public IP address, or VPN setup. Our client initiates the connection to a Localtonet relay. The selected client must remain connected, and the tunnel must remain started, for the public address to work.
Use the current Localtonet HTTP tunnel documentation for the current client and dashboard interface. The documented workflow is to install and run the Localtonet client for your operating system, select the device through its device-specific authentication token, select an available server, create the HTTP target, and press Start. Available client packages, servers, regions, and process options can vary, so use the values currently offered by the product instead of copying a server code or installer command from an older article.
Install the current Localtonet client
Follow the client installation path presented in the current Localtonet documentation or dashboard for the operating system of the trusted device that will run the tunnel. Run the client on a machine that can already open http://<device-ip>:2324, using the actual configured address and port. Do not invent or reuse an old installation command when the current interface provides a different package.
Connect the device with its authentication token
Authenticate the client using the device-specific token issued for that client. Confirm in the current dashboard that the intended device is connected. Keep the token out of screenshots, shell history shared with others, public issue reports, and kiosk configuration fields.
Open the HTTP tunnel configuration
Create an HTTP tunnel rather than a raw UDP, proxy, File Server, or VPN configuration. Remote Admin is an HTTP application with browser, REST, and WebSocket traffic, so its local target is an IP address and port reachable from the selected Localtonet client.
Choose the process type
Select the currently available HTTP process type appropriate for the public address you intend to use. HTTP tunnels may use a random subdomain, a custom subdomain, or a custom domain where supported. All serve the target at a public HTTPS address. Check current documentation before configuring a custom domain because exact DNS requirements are time-sensitive.
Select the device and relay server
Select the connected authentication token for the device running our client, then choose an available relay server or region from the current product interface. Do not hardcode a server code from another deployment because availability can vary.
Enter the tablet as the HTTP target
Enter the Kiosk Satellite tablet's verified LAN IP address as the target IP and its configured Remote Admin port as the target port. Use 2324 only if the application still uses that default. The target is not the public Localtonet address, the Home Assistant server, or necessarily the machine running our client.
Create and start the tunnel
Save or create the tunnel using the current interface, then press Start. Creation alone does not make a tunnel run. Confirm that the tunnel shows a running state and that the product has assigned the expected public HTTPS address before attempting external access.
The Localtonet device token identifies the client that runs the tunnel. The Kiosk Satellite password and API tokens authorize administration of the kiosk. These credentials have different purposes and must never be copied into one another's fields or exposed in screenshots.
Verify the tunnel and public endpoint separately
External verification should prove two different things: first, that the Localtonet tunnel is running; second, that the public address reaches Kiosk Satellite and preserves its authentication behavior. Do not treat the presence of a saved tunnel configuration as proof that either condition is true.
Confirm Localtonet state
- Verify that the Localtonet client process is running on the selected device.
- Confirm that the device token appears connected in the current dashboard.
- Confirm that the intended HTTP tunnel is started rather than merely created.
- Copy the assigned public HTTPS address without adding the local port.
Test from outside the kiosk LAN
Use a device on a genuinely separate network, such as a mobile connection with Wi-Fi disabled. Open the assigned public HTTPS address in a private browsing window. The Kiosk Satellite login interface should appear. Authenticate using the Remote Admin password and confirm a low-risk function such as device information or the current screenshot.
Reload the public page and observe whether live controls or state continue to update. Remote Admin uses /api/ws for live state, events, and log tailing. A page that loads but never updates can indicate a WebSocket-specific problem rather than a complete HTTP tunnel failure.
Verify the public metadata decision
While still on the external network, append /api/health to the public origin:
https://<assigned-public-host>/api/healthDo not include a real private hostname in documentation or screenshots. If health information is returned without authentication, that confirms the documented behavior and the metadata exposure created by publishing the origin. If that exposure is unacceptable, stop the tunnel while you reconsider the architecture or access policy.
Test stopping and restarting
Stop the tunnel from the dashboard and verify that the public address no longer reaches the kiosk. Start it again and confirm that access returns. This controlled test verifies the operational switch administrators will use during maintenance or an incident.
The tunnel works only while the selected Localtonet client is connected and the specific tunnel is running. A running Kiosk Satellite server does not compensate for a disconnected client, and a connected client does not compensate for a stopped tunnel.
Troubleshoot each layer independently
Kiosk Satellite server does not start
Confirm that the application is running, Remote Administration is enabled, and a Remote Admin password is set. The current project documentation requires both remote.enabled and remote.password. Check the configured port rather than assuming it is still 2324. Review on-device Kiosk Satellite logs where available, and restart the application in a controlled manner after saving necessary work.
If the Home Assistant dashboard also fails on the tablet, solve the application, credential, or Home Assistant reachability problem first. The embedded Remote Admin service and the dashboard are related parts of the same deployment, but a tunnel cannot correct an invalid Home Assistant configuration.
The server works on the tablet but not from another LAN device
Recheck the tablet's current IP address and verify that both devices are on networks allowed to communicate. Guest Wi-Fi and some wireless networks isolate clients from one another. Separate VLANs may require an explicit route and permitted firewall policy. Confirm that you are connecting to the tablet rather than the Localtonet client machine.
If the address changed after a reboot or lease renewal, update your test URL. A stable DHCP reservation or another network-managed assignment can reduce these changes, but the exact method belongs to your router or network platform and is outside Kiosk Satellite and Localtonet configuration.
Local access works from one machine but not the Localtonet client device
Perform the local browser test from the exact machine running our client. A successful test from a laptop does not prove that a server, container host, or machine on another VLAN has the same route. Check the client's host firewall, network interface, routing table, DNS assumptions if a hostname is used, and access policy between that host and the tablet.
The Localtonet device is disconnected
Confirm that the Localtonet client process is running and authenticated with the intended device-specific token. Check whether the host is online and can make outbound connections. If the wrong token was used, the dashboard may show a different device than the one expected. Never post the token while requesting support.
The tunnel exists but the public address is unavailable
Check whether the tunnel was actually started. Creating a tunnel does not start it. Confirm that the selected client remains connected, the tunnel shows a running state, and you are using the public address assigned to that tunnel. If the tablet's IP address or Remote Admin port changed, edit the local target to match the currently verified values.
The public page returns a gateway or target error
Return to the Localtonet client machine and open the tablet's local Remote Admin address. If that local request now fails, the problem is between the client machine and the tablet. If it succeeds, compare the working address and port with the HTTP target entered in the tunnel. Look for a mistyped address, old DHCP lease, incorrect port, or selection of the wrong tunnel or client.
The login page appears but authentication fails
This result proves that public HTTP routing reaches Kiosk Satellite. Focus on application authentication rather than the tunnel target. Confirm the current Remote Admin password locally, watch for keyboard-layout or autofill mistakes, and remember that failed login attempts are rate-limited with exponential backoff per client IP. Wait for the backoff rather than repeatedly retrying.
Changing the password does not invalidate existing stateless API tokens. Conversely, an old password will no longer create a new token after the password changes. Distinguish a browser password failure from an automation that is still presenting a previously issued bearer token.
The page loads but live state or logs do not update
The initial page and REST requests can succeed even if the WebSocket at /api/ws is not functioning correctly. Reload the page, sign in again, and inspect browser diagnostics for a failed WebSocket connection without sharing token-bearing URLs. Test locally and publicly to determine whether the failure appears before or after the tunnel.
Because WebSocket authentication uses a token query parameter, expired or malformed tokens can affect live functionality. A newly authenticated browser session can help distinguish token expiration from network transport. Do not paste the WebSocket URL into public troubleshooting material because its query string can contain the token.
The public root works but /api/health behaves differently
Verify the exact path and ensure no browser extension, cache, or unrelated intermediary is changing the request. The project documents GET /api/health as the one unauthenticated API endpoint. If you introduce additional access-control infrastructure outside the scope of this tutorial, its policy can alter the observed result.
Routine operation, updates, backups, and incident response
Monitor the tablet address and target port
A changing tablet LAN address is one of the most common operational causes of target failure. After a tablet reboot, Wi-Fi change, DHCP renewal, or network migration, verify the address from an authorized source and repeat the local browser test from the Localtonet client machine. Update the tunnel target when the address or Remote Admin port changes.
Keep the required processes available
Remote access depends on Kiosk Satellite, the tablet's network connection, the machine running our client, the Localtonet client process, its outbound relay connection, and the running tunnel. If continuous access is required, operate the client on a suitably managed device and account for operating-system updates, sleep behavior, power loss, and network maintenance. This article does not claim an uptime guarantee for any component.
Stop or delete access deliberately
Use Stop when remote administration should be temporarily unavailable but the configuration will be reused. Delete the tunnel when the public mapping is no longer required. Stopping or deleting the tunnel removes that Localtonet access path, but it does not disable Kiosk Satellite's LAN server. Disable Remote Administration on the tablet as well if local administration should also stop.
Update Kiosk Satellite carefully
Review the official releases page before updating and record the version being replaced. Read the release notes for relevant fixes and behavior changes, then schedule the update for a period when local recovery is possible. After updating, verify the dashboard on the tablet, confirm the Remote Admin settings and port, repeat the LAN test, and finally retest the public tunnel.
Do not assume that every release preserves every setting or operational behavior without review. Keep a protected backup when appropriate, but remember that the full backup includes secrets and local storage. An update package and a configuration backup solve different recovery problems and should not be treated as interchangeable.
Back up and restore safely
Store exported configuration in an access-controlled location with a retention policy appropriate for credentials. Do not upload an unreviewed backup to a public repository or issue tracker. When replacing the original tablet, identity adoption may be desired. When cloning a separate tablet, review the documented import controls so it retains its own identity and optional Voice Satellite selection.
Respond to a Remote Admin password exposure
Change the Remote Admin password, review available logs and recent administrative behavior, and consider stopping the Localtonet tunnel during investigation. Remember that the password change does not revoke bearer tokens already issued. The project evidence supplied for this article does not document an individual token-revocation list, so do not claim that a password reset alone ends every existing session.
Respond to an API token exposure
Treat the incident according to the token's possible lifetime. A normal token can remain valid for seven days, while a requested long-lived token can be valid for as many as 3,650 days. Stop the public tunnel if immediate containment is necessary, inspect the device and logs, protect or replace affected configuration, and consult current Kiosk Satellite documentation for any newly available revocation or signing-secret reset procedure before taking destructive action.
Respond to a Localtonet device-token exposure
Treat the device token as compromised authentication material. Stop affected tunnels where possible, remove the token from public locations, and use the current Localtonet dashboard and support process to replace or retire the affected device credential. Do not confuse this response with changing the Kiosk Satellite password. The two credentials protect different layers.
Respond to a backup exposure
Assume that settings, secrets, and page local storage contained in the backup may be compromised. Identify the credentials represented in that specific export and rotate them through their owning systems. Depending on the configuration, this can involve Kiosk Satellite, Home Assistant, or optional integrations. Avoid asserting that deleting the backup from one location invalidates credentials already copied elsewhere.
Security checklist for an exposed kiosk
/api/health response and its documented hardware and uptime facts.
A public HTTPS address protects transport to the Localtonet tunnel edge, but it does not make a weak application password safe or reduce the authority of a stolen bearer token. Apply least privilege, minimize exposure duration, and avoid collecting credentials in screenshots or diagnostic bundles.
Frequently asked questions
What Android version does Kiosk Satellite require?
The evidenced minimum is Android 7.0 or newer. Manufacturer-specific permission, background-operation, rendering, and kiosk-control behavior can still affect compatibility.
What is the default Remote Admin address?
The documented default is http://<device-ip>:2324. Replace the placeholder with the tablet's current LAN address and use the actual configured port if it has been changed.
Why does Remote Admin not start after I enable it?
The server starts only when Remote Administration is enabled and a Remote Admin password is set. Verify both conditions, the configured port, and the application state.
Does Localtonet require router port forwarding?
No. Our client establishes an outbound connection to a Localtonet relay server. The tunnel provides a public address without inbound router port forwarding, firewall changes, VPN setup, or a public IP address.
Is a Localtonet tunnel running as soon as I create it?
No. Creating a tunnel does not start it. Press Start and confirm the running state. The public address remains available only while the selected client is connected and the tunnel is running.
Is every Kiosk Satellite API endpoint protected by the password?
No. The project documents GET /api/health as the one unauthenticated endpoint. It returns read-only device hardware and uptime information. Publishing the Remote Admin origin also makes that path publicly reachable.
How long does a Kiosk Satellite API token remain valid?
The default documented lifetime is seven days. An automation can request a longer lifetime using ttl_days, capped at 3,650 days. Use long-lived tokens only when their operational need and storage controls justify the additional risk.
Does changing the Remote Admin password revoke existing API tokens?
No. The tokens are stateless and remain valid until they expire. If a token may have been exposed, do not rely on a password change alone for immediate containment.
What happens if the tablet's LAN address changes?
The old tunnel target will no longer reach the tablet. Verify the new address from the Localtonet client machine and update the HTTP tunnel target. A network-managed stable address can reduce these changes.
Why does the page load while live status and logs fail?
The page and REST requests can work while the authenticated WebSocket at /api/ws fails. Compare local and public behavior, create a fresh authenticated session, and inspect browser diagnostics without exposing the token-bearing WebSocket URL.
Connect your verified kiosk with Localtonet
After Kiosk Satellite, its Remote Admin server, and the LAN route all work from the device running our client, create and start an HTTP tunnel to reach the administration interface remotely without opening an inbound router port.
Get Started Free →

