

Run MiroTalk SFU, validate its separate application and media paths, then publish the web interface through Localtonet
MiroTalk SFU is an open-source WebRTC conferencing platform built around a mediasoup Selective Forwarding Unit. This guide covers two alternative installation paths, Node.js 22.x or Docker Compose, and places configuration before the first application start as required by the current MiroTalk self-hosting workflow. After local verification, we use a Localtonet HTTP tunnel to publish the web and signaling endpoint on port 3010 through a public HTTPS address. The tunnel does not automatically publish the separate mediasoup WebRTC media plane, so the announced address, media ports, NAT behavior, and external media tests remain essential.
📋 What's in this guide
What Localtonet publishes in this architecture
MiroTalk SFU provides browser-based rooms for real-time video, audio, screen sharing, chat, file sharing, whiteboarding, recording, and related collaboration features. Its mediasoup SFU receives participant media and selectively forwards streams to other participants. That architecture has more than one network path, so publishing the application cannot be treated like exposing a simple static website.
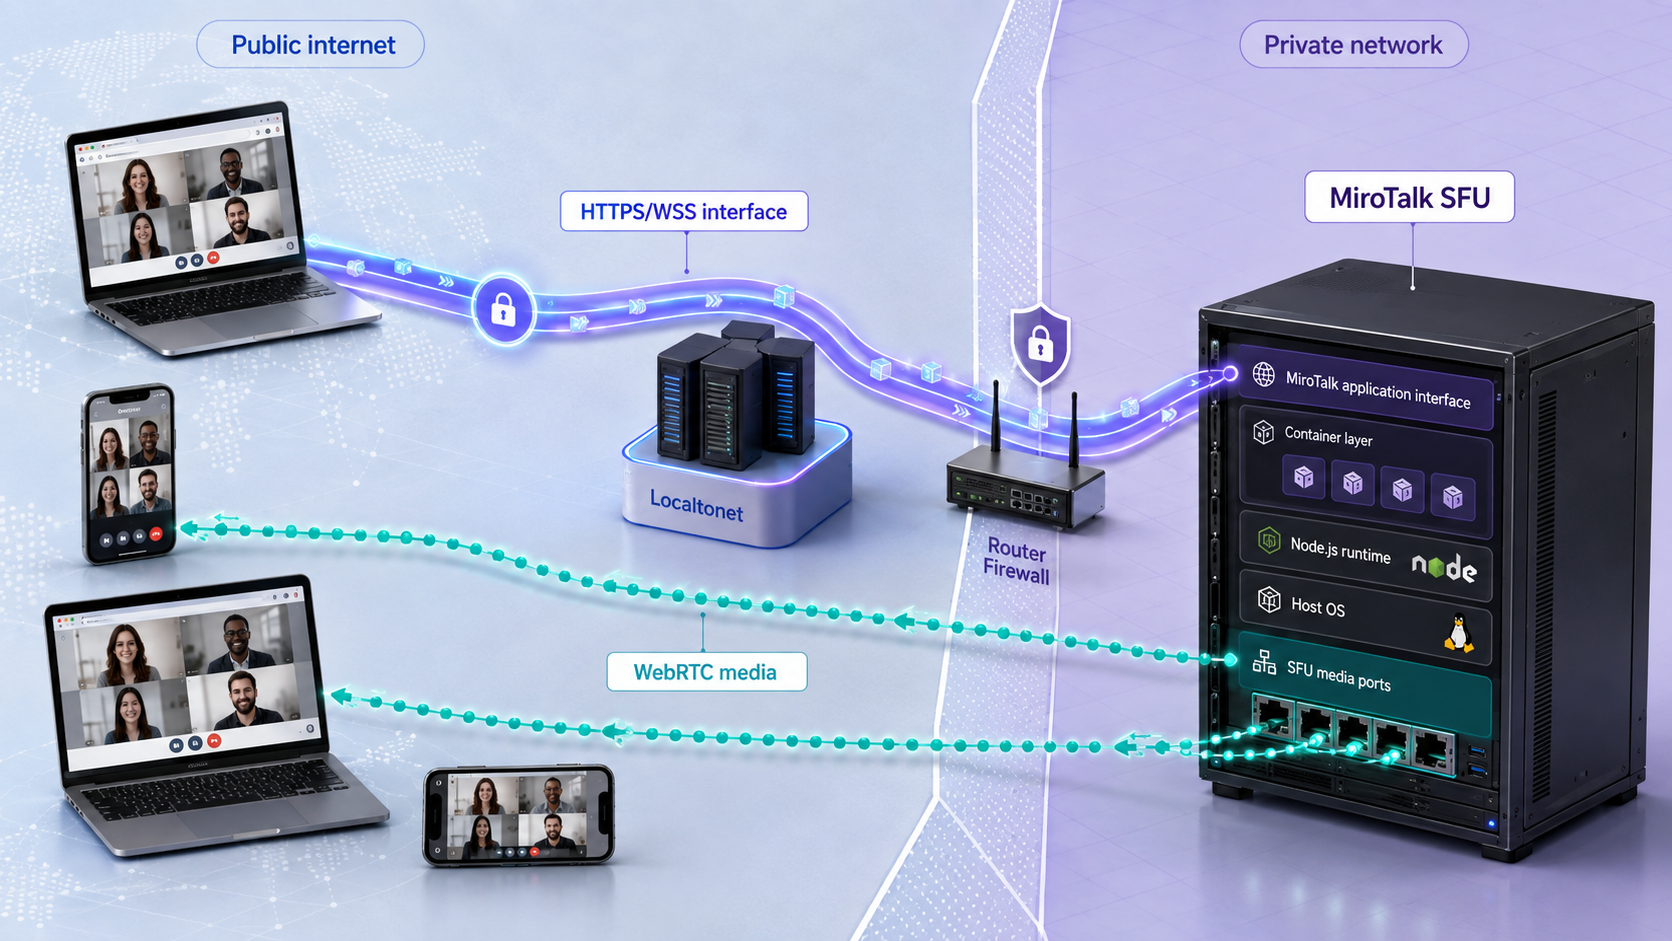
The first path is the MiroTalk application endpoint on TCP port 3010 in the documented default setup. It serves the landing page, room interface, application requests, and signaling connections. A Localtonet HTTP tunnel can make this endpoint available at a public HTTPS URL without inbound router port forwarding to port 3010.
The second path carries real-time WebRTC media. MiroTalk's current self-hosting example assigns TCP and UDP ports 40000 through 40100 to mediasoup. The application announces a public media address through SFU_ANNOUNCED_IP, and remote browsers must be able to reach the resulting ICE candidates. A working Localtonet web URL does not make these separate media listeners reachable automatically.
SFU_ANNOUNCED_IP must identify an address or domain that remote participants can actually reach for ICE and WebRTC connectivity.
The documented Localtonet procedure publishes the application endpoint on port 3010. It does not define an automatic mapping for MiroTalk's dynamic mediasoup range or make the Localtonet HTTP hostname a valid media address. A participant may load the page and join a room while audio and video still fail. Always test page loading, room joining, and bidirectional media as separate results.
| Traffic | Documented endpoint | How this guide handles it |
|---|---|---|
| Web interface and signaling | TCP port 3010 | Verified locally and published through a Localtonet HTTP tunnel. |
| Range-based WebRTC media | TCP and UDP 40000 through 40100 | Exposed and routed separately under the direct public media model. |
| Optional WebRTCServer mode | One media port per worker, beginning at 40000 | Reduces the number of media ports but still requires public reachability. |
| Public browser origin | Assigned HTTPS URL | Provided by the Localtonet HTTP tunnel for the application interface. |
Prepare the MiroTalk SFU host
Choose a machine that can remain online throughout each meeting. An SFU forwards streams to multiple recipients, so CPU load, memory use, and especially outbound bandwidth increase with participant count, enabled video, resolution, bitrate, screen sharing, recording, and other features. MiroTalk provides rough planning estimates, but they are not capacity guarantees. Representative load testing is the only reliable way to size a production deployment.
MiroTalk's current repository says the project has been tested with Node.js 22.x and uses Ubuntu 24.04 LTS in its package example. Its detailed self-hosting page lists Ubuntu 22.04 LTS and Node.js LTS. For the direct installation in this guide, use Node.js 22.x as specified by the current repository and validate your chosen Ubuntu release against the current project instructions before deploying.
Choose one application installation path
The Node.js and Docker Compose sections are alternatives. Do not complete both against the same checkout and port unless you are intentionally building separate instances. Running both normally causes port conflicts because each tries to provide MiroTalk on port 3010 and may also compete for the configured mediasoup ports.
| Path | Best suited to | Primary operational tool |
|---|---|---|
| Node.js 22.x | Direct runtime control and source-based operation | npm for setup, optionally PM2 for supervision |
| Docker Compose | Containerized packaging and Compose-managed lifecycle | The Compose command supported by the installed version |
| Localtonet client | Publishing the already working port 3010 interface | Localtonet dashboard and client application |
Host and network requirements
- A Linux host with administrative access for installing required packages.
- Git and a text editor.
- Node.js 22.x and npm for the direct installation, or Docker Engine and Docker Compose for the container installation.
- Build tools and Python required by project dependencies.
- FFmpeg when using functionality that depends on it, including optional RTMP workflows.
- A public IPv4 address or domain that remote participants can reach for the documented direct mediasoup media model.
- A firewall and upstream network that can pass the selected media ports.
- A Localtonet account and a device-specific authentication token for the client that will run the tunnel.
Install the shared Ubuntu packages
MiroTalk's detailed self-hosting guide provides the following package sequence. Review administrative commands before running them on an existing machine.
export DEBIAN_FRONTEND=noninteractive

apt-get update -y

apt-get install -y \
  build-essential \
  git \
  curl \
  wget \
  unzip \
  tzdata \
  software-properties-common \
  ffmpeg

add-apt-repository -y ppa:deadsnakes/ppa
apt-get update -y
apt-get install -y python3.8 python3-pip
These packages are relevant to the source installation. A container host still needs Git if you are cloning the repository, but the application runtime and its dependencies are packaged in the selected container image.
Plan where the Localtonet client will run
The simplest arrangement runs our client on the same host as MiroTalk. It can then target a loopback address on port 3010. The client may instead run on another device that can reach the MiroTalk host over a private network. In that arrangement, use the MiroTalk host's reachable private address rather than the client device's loopback address.
127.0.0.1 always refers to the device or network namespace where the client is running. If the client runs on another machine or in an isolated container, that address may not lead to MiroTalk. Test the origin from the actual client device before creating the tunnel.
Configure MiroTalk before the first installation or start
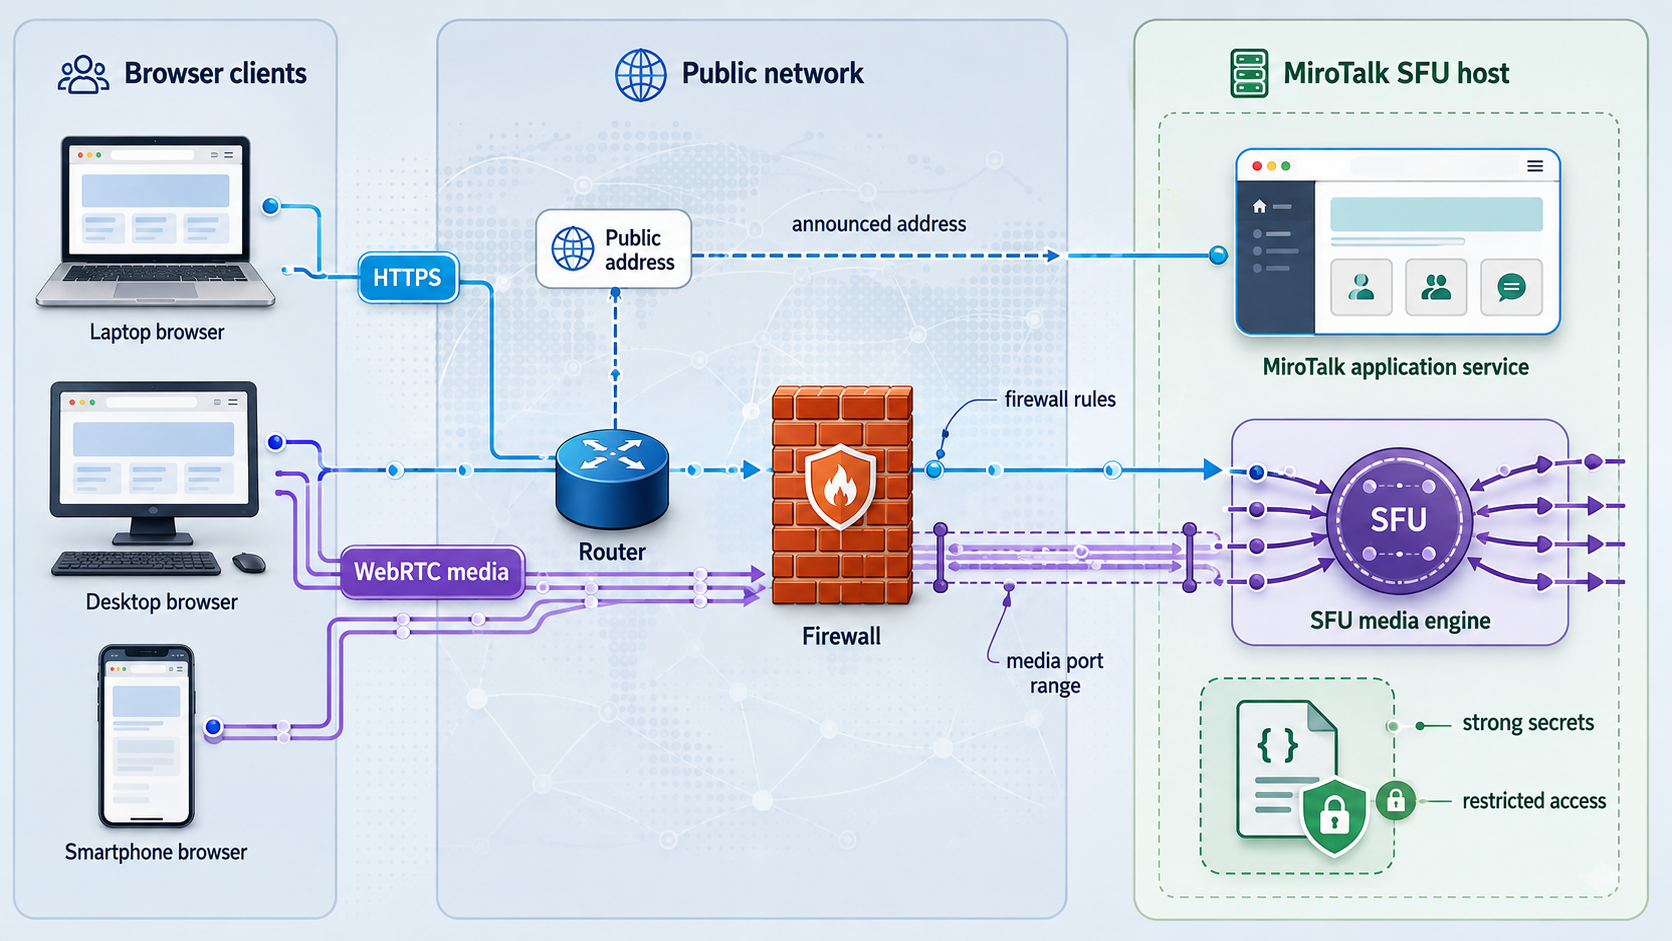
The current MiroTalk self-hosting instructions explicitly direct operators to edit .env before running npm install or npm start. Apply the same configuration-first principle to Docker. Create and review .env, app/src/config.js, and the active Compose file before pulling and starting the container.
Start by cloning the repository. Perform this once for the installation method you selected:
git clone https://github.com/miroslavpejic85/mirotalksfu.git
cd mirotalksfu

cp app/src/config.template.js app/src/config.js
cp .env.template .env
Open both active files in your editor. Do not edit only the template files because the running application uses app/src/config.js and .env.
Set the production media environment
MiroTalk's current production example includes these values:
ENVIRONMENT=production
SFU_ANNOUNCED_IP=YOUR_PUBLIC_IPV4_OR_DOMAIN
SFU_MIN_PORT=40000
SFU_MAX_PORT=40100
SFU_NUM_WORKERS=4
Replace YOUR_PUBLIC_IPV4_OR_DOMAIN with the address through which remote browsers can reach the mediasoup media listeners. Do not insert the Localtonet HTTP hostname merely because it loads the web interface. That hostname represents the HTTP tunnel endpoint and is not automatically a route to the separate TCP and UDP media ports.
| Setting | Purpose | What to verify |
|---|---|---|
ENVIRONMENT |
Selects production behavior for a server deployment. | Use the documented production value for this workflow. |
SFU_ANNOUNCED_IP |
Advertises an address for ICE and WebRTC connectivity. | The address must route to the actual media endpoint. |
SFU_MIN_PORT |
Sets the beginning of the dynamic media range. | It must match the reachable firewall and network configuration. |
SFU_MAX_PORT |
Sets the end of the dynamic media range. | It must match the allowed TCP and UDP range. |
SFU_NUM_WORKERS |
Controls the number of parallel media workers. | MiroTalk says the default is the CPU core count when unset. |
SFU_SERVER |
Enables optional WebRTCServer mode. | Each worker then listens on one port beginning at 40000. |
MiroTalk describes the 40000 through 40100 range as roughly supporting 50 participants and provides a rough estimate of about 100 participants per worker, depending on video quality, bandwidth, and system load. These figures are planning guidance, not guaranteed limits. A deployment can encounter bandwidth, CPU, memory, firewall, or participant-network constraints before reaching an estimated count.
Review application access controls
Inspect app/src/config.js and the security-related values in .env before public access. MiroTalk includes host protection, OIDC authentication, JWT credentials, room passwords, lobby controls, and spam mitigation. The exact active options and configuration keys can change with the project, so this guide does not invent settings that are not established by the supplied current evidence.
Decide who may create rooms, who may join them, and how administrative or host functions are protected. Test permitted and rejected access before sharing the public URL. A tunnel supplies connectivity. It does not replace MiroTalk's participant authorization or meeting controls.
Select and verify the origin scheme on port 3010
The repository quick start tells users to open https://localhost:3010. The current detailed production guide verifies the service at http://YOUR.DOMAIN.NAME:3010. These examples demonstrate two possible local origin schemes and must not be treated as interchangeable.
This tutorial selects MiroTalk's documented production origin form, plain HTTP on port 3010, for the Localtonet upstream connection. The Localtonet public side remains HTTPS. Bind port 3010 only where the Localtonet client can reach it, then target that HTTP origin from the tunnel.
| Observed local origin | Localtonet target scheme | Certificate consideration |
|---|---|---|
http://127.0.0.1:3010 |
HTTP | No certificate is presented by the private upstream. Users still receive the public Localtonet HTTPS URL. |
https://localhost:3010 |
HTTPS | The upstream certificate must be acceptable to the client path and valid for the hostname used as the target. |
| HTTPS with a self-signed certificate | HTTPS only after trust is established | Do not assume the current Localtonet client ignores certificate errors. Use a trusted certificate or the documented HTTP loopback origin instead. |
An origin-scheme mismatch can produce TLS handshake errors, connection failures, certificate-name errors, or redirect loops. Confirm the exact origin from the Localtonet client device. For this guide, use the production HTTP origin on port 3010 and configure the tunnel target as HTTP. If your deployment deliberately enables HTTPS on port 3010, select an HTTPS target and use a certificate trusted for the target hostname.
The supplied MiroTalk evidence does not establish an additional mandatory public-origin variable specifically for a Localtonet URL. Do not invent one. After publishing, verify that the application does not redirect the public URL to localhost or to a private hostname and that room signaling remains connected. If your current MiroTalk release exposes an allowed-origin, trusted-proxy, external-URL, or proxy-header option, configure it according to that release's current documentation and retest.
Install and start MiroTalk with Node.js 22.x
Complete this section only if you selected the direct Node.js path. The configuration files must already exist and have been reviewed as described above.
Install Node.js 22 through Node Version Manager
MiroTalk's current repository directs users to install Node.js 22.x and npm with Node Version Manager. Install NVM through its current official installation method rather than copying an unverified bootstrap URL into a privileged shell. Open a new shell or load NVM according to its installer, then select Node.js 22:
nvm install 22
nvm use 22

node --version
npm --version
Confirm that node --version reports a 22.x release. If it does not, stop and correct the active runtime before installing dependencies.
Confirm the active configuration
Review .env and app/src/config.js. Confirm the announced media address, media range, environment, application controls, and port before dependency installation.
Install the locked dependencies
The detailed self-hosting workflow uses npm ci, which installs dependencies from the repository lock file.
npm ciStart MiroTalk SFU
Start the application from the repository directory. Keep the terminal visible during initial verification.
npm start
The repository's short quick start uses npm install, while the detailed self-hosting guide uses npm ci. This guide follows the detailed npm ci workflow for the checked-out repository and its lock file.
MiroTalk also documents an alternative listen-port invocation:
SERVER_LISTEN_PORT=3011 npm startContinue with port 3010 unless you deliberately change it. If you select another port, use that same value for local verification and the Localtonet target. Changing the application port does not change the separate media-port requirements.
Install and start MiroTalk with Docker Compose
Complete this section only if you selected Docker. Do not also start the Node.js workflow on the same ports. Docker packages the application runtime, but it does not remove the need to configure the announced address, media listeners, firewall, or application controls.
Install and identify the available Compose command
MiroTalk's current self-hosting guide shows Ubuntu packages and uses the legacy hyphenated command:
sudo apt install -y docker.io
sudo apt install -y docker-compose

docker --version
docker-compose --version
Some current Docker installations provide Compose as the docker compose
docker compose version
Use one supported command form consistently. The examples below retain docker-composedocker-composedocker compose
Create the active Compose file
From the already configured repository checkout, copy the project's Compose template.
cp docker-compose.template.yml docker-compose.ymlReview every active configuration file
Edit and verify .env, app/src/config.js, and docker-compose.yml before the first container start. Confirm that the Compose file mounts the active files you edited.
Pull the configured image
Retrieve the image referenced by the active Compose file.
docker-compose pullStart the first run in the foreground
Keep startup output visible while checking configuration, binding, and runtime errors.
docker-compose upAfter the first run succeeds, stop the foreground process normally and start it in the background:
docker-compose up -d
MiroTalk's documented Compose example uses network_mode: 'host', a restart policy of unless-stopped, and read-only mounts for .env, app, and public. Host networking allows the container to use the host's network stack. Do not replace it with arbitrary port mappings without understanding how the application and every mediasoup listener will be reached.
Verify MiroTalk locally before creating a tunnel
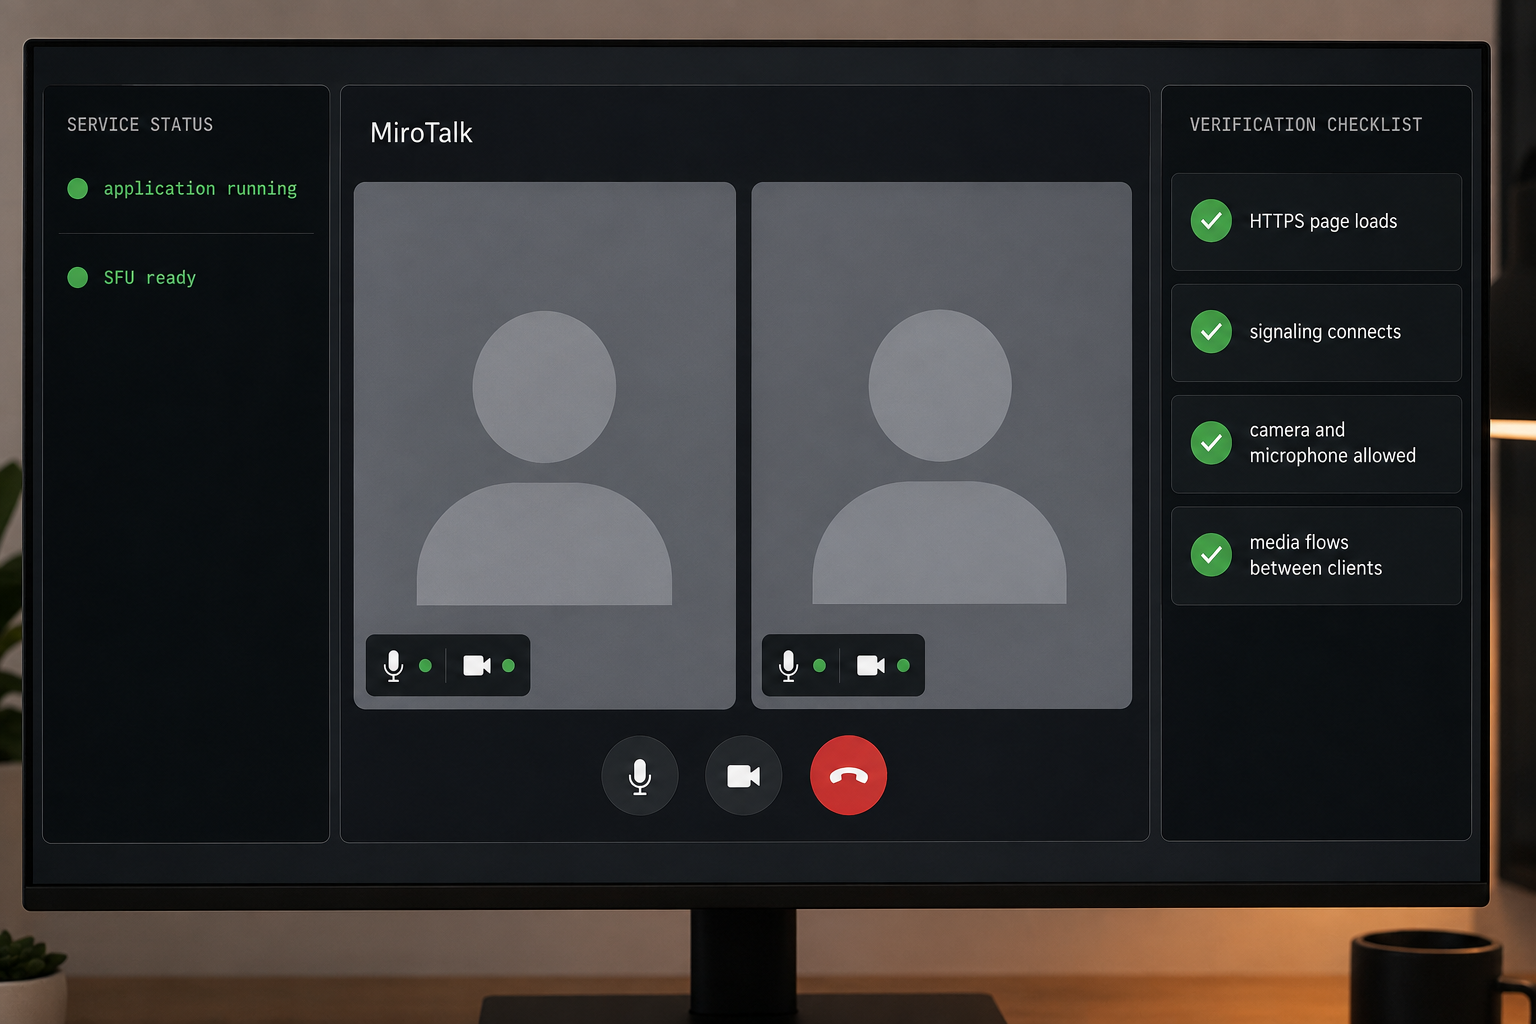
Local verification separates application failures from tunnel failures. A public tunnel cannot repair a process that exited, a syntax error in app/src/config.js, an invalid environment file, or an application that is not listening on the expected port.
Confirm that the selected runtime remains active
For Node.js, verify that npm start remains running without a fatal error. For Docker, inspect the foreground output or use docker-compose ps after starting in the background.
Test the selected origin scheme
For the production-origin workflow in this guide, test http://127.0.0.1:3010 from the MiroTalk host. If your deliberate configuration provides HTTPS instead, test https://localhost:3010 and validate its certificate behavior.
Create or join a permitted room
Confirm that the landing page works, your configured access policy is enforced, and the in-room interface appears.
Test two independent clients
Use separate browsers or devices. Confirm that both participants can join and exchange audio and video in both directions.
Record the three outcomes separately
Note whether the page loads, whether a participant can join, and whether bidirectional media works. These results diagnose different layers.
The repository quick start may present HTTPS on localhost with a certificate that the browser does not trust. Confirm that you are connecting to your own host, but do not teach remote users to ignore certificate warnings. For public access, use the assigned Localtonet HTTPS URL. For the private upstream selected by this guide, use the documented production HTTP origin on port 3010.
Publish the MiroTalk web interface with Localtonet
Once MiroTalk works from the device that will run our client, create the HTTP tunnel. The Localtonet client establishes an outbound connection to a relay server. The Localtonet-only web workflow therefore does not require public inbound access to port 3010, router port forwarding for that port, a public IP address for the web origin, firewall changes for the web origin, or VPN setup.
HTTP tunnels can use Random Sub Domain, Custom Sub Domain, or Custom Domain process types. All three publish the configured content at a public HTTPS address. Choose only a process type and option currently available in your dashboard. Plan and feature availability can vary, and exact custom-domain DNS instructions should come from the current dashboard rather than an article.
Install the Localtonet client for the host operating system
Sign in to Localtonet, obtain the current client installer or package for the device's operating system, complete the displayed installation workflow, and run the client. Do not substitute an old command from an unrelated release because installation details can vary by operating system and client version.
Connect the device with its authentication token
Use the device-specific token assigned to this client. Treat it as a credential. Never place it in .env, source control, screenshots, meeting links, or tutorial text.
Open the HTTP tunnel configuration
Create an HTTP tunnel and choose Random Sub Domain, Custom Sub Domain, or Custom Domain as appropriate for the options currently shown in your account.
Select the connected device and relay server
Select the device authentication entry that identifies the running client, then select an available server or region from the current dashboard. Do not hardcode relay values from an article.
Enter the verified local origin
For the production-origin workflow used here, configure an HTTP target at 127.0.0.1 and port 3010 when the client runs on the MiroTalk host. If the client runs elsewhere, use the MiroTalk host's reachable private IP address and port 3010. If your verified origin is HTTPS instead, select the corresponding HTTPS target behavior and resolve certificate trust before continuing.
Start the tunnel
Creating a tunnel does not make it active. Press Start and confirm that the selected device remains connected and the tunnel reports that it is running.
Test the assigned public HTTPS URL
Open the assigned URL from a device outside the server's local network. Confirm page loading, room signaling, access controls, and expected redirects before testing media.
Refer to the Localtonet HTTP tunnel documentation while configuring the current dashboard. The exact labels displayed by the client or dashboard can change, but the required sequence remains: run and authenticate the client, choose the connected device and available relay, create the correct HTTP target, start the tunnel, and test the assigned URL.
In the workflow selected here, MiroTalk serves HTTP on a private origin reachable by our client, while Localtonet provides the public HTTPS address. This avoids relying on a self-signed upstream certificate. Restrict the private origin to the intended host or private network and do not expose port 3010 publicly unless you are intentionally using MiroTalk's separate direct-server model.
The HTTP hostname leads to the published application endpoint. SFU_ANNOUNCED_IP identifies the media address advertised to WebRTC clients. Substituting one for the other without a documented transport mapping can create a room whose interface works while audio and video fail.
Configure firewall, NAT, STUN, and TURN separately
The web tunnel and the media firewall serve different purposes. Do not open port 3010 publicly merely because MiroTalk's direct-server firewall example includes it. Localtonet reaches that origin through the client connection, so public inbound access to port 3010 is unnecessary for the Localtonet-only web path.
Localtonet web interface with direct public media
In this split design, port 3010 stays private while the mediasoup range remains directly reachable. If UFW is active and the range-based media configuration uses 40000 through 40100, the relevant MiroTalk media rules are:
ufw status
ufw allow 40000:40100/tcp
ufw allow 40000:40100/udp
Apply firewall rules only after confirming the correct interfaces, upstream firewall, administrative access, and organizational policy. A cloud firewall, router, carrier network, or NAT device can still block traffic even when the host firewall allows it.
Direct-public-server deployment
If you intentionally expose MiroTalk directly instead of using Localtonet for the web interface, MiroTalk's example also allows TCP port 3010:
ufw status
ufw allow 3010/tcp
ufw allow 40000:40100/tcp
ufw allow 40000:40100/udp
This is a different deployment model. A public browser service should normally use a proper hostname and HTTPS termination rather than asking users to visit an unencrypted port-based URL. Do not combine the direct rule with the Localtonet workflow unless there is a deliberate reason to maintain both access paths.
Optional WebRTCServer mode
MiroTalk documents an optional mode that uses one listening port for each worker:
SFU_SERVER=trueEach worker receives a WebRTCServer port beginning at 40000. This can reduce the exposed range and simplify firewall management. It does not remove the need for a reachable announced address or suitable NAT behavior, and it does not turn those media connections into HTTP tunnel traffic.
Why reachable SFU ports may still be insufficient
WebRTC uses ICE to choose a connection path. A participant behind ordinary NAT may be able to reach the SFU's announced public address directly. More restrictive participant networks can block UDP, permit only selected outbound ports, use symmetric NAT behavior, or interfere with direct ICE candidates. In those cases, an open SFU firewall does not guarantee that every browser can establish media.
STUN helps a WebRTC endpoint discover its public-facing network mapping. It does not relay media when a direct path is impossible. TURN provides a relay candidate and can carry media for participants that cannot use the available direct candidates. TURN therefore improves connectivity for restrictive networks, but it also becomes part of the media path and must be sized, secured, monitored, and made reachable.
MiroTalk maintains separate STUN and TURN documentation, but the supplied evidence does not establish the current variable names or credential format. Do not copy guessed ICE-server keys into .env or app/src/config.js. Use the settings documented for the exact MiroTalk release you deploy, protect TURN credentials, and test from a restrictive external network.
Perform a meaningful external media test
- Open the Localtonet HTTPS URL from two independent devices.
- Place the devices on separate external networks, such as fixed broadband and a mobile connection.
- Confirm that each participant can join under the configured access policy.
- Confirm bidirectional audio, not just local microphone indication.
- Confirm bidirectional video, not just a local camera preview.
- Test screen sharing if it is required by the deployment.
- Repeat from a restrictive corporate, school, or guest network if those users are in scope.
- Inspect the active ICE candidate type with browser WebRTC diagnostics when direct tests work but restrictive networks fail.
Operate, troubleshoot, back up, and update the deployment
Operate the Node.js process with PM2
A foreground npm start process is useful for initial validation but stops when its terminal session ends. MiroTalk documents PM2 as an optional process manager:
npm install -g pm2
pm2 start app/src/Server.js --name mirotalksfu
pm2 save
pm2 startup
Read the output of pm2 startup. It may print an additional system-specific command that must be run with the displayed environment and permissions.
Routine PM2 operations include:
pm2 status
pm2 logs mirotalksfu
pm2 restart mirotalksfu
pm2 stop mirotalksfu
pm2 start mirotalksfu
pm2 save
Use pm2 status after a reboot and after every configuration change. Review logs before restarting repeatedly because a crash loop usually reflects a dependency, syntax, environment, permission, or port-binding problem.
Operate the Docker deployment
docker-compose ps
docker-compose logs
docker-compose logs -f
docker-compose restart
docker-compose stop
docker-compose up -d
docker-compose down
stop stops the containers while retaining the Compose deployment. down removes the Compose-managed containers and network resources, so use it only when that lifecycle action is intended. If your installation uses the Compose plugin, use the corresponding docker compose
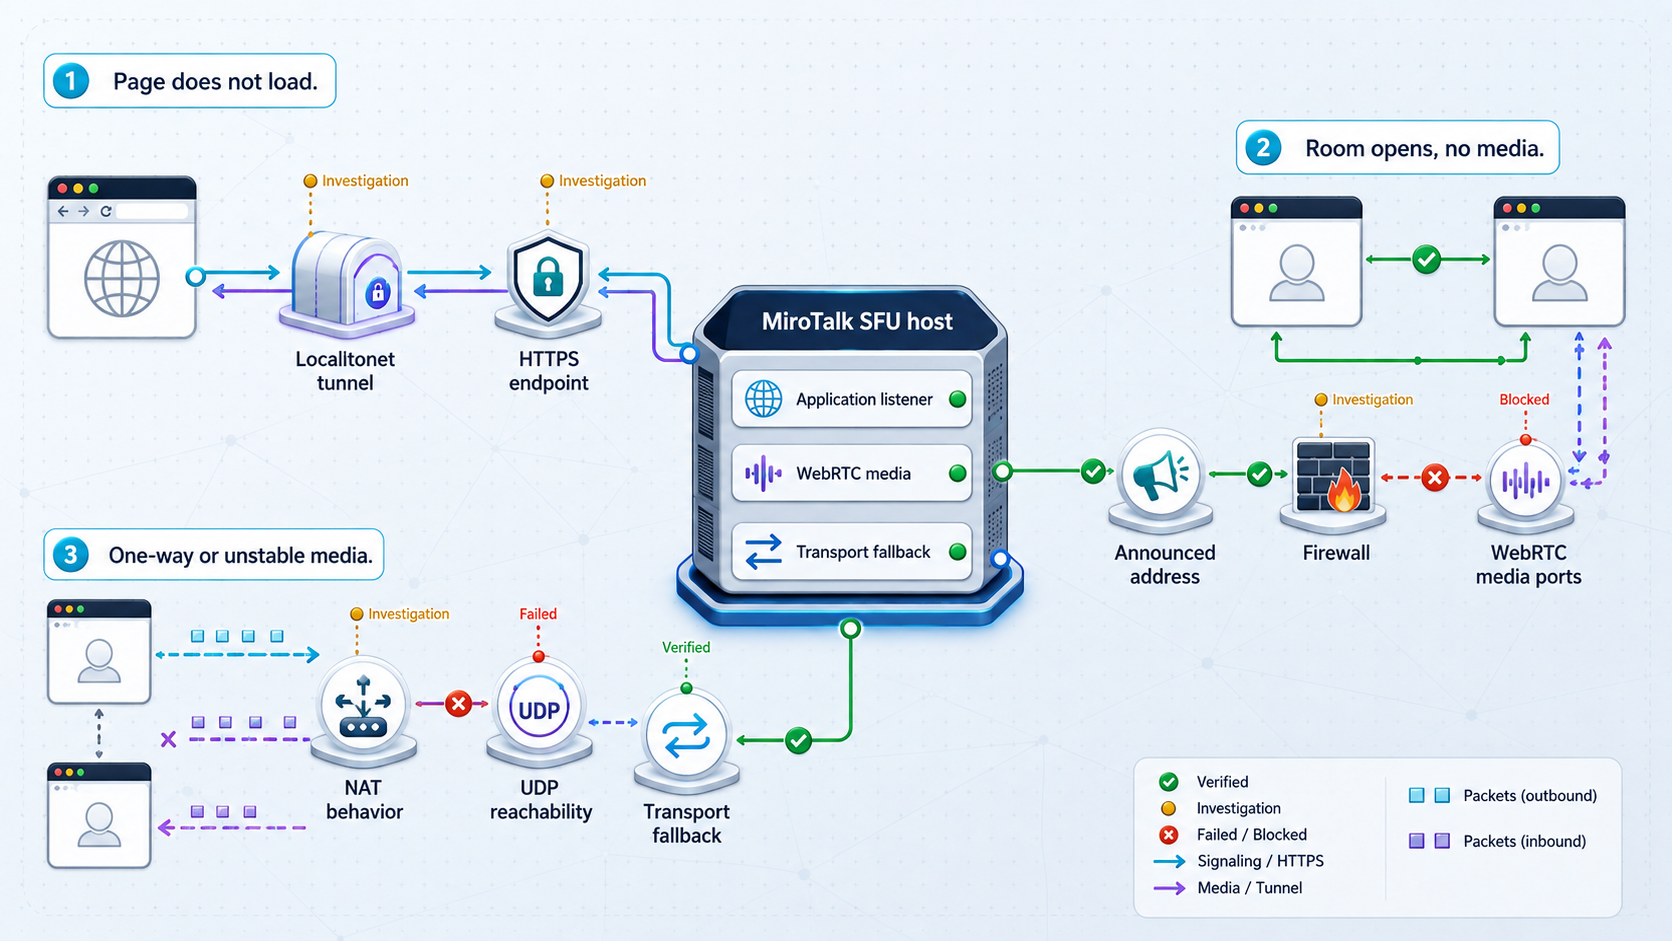
The local page does not open
- Confirm that the selected Node.js process or Docker container is running.
- Review the startup output or logs for configuration and syntax errors.
- Confirm that you edited
.envandapp/src/config.js, not only their templates. - Confirm that port 3010 is not occupied by another process.
- Use the correct origin scheme. An HTTP request sent to an HTTPS listener, or the reverse, will fail.
- For Docker, confirm that the active Compose file mounts the files you edited and uses the expected network mode.
The local origin works but the Localtonet URL fails
- Test the origin from the device that runs the Localtonet client.
- Verify that the client is connected with the intended device token.
- Confirm that the tunnel was started after it was created.
- Check the target scheme, IP address, and port together.
- If using HTTPS upstream, validate certificate trust and hostname matching.
- Check for redirects to localhost, a private IP address, or an unexpected scheme.
- Confirm that MiroTalk remains active while testing the tunnel.
The page loads but room signaling fails
This differs from a media-only failure. Confirm that the application is not rejecting the public origin, that access controls allow the test user, and that the browser remains connected to the application's signaling channel. Review MiroTalk logs and browser developer tools for rejected requests, redirect loops, authorization failures, and disconnected browser connections.
The room opens but there is no audio or video
- Confirm that
SFU_ANNOUNCED_IPis reachable from the participant networks. - Confirm that the announced value is not merely the Localtonet HTTP hostname.
- Verify that the active media range matches the host and upstream firewall rules.
- Check both UDP and TCP media reachability for the documented range-based setup.
- If
SFU_SERVER=trueis active, verify each required per-worker port beginning at 40000. - Confirm that Docker networking has not changed which addresses and ports are reachable.
- Test with two separate external clients.
- Investigate TURN when failures occur only on restrictive NAT or filtered networks.
Camera or microphone permission is unavailable remotely
Open the application through the assigned Localtonet HTTPS URL rather than a plain HTTP public address. Browsers generally require a secure context for camera and microphone access on non-localhost origins. Also inspect the browser's site permissions and the operating system's privacy settings.
The tunnel disconnects
A Localtonet tunnel is available only while the selected client is connected and the tunnel is running. Check whether the host slept, rebooted, lost network connectivity, stopped our client, or stopped the tunnel. Then confirm that MiroTalk is still listening on its local port. Process supervision for MiroTalk does not automatically supervise the Localtonet client, and the reverse is also true.
Back up before changing or updating the installation
At minimum, preserve the active files that contain deployment-specific configuration:
.envapp/src/config.jsdocker-compose.ymlfor Docker deployments- Any locally customized application, public, branding, certificate, or integration files
- The currently deployed source revision or container image identifier needed for rollback
Store backups outside the active checkout and protect any credentials they contain. A backup copied into the same directory can be overwritten, removed, or accidentally committed.
Update and rollback safely
MiroTalk publishes a dedicated updating guide, but the supplied evidence does not include its current exact command sequence. Release-specific migrations can change, so do not assume that a generic source pull or container pull is sufficient for every version.
Use this controlled update procedure:
- Record the current source revision or container image identifier.
- Back up all active configuration and customization files.
- Read the MiroTalk changelog and updating instructions for the target release.
- Schedule a maintenance period and stop new meetings.
- Apply the documented update commands for the selected Node.js or Docker path.
- Compare new templates with your active files rather than overwriting your configuration blindly.
- Restart the process or Compose deployment and inspect logs.
- Repeat local application, access-control, public URL, and two-client media tests.
- If validation fails, restore the saved files and previous source revision or image according to your prepared rollback method.
For a Docker release whose current instructions confirm that pulling the configured image is sufficient, the operational commands normally include:
docker-compose pull
docker-compose up -d
docker-compose ps
docker-compose logs
Do not run these as an automatic update policy without preserving the prior image and configuration. An image tagged latest can change over time, which makes an unrecorded rollback difficult.
Post-update verification checklist
- The Node.js process or Docker container remains healthy after startup.
- The selected HTTP or HTTPS origin still responds on port 3010.
- The Localtonet client remains connected and the tunnel is running.
- The public HTTPS URL loads without redirecting to a private address.
- Host protection, room passwords, authentication, or lobby behavior still works as intended.
- Two external participants can join and exchange audio and video in both directions.
- Restrictive-network testing still succeeds through the intended ICE or TURN design.
- Stopping the Localtonet tunnel removes public access to the web interface.
Frequently asked questions
Does Localtonet publish the complete MiroTalk SFU service?
Not in the workflow documented here. The Localtonet HTTP tunnel publishes MiroTalk's web and signaling endpoint on port 3010. Mediasoup uses separate WebRTC media transports, so its announced address, TCP and UDP media ports, NAT behavior, and optional TURN service require a separate design and test.
Should the Localtonet target use HTTP or HTTPS?
Match the scheme actually served by MiroTalk on port 3010. This guide uses MiroTalk's documented production verification form, HTTP on the private port 3010 origin, while Localtonet provides public HTTPS. If your MiroTalk configuration serves HTTPS locally, select an HTTPS target and ensure its certificate is trusted and valid for the target hostname.
Can Localtonet connect to a self-signed MiroTalk certificate?
Do not assume that the current client ignores self-signed certificate errors. An HTTPS upstream certificate must be acceptable for the hostname used by the client path. The simpler documented workflow is to use MiroTalk's private HTTP production origin on port 3010 and let Localtonet provide the public HTTPS endpoint.
Do I need to open port 3010 in UFW?
Not for the Localtonet-only web-interface workflow. Our client reaches the private origin and creates an outbound relay connection. Open port 3010 publicly only if you deliberately operate MiroTalk's separate direct-public-server model. Media ports may still need inbound rules under the direct mediasoup design.
What should SFU_ANNOUNCED_IP contain?
It should contain the public IPv4 address or domain through which remote WebRTC clients can reach the actual mediasoup media endpoint. Do not use the Localtonet HTTP hostname unless you have separately implemented and validated a media transport design that makes it correct.
Should I install both Node.js and Docker deployments?
No. They are alternative deployment paths. Choose Node.js for direct runtime and source control, or Docker Compose for a container-managed lifecycle. Starting both on the same host normally causes conflicts on port 3010 and the configured media ports.
Why does the page work while audio and video fail?
Page loading confirms the application path, not the mediasoup media path. Check the announced media address, media range, TCP and UDP firewall rules, NAT forwarding, Docker network mode, and ICE results. If failures occur only on restrictive participant networks, evaluate a correctly configured TURN service.
Does STUN replace TURN?
No. STUN helps an endpoint discover a public network mapping. TURN relays media when an acceptable direct path cannot be established. Deployments that must support restrictive NAT or filtered networks should test the current MiroTalk TURN integration rather than assuming STUN alone will be sufficient.
Does creating a Localtonet tunnel start it automatically?
No. Creation and operation are separate lifecycle states. Press Start after creating the tunnel. The public URL remains available only while the selected client device is connected and the tunnel is running.
Publish your verified MiroTalk web interface with Localtonet
Configure MiroTalk before its first start, verify the application and media paths independently, then use our HTTP tunnel to provide public HTTPS access to the working port 3010 interface without opening that web port on your router.
Get Started Free →

