

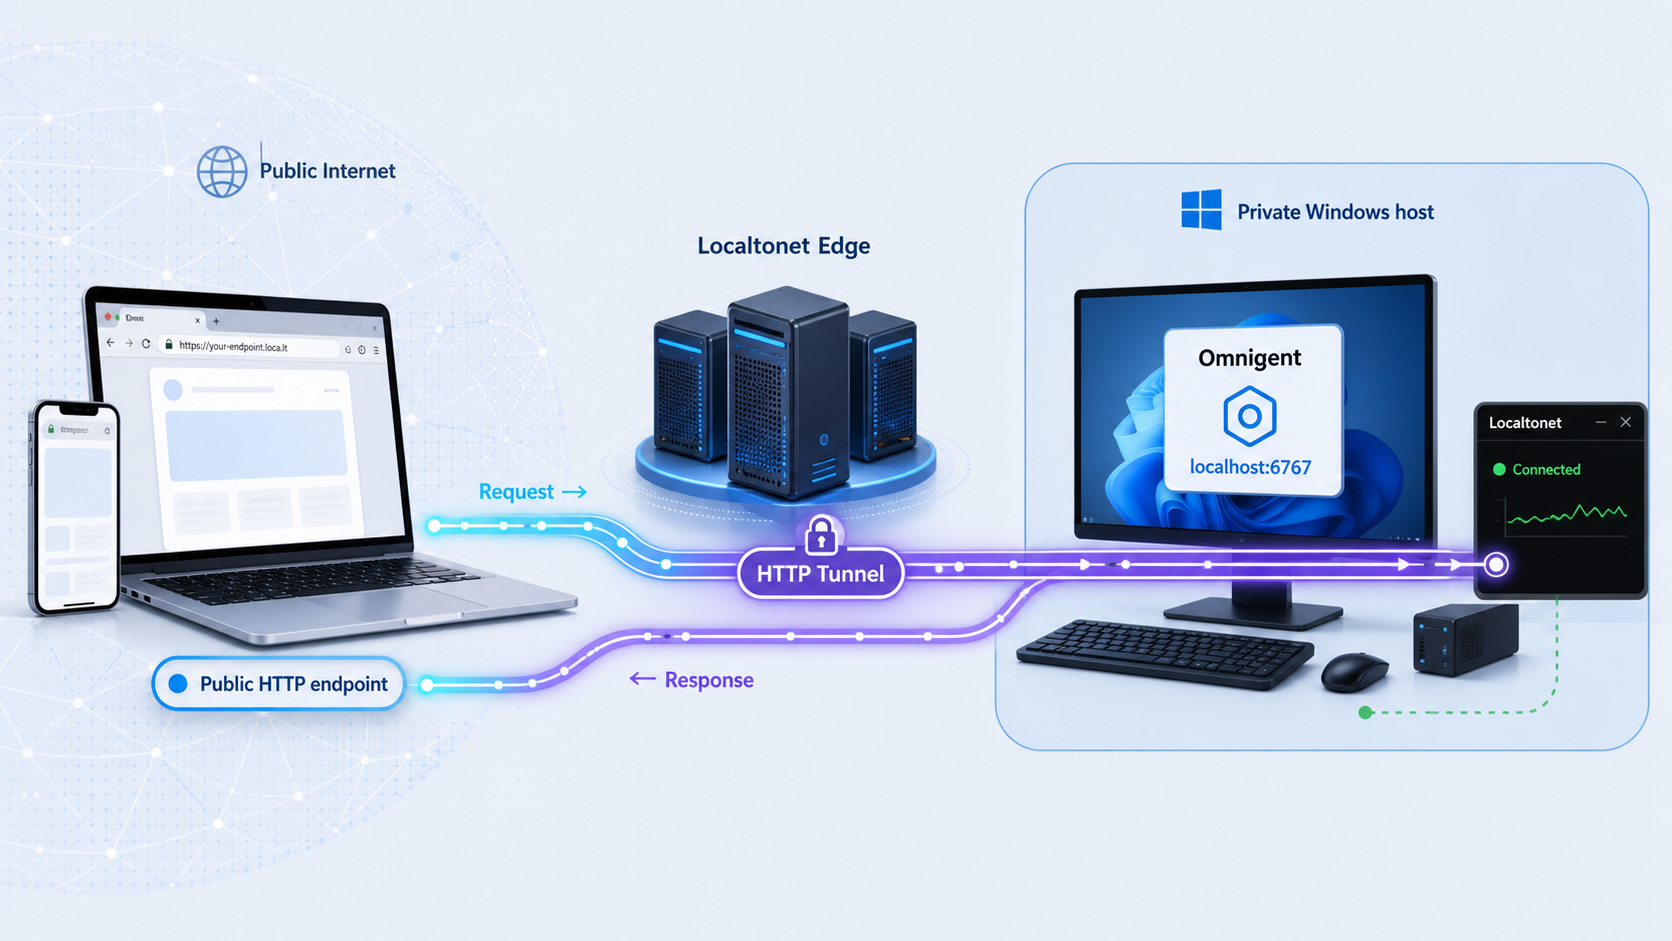
Run the Omnigent web interface on Windows, verify it locally, and make it reachable when you are away from the host
Omnigent provides a common orchestration layer for AI agents and makes sessions available through a browser interface. This guide focuses first on the supported native Windows installation path, including prerequisites, startup, local verification, Windows limitations, routine operation, and troubleshooting. After the local service is working at http://localhost:6767, we explain how to connect that HTTP endpoint through Localtonet as a separate remote-access step. The result is a clear installation-first workflow without requiring inbound router port forwarding, a public IP address, VPN setup, or firewall changes.
📋 What's in this guide
What Omnigent does and how this Windows setup works
Omnigent is an open-source AI agent framework and meta-harness. It places a common orchestration layer over supported coding harnesses and custom agents so that sessions can be accessed through interfaces such as a terminal, browser, phone, native application, or REST API. Its documented use cases include supervising multiple agents, keeping session information synchronized, applying policies, and collaborating on live sessions.
For this tutorial, the important architectural component is the Omnigent server and its web UI. Starting Omnigent creates a local HTTP service whose documented browser address is http://localhost:6767. The word localhost means that the browser connects back to the same Windows machine on which Omnigent is running. Port 6767 identifies the local listening endpoint used by the web interface.
A local endpoint is the right place to begin. It lets you separate application installation problems from networking problems. If the web interface does not work directly on the Windows host, adding a tunnel cannot repair the underlying installation. We will therefore install Omnigent, start it, test the local URL, and only then configure Localtonet.
http://localhost:6767, giving us a confirmed HTTP target for local testing.
Local access and remote access are separate layers
Omnigent owns the application process, web interface, agents, policies, sessions, and application-level authentication or authorization behavior. Localtonet handles the network path between an assigned public endpoint and the Omnigent service running on the Windows device. Creating a tunnel does not install, configure, or start Omnigent.
With Localtonet, our client on the Windows machine establishes an outbound connection to a Localtonet relay server. The HTTP tunnel then points to a local IP address and port reachable from that client. This design does not require inbound router port forwarding, firewall changes, a public IP address, or VPN setup. The tunnel is available only while the selected device is connected and the tunnel is running.
Do not configure remote exposure as a substitute for local verification. The Omnigent page should load successfully at http://localhost:6767 on the Windows host before you create or start an HTTP tunnel.
Windows prerequisites and compatibility boundaries
Native Windows installation differs from the general POSIX installation path. Omnigent publishes a shell bootstrap script for POSIX environments, but that bootstrap is not the native Windows installer. On Windows, the documented path is to install Omnigent directly with uv and explicitly request Python 3.12.
Before installing, make sure the Windows account has permission to install user-level tools and run them from a terminal. PowerShell or another Windows terminal can be used to execute the commands shown in this guide. You also need a supported uv installation and network access to retrieve the Omnigent package and its dependencies.
| Requirement | Why it is needed | Windows guidance |
|---|---|---|
uv |
Installs Omnigent as a command-line tool and provisions the requested Python runtime. | Install a current supported release of uv before running the Omnigent installation command. |
| Python 3.12 or newer | Omnigent documents Python 3.12 or later as its Python requirement. | The documented Windows uv command explicitly selects Python 3.12, so you do not need to replace that version with a guessed value. |
| Git | Git is a documented Omnigent prerequisite and is particularly relevant when installing directly from the repository. | Confirm that Git is available if you choose the repository installation variation. |
| Node.js 22 LTS or newer with npm | Omnigent documents Node.js for coding-harness CLIs installed by omnigent run. |
Install it before using a workflow that depends on those coding-harness tools. |
| pnpm | Omnigent documents pnpm for its web UI toolchain. | It can be made available through Node's Corepack or installed with npm, but do not install it merely to fix an unrelated server error. |
| Localtonet client | Required only for the optional remote-access portion of this guide. | Install and run it on the Windows device that can reach the Omnigent web service. |
Check that uv is available
Open a new PowerShell window and ask uv to print its installed version:
uv --version
A version response confirms that the executable is available in the current terminal. If Windows reports that uv is not recognized, either uv has not been installed or its executable directory is not available through the current PATH. Complete the official uv installation process, close the terminal, open a new one, and repeat the version check. We do not recommend guessing an executable path because it can vary with the installation method and user environment.
Understand native Windows degraded mode
Omnigent explicitly describes native Windows support as degraded mode. The server and web UI work natively, and the documented Windows support includes SDK-based harnesses used through omnigent run <agent.yaml> with the Claude SDK, Cursor, or Codex harnesses. Agent processes run under a Windows Job Object for process-tree containment.
Native terminal-wrapper workflows that depend on POSIX facilities are not available in the same way on Windows. Omnigent documents tmux as a requirement for its native harness terminal wrappers on supported POSIX systems, while Linux additionally requires bubblewrap for the documented OS sandbox behavior. These are not reasons to install Linux commands directly into ordinary Windows PowerShell.
If a desired Omnigent workflow is listed as unavailable in native Windows mode, use Linux, macOS, or Windows Subsystem for Linux as appropriate for that workflow. This guide remains focused on the native Windows server and browser interface. It does not claim that every Omnigent harness or sandbox option works natively on Windows.
The documented install_oss.sh bootstrap is POSIX-only. For a native Windows installation, use the uv command in the next section. WSL is a separate Linux environment and should not be confused with a native Windows installation.
Install Omnigent natively on Windows
The most direct documented native Windows path is a uv tool installation using Python 3.12. A uv tool installation keeps the application available as a command without requiring you to activate a project-specific virtual environment each time.
Open a Windows terminal
Start PowerShell or another terminal under the Windows account that will run Omnigent. Confirm that uv --version succeeds in this same terminal session.
Install Omnigent with Python 3.12
Run uv tool install --python 3.12 omnigent. This is the documented direct uv installation pattern for native Windows.
Open a fresh terminal if necessary
If the installation completes but Windows cannot find the omnigent command, close the current terminal and open a new one so that any environment changes can take effect. Then continue to startup and local verification.
uv tool install --python 3.12 omnigentRead the installation output rather than assuming success. A successful package download alone does not prove that the command is available to your shell. The practical installation test is whether a fresh terminal can start Omnigent.
Install directly from the Git repository
Omnigent also documents installation directly from its Git repository. This path is useful when you intentionally need the repository version rather than the published package:
uv tool install --python 3.12 git+https://github.com/omnigent-ai/omnigent.gitChoose one installation source deliberately. Installing both forms without a reason can make it harder to determine which version is running. The repository method also makes Git availability particularly important. For an ordinary setup, the package command is simpler and gives the terminal a clear package name to manage.
Optional integrations and extras
Omnigent supports optional extras for model providers, sandbox providers, SDK harnesses, storage, and memory integrations. Examples documented by the project include provider or integration names such as Databricks, Bedrock, Vertex, Modal, Daytona, E2B, Kubernetes, Cursor, and S3. Those extras should be selected according to the agent workflow you actually intend to run.
This guide does not add an extra to the base command because an extra is not required merely to establish that the server and web interface start. It is also unsafe to assume that an arbitrary integration is needed for every reader. Install the base application first, verify the UI, and then add only the integrations required by your selected harness or provider.
Omnigent is described by its maintainers as alpha software and is actively released. If a current installation reports that the documented package, runtime, or command syntax has changed, stop and verify the current Omnigent instructions instead of repeatedly modifying command arguments at random.
Start Omnigent and verify the local web UI
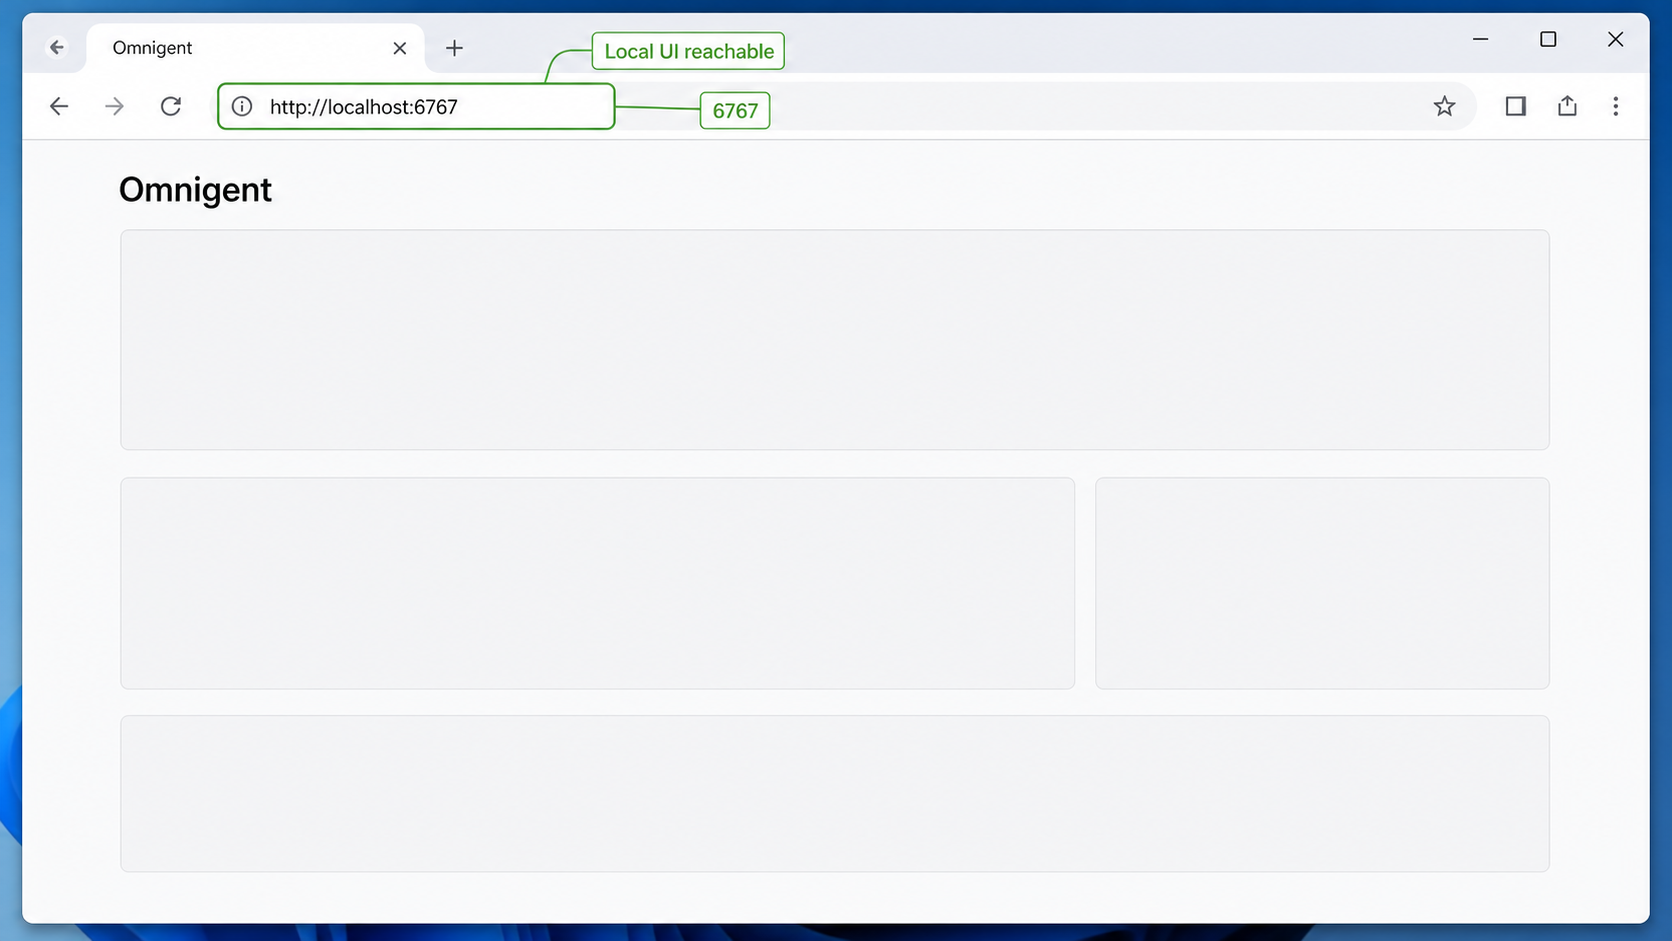
Once installation succeeds, start Omnigent from the Windows terminal with the documented command:
omnigentKeep that terminal open while testing. The running process is responsible for the server, so closing or terminating the process can make the web interface unavailable. Watch the terminal for startup output or a clear error. Do not proceed to remote access if the command immediately exits with an unresolved failure.
Open the confirmed local address
On the same Windows machine, open a browser and enter:
http://localhost:6767
Use http:// for this direct local test because that is the documented local endpoint. Do not change it to HTTPS, substitute a random port, or use a public hostname. A successful test means that the browser receives the Omnigent web interface from the locally running process.
The visible state of the interface can vary with the installed release and whether providers or agents have already been configured. The essential verification is that the browser reaches Omnigent rather than showing a connection-refused, timeout, unrelated application, or generic network error.
A practical verification checklist
omnigent command should not terminate immediately because of an unresolved dependency, unsupported mode, or startup exception.
http://localhost:6767 and display the Omnigent interface.
Test from Windows without relying only on browser state
PowerShell can make a simple HTTP request to the local endpoint:
Invoke-WebRequest http://localhost:6767A returned HTTP response confirms that something is answering at the endpoint. It does not by itself validate every Omnigent function, agent integration, policy, or session operation. Use the browser to confirm that the response is the expected Omnigent UI.
Stopping and restarting
When Omnigent is running in the foreground, use the terminal's normal interrupt action, commonly Ctrl+C, to request termination. Wait for the process to stop before starting another copy. Running multiple instances can create a port conflict if they all try to use port 6767.
Start it again with omnigent and repeat the local browser check after configuration changes, package updates, a Windows restart, or any failure that required stopping the process. This guide does not assume that Omnigent automatically starts with Windows. If you later create automation, ensure it uses the correct Windows account and preserves any required provider credentials without exposing them.
Configure agents without guessing unsupported Windows behavior
Loading the web interface verifies the server, but a useful agent session can require additional choices. Depending on the workflow, those choices may include an agent definition, a harness, model-provider access, policies, or an optional integration. Omnigent supports agents defined in YAML and documents an SDK-oriented command shape of omnigent run <agent.yaml>.
An agent configuration filename is not interchangeable with a complete configuration. The YAML schema, required fields, provider-specific settings, model identifiers, authentication methods, and harness options can change and are not established by the installation evidence available for this article. We therefore do not invent an example agent file or placeholder credentials.
Provider API keys, subscription credentials, Localtonet device tokens, private session URLs, and other secrets should not be committed to a repository or pasted into a shared tutorial. Follow the current integration-specific credential mechanism and give agents only the access required for their task.
Choose a Windows-compatible workflow
Native Windows support includes the server, web UI, and SDK-based harnesses documented for use through omnigent run <agent.yaml>. Before selecting a harness, confirm that it is supported in native Windows mode. If the desired workflow depends on native terminal wrappers, tmux, or Linux-only sandboxing, move that workflow to Linux, macOS, or WSL instead of attempting to force a POSIX dependency into ordinary Windows.
Omnigent describes policy capabilities such as pausing for approval before risky actions, limiting tool access, and applying spend controls. Those controls belong to Omnigent and should be configured according to the current application version and the selected agent. A network tunnel does not create or replace those agent policies.
Validate in small stages
A reliable configuration sequence is to keep each test narrow:
- Confirm that the base Omnigent process starts.
- Confirm that the local web UI loads at port 6767.
- Add the provider or harness required for one selected agent workflow.
- Resolve any provider authentication or harness compatibility errors locally.
- Start a limited test session with appropriate approvals and permissions.
- Confirm that the session behaves as expected before allowing remote users to reach the interface.
This progression prevents a provider failure from being mistaken for an HTTP tunnel failure. It also reduces the chance of exposing an incompletely configured agent interface.
Connect the verified Omnigent web UI through Localtonet
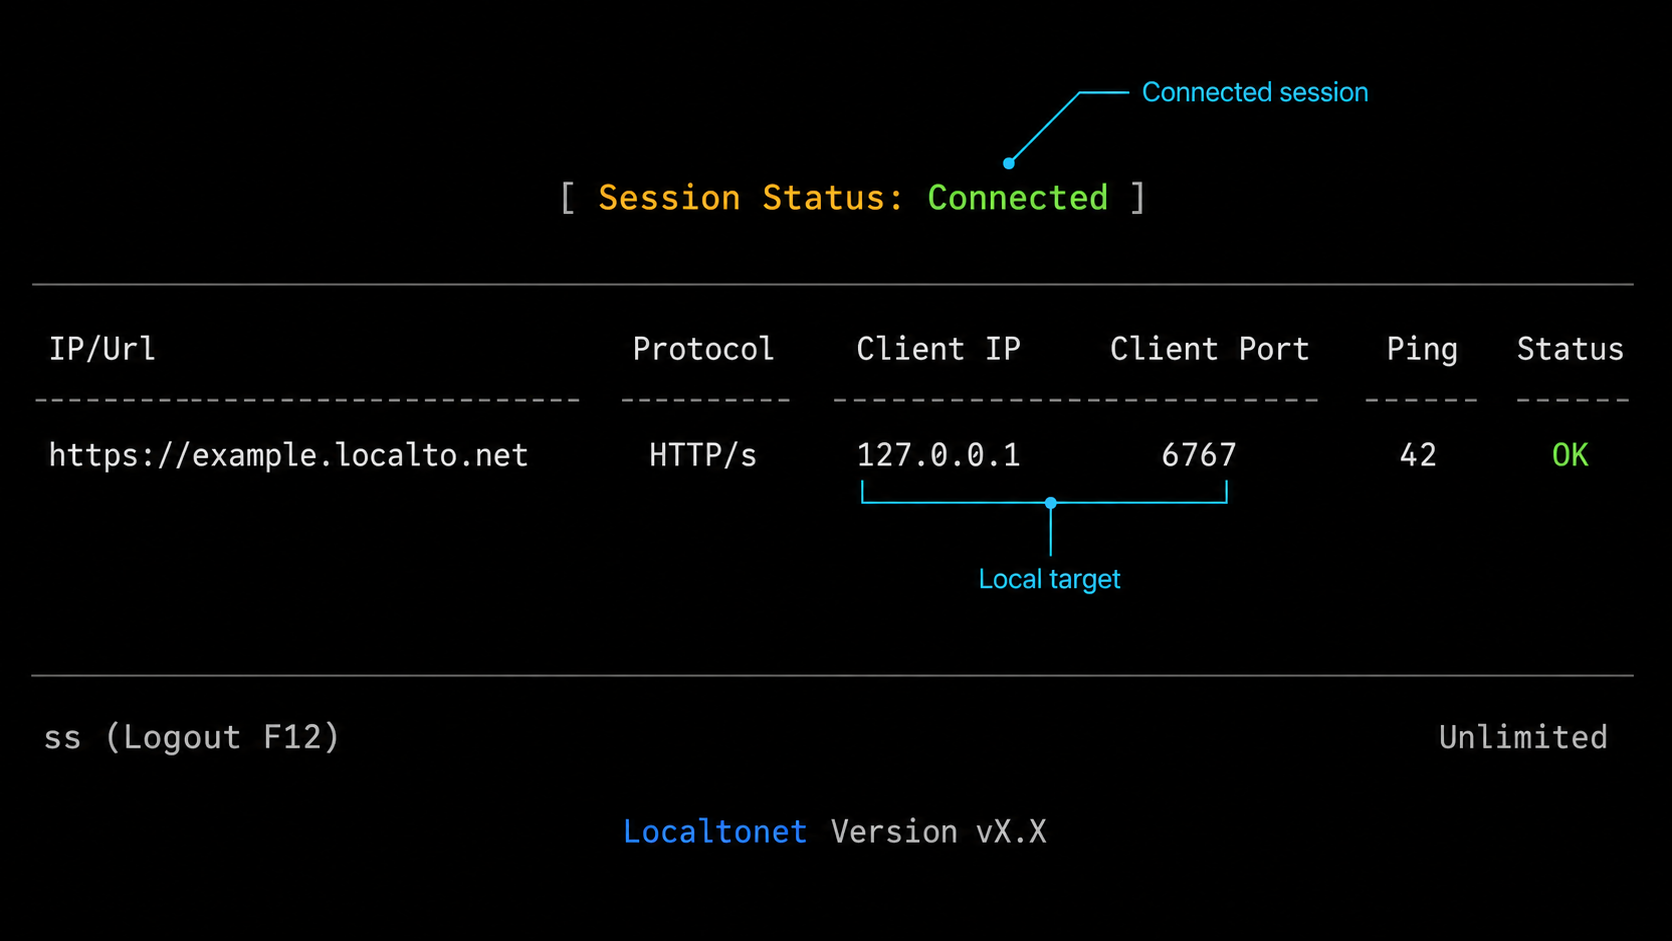
After http://localhost:6767 works on the Windows host, you can configure an HTTP tunnel with Localtonet. Our client establishes an outbound connection to a selected Localtonet relay server. The tunnel forwards requests from its assigned public HTTPS address to the local Omnigent HTTP target.
An HTTP tunnel is the appropriate family for this workflow because Omnigent exposes a browser-based HTTP interface at a confirmed local port. A raw TCP tunnel is not necessary merely to publish that web UI, and standard HTTP tunneling should not be described as a VPN. Localtonet VPN Manager is our separate private mesh VPN feature.
Install and run the Localtonet client
Run our client on the Windows device hosting Omnigent, or on a device that can reach the Omnigent endpoint. For the simplest native Windows setup, use the same host and leave Omnigent running.
Authenticate and select the Windows device
Use the device-specific authentication token associated with the client. Select the connected device in the dashboard. Never copy its token into documentation, screenshots, scripts, chat messages, or a public repository.
Select an available relay server
Choose a server or region from the values currently available in your dashboard. Availability can vary, so this guide does not hardcode a server code or claim that every option is included in every plan.
Create an HTTP tunnel to the local target
Configure the tunnel to use the local Omnigent service at IP address 127.0.0.1 and port 6767 when the Localtonet client is running on the same Windows machine. Choose an available HTTP process type according to your account and current dashboard options.
Start the tunnel
Creating a tunnel does not make it active. Use the Start button and wait until the selected client is connected and the tunnel is running.
Test the assigned public address
Open the assigned public HTTPS URL from another network or device and confirm that the Omnigent interface loads. If it fails, keep the local test and tunnel status checks separate while diagnosing the problem.
For current dashboard details, consult our Localtonet HTTP tunnel documentation. HTTP and File Server tunnels can use a generated subdomain, a selected subdomain where supported, or a custom domain. Exact custom-domain DNS requirements should always be checked against current documentation rather than inferred from an older interface.
Why use 127.0.0.1 as the target?
When both processes run on the same Windows host, 127.0.0.1 explicitly identifies that host's loopback interface. It corresponds to the local-only meaning of localhost while avoiding dependence on hostname resolution in the tunnel target. The port remains 6767 because that is the documented Omnigent web UI port.
If the Localtonet client runs on a different device, 127.0.0.1 would refer to that other device, not to the Omnigent host. In that topology, the target must instead be a local network address through which the client device can actually reach Omnigent. This article does not invent an Omnigent bind-address setting, so the same-host arrangement is the documented and least ambiguous workflow.
| Layer | Test address or state | What success proves |
|---|---|---|
| Omnigent process | omnigent remains running |
The application started without immediately terminating. |
| Local HTTP service | http://localhost:6767 |
The Windows host can reach the Omnigent web UI directly. |
| Localtonet client | Selected device shows connected | The client has established its outbound connection to our platform. |
| HTTP tunnel | Tunnel shows running | The created tunnel has been explicitly started. |
| Remote browser | Assigned public HTTPS URL | The complete public-to-local path reaches the Omnigent interface. |
The public endpoint works only while the selected Localtonet client is connected and the tunnel is running. Creating a tunnel record is not the same as starting it. You can later stop the tunnel for temporary shutdown or delete it when it is no longer required.
Secure an internet-reachable AI agent interface
A working public URL changes the threat model. Before tunneling, only software on the Windows host could reach localhost:6767. After the HTTP tunnel starts, anyone who can reach and use the assigned address may be able to interact with whatever Omnigent exposes there, subject to the application's configured controls.
AI agent interfaces can be especially sensitive because sessions may expose project context, files, terminal output, model interactions, provider usage, or actions performed by tools. Treat the public URL as access to an operational control surface, not as a harmless static website.
Do not assume that an unguessable-looking address is a complete authorization mechanism. Verify Omnigent's current authentication, session-sharing, collaboration, and policy configuration before giving anyone access. Share the endpoint only with intended users, apply least privilege, and stop the tunnel when remote access is not needed.
Apply controls at the correct layer
Network reachability and agent authorization are different controls. Localtonet carries HTTP traffic to the configured target. Omnigent remains responsible for the behavior of its server, agent sessions, approvals, model credentials, tool permissions, policies, and collaboration features. A successful HTTPS connection at the tunnel edge does not prove that application permissions are correctly configured.
Review these areas before remote use:
- Application access: Confirm how the installed Omnigent version authenticates or authorizes users and shared sessions.
- Agent permissions: Use the least tool, filesystem, network, and execution access required by the task.
- Approval policies: Preserve human approval for risky actions where appropriate.
- Provider credentials: Keep API keys and subscription credentials outside public files, screenshots, and repositories.
- Project data: Avoid exposing sessions containing sensitive source code, secrets, personal data, or customer information to unintended users.
- Tunnel lifecycle: Stop the tunnel after the remote work session and delete obsolete configurations.
- Updates: Because Omnigent is alpha and actively released, review changes before updating a remotely accessible installation.
Use a staged remote test
Start with a non-sensitive session and a minimally privileged agent. Open the public URL from a device that is not relying on the Windows host's local browser state. Confirm that intended users can connect, that unintended session sharing has not been enabled, and that stopping the Localtonet tunnel removes remote reachability.
Then stop Omnigent and confirm that the public endpoint no longer reaches the application. Restart Omnigent, repeat the local check, and start the tunnel again only if remote access is still needed. These tests establish a clear operational model for later maintenance.
Troubleshoot installation, startup, and tunnel failures
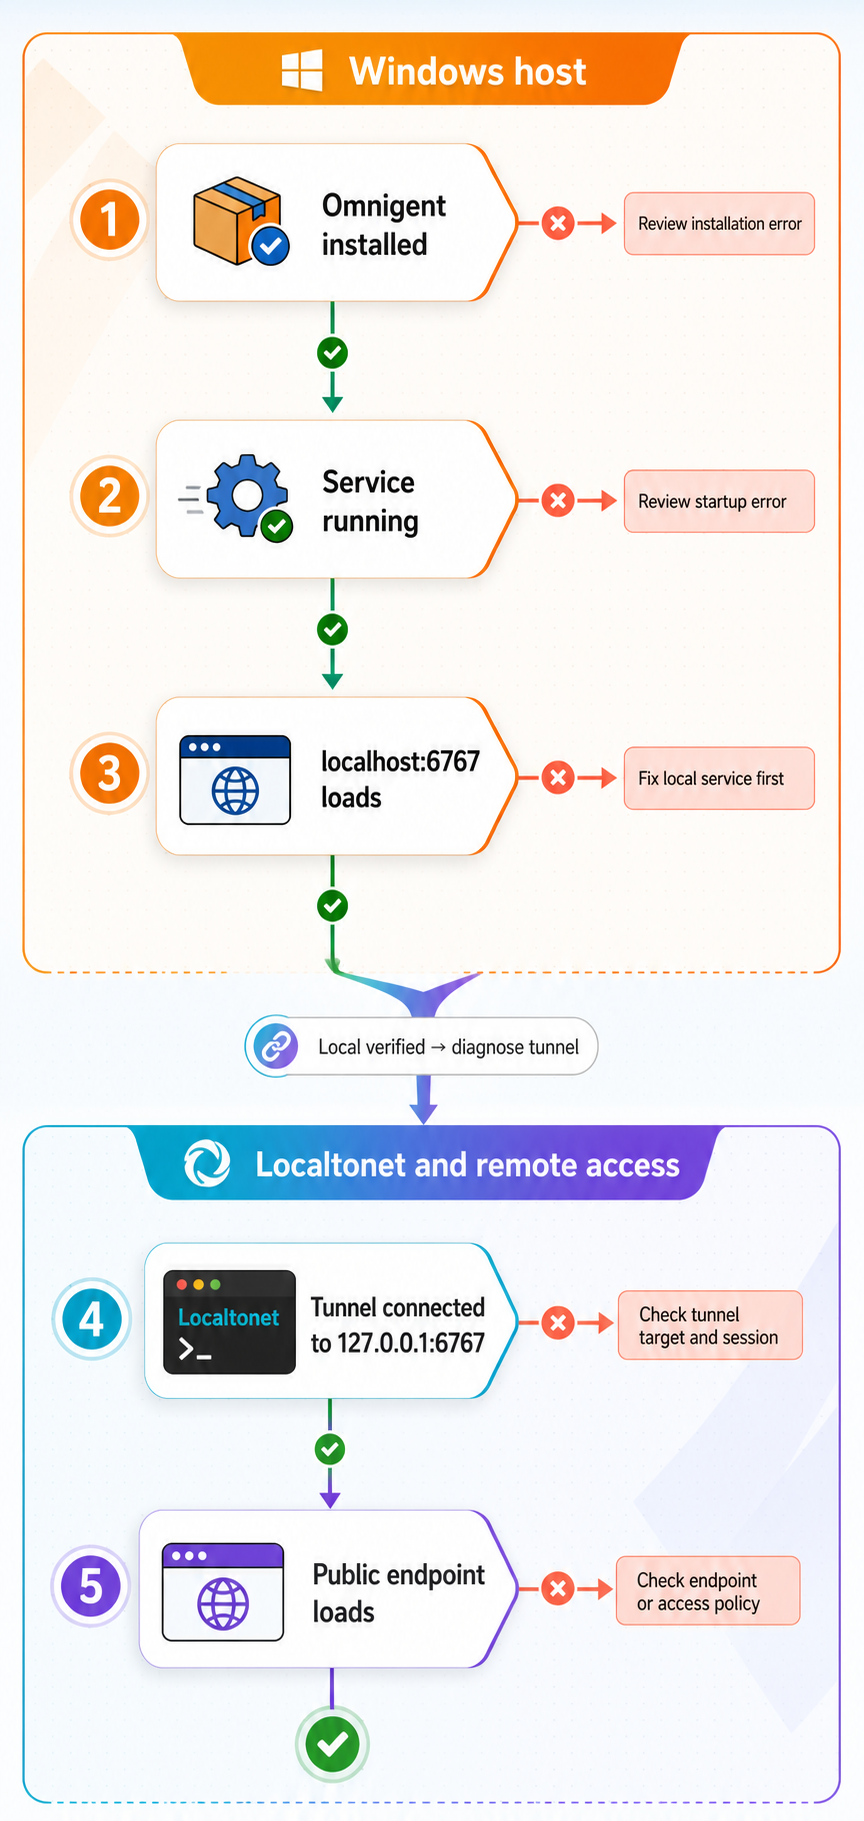
Troubleshooting is fastest when you identify the first failing layer. Begin with command availability, then application startup, then local HTTP access, then Localtonet client connectivity, and finally the public endpoint. Do not change all layers at once.
Windows cannot find uv
If uv --version returns a command-not-found error, Omnigent installation cannot proceed through the documented Windows method. Confirm that uv was installed successfully, open a fresh terminal, and repeat the version check. A stale terminal may not see a newly updated PATH.
The Omnigent installation command fails
Read the first meaningful error in the uv output. Check network access, package resolution, Python provisioning, and whether security software or organizational policy blocked the download or execution. If you used the Git repository method, also confirm that Git is installed and available.
Do not switch repeatedly among pip, uv, the POSIX shell installer, and repository installation without understanding the original failure. Native Windows has a documented uv path, while the shell bootstrap belongs to POSIX environments.
Windows cannot find omnigent after installation
Close the terminal, open a new one, and try omnigent again. If it still is not found, review uv's installation output and tool environment rather than downloading an unrelated executable. Make sure you are using the same Windows account under which the tool was installed.
Omnigent exits immediately
Capture the terminal error before closing the window. Common diagnostic categories include a missing dependency, an unsupported native Windows workflow, a package installation problem, or a port conflict. The exact remedy depends on the reported error, so avoid inventing flags or configuration files.
If the failure concerns a native terminal wrapper or POSIX-only dependency, confirm whether that workflow requires Linux, macOS, or WSL. Native Windows degraded mode does not promise support for every Omnigent harness.
The browser cannot open localhost:6767
Verify that the omnigent process is still running. Re-enter the exact URL http://localhost:6767 and make sure another port was not substituted. Test with PowerShell:
Invoke-WebRequest http://localhost:6767A connection-refused result usually indicates that no service is accepting connections at that endpoint at that moment. Return to the Omnigent terminal and resolve its startup error. A timeout, proxy-generated page, or response from another application requires checking the local Windows networking environment and whether another process owns port 6767.
The local UI works but the public URL does not
Leave the successful local browser test intact and inspect the tunnel layer:
- Confirm that the Localtonet client is running on the expected Windows device.
- Confirm that the selected device shows connected.
- Confirm that the HTTP tunnel targets
127.0.0.1on port6767for a same-host setup. - Confirm that the tunnel was started after it was created.
- Use the currently assigned public URL rather than an old or deleted endpoint.
- Keep the Omnigent process running while testing remotely.
If the Localtonet client is running on another machine, remember that its 127.0.0.1 is not the Omnigent host. Move the client to the Omnigent machine for the straightforward setup, or independently establish a reachable LAN target supported by the application's listening configuration.
The public page loads but an agent does not run
That result proves the HTTP path is working. Return to Omnigent's provider, harness, agent-definition, credentials, policy, and Windows compatibility configuration. A tunnel transports application traffic but does not install SDKs, authenticate model providers, correct YAML, or add operating-system features required by a harness.
Remote access stopped unexpectedly
Check both running processes. Omnigent must continue serving the local web UI, and the Localtonet client must remain connected with the tunnel running. A Windows restart, closed terminal, stopped client, stopped tunnel, lost outbound connection, or terminated Omnigent process can interrupt access.
First restore and verify the local UI. Then restore client connectivity and start the tunnel. This order avoids treating an application outage as a relay or tunnel failure.
Port 6767 is already occupied
Stop duplicate Omnigent instances and determine whether another application is using the confirmed port. This article does not provide an undocumented Omnigent port override. Do not guess a command-line option or environment variable. If the current Omnigent documentation supports changing the port, follow that exact version-specific configuration and update the Localtonet target to match.
Frequently asked questions
Does Omnigent run natively on Windows?
Yes. Omnigent documents native Windows operation in degraded mode. The server, web UI, and documented SDK-based harness workflows are available, while some native terminal-wrapper and POSIX-dependent workflows require Linux, macOS, or WSL.
What command installs Omnigent on native Windows?
After installing uv, run uv tool install --python 3.12 omnigent in a Windows terminal. The POSIX install_oss.sh bootstrap is not the native PowerShell installation path.
What is the Omnigent web UI address?
Starting Omnigent with omnigent launches its local web UI at http://localhost:6767. Verify that address on the Windows host before configuring remote access.
Which Localtonet tunnel type should I use for Omnigent?
Use an HTTP tunnel for the browser interface described in this guide. For a same-host setup, point it to 127.0.0.1 on port 6767. This is standard HTTP tunneling, not VPN functionality.
Do I need router port forwarding or a public IP address?
No. Our client establishes an outbound connection to a Localtonet relay server. This lets the tunnel provide a public endpoint without inbound router port forwarding, firewall changes, VPN setup, or a public IP address.
Does creating the tunnel make it immediately available?
No. Creating a tunnel does not mean it is running. Start it with the Start button. The selected Localtonet client must also remain connected, and Omnigent must remain running on the local Windows host.
Can Localtonet configure my Omnigent agents or provider credentials?
No. The tunnel provides network access to the local HTTP service. Agent YAML, provider authentication, harness selection, policies, approvals, and tool permissions remain Omnigent configuration responsibilities.
Is the public HTTPS URL enough to secure Omnigent?
No. HTTPS protects the public web connection, but application authorization, session sharing, agent policies, provider credentials, and tool permissions must still be configured appropriately. Treat the URL as access to a sensitive operational interface and stop the tunnel when remote access is unnecessary.
Connect your verified Omnigent web UI with Localtonet
Install Omnigent on Windows, confirm that http://localhost:6767 works locally, then create and start an HTTP tunnel to reach the interface from an authorized remote device.


