

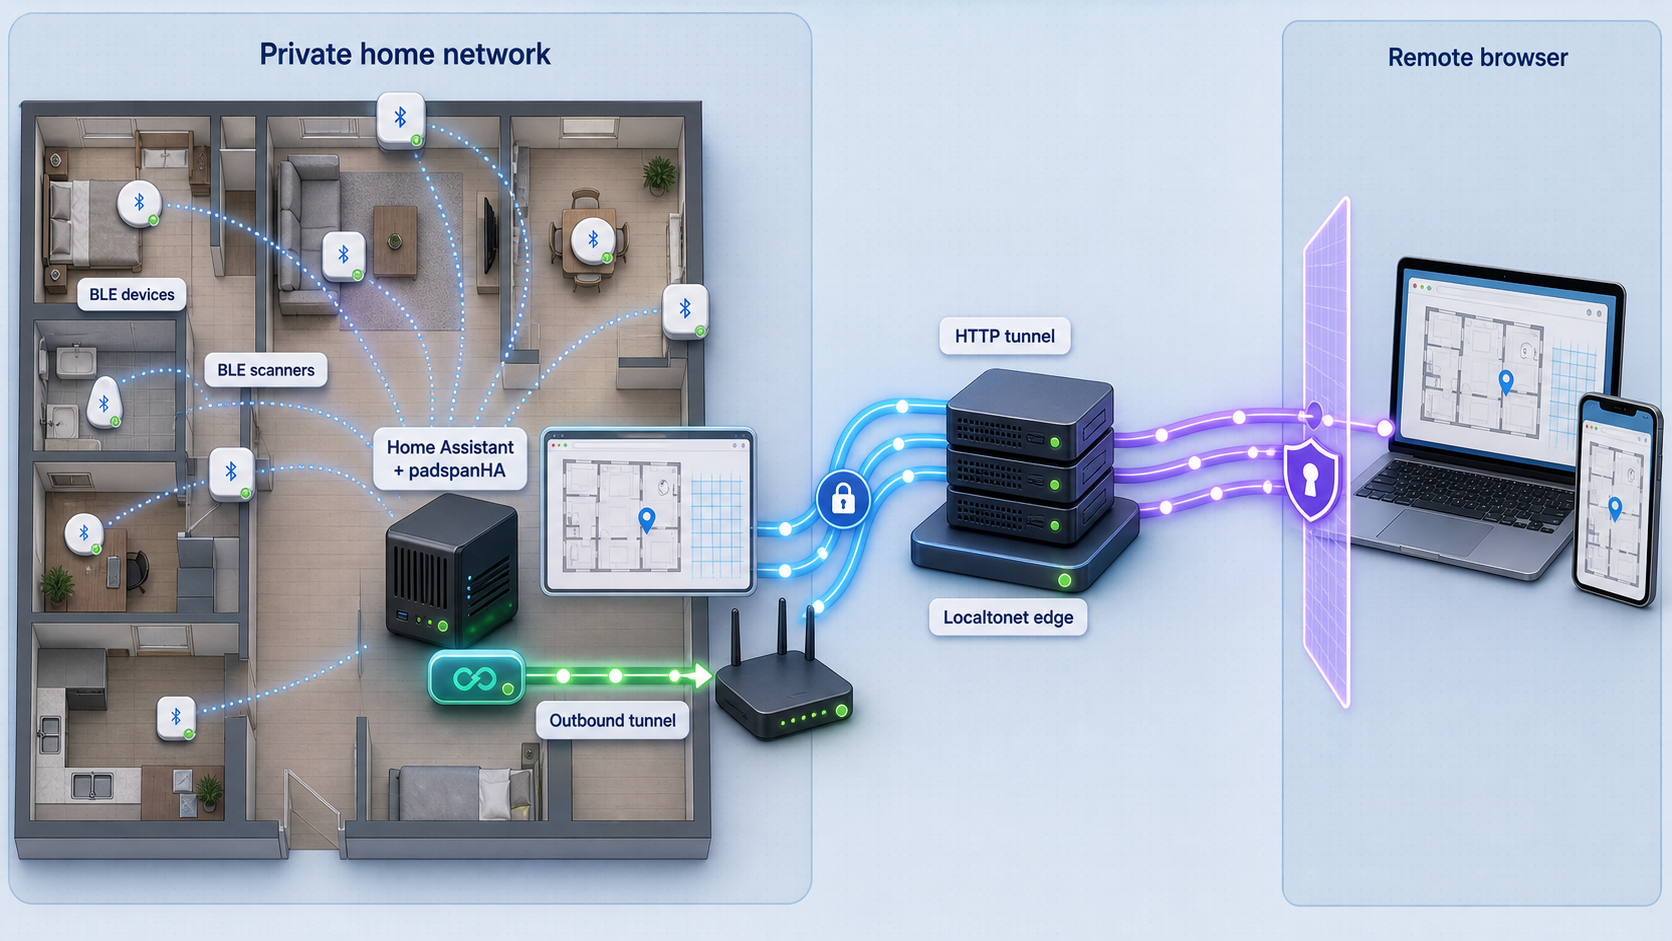
Build a working BLE room-presence system locally, then publish the verified Home Assistant endpoint
padspanHA adds room-level Bluetooth Low Energy presence tracking, floor plans, scanner placement, calibration tools, and dedicated tracking views to Home Assistant. This tutorial covers the full workflow from HACS installation and initial configuration through scanner discovery, device registration, floor-plan preparation, calibration, local verification, safe updates, and remote access with a Localtonet HTTP tunnel. Because padspanHA runs inside Home Assistant, the tunnel exposes the broader Home Assistant interface rather than an isolated padspanHA service.
📋 What's in this guide
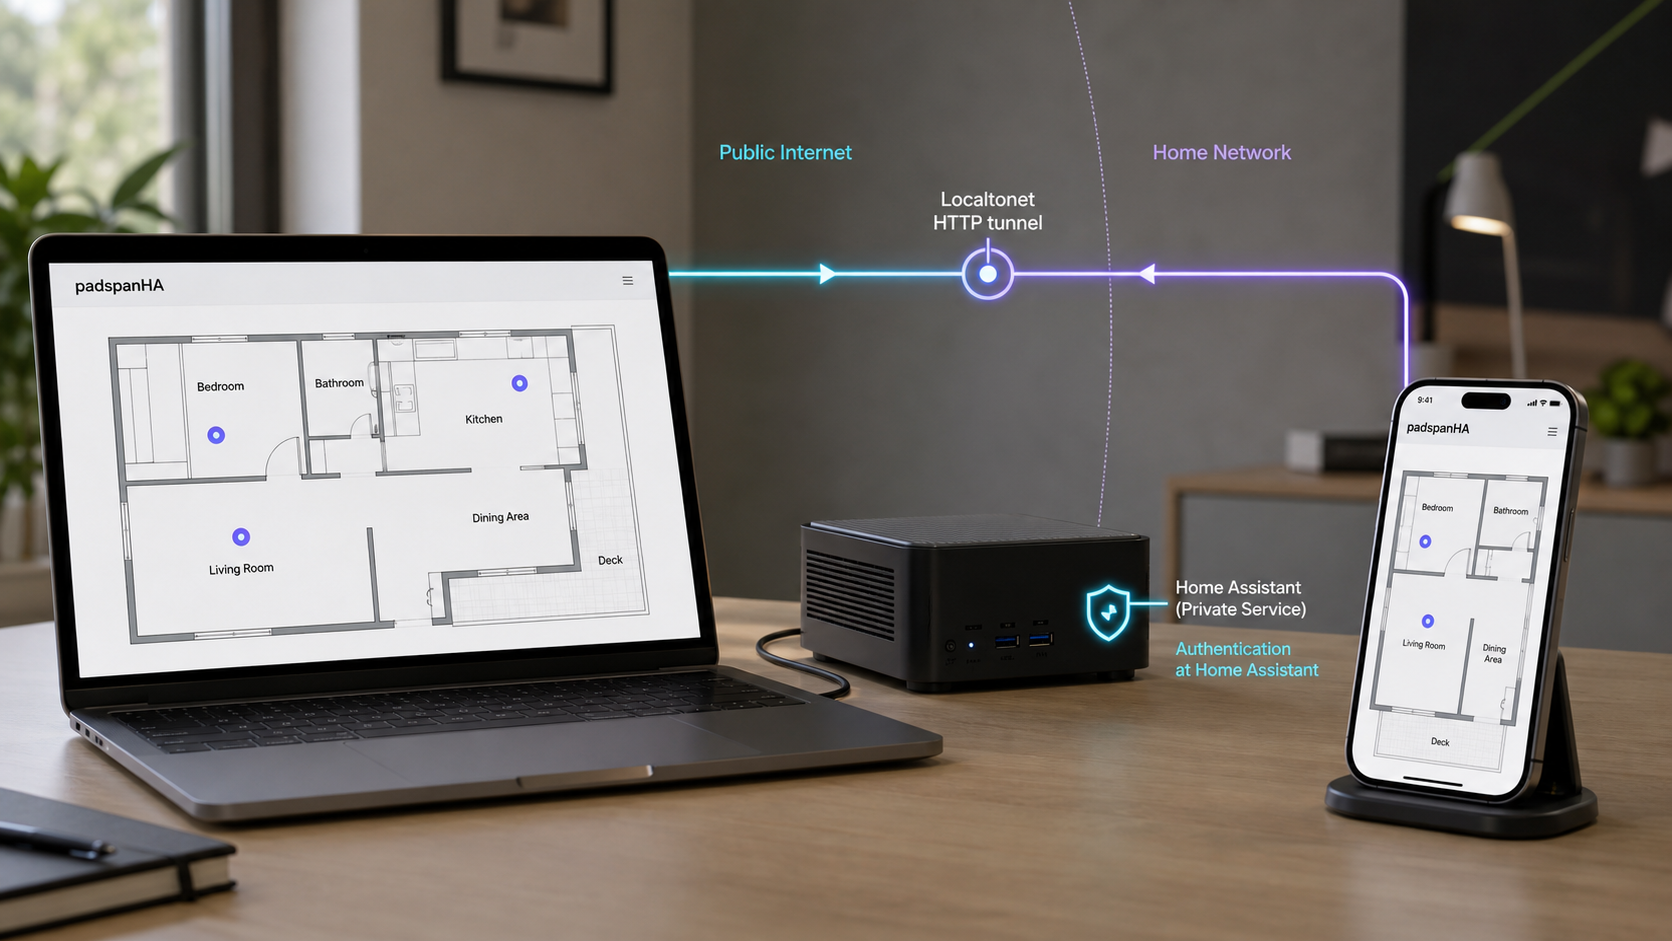
How padspanHA, Home Assistant, and Localtonet fit together
padspanHA is a custom Home Assistant integration for Bluetooth Low Energy room-presence tracking. It goes beyond a basic home-or-away result by associating configured devices with rooms and displaying their positions on floor plans. The project includes two-dimensional and multi-floor three-dimensional views, room boundary tools, scanner placement, calibration, follow mode, movement-related views, and a device identity system intended to cope with the changing identifiers used by some BLE devices.
The integration consumes BLE observations from compatible scanner sources. Home Assistant Bluetooth proxies and Bermuda proxies are detected directly according to the project documentation. ESPresense nodes use MQTT, so that route requires Home Assistant's MQTT integration to be configured and the ESPresense MQTT option to be enabled under Manage → ESPresense MQTT in PadSpan. Installing padspanHA does not create BLE coverage by itself. You still need suitable scanner inputs, identifiable devices, a floor plan, and enough calibration data for useful positioning.
Localtonet addresses a different part of the system. Our client runs on a device that can reach Home Assistant and establishes an outbound connection to a Localtonet relay. An HTTP tunnel then provides a public HTTPS address for the selected local Home Assistant service without inbound router port forwarding, firewall changes, VPN setup, or a public IP address.
padspanHA is presented through Home Assistant. If the tunnel targets the Home Assistant web service, the public address reaches that service as a whole. The permissions of the account used to sign in determine what an authenticated user can see or control. Treat this as exposure of a sensitive home-automation interface, not as publication of a read-only floor-plan page.
Prerequisites and information to collect
Complete the local prerequisites before changing either product. This keeps installation problems, BLE positioning problems, and tunnel problems separate. You should be able to identify which layer failed instead of debugging the entire chain at once.
| Requirement | Why it is needed | What to verify |
|---|---|---|
| Supported Home Assistant installation | padspanHA runs as a custom Home Assistant integration. | Confirm that the target Home Assistant installation is operating normally and is compatible with the current padspanHA release. |
| Administrator access | Installing through HACS, restarting Home Assistant, and adding integrations require appropriate permissions. | Sign in locally with an administrator account before beginning. |
| HACS | The project documents HACS as its installation and update route. | Confirm that HACS is installed, visible, and functioning on the intended Home Assistant instance. |
| Current backup | Custom integrations and later data migrations can change files and stored configuration. | Create a Home Assistant backup using the backup method supported by your installation and confirm that you know where it is stored. |
| Compatible BLE observations | Room positioning requires radio reports from scanners that padspanHA can consume. | Prepare Home Assistant Bluetooth proxies, Bermuda proxies, or ESPresense nodes as applicable. |
| MQTT for ESPresense | ESPresense observations enter PadSpan through MQTT. | Configure Home Assistant's MQTT integration and confirm that the ESPresense nodes are publishing before enabling the PadSpan option. |
| Trackable BLE device | A real device is needed to test identity and positioning. | Choose a supported tag, phone, watch, or other BLE device and review the identity method required for that device type. |
| Floor-plan image | Map placement and room geometry require an image of the physical space. | Prepare a PNG or JPG without personal annotations that do not belong in Home Assistant. |
| Localtonet client device | The client establishes the outbound relay connection and must reach Home Assistant. | Select the Home Assistant host or another continuously available device on the same reachable network. |
| Verified Home Assistant endpoint | The HTTP tunnel needs the real local scheme, address, and port. | Record whether local access uses HTTP or HTTPS, the reachable address, and the configured port. |
Review the current padspanHA installation instructions and the current padspanHA project page before choosing a release. The project is developing actively, and screen names or migration requirements can change between versions.
Open Home Assistant locally from the device that will run the Localtonet client. Record the complete origin, including http:// or https://, the host or IP address, and the port if one is present. Do not assume port 8123, and do not assume that an address usable from your laptop is also reachable from a container or another network namespace.
Install padspanHA through HACS
Create and verify a backup
Back up the target Home Assistant installation before adding custom code. Record the installed Home Assistant version and the padspanHA version you intend to install. Keep the backup outside any temporary working directory used during installation.
Open the HACS integrations area
Sign in to the local Home Assistant interface as an administrator, open HACS, and go to its integrations section. Confirm that you are modifying the intended Home Assistant instance.
Add the official repository
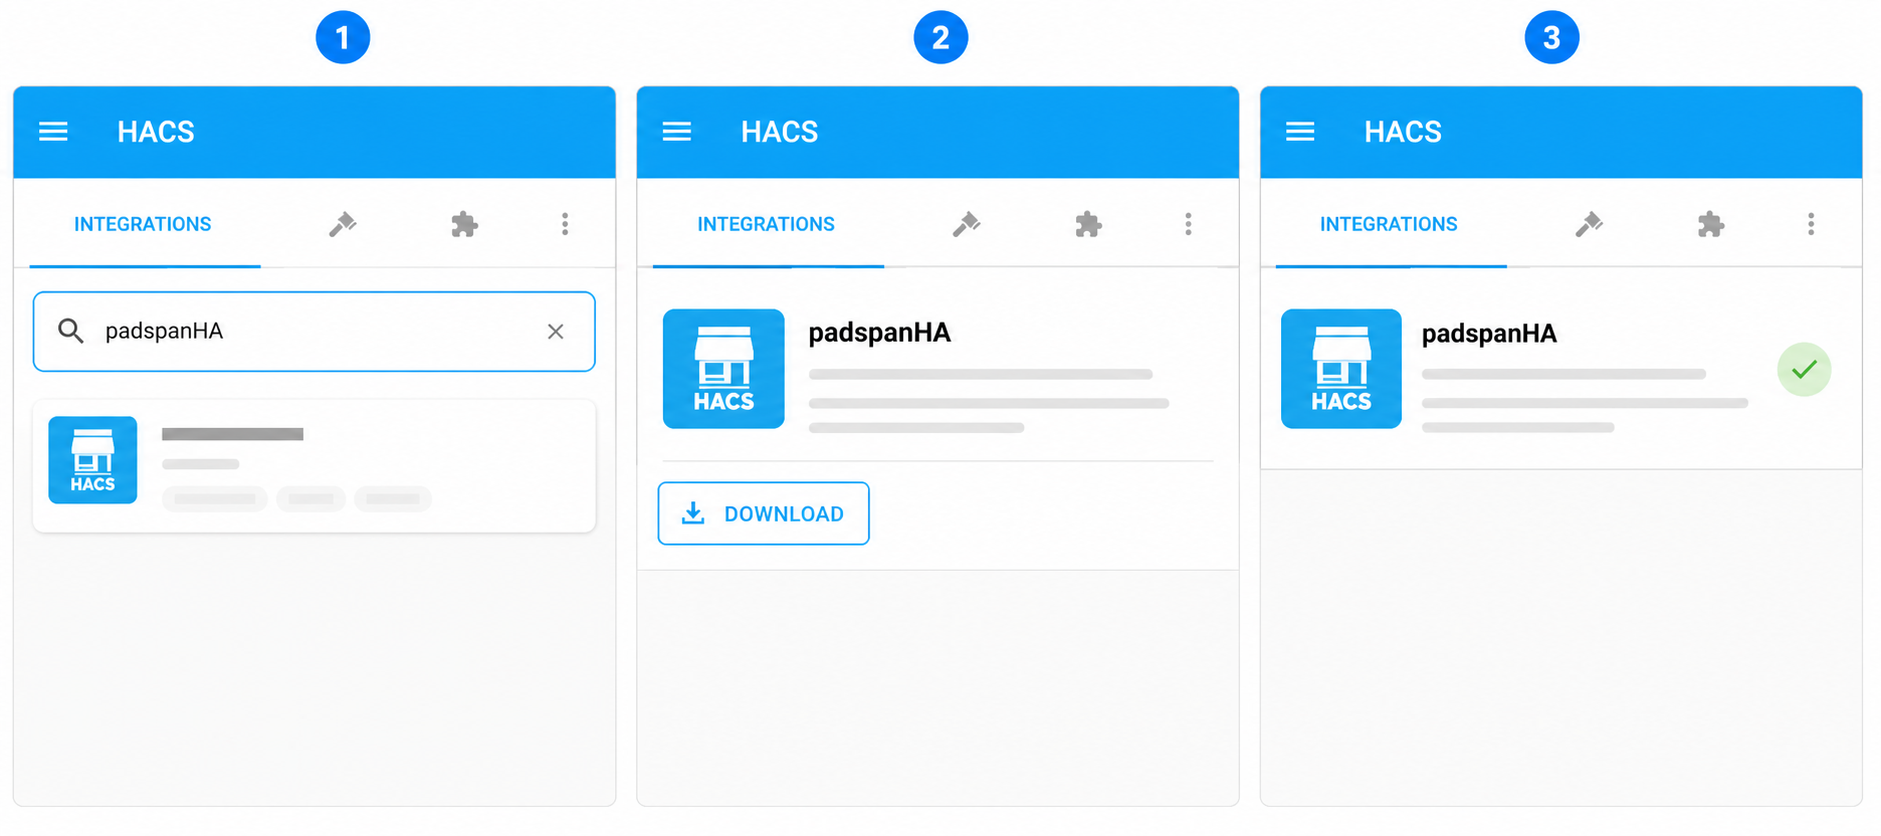
Open the HACS custom-repository dialog and enter https://github.com/gbroeckling/padspanHA. Select Integration as the repository type, then add it. Avoid similarly named repositories or copied packages from an unverified source.
Find and download padspanHA
Search the HACS integrations list for padspanHA, open the repository entry, and use the HACS download action. Review the displayed version and release notes before confirming. Use the release channel you intentionally selected rather than switching to a beta only because its version number is higher.
Restart Home Assistant
After HACS finishes downloading the integration, restart Home Assistant so the custom component is loaded. Wait for Home Assistant to return fully and confirm that the main interface opens without startup errors before adding the integration.
Add the integration in Home Assistant
Go to Settings → Devices & Services, choose Add Integration, search for PadSpan, and select it. Complete the configuration flow shown by the installed release. If PadSpan is missing from the search results, stop here and troubleshoot the HACS download and restart rather than attempting remote access.
Open PadSpan and complete its initial setup
Open the PadSpan panel or integration entry created by the configuration flow. Complete the initial setup prompts presented by the current version. An established installation should open its existing workspace rather than requiring a new floor plan.
Basic installation is successful when Home Assistant restarts normally, PadSpan appears as an installed integration, and its panel or views load locally without a component startup error. This does not yet prove that scanner data, identity resolution, floor geometry, or room positioning is correct.
Configure scanners, devices, floor plans, and calibration
Treat configuration as a sequence. First prove that PadSpan receives observations. Then register a device identity. After that, build the map geometry and place scanners. Calibrate only when the underlying scanner and map data are credible.
1. Connect or discover scanner inputs
Open PadSpan's scanner management view and inspect the discovered radios. Home Assistant Bluetooth proxies and Bermuda proxies should be available through their supported direct-detection paths. Give scanners clear names based on physical location so that placement and later troubleshooting do not depend on opaque identifiers.
For ESPresense, first confirm that Home Assistant's MQTT integration is configured and receiving the node data. Then open Manage → ESPresense MQTT in PadSpan and enable the corresponding option. If ESPresense nodes remain absent, troubleshoot MQTT topics, node connectivity, and Home Assistant's MQTT integration before changing the floor plan.
Current Home Assistant releases may control the scanning mode of an ESPHome Bluetooth proxy through the device configuration rather than the proxy's firmware YAML alone. If a scanner reports an unexpected mode, inspect Settings → Devices & Services → ESPHome → your device → Configure → Bluetooth scanning mode. Active scanning also consumes shared 2.4 GHz airtime, so change it deliberately.
2. Register a device to track
Open PadSpan's device registry or guided device setup and select a BLE device that is visible to the scanner network. Assign a recognizable label and the identity information required by that device type. PadSpan uses a stable internal identity so a physical device can remain associated with its record when a volatile radio identifier changes.
The easiest identity method depends on the device. Android devices can use the Home Assistant Companion App BLE transmitter in iBeacon mode. Apple phones and watches can use an Identity Resolving Key obtained through the project's documented IRK capture workflow. Devices with a stable iBeacon identity can be registered using that stable identity. Experimental MAC rotation bridging is available for devices that expose no stable identifier, but probabilistic matching can misassociate devices in crowded radio environments and should not be treated as equivalent to a cryptographic or stable identity.
Confirm that the registered device receives fresh observations before proceeding. A label in the registry only proves that a record exists. It does not prove that current advertisements are being resolved to that record.
3. Upload and scale the floor plan
Open the map library or floor-plan setup view and upload the prepared PNG or JPG. Use the two-point measurement tool on a known real-world distance to establish the map scale. Choose two points that are far enough apart to reduce measurement error, enter their real distance accurately, and review any aspect-ratio validation shown by PadSpan.
For a multi-floor property, add each relevant plan and use the current alignment tools to position the plans in a common coordinate system. Current releases store map placement in metres. Do not depend on older tutorials that describe a separate master-map record if the installed interface no longer presents one.
4. Draw room boundaries
Use the floor-plan editor to draw room boundary polygons over the image. Keep each polygon aligned with the actual walkable room rather than merely tracing decorative walls. Use clear room names that correspond to the areas you want Home Assistant to report.
Check shared walls, stair openings, exterior spaces, and overlapping corners carefully. Positioning can only classify a result against the geometry you define. An inaccurate boundary can produce a technically valid but operationally misleading room assignment.
5. Place the scanners
Drag each detected scanner marker to its measured physical location on the scaled map. Match the marker's radio identifier and name to the actual device. Do not estimate all positions from memory if accurate measurements are available.
Scanner height, obstructions, walls, metal appliances, and local radio noise affect BLE observations. Map placement is therefore part of the model, not merely a visual annotation. If a scanner is moved physically, update its map position and reassess calibration.
6. Collect calibration fingerprints
Open PadSpan's phone-friendly calibration panel and begin a walk-around collection. Carry the selected reference device to representative locations across the configured rooms and allow the scanner network to collect observations. Include central areas, boundaries, hallways, and locations where the first results appear ambiguous.
Fit the calibration model after collecting a useful spread of samples. Review the available quality indicators and coverage visualization. The project includes fingerprint matching, per-scanner model fitting, coverage heatmaps, and guided suggestions for areas that need more samples. Return to weak or uncovered areas and collect additional fingerprints rather than assuming that a larger tunnel or faster internet connection can improve radio positioning.
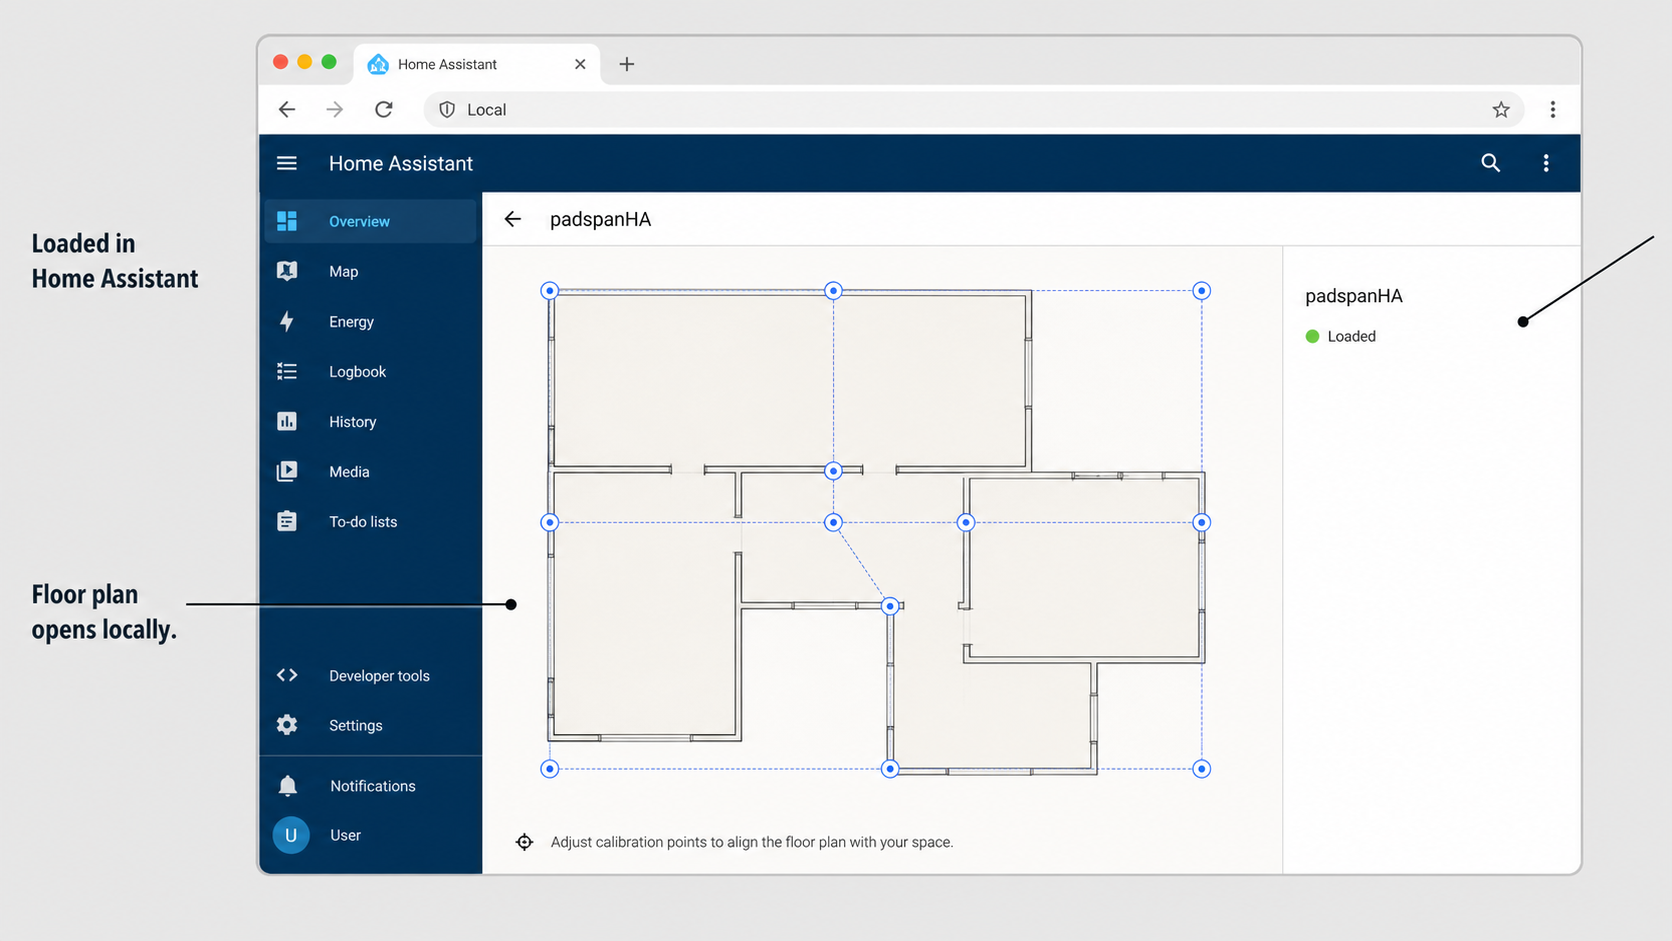
Verify installation and BLE positioning locally
Perform local verification from the trusted network before creating a Localtonet tunnel. Use the exact Home Assistant URL that will later become the tunnel target, and test from the intended Localtonet client device whenever possible.
Basic installation verification
- Home Assistant completes its restart and the normal interface loads.
- PadSpan appears in Settings → Devices & Services.
- The PadSpan panel or its dedicated views open without an integration startup error.
- Existing installations retain their expected maps and configuration after startup.
Passing these checks proves that the custom integration is installed and its interface is available. An empty map or missing position can still indicate incomplete scanner, identity, map, or calibration configuration.
Scanner and positioning verification
- Expected scanners appear with recent observations rather than stale data.
- The chosen BLE device resolves to the intended device record.
- The floor plan has a credible real-world scale and non-overlapping room boundaries.
- Scanner markers correspond to their measured physical positions.
- Calibration coverage includes the rooms and boundaries used in the test.
- Moving the device between rooms eventually produces plausible room changes.
A room result need not change at the instant a person crosses a doorway. Evaluate repeated observations and movement across representative locations rather than using one packet at one boundary as the entire test. If results are poor, inspect scanner coverage, device identity, geometry, and calibration before changing the remote-access layer.
Home Assistant endpoint verification
From the device selected to run the Localtonet client, open the complete local Home Assistant origin. Verify the scheme, host, and port. If the browser uses a URL such as https://home.example.internal:9443, that is an HTTPS origin on port 9443. If it uses a local HTTP address with another configured port, record that exact combination.
Use 127.0.0.1 or localhost only when the Localtonet client and Home Assistant share the same relevant host and network namespace. A Localtonet client inside a different container, virtual machine, or device usually needs an address that routes to Home Assistant from that environment. Test the target from the client device before creating the tunnel.
Update, back up, migrate, and recover safely
padspanHA is actively developed, and recent releases include data migrations as well as interface and positioning changes. At the time reflected by the supplied project information, v0.38.5 was the stable release and v0.38.6 was on the beta channel. Check the current HACS entry and project changelog rather than treating those version numbers as permanently current.
Use an intentional update channel
Stable and beta releases serve different purposes. An installation that controls a daily-use household view should not move to beta accidentally. Before updating, record the currently installed version, selected channel, and relevant release notes. The project previously corrected an update-manifest problem that caused some stable installations to report an older release as current, so verify updates through the current HACS repository entry when the in-integration result appears inconsistent.
Back up before an update
Create a Home Assistant backup before downloading the new release. If PadSpan offers its own backup and restore tools under Health → Backup/Restore, create or confirm a current PadSpan backup as well. These backups serve different recovery scopes: the Home Assistant backup protects the broader installation, while PadSpan's tool is designed for its own stored data.
Allow documented migrations to finish
The v0.38 placement migration changed how map positions are stored, consolidating placement in metres. The project states that this conversion takes an automatic snapshot before changing data and refuses to run if the snapshot cannot be created. It also records progress so an interrupted conversion can resume rather than remaining silently half-applied.
After an update, let Home Assistant and PadSpan finish startup before judging the result. Open the map library, verify each floor, inspect room geometry and scanner placement, and test a known tracked device. Do not repeatedly restart the system during an active migration unless the project documentation specifically directs you to do so.
If a release has converted the stored map format and the result appears wrong, restore the pre-conversion snapshot from Health → Backup/Restore inside PadSpan as directed by the project. Rolling HACS back can leave an older integration version reading files already converted for a newer format. Follow release-specific recovery instructions before changing versions.
Recovery order
- Stop making map or calibration changes after detecting a migration problem.
- Record the installed version and the symptoms.
- Review the release notes for that exact upgrade path.
- Use PadSpan's Backup/Restore workflow when the release instructs you to restore its snapshot.
- Restart only as required by the recovery procedure and verify maps locally.
- Use the broader Home Assistant backup only when recovery requires restoring the wider installation.
- Keep the Localtonet tunnel stopped while repairing or restoring the administrative interface.
Access padspanHA with a Localtonet HTTP tunnel
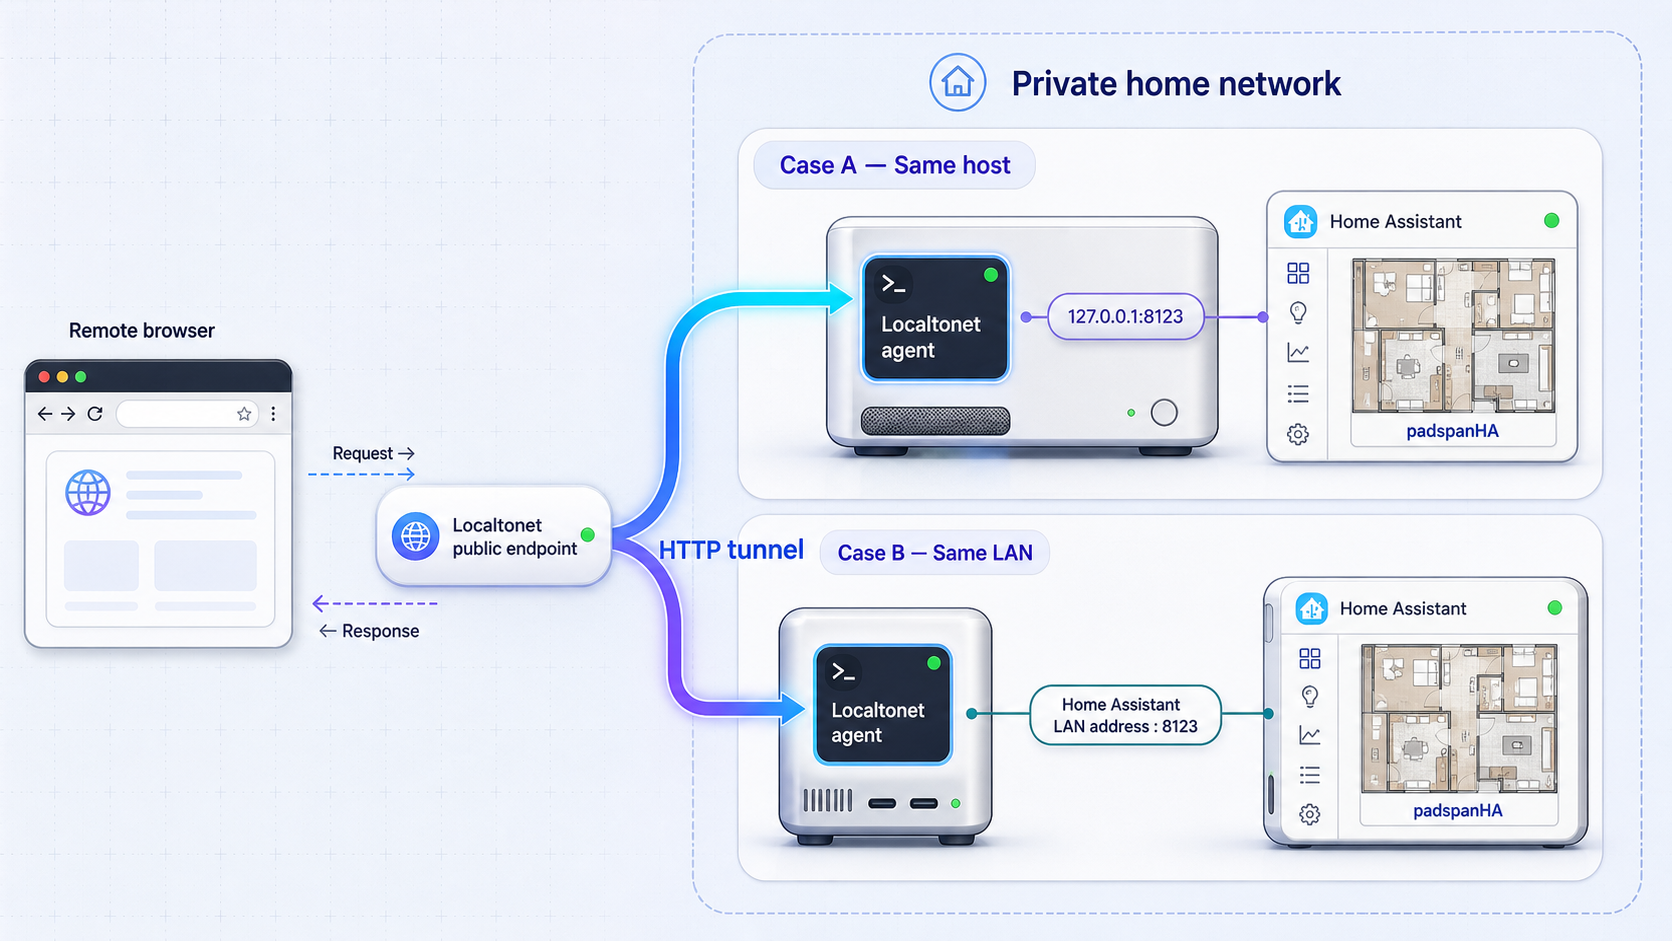
Install our client on the Home Assistant host when that deployment supports it, or on another Windows, Linux, or macOS device that can reach the verified Home Assistant origin. Use the current download and installation path presented by Localtonet for that operating system. Do not copy an unverified command or package name from an older article.
The HTTP tunnel target must match the local service. If Home Assistant accepts plain HTTP at the selected local address and port, configure the target as HTTP. If the reachable Home Assistant origin itself requires HTTPS, select the corresponding secure local target behavior available in the current HTTP tunnel form. A public HTTPS URL does not mean the local target is automatically HTTPS. Public edge termination and the connection from the Localtonet client to the local service are separate parts of the route.
Install and run the Localtonet client
Install the current Localtonet application for the operating system on a device that can reach Home Assistant. Start the client and confirm that it remains online. From that same device or network namespace, verify the Home Assistant origin one more time.
Authenticate or select the client device
Use the device-specific authentication token associated with the client that will carry the tunnel. Select that AuthToken in the dashboard when creating the tunnel. Treat it as a secret and redact it from screenshots, logs, support messages, configuration exports, and published tutorials.
Select an available relay server
Select a currently available server or region from the dashboard. Valid choices vary, so use the options shown in the current product instead of hardcoding a server code from an article.
Create the HTTP tunnel
Open the HTTP tunnel page and select the desired Process Type: Random Sub Domain, Custom Sub Domain, or Custom Domain where available. These options publish the same target content at a public HTTPS address. Enter the verified Home Assistant local address, scheme, and port. Do not enter an assumed padspanHA path or a hardcoded port from another installation.
Start the tunnel
Creating the tunnel only saves its configuration. Use the Start button to run it. Confirm that the selected Localtonet client is connected and that the tunnel reports its running state. The public endpoint is available only while both conditions remain true.
Test the public HTTPS address remotely
Disconnect a phone from the home Wi-Fi or use another genuinely separate network. Open the assigned public HTTPS address, confirm that the expected Home Assistant sign-in page appears, authenticate normally, and navigate to PadSpan. Test a live view long enough to detect loading or real-time connection problems.
The complete current product flow is maintained in our HTTP tunnel documentation. If you choose a custom domain, follow the current DNS instructions shown there rather than relying on copied records that may no longer match the product.
Verify browser and real-time behavior
Home Assistant uses more than a single static page request. After the sign-in screen loads, verify navigation, entity updates, PadSpan map loading, and a live tracking view. A page shell that appears while real-time updates fail is not a complete success.
Do not add Home Assistant proxy settings merely because an HTTP tunnel exists. Home Assistant's use_x_forwarded_for and trusted_proxies settings change how forwarded client information is accepted. Incorrect or overly broad values can weaken request attribution or prevent access. Change them only when the behavior of your verified deployment requires it and you can identify the actual trusted proxy address according to the
Home Assistant HTTP integration documentation.
Operate the tunnel deliberately
Keep the selected Localtonet client online for as long as remote access is required. If remote PadSpan access is temporary, stop the tunnel when the task is finished. You can restart it later without reinstalling padspanHA. Delete the tunnel when the public route is no longer needed.
Secure the exposed Home Assistant interface
A floor plan can reveal room names, building layout, scanner positions, and the movement of tracked devices. Home Assistant can additionally expose automation state, cameras, locks, alarms, energy data, and administrative controls depending on the signed-in user's permissions. Apply security controls to the whole interface before sharing the public URL.
Require strong Home Assistant authentication
Use a unique password for each Home Assistant user and enable multifactor authentication for accounts that can access the tunnel. Do not embed a long-lived access token, password, or other credential in a URL. Never publish a screenshot containing an authenticated session, QR code, recovery code, Localtonet device token, or private endpoint.
Use a dedicated least-privilege user
Avoid using the primary administrator account for routine remote viewing. Create a separate Home Assistant user with only the access appropriate to the intended task wherever the installation and selected dashboards support that separation. Administrative changes, integration installation, backup restoration, and user management should remain restricted to administrators.
Enable login-attempt protection
Home Assistant's HTTP integration supports IP banning after repeated failed login attempts. Review the current Home Assistant documentation before changing YAML and choose a threshold suitable for your environment. A representative configuration structure is:
http:
  ip_ban_enabled: true
  login_attempts_threshold: 5
Validate configuration before restarting Home Assistant. The threshold above is an example policy value, not a universal requirement. If traffic passes through a proxy, confirm how Home Assistant identifies source addresses before relying on per-IP behavior.
Redact location and identity data
Remove household names, street information, room labels, device identities, scanner IDs, personal tracking labels, floor plans, and public tunnel addresses from screenshots unless they are essential and safe to disclose. A tutorial image should use redaction that cannot be reversed by simply opening the original file.
Limit tunnel availability
Start the tunnel only when remote access is required if continuous access is unnecessary. Stop it during backup restoration, migration troubleshooting, account recovery, or major Home Assistant maintenance. Delete obsolete tunnels and remove unused Home Assistant users.
Do not disable authentication, broadly trust private address ranges as proxies, expose secrets in a dashboard, or grant administrator access to every remote user. Diagnose the failing layer and make the smallest documented configuration change needed.
Troubleshoot by layer
PadSpan is absent after the HACS download
Confirm that the official repository was added as type Integration, that HACS completed the download, and that Home Assistant was restarted afterward. Check Home Assistant logs for a custom-component loading or dependency error. Do not create a tunnel until PadSpan appears locally.
The PadSpan panel opens but shows no scanners
Check the scanner source independently. Confirm that Home Assistant can see the Bluetooth or Bermuda proxy. For ESPresense, confirm MQTT connectivity and then verify that Manage → ESPresense MQTT is enabled. Scanner discovery must work before calibration or positioning can succeed.
A device appears but will not remain identified
Review the identity method for that device type. A rotating phone address should not be treated as a permanent MAC identity. Use a supported stable iBeacon identity, IRK workflow, or the documented device setup path. Treat experimental rotation bridging as probabilistic and inspect duplicate records before merging them.
The map loads but positions are inaccurate
Check map scale, room polygons, scanner marker locations, stale radios, and calibration coverage. Confirm that the physical scanner has not moved. Collect additional fingerprints at boundaries and weak areas. Internet access and the Localtonet relay do not calculate BLE positions, so tunnel changes will not correct local radio geometry.
Home Assistant works on a laptop but not from the Localtonet client
Test the exact target from the client device or its network namespace. Replace localhost with a reachable LAN or container-network address when Home Assistant is elsewhere. Confirm the local scheme and port and check local routing before editing the tunnel.
The Localtonet URL does not respond
Confirm that the selected Localtonet client is connected, the correct device token was selected, the relay selection remains available, and the tunnel was started. Creating or saving a tunnel does not run it. Then recheck the local target from the client device.
The sign-in page loads but the session or live views fail
Test normal Home Assistant navigation and real-time entity updates, not only the initial HTML page. Review Home Assistant logs and browser errors. If the deployment uses an additional reverse proxy, inspect that existing proxy configuration separately. Do not add broad trusted-proxy settings without identifying the actual request path.
A PadSpan update changed map placement
Stop the public tunnel, record the versions involved, and review the release-specific migration guidance. For converted placement data, use PadSpan's Health → Backup/Restore process when directed. Do not simply downgrade through HACS and expect an older version to understand newly converted files.
Frequently asked questions
Does padspanHA use a separate web port?
padspanHA is presented through Home Assistant and is not documented as a separate web server with its own listening port. Target the verified Home Assistant origin, including its actual HTTP or HTTPS scheme and configured port.
Is seeing the PadSpan panel enough to prove tracking works?
No. It proves that the integration and panel loaded. Successful positioning additionally requires current scanner observations, a resolved device identity, a scaled floor plan, room boundaries, correct scanner placement, and adequate calibration.
When can I use localhost as the tunnel target?
Use localhost only when the Localtonet client can reach Home Assistant in the same relevant host and network namespace. A client on another computer, container, or virtual machine usually needs a routable address for the Home Assistant service.
Should I always use port 8123?
No. Use the port configured for and reachable on your Home Assistant installation. Verify it from the working local origin and from the device that runs the Localtonet client.
Does Localtonet require router port forwarding?
No. Our client establishes an outbound connection to a Localtonet relay, so the workflow does not require an inbound router port-forwarding rule, a public IP address, firewall changes for unsolicited inbound traffic, or VPN setup.
Is a tunnel active immediately after it is created?
No. Creation saves the tunnel configuration. You must use the Start button, and the selected Localtonet client must remain connected for the public endpoint to be available.
Does the public address expose only the PadSpan floor plan?
No. When the target is the Home Assistant web service, the public address reaches Home Assistant as a whole. Use multifactor authentication, a dedicated least-privilege user, login-attempt protection, and a limited tunnel lifecycle.
Can I stop remote access without uninstalling padspanHA?
Yes. Stopping or deleting the Localtonet tunnel removes that public route without uninstalling the local integration. padspanHA continues to operate inside Home Assistant.
How should I recover after a PadSpan data migration?
Follow the release-specific recovery guidance. When converted map data is involved, the project directs users to restore the relevant snapshot through Health → Backup/Restore inside PadSpan rather than merely rolling HACS back to an older integration version.
Publish your verified Home Assistant endpoint with Localtonet
Once padspanHA loads locally, scanners report current data, and your floor plan produces credible room positions, run our client on a device that can reach Home Assistant and create an HTTP tunnel using the verified scheme, address, and port.
Get Started Free →

