

Verify the complete local observability workspace, then publish only its browser interface
Superlog is an open-core, agentic telemetry system for OpenTelemetry traces, logs, and metrics. Its repository contains the fully open-source Community Edition, including a web app, API, OTLP intake proxy, workers, database packages, and interfaces for investigation runtimes. This guide prepares the required tooling, follows the documented repository quick start, verifies each local endpoint, and then publishes only the web interface through a Localtonet HTTP tunnel. Public HTTPS provides a protected transport endpoint, but it does not add Superlog accounts, roles, or application-level authorization.
📋 What's in this guide
What the Superlog Community Edition deployment contains
Superlog describes itself as an open-source agentic telemetry system and an open-core observability workspace for OpenTelemetry data. It ingests traces, logs, and metrics, groups noisy signals into incidents, and provides a local-first surface for debugging production systems. The public repository contains the fully open-source, free Community Edition used in this tutorial.
The agentic terminology is important, but it should not be interpreted as a guarantee that every detected problem will be repaired automatically. The Community Edition repository includes agent-runner interfaces for pluggable investigation runtimes, along with a default community runner that records a local incident summary. Actual investigation and remediation behavior depends on the runtime, integrations, permissions, configuration, and workflow you choose.
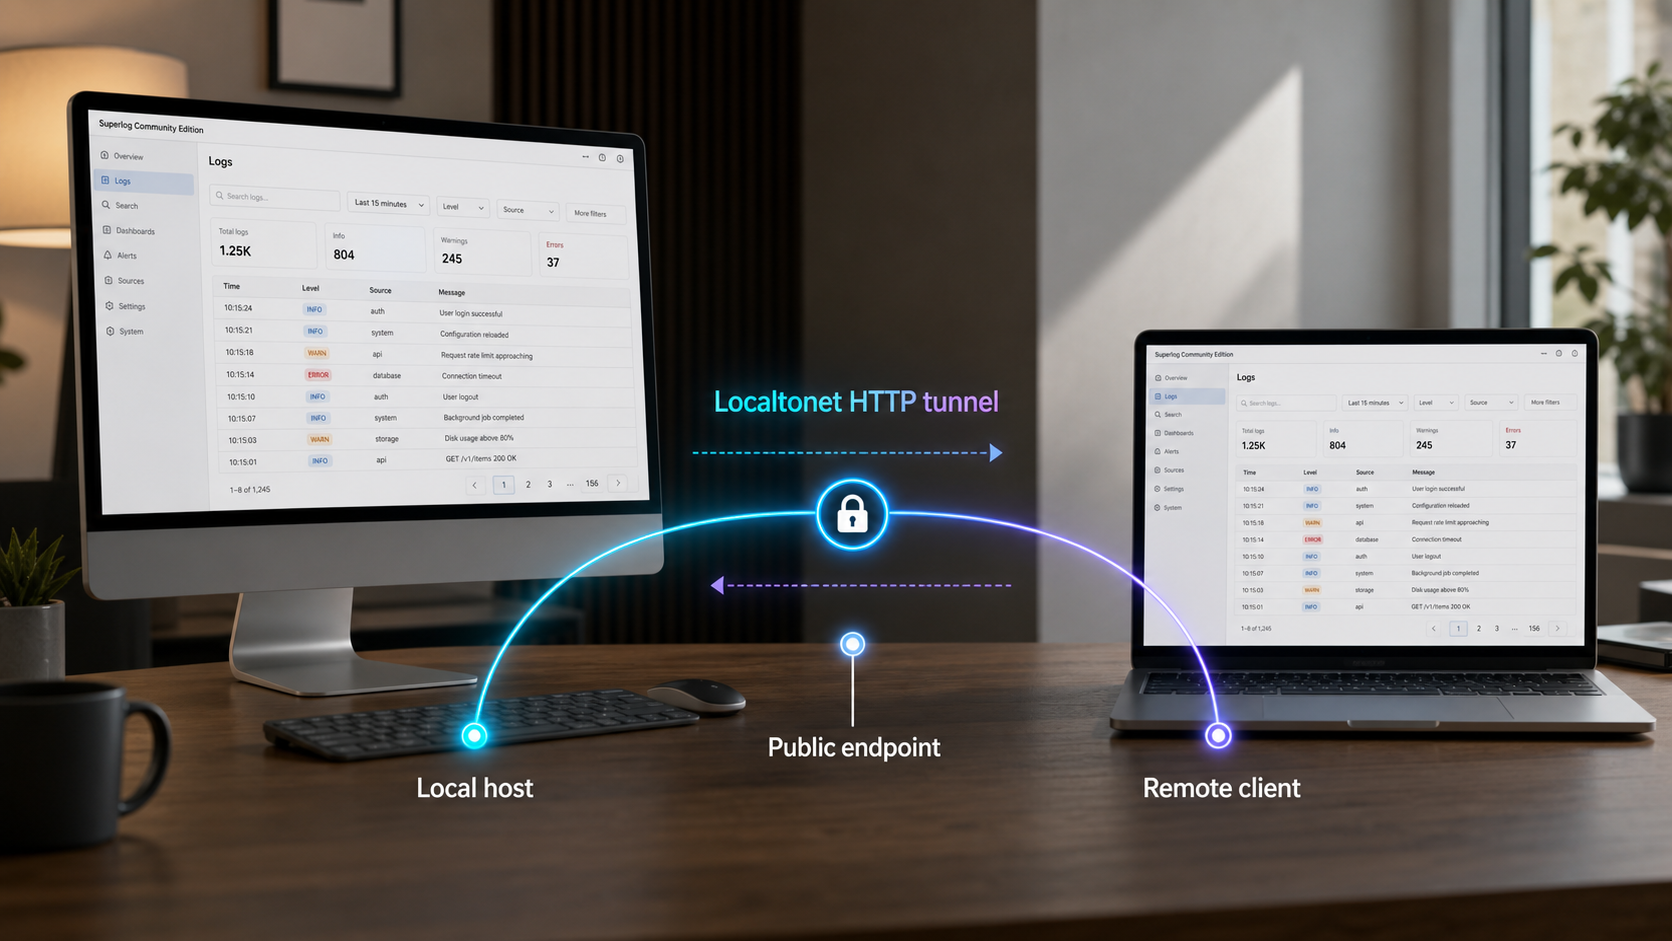
Superlog is not a single standalone log-viewer process. Its repository contains several cooperating applications and packages. The web frontend is under apps/web, the HTTP API is under apps/api, the OTLP intake proxy is under apps/proxy, and background workers and agent orchestration are under apps/worker. Database schema and migrations are under packages/db, while telemetry fingerprinting helpers are under packages/fingerprint.
http://localhost:5173. This is the only Superlog endpoint published in this tutorial.
http://localhost:4100. It supports the application, but the repository quick start does not establish a hardened public API boundary.
http://localhost:4101. Instrumenting an application is separate from installing the workspace.
The three default HTTP addresses can create confusion because each serves a different purpose. Port 5173 is the human-facing web application, port 4100 is the application API, and port 4101 is the telemetry intake service. A response from one port does not prove that the entire workspace is healthy. For example, the frontend shell may load even when an API, worker, migration, or storage dependency has failed.
| Local endpoint | Purpose | Exposure in this guide |
|---|---|---|
http://localhost:5173 |
Superlog web interface | Publish through a Localtonet HTTP tunnel after local verification |
http://localhost:4100 |
Superlog HTTP API | Keep local because public authentication and hardening are not established by the repository quick start |
http://localhost:4101 |
OTLP telemetry intake | Keep local unless current project guidance defines a secure remote-ingestion design |
The documented repository quick start uses pnpm dev, so it is a development-style local workflow. The available project evidence does not define a production build procedure, production process manager, high-availability design, backup policy, retention policy, reverse-proxy configuration, or stable-release deployment process. This guide does not present the quick start as a production architecture.
Prepare the Superlog host
The current Superlog repository lists Node.js 20 or newer, pnpm 9 or newer, and Docker as prerequisites. Its quick start calls docker compose, so the Docker installation must also include a working Compose command. You also need a current checkout or archive of the Superlog Community Edition repository.
The repository does not state supported operating-system versions, CPU architectures, minimum RAM, minimum disk capacity, or a minimum Docker release. Choose a host capable of running a multi-package JavaScript workspace and the containers defined by the current docker-compose.yml. If you are using constrained hardware or an unusual architecture, inspect that Compose file and confirm compatibility before downloading large dependencies or ingesting telemetry.
Choose a supported installation path for each tool
Use official installation channels where possible. Package versions from an operating-system repository can lag behind the versions Superlog requires, especially for Node.js. Always verify the installed versions after setup rather than assuming the package name supplied the current release.
| Requirement | Required version | Practical installation paths |
|---|---|---|
| Node.js | 20 or newer | Use an official Node.js installer or binary from the Node.js download page, or use a version manager that can install a supported Node.js release |
| pnpm | 9 or newer | Install through npm included with Node.js, Corepack where available, or another method listed in the pnpm installation documentation |
| Docker on Windows or macOS | No minimum stated | Docker Desktop provides Docker Engine access and the docker compose command |
| Docker on Linux | No minimum stated | Install Docker Engine and the Docker Compose plugin using the current Docker Engine installation instructions |
| Superlog source | Current Community Edition checkout | Clone the public repository with Git or download its source archive from GitHub |
Node.js preparation
On Windows and macOS, the official Node.js installer is the most direct path. On Linux, use an official binary, a version manager, or a distribution installation path that actually supplies Node.js 20 or newer. Older long-term-support packages still present in some distribution repositories may not satisfy Superlog's requirement.
A version manager can be useful if the host runs other JavaScript projects that need different Node.js releases. Whichever path you choose, make sure the terminal where you will run Superlog resolves the intended Node.js installation. Opening a new terminal after installation can be necessary for updated executable paths to take effect.
pnpm preparation
After Node.js is available, one direct installation path is to use its bundled npm command to install the required pnpm major version:
npm install --global pnpm@9
The pnpm documentation also describes Corepack and standalone installation paths. Use whichever supported method fits your environment, but ensure that the final pnpm executable reports version 9 or newer. If an older pnpm executable remains first in your command path, remove that conflict or update the existing installation before continuing.
Docker and Compose preparation
On Windows and macOS, install and start Docker Desktop, then wait until its engine reports that it is ready. On Windows, Docker Desktop may require an enabled virtualization backend such as WSL 2, depending on the current Docker configuration. Follow the prompts presented by Docker rather than changing unrelated firewall or router settings.
On Linux, install Docker Engine and the Docker Compose plugin for your distribution. The command used by Superlog is docker compose with a space. It is not the older standalone docker-compose executable. Your user must also be able to communicate with the Docker daemon. Apply local Docker permission changes carefully because access to the Docker daemon is security-sensitive.
Confirm all four commands before obtaining dependencies:
node --version
pnpm --version
docker --version
docker compose version
Node.js must report version 20 or newer, and pnpm must report version 9 or newer. The project does not publish a minimum Docker or Compose version in the current repository instructions. For the initial check, both Docker commands must execute successfully and the Docker engine must be running.
If one of these commands is missing, reports an unsupported version, or cannot reach the Docker daemon, correct the prerequisite first. Dependency, container, and migration failures later in the process are harder to diagnose when the base tools are not known to work.
Obtain the Superlog repository
Clone the current Superlog Community Edition repository if Git is installed:
git clone https://github.com/superloglabs/superlog.git
cd superlog
Alternatively, download the repository source archive from GitHub, extract it, and open a terminal in the extracted root directory. You are in the correct directory when repository-level files such as package.json, pnpm-workspace.yaml, pnpm-lock.yaml, and docker-compose.yml are present.
All manual quick-start commands below assume that the terminal remains in this repository root. Running them from a parent directory or from an individual application directory can prevent pnpm from recognizing the workspace or prevent Docker Compose from finding its configuration.
This workflow installs from the repository rather than from a pinned release procedure. Review the current change history, license, security policy, configuration, Compose definition, and database migrations before using a new checkout. Do not assume that configuration from an older revision remains compatible with the current source.
Install and start Superlog Community Edition
Superlog currently presents two installation paths. Its repository promotes coding-agent skills for users who want an agent-assisted setup, while its manual quick start documents the exact pnpm, Docker, migration, and development commands. The agent-assisted path is optional. It does not replace the need to understand which processes and ports are running, especially before exposing the interface publicly.
Option 1: Follow the manual repository quick start
The manual workflow is the clearest path for this tutorial because each stage can be observed and diagnosed independently. After the prerequisites and source are ready, install workspace dependencies, start the Docker stack, apply the database migrations, and launch the development processes in that order.
Install the workspace dependencies
From the repository root, run pnpm install. This installs the dependencies defined by the pnpm workspace and lockfile. Allow it to complete before starting the local infrastructure.
Start the local Docker stack
Run docker compose up -d from the same root directory. The -d option starts the services in the background so the migration and development commands can run afterward.
Apply the database migrations
Run pnpm --filter @superlog/db db:migrate. The filter selects Superlog's database package and invokes its documented migration task. Do not skip this step merely because the containers appear to be running.
Launch the development services
Run pnpm dev and keep that foreground process active. This starts the repository's development workflow and the application processes associated with the documented local endpoints.
The complete manual sequence is:
pnpm install
docker compose up -d
pnpm --filter @superlog/db db:migrate
pnpm dev
Run the commands separately during the first installation. This preserves a useful diagnostic boundary. A package-resolution failure belongs to the pnpm installation stage, a container problem belongs to Docker, a schema problem belongs to the migration stage, and an application startup failure belongs to pnpm dev.
Option 2: Add Superlog installation skills to a coding agent
The Superlog repository also promotes an agent-assisted path. From the project where you want to use the skills, run:
npx skills add superloglabs/skills --allThen use those installed skills with a compatible coding agent to help install Superlog in the project. This is an alternative installation workflow, not an additional command in the manual quick start. You do not need to run it when following the four manual steps above.
The skills command adds capabilities for a coding-agent workflow. Before accepting generated changes, inspect modified files, commands, dependencies, credentials, telemetry configuration, and network bindings. Agent assistance does not remove the need to verify the resulting Superlog services or understand what will become publicly reachable.
What successful startup means
The foreground pnpm dev process should remain active while you use Superlog. If it exits, the application processes managed by the development task may no longer be available even if Docker containers remain running. Conversely, an active development process cannot compensate for unavailable containerized dependencies or an unapplied database migration.
Startup output can contain messages from several workspace packages. Keep the terminal visible and begin with the earliest error if a service fails. Repeatedly restarting the entire stack without reading the first failure can hide the distinction between package, infrastructure, schema, and runtime problems.
A tunnel cannot repair a failed local application. Complete the local checks first and create the Localtonet HTTP tunnel only after the Superlog interface consistently loads from the host where our client will run.
Verify the local Superlog services
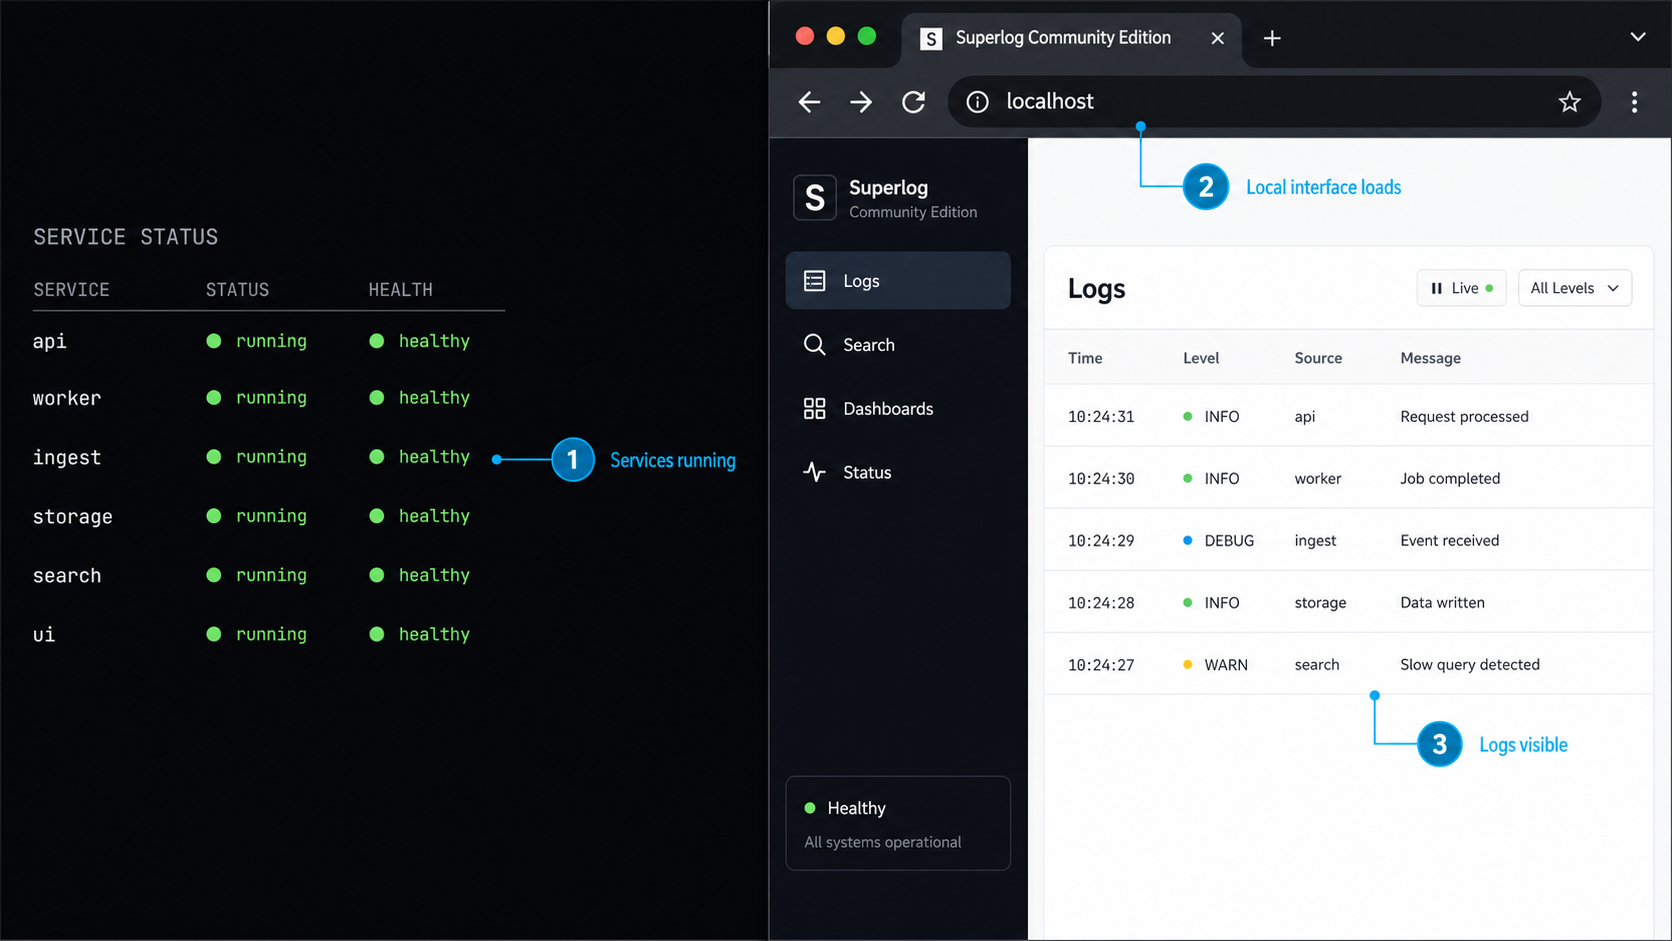
Keep pnpm dev running and open http://localhost:5173 in a browser on the Superlog host. The interface should load directly, without a Localtonet URL. Navigate through the available interface while watching the terminal for API, worker, database, or telemetry-query errors.
A loaded page shell is only the first check. Refresh the page, open more than one interface view if available, and observe whether browser requests complete. If the browser reports failed requests, inspect its developer tools and compare those failures with the pnpm dev output.
Check whether the documented ports are listening
Confirm that the host has listeners for ports 5173, 4100, and 4101 using an operating-system networking tool. On Windows, PowerShell users can run:
Get-NetTCPConnection -State Listen |
  Where-Object LocalPort -in 5173,4100,4101
On Linux, a common check is:
ss -ltn | grep -E ':(5173|4100|4101)\b'On macOS, you can inspect the ports with:
lsof -nP -iTCP:5173 -sTCP:LISTEN
lsof -nP -iTCP:4100 -sTCP:LISTEN
lsof -nP -iTCP:4101 -sTCP:LISTEN
These checks confirm that processes are listening, not that every application operation is healthy. Use them together with the browser and terminal output.
Interpret the API and OTLP endpoints correctly
The API is documented at http://localhost:4100. The current evidence does not define a root response or a dedicated health route, so this tutorial does not claim that visiting / must produce a particular JSON object or status page. A more meaningful validation is that the port is listening and normal web-interface actions can communicate with the backend.
OTLP intake is documented at http://localhost:4101. OTLP is intended for telemetry clients, so opening its root in a browser is not an end-to-end ingestion test. The repository summary supplied for this tutorial does not specify an OTLP health path, transport options, required headers, authentication variables, or a universal sample collector configuration. Do not infer failure solely from an unhelpful browser response at the root URL.
http://localhost:5173 on the host and verify that the page remains usable after a refresh.
pnpm dev. Supporting-service failures can appear even when the frontend shell loads.
pnpm typecheck for development validation. It can identify source-level issues introduced by local edits.
Run the documented typechecking task from the repository root:
pnpm typecheckA successful typecheck is useful, but it is not a runtime health test. It does not prove that Docker services started, migrations completed, ports are reachable, or the web application can communicate with the API.
Establish a clean local boundary
If http://localhost:5173 does not work on the host, stop and fix Superlog. If it works locally but the future public URL does not, investigate our client, the selected device, the tunnel state, or the configured local target. This boundary prevents a Superlog failure from being misdiagnosed as a tunneling problem.
Remember that localhost is relative to the process using it. When our Localtonet client runs directly on the same host as Superlog, 127.0.0.1:5173 is an appropriate target. If our client runs inside another container, a virtual machine, or a separate physical device, its loopback address refers to that environment, not to the Superlog host. In that topology, choose an address reachable from the client and test it from the client's environment before configuring the tunnel.
Operate the local stack predictably
The documented quick start has two runtime layers. Docker Compose starts local infrastructure in detached mode, while pnpm dev runs the development workspace in the foreground. Treat these layers separately during startup, shutdown, maintenance, and troubleshooting.
To stop the foreground development workflow, return to the terminal running pnpm dev and interrupt it normally. The Docker containers started with detached mode can remain active afterward. Use the Docker administration tools appropriate for your environment to inspect or stop them.
The supplied Superlog quick start does not document a project-specific shutdown, reset, backup, restore, or destructive cleanup command. This guide therefore does not prescribe one. In particular, do not delete containers, database files, volumes, or migration state merely because an application process failed to start.
Restart after source changes carefully
For a routine restart without code or dependency changes, make sure the Docker stack is available, confirm that the checked-out schema is current, and run pnpm dev. After pulling a newer repository revision, review dependency and migration changes before startup. Re-run pnpm install and the documented migration task when the updated project requires them.
Keep a record of the exact revision used for important testing. Installing from a moving branch can otherwise make it difficult to distinguish a local configuration problem from a source change.
Be cautious with retained telemetry
Observability systems can accumulate substantial data. Database resets can remove telemetry and incident history, while unbounded ingestion can consume storage. The current evidence does not define Community Edition backup, restore, retention, schema rollback, or minimum disk-capacity procedures.
Monitor available disk space using your operating system and Docker administration tools. Establish a tested data-management plan before relying on this local development workflow for important telemetry.
Keep the tunnel lifecycle separate
A Localtonet tunnel exists independently from the Superlog development process. Creating a tunnel does not start Superlog, and starting Superlog does not start the tunnel. Remote access requires every layer below to remain available:
- The Docker services required by the checked-out Superlog configuration are running.
- The database migration has completed for that revision.
- The
pnpm devworkflow remains active. - The web interface is reachable at the configured local IP address and port.
- Our Localtonet client is connected on the selected device.
- The HTTP tunnel has been explicitly started.
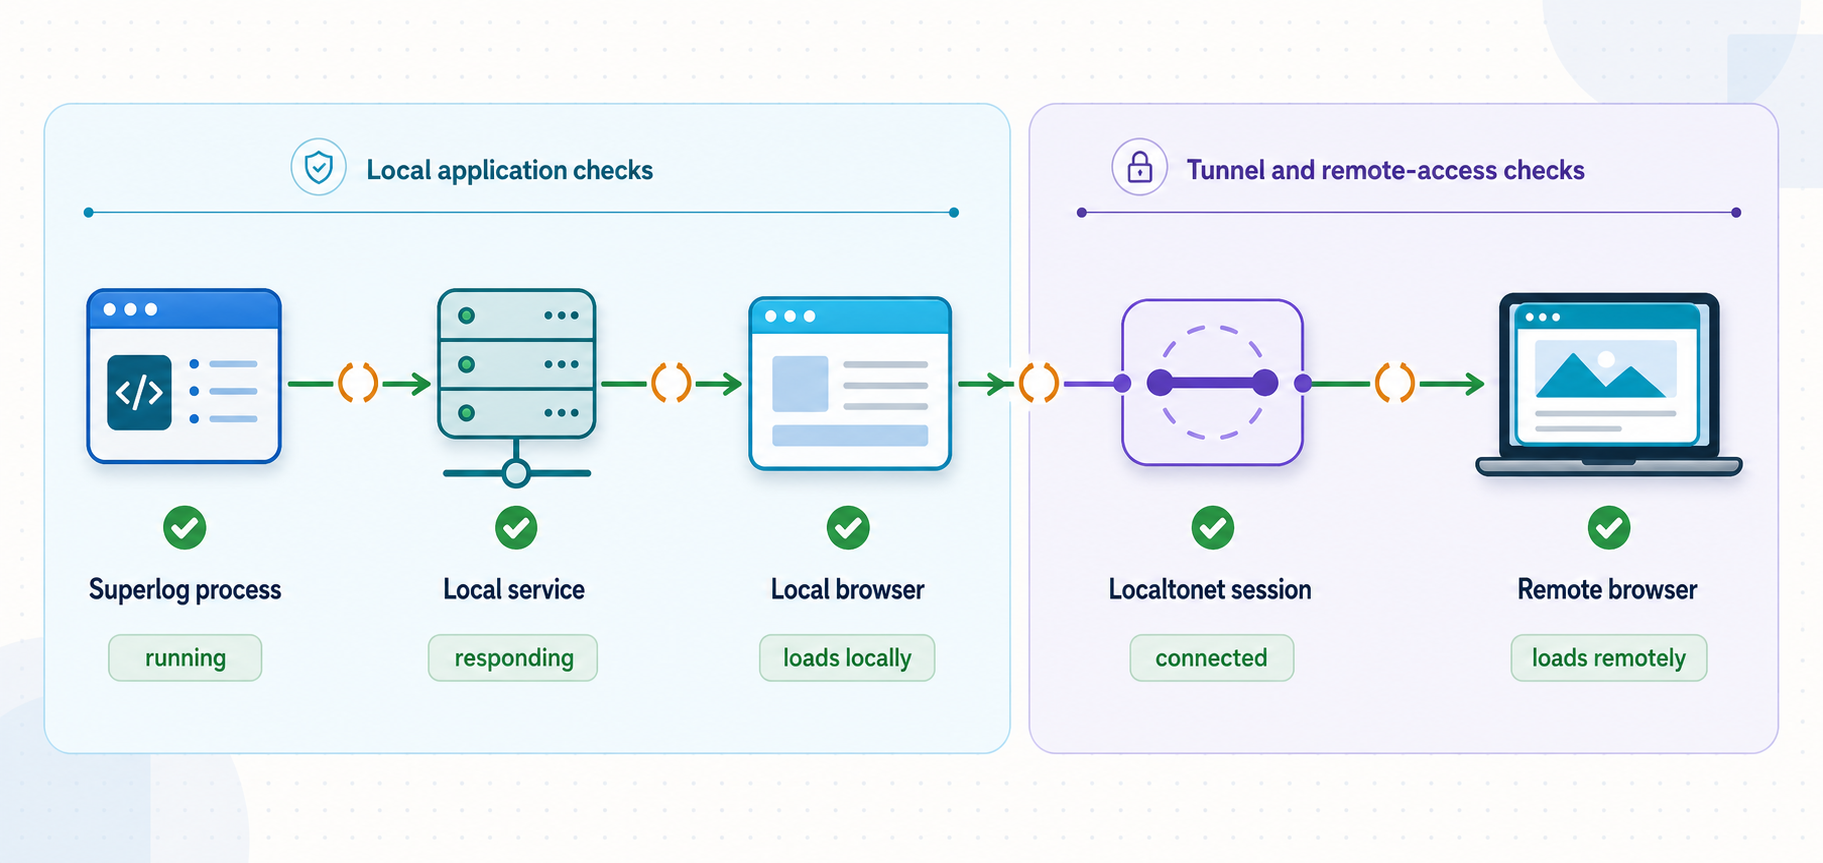
If one layer stops, the public URL may become unreachable or return an application error. Test the layers in this order during diagnosis rather than recreating the tunnel immediately.
Publish the Superlog web interface with a Localtonet HTTP tunnel
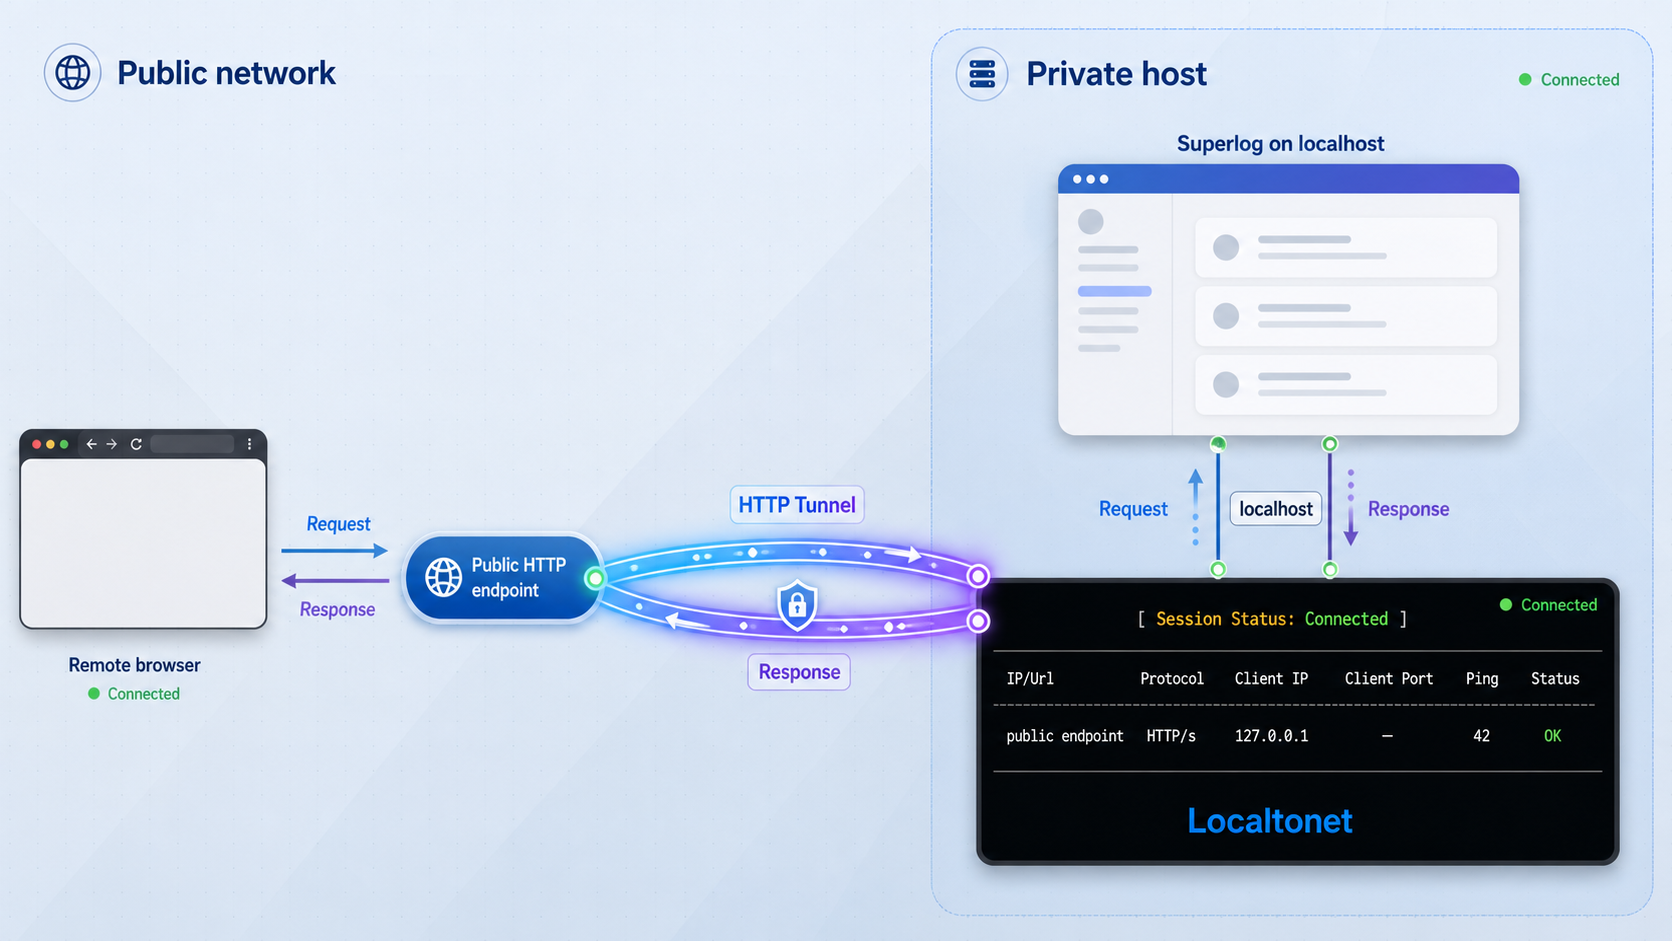
After http://localhost:5173 works reliably, configure a Localtonet HTTP tunnel for that web interface. Our client establishes an outbound connection to a Localtonet relay server. This provides a public URL without inbound router port forwarding, firewall changes, VPN setup, or a public IP address.
Install our client on the Superlog host when possible. If it must run elsewhere, confirm that the client device can reach the Superlog host over the selected local IP address and port. Never use 127.0.0.1 across separate devices, virtual machines, or isolated containers.
The current HTTP tunnel workflow uses a Process Type, AuthToken, server selection, local IP address, and local port. Process Type controls the public address option. The documented choices are Random Sub Domain, Custom Sub Domain, and Custom Domain. They serve the same local content through a public HTTPS address, but availability can vary by current product configuration or plan. Use the options shown in your dashboard rather than assuming every choice is available to every account.
Install and run the Localtonet client
Install our client for the operating system on a device that can reach the Superlog web interface. Keep it running so the device can establish its outbound connection to our relay service.
Open the HTTP Tunnel page and select Process Type
Begin a new HTTP tunnel and choose the Process Type available for the public address you want: Random Sub Domain, Custom Sub Domain, or Custom Domain. All three point public HTTPS requests to the local web target configured later.
Select the AuthToken for the client device
Select the device-specific AuthToken that identifies the client intended to run this tunnel. The selected device must be connected and able to reach Superlog. Keep the token secret and never place it in screenshots, source files, or public troubleshooting logs.
Select an available server
Choose a Localtonet server from the values currently displayed in the dashboard. Server and region availability can change or vary by plan, so do not copy a hardcoded server code from another deployment.
Enter the local IP address and port
When our client runs on the same host as Superlog, enter 127.0.0.1 as the local IP address and 5173 as the local port. Do not use the API port 4100 or OTLP intake port 4101 for this web-interface tunnel.
Create the HTTP tunnel
Create the tunnel after reviewing its Process Type, AuthToken, server, local IP address, and local port. Creation saves the configuration, but it does not make the tunnel active.
Press Start
Use the Start action for the newly created tunnel. The public endpoint can reach Superlog only while the selected client is connected and the tunnel is running.
Verify the public URL, then stop or delete when finished
Open the assigned public HTTPS URL from another browser or network and confirm that the Superlog interface loads. When remote access is no longer required, stop the tunnel. Delete it if you no longer need the saved configuration.
The current workflow and terminology are documented in our Localtonet HTTP tunnel documentation. Exact custom-domain DNS requirements are not reproduced here because they must be checked against the current custom-domain instructions and dashboard values.
Perform an actionable remote test
Do not verify the public URL only from the same browser session used for local testing. Open it from a private browser window, a second device, or a phone using a cellular connection. This proves that you are using the assigned public address rather than a cached local page.
Confirm that the initial page loads, refresh it, and exercise the same basic interface actions used during local verification. Watch the pnpm dev terminal while making the remote request. If the public page fails while the local page still works, check the tunnel target, selected AuthToken, client connection, and tunnel state.
If both local and public pages load but only the public version has failed browser requests, compare browser developer tools for the two addresses. The current Superlog repository summary does not define public-origin variables, proxy-aware settings, WebSocket behavior, or alternate base-URL configuration, so do not invent configuration keys. Preserve the failed request details and compare them with current project guidance.
The public address works only while Superlog is listening at the configured target, our selected client is connected, and the HTTP tunnel is running. A created tunnel configuration is not the same as an active tunnel.
Secure the remote-access workflow
An observability workspace can contain traces, logs, metrics, incident descriptions, hostnames, service names, request details, stack traces, user identifiers, headers, query values, and fragments of application payloads. Treat access to Superlog as access to sensitive engineering and operational data.
The public URL created by this HTTP tunnel uses HTTPS. That protects transport to the public tunnel endpoint. It does not establish Superlog user authentication, add application accounts, create authorization roles, determine which interface actions a visitor may perform, or sanitize the telemetry already stored by Superlog.
The repository quick start used here does not establish built-in authentication for the Community Edition web interface, API, or OTLP intake service. It also does not document production authorization, rate limiting, public deployment hardening, or a production TLS configuration for Superlog itself. Do not interpret the presence of a public HTTPS URL as evidence that the application is safe for unrestricted public access.
Anyone who can reach an unprotected public URL may be able to reach the application presented there. A generated or hard-to-guess subdomain is not an access-control system. Expose the interface only for authorized use, apply appropriate access controls when persistent access is required, and stop the tunnel when the session ends.
Expose only the intended web target
When Superlog and our client share a host, configure this tunnel only for 127.0.0.1:5173. Do not publish all three adjacent ports merely because they are part of one repository. Each endpoint has a different purpose and risk profile.
Keep port 4100 private because the quick start does not establish a hardened public API boundary. Keep port 4101 private unless current Superlog guidance defines the required OTLP protocol, authentication, authorization, rate limits, transport protection, and public-ingestion controls.
Publishing an ingestion endpoint without appropriate controls could allow unauthorized telemetry submission and consume storage or processing capacity. Publishing an internal API could expose operations that were not designed as a public user boundary.
Protect Localtonet device tokens
A Localtonet AuthToken identifies the client device that runs a tunnel. Store it as a secret. Never commit it to the Superlog repository, include it in an environment example, paste it into an issue, display it during a screen share, or send it with diagnostic logs.
Select available tokens and servers directly from the current dashboard. Do not guess token values or reuse examples from another device. If a token may have been exposed, use the current dashboard controls to address the affected device rather than continuing to rely on the same secret.
Prefer temporary exposure for development workflows
For debugging, a review session, or a demonstration, start the tunnel immediately before it is needed and stop it afterward. This reduces the time during which the interface is internet-reachable while allowing Superlog to remain available locally.
If your deployment requires long-lived remote access, first establish application authentication, least-privilege authorization, operational monitoring, data retention, backup, and a supported production process model. Those controls are outside the repository quick start documented here.
Review telemetry before ingesting it
Tunnel security cannot correct unsafe instrumentation. Review OpenTelemetry attributes, logs, traces, exception messages, resource metadata, and application payload capture before sending data to Superlog. Remove or redact credentials, authorization headers, session tokens, personal data, payment information, proprietary payloads, and other secrets that are not required for observability.
Also review who can instrument applications and change collector configuration. Excessive or untrusted telemetry can create privacy, security, processing, and storage problems even when the web interface is not publicly exposed.
Troubleshoot installation and tunnel problems
node, pnpm, or Docker is not found
Close and reopen the terminal after installation so updated executable paths are loaded. Run the four prerequisite checks again. If multiple Node.js or pnpm versions are installed, determine which executable the terminal resolves and remove the unintended path conflict.
For Docker, confirm that Docker Desktop or the Linux Docker daemon is running. A successful client version command does not always prove that the engine is available, so also run docker compose version and inspect any daemon connection error.
pnpm install fails
Confirm that Node.js is version 20 or newer and pnpm is version 9 or newer. Verify that the terminal is in the repository root and that pnpm-workspace.yaml and pnpm-lock.yaml are present. Preserve the first error because it can distinguish network or registry problems from a version, lockfile, permission, or package installation failure.
Do not switch package managers as a generic workaround. The documented workflow uses pnpm, and the repository includes pnpm workspace and lock files. Another package manager can create a dependency layout that this quick start does not document.
docker compose up -d fails
Verify that the Docker engine is running, that docker compose version succeeds, and that docker-compose.yml exists in the current directory. Then read the exact Docker error for image download failures, permissions, port conflicts, storage problems, unsupported architecture, or container startup errors.
Use the Compose file from the checked-out revision as the authority for its services and mappings. The repository summary used here does not list every container, image version, host port, volume, or platform-specific Docker requirement, so manually recreating the stack from guesses can introduce a second problem.
The database migration fails
Confirm that dependency installation completed and that the Docker stack started before running:
pnpm --filter @superlog/db db:migrateMake sure the terminal is still at the repository root. A migration failure can indicate an unavailable database, a checked-out code and schema mismatch, or database state that needs project-specific attention. Do not delete volumes as a first response because doing so can remove retained data.
pnpm dev exits or a documented port is unavailable
Read the earliest error in the terminal. Later workspace failures may be consequences of the first process that failed. Check whether another program is already using port 5173, 4100, or 4101.
The current evidence establishes these default endpoints but does not provide supported alternate-port variables. This tutorial therefore does not invent environment variable names for changing them. Also confirm that migrations completed and Docker dependencies remain available.
If source files were edited, run pnpm typecheck to identify TypeScript problems. A successful typecheck still does not diagnose failed containers, database connectivity, occupied ports, or runtime configuration.
The web interface loads but data or actions fail
A frontend can render while its API, workers, database, or telemetry-query layer has a problem. Watch the pnpm dev output while reproducing the action. Confirm that port 4100 is listening and that the Docker stack remains available.
If no application has been instrumented, an empty workspace does not necessarily indicate a failed installation. Installing Superlog and sending OpenTelemetry data are separate tasks. Use instrumentation appropriate to the application language and current Superlog release rather than assuming one universal configuration.
The public URL does not open
Return to the local boundary first. Open http://localhost:5173 on the Superlog host. If it fails, troubleshoot Superlog. If it succeeds, confirm that our client is running and connected, the correct AuthToken was selected, an available server was chosen, and the tunnel was explicitly started.
Review the local IP address and port. For a client on the same host, the target should be 127.0.0.1:5173. If the client is on another device, in a virtual machine, or inside an isolated container, verify from that exact environment that it can reach the Superlog address. Loopback addresses do not cross those boundaries.
The public page opens but some requests fail
Compare the local and public versions using browser developer tools while monitoring the Superlog terminal. Record the failed request URL, method, status, and relevant non-sensitive error details. Do not include cookies, authorization headers, device tokens, or telemetry secrets in an issue report.
The supplied project evidence does not document public-origin settings, WebSocket behavior, cross-origin configuration, base-URL variables, or proxy-aware headers. If the application emits a local absolute URL or rejects the public origin, consult current Superlog guidance instead of guessing environment keys.
The tunnel worked and then became unavailable
Check each runtime layer. The pnpm dev process may have exited, Docker may be unavailable, our client may have disconnected, or the tunnel may have been stopped. A saved tunnel remains reachable only while the selected device is connected and the tunnel is running.
Remember that this tutorial follows a development workflow. The repository summary does not establish a production supervisor or automatic restart procedure. Do not present an improvised background process as an officially supported production deployment.
Frequently asked questions
What versions of Node.js and pnpm does Superlog require?
The current repository quick start requires Node.js 20 or newer and pnpm 9 or newer. It also requires Docker and uses docker compose, although the repository summary does not state minimum Docker or Compose versions.
Can a coding agent install Superlog?
Superlog currently promotes npx skills add superloglabs/skills --all as a way to add its installation skills to a compatible coding agent. This is optional and does not replace review of generated changes, local service verification, or the documented manual repository quick start.
Which command starts Superlog locally?
After running pnpm install, starting the Docker stack, and applying the database migration, run pnpm dev from the repository root. Keep that foreground process active while using the local services.
What are the default Superlog ports?
The web interface is at http://localhost:5173, the API is at http://localhost:4100, and OTLP intake is at http://localhost:4101. These endpoints have separate roles and should not be treated as interchangeable.
Which Superlog port should the Localtonet HTTP tunnel target?
Target the web interface on port 5173. If our client runs directly on the same machine as Superlog, use 127.0.0.1 as the local IP address. Keep the API and OTLP intake endpoints private unless current project guidance supports a secure public deployment.
Which Localtonet Process Type should I choose?
Choose Random Sub Domain, Custom Sub Domain, or Custom Domain according to the public address you need and the options available in your current dashboard. All three serve the configured local content at a public HTTPS address. Availability can vary by plan or current product configuration.
Does creating a Localtonet tunnel make it active immediately?
No. Creation saves the tunnel configuration. You must press Start, and the selected client device must remain connected. Superlog must also continue listening at the configured local target.
Does the public HTTPS URL authenticate Superlog users?
No. HTTPS protects transport to the public endpoint, but it does not create Superlog accounts, roles, permissions, or application authorization. The Community Edition quick start used here does not establish built-in authentication for the public web workflow.
Can I expose the Superlog OTLP intake port through another tunnel?
Localtonet supports multiple tunnel families, but this guide does not recommend public exposure of Superlog's OTLP intake. The available project evidence does not define the authentication, rate limits, public-ingestion hardening, protocol details, or TLS design required for that endpoint.
Is this a production deployment guide?
No. It follows the repository quick start based on pnpm dev. The evidence used here does not establish a production build, process supervisor, backup and restore strategy, high availability, retention policy, or production security architecture.
Do I need router port forwarding or a public IP address?
No. Our Localtonet client establishes an outbound connection to a relay server. This provides a public URL without inbound router port forwarding, firewall changes, VPN setup, or a public IP address.
Open your verified Superlog workspace with Localtonet
Start Superlog locally, verify the web interface on port 5173, then create and explicitly start an HTTP tunnel for temporary remote access without inbound router port forwarding.
Get Started Free →

