

Run Unsloth Studio locally, secure the web interface, and connect it to a controlled public HTTPS address
Unsloth Studio is a browser-based interface for running and training AI models on your own hardware. This guide explains how to choose the correct Unsloth installation path, install Studio manually on Windows, Linux, macOS, or WSL, verify it on a known local address and port, and expose that verified endpoint through a Localtonet HTTP tunnel. The Localtonet client makes an outbound connection to our relay, so the standard workflow does not require inbound router port forwarding, firewall changes, VPN setup, or a public IP address. You will also learn how to update Studio, disable server-side tools, use a password for headless startup, reset a forgotten password, and troubleshoot the complete connection path.
📋 What's in this guide
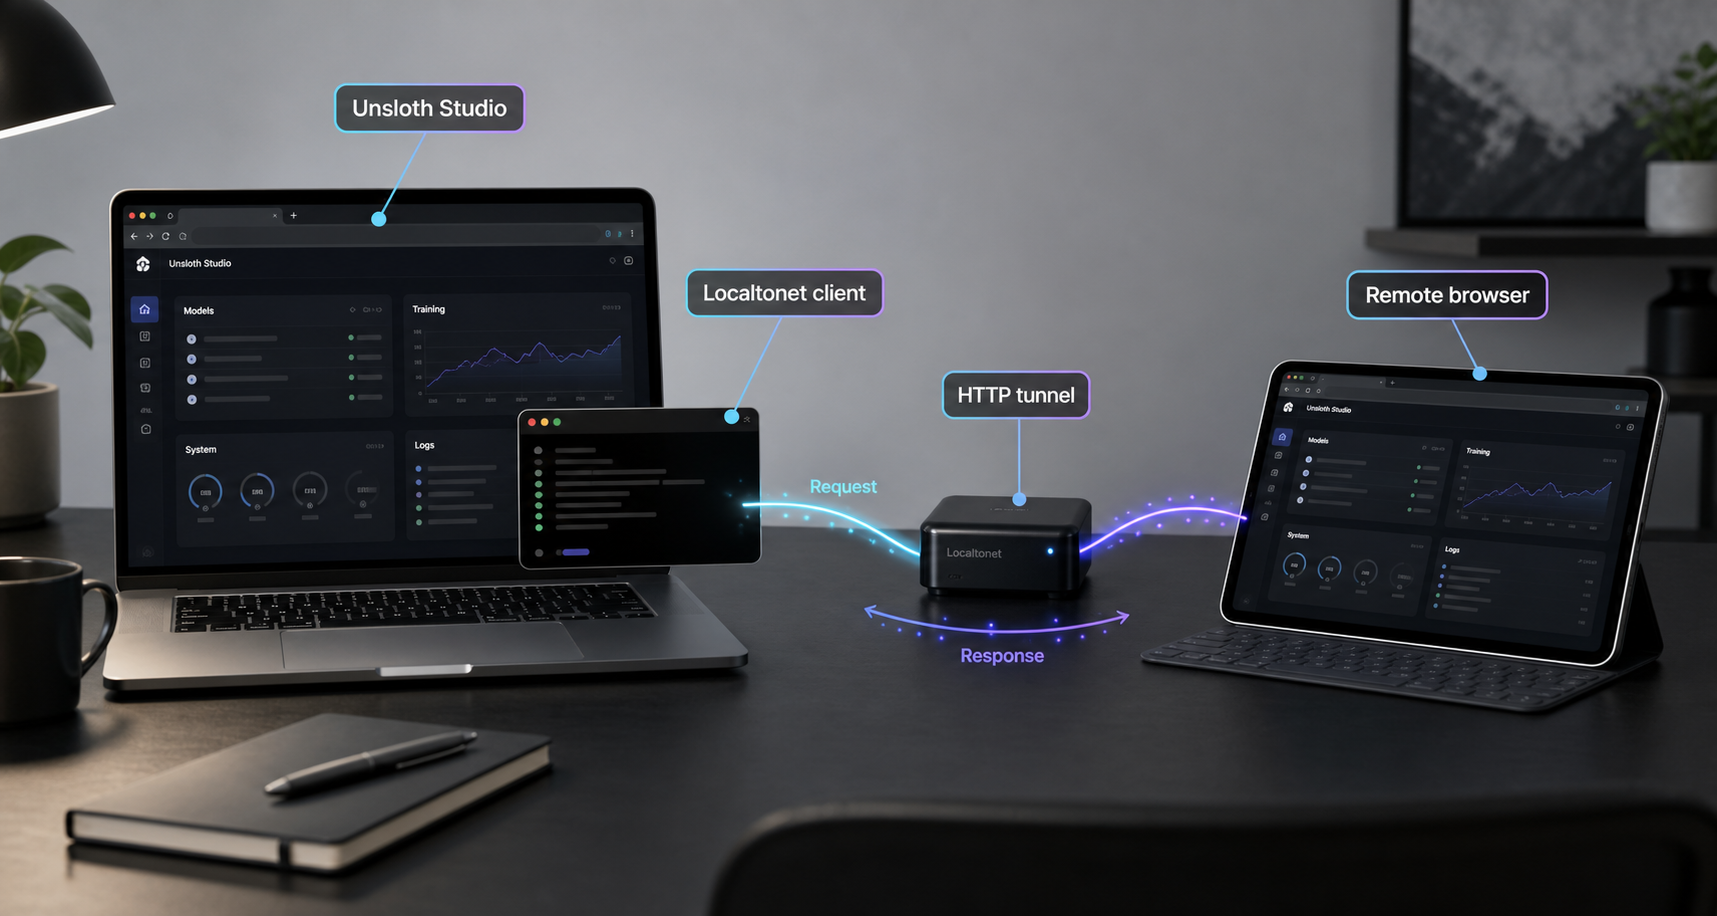
How the Unsloth Studio remote-access path works
Unsloth Studio runs an HTTP service on a computer you control. A browser on that computer connects directly to a local address such as http://127.0.0.1:8888. Remote access adds another layer: the Localtonet client must be able to reach that same HTTP service, and the running HTTP tunnel maps it to an assigned public HTTPS address.
The complete path is therefore the remote browser, the Localtonet relay, the connected Localtonet client, and the local Unsloth Studio process. A failure at any one of those points can make the public address unavailable. This is why the tutorial verifies Studio locally before creating a tunnel. If the local page does not work, changing the tunnel configuration cannot repair the underlying Studio installation or listener.
Creating a Localtonet tunnel configuration does not mean it is running. Studio must remain active, the selected Localtonet client must remain connected, and the tunnel must be started. If the computer or either process restarts, verify each part of the path again instead of assuming that public access resumed automatically.
Choose the correct Unsloth installation path
Unsloth distinguishes among Unsloth Desktop, Unsloth Studio, and Unsloth Core. These are related, but they are not interchangeable installation instructions. The current Unsloth installation documentation describes Desktop as the native application, Studio as the browser-based web UI, and Core as the original code-oriented Python package.
Unsloth recommends its native Desktop application as the easiest installation path. This tutorial instead follows the manual Studio path because the goal is to start a known HTTP listener and connect that listener to a Localtonet HTTP tunnel. If you install Desktop, follow its desktop-specific launch and update workflow rather than assuming every manual Studio command applies to it.
| Installation choice | What it provides | How it relates to this tutorial |
|---|---|---|
| Unsloth Desktop | A native desktop application and the recommended easy installation path. | Use the operating-system download and Desktop instructions. Do not mix its lifecycle with the manual Studio installer unless Unsloth specifically directs you to do so. |
| Manual Unsloth Studio | The browser-based web UI installed through the official shell or PowerShell installer. | This is the primary path covered below because it can be started on an explicit HTTP address and port. |
| Unsloth Studio in Docker | A supported containerized deployment using the unsloth/unsloth image. |
The Localtonet client must target the container service through a published and reachable host port. Container networking adds another boundary to troubleshoot. |
| Unsloth Core | The original Python package for code-based training and inference. | It is not the browser-based Studio workflow covered here. Installing Core alone does not establish the Studio endpoint used by this tutorial. |
Use the commands in the installation section only when you intend to install Unsloth Studio manually. For current platform details and changes, consult the official Unsloth Studio installation guide and the official Unsloth repository.
About the supported Docker path
Unsloth also documents a Docker image for users who prefer a container. Its published example maps ports 8888, 8000, and 2222, mounts a workspace, requests GPU access, and supplies a Jupyter password:
docker run -d -e JUPYTER_PASSWORD="replace-with-a-strong-password" \
  -p 8888:8888 -p 8000:8000 -p 2222:22 \
  -v $(pwd)/work:/workspace/work \
  --gpus all \
  unsloth/unsloth
Treat this as a separate deployment choice, not an extra step in the manual installation. Review the current Unsloth Docker requirements before using it, especially GPU runtime and volume requirements. For tunneling, first confirm which published host port serves the interface you intend to expose. Then test that host endpoint from the device running the Localtonet client. Do not point Localtonet at a container-only address that the client cannot reach.
Review the prerequisites before configuration
Separate the prerequisites into two groups: the requirements for running Unsloth Studio and the requirements for creating a Localtonet tunnel. A working Studio installation is the foundation. Localtonet provides remote connectivity to that service, but it does not install Studio, select a model, supply GPU drivers, or make an unhealthy local process work.
Unsloth Studio prerequisites
Requirements vary by operating system, hardware, and workload. Opening the Studio interface, chatting with a model, and training a model can place very different demands on a computer. A successful Studio launch proves that the web interface is available, but it does not prove that a particular model fits in memory or that every training workflow is supported by the installed hardware.
The current Studio documentation lists Windows, Linux, WSL, and macOS support. For Windows training setups, it identifies 64-bit Windows 10 or Windows 11, relevant NVIDIA drivers, Git, App Installer with winget, and Python 3.11 up to but not including 3.14. It recommends using a Python environment such as uv, venv, or conda/mamba. For WSL with NVIDIA hardware, Unsloth directs users to install the NVIDIA driver on Windows rather than inside WSL and to install the CUDA toolkit inside the WSL distribution.
The documented macOS baseline is macOS 12 Monterey or newer on Intel or Apple Silicon. Capabilities differ by hardware and continue to change, so check the current Unsloth requirements for the model and operation you intend to use.
| Environment | Manual installer | Preparation to check |
|---|---|---|
| macOS | Official shell installation script | Use a supported macOS release and confirm that the intended model workflow is suitable for the available hardware. |
| Linux | Official shell installation script | Review the current CPU, GPU, driver, Python, and environment requirements for your intended workload. |
| WSL | Official shell script run inside the selected WSL distribution | For NVIDIA setups, follow Unsloth guidance for the Windows driver and the CUDA toolkit inside WSL. |
| Windows | Official PowerShell installation script | Review the documented Windows version, driver, Git, App Installer, Python, and environment requirements. |
Localtonet prerequisites
Have all of the following ready before opening the HTTP tunnel configuration:
- A Localtonet account with access to the dashboard.
- The Localtonet client installed and running on the device that will operate the tunnel.
- A connected client identified by its device-specific authentication token.
- An available Localtonet relay server or region selected from the current dashboard.
- A running Unsloth Studio endpoint that is reachable from the Localtonet client device.
- The exact local IP address and port you verified, such as
127.0.0.1and8888for a same-machine setup. - A strong Unsloth Studio password configured before public access is enabled.
A Localtonet authentication token identifies the client device. The Unsloth password protects the Studio application. Never publish either value, embed it in screenshots, commit it to a repository, or send it alongside the public tunnel address. Use placeholders in notes and command examples.
Install and verify Unsloth Studio
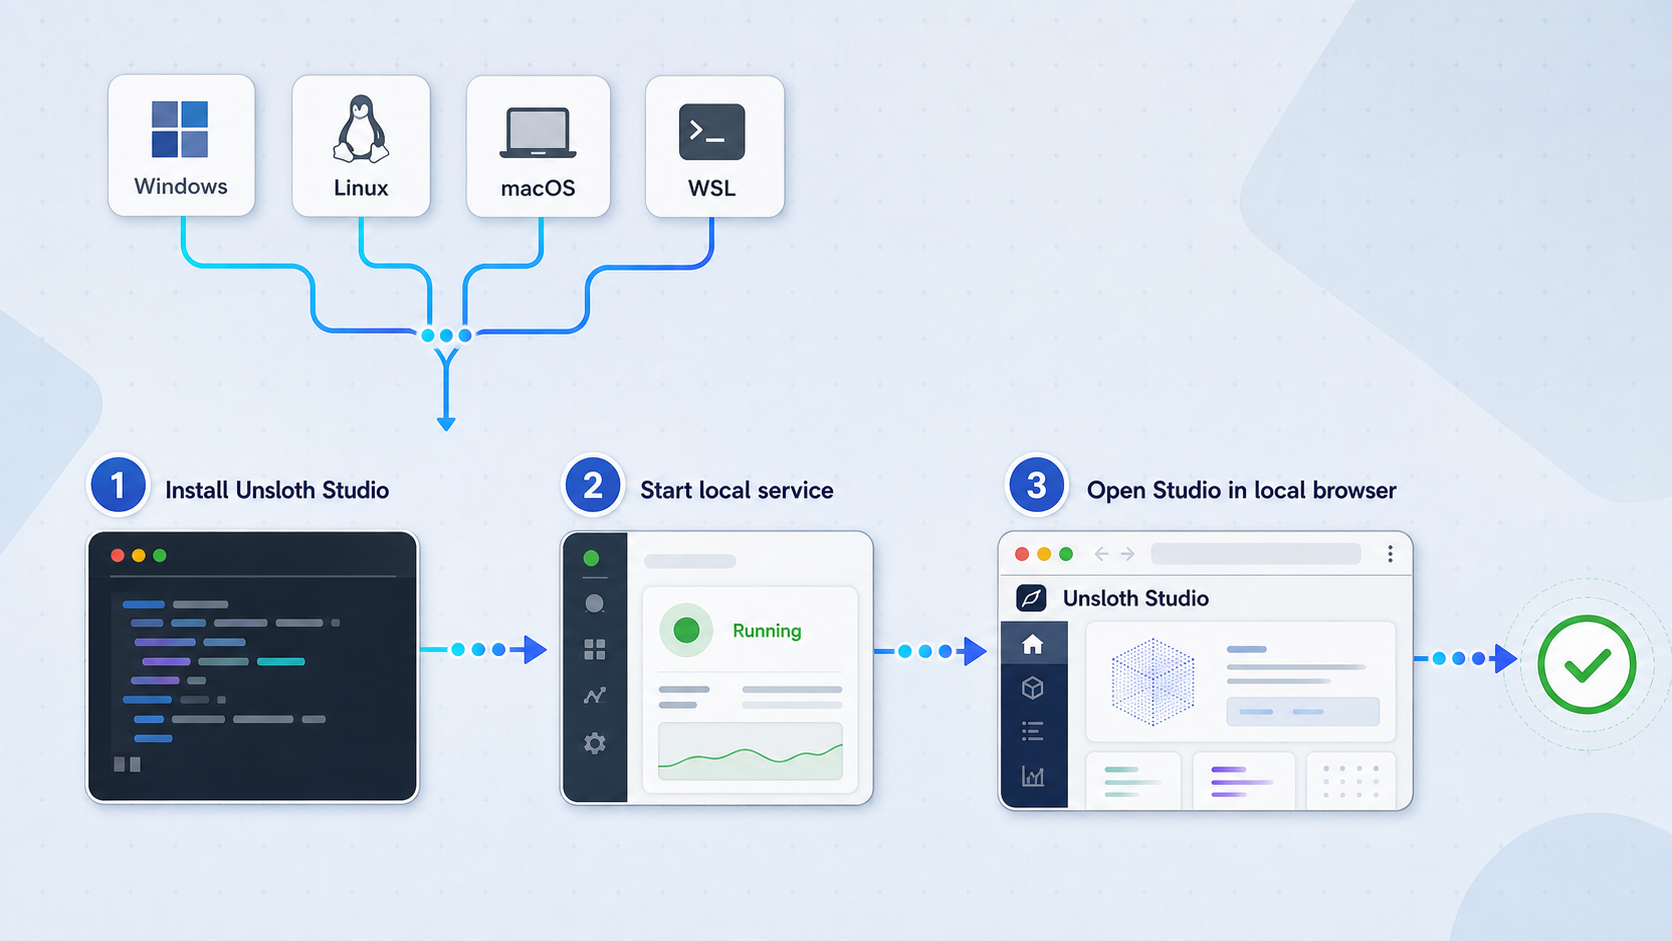
Run the official manual installer
Use the shell installer on macOS, Linux, or WSL, or the PowerShell installer on Windows. The installer may ask whether it should start Studio after setup.
Start Studio on an explicit port
If Studio did not start during installation, launch it with port 8888 explicitly selected. Keep the terminal open and review its output for startup errors.
Open the local interface
On the same operating-system environment, open http://127.0.0.1:8888. On first launch, create a strong password and continue to the Chat page.
Repeat the test from the Localtonet client device
If Localtonet runs somewhere other than the Studio environment, verify that the client device can reach the selected IP address and port. Resolve WSL, container, host, or LAN boundaries before creating the tunnel.
Install on macOS, Linux, or WSL
curl -fsSL https://unsloth.ai/install.sh | shRun the command in a macOS or Linux terminal. For WSL, run it inside the Linux distribution where you intend to operate Studio. The installer configures the required environment and may ask whether it should start Unsloth. Review remote installation scripts and your organization’s software policy before piping a script directly to a shell.
Install on Windows with PowerShell
irm https://unsloth.ai/install.ps1 | iexOpen PowerShell from the Start menu and run the command there. If your organization restricts script execution or software installation, ask the responsible administrator for the approved process instead of weakening system policy.
Launch Studio on port 8888
unsloth studio -p 8888This command explicitly chooses port 8888, so the tunnel configuration does not depend on an assumed default. Leave the process running and open:
http://127.0.0.1:8888On the first launch, Studio should prompt you to create a password before continuing to the Chat page. Create a strong, unique password, sign in, and reload the page to confirm that the application remains available. Do not proceed merely because the command returned no immediate error. The browser test is what confirms that an HTTP service is actually responding at the intended target.
If port 8888 is already in use, select another available port supported by the Studio command and verify it locally. Use the same port later in Localtonet. For example, if you deliberately start Studio on port 8890, the HTTP tunnel target must also use port 8890.
Secure, update, and recover Unsloth Studio
Unsloth warns users to be careful when exposing Studio because server-side tools are enabled by default. Keep the Studio password private and disable tools when they are not required. Do not expose Studio in a way that conflicts with organizational authorization, data-handling, or least-privilege policies.
Disable server-side tools when they are unnecessary
Unsloth documents the exact --disable-tools option for exposed instances. To launch the local service on the explicit port used in this tutorial while disabling tools, run:
unsloth studio -p 8888 --disable-toolsVerify the local interface again after changing startup options. Do not assume that a process restarted successfully or retained the same port. If your workflow depends on a particular tool, test the required Studio behavior before enabling remote access.
Use a password for an approved headless start
Unsloth documents the UNSLOTH_STUDIO_PASSWORD environment variable for headless starts. Use a strong secret supplied through an approved secret-management or service configuration mechanism:
UNSLOTH_STUDIO_PASSWORD='replace-with-a-strong-password' unsloth studio -p 8888 --disable-toolsThe placeholder above is not a password recommendation. Avoid placing a real password in shared shell history, process documentation, source control, screenshots, or support messages. Environment-variable handling and persistence vary by operating system and service manager, so follow your local security policy when automating startup.
Reset a forgotten Studio password
If you lose the Studio password, use Unsloth’s documented reset command on the machine where Studio is installed:
unsloth studio reset-passwordComplete the reset locally, restart Studio if required by the displayed instructions, and confirm that you can sign in through the local address before testing the public tunnel again. A Localtonet token cannot reset or replace the Unsloth application password.
Update Studio with the installer
Unsloth’s Studio documentation directs users to update with the same command used for installation. On macOS, Linux, or WSL, run:
curl -fsSL https://unsloth.ai/install.sh | shOn Windows, run the installer again in PowerShell:
irm https://unsloth.ai/install.ps1 | iexStop active work safely before updating. After the installer completes, launch Studio with your intended options, verify the local page, confirm authentication, and only then rely on remote access. An update can restart or replace application components, so treat post-update verification as a required operational step.
Operate the tunnel with minimum exposure
Keep remote access available only as long as needed. Do not share the assigned public address broadly, and do not treat an unlisted URL as an access control. When the session ends, stop the Localtonet tunnel. Delete the tunnel if you no longer intend to use its configuration.
If you automate either Studio or the Localtonet client after a reboot, verify that the automation uses approved credentials and starts components in the right order. Studio must be listening before the tunnel can successfully forward requests to it. A running tunnel cannot compensate for a stopped application.
Choose the correct Studio bind address
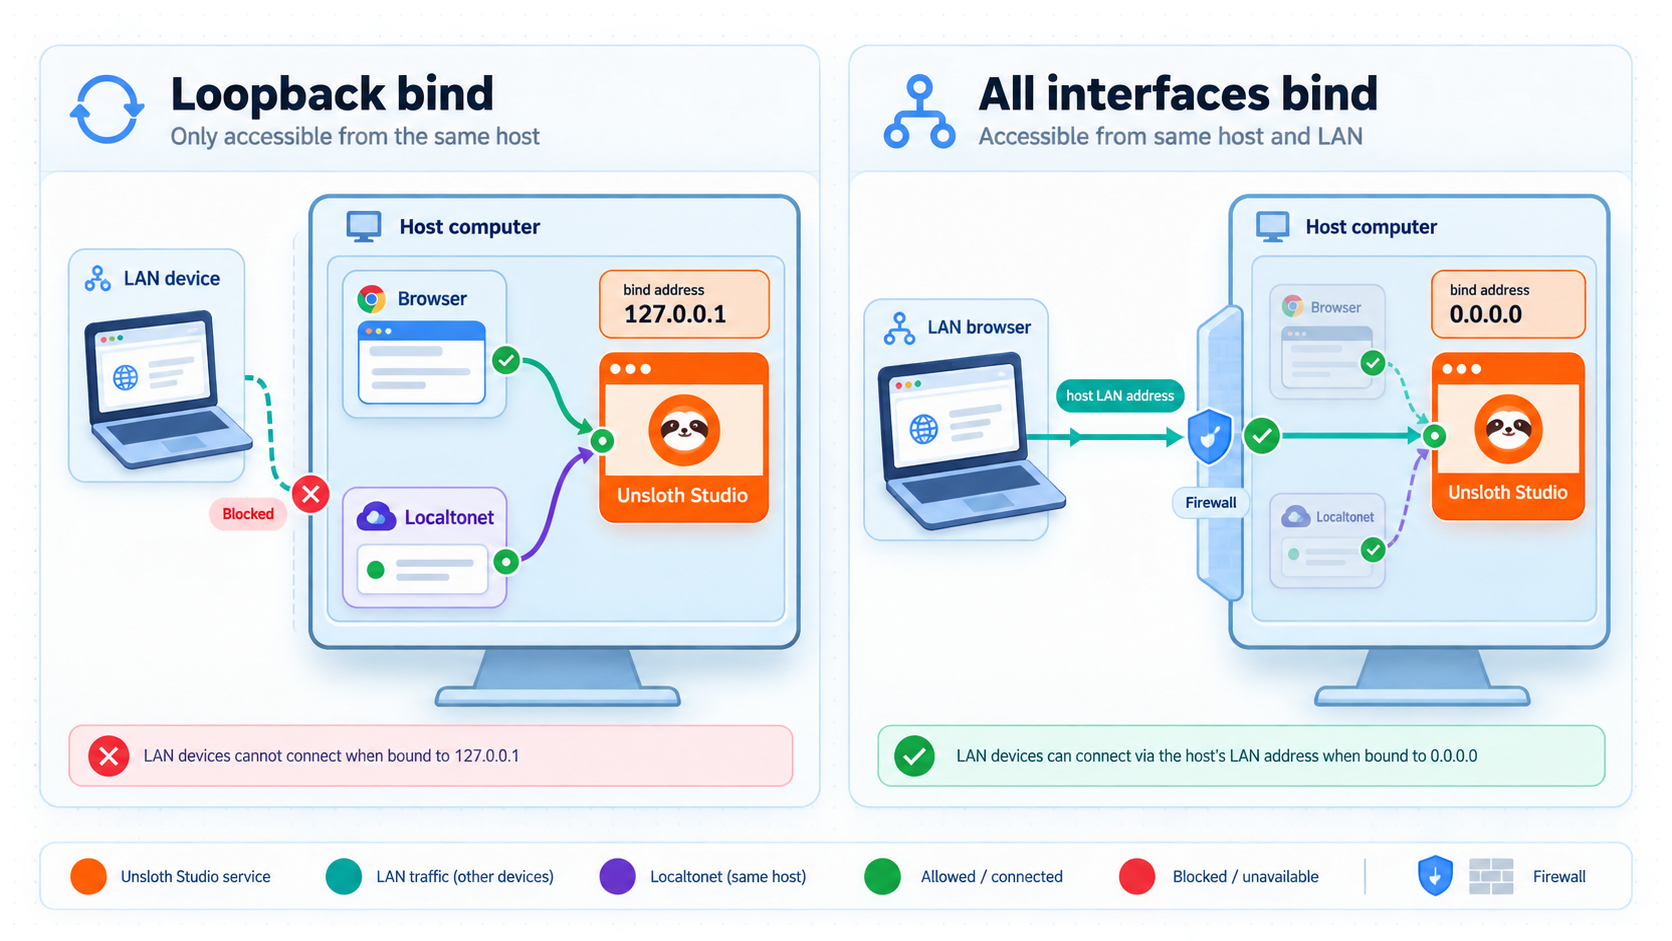
The bind address determines which network interfaces accept connections to Studio. A listener on 127.0.0.1 is available only within the same operating-system network environment. A listener on 0.0.0.0 accepts connections through available interfaces, subject to host firewall and network controls.
When Studio and the Localtonet client run on the same host and the client can reach 127.0.0.1:8888, use that narrower target. There is no need to add direct LAN exposure solely because the service will be tunneled.
WSL, containers, virtual machines, and split host environments can complicate the meaning of loopback. The address 127.0.0.1 inside a container or WSL distribution may not identify the same listener from the Windows host or another container. Test from the environment where the Localtonet client actually runs.
When access across that boundary is required, Unsloth documents an all-interfaces binding:
unsloth studio -H 0.0.0.0 -p 8888To combine that binding with the documented tool restriction, use:
unsloth studio -H 0.0.0.0 -p 8888 --disable-toolsBinding to all interfaces is not an authentication or encryption feature. It can make Studio reachable by other devices on connected networks when host and network controls permit it. Use it only when required, keep the Studio password enabled, review firewall exposure, and test from an authorized device.
Configure the Localtonet HTTP tunnel
Begin this section only after the chosen Studio endpoint works from the device running our client. For a simple same-machine installation, that target is usually 127.0.0.1 with port 8888. If your Localtonet client runs outside the Studio environment, enter the different address only after you have verified that it is reachable from the client device.
Install and connect the Localtonet client
Sign in to your Localtonet account, install our client on the device that can reach Studio, and keep it running. Confirm in the current product that the intended device is connected before configuring the tunnel.
Open the HTTP tunnel configuration
Create an HTTP tunnel for the Studio web service. HTTP is appropriate here because Studio presents a browser-based HTTP endpoint rather than a raw TCP, UDP, File Server, proxy, or VPN target.
Select the HTTP Process Type
Choose the Process Type available for your intended public address: Random Sub Domain, Custom Sub Domain, or Custom Domain. All three serve the local HTTP content through a public HTTPS address. Availability and custom-domain requirements can vary, so use the options shown in the current dashboard.
Select the connected device token
Select the device-specific authentication token for the client that can reach Studio. Do not copy a token from another device and never expose the token in screenshots, commands, logs, or public messages.
Select an available relay server
Choose a currently available server or region from the dashboard. Server codes and regional availability should be obtained from the current product rather than copied from a static example.
Enter the verified local IP address and port
Enter 127.0.0.1 in the local IP address field and 8888 in the local port field only if that exact endpoint worked from the Localtonet client device. For WSL, containers, or another host, enter the alternative tested address and matching Studio port.
Start the tunnel
Use the Start button after reviewing the configuration. Creating the tunnel alone does not make it active. Keep both Studio and the selected Localtonet client running.
Verify the public address remotely
Open the assigned public HTTPS address from a separate authorized device or network. Confirm that the Unsloth password page appears, sign in, and verify the expected Studio interface without exposing credentials.
Stop or delete access when finished
Stop the tunnel when remote access is no longer required. Delete it when you no longer need the configuration. Stopping the tunnel removes the active route without requiring you to uninstall Studio.
See our HTTP tunnel documentation alongside the current dashboard when configuring the connection. Check current domain options, relay availability, and plan-specific capabilities rather than assuming that every option is present for every account.
Verify local and remote access in the correct order
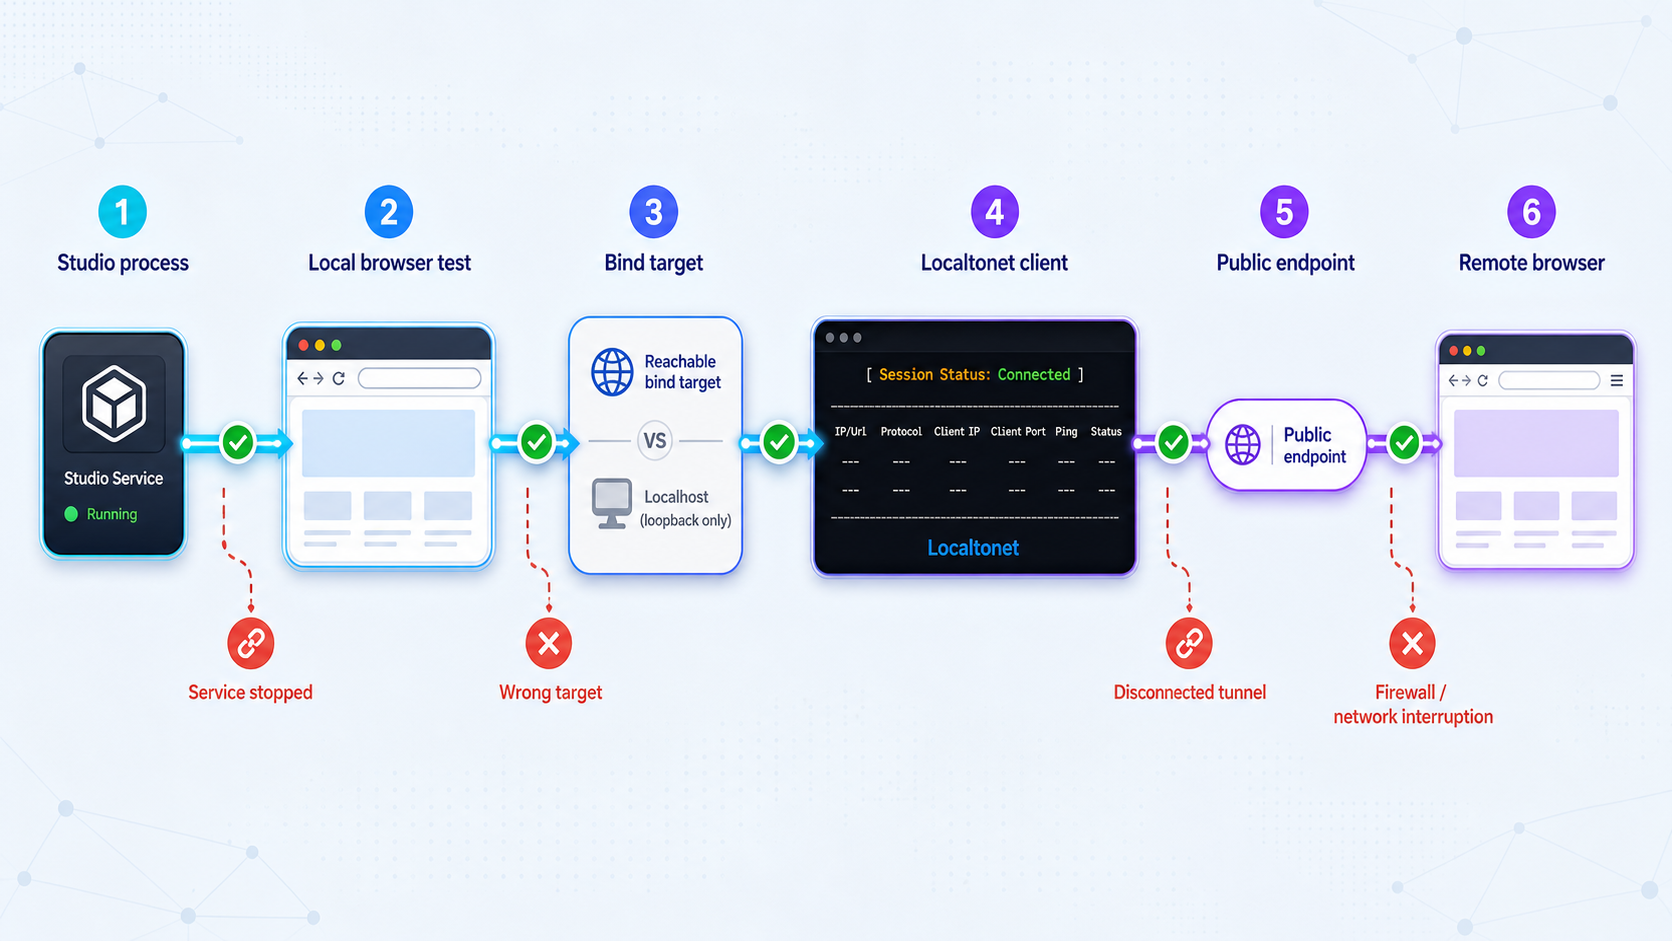
A structured verification sequence prevents tunnel symptoms from being confused with application problems. Perform each test in order and stop at the first failure.
- Confirm that the Studio process is still running and has not reported a startup error.
- Open the exact local URL from the Studio environment.
- If the Localtonet client runs elsewhere, open the chosen target from that client device or environment.
- Confirm that the correct Localtonet device is connected.
- Confirm that the HTTP tunnel is started.
- Open the assigned HTTPS address from a separate authorized browser.
- Verify that Studio requests its application password and accepts the correct credentials.
- After testing, stop the tunnel if continued remote access is unnecessary.
| Access method | Typical listener or target | Best use | Primary consideration |
|---|---|---|---|
| Local browser only | 127.0.0.1:8888 |
Installation verification and same-machine use | It is not directly reachable from another network environment. |
| Direct LAN access | 0.0.0.0:8888 |
Access from authorized devices on the same network | It can expose Studio directly to the LAN, subject to host and network controls. |
| Localtonet HTTP tunnel | A tested local IP address and port | Remote access through an assigned public HTTPS address | Studio, the Localtonet client, and the tunnel must all remain active. |
| Unsloth secure mode | Managed by Unsloth | Unsloth’s documented Cloudflare-based remote HTTPS mode | It is an alternative remote-access path, not a prerequisite for Localtonet. |
Unsloth documents unsloth studio --secure for a Cloudflare-based HTTPS link. You do not need to combine that mode with a Localtonet HTTP tunnel. Avoid creating multiple public routes unless there is a clear operational requirement and you understand how each route is authenticated and stopped.
Troubleshoot the complete connection path
The Unsloth installer fails
Read the first meaningful error in the terminal rather than repeatedly rerunning the command. Confirm that the operating system is supported, the computer can retrieve the installer URL, and the required package-management and development tools are present. On managed devices, script execution, downloads, or package installation may be blocked by policy.
For Windows, check the documented Windows version, App Installer with winget, Git, supported Python version, and relevant drivers. For WSL with NVIDIA hardware, verify that the NVIDIA driver is installed on Windows and the CUDA toolkit is installed inside WSL as directed by Unsloth. Use the current Unsloth installation documentation for platform-specific dependency errors.
The unsloth command is not found
Open a new terminal after installation so shell environment changes can take effect. Make sure you are using the same user account and environment in which Studio was installed. In WSL, run the command inside the same distribution used for installation. If a Python environment was involved, activate that environment before launching Studio.
Do not solve a PATH problem by downloading unrelated executables or running an unverified command. Review the installer output for the installed location and follow Unsloth’s current PATH guidance for your platform. After correcting PATH, run the launch command again and verify the browser endpoint locally.
Studio reports that port 8888 is occupied
Another process may already be listening on that port, or an earlier Studio process may still be active. Determine whether the existing listener is the intended Studio instance before terminating anything. If you select a different port, specify it in the Studio command, verify the matching local URL, and enter that exact port in Localtonet.
A port change must be applied consistently. Starting Studio on one port while leaving the tunnel pointed at 8888 will produce a public connection failure even though both Studio and the tunnel appear to be running.
The Studio process starts, but the local page does not open
Check the terminal for a bind or startup error and confirm that the process remains active. Verify the exact scheme, IP address, and port. For the loopback example, use http://127.0.0.1:8888, not the eventual Localtonet HTTPS address.
If the browser is outside the environment where Studio runs, the test may no longer be local. A Windows browser, a WSL process, and a container can occupy different network contexts. Test inside the Studio environment first, then test across the boundary using a reachable address.
Studio works in WSL or a container, but Localtonet cannot reach it
Identify where the Localtonet client is running. If Studio listens only on loopback inside WSL or a container, a client on the host may not be able to connect to that listener. Use the platform’s supported host or published-port networking, or bind Studio to 0.0.0.0 when that is necessary and authorized.
After changing the bind address, test the new target from the Localtonet client device before editing the tunnel. Review direct LAN exposure and firewall behavior because an all-interfaces listener can be reachable independently of Localtonet.
The local target works, but the public address does not
Confirm that the Localtonet client is connected and that the HTTP tunnel uses that client’s device-specific token. Verify the selected relay, Process Type, local IP address, and local port. Then confirm that you pressed Start. A saved but stopped tunnel does not provide public access.
If the target is 127.0.0.1:8888, confirm that this address works from the Localtonet client’s own environment. Do not assume that a browser test on another host proves client-side reachability.
The remote page appears, but authentication fails
Use the Unsloth Studio password, not the Localtonet device token or account password. Check for accidental spaces, keyboard-layout differences, stale password-manager entries, or an earlier password reset. If the Studio password is lost, run:
unsloth studio reset-passwordComplete the recovery locally and verify the new credentials through the local page first. Never send a password or authentication token in a diagnostic screenshot.
The tunnel works until Studio, the client, or the computer restarts
Rebuild the chain in order. Start Studio with the intended port, bind address, password handling, and tool settings. Verify the local page. Start or reconnect the Localtonet client, confirm that the expected device is connected, and check the tunnel state. Start the tunnel if it is stopped, then test the public address.
The tunnel is available only while its selected client is connected and the tunnel is running. Studio must also remain active. If you need unattended operation, use only approved startup mechanisms and secret handling for your operating system. Test recovery after a planned restart before depending on it remotely.
The public address loads the wrong service
Stop the tunnel and compare its target against the endpoint you verified. Another process may now occupy the selected port, especially after a restart or application failure. Confirm that the local page is genuinely Unsloth Studio and that its password protection is active before restarting public access.
Frequently asked questions
Is port 8888 always the default Unsloth Studio port?
This tutorial does not depend on an assumed default. The command unsloth studio -p 8888 explicitly selects port 8888. If you choose another port, verify it locally and use that same value in the Localtonet local port field.
Must Studio bind to 0.0.0.0 for Localtonet?
No. If our client runs in the same environment and can reach 127.0.0.1:8888, use the loopback target. An all-interfaces bind may be necessary across WSL, container, virtual-machine, host, or LAN boundaries, but it can also broaden direct network exposure.
Does Localtonet replace the Unsloth password?
No. Localtonet provides connectivity to the local HTTP service. Studio remains responsible for its application-level password. Keep the Studio password enabled and private.
How do I disable Unsloth server-side tools?
Add Unsloth’s documented --disable-tools option when launching Studio. For this tutorial’s port, use unsloth studio -p 8888 --disable-tools, then verify the local interface before starting the tunnel.
How do I reset a forgotten Studio password?
Run unsloth studio reset-password on the machine where Studio is installed. Complete the recovery locally and verify the new password before testing remote access.
How do I update a manual Unsloth Studio installation?
Run the same official installer used for installation. Use the shell installer on macOS, Linux, or WSL and the PowerShell installer on Windows. After updating, restart Studio with your intended options and repeat local verification.
Do I need router port forwarding or a public IP address?
No. The Localtonet client establishes an outbound connection to our relay. The standard HTTP tunnel workflow does not require inbound router port forwarding, firewall changes, VPN setup, or a public IP address.
Is Localtonet required for remote Unsloth Studio access?
No. Unsloth documents its own --secure Cloudflare-based HTTPS mode. Localtonet is an alternative when you want to manage the HTTP tunnel through our dashboard or REST API. Choose one intentional public-access path unless you have a clear reason to maintain more than one.
Why does the public address stop working when the Localtonet client closes?
A tunnel is available only while its selected Localtonet client is connected and the tunnel is running. The Unsloth Studio process must also remain active at the configured local IP address and port.
Connect your verified Unsloth Studio interface
Install Studio, secure it, and confirm that the exact local address and port work from the Localtonet client device. Then create and start an HTTP tunnel to that verified target, test the assigned HTTPS address, and stop access when it is no longer needed.
Get Started Free →

