

Deploy the agent-execution backend, connect a separate dashboard, validate a safe mission, and publish only the verified service
sandboxed.sh separates its mission-execution backend from the web, desktop, iOS, CLI, and MCP control surfaces that connect to it. This distinction is essential when deploying the project and choosing a Localtonet target. This guide uses the latest named release available in the supplied project evidence, v0.12.0 at commit 33c0345, explains the verified Docker Compose workflow and its limits, distinguishes backend and dashboard endpoints, and walks through local verification, a first low-risk mission, routine operations, and remote access. We do not assume that port 3000 belongs to the backend or that a local dashboard development server is part of the backend Compose deployment.
📋 What's in this guide
Version, evidence, and tutorial scope
Reproducible deployment instructions need a named source revision. This tutorial targets the sandboxed.sh v0.12.0 release, identified by the project as commit 33c0345. That release added first-class Grok support, transcript streaming changes, new mission lifecycle states, dashboard API-base inference improvements, and related web and iOS changes. The repository reports substantial development on master after this release, so commands, environment fields, API routes, and interface labels from the current branch must not be silently treated as part of v0.12.0.
The supplied evidence confirms that the repository contains Dockerfile, docker-compose.yml, .env.example, INSTALL.md, backend source, and dashboard source. It also confirms that the public setup documentation installs the backend on a server while presenting the dashboard as a separate choice: a Vercel-hosted Next.js dashboard, a local dashboard started with Bun, an iOS application, or another compatible control surface.
The available material does not reproduce the contents of the v0.12.0 .env.example, its Docker guide, or its Compose port mappings. We therefore cannot safely invent mandatory environment variable names, default backend ports, volume names, health routes, or secret values. The commands below pin and operate the evidenced Compose revision, but deployment must pause if docker compose config reports an unset required value. Resolve that value from the checked-out v0.12.0 files before starting the service.
This limitation also means there is no responsible basis for calling Docker the universally recommended installation method. The current project offers an installation comparison and links to both Docker and native installation guides. This tutorial deliberately chooses Docker Compose because the repository includes that deployment definition and because Compose provides a consistent set of inspection and lifecycle commands. It does not claim that Docker is best for every host.
You can review the selected release in the
sandboxed.sh v0.12.0 release
and the evolving project in the
official sandboxed.sh repository.
Do not combine files copied from master with a v0.12.0 deployment unless you have reviewed and tested the differences.
Understand the backend, control plane, and user interfaces
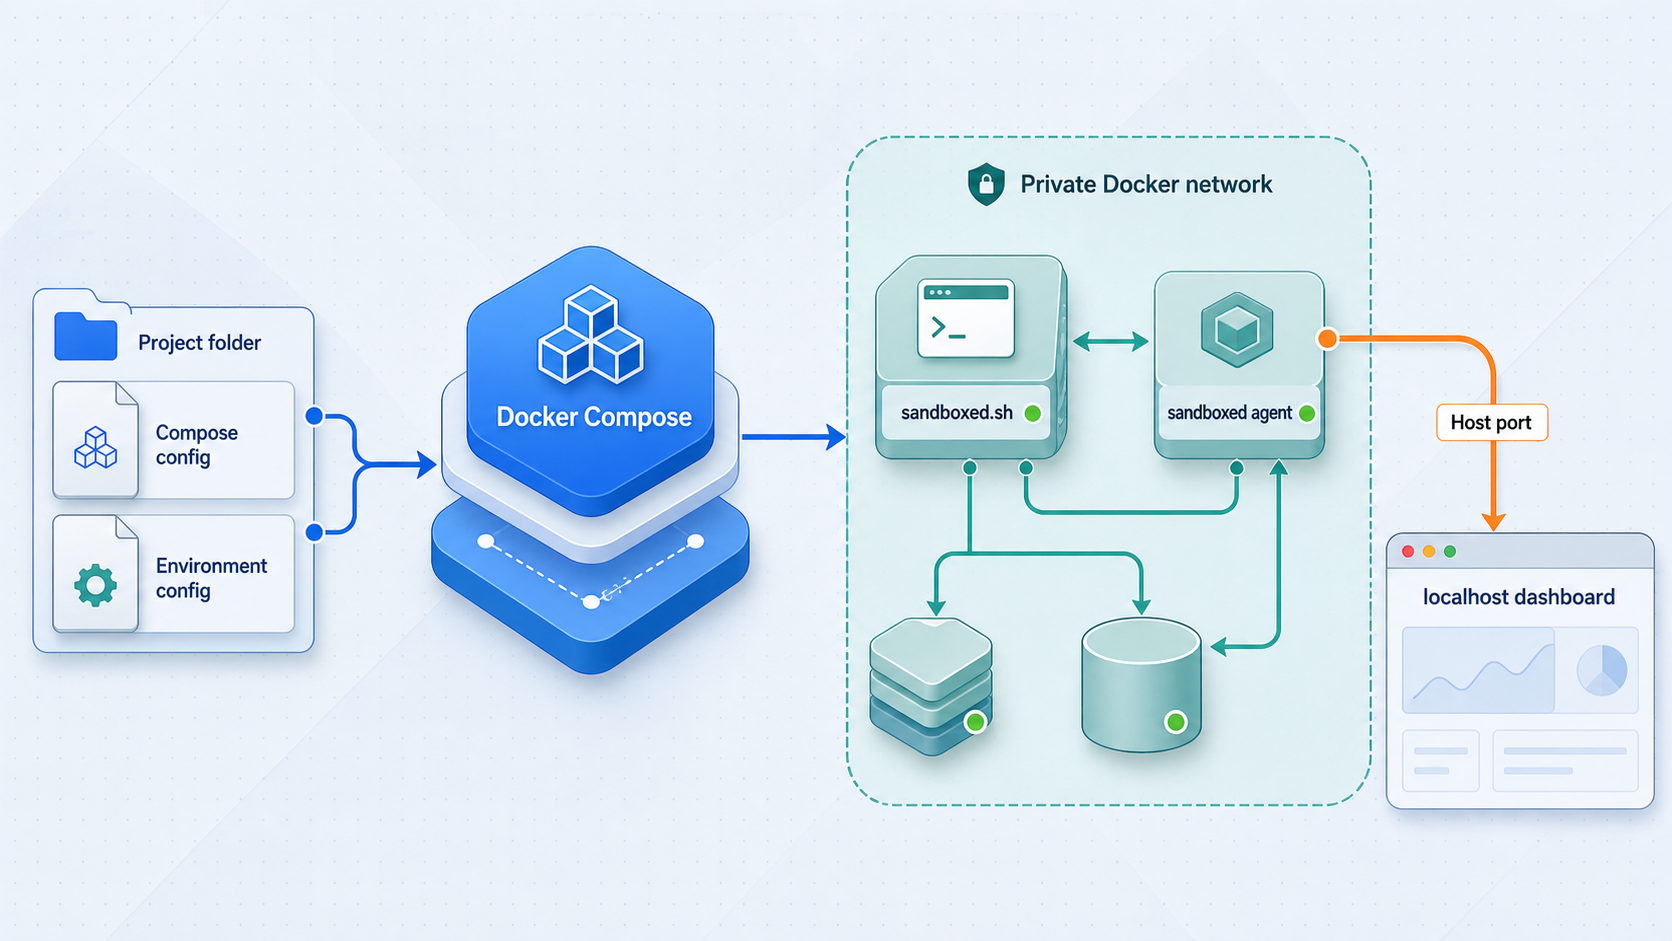
sandboxed.sh is a self-hosted mission-execution backend. It does not provide the model that reasons about a task. Instead, it prepares isolated workspaces, starts and monitors supported agent runtimes, synchronizes configuration, and turns runtime output into structured events for its clients. The selected runtime, such as Claude Code, OpenCode, Codex, Gemini, or Grok, performs the underlying agent work and has its own installation and provider-authentication requirements.
The project describes a two-part system. A coordinator decides what should happen and when, then drives sandboxed.sh over MCP. Hermes is the project's reference coordinator, but the architecture permits another MCP-capable assistant. sandboxed.sh receives executable units of work and runs them in workspace-aware environments. Structured results return through server-sent events, webhooks, or the applicable client connection.
The current control-plane model
Current project material describes the canonical agent-native control plane as portfolio → project → track → attempt → action → receipt → evidence. This model is broader than an older description based only on projects, controllers, conversations, and missions. The latter terms remain useful runtime concepts, but they are not the complete canonical model.
| Concept | Role | Operational meaning |
|---|---|---|
| Portfolio | Top-level organization | Groups related project activity in the canonical control-plane hierarchy. |
| Project | Durable unit of work | Tracks an audit, paper, benchmark, implementation, or similar goal with mode, autonomy grant, tracks, and open decisions. |
| Track | Workstream within a project | Associates related execution with a defined part of the project. |
| Attempt and action | Execution progression | Represent an effort and the concrete operations performed during that effort. |
| Receipt and evidence | Verifiable results | Record what occurred and the material supporting the result. |
| Controller | Coordinator process | Reads project state and a control conversation, then dispatches work through MCP. |
| Mission | One autonomous execution unit | Runs an agent harness in an isolated workspace and can be associated with a project and track. |
A project can have an active, blocked, or paused mode and an autonomy grant covering concerns such as merge authority, budget, and parallelism. Project state is stored on the sandboxed.sh host and is served through project API routes. A controller can wake on a schedule, read the control conversation and project state, and dispatch a mission when real filesystem, Git, build, test, or pull-request work is required.
Prepare a host for the pinned Docker deployment
Use a host under your administrative control. It needs Git, Docker Engine, and the Docker Compose plugin. The account performing deployment must be able to communicate with the Docker daemon. It also needs enough storage for images, application state, repositories, workspace copies, runtime configuration, build artifacts, and logs.
Resource requirements depend on workload. A small source review and a parallel build have very different CPU, memory, and disk profiles. The project evidence does not define a universal minimum specification, so size the host around the runtime, repositories, build systems, and mission concurrency you intend to permit.
Run prerequisite checks
git --version
docker version
docker compose version
docker info
Each command must succeed before continuing. A Docker permission error is a host-administration issue, not a sandboxed.sh problem. Resolve it according to your operating system's supported Docker installation method rather than running an unreviewed command with elevated privileges.
Prepare runtime and network access
- Choose at least one supported runtime to test first.
- Prepare its provider account, local model access, API credential, or provider login as required by that runtime.
- Allow only the outbound network destinations needed to obtain source, images, dependencies, provider responses, and Localtonet connectivity.
- Use a disposable repository or directory for the first mission.
- Decide where persistent backend state, Library data, and workspaces will be stored.
- Keep the backend and dashboard private until authentication and authorization have been verified.
A permitted runtime can execute commands, write files, operate on Git repositories, and contact services available from its environment. Use restricted repository credentials, narrowly scoped provider keys, minimal mounts, explicit workspace boundaries, conservative autonomy grants, and disposable test data. Never mount an entire host filesystem merely to solve a path error.
Install sandboxed.sh v0.12.0 with Docker Compose
The following procedure checks out the exact release used by this tutorial and uses its included Compose definition. It deliberately validates configuration before starting containers. It does not substitute invented environment values for the checked-out release.
Clone the official repository
Obtain the source from the official repository and enter the checkout.
Check out the selected release
Fetch tags, check out v0.12.0, and confirm that Git resolves it to commit 33c0345.
Create a private environment file
Copy the versioned example to a local .env file. Keep the example as a reference and place real credentials only in the uncommitted local file or an approved secret-management system.
Validate the resolved Compose configuration
Render the Compose model before startup. Stop if it identifies an unset required variable, invalid interpolation, missing file, or conflicting configuration.
Build and start the services
Start the release's Compose services in detached mode and build images where the Compose file requires local builds.
Inspect containers and startup logs
Confirm which services are running, whether health checks exist, and which host ports are actually published. Read logs before attempting to configure a dashboard or tunnel.
git clone https://github.com/Th0rgal/sandboxed.sh.git
cd sandboxed.sh

git fetch --tags
git checkout v0.12.0
git rev-parse --short HEAD

cp .env.example .env
chmod 600 .env

docker compose config
docker compose up -d --build
docker compose ps
docker compose logs --tail=200
The revision check should report 33c0345. If it does not, stop and inspect the tag resolution before supplying credentials or starting containers.
Complete the environment file safely
Open .env.example and docker-compose.yml from the checked-out tag side by side. Preserve documented non-secret defaults unless your deployment requires a deliberate change. For every blank or placeholder field, determine whether it controls a backend bind address, public backend URL, state path, workspace path, provider integration, runtime executable, database, or credential.
The supplied evidence does not contain the actual field list for this release, so this article cannot truthfully enumerate it. Do not guess names based on another project or a newer master checkout. A field is required when the tagged configuration or docker compose config identifies it as required, or when the tagged installation guide says the related feature cannot start without it.
- Do not commit
.env. - Do not place provider tokens in Compose labels, public URLs, screenshots, or support messages.
- Do not paste the Localtonet device token into sandboxed.sh configuration.
- Restrict access to environment and credential files.
- Use separate credentials for testing and production.
- Rotate any secret accidentally recorded in shell history, logs, or source control.
Discover the verified backend binding
Do not assume port 3000. Inspect the fully resolved Compose configuration and the running container mappings:
docker compose config
docker compose ps
docker compose port SERVICE CONTAINER_PORT
Replace SERVICE and CONTAINER_PORT only after reading their actual values from docker compose config. The final command is a Docker Compose inspection pattern, not a claim about a particular sandboxed.sh service name or port.
Write down the backend host address, published port, and protocol shown by this deployment. That verified address is used for API tests and may become the Localtonet target. Port 3000 must not be used unless the running configuration proves that the intended service is listening there.
Connect a dashboard without confusing it with the backend
The sandboxed.sh public documentation explicitly separates backend installation from dashboard hosting. The backend runs on the server. A dashboard or application connects to that backend through its configured server URL. As a result, successfully opening a Next.js development page does not prove that the sandboxed.sh backend is healthy, and tunneling that development page does not necessarily expose the backend used by remote clients.
| Surface | Where it runs | What must be configured |
|---|---|---|
| Vercel web dashboard | Hosted separately from the backend | The dashboard must be configured to use the reachable sandboxed.sh backend URL. |
| Local Next.js dashboard | Started from the repository's dashboard directory with Bun |
Its API base must point to the backend. Its development-server port is not automatically the backend port. |
| iOS application | On an iOS device | The user enters the sandboxed.sh server URL. |
| Desktop or CLI surface | On the operator's device | It needs a network path and configuration for the backend it controls. |
| MCP coordinator | Where the coordinating assistant runs | It connects to sandboxed.sh and dispatches executable work through the supported tools. |
Local Bun dashboard
The documented local dashboard entry point is the dashboard directory and the startup command is:
cd dashboard
bun dev
Bun must already be installed, and dependencies must have been prepared according to the package metadata in the selected revision. The supplied evidence does not identify a version-specific dependency-install command, API-base variable, or development-server port, so those values cannot be added safely here. Use the URL printed by bun dev, then verify through browser network tools that the page is contacting the intended backend rather than a stale or inferred address.
Release v0.12.0 mentions local dashboard API-base inference. Inference is convenient, but it is not a substitute for verification. Inspect API requests and confirm their destination before publishing either service.
Verify the backend and dashboard locally
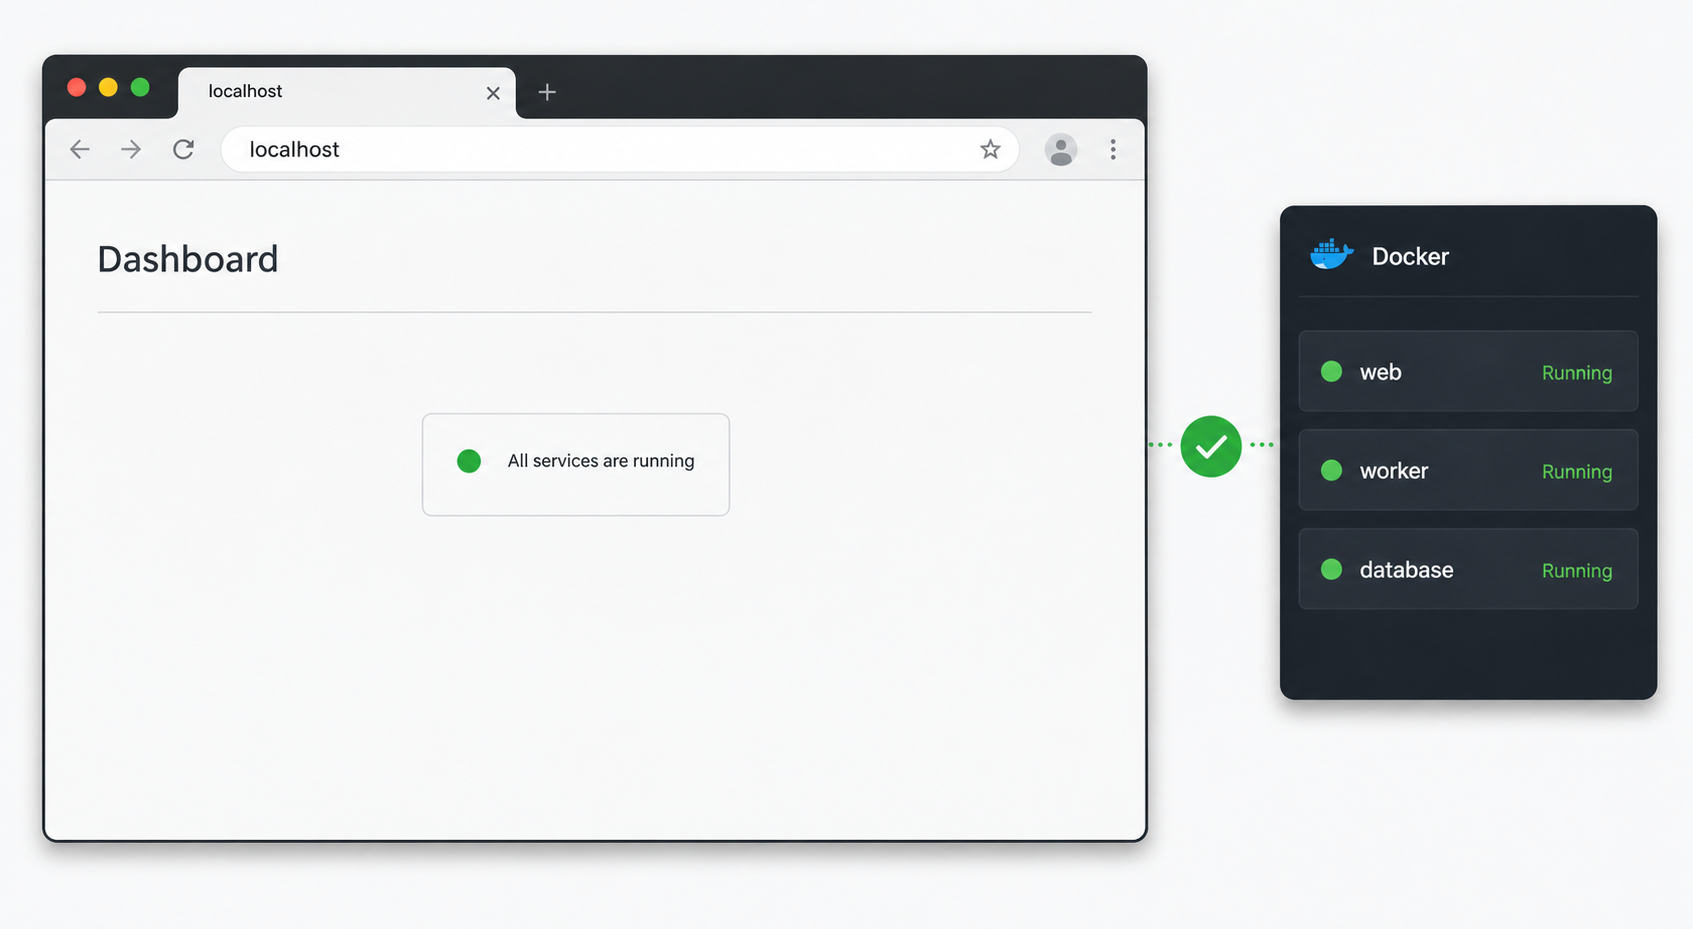
Verification should move through layers. First check Docker. Then test the backend directly. Next verify the dashboard-to-backend API path. Finally, test the event stream and one low-risk runtime. This order keeps application, runtime, and tunnel failures separate.
Check container state and health
docker compose ps
docker compose logs --tail=200
docker compose top
Required containers should remain running instead of repeatedly restarting. If the Compose file defines health checks, inspect their state in docker compose ps. A container without a declared health check can be running while its application is still unusable, so continue with an HTTP test.
Test the observed backend endpoint
Substitute the host and port reported by the pinned Compose deployment:
curl -i http://BACKEND_HOST:BACKEND_PORT/
An HTTP response proves that a process is reachable at that route. A 404 may still prove network reachability if the backend does not serve its root path, but it does not prove API health. The supplied evidence identifies project routes under /api/projects/* on current project material, but it does not establish an unauthenticated health route for v0.12.0. Do not invent one. Use a route shown by the tagged application or by the dashboard's observed requests.
Verify the dashboard API path
- Open the dashboard URL printed by its host or development server.
- Confirm that HTML, scripts, fonts, and other static assets load.
- Open the browser network panel and identify API requests.
- Confirm that those requests target the intended backend origin.
- Check for authorization failures, blocked cross-origin requests, mixed-content errors, and repeated retries.
- Open a mission or project view and confirm that data comes from the selected backend.
Verify event streaming
sandboxed.sh sends structured mission progress to its clients. Current project material describes SSE and webhook delivery, while release v0.12.0 specifically changed transcript and trace handling. Keep a browser network panel open while viewing a test mission. The streaming request should remain connected as appropriate, and new mission events should appear without repeatedly reloading the page.
The dashboard can render while its backend URL is wrong, provider authentication is invalid, workspace preparation fails, or the event stream is disconnected. Do not proceed to public exposure until the API, stream, and one disposable mission work locally.
Run a low-risk first mission
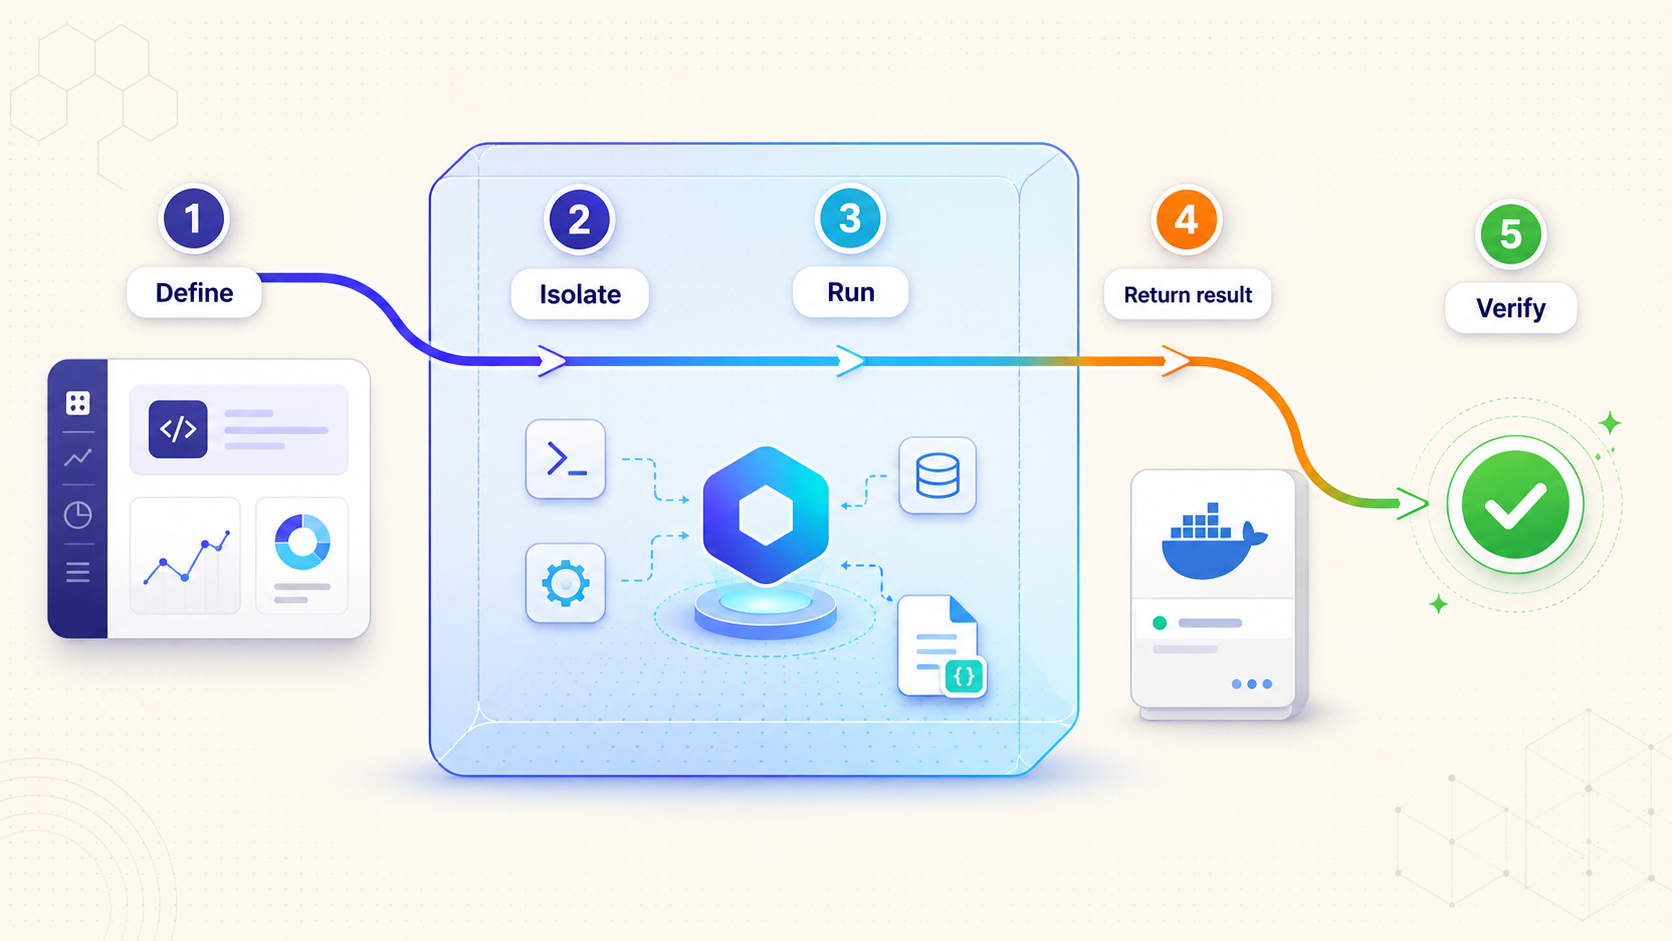
The current execution contract documents a stable mission sequence: the user creates a mission with a workspace and agent backend, sandboxed.sh prepares a per-mission directory, synchronizes Library content, writes runtime-specific configuration, launches the harness through the workspace execution layer, and converts the harness's JSON output into a unified event stream.
Exact interface labels vary between release v0.12.0, later web revisions, iOS, and other control surfaces. The evidence does not expose a complete screenshot-by-screenshot form definition for the selected release, so the walkthrough below identifies the required documented controls without inventing button names.
Configure one supported runtime
Choose Claude Code, OpenCode, Codex, Gemini, or Grok and complete its provider-specific authentication. Confirm that the runtime is available inside the workspace execution context, not only in an unrelated host shell.
Create or select a disposable workspace
Use a test repository or directory without production credentials. Select a host or container workspace according to the deployment and the isolation required.
Select the agent backend
Associate the mission with the configured runtime. Verify any backend-specific path or override shown by the interface before execution.
Enter a bounded objective
Ask the agent to inspect the disposable workspace and produce a summary without modifying files. The outcome should be easy to observe and should not require external write access.
Start the mission and watch preparation
Confirm that sandboxed.sh creates the mission workspace, synchronizes applicable Library content, writes runtime configuration, and starts the selected harness.
Inspect streamed events and final state
Review text deltas, tool calls, tool results, thinking information where available, and the completion or error status. In v0.12.0, a mission may also enter the documented Awaiting User lifecycle rather than immediately appearing completed.
Verify all side effects
Inspect the workspace, Git status, branches, files, and external systems. Confirm that the mission stayed within the intended directory and did not perform an unrequested write.
Runtime-generated workspace files
The project documents runtime-specific files generated from Library content, backend settings, and workspace settings. OpenCode uses configuration at the workspace root and under .opencode. Claude Code uses settings and skills under .claude plus a workspace CLAUDE.md. Codex uses configuration and skills under .codex. Gemini and Grok use their native CLI backends and provider-specific authentication.
Treat these as generated operational files. If a mission receives the wrong tools or instructions, compare the Library, backend settings, and workspace settings before manually editing generated mission output.
Host and container workspace behavior
A host workspace runs the harness directly on the host with the mission directory as its working directory. A container workspace runs through the project's container-aware execution layer. Built-in shell and file operations occur in that selected context.
Host facilities are not automatically available inside a container workspace. The project specifically notes that the host X11 socket is not bind-mounted for normal container harness or MCP execution. Desktop automation therefore requires an explicitly supported display configuration or a suitable host workspace. Do not expose the host desktop or add broad mounts simply to make an initial test pass.
A working mission can run commands, install dependencies, modify files, create commits, and contact external services according to its permissions. Verify the full execution chain before granting access to an important repository, production credential, deployment key, or merge authority.
Operate, back up, update, and roll back the deployment
Compose provides concrete commands for routine container operations, but durable state depends on the volumes and bind mounts declared by the selected release. Inspect those mappings before backing up, removing, or replacing anything.
Status, logs, restart, and stop
docker compose ps
docker compose logs --tail=200
docker compose logs -f
docker compose restart
docker compose stop
docker compose start
docker compose down
docker compose stop stops containers while retaining them. docker compose start starts those stopped containers. docker compose restart restarts services. docker compose down removes the Compose containers and network but, without a volume-removal option, normally leaves named volumes in place. Verify the release's bind mounts and external resources before relying on that behavior as a backup strategy.
--volumes to a removal command casually
Removing volumes can destroy persistent application state. Docker image pruning, bind-mount deletion, workspace cleanup, and repository deletion can also be destructive. Identify and back up every persistent location before using any cleanup command.
Inspect persistence
docker compose config
docker compose ps -q
docker volume ls
In the rendered Compose configuration, identify named volumes and host bind mounts used for project state, workspace data, Library content, configuration, runtime credentials, and databases. Not every item needs the same backup treatment. Container images and generated caches can usually be recreated, while project records, unique workspaces, Library changes, and irreplaceable credentials need deliberate handling.
Back up the deployment
Stop mission creation and wait for active work to finish. Record the deployed commit, save the Compose and non-secret configuration files, and back up each identified persistent path with the storage platform's supported method. Back up the Library repository through Git as well as through storage snapshots when it contains unpushed changes.
Do not copy a live database file without confirming that its storage engine supports that method. The current architecture identifies projects.db on the backend host, but the supplied evidence does not define a release-specific online backup command. A maintenance-window filesystem snapshot or an application-supported export is safer than assuming a live file copy is consistent.
Update to a reviewed revision
git fetch --tags
git status
git checkout NEW_REVIEWED_TAG
docker compose config
docker compose build
docker compose up -d
docker compose ps
docker compose logs --tail=200
Replace NEW_REVIEWED_TAG with a release you have actually reviewed. Before starting it, compare .env.example, docker-compose.yml, storage mappings, migration notes, authentication behavior, API changes, and dashboard compatibility with the previous revision. Repeat the direct backend test, dashboard test, event-stream check, and disposable mission after updating.
Roll back safely
A source rollback does not necessarily reverse a database or storage migration. Preserve the old source revision, image identifiers where practical, configuration, and a pre-update backup. If validation fails, stop the new services, restore storage only according to the project's migration guidance, check out the previous tag, validate its Compose configuration, and start it again.
docker compose down
git checkout v0.12.0
docker compose config
docker compose up -d
docker compose ps
docker compose logs --tail=200
These commands restore the selected source and Compose definition. They do not automatically undo data-format changes. If an update migrated durable data incompatibly, restore the verified pre-update backup before restarting the older release.
Publish the verified service with a Localtonet HTTP tunnel
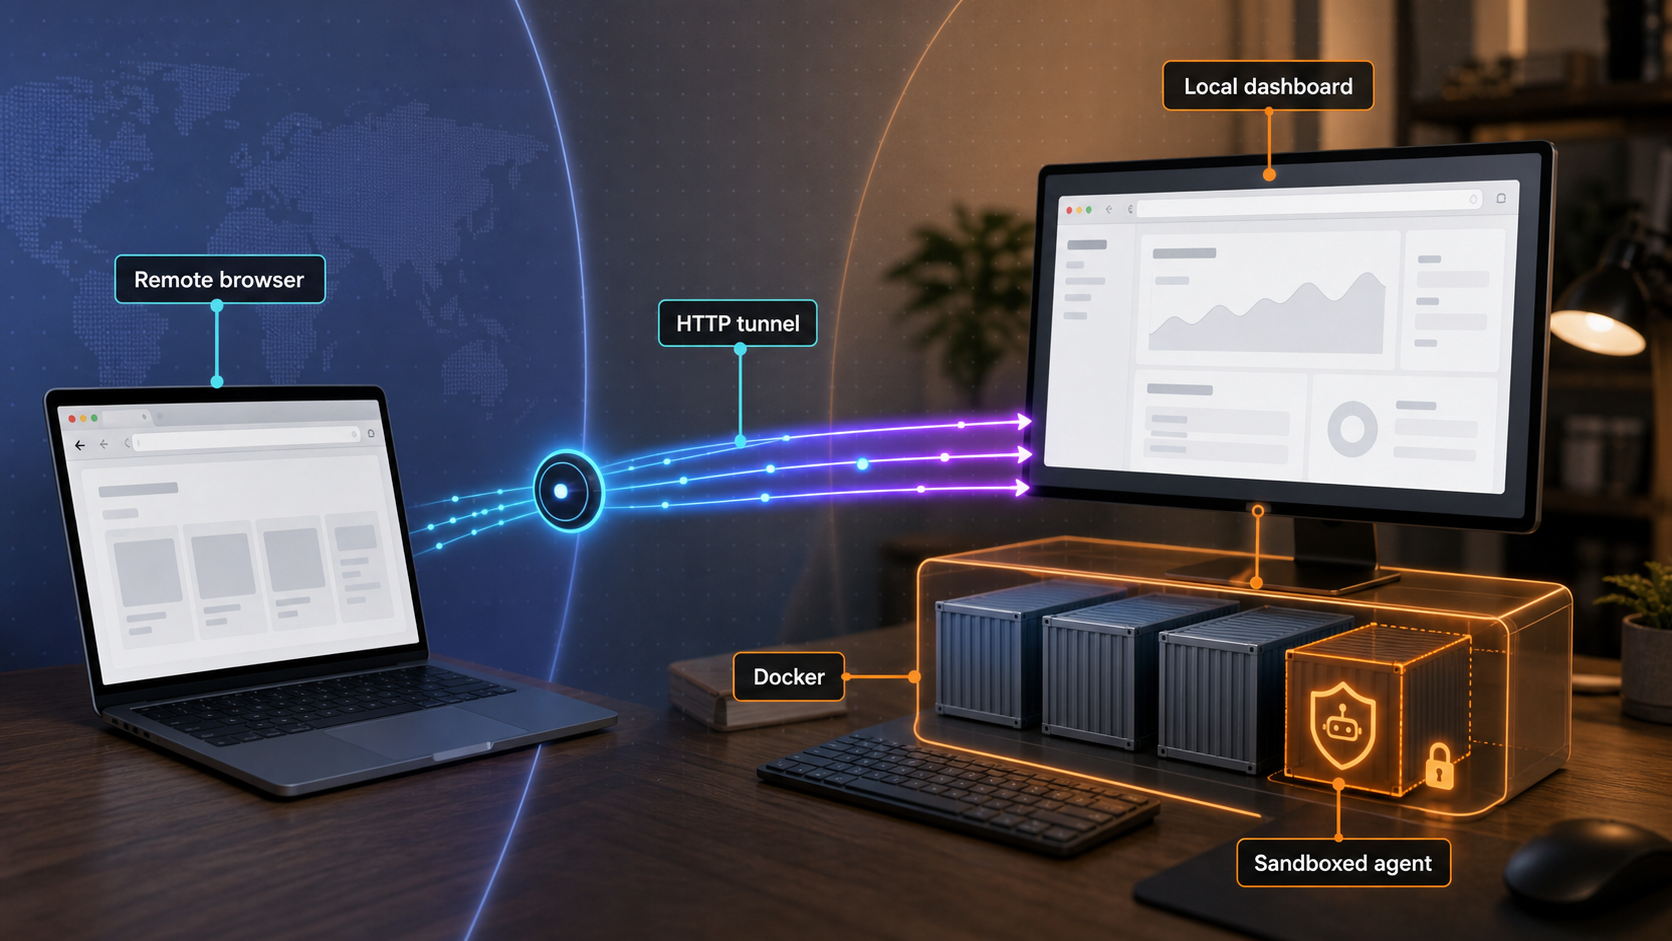
Decide what remote users actually need. An iOS app, separately hosted web dashboard, CLI, or coordinator normally needs access to the sandboxed.sh backend. A remote browser may instead need access to a locally hosted dashboard, but that dashboard must still have a valid path to its backend. These are different targets and may require different exposure decisions.
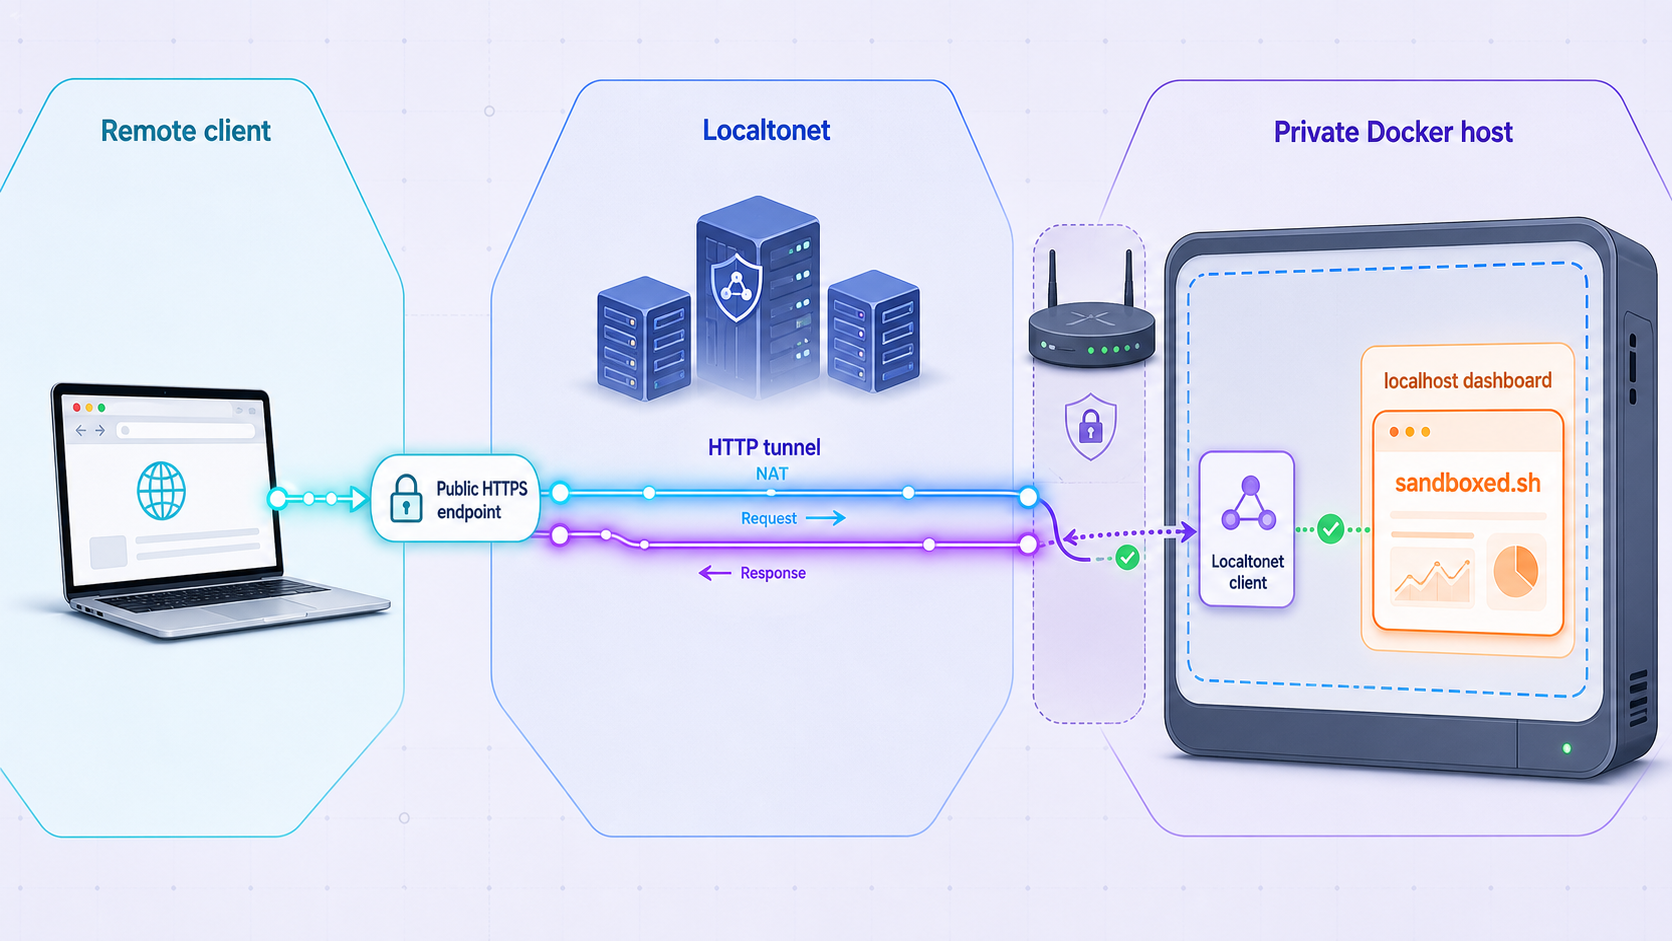
Our client establishes an outbound connection to a Localtonet relay server. The HTTP tunnel provides a public HTTPS URL without requiring inbound router port forwarding, firewall changes, VPN setup, or a public IP address. The tunnel is available only while the selected client device is connected and the tunnel is running.
Do not publicly expose a backend or dashboard until the exact sandboxed.sh release enforces suitable authentication and authorization for that endpoint. A difficult-to-guess URL is not an access-control mechanism. From a signed-out browser, confirm that an unauthenticated visitor cannot read projects or mission output, change settings, send messages, start missions, or retrieve credentials.
Install and run the Localtonet client
Use the current client installation path presented by Localtonet for your operating system. Run the client on the sandboxed.sh host or on another device that can reach the chosen backend or dashboard endpoint.
Select the client device and AuthToken
In the Localtonet dashboard, select the device-specific authentication token for the client that will carry the traffic. Keep this token secret and never add it to sandboxed.sh, source control, screenshots, or a public URL.
Open the HTTP tunnel workflow and choose Process Type
Create an HTTP tunnel and choose Random Sub Domain, Custom Sub Domain, or Custom Domain according to the options currently available to your account. These process types serve the configured content at a public HTTPS address.
Select an available relay server
Choose a current server or region from the dashboard. Do not copy a hardcoded server code from an older tutorial because availability can vary.
Enter the verified local IP address and port
Use the endpoint that responds from the Localtonet client device. If the client and service share a host, this may be a loopback address. If they are on separate devices, use the service address reachable from the client and permitted by your network policy.
Start the tunnel
Creating or saving a tunnel does not make it active. Use the Start button and wait for the selected client and tunnel to report a connected state.
Verify the public HTTPS address
Test the assigned URL from a different network, such as a mobile connection with Wi-Fi disabled. Confirm authentication, ordinary API requests, mission loading, and live event updates.
Stop or delete access when finished
Stop the tunnel when remote access is temporarily unnecessary. Delete it when its configuration should no longer be retained.
See the Localtonet HTTP tunnel documentation for the current dashboard workflow. Available protocols, process types, regions, and options can vary by current product configuration or plan, so select values shown in your account rather than copying unavailable settings.
Choose the correct Localtonet target
| Remote need | Likely target | Required verification |
|---|---|---|
| iOS, CLI, desktop, or MCP access | The sandboxed.sh backend | Direct API requests and authentication work from the Localtonet client device. |
| Access to a locally hosted web dashboard | The dashboard development or production web server | The UI loads and its backend API base remains reachable from remote browsers. |
| Access to both separately hosted services | Separately evaluated HTTP endpoints | Authentication, origins, API routing, and event streams work for the complete topology. |
| Vercel dashboard using a private backend | The backend, if the dashboard must reach it publicly | The configured backend URL, application authentication, and browser-origin behavior are valid. |
Test streaming through the tunnel
A normal page load does not prove that mission streaming works. Open a low-risk mission through the public URL and watch the browser network panel. Compare it with the same mission locally. If local streaming succeeds but remote streaming fails, record the request URL, HTTP status, browser origin error, disconnect timing, and sandboxed.sh logs.
Do not add speculative WebSocket, buffering, header, or origin settings. The current evidence describes SSE for project and mission integration and structured event streaming, but a specific route and proxy adjustment must be based on the selected release and the observed failure. Localtonet should target the HTTP service that already handles the working local stream.
If Localtonet runs on another machine, localhost points to that client machine, not the sandboxed.sh host. Test the backend or dashboard from the client device first and use an address that device can actually reach.
Apply least privilege to the complete deployment
Remote connectivity is only one security layer. The sandboxed.sh backend can coordinate tools with meaningful filesystem, source-control, provider, and network privileges. Protect the application endpoint, host, runtime credentials, repository credentials, workspace boundaries, and Localtonet device token independently.
- Require verified application authentication and authorization before public exposure.
- Use repository credentials limited to the repositories and actions required.
- Keep test, development, and production credentials separate.
- Limit provider credentials using provider-supported controls.
- Review project mode, autonomy grant, merge authority, budget, and parallelism.
- Use narrow bind mounts and avoid exposing unrelated host directories.
- Restrict access to
.env, runtime login caches, databases, and backup files. - Do not place secrets in prompts, mission objectives, event output, public URLs, or screenshots.
- Review logs and mission evidence for accidental credential disclosure.
- Stop the Localtonet tunnel when remote access is not needed.
Test authorization with a separate signed-out browser or device. Verify denial of project data, transcripts, traces, workspace files, configuration changes, and mission controls. HTTPS protects traffic to the public tunnel address, but it does not decide who is allowed to operate the application.
Troubleshoot each layer in order
Compose cannot render the configuration
Run docker compose config and address the first reported error. Check for unset variables, malformed interpolation, missing mounted files, duplicate ports, and paths that do not exist. Confirm that the checkout is still v0.12.0 and that the local .env was created from that tag's example rather than from master.
A container exits or repeatedly restarts
docker compose ps
docker compose logs --tail=300
docker compose logs SERVICE
Replace SERVICE with the actual Compose service name. Investigate the first meaningful application error. Typical categories include incomplete configuration, storage permissions, unavailable dependencies, failed runtime discovery, or an occupied host port. Do not repeatedly restart a container without correcting its startup failure.
The backend does not answer locally
Confirm the published mapping with docker compose ps and the resolved model with docker compose config. Test the observed address with curl. A refusal means no process is accepting the connection at that address. A timeout points toward binding or network filtering. An HTTP response shifts investigation from the network path to the route, authentication, or application.
The dashboard loads but remains empty
Open browser developer tools and inspect the destination and status of API requests. Verify that the API base points to the intended backend, not the dashboard's own development port. Check for authorization errors, cross-origin failures, mixed-content blocking, and stale configuration. Compare the same backend route with a direct local request.
No agent runtime can start
Separate backend health from runtime health. Check whether the runtime executable or service is available in the selected workspace context, whether provider authentication is valid, and whether credentials are made available through the supported configuration. A runtime installed on the host is not automatically available inside a container workspace.
A mission cannot access expected files
Verify the selected workspace type and mission directory. Inspect the Library, backend settings, and workspace settings that generated the runtime configuration. Do not solve the problem by mounting the entire host filesystem. Make the smallest justified path available or move the disposable repository into the intended workspace.
The dashboard stops updating during a mission
Check local streaming first. Inspect backend logs, runtime output, CPU, memory, disk space, and container activity. Mission workloads can be bursty, and resource contention can starve an API or event stream. If the event stream is already broken locally, changing Localtonet settings will not repair it.
The local service works but the public URL does not
- Confirm that the Localtonet client is running and connected.
- Confirm that the selected AuthToken belongs to that device.
- Confirm that the tunnel was started after creation.
- Test the target IP address and port from the client device.
- Replace
localhostif the client and service run on different devices. - Confirm that the selected relay remains available.
- Check that the target is the intended backend or dashboard, not an assumed port.
- Retry the assigned public HTTPS URL from another network.
The page works remotely but streaming fails
Compare browser network traces for local and public sessions. Confirm whether the stream reaches the same backend route, whether authentication is sent, and whether the failure is an HTTP response, origin restriction, disconnect, or application error. Correlate the request with sandboxed.sh logs. Make only a correction supported by the observed error and the selected release.
Check the pinned revision, Compose rendering, container state, direct backend HTTP, application authentication, dashboard API calls, runtime availability, disposable mission, local event stream, client-to-target connectivity, Localtonet client state, tunnel state, and finally the public HTTPS request.
Frequently asked questions
Which sandboxed.sh version does this tutorial use?
It targets release v0.12.0 at commit 33c0345, the latest named release in the supplied evidence. The master branch has substantial later development, so its configuration and interface must not be mixed into this deployment without review.
Is port 3000 the sandboxed.sh backend port?
The supplied evidence does not establish that. Port 3000 may be associated with a Next.js development server in some configurations, but it must not be treated as the backend endpoint without inspecting the pinned Compose configuration and running services. Use the host and port that your deployment actually publishes.
Does Docker Compose include the web dashboard?
Do not assume that it does. The project documentation distinguishes backend installation from dashboard hosting and lists Vercel, a local Bun-based Next.js dashboard, and iOS as client options. Inspect the selected Compose file to determine exactly which services it starts.
Why does this article not list named sandboxed.sh environment variables?
The supplied evidence confirms that .env.example exists but does not include its contents for v0.12.0. Inventing variable names or defaults could misconfigure security, storage, or networking. Use the environment contract included in the checked-out tag and require docker compose config to succeed before startup.
Which service should Localtonet expose?
Expose the authenticated HTTP service that remote clients actually need and that responds from the Localtonet client device. This is often the backend for iOS, CLI, desktop, MCP, or separately hosted dashboard access. If you intentionally host the web dashboard locally, it is a separate candidate endpoint with its own backend-connectivity requirements.
Does creating a Localtonet tunnel start it?
No. After configuring the tunnel, use the Start button. The selected client device must also remain connected. You can stop the tunnel while retaining its configuration or delete it when the configuration is no longer needed.
Does Localtonet require router port forwarding or a public IP?
No. Our client establishes an outbound connection to a Localtonet relay. The resulting tunnel provides a public URL without inbound router port forwarding, firewall changes, VPN setup, or a public IP address.
Is the public HTTPS URL sufficient authentication?
No. HTTPS protects the connection, but the application must still authenticate and authorize users. Verify that a signed-out visitor cannot view data or operate missions before starting the public tunnel.
Can the Localtonet client run on a different machine?
Yes, if that machine can reach the selected sandboxed.sh backend or dashboard endpoint. Test the endpoint from the client machine and configure its reachable address. Do not use localhost unless the target service runs on that same machine.
Connect only the sandboxed.sh service you have verified
Pin the deployment, validate Docker and the backend locally, connect a dashboard to the correct API, complete a disposable mission, confirm application authentication, and then create a Localtonet HTTP tunnel for the endpoint remote clients actually need.
Get Started Free →

