

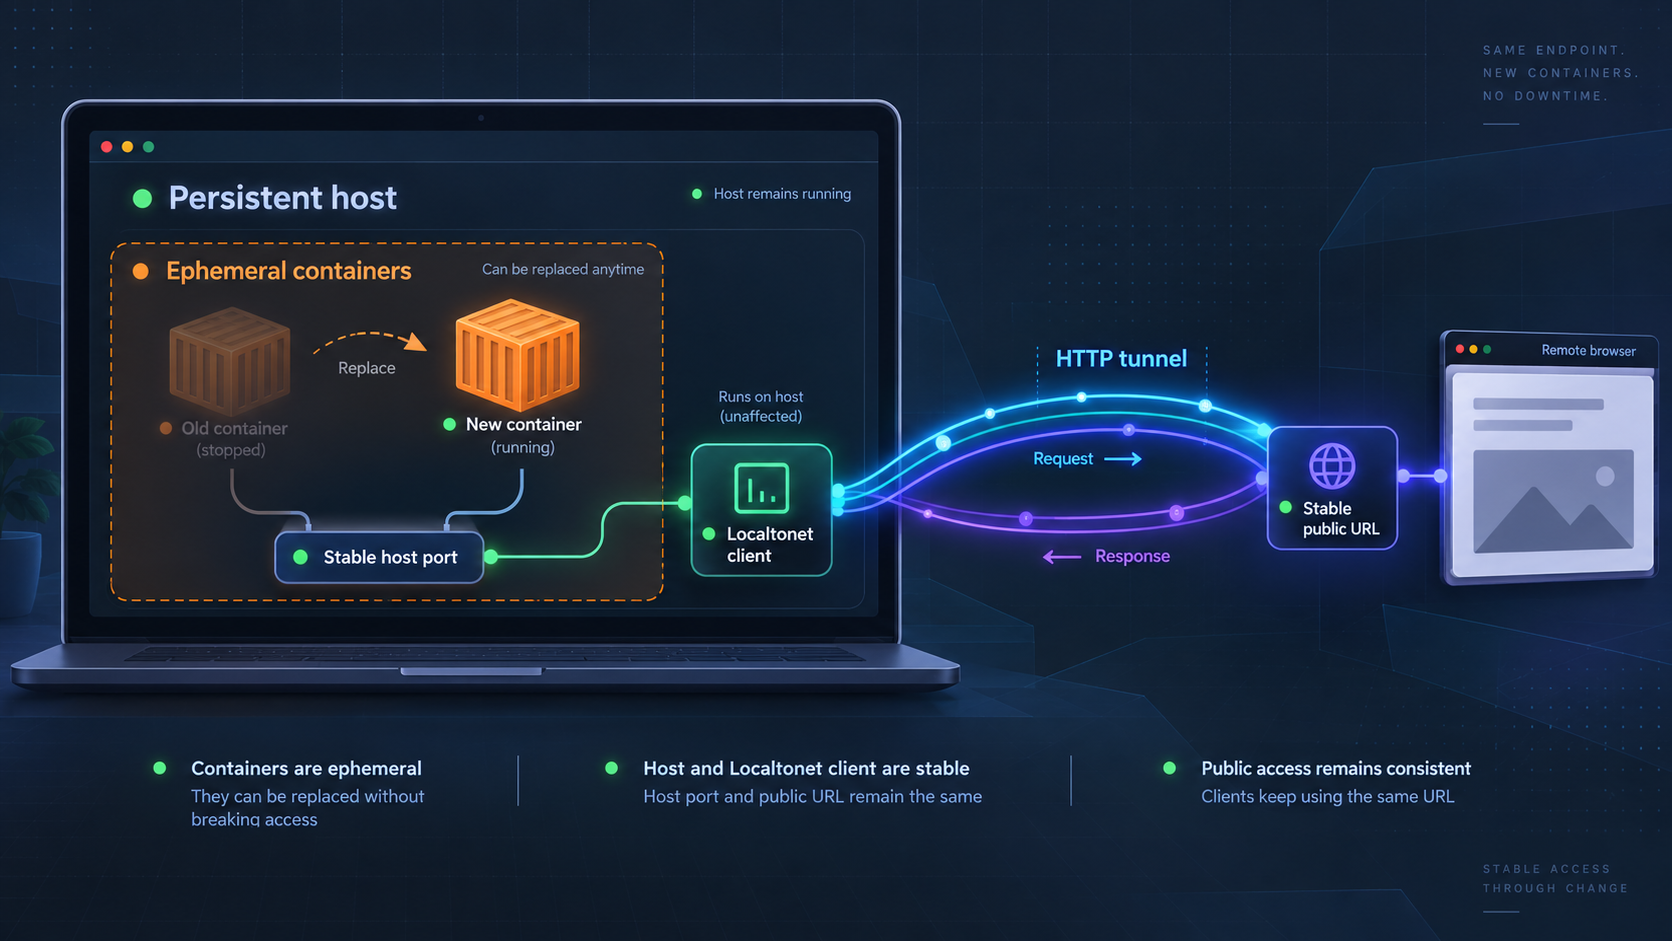
Keep the public endpoint persistent while your application container remains disposable
Restarting or rebuilding a development container should not require you to distribute a new preview link. The key is to run the Localtonet client outside the ephemeral application container, publish the application through a stable host port, and keep the existing HTTP tunnel configuration. This guide explains that architecture, local verification, controlled restart testing, WebSocket and hot module replacement diagnostics, proxy-header considerations, and a practical troubleshooting sequence. The public endpoint can remain associated with the tunnel, but the application is reachable only while the selected Localtonet client is connected, the tunnel is running, and the local service is available.
📋 What's in this guide
Separate the tunnel lifecycle from the container lifecycle
A stable development preview begins with a simple architectural decision: the Localtonet client and the application container should not share the same disposable lifecycle. Development containers are routinely stopped, rebuilt, replaced, or recreated after dependency and configuration changes. If the tunnel client runs inside that same container, every application rebuild also interrupts the client process and can encourage developers to create a new tunnel unnecessarily.
Instead, run the Localtonet client on the host operating system or on another persistent device that can reliably reach the published application port. The development container can then be treated as replaceable. It listens on an internal container port, Docker publishes that service on a predictable host port, and the Localtonet HTTP tunnel points to the host-side address and port.
A typical network path looks like this:
Public HTTPS address
        |
Localtonet relay
        |
Outbound Localtonet client connection
        |
Host target, for example 127.0.0.1:3000
        |
Docker published-port mapping
        |
Application listening inside the container
This design separates endpoint identity from application uptime. Rebuilding the container does not require the existing tunnel configuration to be deleted or recreated. While the container is unavailable, requests cannot reach the application. Once the replacement container starts listening behind the same published host port, the existing network path can work again.
The public address may remain associated with the existing tunnel configuration while the application container restarts. During the restart, visitors may receive an error or a failed request because no local process is accepting traffic. The tunnel itself is available only while the selected Localtonet client is connected and the tunnel is running.
Why a container IP address is usually the wrong target
Containers commonly receive addresses from a Docker-managed network. Those addresses belong to a particular container instance and can change when the container is recreated. A host process should not depend on such an address when a published port can provide a more stable boundary.
If the Localtonet client runs on the host, point the HTTP tunnel at the published host address and port, not at the current private address reported for the container. The container may change, but the host-side listening address can remain the same as long as the replacement container publishes the same port.
Three independent states determine whether the preview works
| Layer | Required state | Typical failure symptom |
|---|---|---|
| Application | The development server is running and listening on the intended container interface and port. | The host port accepts no useful response, or Docker logs show that the process exited. |
| Container publishing | The internal application port is mapped to the expected host address and port. | The app works inside the container but not at the host URL. |
| Localtonet client | The selected device is authenticated and connected to our platform. | The public endpoint is unavailable even though the host URL works. |
| HTTP tunnel | The existing tunnel is running and targets the correct host address and port. | The client is connected, but requests do not reach the intended local service. |
| Browser runtime | Page requests, API calls, and any required WebSocket connection use compatible public origins and schemes. | The page loads, but API calls, live updates, or hot reload fail. |
Prepare the host, container, and application
Before configuring the tunnel, identify the exact service boundary you want to expose. Do not begin with the public endpoint. First make the host-side application URL predictable and locally testable.
You need the following:
- A development application that can run inside a Docker or compatible development container.
- A known application port inside the container.
- A fixed, currently unused port on the host.
- A container port mapping from the selected host port to the application port.
- The Localtonet client installed and running on the host, or on another persistent device that can reach the host-side target.
- A Localtonet device authentication token selected through the supported client and dashboard workflow. Tokens are device-specific and must not be placed in source control, screenshots, logs, or example configuration.
- An available relay server or region selected from the current Localtonet dashboard rather than copied from an old guide.
- Browser developer tools and a local HTTP client such as
curlfor verification.
The examples below use container port 3000 and host address 127.0.0.1:3000 only to demonstrate the pattern. Replace them with the port your development server actually uses. Project defaults differ, and the correct port must come from your application's configuration or startup output.
Confirm what is listening on the selected port before creating a public tunnel. Development servers can expose source maps, debug routes, test data, administrative tools, environment details, or unauthenticated APIs. Remove secrets, disable unnecessary diagnostics, and apply application-level authentication where appropriate.
Choose where the Localtonet client will run
For this workflow, the simplest placement is usually the host that runs Docker. A client on the host can connect to a loopback-published port such as 127.0.0.1:3000. The application container can disappear and return without terminating the host-side Localtonet process.
A persistent management container is another possible architecture, but it changes the target address and Docker networking model. It also introduces its own storage, restart, token-handling, and network-reachability requirements. This guide does not invent a container image, token environment variable, or startup command for the Localtonet client. Use the current supported Localtonet installation workflow for your operating system, and keep the device credential outside the application image.
Choose a fixed host port deliberately
Avoid dynamic port publishing when the tunnel needs a repeatable target. Docker can automatically assign an available host port, but that assigned value may change when the container is recreated. An explicit host mapping makes the target predictable.
Also check that another process is not already using the chosen host port. If Docker cannot bind the port, the container may fail to start or may start without the mapping you expected. The exact port-inspection command varies by operating system, so Docker's own status output and the direct HTTP test should be treated as the authoritative checks for this workflow.
Publish the development server on a stable host port
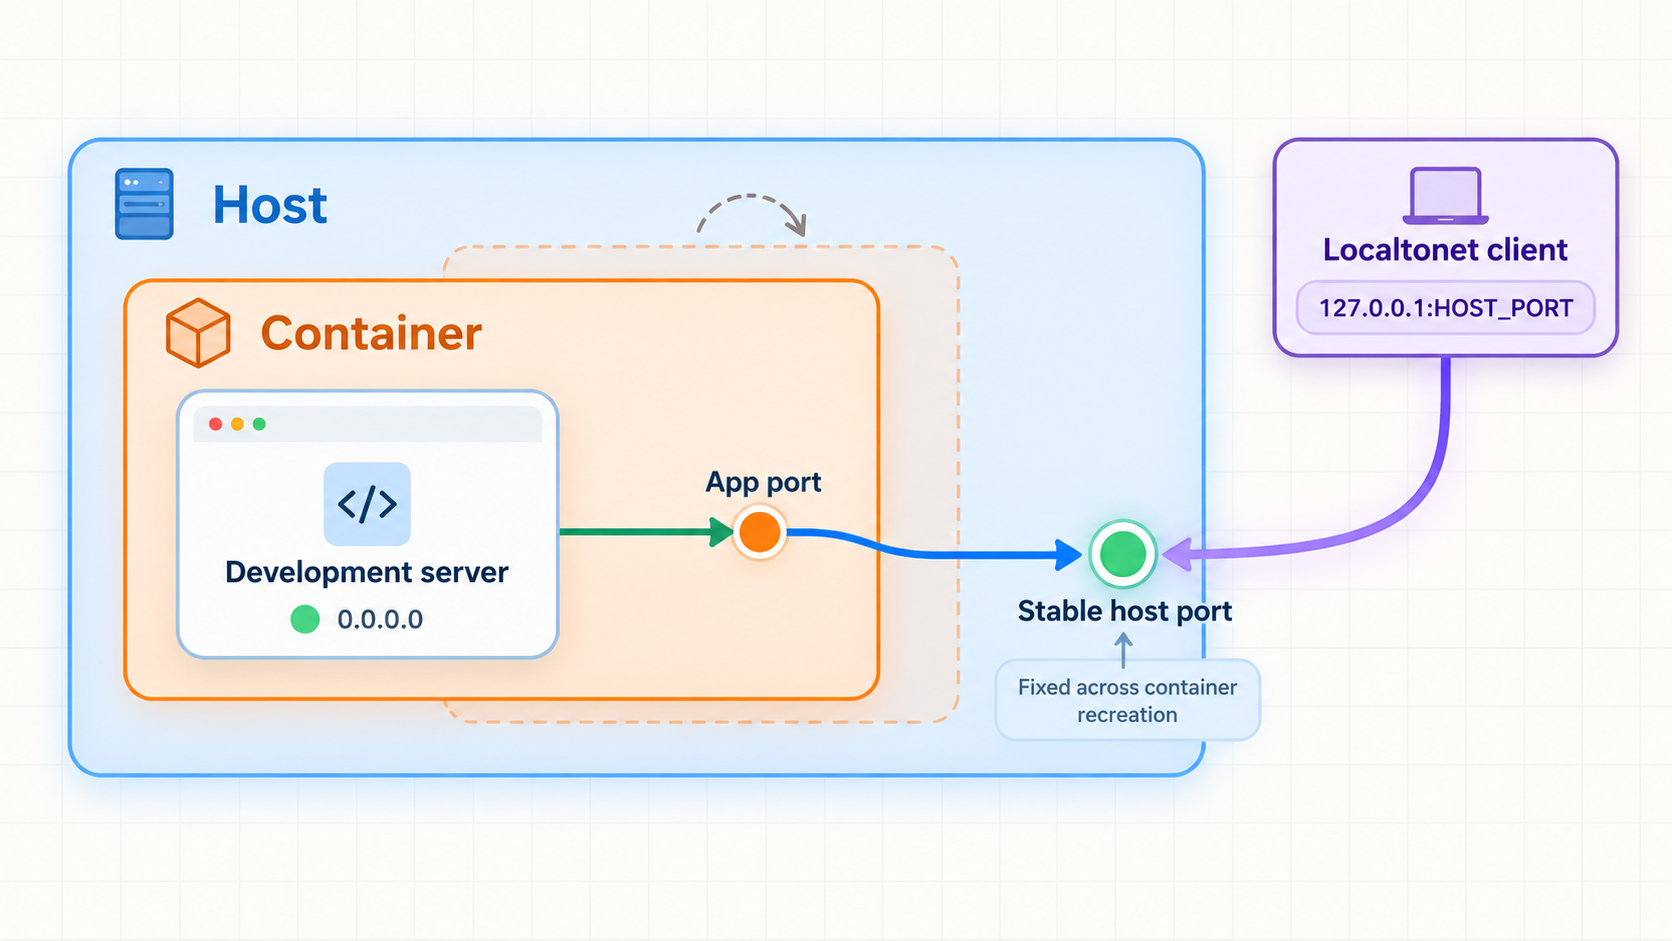
Two settings must agree:
- The application must listen on a container interface reachable through the container's network namespace.
- Docker must publish that container port on the fixed host address and port targeted by the Localtonet tunnel.
A frequent mistake is to publish the correct container port while the development server listens only on 127.0.0.1 inside the container. Inside a container, that loopback address belongs to the container itself. Docker's published-port forwarding generally needs the application to listen on an appropriate container interface, commonly 0.0.0.0. The exact framework option, command-line flag, or environment variable used to select that interface is project-specific. Consult the application's configuration rather than guessing a setting.
Docker Compose port mapping
The following fragment demonstrates the host-to-container mapping. Merge the ports entry into the actual application service in your Compose file. The service still needs its real image or build configuration, startup command, volumes, and any project-specific environment.
services:
  app:
    ports:
      - "127.0.0.1:3000:3000"
The first address and port belong to the host. The final port belongs to the container. With this example, a host process reaches the application at http://127.0.0.1:3000, while the development server listens on port 3000
Binding the published port to 127.0.0.1 limits direct access to processes on the host. This is often a sensible development default when the Localtonet client runs on the same machine. Publishing on every host interface can make the service reachable from the local network, depending on the host firewall and network configuration. Use a broader bind only when the architecture actually requires it.
Direct Docker port mapping
If you run the application without Compose, the equivalent publishing pattern is:
docker run --rm -p 127.0.0.1:3000:3000 your-image
Replace your-image and both ports as required. This command does not configure the process inside the image. The image must still start the intended development server, and that server must listen on the container-side port and an appropriate interface.
Do not target a changing container address
Avoid copying an address from container inspection output into the Localtonet tunnel configuration. That creates a dependency on one container instance. A rebuild can replace the container and assign a different address even when the service name and published host port remain unchanged.
Docker service names are useful for communication between containers on the same user-defined network, but a Localtonet client running directly on the host does not normally resolve a Compose service name through Docker's internal DNS. The published host port is the intentional boundary between the host process and the application container.
The goal is not to preserve a particular container forever. Preserve the host-side address and port. A newly created container can replace the old one as long as it starts the same service and publishes it through the same host target.
Start and inspect the application stack
For a Compose-based project, start the services using the project's existing Compose configuration:
docker compose up -d
docker compose ps
docker compose logs --tail=100 app
Replace app with the real Compose service name. The status output should show the service running and the expected published-port mapping. The logs should show the application's successful startup and the address on which it is listening. If the project intentionally runs in the foreground, omit -d and observe the output directly.
Do not assume that a running container means a working application. A container can remain active while the application reports startup errors, waits for another dependency, or listens on a different port. Continue with direct HTTP verification before configuring Localtonet.
Verify the local target before creating the tunnel
A tunnel cannot repair a broken local route. The most efficient diagnostic method is to prove each boundary in order, beginning as close to the application as practical.
Confirm that the container is running
Use docker compose ps or the equivalent Docker status command. Confirm that the intended application service is active and that its port mapping matches the Compose file.
Read the application startup logs
Look for the actual listening port, bind address, startup errors, dependency failures, and restart loops. Do not rely only on the port you expected the framework to use.
Request the host-side URL
From the same host that runs the Localtonet client, request the exact local address and port that the tunnel will target. A successful result proves that the host can reach the published service.
Check the returned application content
Confirm that the response belongs to the intended application. A successful status from an unrelated service on the same port is not a valid test.
Test an application-specific route
If the application provides a documented health route or known page, request it as well. Do not invent a health endpoint. Use a route that the project actually implements.
For the example target, a verbose request is:
curl -v http://127.0.0.1:3000/
On systems where the shell maps curl to another command, invoke the installed HTTP client explicitly. The important result is not merely an HTTP status code. Inspect the connection destination, response headers, redirects, and body. A redirect to an internal-only hostname, an unexpected port, or plain HTTP can later affect browser behavior through a public HTTPS address.
Interpret common local outcomes
- Connection refused: no process is accepting traffic at that address and port, or the port is not published as expected.
- Connection timeout: the path may be filtered, routed incorrectly, or directed to an address that is not locally reachable.
- Empty reply or reset: the application may accept the connection and then exit, reject the request, or expect a different protocol.
- 404 response: connectivity works, but the requested path may not exist.
- Host not allowed: the framework is validating the request host. Configure the public hostname through the framework's documented allowlist rather than disabling validation globally.
- Redirect loop: the application may not be interpreting the external scheme or host as intended. Review its trusted-proxy and canonical-URL configuration.
Do not proceed to tunnel troubleshooting until the host-side request succeeds consistently. If the Localtonet client runs on a different device, repeat the test from that device using an address that is reachable from it. A loopback address such as 127.0.0.1 always refers to the device making the connection, not to another computer.
Configure the Localtonet HTTP tunnel
Once the application works through the stable host target, create or update an HTTP tunnel using the documented Localtonet workflow. HTTP and HTTPS application traffic belongs in an HTTP tunnel. Raw TCP and UDP tunnel types solve different forwarding needs and should not be selected merely because a web application uses a TCP connection underneath HTTP.
Install and run the Localtonet client
Run the client on the persistent host or device that can reach the published application port. Keeping it outside the disposable development container prevents an application rebuild from terminating the tunnel client process.
Authenticate or select the device
Use the device-specific authentication token through the supported Localtonet workflow. Never guess a token, embed it in the application image, commit it to a repository, or expose it in tutorial output.
Select an available relay server
Choose from the server or region values currently available in the dashboard. Availability can vary, so this guide does not hardcode a server code.
Create the HTTP tunnel configuration
Set the local target to the tested host address and port, such as 127.0.0.1:3000 when the client and Docker run on the same host. For the process type, use Random Sub Domain, Custom Sub Domain, or Custom Domain according to the options available for the intended configuration. All three process types serve the content at a public HTTPS address.
Start the tunnel
Creating a tunnel does not start it. Use the Start button and confirm that the selected client is connected. Record the public address shown for this tunnel without exposing the device token.
Use, stop, or delete the tunnel deliberately
Open the assigned public URL and verify the application. Stop the tunnel when temporary access is no longer required. Delete it only when you no longer need that configuration, since deleting and creating a different tunnel is contrary to the goal of retaining the existing preview endpoint.
The central operational rule is straightforward: restart the application container, not the tunnel configuration. Keep the Localtonet client connected and leave the existing tunnel running when you want the public address to remain available for the replacement application process.
Exact custom-domain DNS instructions are not included here because they must be checked against the current Localtonet documentation and the domain configuration shown in the dashboard. Do not guess DNS record types or values. If endpoint continuity is important, validate the selected process type and address behavior before distributing the URL to reviewers.
The authentication token identifies the Localtonet client device and must be treated as a secret. The public application address is not a substitute for application authorization. Anyone able to reach a public preview may interact with whatever the application exposes unless the application or an applicable access layer restricts them.
Prove that the public path survives a container replacement
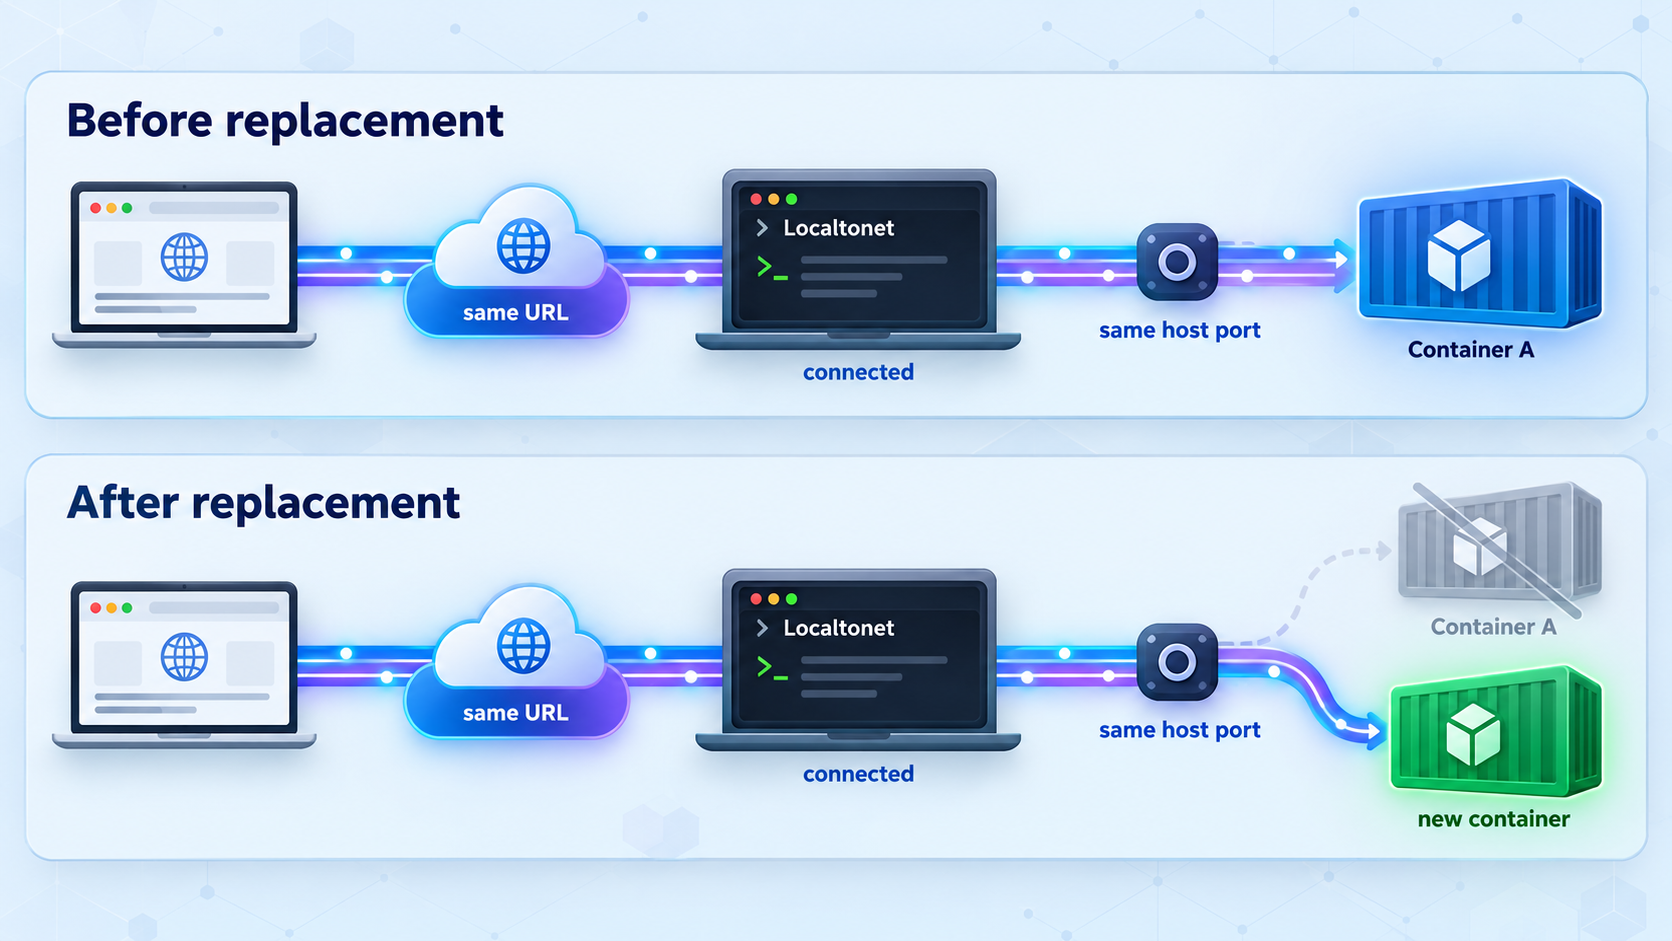
Do not wait for an important demonstration to discover whether the architecture works. Perform a controlled restart test while monitoring the local application, the Localtonet client, and the browser.
Establish a working baseline
Open the host-side URL and the Localtonet public URL. Confirm that both return the expected application and that ordinary navigation and API requests work.
Record the existing public address
Copy the address associated with the running tunnel so that the same endpoint can be tested after the container operation. Do not create a second tunnel.
Restart or recreate only the application service
Use the project's normal Docker workflow. For a simple Compose restart, run docker compose restart app after replacing app with the real service name. A rebuild may instead require the project's established docker compose up workflow.
Observe the expected interruption
Requests may fail while the application process is stopped. This does not automatically mean that the public address changed or that the Localtonet tunnel should be recreated.
Recheck the host target first
Wait for the replacement container to report a healthy application startup, then repeat the request to the same host address and port.
Reopen the same public URL
Use the address recorded before the restart. If the Localtonet client remained connected, the tunnel remained running, and the local target returned on the same host port, the existing path should not require a new tunnel configuration.
Test a full rebuild separately
A simple restart preserves more container state than a recreation. Perform the project's normal rebuild and replacement operation, then verify that the new container still publishes the same host port.
Expected behavior during the restart window
Reviewers may see a temporary browser error, failed fetch, gateway-style error, or stalled request while the application is absent. The exact response is not a reliable indicator of which layer failed. First check whether the host target has returned. Once it does, reload the existing public URL before changing any tunnel settings.
If the host URL returns but the public URL does not, check the Localtonet client connection and tunnel state. If both URLs fail, remain focused on the application and Docker layers. Recreating the tunnel when the host target is broken only adds another changing variable.
Understand WebSockets and hot module replacement
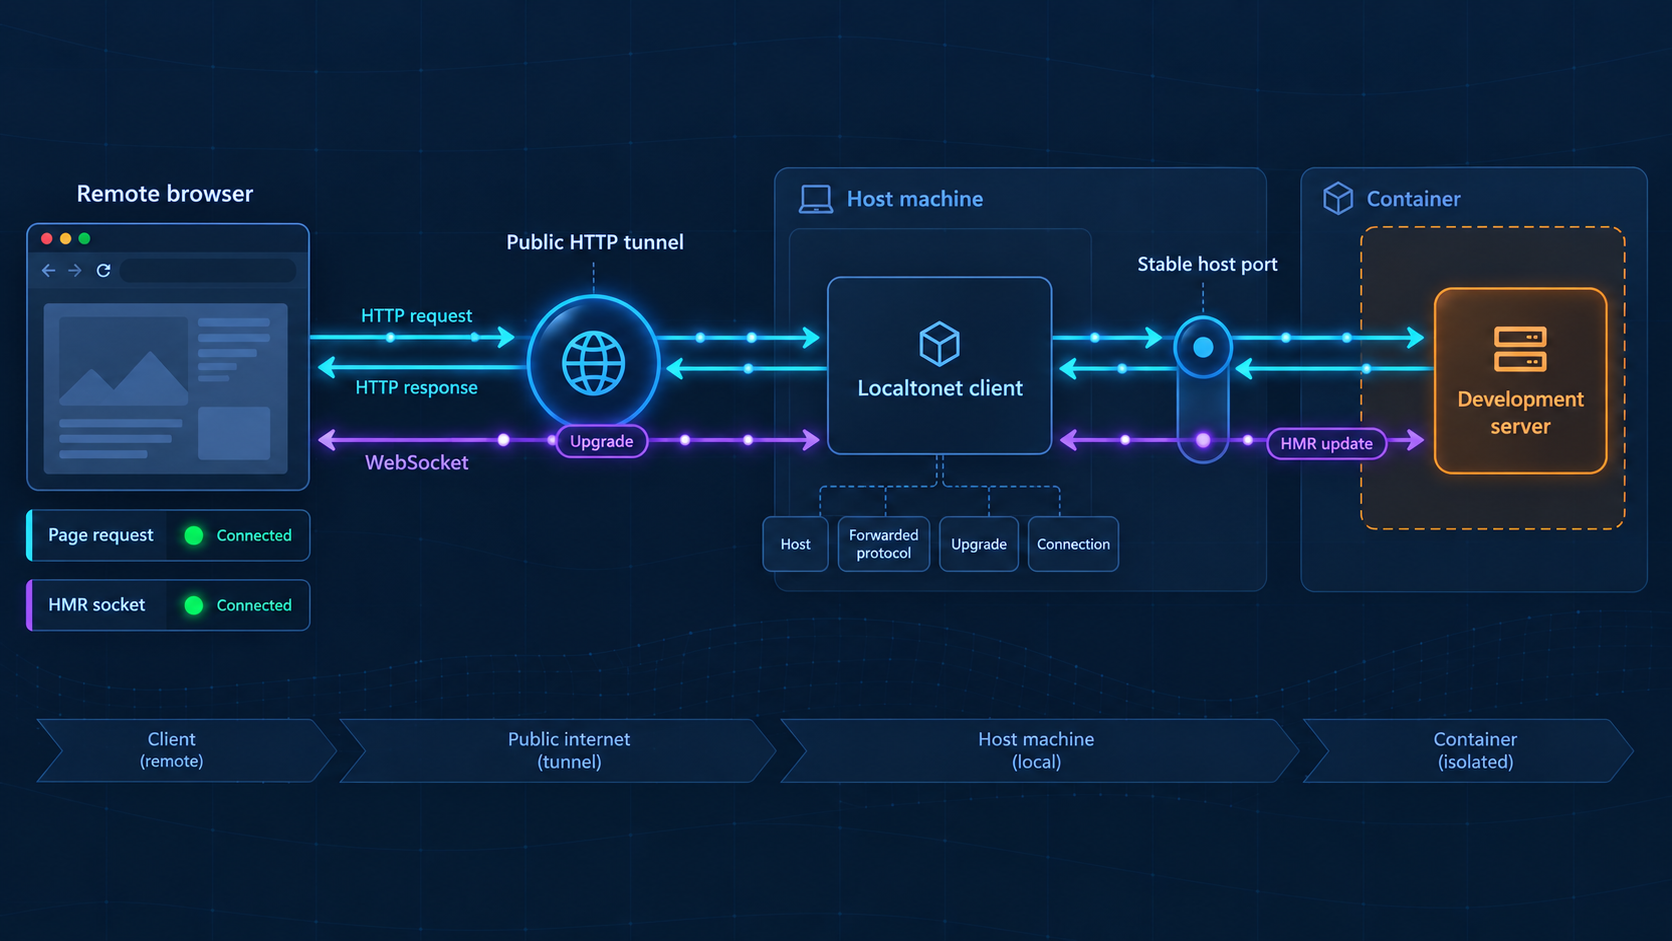
A page can load successfully while hot module replacement, live reload, or another real-time feature remains disconnected. These functions often use a long-lived WebSocket connection that is separate from the initial HTML, JavaScript, stylesheet, and API requests.
A WebSocket session begins as an HTTP request and asks to upgrade the connection. The browser then keeps that connection open so the development server can notify it when files change. Through a public HTTPS page, the browser generally needs a secure WebSocket URL using wss://. A client that attempts an insecure ws:// connection from an HTTPS page can be blocked as mixed content.
Frameworks generate the HMR client configuration in different ways. Some derive the WebSocket host, scheme, and port from the page URL. Others use development-server settings, environment variables, a hardcoded local address, or information injected into the client bundle. There is no universal HMR variable that can safely be recommended for every framework.
Inspect the browser instead of guessing
Open the browser's developer tools and examine both the Console and Network panels. Filter the Network panel for WebSocket connections, commonly shown under a WS filter. Then answer these questions:
- Does the browser attempt a WebSocket connection at all?
- Is the URL using
wss://when the page itself uses public HTTPS? - Does the WebSocket hostname match the public hostname, or does it incorrectly point to
localhost, a container service name, or a private address? - Does the URL contain the intended public port, or an internal development port that remote browsers cannot reach?
- Does the handshake return an HTTP error, close immediately, or remain connected?
- Does saving a source file produce a message on the connection?
A remote browser interprets localhost as its own device. If the HMR client tries to connect to ws://localhost:3000, it is not connecting back through the public Localtonet address. Configure the development server using its documented public host, client WebSocket, origin, or reverse-proxy settings. The exact option names must come from that framework's current documentation.
Separate page delivery from HMR delivery
| Observed behavior | Likely area to inspect | Next check |
|---|---|---|
| The page and assets do not load | Application, port publishing, client connection, or tunnel target | Repeat the host-side HTTP request before inspecting HMR. |
| The page loads but the WebSocket URL uses localhost | Framework-generated HMR client configuration | Configure the documented external hostname behavior. |
| The page loads but the browser reports mixed content | WebSocket scheme selection | Ensure the browser-facing connection is configured for secure WebSockets with an HTTPS page. |
| The handshake returns a host or origin error | Development-server host validation or origin policy | Add the specific public hostname through the framework's supported allowlist. |
| The socket connects but updates never arrive | File watching, HMR server behavior, or client subscription | Verify that a local browser receives updates and inspect container file events. |
| The socket disconnects only after a rebuild | Application readiness or client reconnection behavior | Wait for the local target to return, then reload the public page and inspect the new handshake. |
Host validation is not the same as CORS
Development servers often validate the HTTP Host value to reduce exposure to hostile hostnames. APIs may separately enforce Cross-Origin Resource Sharing rules, and WebSocket servers may check the Origin header during the handshake. These controls solve related but distinct problems.
If the framework rejects the public hostname, add that exact hostname through its documented configuration. Avoid broad settings that accept every host or origin unless the project documentation explicitly requires them and the risk is understood. A temporary preview is still a public service.
Proxy headers and external URL detection
Applications behind an HTTPS tunnel may need to distinguish the browser-facing public scheme and hostname from the local HTTP connection accepted by the development server. Frameworks sometimes use forwarded headers when generating redirects, absolute links, callback URLs, cookies, or WebSocket endpoints.
The exact headers supplied by Localtonet are not established in the evidence available for this article, so this guide does not claim a specific header set or order. Inspect the request information received by your application and consult the current framework and Localtonet documentation before depending on a particular forwarded header.
Do not enable unrestricted trust for forwarded headers as a reflex. Many frameworks require an explicit trusted-proxy configuration because accepting spoofable forwarding data from arbitrary clients can affect URL generation and security decisions. Trust only the path appropriate for the deployment, using the framework's documented mechanism.
File watching can fail even when WebSockets work
Hot reload has at least two independent sides. The server must detect a file change, and the browser must receive the resulting notification. Bind-mounted files, host filesystem behavior, editor save strategies, and framework watchers can affect the first side. The public tunnel is not involved if the development server never detects the change.
Test HMR locally through the host URL first. If a local browser does not update, troubleshoot file watching and the development server. If local HMR works but public HMR does not, compare the local and public WebSocket requests, focusing on hostname, scheme, port, path, host validation, and origin handling.
Do not treat a successful page load as proof that HMR works. Test the real WebSocket handshake and a real source change. Framework behavior, client-generated URLs, and origin checks can differ between projects and versions.
Use a strict troubleshooting sequence
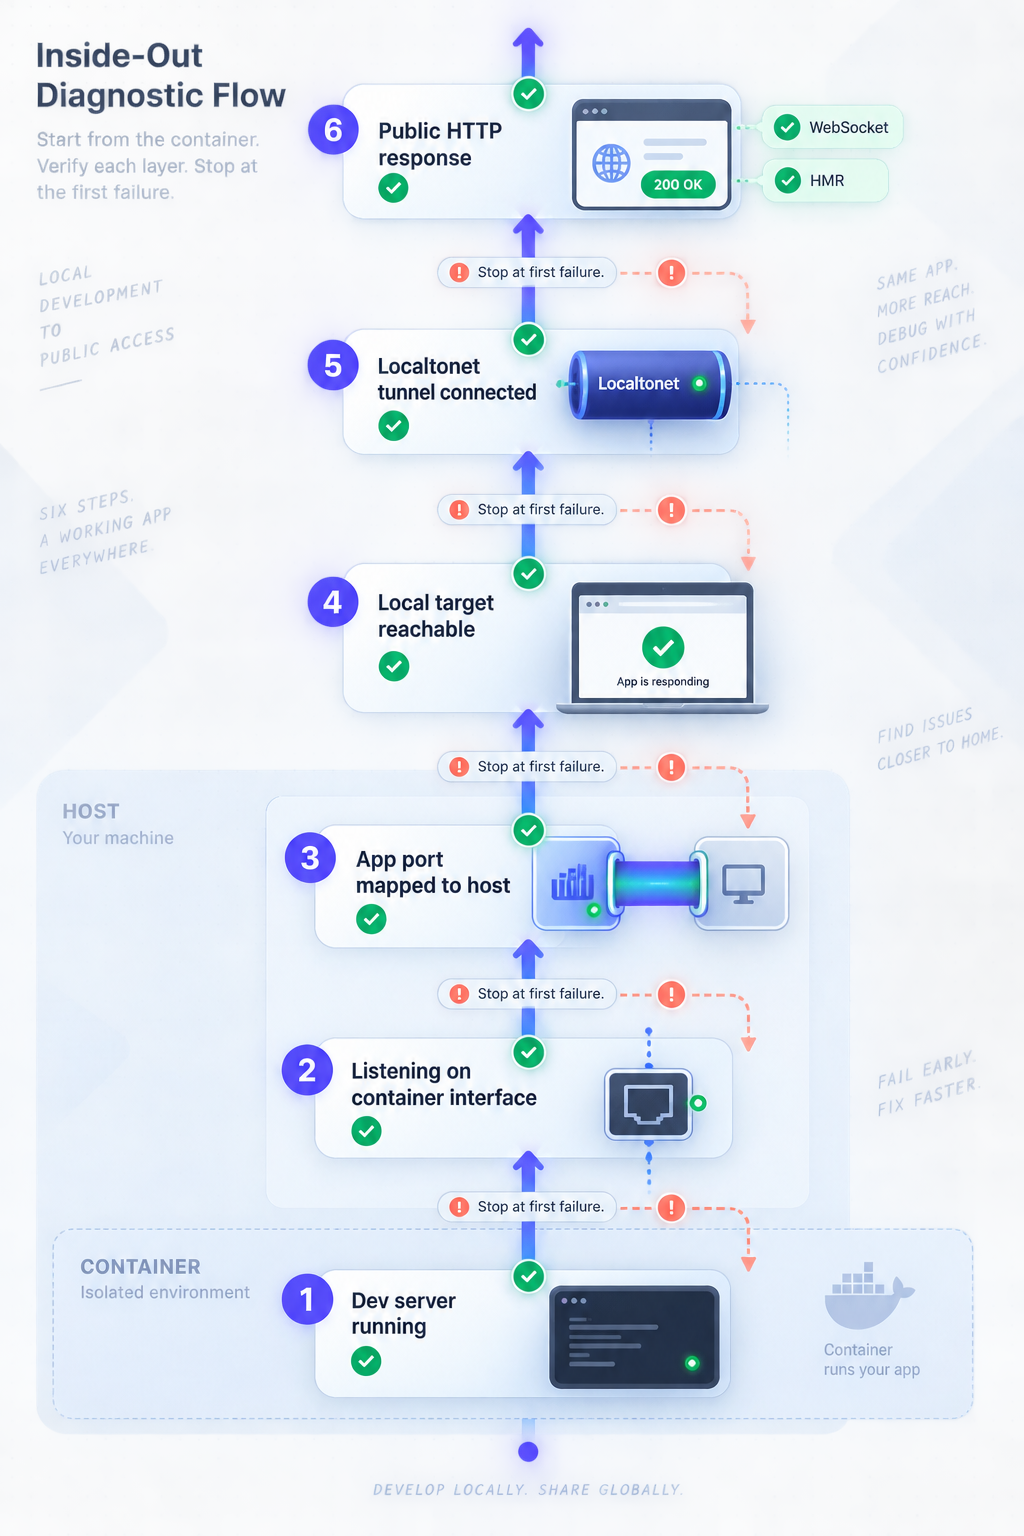
Troubleshooting is fastest when each test has one purpose. Changing the container mapping, application bind address, Localtonet target, public hostname, and framework proxy settings at the same time makes the result difficult to interpret.
1. Confirm the application process
Read the current container logs. Confirm that the process remains running, has completed startup, and reports the expected internal port. Look for compilation errors, missing dependencies, occupied ports, failed database connections, and restart loops.
2. Confirm the application bind address
If the server listens only on container loopback, published traffic may not reach it. Configure the server through the project's supported method to listen on an interface reachable through the container. Do not copy a framework-specific flag from another project without verifying that it applies.
3. Confirm the published-port mapping
Run:
docker compose ps
Verify both sides of the mapping. A common mistake is to publish host port 3000 to container port 3001 while the application actually listens on 3000, or to change the Compose file without recreating the container.
4. Test the exact Localtonet target locally
curl -v http://127.0.0.1:3000/Use the actual target configured for the tunnel. If this request fails on the device running the Localtonet client, stop troubleshooting the public URL. Repair the local route first.
5. Confirm the selected Localtonet device is connected
The client establishes an outbound connection to a Localtonet relay server. No inbound router port forwarding, public IP address, VPN setup, or firewall change is required for the standard tunnel workflow. However, the client still needs working outbound connectivity and must remain connected.
6. Confirm that the existing tunnel is running
A configured tunnel is not automatically active. Check its current state and use Start when necessary. Also confirm that the tunnel references the intended device, relay selection, local IP address, and local port.
7. Test ordinary HTTP before real-time behavior
Open the public root page and a known application route. If normal HTTP fails, WebSocket testing is premature. If HTTP works, proceed to the browser's WebSocket inspection.
8. Inspect browser failures precisely
Record the failing request URL, scheme, hostname, port, status, response, and console message. Statements such as “HMR is broken” hide the distinction between a missing connection attempt, an invalid public URL, a rejected handshake, and a connected socket receiving no messages.
9. Review application host and origin policy
Configure only the public hostname and origins the application needs. If the application has separate controls for ordinary hosts, CORS, WebSocket origins, and callback URLs, review each relevant control instead of disabling all validation.
10. Retest after a clean container replacement
Once the configuration is correct, recreate the container and repeat the local and public tests. This proves that the solution does not depend on a stale container address, manually assigned ephemeral port, or one-time process state.
| Symptom | Most useful first test | Common correction |
|---|---|---|
| Public URL fails and local URL fails | Container logs and host-side curl |
Start the app, correct its bind address, or repair the port mapping. |
| Local URL works but public URL fails | Localtonet client and tunnel status | Reconnect the selected device, start the tunnel, or correct the local target. |
| Everything breaks only after recreation | Compare the old and new published-port mapping | Use an explicit host port and avoid a container-IP target. |
| Public page returns “host not allowed” | Framework host-validation logs | Allow the exact public hostname using documented project settings. |
| Redirects point to HTTP or an internal hostname | Inspect response locations and application URL generation | Configure the documented external URL and trusted-proxy behavior. |
| Page works but API calls fail | Browser Network and Console panels | Correct API base URLs, origin policy, authentication, or application routes. |
| Page works but HMR points to localhost | Inspect the WebSocket request URL | Configure the framework's browser-facing HMR host, scheme, and port. |
| HMR works locally but not publicly | Compare local and public WebSocket handshakes | Correct secure WebSocket, host, origin, or proxy-aware settings. |
| Socket connects but no rebuild appears | Local file-watching test | Repair container volume or watcher behavior before changing the tunnel. |
Expose development previews safely
A public preview is still public infrastructure, even when it is temporary. The absence of router port forwarding does not make the application private. Localtonet lets the client establish an outbound connection and provides a public URL, but application access controls remain important.
- Do not expose environment files, secret-management interfaces, database consoles, debug dashboards, or administrative routes.
- Use application authentication when the preview contains non-public data or privileged actions.
- Create test accounts with limited permissions rather than sharing production credentials.
- Use synthetic or sanitized data whenever possible.
- Review file upload, webhook, form submission, and account-creation behavior before sharing the URL.
- Restrict accepted hosts and origins to the values the preview actually needs.
- Keep authentication tokens out of Compose files committed to source control.
- Stop the tunnel when the review session ends, and delete it when the configuration is no longer needed.
Least privilege should apply to both the application and its surrounding services. A development server that can reach internal databases, cloud metadata services, local files, or privileged Docker interfaces deserves additional caution. Expose only the service intended for review, not a broad network path.
A shared URL can appear in browser history, chat logs, issue trackers, analytics, screenshots, and referrer data. Protect sensitive previews with real authorization and remove access when it is no longer required.
Operational checklist before sharing the link
- The application works at the exact host-side target.
- The container uses an explicit host-port mapping.
- The tunnel points to the host mapping rather than a container IP.
- The Localtonet client runs independently of the disposable application container.
- The selected device is connected and the tunnel is running.
- The public page, static assets, API calls, and authentication flow have been tested.
- Any required WebSocket connection uses the correct public scheme, host, port, and path.
- Host and origin validation permit only the intended values.
- The application contains no secrets or unsafe debug functionality.
- A container restart and a full recreation have both been tested against the same public URL.
Frequently asked questions
Will restarting my development container change the Localtonet public URL?
A container restart does not require you to create a new Localtonet tunnel. Keep the existing tunnel configuration and preserve its fixed local target. The public address can remain associated with that tunnel while the application container is restarted or replaced. Do not delete and recreate the tunnel as part of the container workflow. Validate the endpoint behavior shown for your selected process type before distributing a long-lived preview link.
Will the application remain available while the container is restarting?
Not unless another healthy application instance serves the same target. With a single development container, there is normally an interruption between the old process stopping and the replacement becoming ready. URL continuity and application uptime are different properties.
Should the tunnel target the container's private IP address?
Usually not when the Localtonet client runs on the Docker host. Container addresses can change when containers are recreated. Publish the application through a fixed host port and target that host-side address instead. This keeps the tunnel independent of the current container identity.
Can I bind the Docker port to 127.0.0.1?
Yes, when the Localtonet client runs on the same host. A mapping such as 127.0.0.1:3000:3000 makes the service available to host processes without deliberately publishing it on every LAN-facing interface. If the client runs on another device, host loopback will not be reachable from that device, so use an appropriate reachable address and apply suitable network controls.
Why does the page load while hot reload fails?
The page and HMR connection are separate network operations. The HTML may load over public HTTPS while the generated HMR client tries to open a WebSocket at localhost, an internal container hostname, the wrong port, or an insecure ws:// URL. Inspect the browser's WebSocket request and configure the framework through its documented public HMR settings.
Does a successful WebSocket connection prove file watching works?
No. The development server must first detect the changed file and generate an update. Test HMR through the local host URL. If local HMR also fails, investigate bind-mounted files, filesystem events, watcher configuration, and the development server before changing the public tunnel.
Why does my development server reject the public hostname?
Many development servers validate accepted hosts or WebSocket origins. Add the specific public hostname using the framework's documented allowlist or origin setting. Avoid disabling validation for every host unless that behavior is explicitly required and its exposure is understood.
Does creating a Localtonet tunnel start it automatically?
No. Creating the configuration and running it are separate lifecycle actions. Use the Start button, keep the selected client connected, and confirm the tunnel state before testing the public endpoint.
Does Localtonet require inbound router port forwarding for this workflow?
No. The Localtonet client establishes an outbound connection to our relay server, so this standard tunnel workflow does not require inbound router port forwarding, a public IP address, VPN setup, or inbound firewall changes. The local client must still be able to reach the application target and establish its outbound connection.
Should I run the Localtonet client inside the application container?
Not for the lifecycle-separation pattern described here. Running the client on the host or another persistent device allows the application container to be rebuilt without terminating the client at the same time. If you choose a containerized client architecture, manage its credentials, persistence, networking, and restart behavior independently from the disposable application service.
Keep your development preview endpoint independent
Run our client outside the disposable application container, point an HTTP tunnel at a verified fixed host port, and keep the existing tunnel running while you rebuild the app behind it.
Get Started Free →

