

Reach a GNOME Wayland desktop through RDP without opening an inbound router port
This tutorial uses GNOME 46 or later Remote Login as a concrete Wayland-compatible remote desktop implementation. You will configure its system-level RDP service, verify the listener locally, and then forward that listener through a Localtonet TCP tunnel. Localtonet solves the public reachability problem by connecting outward from the Linux device to a relay, but the RDP service remains responsible for TLS, authentication, desktop sessions, and authorization. The result does not require inbound router port forwarding, a public IP address on the Linux network, a self-managed VPS, or VPN setup.
📋 What's in this guide
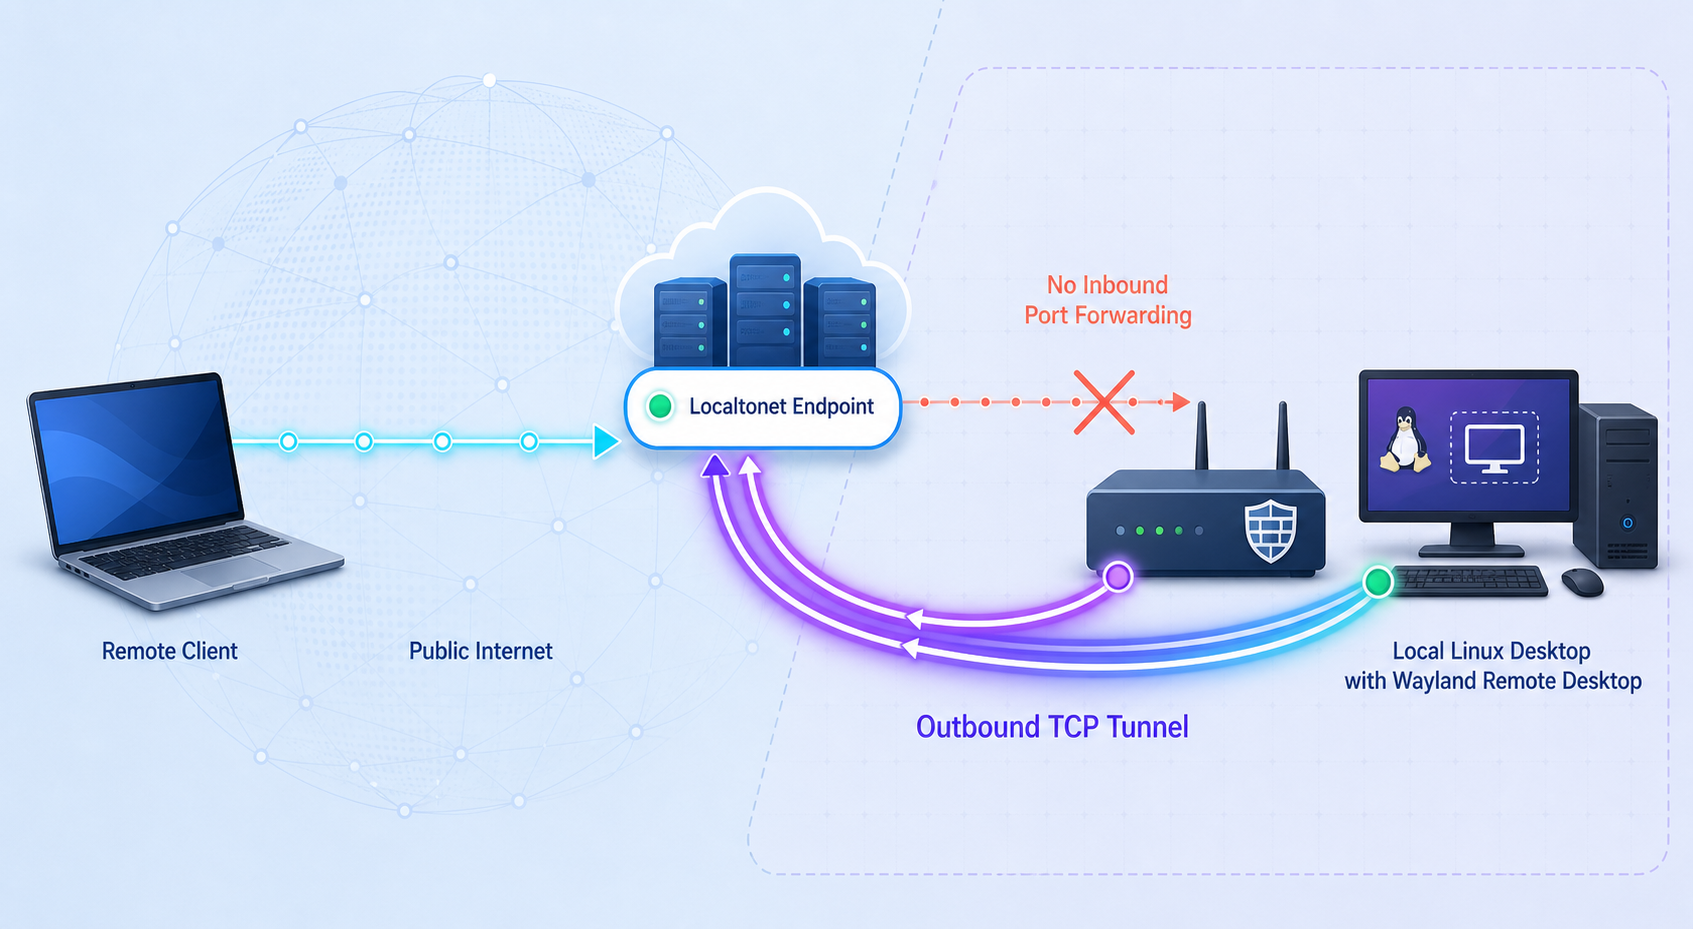
Tutorial scope and networking architecture
This guide deliberately focuses on one reproducible Wayland remote desktop path: GNOME Remote Login on GNOME 46 or later. Remote Login is provided by GNOME Remote Desktop and exposes a system-level RDP service associated with the GDM login experience. It is different from sharing an already active desktop session.
This distinction matters because “Wayland remote desktop” is not one interchangeable feature. Wayland defines how a compositor communicates with its clients, but individual desktop environments and compositors decide how screen capture, input injection, authentication, login sessions, and unattended operation are implemented. The Wayland protocol documentation describes the underlying compositor and client architecture. It does not define a universal remote desktop server that behaves identically on GNOME, KDE Plasma, Sway, or other compositors.
Many applications that share an active Wayland session use the Remote Desktop and ScreenCast portals. These portal-mediated workflows are designed to obtain compositor-approved access to screen content and input. Their approval, persistence, lock-screen, and session behavior depends on the compositor, portal backend, desktop version, and application. A workflow that works for attended screen sharing must not be assumed to provide pre-login or post-reboot access.
GNOME Remote Login addresses a narrower requirement. It runs as a system-level RDP service and presents a remote login workflow rather than asking an application inside an existing user session to capture that session. This makes it the appropriate implementation for this tutorial’s pre-login and reboot-recovery use case. GNOME 46 introduced this Remote Login path. GNOME 47 added persistent-session improvements, so disconnect and reconnection behavior can differ between GNOME 46 and later releases.
This article does not claim that a raw Localtonet TCP tunnel adds transport encryption to an otherwise unencrypted protocol. The tunnel provides reachability. GNOME Remote Desktop must still use RDP TLS, a certificate, and strong remote desktop credentials. A public TCP endpoint is not authorization.
What happens to an RDP connection
The remote RDP client connects to the public host and port assigned by Localtonet. A Localtonet relay sends that TCP traffic through the outbound connection already established by the Localtonet client on the Linux machine. The tunnel then delivers the connection to the configured local target, normally 127.0.0.1:3389 when both GNOME Remote Desktop and the Localtonet client run on the same host and the listener is reachable through loopback.
Localtonet does not participate in the GNOME login dialog, validate the RDP certificate for the client, select a Linux user, or grant access to a Wayland session. Those operations remain within the remote desktop implementation. This separation is useful for troubleshooting: first prove that GNOME Remote Login works locally, then prove that Localtonet can reach the same listener, and only then test the public endpoint.
Prerequisites and compatibility checklist
Confirm every prerequisite before changing the networking configuration. A TCP tunnel cannot repair a missing RDP package, an unsupported GNOME version, an unreadable TLS key, a stopped system service, or an incompatible RDP client.
| Requirement | What you need | How to confirm it |
|---|---|---|
| Desktop environment | GNOME 46 or later with GDM for the Remote Login workflow covered here | Run gnome-shell --version and confirm the installed desktop and display manager using your distribution documentation. |
| GNOME Remote Desktop | The distribution’s gnome-remote-desktop package, including grdctl |
Run command -v grdctl. Install the package from your distribution repositories if no command is returned. |
| Administrative access | An account allowed to configure the system service and use sudo |
Confirm that you can inspect system services without sharing or weakening the root account. |
| TLS material | A certificate and private key readable by GNOME Remote Desktop, or certificate generation through the supported GNOME Settings workflow | Verify the configured paths and permissions without printing private key contents. |
| RDP client | A current client compatible with GNOME Remote Login’s RDP negotiation and server-redirection behavior | Test locally before creating the public tunnel. Compatibility can differ between client versions. |
| Local RDP listener | GNOME Remote Desktop listening on the expected TCP port, commonly 3389 | Use ss and a local TCP test, then complete an actual RDP login if possible. |
| Localtonet account and client | A Localtonet account and a client running on the Linux machine or another device that can reach it | Confirm that the intended device token is shown as connected in the dashboard. |
| Relay selection | An available relay server or region from the current dashboard | Use a value currently displayed by Localtonet rather than copying an old server code. |
Distribution support is more than a package name
Some distributions may provide gnome-remote-desktop while shipping a GNOME release older than 46. That does not establish support for the system-level Remote Login workflow covered here. Confirm both the GNOME version and the features enabled by your distribution’s package.
On Fedora-family and Debian or Ubuntu-family systems, the package is commonly named gnome-remote-desktop, but package availability and GNOME version depend on the distribution release. Use the distribution’s supported package manager and remote desktop documentation. Do not replace core desktop packages or mix repositories merely to force a newer GNOME version onto a production machine.
The GNOME Remote Desktop project is the upstream implementation. Distribution documentation remains important because service integration, package versions, SELinux or AppArmor policy, certificate storage, and supported client combinations can vary.
Choose a compatible RDP client before relying on unattended access
GNOME Remote Login uses RDP behavior that can include server redirection as the connection moves from the system login service into a user session. An RDP client that can open an ordinary RDP desktop is not automatically guaranteed to handle this workflow correctly. Use a maintained client and test the complete login path, not just the first certificate prompt.
The native Windows Remote Desktop client is a practical test option for this workflow. Other clients may work, but compatibility depends on their support for the required RDP security and redirection behavior. If a connection reaches the server and then closes, loops back to the first login prompt, or fails during redirection, test with another current client before changing the tunnel.
Install and configure GNOME 46+ Remote Login
Start this work from a trusted local console or an existing administrative connection. Do not create the public Localtonet tunnel until the RDP listener and authentication flow work locally.
Confirm GNOME 46 or later and install GNOME Remote Desktop
Check the GNOME version, then install the distribution-provided gnome-remote-desktop package if it is not already present. Verify that grdctl is available. Package commands and supported versions differ by distribution, so use the package manager associated with the installed release.
Prepare an RDP TLS certificate and private key
Use a certificate issued for the name clients will connect to where practical. For a personal test, GNOME Settings can generate a self-signed certificate when Remote Login is configured through the graphical interface. A self-signed certificate encrypts the RDP session but still requires explicit trust and identity verification by the client.
Assign the certificate and key to the system RDP service
Use grdctl --system with the actual certificate and key paths. Keep the private key readable only by the identities that require it. Do not paste certificate keys, Localtonet tokens, or passwords into shared logs.
Set the system Remote Login credentials
Run the system credential command interactively and choose a strong, unique credential. These RDP service credentials protect entry to the Remote Login workflow. The normal Linux account login at GDM remains a separate authorization step.
Enable RDP in GNOME Remote Desktop
Enable the system RDP configuration with grdctl. This configures the feature, but service state must still be checked separately.
Enable and start the system service
Enable gnome-remote-desktop.service so it can start during boot, and start it immediately. Then inspect its status before proceeding.
The verified command sequence for an existing certificate and key is:
gnome-shell --version
command -v grdctl

sudo grdctl --system rdp set-tls-key /path/to/rdp-tls.key
sudo grdctl --system rdp set-tls-cert /path/to/rdp-tls.crt
sudo grdctl --system rdp set-credentials
sudo grdctl --system rdp enable
sudo systemctl enable --now gnome-remote-desktop.service
sudo systemctl status gnome-remote-desktop.service
Replace the placeholder certificate paths with real files. The private key must match the certificate and must be readable by the service under your distribution’s security policy. If the service reports permission or labeling errors, correct the file ownership, permissions, and any mandatory access-control context according to your distribution documentation. Do not make the private key world-readable as a shortcut.
On a supported GNOME release, you can also review Remote Login under GNOME Settings, normally in the Remote Desktop area of System settings. Labels can vary by release and distribution. The command-line path is useful on machines where you need explicit service configuration, but the graphical workflow can simplify self-signed certificate creation.
Understand the two authentication stages
The system RDP credential configured by sudo grdctl --system rdp set-credentials controls access to the Remote Login service. After that stage, the GDM workflow asks for the credentials of the Linux account that will own the desktop session. Keep these credentials distinct where the implementation permits it, and never configure automatic login merely to avoid understanding the two stages.
Remote Login is not a general multi-user terminal server guarantee. Session ownership, simultaneous-user behavior, local-console interaction, and reconnect persistence depend on the GNOME release. Test the exact operating pattern you need, including disconnecting without logging out, reconnecting, rebooting, and attempting access while another local session is active.
Verify the RDP listener before exposing it
Local verification separates desktop-service problems from tunnel problems. If there is no process accepting TCP connections on the target port, Localtonet has nothing to forward.
Check service state and recent errors
sudo systemctl status gnome-remote-desktop.service
sudo journalctl -u gnome-remote-desktop.service -b
The service should be active and should not be repeatedly restarting. Investigate messages concerning the TLS key, certificate, credentials, port conflicts, access-control policy, or unavailable GNOME components before continuing.
Inspect the listening address and port
sudo ss -ltnp | grep ':3389'A matching line means a process is listening on TCP port 3389. Pay attention to the address as well as the port:
127.0.0.1:3389means the listener is available through IPv4 loopback on the same machine.0.0.0.0:3389means it is bound to all IPv4 interfaces, including loopback unless local policy says otherwise.[::]:3389is an IPv6 wildcard listener and may also accept IPv4 depending on system configuration.- A specific LAN address means the Localtonet target must use an address and route that the Localtonet client can actually reach.
If nothing is listening, do not create the tunnel yet. Recheck service status, the GNOME version, RDP enablement, TLS configuration, and whether another process already owns the port.
Perform a TCP reachability test
If a netcat-compatible utility is installed, a basic loopback test can confirm that the port accepts a TCP connection:
nc -vz 127.0.0.1 3389This proves only that a TCP connection can be opened. It does not verify RDP TLS, certificate identity, credentials, server redirection, or desktop creation. Complete at least one real RDP login from a trusted local client before public exposure. If the server listens only on loopback, run the test on the Linux host. If it listens on a LAN address, you can also test from another trusted device on that LAN.
If the service is intentionally limited to loopback, keep it that way and run Localtonet on the same host. Do not change it to a wildcard address or add an inbound firewall rule unless your architecture genuinely requires LAN access and you understand the additional exposure.
Create the Localtonet TCP tunnel
Once GNOME Remote Login works locally, configure the networking path. The sequence below follows the Localtonet TCP workflow: run the client, select its device token, choose a current relay, create the TCP target, start the tunnel, and use the assigned public host and port. See the Localtonet documentation alongside the current dashboard because available relay values and interface details can change.
Install and run the Localtonet client
Run the Localtonet client on the GNOME machine or on another device that can reach the RDP listener. The client establishes the outbound connection to our relay. The tunnel cannot accept traffic when this selected device is disconnected.
Select the correct device auth token
Choose the device-specific token associated with the client that can reach GNOME Remote Desktop. Treat the token as a credential and never place it in screenshots, shell history, public issue reports, or article examples.
Select an available relay server
Choose a relay server or region from the values currently shown in the dashboard. Do not copy a server code from an old tutorial because availability can vary by product state, plan, region, or deployment.
Create a TCP tunnel to the verified target
Select the TCP tunnel type and enter the local IP address and port verified in the previous section. When both services run on the same Linux host and loopback works, use 127.0.0.1 and port 3389. If Localtonet runs on another LAN device, use the GNOME machine’s reachable LAN address instead.
Start the tunnel
Creating the configuration does not start it. Press Start and wait for the dashboard to show the tunnel and selected device as connected. Record the assigned public host and port without exposing private account details.
Stop or delete it when access is no longer required
Use Stop to close the public exposure while retaining the configuration. Delete the tunnel if the configuration is temporary and no longer needed. A stopped tunnel should no longer accept connections through its public endpoint.
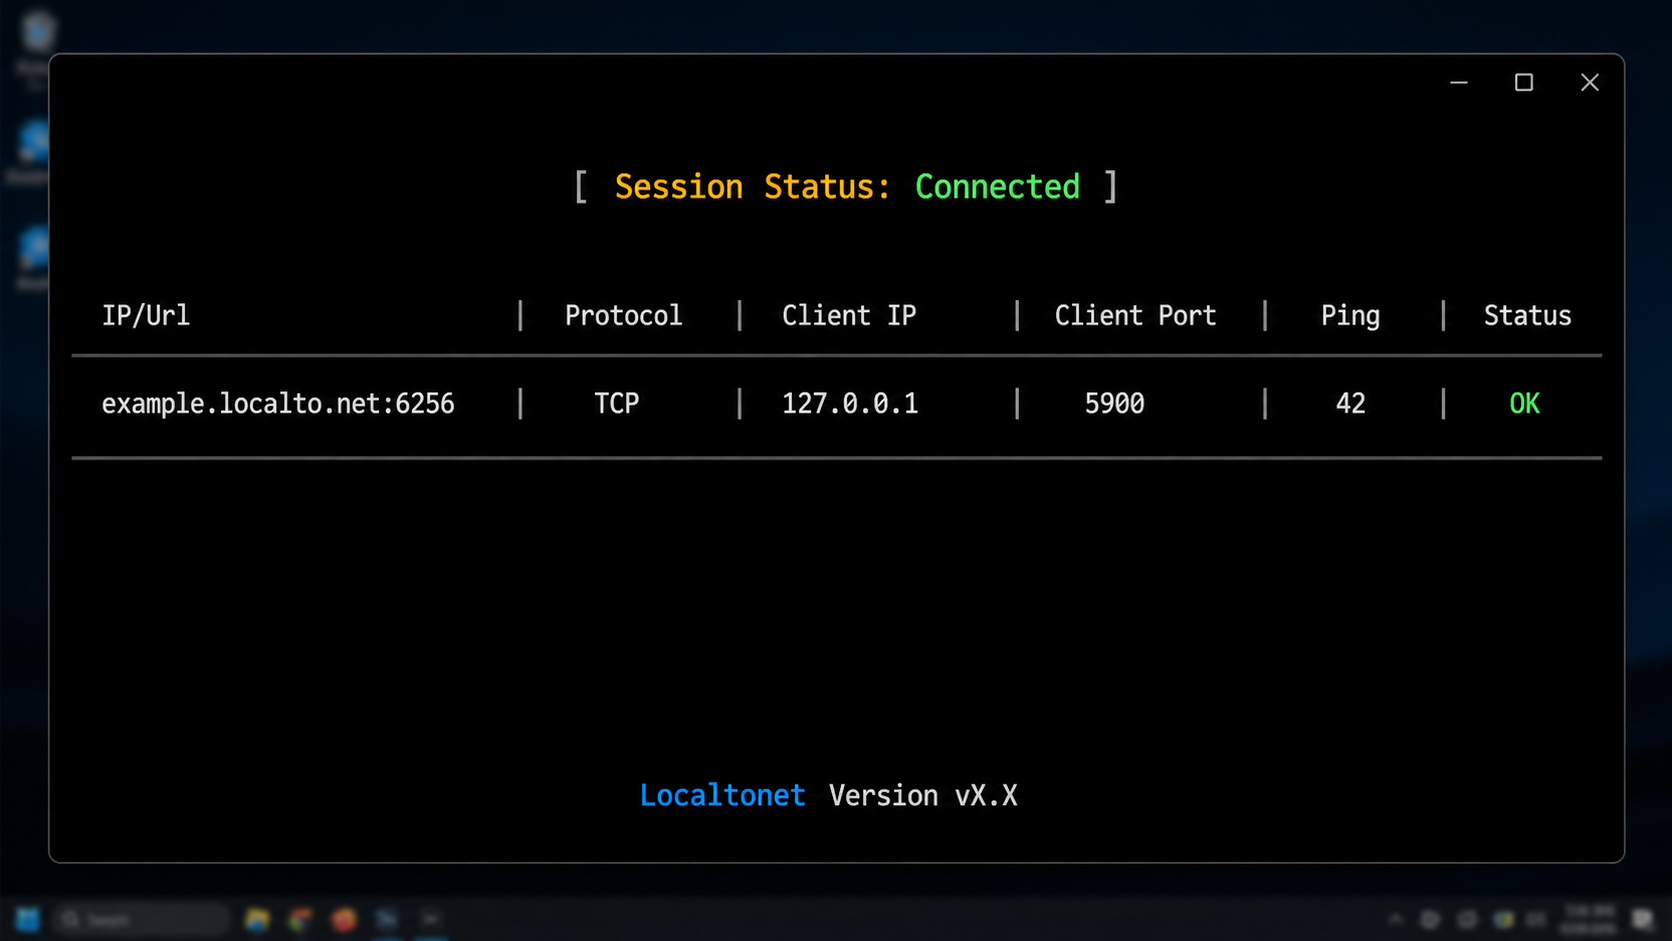
Choose the local target carefully
Use 127.0.0.1:3389 only when the Localtonet client runs on the same machine and the RDP service accepts loopback connections. If Localtonet runs on a Raspberry Pi, router-adjacent server, or another machine, 127.0.0.1 would point back to that other device, not to the GNOME workstation. In that architecture, enter the workstation’s reachable LAN address and confirm the route and host firewall permit the Localtonet device to connect.
A bind-address mismatch often looks like a tunnel failure even though the tunnel is configured correctly. Compare the address shown by ss with the IP used as the Localtonet target. Test that exact target from the device running the Localtonet client.
Verify the public RDP connection end to end
Move the RDP client to a network outside the Linux machine’s LAN, such as a trusted mobile connection or another controlled internet connection. This avoids accidentally testing a local route instead of the tunnel.
- Confirm that the GNOME Remote Desktop system service is active.
- Confirm that TCP port 3389 is listening on the address used by the tunnel.
- Confirm that the selected Localtonet device is connected.
- Confirm that the TCP tunnel has been started, not merely created.
- Enter the assigned Localtonet public host and port in the RDP client.
- Inspect the RDP certificate prompt and verify the expected certificate identity or fingerprint before trusting it.
- Authenticate to the system Remote Login service.
- Complete the normal GNOME account login presented through GDM.
- Verify keyboard input, pointer input, display updates, and the expected desktop identity.
- Disconnect without logging out, then reconnect to determine the behavior of your GNOME version and client.
A successful test reaches the GNOME login flow, completes both required authentication stages, and opens the expected desktop. Merely seeing a certificate prompt proves only that an RDP-speaking endpoint answered. A blank screen, immediate disconnect, repeated login prompt, or failed redirect is not a successful result.
Confirm that stopping the tunnel closes public access
Disconnect the RDP client, stop the Localtonet tunnel in the dashboard, and wait for its state to update. Attempt a new connection to the same public host and port from the external network. It should no longer establish the RDP session through that stopped tunnel.
This is a safe lifecycle test because the local GNOME Remote Desktop service can remain running while you verify that Localtonet exposure is closed. If the public endpoint still appears reachable, confirm that you stopped the correct tunnel and that the RDP client is not reusing an existing connection. Also check whether another tunnel or direct network rule exposes the same service.
Compare remote desktop reachability approaches
Direct internet reachability does not always require a static public IPv4 address. A network might use a dynamic public address with dynamic DNS, globally routed IPv6, or another inbound routing arrangement. Conversely, carrier-grade NAT can prevent conventional IPv4 port forwarding even when the local router is configured correctly. The important difference is whether an inbound route can reach the service and who operates that route.
| Approach | Internet reachability | Router or firewall work | Infrastructure responsibility | Important limitation |
|---|---|---|---|---|
| Direct inbound access | May use static or dynamic public IPv4, routed IPv6, or another provider-supported inbound path | Usually requires explicit inbound routing and firewall policy | You operate the exposed host and network edge | Carrier-grade NAT or restrictive provider policy may make inbound IPv4 unavailable |
| Self-managed VPS relay | Remote clients connect to the VPS, while the desktop establishes or receives a path through it | The desktop network may avoid inbound forwarding, but the VPS needs public reachability | You provision, patch, monitor, and secure the relay | Relay configuration and service hardening become your responsibility |
| Localtonet TCP tunnel | Remote clients use the assigned public host and port | No inbound router port forwarding, firewall changes, public device IP, or VPN setup is required for the tunnel | We operate the relay platform; you operate the local service and its authorization | The selected Localtonet device must be connected and the tunnel must be running |
| Private mesh VPN | Authorized VPN members reach private addresses through the mesh | Depends on the VPN design and endpoint policy | The VPN control and endpoint configuration must be operated | This is a different access model from a public TCP tunnel |
A standard Localtonet TCP tunnel is not a VPN. Localtonet VPN Manager is our actual private mesh VPN feature. Choose between a public TCP endpoint and a private VPN architecture according to your users, client support, and security policy.
Harden GNOME Remote Login and the public TCP path
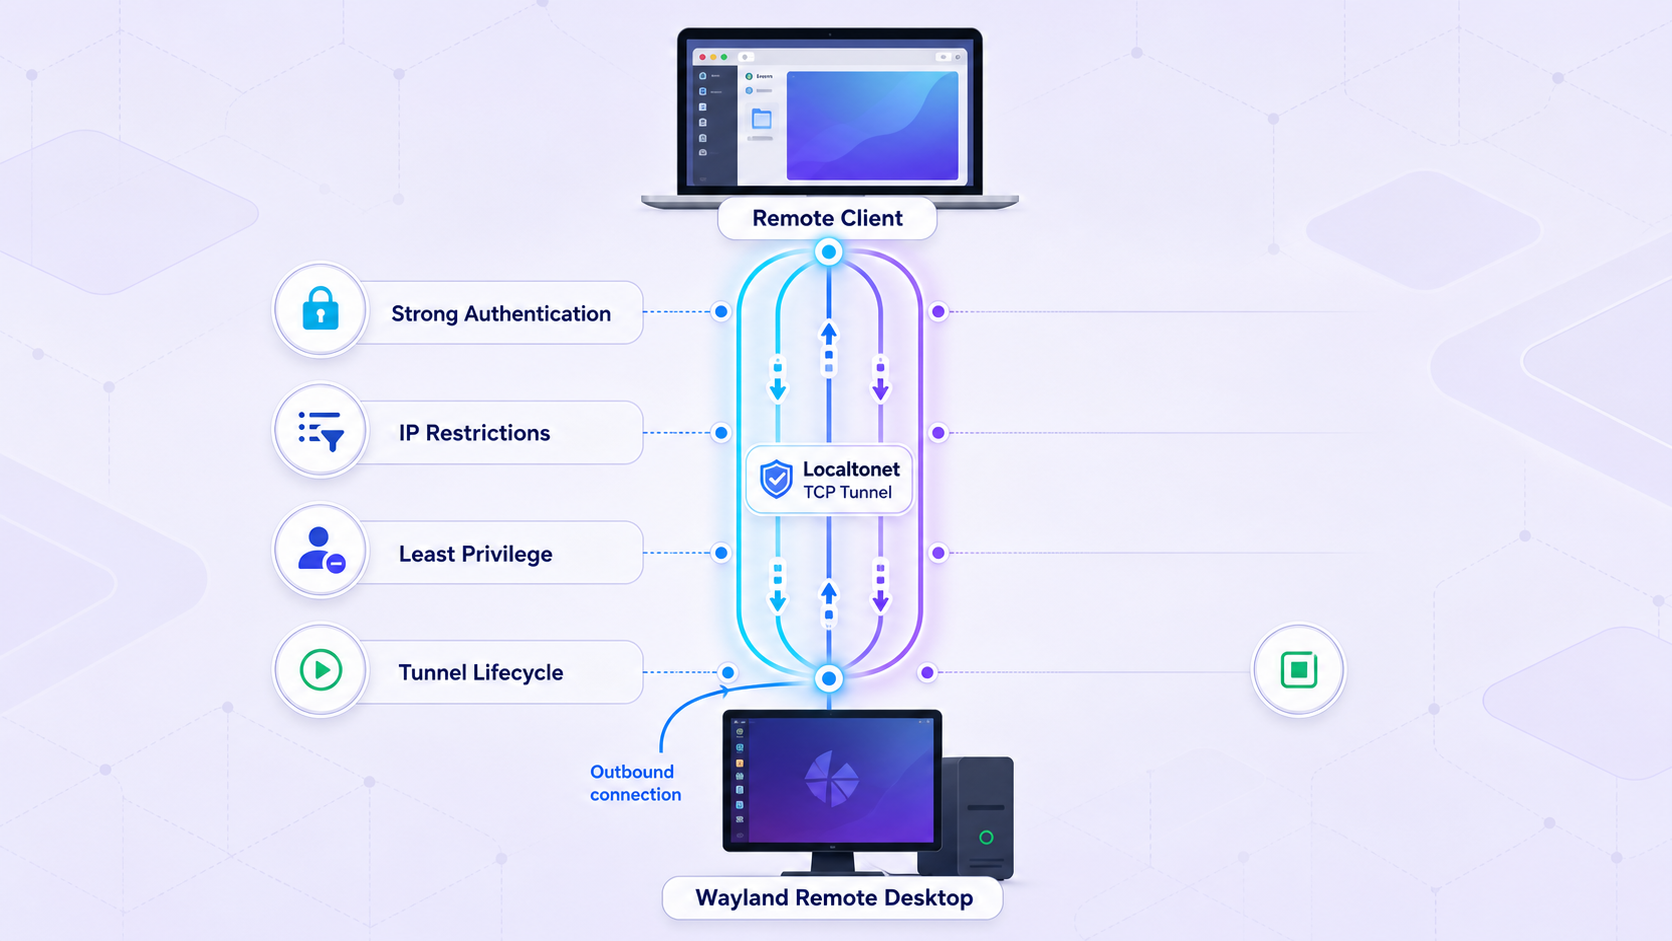
Keep RDP TLS enabled
RDP carries credentials, display content, keyboard input, clipboard data, and potentially other redirected resources. GNOME Remote Desktop should be configured with its TLS certificate and matching private key before the listener is exposed. Do not interpret successful TCP forwarding as evidence that the RDP application layer is correctly encrypted.
Protect the private key with restrictive permissions and follow your distribution’s service-account and mandatory access-control requirements. If the key is copied, replace the certificate and key rather than merely changing the RDP password.
Validate the certificate
A self-signed certificate can encrypt a session, but it does not automatically prove server identity. Verify its fingerprint through a trusted local channel before accepting it remotely. If your RDP client supports pinning or importing the certificate into an appropriate trust store, use that functionality rather than accepting every warning on every connection.
A certificate warning after an expected certificate renewal can be legitimate. A warning that appears unexpectedly might also indicate a configuration change, an incorrect public endpoint, or interception. Stop and verify before entering credentials.
Use strong, unique credentials at both stages
Choose a strong credential for the system RDP service and strong credentials for the Linux user account. Do not reuse passwords from email, source control, cloud dashboards, or the Localtonet account. Use least privilege for the desktop account and avoid routine graphical work as root.
Where the surrounding account system supports additional protections, apply them according to your organization’s identity policy. Do not assume that the public host and port are secret. Public endpoints can be discovered or scanned, so authentication must withstand unsolicited connection attempts.
Patch every component in the path
Keep GNOME, GNOME Remote Desktop, GDM, the Linux kernel, graphics components, the RDP client, and the Localtonet client updated through their supported channels. Remote desktop combines network parsing, authentication, graphical session management, and input handling, so delayed security updates create avoidable risk.
Minimize the exposure window
Create the tunnel only after local verification and stop it when remote access is no longer needed. If the use case requires continuous availability, monitor both the remote desktop service and Localtonet device state. Continuous exposure should be a deliberate operational decision rather than the accidental result of forgetting a test tunnel.
Protect the Localtonet device token
The device auth token identifies the Localtonet client device. Do not include it in terminal screenshots, configuration examples, support posts, or shared shell history. If you believe it has been exposed, take the appropriate dashboard action to revoke or rotate access rather than relying on the token remaining undiscovered.
Use host firewall rules, service-level controls, account policy, rate limits, or address restrictions when your selected service, environment, and Localtonet plan explicitly provide them. Do not assume that every restriction exists on every plan or that a public TCP endpoint supplies an allowlist automatically.
Reboot behavior, routine operation, and troubleshooting
Plan for reboots
systemctl enable --now gnome-remote-desktop.service enables the GNOME Remote Desktop system service for subsequent boots and starts it immediately. After a real reboot, verify that the service returns, the RDP listener appears, and the certificate remains readable.
The Localtonet side has a separate lifecycle. The client must reconnect as the correct device, and the TCP tunnel must be running. Do not assume that enabling GNOME Remote Desktop automatically launches Localtonet or starts a tunnel. Client startup behavior can vary by installation method and version, so test the complete boot sequence on the actual machine.
A practical post-reboot checklist is:
- Confirm the Linux machine has network connectivity.
- Confirm
gnome-remote-desktop.serviceis active. - Confirm port 3389 is listening on the expected address.
- Confirm the Localtonet device is connected.
- Confirm the intended TCP tunnel is running.
- Complete a fresh external RDP connection.
The GNOME Remote Desktop service is inactive or failed
Inspect service status and the current boot journal:
sudo systemctl status gnome-remote-desktop.service
sudo journalctl -u gnome-remote-desktop.service -b
Common categories include a missing or unreadable TLS key, a mismatched certificate and key, missing credentials, an unsupported GNOME build, port 3389 already in use, or a distribution security policy denying file access. Fix the underlying issue rather than repeatedly restarting the service.
No process is listening on port 3389
Confirm that system RDP is enabled and the service is active. Check whether your GNOME release uses the expected Remote Login feature and whether another application already owns the port. Re-run the listener check after each correction:
sudo ss -ltnp | grep ':3389'If your configured service uses a different port, use the port reported by its authoritative configuration and listener output. Do not guess a VNC port or substitute an unrelated server merely because 3389 is absent.
The listener works locally but Localtonet cannot reach it
Check where the Localtonet client runs. If it runs on the GNOME machine, test the exact target 127.0.0.1:3389 there. If it runs on another device, loopback is wrong because it points to that second device. Use the GNOME host’s LAN address and test the exact address and port from the Localtonet device.
Also inspect host firewall policy and routing between the two devices. Localtonet does not bypass local network policy. A TCP target must already be reachable from the client device.
The Localtonet device shows disconnected
The public endpoint depends on the selected client device maintaining its outbound connection to a Localtonet relay. Confirm that the client process is running, the host has internet connectivity, and the configured device token is the intended one. Do not solve a token problem by posting the token in a public support channel.
The tunnel exists but connections time out
Creating a tunnel does not start it. Check for the running or connected state and use the Start button if necessary. Then verify the selected device, relay, local IP, and local port. A tunnel tied to the wrong token can remain unavailable even while a different Localtonet device is online.
The selected relay is unavailable or performs poorly
Choose from the relay servers currently available in the dashboard. Do not hardcode an old region or server code. If a connection cannot be established through one available selection, confirm the device connection and target first, then test another currently offered relay where your account and deployment permit it.
RDP reports an authentication failure
Identify which stage failed. The system Remote Login credential is separate from the Linux account login at GDM. Re-enter the correct credential for that stage, check keyboard layout and lock keys, and avoid repeated guessing that could trigger account policy. If credentials must be reset, use the supported grdctl --system rdp set-credentials workflow from a trusted administrative session.
The client displays a certificate warning
Compare the presented certificate with the certificate configured on the GNOME host. For a planned self-signed deployment, verify the fingerprint through a trusted route before accepting it. Do not disable certificate checks globally. If the certificate changed unexpectedly, investigate before entering either RDP or Linux account credentials.
The connection reaches GNOME and then disconnects
This can indicate an RDP client compatibility problem, particularly around security negotiation or server redirection. Update the client and test with another maintained implementation known to handle GNOME Remote Login. If one client works through the same endpoint, the Localtonet TCP path is unlikely to be the cause.
A disconnected session cannot be resumed
Persistent session behavior depends on the GNOME version. GNOME 47 added improvements for disconnecting and reconnecting without immediately losing the session, while GNOME 46 deployments can behave differently. Logging out intentionally ends the session. Test disconnect, reconnect, local-console interaction, and reboot behavior before depending on session persistence.
The active local desktop is not the desktop shown remotely
Remote Login is not the same as active-session screen sharing. It can create or connect through a login-oriented remote session rather than mirror the currently visible local desktop. If your requirement is collaborative viewing of the active console session, configure GNOME’s screen-sharing feature and evaluate its attended, portal, lock-screen, and permission behavior separately.
Frequently asked questions
Does Localtonet bypass Wayland capture prompts?
No. Localtonet forwards TCP traffic and does not grant access to a Wayland compositor, approve a portal request, or alter GNOME authorization. This tutorial uses GNOME Remote Login because it is a system-level login workflow rather than an attempt to make a portal-mediated screen-sharing application unattended.
Is GNOME Remote Login the same as GNOME desktop sharing?
No. Desktop sharing works with an existing user session. Remote Login is a system-level RDP path associated with GDM and can present login access before a normal desktop session is active. Their permission, locking, session, and reconnection behavior should not be treated as interchangeable.
Does the Localtonet TCP tunnel encrypt RDP traffic?
This article does not make that claim for raw TCP tunneling. Configure GNOME Remote Desktop with RDP TLS, protect the private key, and validate the certificate from the client. Treat Localtonet as the reachability layer and RDP as the application protocol responsible for its own security.
Do I need port forwarding or a public IP address?
No. The Localtonet client establishes an outbound connection to a relay. A Localtonet TCP tunnel does not require inbound router port forwarding, firewall changes, a public IP address on the device network, or VPN setup.
Why should I use 127.0.0.1 as the tunnel target?
Use 127.0.0.1 only when the Localtonet client and GNOME Remote Desktop run on the same machine and the RDP listener accepts loopback connections. If Localtonet runs on another device, use a LAN address reachable from that device instead.
Will the tunnel run automatically after I create it?
No. Creating a tunnel does not mean it is running. The selected Localtonet device must be connected and the tunnel must be started. Test both states after a reboot rather than assuming service persistence.
Can I use any RDP client?
Not necessarily. GNOME Remote Login can rely on RDP security and server-redirection behavior that is not implemented consistently by every client version. Use a current client and test the complete login, redirect, desktop creation, disconnect, and reconnect sequence locally before relying on public access.
Is this a Localtonet VPN connection?
No. This tutorial uses a public TCP tunnel to one local service. Standard HTTP, TCP, UDP, and File Server tunnels are not VPN functionality. Localtonet VPN Manager is the actual private mesh VPN feature.
Connect GNOME Remote Login through Localtonet
Verify GNOME’s RDP listener and TLS configuration locally, then create a Localtonet TCP tunnel to the tested address and port. Keep the device token private, start the tunnel only when needed, and let the remote desktop service enforce authentication and session access.
Get Started Free →

