

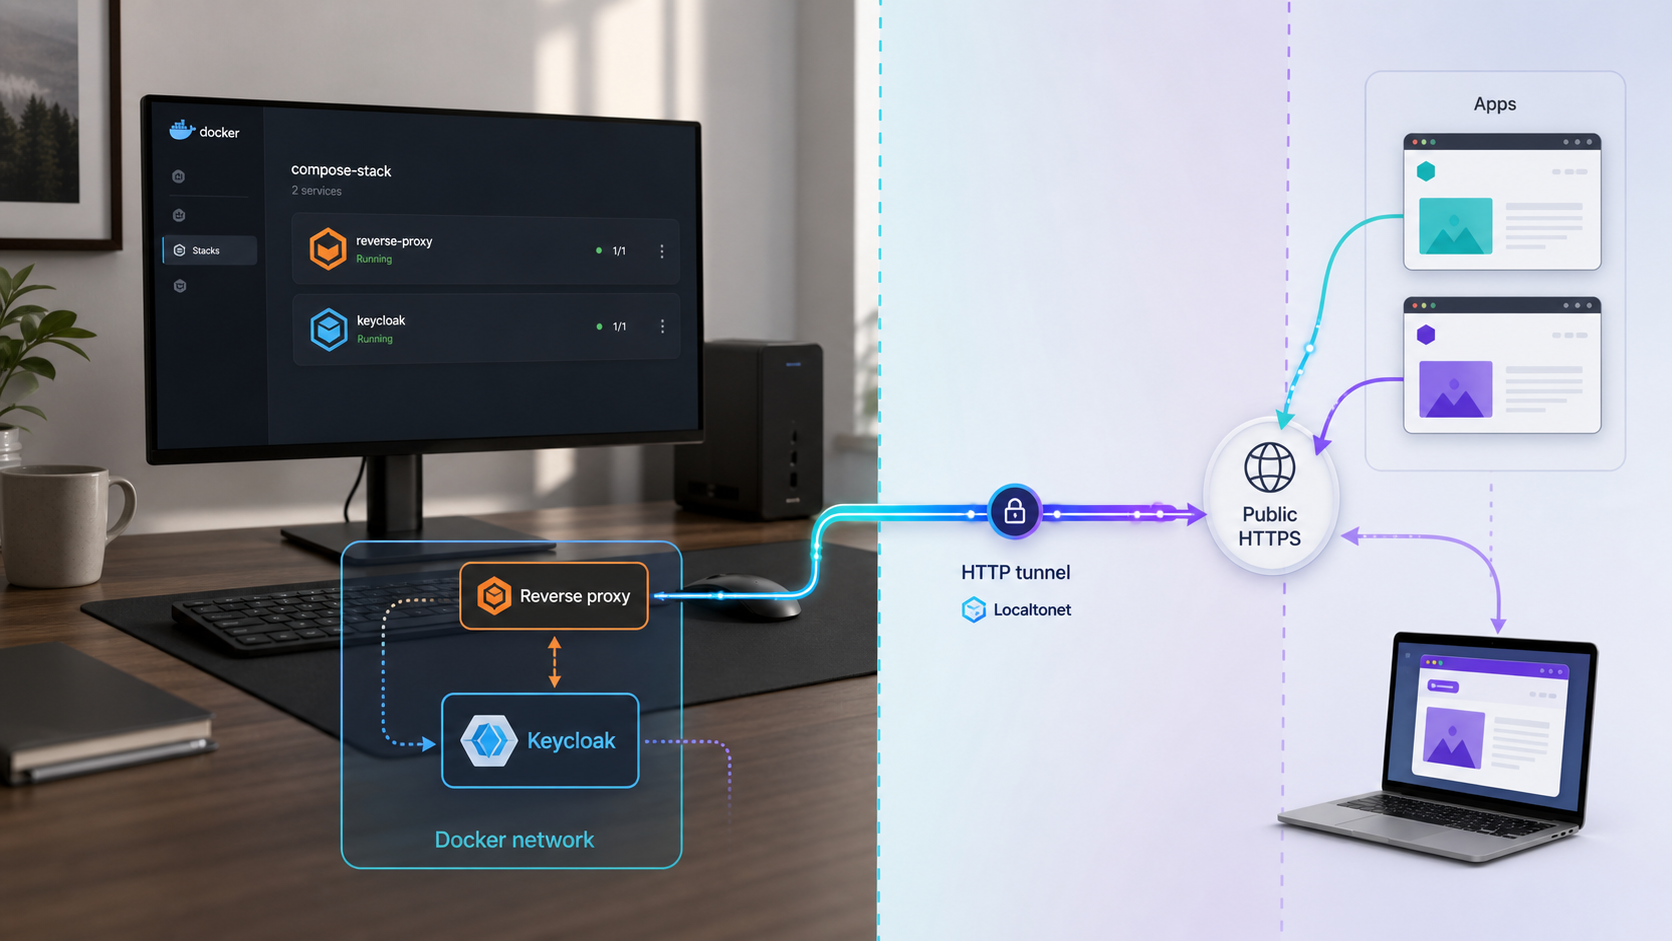
Build a stable identity service without exposing development mode
Keycloak can centralize login, sessions, users, and authorization data for multiple applications, but a local evaluation and a public identity service have very different requirements. This guide keeps those profiles separate. You will run an isolated development instance, prepare an optimized Keycloak container with PostgreSQL for durable use, publish it through a Localtonet HTTP tunnel, configure a realm and OpenID Connect client, and connect an application through a framework-neutral authorization code flow.
📋 What's in this guide
Separate local evaluation from a public identity service
Keycloak is an identity and access management system that supports OpenID Connect, OAuth 2.0, and SAML 2.0. A realm provides an isolated namespace for users, roles, groups, clients, authentication policies, and sessions. Applications registered in that realm can redirect users to Keycloak instead of implementing their own password database and login workflow.
Single Sign-On means a user with an active Keycloak browser session can authenticate to another appropriately configured client without entering credentials again. It does not mean that every application automatically accepts every session, receives every role, or logs out at the same time. Each client still needs valid redirect URIs, suitable scopes and token mappers, secure session handling, and the appropriate OpenID Connect logout configuration.
| Profile | Purpose | Startup mode | Public exposure | Data handling |
|---|---|---|---|---|
| Local evaluation | Learning the Admin Console and testing an integration on one workstation | start-dev |
No | Disposable unless you deliberately add persistent storage |
| Durable public deployment | Providing an issuer used by remote applications and users | Build an optimized image, then use start --optimized |
Only after hostname, proxy, database, and administrator controls are ready | PostgreSQL with tested backup and restore procedures |
| High-availability deployment | Serving workloads that cannot depend on one host or one tunnel client | Production mode with deployment-specific clustering and infrastructure | Through a deliberately designed ingress architecture | Replicated database, monitoring, recovery, and capacity planning |
Keycloak documents start-dev as a development-only mode with insecure defaults. A public Localtonet URL does not turn development mode into a production deployment. Keep the evaluation profile bound to localhost and build a separate optimized image for public use.
This tutorial covers one durable Keycloak instance on one Docker host. It does not claim high availability. The public issuer remains available only while Keycloak, PostgreSQL, the selected Localtonet client device, and the Localtonet tunnel are all running.
Prerequisites and decisions to make first
Prepare the host and choose the public URLs before configuring clients. Identity systems persist their issuer in discovery metadata and tokens, while applications store that issuer in their own configuration. Changing it later can invalidate assumptions in token validation, redirect handling, and active sessions.
docker compose version works.
latest.
https://sso.example.com and an application URL such as https://app.example.com.
Exact current Keycloak and PostgreSQL versions are not established by the supplied evidence for this revision. The examples therefore use required version variables rather than inventing a release number. Resolve them to exact supported tags, or preferably image digests, after checking the current vendor documentation. Record those values with your deployment files so the same images can be rebuilt during rollback.
You also need a Localtonet account and the current Localtonet client application installed on the machine that can reach 127.0.0.1:8080. Do not paste the device AuthToken into commands, Compose files, screenshots, or application configuration. The token identifies the client device that runs the tunnel.
Profile 1: run a disposable local evaluation
Use this profile to explore Keycloak and test an application whose browser and callback are local. It does not use the public tunnel. Development mode can create local HTTP endpoints and relaxed defaults that are unsuitable for an internet-facing identity provider.
Select an exact Keycloak image version
Check the current Keycloak container documentation, select a supported release, and replace <PINNED_KEYCLOAK_VERSION> below. Do not replace it with latest.
Load temporary bootstrap credentials without putting the password in shell history
Use a hidden prompt in the current shell. These credentials are only for the disposable local profile and must not be reused for the public deployment.
Start Keycloak on loopback
Bind the container to 127.0.0.1 so other network devices cannot connect directly. Start development mode only for this isolated evaluation.
Verify startup from logs and HTTP
Follow the container logs until startup completes, then open the local URL. Do not rely on a fixed sleep interval because startup time varies by host and image.
Remove the evaluation container when finished
Stop and delete the disposable instance before creating the durable deployment so that it cannot be mistaken for the production service.
export KEYCLOAK_VERSION='<PINNED_KEYCLOAK_VERSION>'
export KC_BOOTSTRAP_ADMIN_USERNAME='local-admin'
read -s -p 'Temporary local admin password: ' KC_BOOTSTRAP_ADMIN_PASSWORD
echo
export KC_BOOTSTRAP_ADMIN_PASSWORD

docker run --name keycloak-evaluation \
  --rm \
  -p 127.0.0.1:8080:8080 \
  -e KC_BOOTSTRAP_ADMIN_USERNAME \
  -e KC_BOOTSTRAP_ADMIN_PASSWORD \
  "quay.io/keycloak/keycloak:${KEYCLOAK_VERSION}" \
  start-dev
In another terminal, inspect the logs with docker logs -f keycloak-evaluation. When startup is complete, open http://127.0.0.1:8080. Stop the container with docker stop keycloak-evaluation when the evaluation is over.
The development profile is deliberately local. The remainder of this guide creates a separate optimized image and durable database before any public URL is used.
Design the public hostname and reverse-proxy boundary
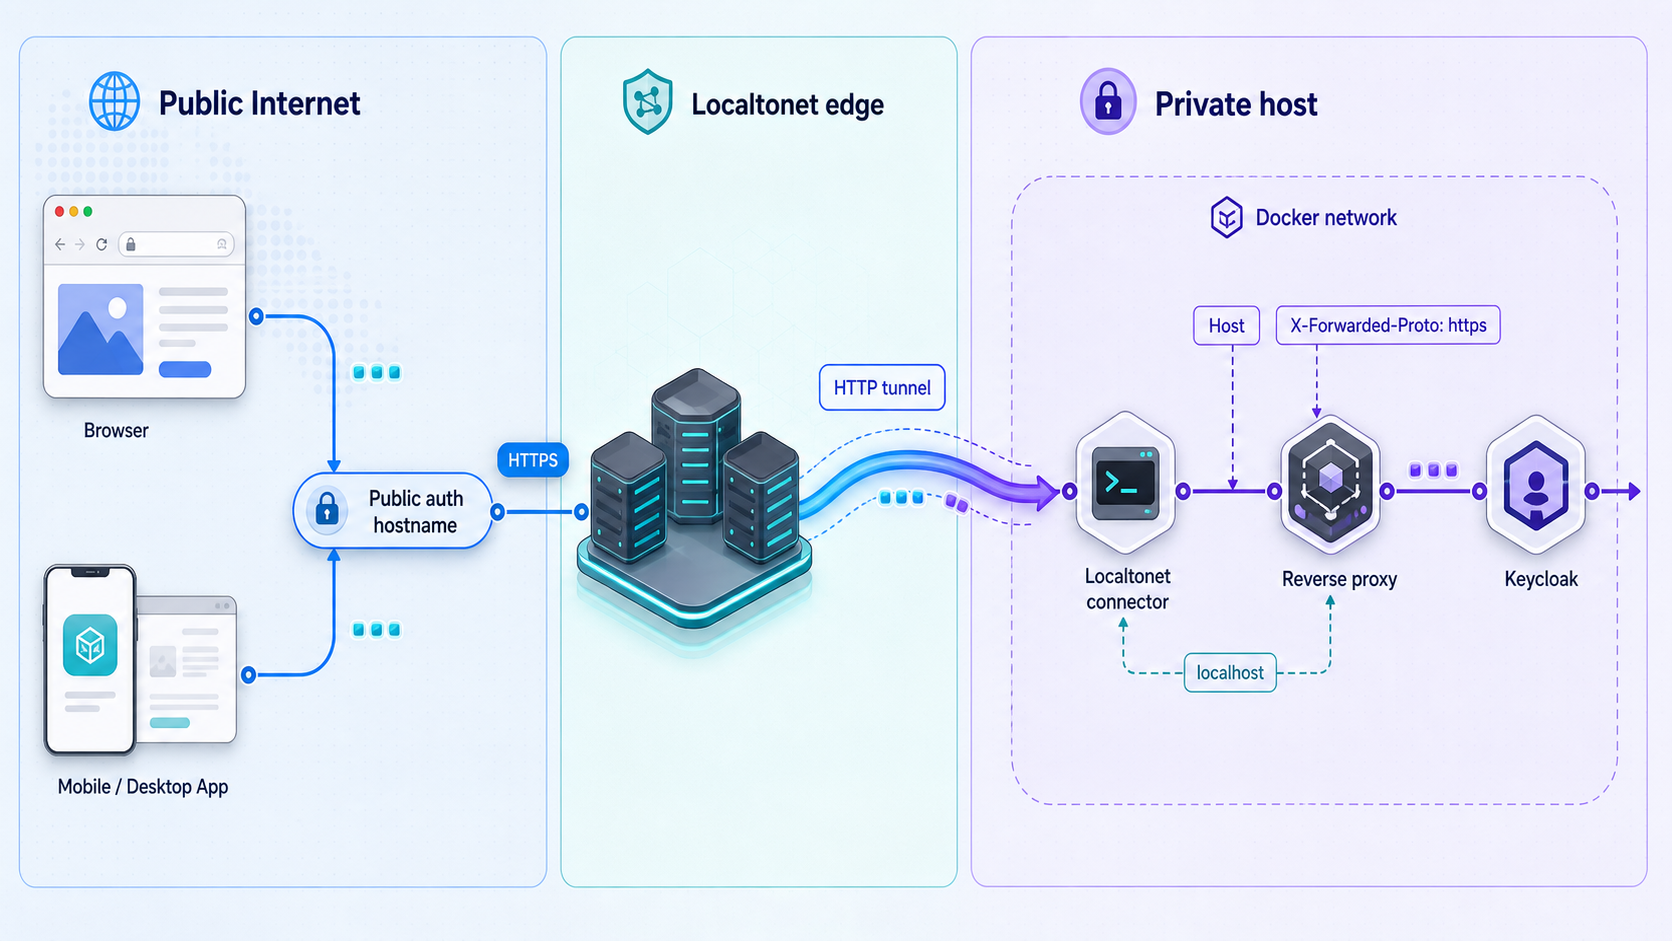
In the public profile, a browser reaches a public HTTPS Keycloak issuer through a Localtonet relay. The Localtonet client maintains an outbound connection from the host to the relay, so inbound router port forwarding, a public IP address, VPN setup, and inbound firewall changes are not required. The HTTP tunnel forwards traffic to Keycloak on 127.0.0.1:8080.
TLS is terminated at the tunnel edge for the public HTTPS address. The backend connection in this design reaches Keycloak over loopback HTTP. Keycloak therefore needs HTTP enabled internally, a complete canonical HTTPS hostname, and reverse-proxy settings that match the headers actually supplied by the edge.
Use one canonical HTTPS issuer
Configure Keycloak with the full external URL, not just a bare host:
https://sso.example.comFor a durable identity service, use a stable custom domain where it is available for your account and tunnel configuration. A generated address may change after a restart depending on the selected process type and plan. If the issuer changes, applications may reject tokens, discovery metadata may no longer match their configuration, and registered redirects may become stale.
Localtonet HTTP Process Types include Random Sub Domain, Custom Sub Domain, and Custom Domain. All serve the same local HTTP content at a public HTTPS address. Custom-domain requirements, plan availability, and DNS behavior can change, so check the current dashboard and the Localtonet custom-domain guide before committing to a hostname.
Confirm forwarded headers before enabling trust
Keycloak supports standard Forwarded headers and the X-Forwarded-* family through its proxy-header setting. These modes are not interchangeable. Trusting the wrong header family can produce incorrect schemes and ports, failed origin checks, or security problems if untrusted clients can inject values that are not overwritten by the proxy.
The supplied Localtonet evidence does not establish whether the current HTTP relay sends RFC 7239 Forwarded headers, X-Forwarded-* headers, or which values it overwrites. Confirm the behavior using current Localtonet documentation or support before public deployment. Then set Keycloak's proxy-header mode to the confirmed family. Do not expose the service while leaving a guessed value in production.
A full KC_HOSTNAME=https://sso.example.com gives Keycloak a fixed frontend URL, but it does not remove the need to configure and verify proxy headers when TLS is terminated upstream. Test origin checks, redirects, and discovery metadata after applying the verified mode.
Create and start the Localtonet HTTP tunnel
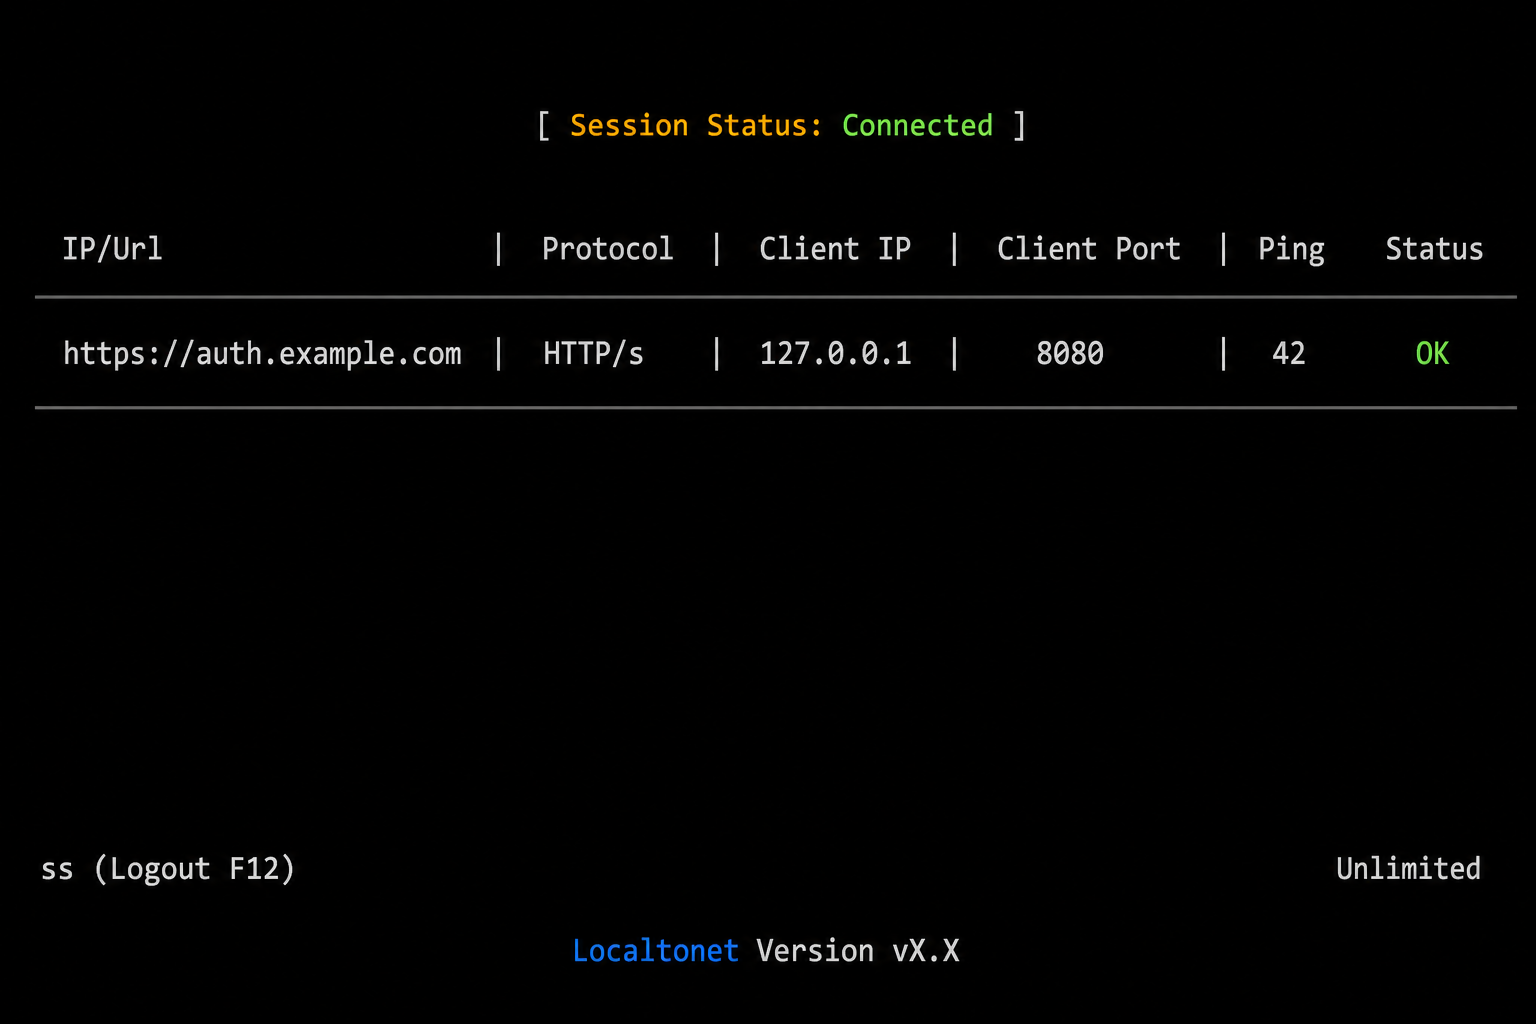
Create the stable public address before finalizing the production Keycloak configuration. Creating a tunnel record does not start it. The selected device must remain connected and the tunnel must be running for the issuer to be reachable.
Install and run the current Localtonet client
Install the Localtonet application for the host operating system using the current official download flow. Run it on the same device as Docker, or on a device that can reach the Keycloak target. Unsupported installer and service commands are intentionally not included.
Open the HTTP Tunnel page
Sign in to the Localtonet dashboard and open the HTTP Tunnel page. Select the device-specific AuthToken for the client that will carry this tunnel. Never copy that token into the Keycloak configuration.
Select an available relay server
Choose a relay server or region currently offered by the dashboard. Do not hardcode a server code from an article because availability can vary by account, plan, region, and product version.
Choose the HTTP Process Type
Use Custom Domain for the planned stable issuer where that option is available and already configured. Otherwise, select a supported subdomain option and understand its restart and stability behavior before using it as an issuer.
Set the local target
Enter 127.0.0.1 as the local IP address and 8080 as the local port. The Compose deployment below publishes Keycloak only on that loopback address.
Create the tunnel and press Start
Create the configuration, then explicitly press Start. Record the assigned public HTTPS address and use that exact address as the canonical Keycloak hostname.
Verify both connection states
Confirm that the selected Localtonet client is connected and that the tunnel is running. The URL stops being available when the client disconnects or the tunnel is stopped or deleted.
It is acceptable to reserve and start the tunnel before Keycloak is running so you can establish the final hostname. Public requests will not succeed until the optimized Keycloak service is ready on 127.0.0.1:8080.
Profile 2: build an optimized Keycloak deployment
Keycloak's optimized container workflow has two phases. First, run kc.sh build while constructing the image. Then start that built image with start --optimized. Merely changing a development container from start-dev to start --optimized skips the documented optimization build.
The example below uses PostgreSQL for durable storage. PostgreSQL is a supported Keycloak database, but it is not mandatory for every development experiment. The local profile can remain disposable. The durable profile uses a separate database because identity configuration and users must survive container replacement.
Project files
Create the following structure:
keycloak-public/
├── compose.yaml
├── Dockerfile
├── keycloak-start.sh
├── versions.env
└── secrets/
    ├── postgres_password
    └── keycloak_bootstrap_admin_password
Pin the images
Put exact, currently supported versions in versions.env. This file contains versions and public configuration, not passwords:
KEYCLOAK_VERSION=<PINNED_KEYCLOAK_VERSION>
POSTGRES_VERSION=<PINNED_POSTGRES_VERSION>
KEYCLOAK_HOSTNAME=https://sso.example.com
KEYCLOAK_PROXY_HEADERS=<forwarded-or-xforwarded-after-verification>
Exact tags avoid silent major-version changes. Immutable image digests provide stronger reproducibility if your deployment process supports them. Preserve the previous known-good image references for rollback.
Build the optimized Keycloak image
ARG KEYCLOAK_VERSION

FROM quay.io/keycloak/keycloak:${KEYCLOAK_VERSION} AS builder
ENV KC_DB=postgres
ENV KC_HEALTH_ENABLED=true
ENV KC_METRICS_ENABLED=true
RUN /opt/keycloak/bin/kc.sh build

FROM quay.io/keycloak/keycloak:${KEYCLOAK_VERSION}
COPY --from=builder /opt/keycloak/ /opt/keycloak/
COPY --chmod=0755 keycloak-start.sh /opt/keycloak/bin/keycloak-start.sh
ENTRYPOINT ["/opt/keycloak/bin/keycloak-start.sh"]
The startup wrapper reads the mounted Docker secrets and exports them only inside the container before replacing itself with Keycloak:
#!/bin/sh
set -eu

export KC_DB_PASSWORD="$(cat /run/secrets/keycloak_db_password)"
export KC_BOOTSTRAP_ADMIN_PASSWORD="$(cat /run/secrets/keycloak_bootstrap_admin_password)"

exec /opt/keycloak/bin/kc.sh start --optimized
Create the Compose deployment
services:
  postgres:
    image: postgres:${POSTGRES_VERSION}
    restart: unless-stopped
    environment:
      POSTGRES_DB: keycloak
      POSTGRES_USER: keycloak
      POSTGRES_PASSWORD_FILE: /run/secrets/postgres_password
    secrets:
      - postgres_password
    volumes:
      - postgres_data:/var/lib/postgresql/data
    healthcheck:
      test: ["CMD-SHELL", "pg_isready -U keycloak -d keycloak"]
      interval: 10s
      timeout: 5s
      retries: 12
      start_period: 20s
    networks:
      - keycloak_private

  keycloak:
    build:
      context: .
      args:
        KEYCLOAK_VERSION: ${KEYCLOAK_VERSION}
    restart: unless-stopped
    environment:
      KC_DB: postgres
      KC_DB_URL: jdbc:postgresql://postgres:5432/keycloak
      KC_DB_USERNAME: keycloak
      KC_BOOTSTRAP_ADMIN_USERNAME: bootstrap-admin
      KC_HOSTNAME: ${KEYCLOAK_HOSTNAME}
      KC_HTTP_ENABLED: "true"
      KC_PROXY_HEADERS: ${KEYCLOAK_PROXY_HEADERS}
      KC_HEALTH_ENABLED: "true"
      KC_METRICS_ENABLED: "true"
    secrets:
      - keycloak_db_password
      - keycloak_bootstrap_admin_password
    ports:
      - "127.0.0.1:8080:8080"
      - "127.0.0.1:9000:9000"
    depends_on:
      postgres:
        condition: service_healthy
    networks:
      - keycloak_private

secrets:
  postgres_password:
    file: ./secrets/postgres_password
  keycloak_db_password:
    file: ./secrets/postgres_password
  keycloak_bootstrap_admin_password:
    file: ./secrets/keycloak_bootstrap_admin_password

volumes:
  postgres_data:

networks:
  keycloak_private:
PostgreSQL has no host port. Keycloak's application and management ports are both restricted to loopback. Port 9000 is available locally for health verification and must not be targeted by the public tunnel.
Create secrets and start the stack
Create protected secret files
Generate independent random values into files, restrict their permissions, and exclude the entire secrets directory from version control and backups that are not encrypted.
Validate the resolved configuration
Run Compose configuration validation with the version file. Review image references, hostname, ports, and proxy mode. The rendered output should not contain the secret file contents.
Build the optimized image
Build the image before startup. Save the resulting image reference and build inputs as part of the deployment record.
Start PostgreSQL and Keycloak
Start the services in detached mode. Compose waits for the database health check before starting Keycloak, but you must still verify Keycloak readiness separately.
Check health and logs
Inspect container state and logs, then request the local readiness endpoint. Continue only after it reports ready.
mkdir -p secrets
umask 077
openssl rand -base64 36 > secrets/postgres_password
openssl rand -base64 36 > secrets/keycloak_bootstrap_admin_password
chmod 600 secrets/postgres_password secrets/keycloak_bootstrap_admin_password

docker compose --env-file versions.env config
docker compose --env-file versions.env build
docker compose --env-file versions.env up -d
docker compose --env-file versions.env ps
docker compose --env-file versions.env logs --tail=200 postgres keycloak

curl --fail --silent --show-error \
http://127.0.0.1:9000/health/readyBootstrap credentials exist to establish administration, not to become a shared permanent operator account. After first login, create named administrative users with only the permissions they need, enroll strong authentication, test those accounts, and remove or rotate the bootstrap credential according to the current Keycloak bootstrap-admin procedure. Do not leave the bootstrap secret in an unattended deployment indefinitely.
Create the realm, users, and OpenID Connect client
The bootstrap administrator normally signs into the master realm to administer Keycloak. Application users belong in a separate realm. In this example, the realm is apps, the client ID is portal, and the application callback is https://app.example.com/oidc/callback.
Create an application realm
Sign in to the Admin Console through a controlled administrative path and create a realm named apps. Do not register ordinary applications or users in the master realm.
Create an OpenID Connect client
In the apps realm, create a client using the OpenID Connect client type and set its Client ID to portal.
Choose public or confidential client behavior
A browser-only, mobile, desktop, or other client that cannot keep a secret is public and should use authorization code flow with PKCE. A server-side application can be confidential if its secret is stored only on the server. Do not put a client secret in browser JavaScript, mobile packages, public repositories, or container images.
Register exact redirect URIs
Add the exact callback URI, such as https://app.example.com/oidc/callback. Avoid broad wildcards. Scheme, host, port, path, and trailing slash behavior must match what the application actually sends.
Set web origins only where required
Browser applications that call Keycloak endpoints across origins may require a precise Web Origin. Server-side applications usually do not need broad cross-origin access. Never use an unrestricted origin as a shortcut.
Create a test user safely
Create a user in the application realm and assign a temporary initial password or the Update Password required action. Let the user choose a private password at first login. Mark email as verified only for controlled testing where you know the address is controlled. Email verification is required for login only when the realm's policy enforces it.
Configure roles and claims deliberately
Create realm or client roles and assign them according to least privilege. Confirm the relevant client scopes and protocol mappers place the required claims in the intended token. A newly created role is not guaranteed to appear at the claim path expected by every application.
Enroll MFA through required actions
Use Keycloak authentication policies and the Configure OTP or WebAuthn required action as appropriate. Required actions are different from role mappings. SMS MFA is not a standard built-in method equivalent to OTP or WebAuthn and normally requires an extension or external integration.
Social identity providers also require provider-specific work. You generally need to register an application with the upstream provider, configure its exact callback URL, protect its client secret, map claims, and test account-linking behavior. Do not assume every provider has identical fields or approval requirements.
Publishing the Keycloak hostname can also make administrative paths reachable through the tunnel. Use strong administrator MFA, named accounts, least-privilege permissions, monitoring, and any appropriate network or upstream access restrictions. Do not share an administrator account with application operators or end users.
Add SSO to an application with OpenID Connect
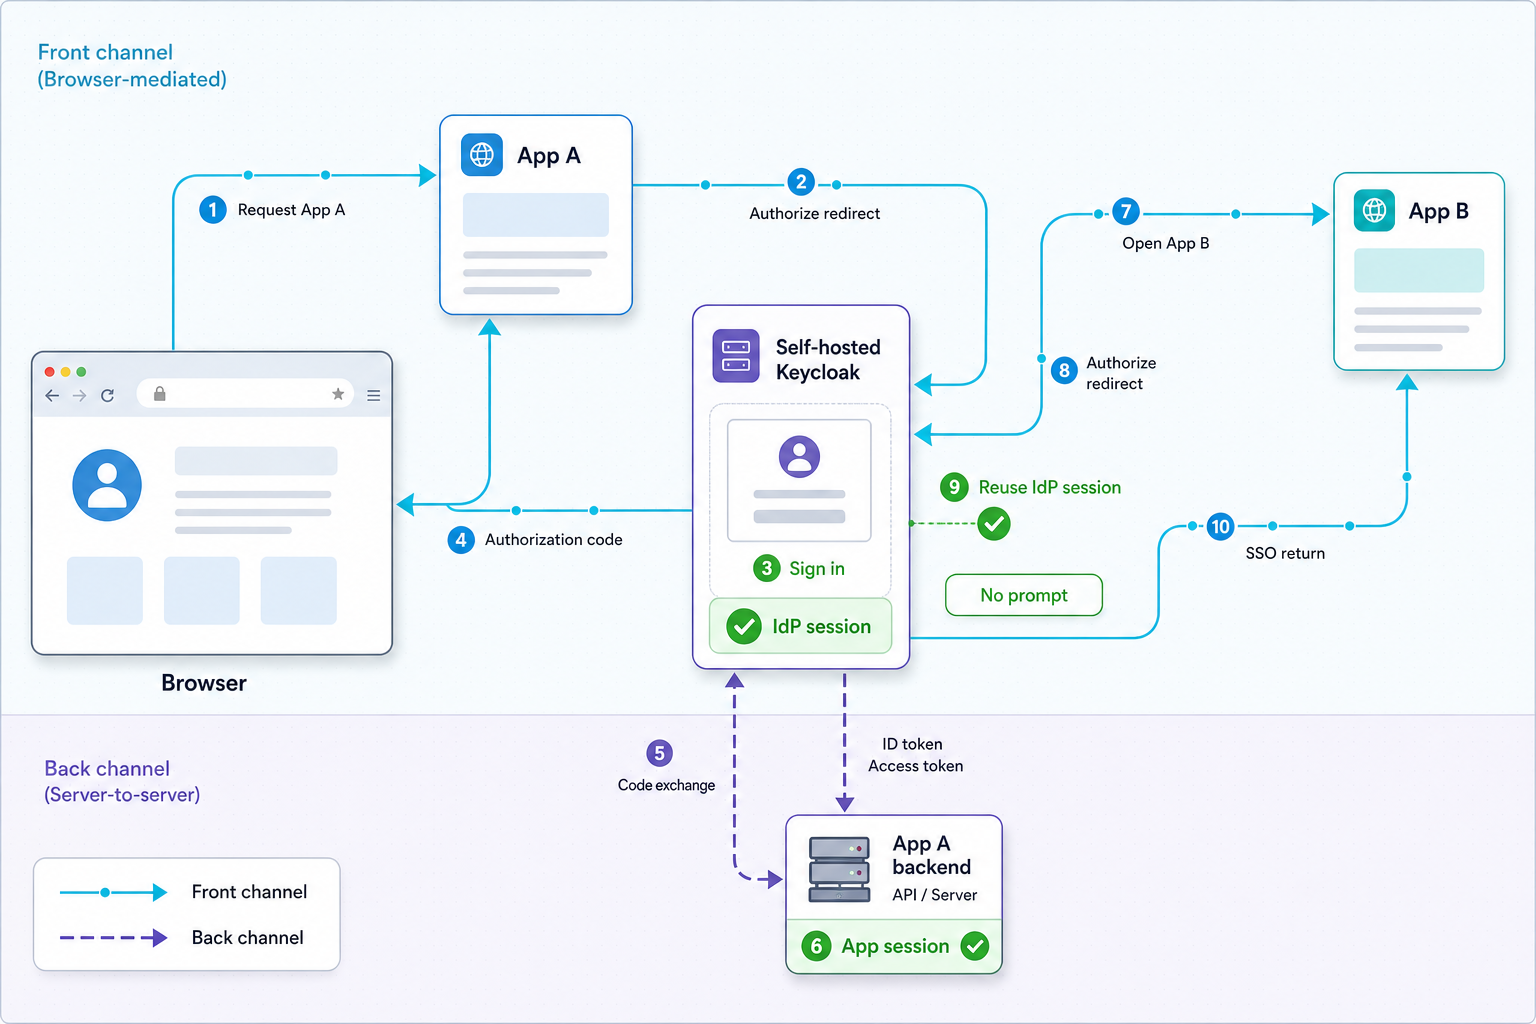
This section is intentionally framework-neutral. Use a maintained OpenID Connect library for your language and framework rather than hand-building authorization requests, parsing JWTs manually, or implementing cryptography yourself. The application needs four primary configuration values:
Issuer:       https://sso.example.com/realms/apps
Discovery:    https://sso.example.com/realms/apps/.well-known/openid-configuration
Client ID:    portal
Redirect URI: https://app.example.com/oidc/callback
A confidential server-side application also needs a client secret. Store that secret in a deployment secret manager and expose it only to the backend process that performs the token exchange. A public client has no usable secret and relies on PKCE and other protocol protections.
Authorization code flow with PKCE
Discover the provider configuration
Configure the maintained library with the exact issuer. Let it retrieve the discovery document and signing-key metadata over HTTPS. Reject a discovery document whose issuer does not exactly match the configured issuer.
Begin login with state, nonce, and PKCE
Have the library generate an unpredictable state value, an OpenID Connect nonce, and a PKCE verifier and challenge. Store the correlation values in a protected, short-lived browser session. Request only the scopes the application needs, usually beginning with openid.
Redirect the browser to Keycloak
The authorization request uses the public HTTPS issuer and the exact registered callback. Keycloak authenticates the user and obtains consent where configured.
Validate the callback
On return, the application must reject errors, missing parameters, an unexpected state value, and reused callbacks. The callback route should be HTTPS in the public deployment.
Exchange the authorization code
The library sends the code, redirect URI, and PKCE verifier to the discovered token endpoint. Confidential clients also authenticate with their client credentials using a method supported by their library and Keycloak configuration.
Validate returned tokens
The library must verify the signature using trusted provider keys and validate issuer, audience or authorized party as required, expiration, nonce, and other applicable claims. Do not accept a token merely because its JSON can be decoded.
Create the application session
Store only the necessary identity and token data in an encrypted server-side session or another framework-supported secure session design. Use Secure, HttpOnly, and appropriate SameSite cookie settings. Do not expose refresh tokens to browser code unless the selected architecture and library explicitly require and protect them.
Enforce authorization in the application
Map verified claims to application permissions. Treat authentication and authorization as separate decisions. Check that the token contains the intended realm or client role claim rather than assuming every Keycloak role appears in every token.
Implement standards-based logout
Clear the local application session and use the provider's discovered OpenID Connect logout endpoint where appropriate. Register exact post-logout redirect URIs. Logging out of one application does not automatically end every other client session unless the clients and Keycloak session and logout mechanisms are configured for that behavior.
Scopes and claims
The openid scope identifies an OpenID Connect request. Additional scopes such as profile and email request related claims, subject to client scopes, mappers, user data, consent, and realm configuration. Request the minimum information the application needs.
Keycloak commonly exposes realm roles and client roles through configured client scopes and protocol mappers. Inspect a test token only in a secure development environment and document the exact claim path your application authorizes against. Do not log production access tokens or ID tokens.
Verify the local service, public issuer, and complete SSO flow
A successful login page is not enough. Verify every boundary from PostgreSQL readiness to application logout. Perform these checks whenever the hostname, proxy configuration, image version, client settings, or tunnel configuration changes.
Infrastructure checks
docker compose --env-file versions.env ps
docker compose --env-file versions.env logs --tail=200 postgres keycloak

curl --fail --silent --show-error \
  http://127.0.0.1:9000/health/ready
Confirm that PostgreSQL is healthy, Keycloak remains running, and the readiness response reports ready. Then verify in the Localtonet dashboard that both the selected client and HTTP tunnel are connected.
Public discovery and issuer checks
curl --fail --silent --show-error \
  https://sso.example.com/realms/apps/.well-known/openid-configuration
Inspect the returned JSON. Its issuer must be exactly:
"issuer": "https://sso.example.com/realms/apps"
Authorization, token, user-info, key, and logout endpoints should use the same public HTTPS origin where applicable. An http:// endpoint, internal container host, port 8080, or obsolete tunnel hostname indicates incorrect hostname or reverse-proxy configuration.
Browser and application checks
Start from a private browser window
Open the protected application without an existing application or Keycloak session and begin login.
Inspect the authorization redirect
Confirm the browser goes to the public HTTPS Keycloak hostname and that the request contains the expected Client ID, exact redirect URI, response type, scopes, state, nonce, and PKCE challenge.
Complete required actions
For a newly onboarded user, verify password update, OTP, WebAuthn, or email actions according to the configured policy. Required-action redirects must remain on the canonical public hostname.
Verify the callback and token exchange
Confirm the browser returns to the exact application callback, the application validates state, and the backend completes the code exchange without exposing the code, secret, or tokens in logs.
Verify token validation and authorization
Confirm the application accepts the expected issuer and audience, rejects expired or incorrectly issued tokens, and grants only the permissions represented by verified claims.
Test SSO in a second client
If another client is configured, open it in the same browser session and confirm the expected SSO behavior. Each client still needs its own valid redirect and authorization configuration.
Test logout behavior
Verify local session removal, provider logout where configured, post-logout redirection, and the behavior of other clients. Document whether your design expects local logout, identity-provider logout, front-channel logout, or back-channel logout.
Operate, back up, upgrade, and recover the deployment
Logs and routine health
Monitor container restarts, Keycloak startup and authentication errors, PostgreSQL health, local disk capacity, the readiness endpoint, the public discovery endpoint, and Localtonet client and tunnel status. Configure log retention outside the container runtime so disk usage cannot grow without bounds. Avoid logging passwords, authorization codes, client secrets, cookies, or tokens.
Docker's restart: unless-stopped can restart containers when the Docker service returns, but it does not guarantee that the Localtonet client will reconnect on every operating system. Use the current supported Localtonet application behavior for your platform, then test a full host reboot. Do not substitute unverified system-service flags from old articles.
Database backups
A database backup is useful only if it has a protected destination, retention policy, integrity checks, and a tested restore procedure. Store backups outside the PostgreSQL volume and preferably outside the Docker host. Encrypt them according to the sensitivity of your identity data and restrict access.
The following command creates a compressed logical dump in a host directory. It does not put a database password in the command:
mkdir -p backups
chmod 700 backups

docker compose --env-file versions.env exec -T postgres \
  pg_dump -U keycloak -d keycloak -Fc \
  > "backups/keycloak-$(date -u +%Y%m%dT%H%M%SZ).dump"
Check that the command succeeded, the file is non-empty, and the dump can be listed with a compatible pg_restore tool. Move the result to protected backup storage. Define retention according to your recovery objectives rather than retaining every dump indefinitely.
Test restoration
Restore into a separate PostgreSQL instance with a compatible version. Do not test by overwriting the live database. A representative restore procedure is:
createdb -U keycloak keycloak_restore

pg_restore \
  -U keycloak \
  -d keycloak_restore \
  --clean \
  --if-exists \
  /protected/path/keycloak-backup.dump
The exact host, authentication method, and database command location depend on your recovery environment. After restoration, start an isolated Keycloak instance using a non-production hostname and verify realm configuration, clients, users, role mappings, and login. Record the recovery time and any manual steps.
Upgrades and rollback
Read the release and migration notes
Review every intervening Keycloak and PostgreSQL release. Check removed options, hostname changes, proxy behavior, extension compatibility, database requirements, and supported upgrade paths.
Back up and test restoration
Take a new database backup and prove it can be restored before changing images. Save current image tags or digests and deployment files.
Rebuild the optimized image
Update the pinned Keycloak version, rebuild through the optimized build stage, and test in a separate environment using restored data where the supported migration path permits it.
Validate SSO before rollout
Repeat discovery, issuer, login, callback, token validation, role authorization, refresh, and logout tests.
Deploy with a documented rollback decision
Database migrations can make an old Keycloak image incompatible with the upgraded database. Rollback may require restoring the pre-upgrade database rather than merely selecting the previous image. Define that decision before rollout.
Tunnel recovery
If the public issuer becomes unavailable, check the components in order: Keycloak readiness, PostgreSQL health, the localhost application endpoint, Localtonet client connectivity, tunnel running state, public DNS, and the public discovery endpoint. If a generated hostname changed, do not silently continue with a new issuer. Update Keycloak and every relying client deliberately, or restore the stable custom-domain tunnel.
Troubleshooting common failures
| Symptom | Likely cause | What to verify |
|---|---|---|
invalid_redirect_uri |
The authorization request does not exactly match a registered redirect URI | Compare scheme, host, port, path, trailing slash, and encoding. Replace broad wildcards with the exact callback. |
| Issuer mismatch | Application configuration, discovery metadata, and token iss values differ |
Fetch the public discovery document and compare its issuer character for character with the application setting. |
| Redirects use HTTP or port 8080 | Incomplete hostname configuration or incorrect proxy-header handling | Use the full external HTTPS hostname and confirm which forwarded-header family the Localtonet edge supplies. |
| 403 or origin-check failure behind the tunnel | Keycloak does not trust the correct proxy headers, or the proxy accepts spoofed values | Confirm the edge behavior, set only the matching Keycloak proxy-header mode, and verify that untrusted forwarded values are overwritten. |
| Keycloak container exits during startup | Unsupported image combination, invalid option, unreadable secret, failed optimized build, or database error | Inspect complete Keycloak logs, confirm secret file permissions, version pins, and build output. |
| Database remains unhealthy | Wrong secret, storage permissions, insufficient disk space, corruption, or incompatible database files | Inspect PostgreSQL logs and pg_isready output. Do not delete the volume before preserving evidence and backups. |
| Callback arrives but login fails | State, nonce, PKCE, client authentication, cookie, or token-exchange problem | Use library diagnostics with secret redaction. Confirm the same redirect URI and PKCE verifier are used during the exchange. |
| User has a role but the app denies access | The token lacks the mapped claim or the application reads the wrong claim path | Review role assignment, client scopes, protocol mappers, token audience, and the application's authorization mapping. |
| Public URL suddenly stops responding | Keycloak is not ready, the Localtonet client disconnected, or the tunnel stopped | Check local readiness first, then confirm both client and tunnel status in the Localtonet dashboard. |
| Configuration still advertises an old hostname | Stale environment values, an old image, cached discovery, or incomplete restart | Inspect the resolved Compose configuration, recreate the container, and fetch discovery without relying on application caches. |
| Logout affects only one application | Only the local application session was cleared | Configure the discovered OIDC logout endpoint and appropriate client-session, post-logout, front-channel, or back-channel behavior. |
Disabling issuer checks, accepting arbitrary redirect URIs, ignoring TLS errors, turning off state or nonce validation, or trusting every forwarded header converts a configuration problem into an authentication vulnerability. Correct the hostname, proxy, client, or application settings instead.
Frequently asked questions
Can I expose Keycloak start-dev through Localtonet?
No. start-dev is intended for development and uses insecure defaults. Keep it bound to localhost for disposable evaluation. For public use, build an optimized Keycloak image, start it with start --optimized, use durable storage, configure the canonical hostname and verified proxy headers, and complete security and recovery checks first.
Does Keycloak require PostgreSQL?
Keycloak supports PostgreSQL, and this guide uses it for the durable profile. PostgreSQL is not mandatory for every disposable development test. Select a database supported by the exact Keycloak release and design its backup, upgrade, and recovery procedures before public use.
Why does a stable Keycloak hostname matter?
The realm issuer appears in discovery metadata and tokens, and applications validate it exactly. Applications also register redirect and logout addresses. Changing the public hostname can therefore break discovery, token validation, callbacks, and active sessions. Use a stable custom domain where available and confirm current plan and DNS requirements.
Does creating a Localtonet tunnel make it immediately available?
No. After creating the tunnel, press Start. The selected device's Localtonet client must remain connected and the tunnel must remain running. Stopping the tunnel, deleting it, or disconnecting the selected client makes the public address unavailable.
Should my application be a public or confidential client?
Use a public client when the software cannot keep a secret, including browser-only, mobile, and desktop applications. Use authorization code flow with PKCE. A server-side application can use a confidential client when the secret remains exclusively on the backend in protected secret storage. PKCE is still useful where supported.
Does every Keycloak role automatically appear in every token?
No. Role claims depend on role assignment, client scopes, protocol mappers, requested scopes, and token type. Configure the required mapping deliberately and verify the exact claim path expected by the application.
Does logging out of one client log the user out everywhere?
Not automatically. An application can clear only its local session, invoke the OpenID Connect logout endpoint, or participate in configured front-channel or back-channel logout. The result depends on Keycloak session settings and each client's logout implementation.
Does Keycloak include SMS MFA as a standard built-in option?
SMS MFA is not a standard built-in method equivalent to OTP and WebAuthn. It generally requires an extension or external integration. Evaluate the extension's maintenance, secret handling, delivery provider, upgrade compatibility, recovery workflow, and security properties before relying on it.
Publish a stable Keycloak issuer with Localtonet
Prepare the optimized Keycloak deployment, keep it bound to localhost, and use a Localtonet HTTP tunnel to provide the canonical public HTTPS address without inbound router port forwarding.
Get Started Free →

