

Turn a supported Home Assistant speaker into a browser-based music quiz for local players and carefully tested remote guests
Beatify is an open-source Home Assistant custom integration that plays music through supported speakers while participants submit answers from their phones. This guide covers compatibility checks, the HACS prerequisite, Beatify installation, first-time configuration, local verification, and a complete test game. It also explains how to evaluate optional remote access with a Localtonet HTTP tunnel without assuming that authentication redirects, reverse-proxy handling, or live game updates will work before you test them. Start locally, verify the whole game, and only then publish the Home Assistant listener for a controlled external test.
📋 What's in this guide
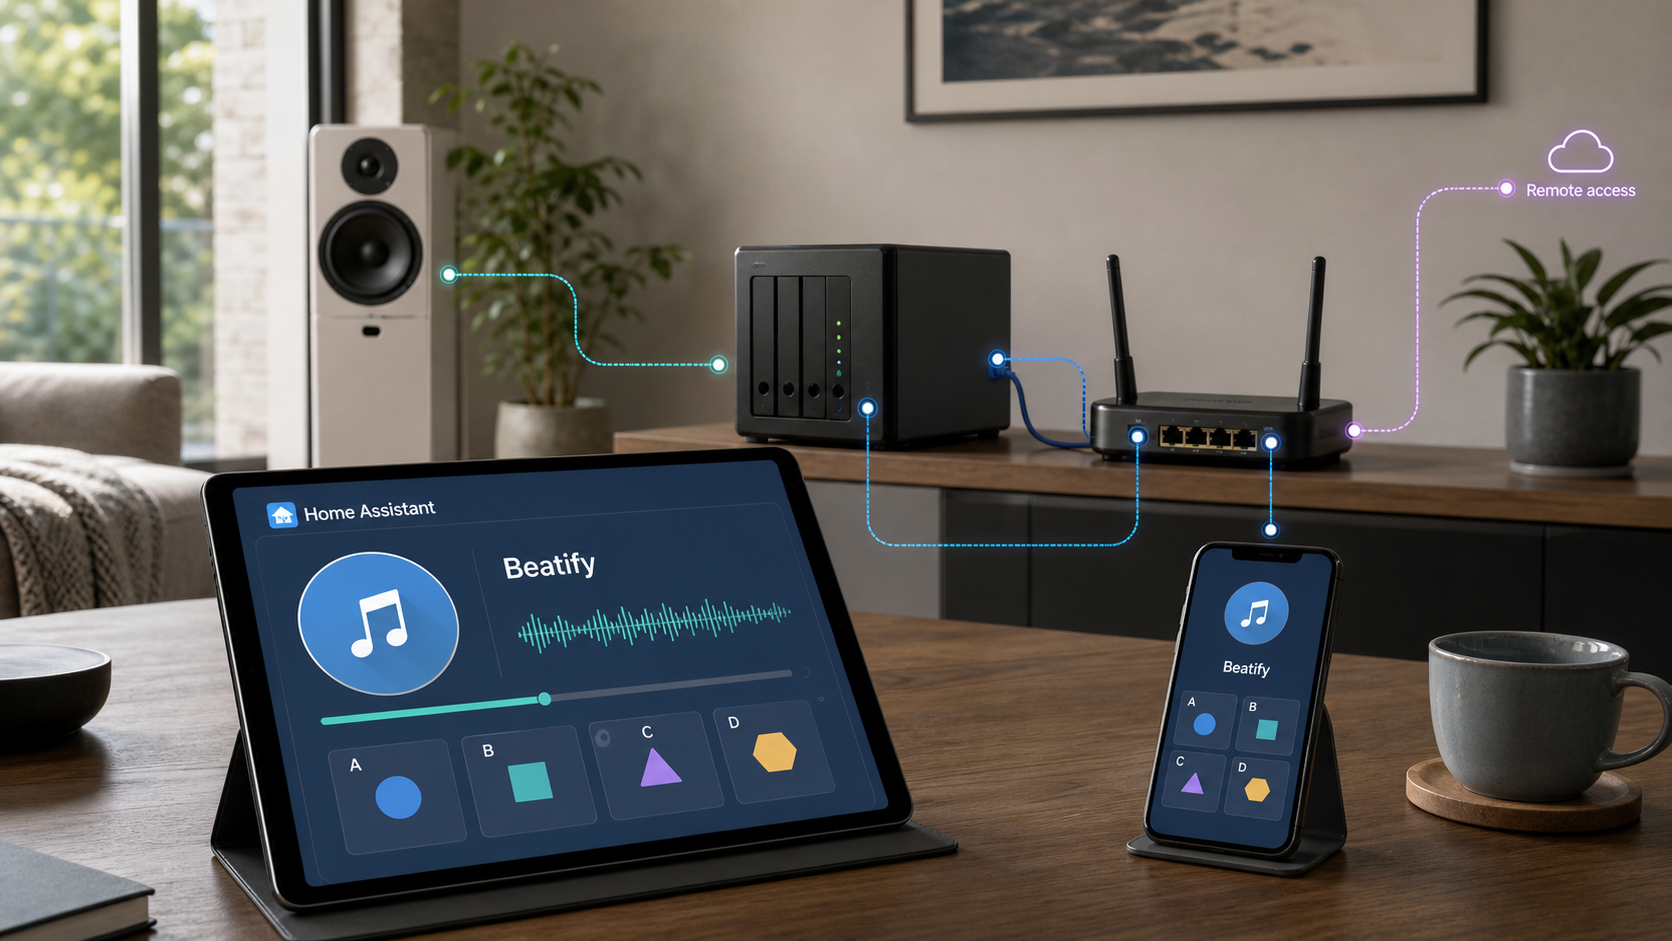
How Beatify works inside Home Assistant
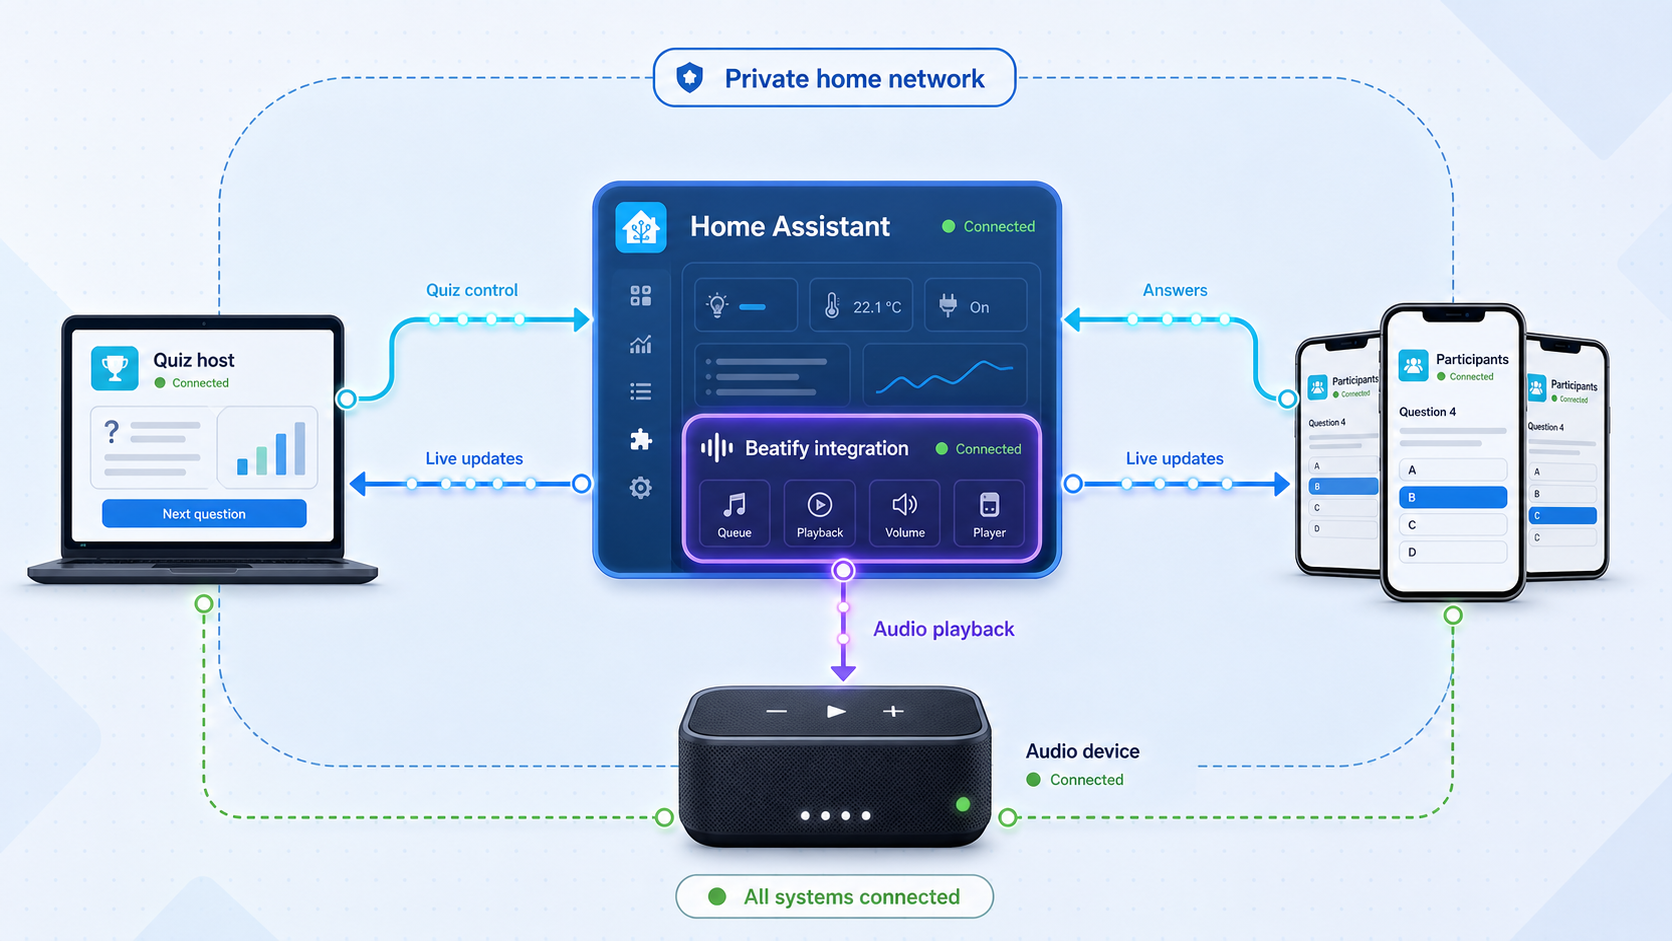
Beatify is a self-hosted music party game implemented as a Home Assistant custom integration. A host chooses a speaker, music source, playlist, and game settings. Participants join from their phones and compete by guessing a song's release year or, in Title & Artist mode, entering the track title and artist.
The architectural detail that matters for installation and remote access is that Beatify does not run as a separately documented server with its own listener. Its browser interfaces are served through the existing Home Assistant HTTP listener. In an installation using Home Assistant's common default web port, the local base address resembles http://YOUR-HA-IP:8123. Beatify adds routes beneath that address, including the host interface at /beatify/admin and the guest interface at /beatify/play.
Music does not play through each participant's phone. Beatify controls a supported speaker through Home Assistant, while phones act as game controllers. This keeps the shared audio in the room and means guests do not need to install a separate Beatify application or create Beatify accounts.
Host and player access are intentionally different
The host opens the Beatify sidebar launcher or visits /beatify/admin. On a device without an active Home Assistant session, opening that route should lead to the normal Home Assistant login screen. After authentication, that browser can access the game controls.
Players use /beatify/play. The route is designed to remain password-free, which is convenient on a trusted local network but requires deliberate handling when the Home Assistant listener is made publicly reachable. Anyone who receives a working public player address may be able to open the guest interface while the service and tunnel are available.
Install and verify Home Assistant first, then add Beatify to that system. Do not create a second container, invent a Beatify startup command, or forward a separate Beatify port. The browser routes are provided by Home Assistant's HTTP endpoint.
Prerequisites and compatibility checks
Check the complete playback chain before installing Beatify. A successful game needs a compatible Home Assistant release, a supported speaker path, a usable music source, and modern browsers for the host and players. Installing the integration files will not fix a speaker or provider that Home Assistant cannot already use.
Home Assistant version
The current Beatify repository documentation specifies Home Assistant 2025.1 or newer. An older Beatify project page displays a 2024.1 minimum, but the repository is the more current installation evidence. For a new deployment, use Home Assistant 2025.1 or newer.
Back up Home Assistant before updating it or adding a custom integration. Home Assistant OS, Supervised, Container, and Core installations have different update and recovery procedures, so do not apply an update command written for a different installation model.
Supported speaker path
Beatify requires a speaker available through Music Assistant, Sonos, or Alexa. Music Assistant can also provide access to speaker ecosystems that Beatify does not control directly. Chromecast, Nest, and HomePod devices are documented as working only through Music Assistant.
Confirm that the intended speaker is online and that ordinary playback works before opening Beatify. If Home Assistant or Music Assistant cannot control the device, resolve that underlying integration problem first.
Music source
Beatify supports Spotify, Apple Music, YouTube Music, Tidal, Deezer, and Amazon Music, subject to the provider and speaker arrangement in your installation. It can also use a personal library supplied through Music Assistant, including Plex, Jellyfin, or local files.
Most streaming services require an account tier that permits selecting a particular track on demand. The Beatify documentation specifically warns that Spotify Free cannot supply the required playback behavior. Beatify v4.4.0 introduced ytmusic_free, which can stream YouTube Music without a Premium account after that provider has first been installed in Music Assistant. Verify that your installed Beatify release includes this feature before depending on it.
| Requirement | What to verify | Why it matters |
|---|---|---|
| Home Assistant | Version 2025.1 or newer | This is the current minimum stated in the Beatify repository. |
| Speaker | Available through Music Assistant, Sonos, or Alexa | Beatify sends shared game audio to a supported speaker. |
| Streaming provider | Can play a selected track on demand | Restricted free tiers generally cannot perform the requested playback operation. |
| Personal library | Available through Music Assistant | Plex, Jellyfin, and local files can be used without a commercial streaming subscription. |
| HACS | Installed, added to Home Assistant, and functioning | HACS is the recommended way to download and update Beatify. |
| Guest device | Modern browser with network access to Home Assistant | Players interact with Beatify through the browser interface. |
| Remote access | Complete local game works first | A tunnel can relay a working listener but cannot repair Beatify configuration or playback. |
Beatify must request specific tracks during a game. Use a compatible provider plan, a personal library through Music Assistant, or the documented ytmusic_free path available from Beatify v4.4.0 after it is installed in Music Assistant.
Prepare HACS before installing Beatify
HACS, the Home Assistant Community Store, is separate from Beatify. If HACS already appears in your Home Assistant sidebar and can open its integration store, continue to the Beatify installation section. If it is absent, install and configure HACS first.
HACS installation varies with the Home Assistant installation type. The supported procedure can require access to the Home Assistant configuration directory, downloading the HACS files, restarting Home Assistant, clearing the browser cache when instructed, and then adding HACS through Settings, Devices & Services. HACS may also require authorization through the account flow presented during setup.
Use the official HACS download and installation instructions and select the procedure that matches your Home Assistant deployment. Do not run a Home Assistant OS or Supervised add-on procedure against a Container or Core installation, and do not assume that a shell path from one environment maps to the same location in another.
Identify the Home Assistant installation type
Determine whether you run Home Assistant OS, Supervised, Container, or Core. This controls how the configuration directory and command environment are accessed.
Follow the matching official HACS download path
Use the HACS instructions for that installation type. Avoid copying terminal commands from an unrelated deployment model because the available shell, permissions, and configuration path may differ.
Restart Home Assistant when instructed
A file download alone does not load HACS into the running Home Assistant process. Complete the restart required by the HACS installation workflow.
Add and finish configuring HACS
In Home Assistant, open Settings, then Devices & Services, and add HACS when it becomes available. Complete the authorization and acknowledgements shown by the current HACS setup flow.
HACS and integrations installed through it are not part of Home Assistant Core. Back up your configuration, review custom integration updates, and keep the recovery process for your Home Assistant installation type available.
Install Beatify through HACS
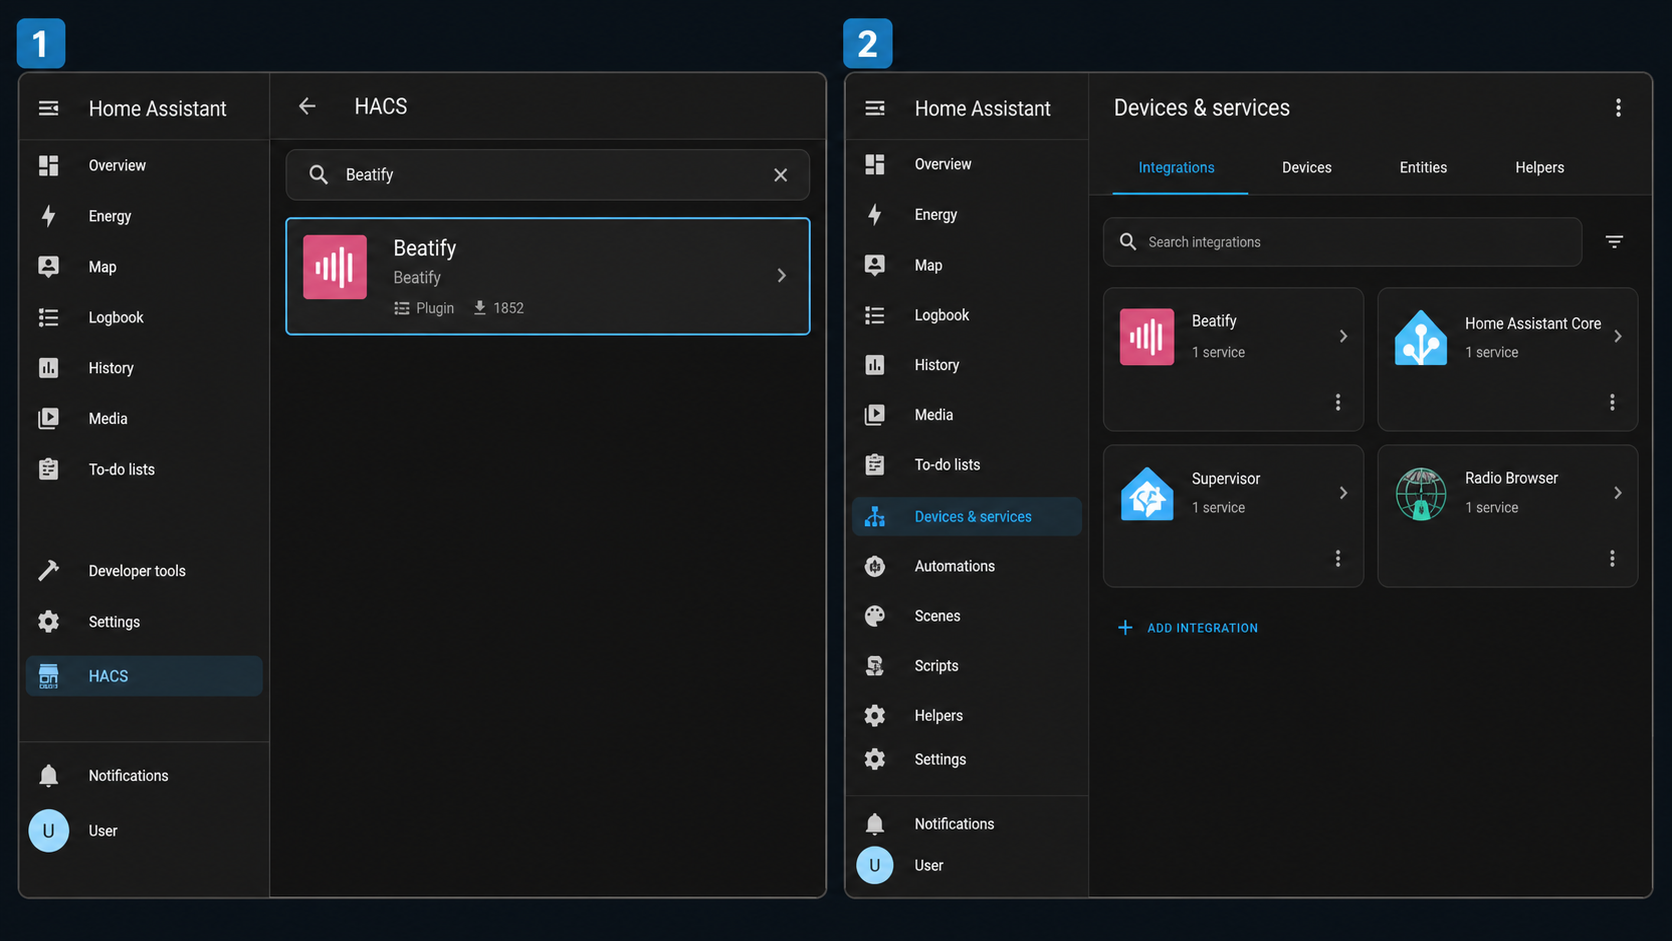
HACS is the recommended installation route because Beatify is listed in its default store. The normal HACS workflow does not require adding Beatify as a custom repository.
Open HACS
Sign in to Home Assistant with an account permitted to manage integrations, then open HACS. Confirm that HACS loads successfully before searching for Beatify.
Search for Beatify
Search the default HACS store for Beatify. Do not add a custom repository when the normal store result is available.
Download the integration
Open the Beatify result and use the HACS download action. Wait until HACS reports that the download has completed.
Restart Home Assistant
Restart Home Assistant using the supported controls for your deployment. The restart allows Home Assistant to discover the newly downloaded custom integration.
Why the previously published manual Git command is not included
The Beatify repository root contains the integration under custom_components/beatify. Cloning the entire repository directly into /config/custom_components/beatify can therefore produce an extra directory level instead of the custom integration layout Home Assistant expects. The resulting destination could contain repository-level files and another nested custom_components/beatify directory rather than placing the integration manifest directly in the required component folder.
Although the upstream README currently displays a root-clone command, the visible repository structure makes that command unsafe to present here as a verified universal alternative. This revision does not repeat it. Until upstream documentation clarifies or tests the resulting layout, use HACS.
Home Assistant expects the Beatify component itself at CONFIG/custom_components/beatify. A manual installation must place the contents of the repository's custom_components/beatify directory there, not blindly place the entire repository root there. Manual copying also gives up HACS-managed updates. Use HACS unless you can independently validate the files, destination, permissions, and upgrade process.
If Home Assistant itself runs in a container, Beatify still belongs in Home Assistant's mapped configuration storage. It is not a reason to create a separate Beatify container or expose a new port.
Add and configure the Beatify integration
Downloading Beatify through HACS places its files in the Home Assistant configuration. You must still add the integration and complete the first-run setup.
Open Devices & Services
In Home Assistant, go to Settings, then Devices & Services.
Add Beatify
Select Add Integration, search for Beatify, and select it. If it is absent, confirm the HACS download and Home Assistant restart.
Open the Beatify launcher
Find Beatify in the Home Assistant sidebar, open it, and select Open Beatify. The launcher opens the game in a full-screen tab without the normal Home Assistant interface around it.
Choose the speaker
On the first visit, use the guided wizard to select the supported speaker that will play the quiz audio. If it is missing, return to the underlying speaker integration and resolve its availability.
Choose the music service and playlist
Select a configured source and playlist. Confirm that the source can play chosen tracks on demand. Personal Plex, Jellyfin, and local-file libraries must be supplied through Music Assistant.
Returning hosts normally skip the first-run wizard and go to the Ready to host screen. Available choices may change between Beatify releases, so follow the labels shown by your installed version.
If the sidebar item is missing
Restart Home Assistant and reload the browser. Also verify that Beatify was added under Devices & Services rather than only downloaded through HACS. You can test the documented direct route:
http://YOUR-HA-IP:8123/beatify/admin
Replace YOUR-HA-IP with the address already used to reach Home Assistant. Port 8123 is the common default, but an existing reverse proxy or customized HTTP configuration may use another endpoint.
Start your first Beatify music quiz
Run the first game with one host browser and at least one player phone. This confirms that Home Assistant loads Beatify, the host can authenticate, the player can join, the selected speaker works, and game updates reach both browsers.
Open Beatify as the host
Select Beatify in the Home Assistant sidebar and then Open Beatify, or browse directly to /beatify/admin. Complete the normal Home Assistant login if necessary.
Review the setup
Confirm the speaker, music service, and playlist. Make sure the speaker is powered on, reachable, and set to a suitable volume.
Display the guest QR code
On the Ready to host screen, show the QR code. A player scans it, opens the browser page, and enters a name without installing an app or creating a Beatify account.
Confirm players in the lobby
Wait until the expected players appear. If a phone cannot join, test the player route directly before changing speaker or provider settings.
Start the game
Select Start game. Confirm that a track starts on the chosen speaker and that the player can submit the expected response.
Authentication protects the host, not the guest route
Beatify's current documentation says any Home Assistant user account can host. It does not distinguish between administrator and non-administrator accounts for this role. Host actions still require a valid Home Assistant login.
Players use a different route and do not pass through that login gate. Do not give guests Home Assistant credentials. Share the player QR code or player URL instead.
Verify Beatify locally before adding remote access
Remote publishing is the final integration step, not a troubleshooting shortcut. If Beatify fails locally, a tunnel only adds another variable.
| Route | Audience | Expected result |
|---|---|---|
/beatify/admin |
Host | Opens the host interface and invokes Home Assistant login when no valid session exists. |
/beatify/play |
Players | Opens the guest interface without requiring a Home Assistant account. |
/beatify/static/dashboard.html |
Browser display | Confirms that the documented Beatify dashboard resource is served by the Home Assistant listener. |
Test the admin route in a browser with an existing Home Assistant session and in a private window without one. Then test the player route on a second device. A page render alone is not sufficient. Run a complete local round and verify:
- The Beatify launcher or direct admin route opens.
- An unauthenticated host browser reaches the Home Assistant login flow.
- The selected speaker appears and can play audio.
- The selected provider or personal library is available.
- A player phone can open the guest interface and join the lobby.
- The host sees the new player without manually reloading.
- The game starts and the intended track plays through the speaker.
- The player can submit an answer.
- Round changes and results appear on both devices.
Note the IP address and port that load Home Assistant from the device where the Localtonet client will run. An address that works on a laptop may not be reachable from a separate server, container, VLAN, or isolated network.
Evaluate remote Beatify access with a Localtonet HTTP tunnel
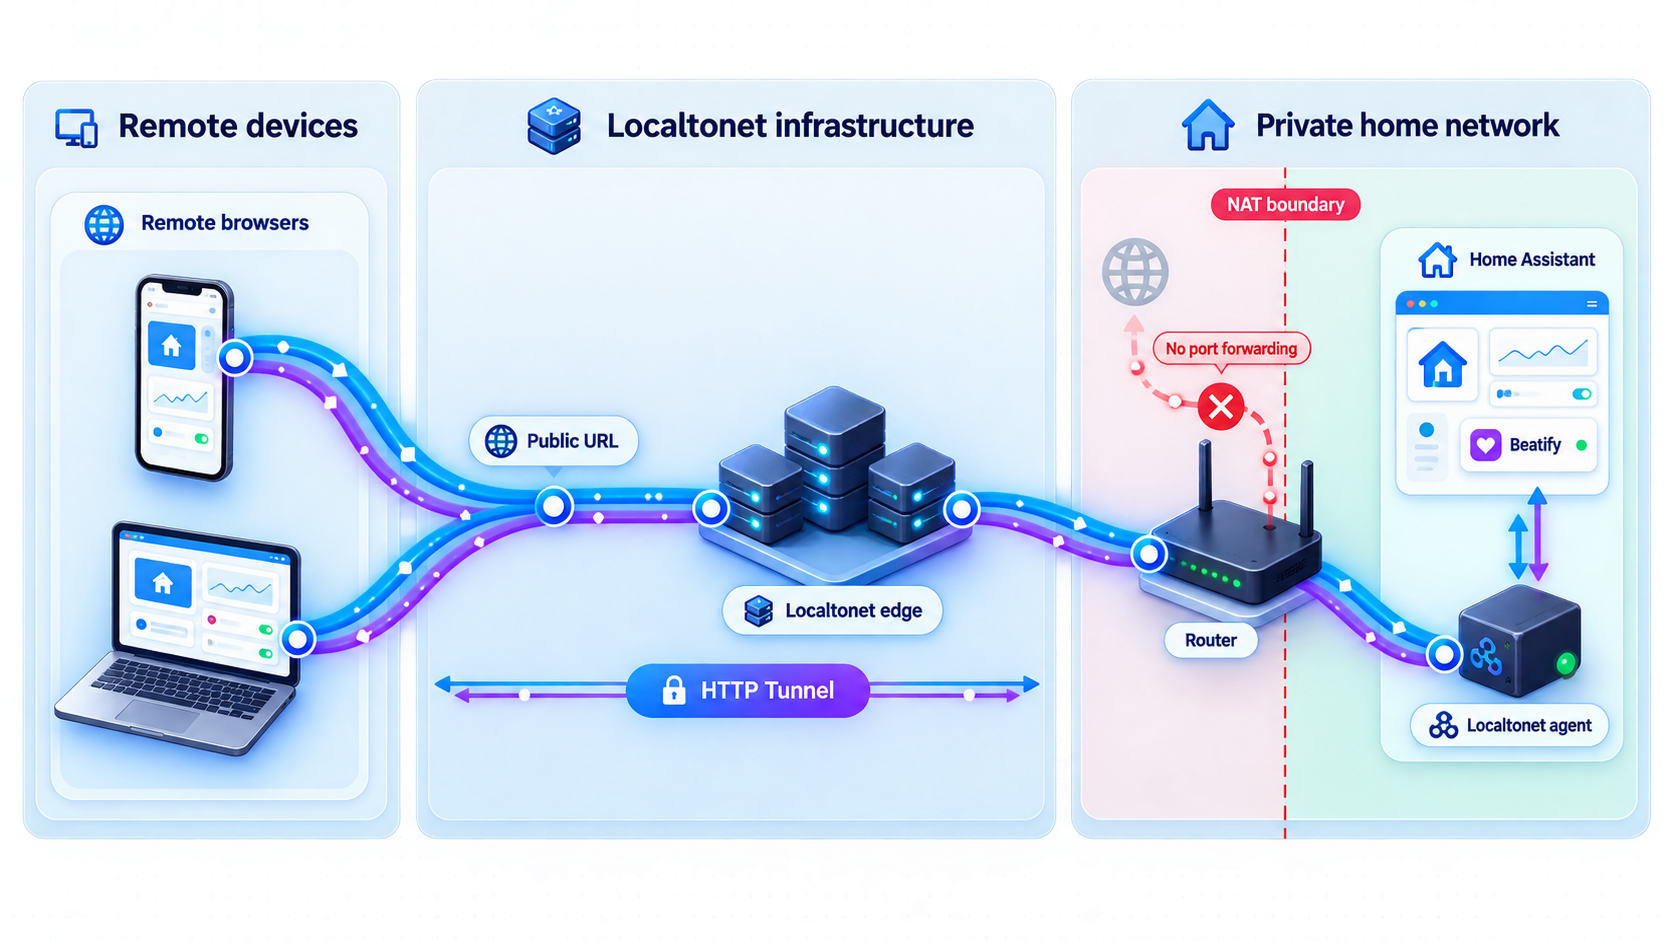
With Localtonet, our client application establishes an outbound connection from a selected device to a relay server. An HTTP tunnel can then provide a public URL for a local web listener without inbound router port forwarding, inbound firewall changes, VPN setup, or a public IP address.
Beatify is served by Home Assistant, so the tunnel target is the verified Home Assistant local IP address and port. It is not a separate Beatify port. The device running our client must be able to reach that target directly.
Localtonet client installation scope
Install the Localtonet client application for the operating system of the device that can reach Home Assistant, run it, and associate that device with its device-specific auth token. The verified evidence available for this revision does not include current package names, package-manager commands, service-unit instructions, or download URLs for each supported operating system. Those details may vary by client version and platform, so this article does not invent them.
The supported path within this tutorial begins after the official client application has been installed and launched on the chosen device. If you cannot install the current client package for that operating system, stop here rather than substituting an unofficial binary or an unverified command.
The evidence for this article establishes Beatify's Home Assistant routes and Localtonet's HTTP tunneling workflow. It does not independently establish full compatibility for every Home Assistant authentication redirect, forwarded-header configuration, WebSocket session, custom proxy chain, or Beatify release. Treat the external test below as a deployment gate. Do not invite remote players until login, lobby updates, answer submission, and round transitions all work through the public address.
Install and run the Localtonet client
Use the official Localtonet client application for the selected device's operating system. Place it on the Home Assistant host or another authorized device that can reach the verified Home Assistant listener. Keep it running while remote access is required.
Authenticate the intended device
Associate the client with its device-specific auth token. Treat the token as a credential and never publish it in screenshots, logs, articles, or support messages.
Select an available relay server
Select a currently available relay server or region from the dashboard. Do not copy a server code from another installation because availability can vary.
Create an HTTP tunnel to Home Assistant
Enter the local IP address and port that passed local verification. Port 8123 is common, but use the listener that actually works from the Localtonet client device. Select an available Process Type for the public HTTPS address.
Start the tunnel and perform the compatibility test
Creating a tunnel does not start it. Select Start, confirm that the client is connected and the tunnel is running, then test the assigned public address from a genuinely external connection.
For current dashboard fields and available choices, see the Localtonet HTTP tunnel documentation . The current dashboard is authoritative for relay selection, Process Type choices, and account-specific availability.
Test authentication redirects through the public host
Open the public admin path in a private browser window:
https://YOUR-ASSIGNED-PUBLIC-ADDRESS/beatify/adminThe expected behavior is a Home Assistant authentication flow followed by a return to Beatify after successful login. Verify the browser's address throughout the process. If the redirect unexpectedly points to a private hostname, an internal IP address, an incorrect scheme, or another configured external URL, do not distribute the address. Review the Home Assistant URL and proxy configuration first.
Do not assume success merely because the Home Assistant login page appears. Complete a login with a dedicated authorized test account, confirm that the browser returns to the Beatify admin interface, and verify that host controls work through the public address.
Test the public player route and live updates
Open the player path from a phone using mobile data or another trusted external network:
https://YOUR-ASSIGNED-PUBLIC-ADDRESS/beatify/playJoin with a temporary player name and confirm that the host lobby updates. Start a short test round and verify that the remote phone receives state changes, can submit an answer, remains connected across round transitions, and sees the result without repeated manual refreshes.
Home Assistant applications commonly use persistent browser connections, including WebSocket-based communication through Home Assistant's HTTP service. Beatify's release history also documents WebSocket reconnect work. A public page that initially renders is therefore not proof that the live game path is functioning. Stalled lobbies, missing updates, repeated reconnects, or updates that appear only after refresh indicate an incomplete compatibility result.
Handle Home Assistant trusted proxies only when evidence requires it
Home Assistant can be configured to accept forwarded client information from explicitly trusted reverse proxies. Settings such as use_x_forwarded_for and trusted_proxies should not be added speculatively. Whether they are required depends on the request path Home Assistant actually observes and on how the proxy forwards headers.
Start with the existing working Home Assistant configuration. If Home Assistant rejects proxied requests, reports an untrusted proxy, or its logs establish that forwarded-header handling is required, identify the actual proxy source seen by Home Assistant. Trust only the narrow address or network required by the observed path. Do not trust all private networks or broad address ranges merely to suppress an error.
An overly broad trusted_proxies configuration can cause Home Assistant to accept forwarded identity information from systems that should not control it. Inspect the observed source, use the narrowest correct value, validate the configuration, and restart Home Assistant only through its supported process.
Understand the shared-listener exposure
A Localtonet HTTP tunnel points to the Home Assistant listener, not to an independently isolated Beatify process. Other paths served by that listener may therefore be reachable at the public base address. Home Assistant authentication continues to protect authenticated areas, while Beatify's player route remains intentionally password-free.
Do not treat the tunnel as a path-level access control that publishes only /beatify/play. Review the complete Home Assistant service, installed integrations, intentionally public routes, authentication settings, and external URL behavior before enabling the tunnel.
Security and safe operating practices
Remote access changes a local party service into an internet-reachable Home Assistant endpoint. Use a short, controlled exposure window and verify unauthenticated behavior yourself.
Keep the tunnel stopped during ordinary configuration work. Start it shortly before the external compatibility test or game, and stop it when the session concludes. Delete it if the configuration and address will not be reused.
The public tunnel address uses HTTPS for the browser-facing connection. HTTPS does not replace Home Assistant authentication, careful URL sharing, least-privilege account management, or correct proxy configuration.
Install the Localtonet client only on an authorized device and follow applicable network policies. This workflow does not bypass authorization or organizational controls.
Troubleshooting installation, playback, and remote access
HACS is not installed
Stop the Beatify procedure and install HACS using the official instructions for your Home Assistant installation type. Restart Home Assistant and add HACS under Devices & Services before searching for Beatify.
Beatify does not appear in HACS
Confirm that HACS opens normally and search the default store for the exact name Beatify. Do not add the project as a custom repository unless current upstream instructions explicitly require that for a future release.
Beatify was downloaded but cannot be added
Restart Home Assistant, then go to Settings, Devices & Services, Add Integration, and search again. A completed HACS download does not mean the running Home Assistant process has loaded the integration.
A previous manual installation has the wrong directory layout
Inspect the component directory before making changes. The expected location is CONFIG/custom_components/beatify, with the Beatify integration files directly inside it. If that location instead contains a cloned repository root and another nested custom_components/beatify path, the installation layout is inconsistent with Home Assistant's expected custom component structure.
Back up the configuration before removing anything. Avoid combining manually managed files with a HACS-managed installation. If you are uncertain which process owns the directory, restore from a known backup or obtain project-specific support rather than deleting files during an active Home Assistant session.
The sidebar entry is missing
Restart Home Assistant, reload the browser, and confirm that Beatify was added as an integration. Test /beatify/admin directly using the local Home Assistant address that already works.
The expected speaker is unavailable
Verify that the speaker is available through Music Assistant, Sonos, or Alexa. Chromecast, Nest, and HomePod require Music Assistant. Test ordinary speaker control outside Beatify before reinstalling anything.
The playlist appears but tracks do not play
Check whether the provider account supports selected-track playback. Spotify Free is explicitly documented as unsuitable. For ytmusic_free, verify Beatify v4.4.0 or newer and install that provider in Music Assistant first. A personal library through Music Assistant is another supported path.
The local game works but the public page does not open
- Confirm the local Home Assistant and Beatify routes still work.
- Confirm the Localtonet client device can reach the same local IP and port.
- Confirm the intended client device is connected.
- Confirm the correct device token and an available relay server are selected.
- Confirm the HTTP tunnel was started, not only created.
- Use the currently assigned public address.
- Append the exact Beatify route without retaining the local port or hostname.
The public login redirects to a private address
Do not invite users yet. Review Home Assistant's configured internal and external URL behavior and any existing reverse proxy. The public flow must remain on the expected public origin and return to the Beatify admin page after authentication.
Home Assistant reports an untrusted proxy
Review the Home Assistant log and identify the source address it actually reports. Configure trusted proxy handling only if the observed request path requires it. Use the narrowest correct source or subnet rather than copying a broad example.
The page loads, but the lobby or rounds do not update
Treat this as a failed remote compatibility test. Compare with a working local session, inspect browser and Home Assistant errors, and check whether the persistent connection is repeatedly disconnecting. Verify that the problem occurs only through the public origin. Do not tell remote guests to refresh after every action as a substitute for a functioning game connection.
The admin page asks a guest to sign in
That is expected for /beatify/admin. Guests should use the QR code or /beatify/play. Never give guests host credentials to avoid the normal player route.
The tunnel stops unexpectedly
Localtonet tunnels are available only while the selected client remains connected and the tunnel is running. Check that the device is powered on, the client application is running, and its network permits the outbound connection. Then inspect and restart the tunnel if appropriate.
Frequently asked questions
What Home Assistant version does Beatify require?
The current Beatify repository requires Home Assistant 2025.1 or newer. Use that current repository requirement rather than the older 2024.1 value displayed on a separate project page.
What should I do if HACS is not installed?
Identify your Home Assistant installation type and follow the official HACS download procedure for that deployment. Restart Home Assistant and add HACS under Devices & Services before installing Beatify.
Is the manual Git clone command recommended?
No. The repository stores the component below custom_components/beatify, so cloning the repository root directly into the final component directory may create the wrong nested layout. This guide recommends HACS and does not present that command as a verified alternative.
Does Beatify have a standalone Docker image?
The available project instructions document Beatify as a Home Assistant custom integration. They do not establish a separate Beatify container, startup command, or independent port.
Which speakers can Beatify use?
Beatify supports speakers through Music Assistant, Sonos, or Alexa. Chromecast, Nest, and HomePod must be available through Music Assistant.
Can Beatify use a personal music library?
Yes. Beatify can use Plex, Jellyfin, or local files when the library is supplied through Music Assistant.
Do guests need Home Assistant accounts?
No. Guests use the password-free Beatify player route. Hosts use the separate admin route and must authenticate through Home Assistant.
Does a Localtonet tunnel expose only the Beatify player page?
No. Beatify shares the Home Assistant HTTP listener, so other Home Assistant paths may also be reachable through the public base address. Do not treat the tunnel as a Beatify-only path filter.
Do I always need Home Assistant trusted proxy settings?
No. Add trusted proxy settings only when Home Assistant's observed request path and logs show they are required. Trust the narrowest correct proxy source and never copy a broad network range merely to remove an error.
Is loading the public player page enough to prove remote compatibility?
No. Verify joining, host lobby updates, answer submission, round transitions, reconnect behavior, and the Home Assistant authentication redirect through the public origin. A static page render does not prove that the live game connection works.
Does creating a Localtonet tunnel immediately make Beatify public?
No. Creating and running a tunnel are separate lifecycle states. The selected client must be connected and the tunnel must be started. You can later stop or delete it.
Do I need router port forwarding?
No. Our Localtonet client establishes an outbound connection to a relay server, so the workflow does not require inbound router port forwarding, a public IP address, VPN setup, or inbound firewall changes.
Test Beatify locally, then evaluate controlled remote access
Install Beatify through HACS, complete a local game, and record the working Home Assistant target. You can then use a Localtonet HTTP tunnel for a controlled external test of authentication, player access, and live game updates. Keep credentials and device tokens private, review the shared Home Assistant listener, and stop the tunnel after the event.
Get Started Free →

